Olympus PEN E-P1
-
-
Written by Gordon Laing
Olympus E-P1 design and controls
Viewed from the front, the Olympus E-P1 could be mistaken for one of the original film PEN cameras of decades past, with only the tiny Micro Four Thirds badge giving the game away. Turn it around though and it’s obviously a modern digital camera with a screen alongside numerous buttons.
Appearances can be slightly deceptive though, as when viewed in isolation, the E-P1 looks smaller than it really is in the flesh, especially when pictured with a pancake prime lens rather than the kit zoom. It’s certainly compact compared to a DSLR, but measuring 121x70x35mm for the body alone (without any lens mounted) and weighing 380g with battery, it’s definitely on the chunky side of the compact market. To be fair though, Panasonic’s Lumix GF1 is virtually the same size at 119x71x36mm, albeit a bit lighter at 341g including battery. Remember the E-P1 has built-in stabilisation though whereas the Panasonic relies on stabilised lenses to counteract wobbles.
 |
|
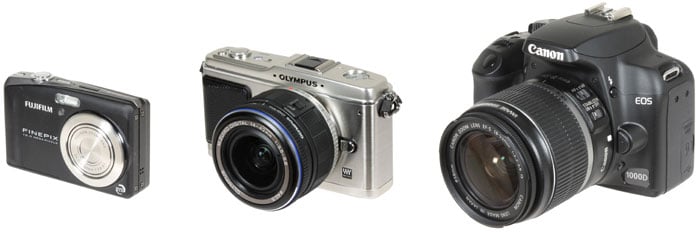
To put the E-P1’s scale into perspective we’ve pictured it above with its kit lens, flanked by the Fujifilm F60fd and the Canon EOS 1000D / XS in their ‘smallest’ transportable configurations. It’s clearly considerably larger than even an average-sized compact, but equally dwarfed by a standard DSLR – and lest we forget the E-P1 essentially packs the image quality of the E-620 (or indeed the E-30) into this form factor.
Both the E-P1 and Panasonic GF1 compare favourably with a typical enthusiast’s compact like the Canon PowerShot G11, which at 112x76x48mm may be 9mm narrower, but 6mm taller and a considerable 13mm thicker; the G11 is also slightly heavier at 402g including battery. Of course the G11’s dimensions and weight include a built-in 5x 28-140mm equivalent zoom lens, while the E-P1 and GF1 measurements above are for their body and batteries alone.
The smallest lens option for the E-P1 is the Olympus 17mm pancake, a fixed f2.8 prime adding 71g to the weight and 22mm to its thickness, while the standard 14-42mm 3x zoom adds 150g to the weight and 44mm to its thickness. There’s certainly a reason you see the E-P1 and GF1 promoted with a pancake lens, as the proportions look so much better.
 |
So the E-P1 is clearly thicker and heavier than most compacts once you fit a lens (especially a zoom), and it’s more suited to carrying in a small bag or large coat pocket, but both it and the GF1 are still impressively small considering their interchangeable lens capability and DSLR-sized sensors.
As for the build quality, the E-P1 feels very solid and well-constructed. There’s only a minimal grip on the front with a slightly raised surface, but this along with a ridged strip on the rear to press your thumb against allow you to hold the camera comfortably and securely. You can do so with one hand if necessary, but two-handed operation is preferred, and thankfully the retro-styled strap lugs don’t press-into your palms.
 |
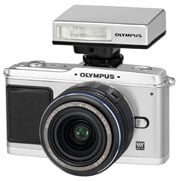 |
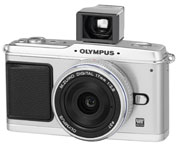
Looking around the body, you’ll notice two omissions: there’s no built-in viewfinder (whether electronic or optical) and no flash either. Both are sold as optional accessories which mount onto the hotshoe: there’s the VF-1 viewfinder offering basic optical composition which matches the coverage of the 17mm pancake lens (34mm equivalent), and the compact FL-14 flashgun which runs on two AAA batteries delivering a Guide number of 14. The E-P1 can also use larger flashguns including the FL-36R and FL-50R models.
As standard, the Panasonic GF1 also relies on its screen only for composition, with an optional viewfinder accessory, although this is an electronic model allowing it to exactly match the coverage of the lens in use. In a key difference between the two models, the Panasonic GF1 also sports a built-in flash.
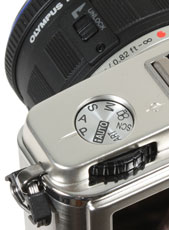 |
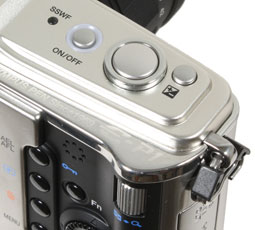
The E-P1’s controls run along the top surface and to the right of the screen on the rear. Starting at the upper left side of the body, you’ll find a recessed mode dial, adjusted from the rear, an accessory shoe roughly in the middle, and to the right of it a small light indicating the SSWF anti-dust system, a power button, the shutter release and an exposure compensation button.
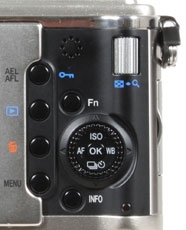 |
Round the back are a number of buttons impressively complemented by not one but two dials, both operated by your right thumb: one is a flat disc similar in style to those on higher-end Canon cameras, while the other is a vertical cylinder turned by rolling your thumb over it from left to right. It’s great to have two dials on any camera, but we found both occasionally tricky to operate – ergonomically you may find them fine, but we’d advise trying them out in person. The flat disc additionally tilts in four directions, offering direct access to the ISO, White Balance, Drive mode and Autofocus menus.
Above the flat disc is a programmable function button and below it one which cycles through various pages of information and graphics on-screen; we’ll detail these views and options lower down this page. By default, the Function button is assigned to deliver a depth-of-field preview, which also automatically increases the brightness of the screen to give a good preview of what you’ll actually capture; under dimmer conditions, there’ll inevitably be some noise on the screen preview, but this won’t appear on the final image.
Olympus E-P1 screen and menus
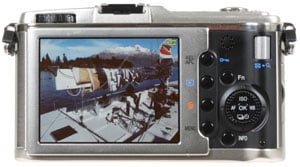 |
The Olympus E-P1 employs a 3in screen with 230k resolution as its sole means of composition in the standard package. An optional optical viewfinder accessory is available, but as described above, is designed to only match the coverage of the 17mm prime lens, and therefore isn’t really suitable for framing at other focal lengths.
The screen itself is good quality with a wide viewing angle and fast refresh, although it’s a shame Olympus opted for a 230k model. This is fairly low resolution in today’s terms, especially on a 3in screen, where the details can look a little coarse. This is another aspect where Panasonic takes the lead with its GF1 which may sport the same sized 3in screen, but one with double the total pixels.
The 460k screen on the GF1 operates at a resolution of 480×320 pixels compared to the 320×240 resolution of the E-P1’s 230k screen. Obviously the screen resolution doesn’t affect the final image quality, but higher resolution models sure look nicer, especially when playing back images. Considering the price of the E-P1 and its target audience of discerning enthusiasts, many will understandably be disappointed by the screen resolution. Remember if you’re willing to go for a traditional DSLR form-factor, you could alternatively buy a Canon EOS 500D / T1i with a 3in VGA screen for much the same money.
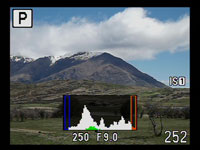
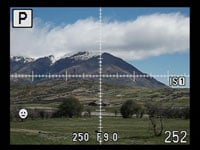
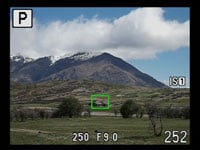
Making up for this in some respect though is the degree of information the E-P1 can display on its screen, not to mention the numerous ways of adjusting settings. Pressing the Info button while composing cycles through a number of views with various super-imposed graphics: first is one with basic shooting information, followed by a live histogram (looking a little coarse like E-series DSLRs), then an adjustable green rectangle (for magnified focusing assistance), followed by a view with four thumbnails showing live previews of exposure compensation or white balance options, then a clean image and finally one with a choice of alignment grids. If Level Gauge is enabled in the menus, an additional page displays two scales indicating both vertical and horizontal tilt – very handy for ensuring the camera’s perfectly level. So apart from the coarse-looking live histogram (which in its defence responds very quickly), the E-P1 has all views covered.
 |
 |
 |
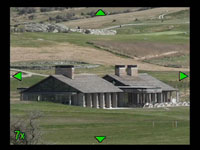
On the green rectangle view, you can zoom-in on a small portion of the image and magnify it by 7 or 10x for a closer look – useful to confirm focus. This area can be adjusted in position before or after zooming.
 |
 |
 |
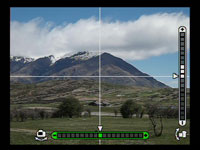
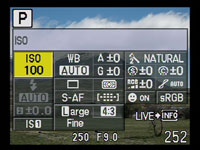
The E-P1 lets you change a wide variety of shooting options while composing, and impressively offers not one, but two main interfaces for doing it, along with a third for accessing the most common settings. Pressing the OK button overlays a list of settings running vertically down the right side of the screen, with a horizontal strip at the bottom showing the available options for each. You can then use any combination of the two dials or the direction rocker to navigate and select as desired. Available settings in program mode include the White Balance, Drive mode, IS mode, aspect ratio, image quality, flash setting, sensitivity, metering, AF mode, Face Detection setting and AF area.
Pressing the Info button while this menu system is active switches the E-P1 to an alternative interface which fills the screen with settings. Called the ‘Super Control Panel’, this works like E-Series DSLRs, where you move a yellow highlighter over the desired setting, then either press OK to see a dedicated menu or simply adjust it directly with a dial. From this interface you can adjust all of the settings mentioned above, along with a few more including Picture mode, sharpness, contrast and saturation.
 |
 |
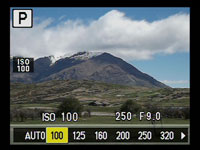 |
Alternatively if these two interfaces weren’t sufficient, the flat rocker disc provides direct access to the ISO, White Balance, Drive mode and AF options, so for settings like sensitivity, you have three ways of adjusting it (see screengrabs above). The E-P1’s certainly got access to its settings covered.
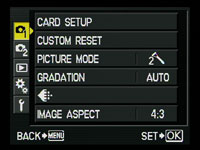
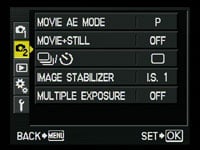
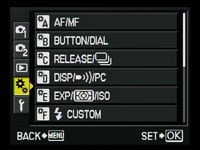
Pressing the Menu button presents four main tabbed sections, each with a single page of options. The settings page allows you to optionally enable a fifth section, unlocking no fewer than 64 custom options. Like E-series DSLRs, these allow you to adjust a vast amount of settings, from the direction of the focusing ring to the Bulb timer.
 |
 |
 |
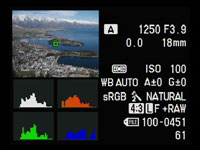
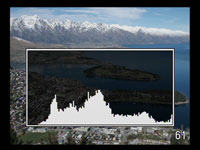
During playback, pressing the Info button cycles between a clean view, one with basic shooting information, a thumbnail with brightness and RGB histograms, a normal view with a larger brightness histogram (again coarse-looking and there’s no response excuse this time), and finally one with flashing shadows and highlights.
 |
 |
 |
Sadly you can’t enter playback from power-off by pressing the play button. Instead you have to press the On / Off button first and probably endure the retracted lens warning – it’s annoying to have to either extend the lens or ignore this warning when you only want to playback an image.
Olympus E-P1 battery and ports
 |
|
The E-P1 is powered by the PS-BLS1 Lithium Ion rechargeable battery which is also used on the E-620 DSLR. Olympus quotes up to 300 shots under CIPA conditions, and all using the screen for composition.
If you fit the optional optical viewfinder and switch the screen off, you could enjoy more shots per charge – the E-620 squeezed up to 500 with its optical viewfinder from the same battery.
Behind a door on the right side of the body are the E-P1’s two ports: a combined USB / AV output and below it a mini HDMI port for connection to HDTVs.
The battery and SD memory card slot are both located in a compartment below the camera which becomes blocked when the E-P1 is mounted on a tripod. This is par for the course for most compacts, but given its higher price and enthusiast audience, we’d have preferred to find the card slot on the side.
Now let’s check out the E-P1’s features, including its lenses, focusing, sensor, stabilisation and movie mode!


