Olympus E-620
-
-
Written by Gordon Laing
Olympus E-620 design and controls
The E-620 is immediately recognisable as an Olympus DSLR, taking design cues from a number of existing models. It shares similar controls to the E-420 and E-520 while falling roughly between their size and weight, and having the E-30’s articulated screen on the rear.
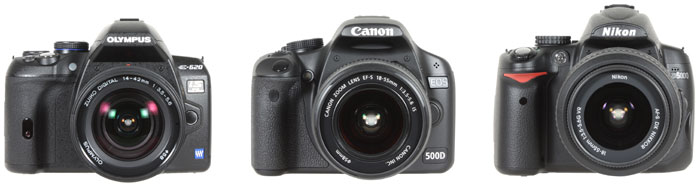 |
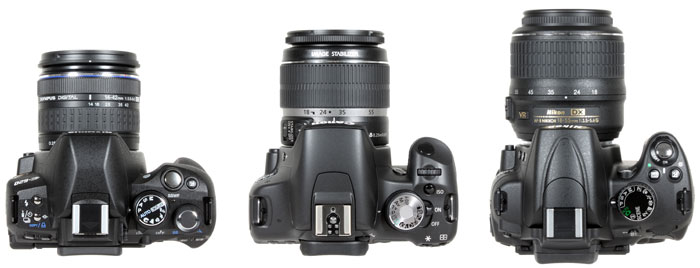
We’ve pictured the E-620 above on the left, with the Canon EOS 500D / Rebel T1i in the middle and the Nikon D5000 on the right; below you’ll find another view of all three cameras taken from above. Measuring 130x94x60mm, the E-620 is comfortably the smallest of the three rivals, and at 521g for the body plus battery or 711g including the 14-42mm kit lens, it’s also the lightest. In contrast, the Canon and Nikon bodies measure 129x98x62mm and 127x104x80mm respectively and have body plus battery weights of 530g and 611g, or 730g and 876g with their respective kit lenses.
Compared to other Olympus bodies, the E-620 may be 2mm taller than the E-520, but it’s 6mm narrower and 8mm thinner, making it comfortably smaller overall. The E-420 still manages to be the smallest ‘proper’ DSLR, being 3mm shorter and 7mm thinner still, but impressively they’re actually the same width. In terms of body weight with battery, the E-620 is 100g heavier than the E-420, but shaves 29g from the operating weight of the E-520.
So the E-620 may be bigger and heavier than the E-420 (and its ‘successor’ the E-450), but crucially it features Image Stabilisation facilities which were sorely missing from the smallest Olympus model(s). Indeed by squeezing IS into a body that’s comfortably smaller than the E-520, the E-620 becomes the world’s smallest DSLR with built-in anti-shake facilities which work with any lens you attach. It’s even more impressive when you consider there’s also an articulated screen in there.
 |
|
The build quality feels roughly the same as the E-420 and E-520 before it: the glass-reinforced plastic shell is solid and free of creaks, feeling at least as good, if not better than most rivals at this price point. In our view, the smaller body size gives it a superior feeling of density than the Canon 500D / T1i or Nikon D5000, although the actual build quality is roughly the same.
The grip may be noticeably smaller than that of the E-520 and most typical DSLRs, but it is larger than the E-420 and in combination with the raised thumb-rest on the rear, it’s surprisingly comfortable and secure to hold – even single-handedly. Like Nikon’s DSLRs, an indented area within the grip hooks onto your finger-tips, providing greater security. The grip and general feel of a camera is of course very personal, but overall we found the E-620 preferable to its Canon and Nikon rivals.
Unsurprisingly at this price, there’s no claims of weather-proofing, although the optional PT-E06 housing will allow submersion to depths of 40m. The E-520 also offered an underwater housing, and it’s good to see these accessories when many rivals rely on third-party solutions.
 |
The upper control layout is closest to the E-420, with the main mode dial, thumb wheel and shutter release arranged in a close triangle; they’re more spaced-out on the E-520, but there’s no sacrifice to ergonomics here. Like these models, the exposure compensation button is positioned close to the shutter release, leaving two buttons for the flash and drive modes on the opposite side of the body.
The main Command dial offers virtually the same settings as the E-520 before it: Auto, Program, Manual, Aperture and Shutter Priority modes, along with direct access to five popular scene presets. The only difference is the earlier SCENE position has now become ART / SCN, offering on-screen access to the six Art Filters in addition to the 13 extra Scene presets; each Art Filter and Scene preset is accompanied by an example image and brief description. We’ll discuss the Art Filters in more detail later.
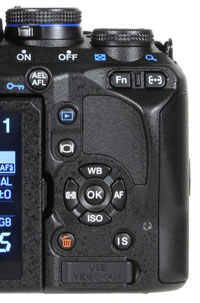 |
Turning to the rear of the body, the far left-hand buttons have been relocated due to the articulated screen hinge. Menu and Info are now found in the upper left corner, while Image Play and Delete have been shifted to the right side of the screen around the main cross-key group. Uniquely the button icons on this right-hand group also become illuminated as the camera powers-up or when you half-press the shutter, making them easily identified in low light – a very considerate touch and one which follows labelling which was already designed to be easier to read by those with colour blindness.
Like the E-520, the four cross-keys offer direct access to a number of key menus: push up for White Balance, right for AF options, down for ISO and left for the metering modes. Following previous models you can also adjust a wide range of settings by pressing the OK button on the back and using the four cross-keys to highlight the desired option on-screen. You can then either press OK again to present a dedicated menu for that item, or simply turn the thumb wheel to directly adjust it. This remains a very quick and easy way to work which we’ll fully describe lower on this page.
Olympus E-620 flash
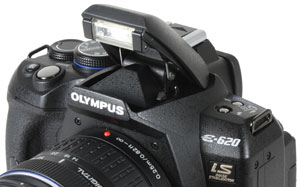 |
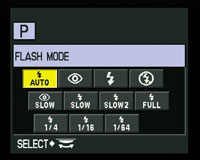
Pressing the flash button once pops up the built-in flash and pressing it again presents a wide variety of options including Auto, redeye, always on, forced off, slow sync with or without redeye, slow sync with rear curtain, and four different power options.
The main menu additionally offers flash compensation settings (+/-3 EV) and flash power bracketing. You can also set a custom option which prevents the flash from popping-up automatically if preferred. All these options are the same as the earlier E-520.
 |  |
Also like the E-520 before it, the E-620 supports wireless flash control when used with the FL-50R and FL-36R flashguns; the built-in flash is used as a controller.
Flash exposure settings can be assigned to multiple units in three different groups and includes auto, manual, TTL and Super FP control; the latter is designed for use with the FL-50R and FL-36R and allows sync speeds up to 1/4000. The normal flash sync speed is 1/180.
Olympus E-620 viewfinder
The Olympus E-620 employs a penta-mirror optical viewfinder system like the E-520, and shares the same 95% coverage, although Olympus has slightly improved the magnification from 0.92x to 0.96x. In use, the E-620’s viewfinder image certainly looks a little larger than that on the E-520, which is a welcome improvement since the relatively small viewfinder size of earlier consumer E-series DSLRs was always one of their downsides compared to rival models.
 |
Compared side-by-side with Canon’s EOS 450D / Rebel XSi, the E-620’s viewfinder image approaches a similar height, although is obviously narrower thanks to the squarer 4:3 aspect ratio of its sensor.
As such, the overall viewfinder image still looks smaller than most APS-C DSLRs, although it is at least an improvement on the E-520. We did however find that we needed to press our eye right up against the viewfinder in order to see the whole image and the shooting information without peering up and down; users of glasses beware.
The viewfinder specification is a key differentiator between the E-620 and the higher-end models in the range. The E-30 and E-3 both employ brighter penta-prism viewfinders with larger views and broader coverage: 98% / 1.02x on the E-30 and 100% / 1.15x on the E3. These are models to go for if you really want or need a larger optical viewfinder experience with greater coverage from an Olympus body, although it should be noted that by using the main sensor to deliver Live View, the E-620 can deliver 100% coverage when composing on-screen.
The E-620 may not match the viewfinder coverage or magnification of the higher-end Olympus models, but impressively it shares exactly the same information running below the image; this is a key improvement over the E-520 which showed less information and displayed it to the right of the image. One of the very welcome additions is the ISO sensitivity value displayed at all times.
Another key difference with the E-520 when looking through the viewfinder is the number of AF-points visible: seven compared to three. This is thanks to the E-620’s new 7-point AF system which we’ll fully describe on the next page. Finally, note there’s no dedicated depth-of-field preview button on the E-620, but by assigning it to the programmable Fn button, you can activate it for both viewfinder or Live View compositions.
Olympus E-620 Screen and Live View
The Olympus E-620 is equipped with a 2.7in screen with 230k pixels. In this respect it matches the E-520 before it, but in a major upgrade inherited from the higher-end models, the screen is now fully-articulated and able to flip and twist to any angle. The actual screen itself is also a brand new version: the E-520 and E-30 employed 2.7in HyperCrystal II panels, while the E-620 has the latest HyperCrystal III model.
Like the handful of other DSLRs sporting articulated monitors, this gives the E-620 enormous compositional flexibility when composing in live View. You can twist it to face-up for easy shooting at low angles, or face down to help when the camera’s held high over-head. With a hinge on the side, the screen can also twist to face the subject (handy for self-timed shots) or back on itself for protection, while never potentially blocking the tripod thread (unlike the Nikon D5000). The hinge mechanism itself feels very smooth and strong like the E-30.
|
On the downside, the screen doesn’t match the size and resolution of the latest fixed panels, with Canon’s EOS 500D / T1i boasting a 3in / 920k VGA model. It should however be noted the articulated screen on Nikon’s D5000 is also a 2.7in / 230k model, and the closer-priced rival from Canon, the EOS 450D / XSi, has a fixed screen which shares the same resolution and is only half an inch bigger. While larger, higher resolution monitors are undoubtedly nice to use, most would sacrifice a little size and screen detail for a monitor which flipped-out instead. It is however important to note that while the screen is flexible for composition, focusing and shooting in Live View may be too slow for subjects in motion – see next page.
In use the E-620’s screen is a noticeable step-up in brightness and vibrancy over the E-520’s, although it also shares the same useful transflective property of being highly visible in direct sunlight. Like the E-520 and other Olympus models, once the backlight switches off to save power, the on-screen information remains visible in reverse type (such as dark characters on a light background), and this becomes easily read even with intense sunlight shining on it. This is a distinct advantage over normal screens which can be rendered almost invisible in extreme conditions. Note there aren’t any proximity sensors which switch the screen off when you’re looking through the viewfinder though.
The E-620 offers Live View facilities which are identical to those on the E-520. Like most DSLRs these days, excluding the Sony Alpha A300 and A350, Live View on the E-620 employs the main sensor to deliver the feed; this may incur delays, but has the benefit of previewing exactly what you’re going to capture.
To activate Live View on the E-620, you’ll need to press the monitor button on the back of the camera. The mirror will then flip up and just over a second later the live image will appear on the screen; the view shown represents 100% of the frame and while the refresh may not be quite as fluid as the best compacts, it’s certainly pretty smooth.
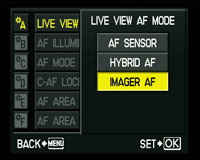 |
Like the E-520 before it, the E-620 offers a choice of three AF modes in Live View: AF Sensor, Hybrid AF and Imager AF. The AF Sensor option employs the traditional phase-change AF system, which means the mirror has to be temporarily dropped to take a reading before opening again to continue the view. This understandably sounds like you’re taking a photo, and also briefly interrupts the live image, although the E-620 freezes the picture during this process rather than displaying a blank view. The entire process is normally completed in less than a second.
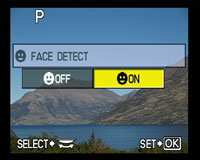
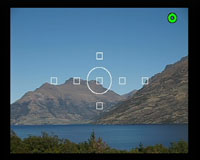
The Imager AF mode, which made its debut on the E-420 and E-520, employs contrast-based techniques like a compact camera to autofocus without flipping the mirror and interrupting the image. It also supports a broader 11-area AF system compared to the 7-point phase-change system. Contrast autofocus additionally allows face detection, and if this is enabled on the E-620, human faces are framed by a white box which tracks them across the frame.
 |  |
Like the E-520, Imager AF is the default setting on the E-620 and will certainly make anyone coming from a point and shoot feel at home. While you can still autofocus by pressing the AEL / AFL button on the back of the camera, you can alternatively half-press the shutter release as you would outside of Live View. In practice this feels very natural and while the process is slower than the AF Sensor option (typically taking two or three seconds), the lack of image interruption or mirror noise while focusing will be preferable for most.
 |
Imager AF will however only work with relatively modern lenses which support the feature, and at the time of writing, there were only five from Olympus: the 14-42mm and 45-150mm kit lenses, the 25mm pancake, and the most recent 9-18mm and 14-54mm II zooms.
Other lenses fall back on either the traditional AF Sensor system or the Hybrid AF option which uses a combination of the other two modes. Hybrid AF roughly but quietly focuses using the contrast method when you half-press the shutter, but unlike the Imager AF mode, then takes a reading from the traditional 7-point AF sensor when you fully press the button to take the picture. See screenshot left.
Both the Imager AF and Hybrid AF result in several mirror flaps as you take the photo, but the Hybrid mode is slightly slower. You can see a demonstration of all three Live View modes in our video tour.
 |
 |
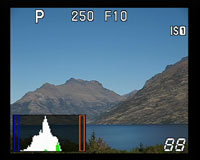 |
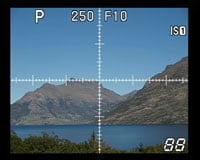
Pressing the Info button during Live View cycles between a clean view, one with a choice of alignment graphics, one with detailed shooting information, followed by a live brightness histogram, the Enlarged display option and finally the Perfect Shot Preview.
 |
 |
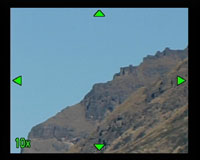 |
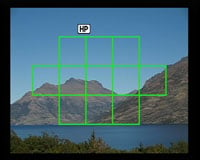
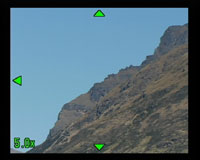
Enlarged display presents a small green frame on the screen which can be moved around using the cross keys. Then when it’s over a point of interest, press OK and turn the thumb dial to switch between 5x, 7x and 10x magnification. This allows you to carefully check the focus and is especially useful in manual focus mode, and unlike the E-520, you can use the cross-keys to adjust the frame’s position when zoomed-in or out.
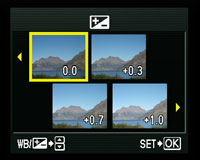
Perfect Shot Preview builds on what was already offered on Olympus compacts by showing four different thumbnail versions of the same composition which are all updated in real time. You can either choose for the thumbnails to show variations in exposure compensation or white balance, and seeing four different options on the screen at once certainly makes it easier to choose the right one.
 |
You can also preview white balance and exposure compensation on the full image in Live View. A depth-of-field preview is also available, so long as you assign it to the programmable Fn button. When previewing the depth-of-field, the E-620 will increase the gain as required to maintain the image brightness, which under darker conditions can result in a monochrome and slightly grainy image, but the final result of course looks fine.
So with 100% coverage, live histogram, a choice of alignment grids, magnified manual focus assistance, previews of white balance, exposure compensation and depth-of-field, not to mention the choice of AF systems and of course the fully-articulated screen for flexible composition, the E-620 delivers a powerful and comprehensive live view experience – even if it doesn’t feature the level gauge of the higher-end E-30.
Olympus E-620 menus
Like earlier E-series models, the E-620 uses its colour monitor to display shooting information, and like the E-520 before it, there’s a vast amount of information at a glance – in fact the same as the flagship E-3 with the addition of face detection.
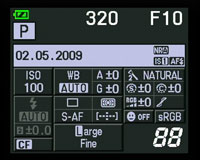 |
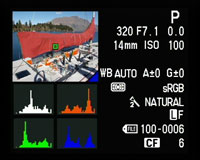
You’ll see the Shutter and Aperture value, an exposure compensation scale, the shooting mode, date, flash, IS and NR settings, the sensitivity, white balance (plus adjustments), Picture Mode, Sharpness, Contrast, Saturation and Gradation, Colour Space, Face Detection on / off, AF Area, Metering, AF and Drive modes, Flash mode and flash compensation, memory card in use, image size and quality and number of shots remaining. Battery life is still shown with a basic two segment icon though which is a bit disappointing given the fine degree of other details.
There’s a variety of ways to adjust settings. Like most DSLRs, the four direction buttons on the back provide direct access to the White Balance, AF, Sensitivity and Metering menus. This would be adequate, but like its predecessors, the E-620 also offers an alternative means of modifying a broad variety of settings without requiring dedicated buttons or delving into menus.
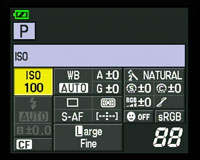 | 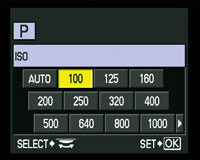 |
With the camera powered-up, press the OK button and the ISO value is highlighted in yellow. You can then turn the thumb-dial to change the setting, or if you prefer, press OK again to enter a dedicated adjustment menu. Alternatively with ISO highlighted, just use the up, down, left and right buttons to highlight any other option, before then using the dial to adjust it, or pressing OK to again view a dedicated menu. In practice it’s quick, intuitive and works really well. We’ve got a demonstration in our E-620 video tour.
 |
 |
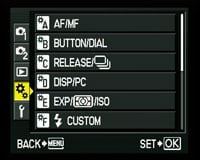 |
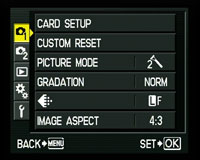
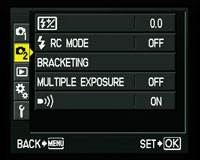
Pressing the Menu button presents the E-620’s options arranged into five vertically-tabbed pages: two for shooting, one for playback, one for setup, and one for custom options; the latter is hidden by default and must be enabled by an option in the setup menu. The custom menu offers no fewer than 66 options which include setting the Live View AF mode, choosing the maximum exposure in Bulb, configuring the function button, adjusting the noise reduction and customising the quality settings. This degree of control and customisation is one of the joys of owning an Olympus DSLR, and it’s sensible to find all the options in one section for those who are interested, or simply hidden from view for those who are happy with the defaults.
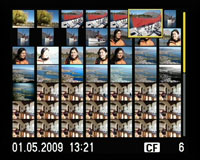 |
During playback, turning the thumb-dial to the right zooms-in on the image, while turning it to the left presents a number of thumbnails, first four, then nine, then 16, 25, 49, and even 100, followed by a fun calendar view of the current month showing a tiny photo thumbnail on the days you took a photo.
With an image filling the screen in playback, pressing the Info button cycles through RGB and brightness histograms, along with options to flash any clipped highlight or shadow areas. The histograms once again look a little coarse compared to those on rival models, but it’s still good to have this number of options.
 |
 |
 |
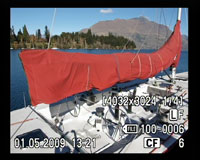
Turning the camera to a portrait orientation also turns the image by 90 degrees, either clockwise or anti-clockwise. That’s a nice feature to ensure portrait images fill the screen during playback, but it’s a shame the shooting menu doesn’t also rotate as it does on Sony’s Alpha models and the Nikon D5000.
Olympus E-620 battery and connectivity
 |
The E-620’s powered by the same PS-BLS1 1150mAh Lithium Ion battery pack as the E-420, as there’s no room for the fatter BLM1 model employed by larger Olympus DSLRs including the E-520.
Olympus quotes up to 500 shots under CIPA conditions using the optical viewfinder; this will reduce considerably if you regularly use Live View and the Image Stabiliser. The figure is understandably down from the 650 shots of the E-520 under the same conditions thanks to the less powerful battery, but it’s not a huge loss.
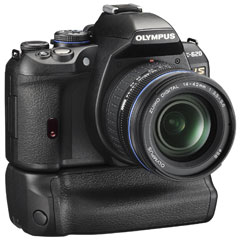
One big advantage over the E-520 though is the availability of an optional battery grip. The new HLD-5 can house two BLS1 packs, doubling the battery life while additionally featuring portrait controls. It’s a very welcome accessory for the E-620 and one which was sorely missing for the E-520.
Interestingly the latch on the memory card door has changed since the E-520, so rather than simply pushing it open, there’s the more common sliding mechanism to unlock the hinge. Behind the door though the story is the same: you’ll find slots for both Compact Flash and xD cards, although again you can’t record files to both simultaneously for backup. As with other Olympus cameras, there’s also the continued insistence to use Olympus xD cards to support the panorama feature.
Finally, behind a small flap on the rear of the E-620 you’ll find a single port delivering both USB and TV connectivity; the camera’s supplied with two different cables for use with this port. This is exactly the same as the E-520, and it’s a shame not to find an HDMI port here for high definition slideshows.


