Olympus E-3
-
-
Written by Gordon Laing
Olympus E-3 design and controls
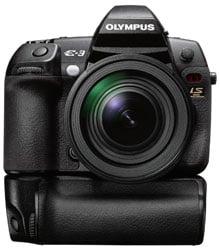
Olympus has departed from the slightly unconventional design of the original E-1 and given the new E-3 the look and feel of a more traditional DSLR. While some may miss the individuality of the E-1, we believe this was a sensible move which undoubtedly makes the E-3 more acceptable to a broader market.
Speaking of which, the E-3 may be branded by Olympus as a professional model, but it’s dwarfed in size, weight and price by the major pro heavyweights, Canon’s EOS 1D(s) Mark III and the Nikon D3. In terms of style, features and price the E-3 is much closer to what its rivals currently refer to as a semi-pro DSLR. So in our view, the E-3 goes up against models like the Canon EOS 40D, Sony Alpha A700, and in particular the Nikon D300. Indeed, the D300 body costs approximately the same as the E-3, so as its closest rival, that’s what we’ve used for most of our comparisons here.
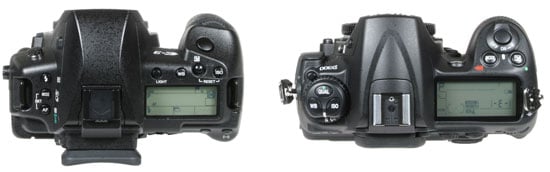
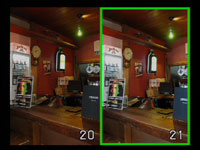
We’ve pictured the E-3 above alongside the D300, with both cameras fitted with high-end general purpose lenses: the E-3 with the Zuiko Digital 12-60mm 1:2.8-4 SWD and the D300 with the Nikkor DX 17-55mm f2.8.
The two cameras are actually very closely matched in size and weight. Measuring 142x116x75mm, the E-3 is 5mm narrower, 2mm taller and 1mm thicker than the D300. The E-3 body weighs-in at 800g without battery and the D300 is just 25g heavier. Fit their respective battery packs and the same small difference remains. Fit the lenses we’ve pictured them with above though, and the constant f2.8 aperture of the Nikkor model tips the scales with approximately a 200g difference.
Certainly the initial claims by Olympus that the Four Thirds standard allows smaller and lighter cameras doesn’t apply here, but to be fair, the E-3’s heft is appropriate for its market and it also features both built-in stabilisation, a flip out screen and a big penta-prism viewfinder.
 |
In terms of build quality, both cameras are built like tanks. They feel incredibly tough, solid and very confident in your hands, although of the two, Olympus makes greater claims over weatherproofing, saying it’s dust and splash proof. During our test period the bad weather mostly stayed away, but we did use it in very mild rain with no adverse effects. We also know several photographers who’ve used the E-3 in showery conditions without problems and Olympus’s promotional videos even show it being splashed in a canoe, although you will of course also need a sealed lens.
Ergonomically though we felt the Nikon D300 had the edge, as indeed it does over most rivals. It’s a personal preference, but the D300’s grip with its tactile coating and hooked inner area for your fingertips felt more comfortable and secure in our hands. We also felt the controls were more sensibly placed on the D300, not to mention larger for easier operation when gloved, although again appreciate this is a very personal thing. You might pick up the E-3 and find it a perfect fit for your hands with controls falling naturally under your fingers and thumbs. If you’re evaluating both models, it’s essential to handle them for yourself in person.
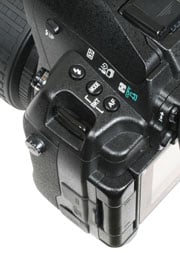 |
In terms of controls, the E-3 is equipped with a finger and a thumb dial and most adjustments involve holding a button down as one of the dials is turned; some buttons have just one function, while others have two with the finger dial adjusting one and the thumb dial the other.
Like the D300 and both of Canon and Nikon’s top pro models, there’s no command mode dial on the E-3. Instead the shooting mode is adjusted by holding a button and turning the thumb dial. This mode button is one of three on the upper left side of the body, with the others adjusting the flash and AF modes. You’d be forgiven for thinking this their only function, but icons printed on the vertical side of the viewfinder head reveal each button also has a secondary purpose of adjusting flash compensation, drive and metering modes. We’ve nothing against dual functions for buttons, but until you get used to the E-3, it’s easy to miss the labelling on the side of the head and wonder where the controls for these functions are located.
The actual shooting modes consist of Program, Aperture and Shutter Priority, Manual, Bulb, and two custom options adjusted in the ‘My Mode’ menu. The E-3 offers shutter speeds of 1/8000 to 60 seconds and up to 30 minutes in Bulb, although unless you change it in a menu, the default maximum is eight minutes. The flash sync speed is 1/250 and we have more details below. Exposure compensation is offered in a wide range of +/- 5EV, although as described below, the indented button isn’t very comfortably positioned.
Interestingly there’s also two underwater presets which can be enabled in the Function menu, one for landscapes and the other for close-ups; you will of course also need an optional underwater housing as while the E-3 may be weatherproof, it sure isn’t water-proof.
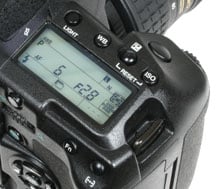 |
Like most semi-pro DSLRs (apart from the Sony Alpha A700), the upper right surface of the body is dominated by an LCD information screen. This is a little smaller than the Nikon D300s, but still packs in a wealth of shooting information. Beyond the usual shutter, aperture and shooting mode, it displays the white balance, image resolution and compression, metering mode and AF points, flash, AF and drive modes, shots remaining and battery life with a basic two segment indicator. Sadly ISO isn’t shown on this screen at all times, but it is always visible in the viewfinder and also on the monitor-based information screen.
 |
Running along the top side of this LCD screen from left to right are four buttons to operate the screen backlight, the White Balance, the exposure compensation and the sensitivity. None have a double function, although hold the last two down and you’ll reset the camera’s settings. Like the buttons on the upper left side, these are all quite small and not that easy to operate with gloves, which is disappointing for a semi-pro model. The exposure compensation and sensitivity buttons are also in an indented area which may protect them from accidental operation, but makes them trickier to press.
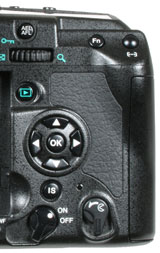
Below the information screen at the top of the rear surface are buttons for the AE / AF lock, a programmable Function button and one for adjusting the AF point; again all three are quite small. Below these are the thumb dial, play button, cross-keys, a dedicated button for adjusting the built-in IS mode and two levers, one for powering the camera and the other to release the memory card door.
Finally, below the screen in another indented area are four buttons for trash, Info, Menu and Live View; again these are not as well positioned as they could be. We appreciate design is subjective, but in our view Canon and Nikon have better thought-out controls.
Olympus E-3 flash
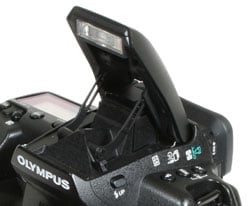 |
Further reinforcing its position alongside other semi-pro DSLRs (and unlike the original E-1), the Olympus E-3 features a popup flash; this is mechanically popped-up by pressing a button on the side of the viewfinder head, so there’s no surprises with it popping up of its own accord. The flash can be used for AF assistance, but you’ll of course have to manually raise it first.
 |
 |
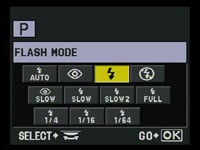
Hold down the flash button on the top left side while turning the thumb dial allows you to switch between flash on, flash off, red eye reduction and slow sync either with front or rear curtains. Along with flash compensation of +/-3 adjusted with the finger dial, you can also use the thumb dial to manually set the flash power from full to 1/64 in four steps. Flash bracketing is also available, shooting three frames with varying amount of flash power.
The E-3 is also equipped with a hotshoe which can take the FL-50R, FL-50, FL-36R, FL-36, FL-20, RF-11 or TF-22 units, although to support the full exposure modes and control, you’ll need one of the first four models listed; the FL-40 is not supported. The FL-50R and FL-36R models also support wireless remote control, with the E-3’s built-in flash acting as a controller. Suffice it to say as a high-end model, the E-3 also sports a PC Sync port for other external lighting options.
Olympus E-3 viewfinder
The Olympus E-3 is equipped with an optical viewfinder which employs a penta-prism arrangement with 100% coverage with 1.15x magnification. A mechanically operated curtain is fitted to prevent stray light from entering and the camera reminds you to close it when activating Live View.
 |
Viewfinders have previously been a downside of the Four Thirds system. They’ve resembled the already small viewfinders of APS-C DSLRs, but with vertical strips taken from each side to match their narrower 4:3 aspect ratio. The result is like looking down a tunnel.
Olympus has been all too aware of this issue and thankfully addressed it with the E-3. The shape of the E-3’s viewfinder of course remains 4:3, but instead of being narrower than existing viewfinders, it’s taller. Sadly it’s not quite the same width as that in the Nikon D300, but it is noticeably taller and the result looks great. In fact seeing the 4:3 frame at this scale is a refreshing change from 3:2 viewfinders and inspires you to use the shape creatively. You really now see the aspect ratio as a positive thing rather than cursing it for compromising the size of the viewfinder on previous models.
Beyond the apparent size, it also features 100% coverage, which neither the Canon 40D nor Sony A700 can offer, although in our tests it didn’t always quite match up with the 100% coverage you’d see on the screen in Live View. There’s also a traditional depth of field preview facility through the viewfinder, and an optional grid focusing screen, although it’s not user-changeable.
In terms of shooting information, the E-3 displays its details underneath the frame like most DSLRs, although unlike previous Four Thirds models which had it on the right side. We’re pleased to say this information also includes the ISO value at all times. You’ll also see not the usual three AF points of every Four Thirds DSLR to date, but a glorious 11 AF points which we’ll describe on the next page.
Overall, Olympus is to be commended for the E-3’s viewfinder. It may involve a fairly large penta-prism, but the result is a joy to use – and that’s something we never thought we’d say about a Four Thirds viewfinder.
Olympus E-3 Screen and Live View
The Olympus E-3 is equipped with a 2.5in screen with 230k pixels. This may be smaller than the 3in screens of the Canon 40D and Nikon D300, and also lower resolution than the Nikon’s VGA monitor, but it sports one huge advantage over both models: the E-3’s screen is fully articulated and able to flip out, tilt to completely face up or down, twist round to face the subject or back on itself for protection.
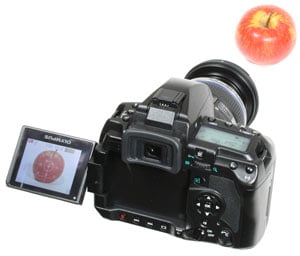 |
This gives the E-3 great compositional flexibility during Live View over the Canon and Nikon, not to mention the lower-end Sony A300 and A350 models who’s screens only tilt vertically. The mechanism also feels very solid and confident in operation with tactile feedback in certain positions and a satisfying click as it folds back into the body. It’s a feature we’ve long-known about from the various Olympus previews, but it’s still a pleasure to use and combined with the big viewfinder, makes composition a real highlight of the body.
While Live View is only now being rolled-out by every DSLR manufacturer, Olympus was the first to offer the concept back on the E-330. So it’s no surprise to find Live View present on the E-3, although considering the company has been offering it longer than anyone to date, it’s a fairly traditional offering.
Press the Live View button below the screen and the mirror flips up to expose the main sensor with the image appearing roughly one second later. The E-3 prompts you with a message to close the shutter in the viewfinder to prevent stray light from entering – a handy reminder the first few times, but a little irritating after a while. This message disappears promptly though, leaving you with a live image of the composition and 100% coverage.
There’s only one way to autofocus the E-3 in Live View and that’s to drop the main mirror in order to take a reading with the traditional phase-change system, then flip it back up again to continue the video feed. To do this you’ll need to press the AE / AF lock button, and so long as there aren’t any delays with the lens searching, the E-3 can be focused and returned to Live View in around one second with the sound of two mirror-flips. Olympus has chosen not to blank the screen during the AF process and instead freezes the view on the screen; if the camera and subject were static, you won’t even notice the interruption, but if there’s any motion you’ll see it once the real Live View recommences. We have a demonstration in our video tour.
 |
 |
 |
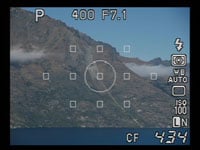
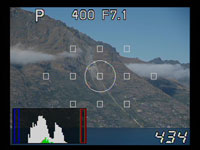
Press the Info button during Live View and you can cycle through various graphics and details. First a clean view with just the AF points, followed by the shooting information, a choice of three alignment grids (or none at all), a live histogram and finally the ‘enlarged display’ option.
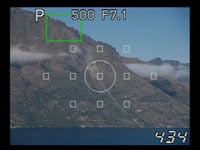
Enlarged display presents a green frame on the screen which can be moved around using the cross keys. Then when it’s over a point of interest, press OK and turn the thumb or finger dials to switch between 5x, 7x and 10x magnification. This allows you to carefully check the focus and is especially useful in manual focus mode, although bizarrely once you’re zoomed-in, the cross-keys are locked from moving the frame around until you fully zoom back out.
 |
 |
 |
So overall it’s a fairly traditional Live View implementation with 100% coverage, magnified manual focus assistance, preview of the in-camera IS system, and the choice of alignment graphics or a live histogram. It’s very usable with the flip-out screen, but the inability to move the magnified manual focus frame once zoomed-in is a little daft. And of course by not having a contrast-based AF option, the autofocus process will interrupt the live image and make a noise. The optional PC remote control software also won’t let you preview a live image, unlike Canon’s software which additionally comes free with the EOS 40D and EOS 450D / XSi. But again the E-3’s fully-articulated screen will more than make up for any limitations for most people.
Olympus E-3 menus
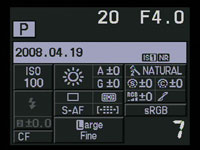 |
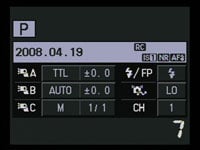
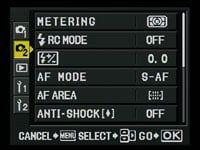
Power-up the E-3 and you’ll probably use its traditional top screen or viewfinder for shooting information, but like almost all DSLRs these days, you can also use the rear colour monitor. To view shooting information on the E-3, you’ll need to press the Info button below it.
This presents a wealth of details including the Shutter and Aperture value, an exposure compensation scale, the shooting mode, date, IS and NR setting, sensitivity, white balance (plus adjustments), Picture Mode, Sharpness, Contrast, Saturation and Gradation, Colour Space, AF Area, Metering, AF and Drive modes, Flash mode and flash compensation, memory card in use, image size and quality and number of shots remaining. Battery life is shown with a basic two segment icon which is a bit of a disappointment after the accurate percentage remaining of the Nikon D300 and Sony A700. Unlike the consumer Olympus DSLR range, there’s also no reformatting for a simpler presentation.
 |
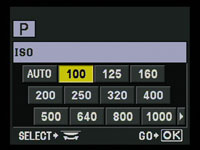 | ||
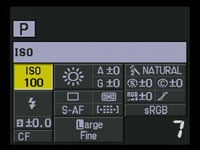
While there are dedicated buttons or menus for all of these settings, like earlier Olympus DSLRs you can alternatively press the OK button and use the cross keys to move a yellow highlighter over the desired setting – then simply turn a dial to directly adjust it, or press OK again to show a dedicated menu. It’s a quick and intuitive way of changing virtually any shooting setting.
 |
 |
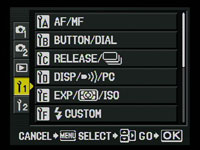 |
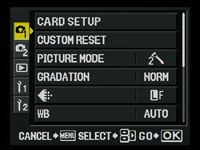
Press the Menu button and you’ll see five tabs running vertically down the left side of the screen: two for recording, one for playback and two for setup. The first setup menu offers a vast range of custom settings, 46 in all, split into nine sub-categories. These include changing the direction of the focusing ring on the motor-assisted lenses, configuring the Function button, choosing the alignment graphics, setting the maximum exposure in Bulb mode from one to 30 minutes, and configuring the quality settings.
 |
 |
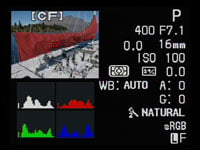 |
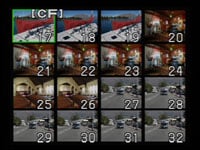
In Playback mode, pressing the Info button cycles between a clean view, two with file and shooting information, a fourth with RGB histograms, a fifth with a large but chunky brightness histogram, and finally two more with flashing highlight or shadow areas. Turn either dial and you can zoom-into 14 times for a magnified view, although the top 10x and 14 views look a little coarse. Zoom out in the opposite direction and you’ll see increasing numbers of thumbnails, first four, then none, 16, 25, and finally a calendar view.
 |
 |
 |
If you press the AF point selector button during playback, you can display two images side by side for direct comparison which can be handy for comparing exposures or bracketing options.
Olympus E-3 Battery and connectivity
 |
 |
The Olympus E-3 is powered by the same BLM-1 Lithium Ion battery pack employed by every Olympus DSLR apart from the slim E-400 / E-410 / E-420 line. It’s a chunky model with a decent 1500mAh rating, and Olympus quotes 610 shots under CIPA conditions.
Make regular use of Live View or IS though and you’ll unsurprisingly see this reduce – we shot with IS on all the time and with only occasional use of Live View, and found the battery was good for closer to 400-500 shots. For longer life and an easier grip in the portrait orientation, Olympus offers the HLD-4 battery grip which can hold a pair of BLM-1 battery packs while maintaining the body’s dust and splash resistance.
 |
Behind a thick rubber flap on the lower left side of the body is a USB port and standard definition TV output, and below it behind a smaller flap is a DC input; unlike the Nikon D300 or Sony A700, there’s no HDMI port. On the upper left side you’ll find a connector for an optional remote cable and just round from here on the front of the body is a PC Sync port for external lighting.
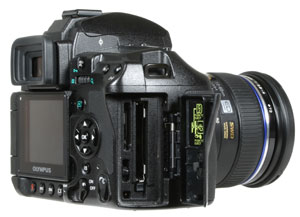
A lever on the lower right side of the back of the body flips open a door on the right side to access the memory card slots: one for Compact Flash (UDMA cards are supported) and another for xD memory. You can choose which card is recorded to, but sadly there’s no option to record on both simultaneously.


