Nikon D90
-
-
Written by Gordon Laing
Nikon D90 lenses and autofocus
Nikon D90 features : Lens, AF, sensor and release modes / Movie Mode
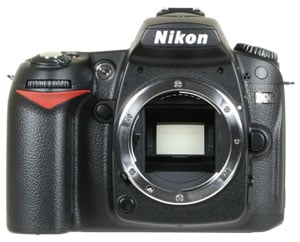
The Nikon D90 features an F-mount which can accommodate most Nikkor lenses, with the DX-format sensor resulting in their field of view being reduced by 1.5 times. As with all Nikon DSLRs, you’ll need recent lenses to support the full focusing and metering modes. There’s a compatibility chart in the D90 manual or specification sheets, but just briefly you’ll need a Type G or D AF (including AF-S and AF-I) Nikkor to support all functions including the most sophisticated 3D Colour Matrix Metering II system. We’re pleased to report that unlike the entry-level D40, D40x and D60 bodies, the new D90 retains the built-in AF motor required to autofocus non AF-S lenses.
 |
Unlike Nikon’s D300 and D700, there’s no means to manually enter details for non-CPU lenses (allowing them to exploit more sophisticated metering), and the AF fine tune of the D700 is not present here.
The D90 is available body alone, or in a kit with the Nikkor DX 18-105mm f3.5-5.6 VR lens. This is a new lens launched with the D90 which may have a slightly shorter range than the DX 18-135mm typically supplied with the earlier D80, but now crucially features Vibration Reduction to counteract camera shake.
|
The DX 18-105mm VR has a 5.8x range that’s equivalent to 27-158mm; this takes you from wide angle to reasonable telephoto and we have examples of how you might use this in our D90 Sample Images page. The telephoto end may be 30mm shorter than the lens commonly bundled with the D80, but it’s 50mm longer than most kit lenses, and you can see an illustration of this coverage in practice below.
Nikon D90 with Nikkor DX 18-105mm VR coverage | ||
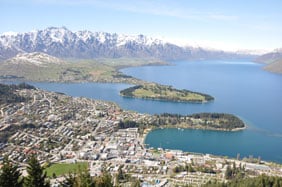 |  | |
DX 18-105mm VR at 18mm (27mm equivalent) |
DX 18-105mm VR at 105mm (158mm equivalent) | |
| ||
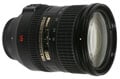
The design and build quality of the DX 18-105mm VR are very similar to the older DX 18-135mm. It’s comfortably larger than the typical 18-55mm models supplied with entry-level models (see our design page), but also a step-up in construction and features. For starters it’s an AF-S model which means it features a built-in SWM focusing motor. This allows the lens to focus faster and much more quietly than most kit lenses, although remember it’s still a budget model so there are quicker lenses in the Nikkor range.
There’s also a slim manual focusing ring with full-time operation, although no window with distance markings. This ring is fine for most manual focusing applications, although if you really get into the D90’s movie mode, you’ll want something smoother and with distance markings.
We’re pleased to report the end section of the barrel does not rotate while focusing, which is good news for users of polarising filters. Nikon also supplies the DX 18-105mm VR lens with a hood and pouch – Canon, are you listening?
So the new kit lens is a classy step-up from rival kit models and we’ll have a full report on it in the near future, but remember it adds around $300 USD to the body-only price of the D90, which is halfway to buying the Nikkor DX 18-200mm VR superzoom. As such it’s well worth thinking carefully about whether you’d be better-off buying the D90 body-only and complementing it with a more sophisticated lens from day-one.
Nikon D90 focusing
The Nikon D90 inherits the 11-point AF system of its predecessor and employs the same Multi-CAM 1000 module with a single cross-type sensor. There’s three main AF modes: AF-S (Single Servo AF), AF-C (Continuous Servo AF) and AF-A (an Auto mode which selects between them depending on whether the subject is in motion – this is the default option).
The AF mode is changed by pressing and holding the AF button on the top surface of the body while turning the thumb dial. A switch to the side of the lens mount sets the camera to auto or manual focus. Unlike many more affordable DSLRs which strobe their built-in flashes for AF assistance, the D90 employs a dedicated lamp – it’s pretty bright, but much more discreet than the flash flickering.
 |
There’s four AF Area modes: Single Point, Dynamic Area, Auto Area, and new to the D90 over its predecessor, 3D Tracking. In Single and Dynamic Area, you can manually adjust the focusing point using the multi-selector, with Dynamic Area also considering surrounding focus points if the subject moves. In Auto Area, the D90 chooses the focus point automatically.
In the new 3D Tracking option, you manually select a focusing point, after which the D90 will attempt to keep the original subject in focus even if you recompose the shot. 3D Tracking also exploits the metering sensor to use colour information to help track a subject. Nikon recommends using Dynamic Area for erratically moving subjects, and 3D Tracking when recomposing photos with relatively static subjects.
We’ve detailed the Live View auto-focusing options on the previous Design page, but just briefly here, the D90 exclusively relies on contrast-based AF in Live View, with the choice of three modes: Normal Area, Wide Area and Face Priority. Nikon claims face detection is also used outside of Live View to recognise and expose for human subjects.
In use, the D90’s phase-change AF system worked very well. Set to the default Auto Area it generally did a good job of recognising the primary subject and locking the lens onto it, with the active AF points highlighted. In Dynamic mode with AF-C, subjects placed under the manually chosen focus point were tracked effectively as they moved towards or away from the camera – we found the D90 with the DX 18-105mm kit lens zoomed-in had no problem keeping vehicles in sharp focus which were approaching face-on at 40kph.
Finally, the new 3D Tracking option was effective at following subjects moving around the frame or as you recomposed with a static subject; this worked particularly well with strongly coloured subjects which stood out from the background, although as Nikon recommended, it’s best-suited to more leisurely motion.
As with all DSLRs which offer a variety of AF options, it’s a case of experimenting to see which works best for your particular application. But if you’re shooting a subject in motion and can keep it within the diamond area covered by the 11 AF points, the D90’s Dynamic Area and 3D Tracking modes should keep it sharp.
Nikon D90 metering, exposures and bracketing
| ||
The Nikon D90 offers three main metering modes: Spot, Centre-weighted and 3D Colour Matrix II. These are selected by pressing and holding the metering button on the camera’s top surface while turning the thumb dial.
 |
 |
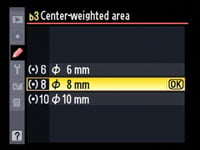
3D Colour Matrix II employs the same 420-segment RGB sensor as its predecessor, which while less sophisticated than the 1005 pixel sensor of the D300 upwards, still does an excellent job of evaluating the composition. Note you’ll need a type G or D lens to deliver distance information; other CPU lenses do not include range data, and therefore fall back on Colour Matrix Metering II. Custom option b3 lets you change the diameter of the centre-weighted area to 6, 8 or 10mm, with 8mm being the default setting. Spot metering on the D90 uses a circle with a 3.5mm diameter.
 |
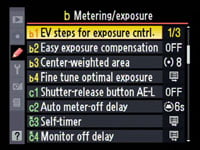
The D90 offers shutter speeds from 1/4000 to 30 seconds plus a Bulb option. Exposure compensation is available in a wide range of +/-5EV in 0.3 or 0.5 steps. The shutter block is tested for 100,000 cycles, compared to 150,000 on the D300 / D700 and 300,000 on the D3.
Exposure bracketing is available with two or three frames in steps of 0.3, 0.5, 0.7, 1 or 2EV. Flash bracketing is available with the same settings. White Balance bracketing is also available, again with two or three frames, and with steps of 1, 2 or 3. Exposure bracketing with 2EV steps is nice to have for HDR work, but specialist photographers will much prefer the 9-frame option on the D300.
Nikon D90 anti-dust
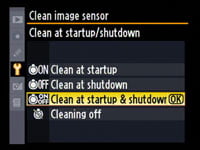
New to the D90 over its predecessor are anti-dust facilities, which are implemented in the same way as the D300 and D700. Like those bodies the D90 vibrates the low pass filter in front of the main sensor in an attempt to shake-free any foreign particles. You can set the D90 to perform this process at startup, shutdown, both or neither. You can also activate it manually at any time, along with recording a dust reference frame for automatic dust removal of images in the optional Capture NX software.
 |
Following our usual DSLR torture-test we left the D90 face-up without a lens, inside and outside for ten minutes each; we can’t know how much dust entered the body during this time, nor even how much was present to start with, but we know such a process would result in dust being a problem for most models.
With Cleaning set to take place at startup and shutdown we then powered the camera on and off twice, before taking a series of photos at every aperture setting of a plain white surface at close range with the Nikkor DX 18-105mm VR lens set to 50mm and manually focused to infinity. Dust marks normally become most apparent at the smallest apertures (eg f16 and f22), but it’s also important to test at more common apertures.
|

Nikon D90 dust example at f22 / f8 | ||
 | ||
100% crop, 18-105mm at 50mm, f22 |
100% crop, 18-105mm at 50mm, f22 | |
We started as always by examining the f22 sample, as the worse-case scenario, but much to our relief (and surprise), no obvious dust marks were visible. Applying extreme Levels in Photoshop revealed a number of marks, and we’ve cropped a 100% sample of the worst above right. The exact same area is shown above left without Levels, and you’re welcome to download it and apply the Levels command to verify.
Since dust marks become less visible at larger apertures, it’s safe to say there weren’t any offending particles in the other images. This is a great result for the D90, although since we believe it employs a similar – or even the same – anti dust system as the D300, we suspect the result here also has a factor of good luck. But as always, a picture of the effectiveness of anti-dust systems can be built-up by anecdotal evidence, so here’s one in the good camp. If you own the D90, we’d be interested to hear your own experiences with dust in the Nikon section of the Cameralabs forum.
Nikon D90 sensor and processing
The Nikon D90 is equipped with a 12.3 Megapixel CMOS sensor which conforms to Nikon’s DX format and measures 23.6×15.8mm. These specifications are identical to the D300’s sensor, although Nikon describes it as a newly developed sensor with technology directly inherited from the D300. As we’ll see there’s some similarities, but also some differences, at least when considering the complete imaging pipeline.
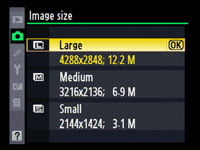
The maximum resolution is certainly the same: the D90 generates 3:2 aspect ratio images with a top resolution of 4288×2848 pixels and there’s the choice of two lower resolutions, along with three JPEG compression levels: Fine, Normal and Basic. Normal is the default, but we used Fine for all our test shots.
 |
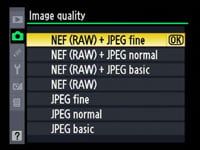 |
RAW files can be recorded either alone or accompanied by a JPEG with Fine, Normal or Basic compression; the JPEG will be recorded with the selected resolution, but the RAW file will always be at the maximum resolution. The major difference between the D90 and D300 are that the former records RAW files with 12 bits of tonal detail, whereas the D300 can opt for 12 or 14 bits. The D300 additionally offers further compression options for both RAW and JPEG files, along with a TIFF mode, which aren’t present on the D90. It’s a shame the D90 doesn’t support 14-bit data as this is now available on cheaper rivals including Canon’s EOS 450D / XSi.
The D90’s best quality Large Fine JPEGs typically measure 6MB each, while RAW files measure around 10.8MB (Nikon’s figures). The D90 achieves relatively small RAW file sizes by applying lossy compression to the data whether you like it or not – to put them into context, the D300 with the same resolution typically delivers 12-bit RAW files measuring 13.6MB with lossless compression, or 14.2MB with no compression at all. It’s always good to save space, but we’d sooner the D90 employed lossless compression on its RAW files, or at least gave you the option. For that you’ll need the D300.
Nikon supplies its basic View NX conversion software for RAW files, but the more sophisticated Capture NX 2 remains an optional purchase with a free trial. It’s a shame Nikon still doesn’t bundle Capture NX, at least on its mid-range DSLRs upwards – remember all Canon DSLRs come with its Digital Photo Professional software for free.
 |
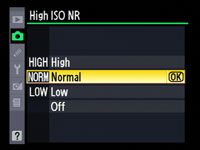 |
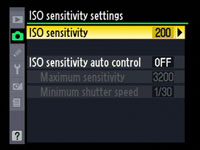
The D90 shares exactly the same sensitivity range as the D300, running between 200 and 3200 ISO with additional L1.0 and H1.0 options representing 100 and 6400 ISO respectively. High ISO Noise reduction is applied at 800 ISO and above, but you get the choice of four settings: Low, Normal (the default), High, and Off, although even when ‘Off’, there’s some noise reduction applied at 4000 ISO and above. You can see how the same image looks at all sensitivities and NR settings in our Nikon D90 High ISO Noise results pages.
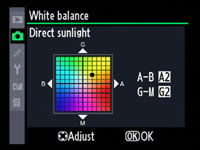
Image processing duties are carried out by Nikon’s EXPEED processor. White Balance can be set to Auto, Incandescent, Fluorescent (with seven sub-presets), Direct Sunlight, Flash, Cloudy, Shade, a manually set colour temperature or a custom preset. Each can be fine-tuned, and bracketing is also available.
 |
Like other recent Nikon DSLRs, EXPEED automatically removes – or at least greatly reduces – the effect of lateral chromatic aberrations, also known as purple fringing. This correction is applied automatically to all JPEG files whether you like it or not, but not to RAW files, which gives us a chance to make a comparison.
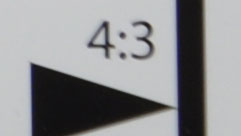
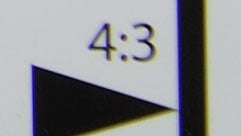
Below are crops taken from our resolution test chart taken with the D90 and DX 18-105mm lens at 35mm f8. We shot this using the RAW plus Large Fine JPEG mode. Below left is a crop taken from the JPEG file which is virtually bereft of any coloured fringing. Below right is the RAW file with Capture NX’s default CA Correction applied, which has totally eliminated any coloured fringing – indeed it almost looks like the file has been turned to greyscale.
In the middle though is the same RAW file, again processed in Capture NX, but this time with CA Correction disabled. Now you can see the actual optical aberrations of the lens, and equally how the D90 can greatly reduce them either in-camera or using software afterwards. Note: the D700’s Vignette Control is not offered in-camera, although you can apply it using Capture NX afterwards.
Nikon D90 JPEG from camera |
Nikon D90 RAW without Auto CA |
Nikon D90 RAW with Auto CA | ||
 |
 |
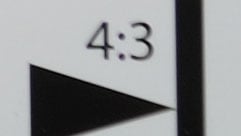 | ||
18-105mm at 35mm f8, 100% crop |
18-105mm at 35mm f8, 100% crop |
18-105mm at 35mm f8, 100% crop |
The headline processing feature remains Active D-Lighting which adjusts the tonal curve of images in an attempt to boost darker areas without blowing highlights. Unlike Nikon’s earlier D-Lighting system, the Active version applies the adjustments to JPEG files as they’re being processed, although normal D-Lighting is still offered in the Retouch menu for existing images.
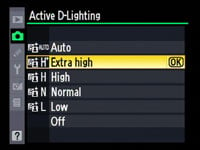 |
Active D-Lighting is offered in Low, Normal, High, or new to the D90, Extra High settings and is non-reversible on JPEGs; you can however opt for a bracketing option which takes one picture with Active D-Lighting and the other without. There’s additionally an Auto mode which adjusts the Active D-Lighting depending on the conditions – that’s the default setting, so the one we’ve used in our main Results and Gallery pages.
The current Active D-Lighting setting is also stored with RAW files and applied as you open them in Capture NX, but the software allows you to adjust the setting, or switch it off entirely if preferred. You don’t however get this option on RAW files if they were taken with Active D-Lighting switched off.
Active D-Lighting preserves highlight areas by first reducing the exposure slightly, then boosting the darker areas with a tone curve. You can see two examples of this below taken with the D90 in Aperture Priority at f3.5 and 200 ISO. The first image, on the left side is a normal exposure without Active D-Lighting, and the camera metered a shutter speed of 1/8. To the right is an image taken with Active D-Lighting set to its maximum setting of Extra High, which with the same aperture and sensitivity resulted in a faster exposure of 1/13 of a second.
|

Nikon D90 Active D-Lighting | ||
 | ||
 |  | |
Active D-Lighting Off: 200 ISO, f3.5, 1/8 sec |
Active D-Lighting Extra High: 200 ISO, f3.5, 1/13 sec | |
The histograms below each image illustrates exactly how Active D-Lighting works. The shorter exposure above right has retained more highlight detail, which in turn has meant the bright window areas are less burnt-out. At the other end, dark shadow areas have been reduced, while mid shadows have been boosted, brightening the dimmer portions of the scene. Boosting shadow areas, especially in conjunction with a shorter exposure, inevitably increases noise though, and this has become more apparent in the dark areas.
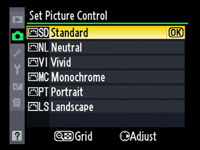
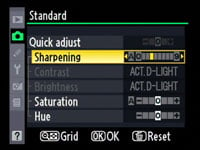
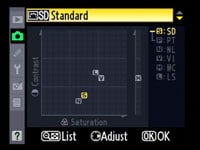
More traditional image processing options are applied using a series of Picture Controls. The Standard, Neutral, Vivid, Portrait and Landscape Picture Controls all offer adjustment of Sharpening (0-9), Contrast (+/-3), Brightness (+/-1), Saturation (+/-3) and Hue (+/-3), while the Monochrome Picture Style swaps Saturation and Hue for nine Toning and four Filter Effects. If you’re in a real hurry, a Quick Adjust option can boost or lessen a group of settings in one go. Note: the Portrait and Landscape Picture Controls are new to the D90. Custom Picture Controls can be created in-camera or using the supplied software.
 |
 |
 |
As always we used the default processing option for our test shots – in this instance the Standard Picture Control. As you’ll see in our Results and Sample Images Gallery pages, the D90’s default JPEG output is quite different to its predecessor. The D80 delivered vibrant, consumer-friendly images out of the camera, which could sometimes appear over-saturated under already bright and colourful conditions. In contrast the D90 is much more refrained, delivering output similar to that from the higher-end Nikon DSLRs – indeed the colour and tone settings in the D90’s Picture Controls are the same as those on the D300, D700 and D3.
As such, the D90’s default output can appear quite subdued compared to the D80, and this can come as a bit of a surprise if you’re upgrading from one to the other. If you miss the D80’s processing strategy though, simply opt for the Vivid Picture Control as your default, or manually tweak the colour and tone settings until you get the result you desire. Better still, shoot in RAW and make the adjustments later.
Nikon D90 drive modes
The Nikon D90 offers six Release options: Single Frame, Continuous Low, Continuous High, Self Timer, Delayed Remote and Quick Response Remote. To adjust these settings, press and hold the drive button on the camera’s top surface while turning the thumb dial.
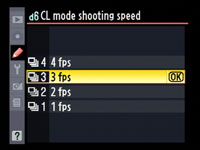 |
Continuous Low shoots at 1 to 4 fps depending on custom setting d6. Continuous High records at the D90’s top speed of 4.5fps, which is a significant boost of its predecessor’s 3fps. It’s also comfortably quicker than the 3.5fps of the Canon EOS 450D / XSi and the Olympus E-420 / E-520, although for pretty much the same money, the D90 is up against Canon’s EOS 40D which can shoot at up to 6.5fps.
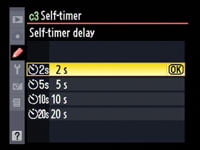 |
The Self Timer can be set to 2, 5, 10 or 20 seconds using custom option c3. The two Remote options are designed for use with the optional ML-L3 infra-red remote control; the Quick Response option takes the photo straightaway while the Delayed option releases the shutter two seconds after you press the button which is handy to avoid self-portraits or group shots showing the photographer pointing the remote at the camera.
There’s no explicitly-named Mirror-lockup facility, but enabling custom option d10 introduces a delay of about one second between the mirror raising and the shutter opening. The built-in Intervalometer facilities of the D300 and D700 are sadly not available here.
To test the D90’s continuous shooting capabilities we fitted it with a SanDisk Ultra II 1GB SD memory card and set the Release mode to High; the shutter speed was 1/500, the sensitivity 200 ISO and Active D-Lighting set to its default Auto. With the D90 set to record Large Fine JPEGs, we fired-off 50 frames in 11.3 seconds, before the camera began to slow, corresponding to a rate of 4.46fps. Beyond this, the D90 kept firing, but at a slightly slower rate.
Next we set the D90 to RAW mode and fired-off nine frames in exactly two seconds, corresponding to a rate of 4.5 fps; the D90 took ten seconds to subsequently clear its buffer and write the data to our card.
So the D90 delivered its quoted rate of 4.5fps in practice, which is a decent upgrade over the 3fps of the D80, although again slower than the 6.5fps of the Canon EOS 40D body which costs the same.
PC-based remote control of the Nikon D90 is possible with the optional Camera Control Pro 2 software. This is another area where Canon takes the lead as its EOS Utility offers full remote control of the DSLR (including focusing and Live View), and is supplied free of charge with all current EOS DSLRs including the budget EOS 1000D / Rebel XS. Nikon should rethink its strategy of charging for RAW processing and remote control software when its biggest rival gives them away for free even with the cheapest models.
Now check out our page devoted to the Nikon D90 Movie Mode.


