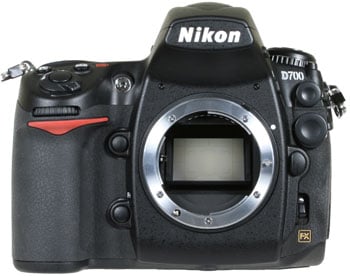
Nikon D700
-
-
Written by Gordon Laing
Nikon D700 lenses and autofocus
The Nikon D700 features an F-mount which can accommodate most Nikkor lenses, and like all Nikon DSLRs, you’ll need recent lenses to support the full focusing and metering modes. There’s detailed compatibility charts in the D700 manual or specification sheets, but just briefly you’ll need a Type G or D AF (including AF-S and AF-I) Nikkor to support all functions including the most sophisticated 3D Colour Matrix Metering II system.
 |
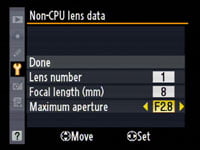
The less sophisticated (but still capable) Colour Matrix Metering system is supported on non-CPU lenses if you enter their focal length and maximum aperture into the D700; there’s room to store details of nine different non-CPU lenses with focal lengths from 6 to 4000mm and apertures from f1.2 to f22.
 |
As a full-frame DSLR, the D700 doesn’t apply a field-reduction factor to lenses you attach, so for example, a 24mm lens really will deliver the same field of view as it would on a 35mm film SLR. Unlike Canon’s full-frame DSLRs, you can also use DX-format lenses on the D700 which are designed for its cropped-frame bodies like the D300 and D80.
By default when a DX lens is mounted on the D700, it switches to a crop mode which only uses a smaller area of the sensor measuring 23.5×15.6mm – the same size as the DX-format sensors on models like the D300 and D80. This area is indicated by a frame in the D700’s viewfinder, although in Live View the D700 simply scales the cropped image to fit the screen. Since you’re effectively using the same sensor area, the same DX field reduction of 1.5 times still applies, so an 18mm lens will deliver a field of view equivalent to 27mm.
It’s neat to support DX lenses, but the downside to not using the full sensor area is not recording images with the full sensor resolution. So in DX mode, that maximum resolution falls from 12 Megapixels to just five. Unlike the flagship D3 which can shoot more quickly in DX mode, the continuous shooting speed on the D700 remains the same regardless of its image area.
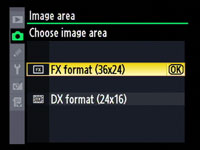 |
The D700 is additionally lacking the D3’s 5:4 recording mode, but if you disable Auto DX Crop and select FX format for Image Area, the D700 will use its full sensor area and resolution with a DX lens. Since DX lenses are only corrected for a smaller sensor area you’ll unsurprisingly see image quality fall off significantly in the corners, but this will vary between lenses and some may deliver an acceptable image area a little beyond the standard DX crop.
In terms of lens kits, the D700 will be available in a bundle with the Nikkor 24-120mm VR lens. This delivers a useful general-purpose range complete with Vibration Reduction, but is not one of the best models in the Nikkor catalogue. It’s fine to get you started, but if you really want to see what the D700 is capable of, you should really fit a higher-end model like the excellent AF-S 14-24mm. We had the pleasure of using this lens during our D700 test period and it really is a joy for anyone who’s into wide angle photography – see our Gallery and Results pages for examples taken with it.
Nikon D700 focusing
The Nikon D700 inherits the powerful 51-point AF system of the D3 and D300, using the same Multi-CAM 3500FX sensor as the D3. The 51 AF points cover a broad area of the frame – as seen in the viewfinder image on the previous page – and no fewer than 15 of them are cross-type. It’s a very impressive specification when the total number of AF points on rival systems doesn’t even match the number of cross-type sensors on the Nikons.
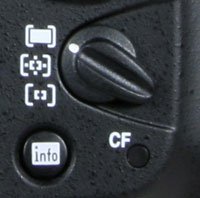 |
Like the D300, a three-way switch on the back of the camera allows you to select between Single Point AF (where you choose the focus point manually using the rocker), Dynamic Area AF (which can track a moving subject) and Auto-area AF (which detects subjects like people against backgrounds). Another switch by the lens mount lets you choose between Manual, Single or Continuous auto focus.
The thought of 51 focus points packed into the viewfinder sounds like potential clutter, but like other Nikon DSLRs, each point is indicated by an LCD rectangle which completely disappears from view when not active. So the reality of the system is that only a handful of active focus points are seen, which thankfully makes for a cleaner viewfinder experience.
Like the D300, you can choose between four different Dynamic AF Area modes which employ nine, 21, or all 51 focus points, the latter with an additional 3D tracking option. You might think you’d always go for the full 51-point system for all moving subjects, but there are benefits to the others.
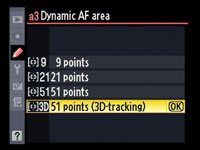 |
The nine-point system reacts quickly to predictably-moving subjects which tend to stay in the middle of the frame, such as runners or cars. The 21-point system considers a slightly larger area, allowing you to better track unpredictable motion like football players. If the subject is moving very quickly and can’t be easily framed in the centre, like a bird in flight, then go for the full 51-points. And finally, the 51-point 3D-tracking option remembers the colours of the area in the initially selected focus point and tracks the subject based on them – ideal for erratic motion like a tennis player against a coloured court.
Like the D300, it all comes together very well in practice. With the D700 set to Continuous shooting and the nine-point dynamic area, it effectively tracked and photographed vehicles approaching face-on at 50kph, using the Nikkor 50mm f1.8 lens (this was the longest focal length we had available during our test).
 |
Set to 51-point 3D-tracking, it coped with skiers and snowboarders moving erratically around the frame, with the active focus point visibly following them through the viewfinder with pretty decent accuracy. It works very well in this environment where a subject stands out against the background. As always you’ll need a lens with quick AF for the best success, but with the D700, like the D300 before it, Nikon’s got fast-action covered. Just be sure to experiment with the different focusing area options as one may work much better than another depending on the subject and conditions.
In Live View mode, the D700 can use either the traditional 51-point phase-change AF system, or a compact camera style contrast-based AF system – both are fully described on our Design page.
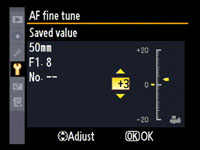
Recognising that not all lenses are perfect, Nikon also allows you to fine-tune the AF on up to 12 models by 20 steps either way. This is a very welcome feature that we’d like to see on higher-end DSLRs from all manufacturers.
Nikon D700 metering, exposures and bracketing
The Nikon D700 offers three main metering modes, selected using a dial to the right of the viewfinder: Spot, Centre-weighted and 3D Colour Matrix II. The latter employs a 1005 pixel sensor and considers brightness, colour, distance and composition information to evaluate the scene; note you’ll need a type G or D lens to deliver distance information. If focal length and maximum aperture settings are entered for non-CPU lenses, the D700 can offer its still very capable Colour Matrix Metering.
 |
We used 3D Colour Matrix Metering II for all our test shots and like previous Nikon DSLRs, found it had an uncanny ability of working out what you intended for the shot. We’ve said it before and will say it again: Nikon’s metering is the best around.
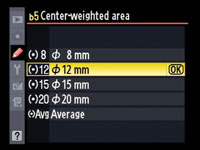
Like the D300, you can also adjust the diameter of the circle in the Centre-Weighted mode to 8mm, 12mm (the default), 15mm or 20mm; there’s also an Average option which takes the average of the entire frame.
 |
The D700 offers shutter speeds from 1/8000 to 30 seconds plus a Bulb option. Exposure compensation is available in a wide range of +/-5EV, and you can choose whether exposure increments are in 0.3, 0.5 or 1EV increments. Pros should note the shutter block is only tested to the same 150,000 cycles as the D300, compared to 300,000 of the D3.
Exposure bracketing is a joy on the D700. HDR fans will be delighted to find up to 9 frames can be taken at increments of 0.3, 0.5 or 1EV apart. Flash and White Balance bracketing are also available, again with two to nine frames.
Nikon D700 anti-dust
The Nikon D700 follows the D300 to offer anti-dust capabilities – this is another key difference between it and the flagship D3 which doesn’t offer the facility. Like the D300, the D700 vibrates a filter in front of the main sensor in an attempt to shake-free any foreign particles. You can set the D700 to perform this process at startup, shutdown, both or neither. You can also activate it manually at any time, along with recording a dust reference frame for automatic dust removal of RAW images in the optional Capture NX software.
Following our usual DSLR torture-test we left the D700 face-up without a lens, inside and outside for ten minutes each; we can’t know how much dust entered the body during this time, nor even how much was present to start with, but we know such a process would result in dust being a problem for most models.
With Cleaning set to take place at startup and shutdown we then powered the camera on and off twice, before taking a series of photos at every aperture setting of a plain white surface at close range with the Nikkor AF 50mm f1.8 lens manually focused to infinity. Dust marks normally become most apparent at the smallest apertures (eg f16 and f22), but it’s also important to test at more common apertures.
|

Nikon D700 dust example at f22 / f8 | ||
 | ||
100% crop, 50mm at f22 |
100% crop, 50mm at f8 | |
At f22, two small dust marks were faintly visible on the image and we’ve cropped the darkest of them above on the left. At f16, they grew fainter and by f11 had effectively become almost invisible. At f8, there was no sign of any, and to illustrate this we’ve cropped the exact same area from the f8 sample and shown it above right. If you save this image to your computer and apply Auto Levels, you’ll see the dust mark towards the bottom of the frame.
So like the D300 before it (and most DSLRs), some dust can remain in the D700 even after its filter has vibrated. We’ve seen worse examples, but any D3 owners tempted by the D700 for this feature should know it’s far from infallible, and you won’t be able to retire the manual blower just yet. We also tried applying a dust reference frame to a RAW file in Capture NX, but the dust marks described above remained.
Nikon D700 sensor and processing
The headline feature of the D700 is of course its full-frame FX-format sensor; this makes it the second full-frame model from Nikon, after the flagship D3. In fact the D700 shares exactly the same 12.1 Megapixel sensor as the D3, measuring 36×23.9mm and delivering images with a maximum resolution of 4256×2832 pixels.
The D700 offers two lower resolutions, along with a variety of compression settings. There’s three JPEG modes: Fine, Normal and Basic, and you also get to choose whether the compression is prioritised to maintain a consistent file size or for quality. Unusually for a modern camera, there’s also the addition of an 8-bit TIFF option.
If the D700 is fitted with a DX-format lens and set to the default Auto DX Mode, the maximum resolution drops to 2784×1848 pixels, or 5.1 Megapixels. Once again though you still have the option of two lower resolutions, along with all the JPEG compression options. As described in the lens section above, it is possible to disable the Auto DX Format option and select the full FX frame even when shooting with DX-format lenses. This will use the full sensor area and resolution, although since DX lenses are only corrected for a smaller frame, the quality will deteriorate significantly towards the corners of the larger FX frame.
In terms of RAW files, the D700 also gives you plenty of choice. You can record them as uncompressed data or with lossy or lossless compression. You can choose between 12 bit and 14 bit tonal depth, and once you’ve chosen your desired RAW type, you can accompany it with a JPEG at any compression setting. Unlike the D300, switching to 14-bit RAW files does not compromise the continuous shooting speed – this is a key feature of the D700, which matches the flagship D3.
Nikon supplies basic conversion software for RAW files, but sadly the more sophisticated Capture NX software appears to have become an optional accessory again after the initial trial of offering it free with early D300s. This decision may vary depending on your region though, so check with your supplier for details. We just hope Nikon makes a solid decision at some point to include Capture NX, at least with its higher-end DSLRs – remember all Canon DSLRs come with its Digital Photo Professional software for free.
With the D700 recording a FX frame at its full 12.1 Megapixel resolution, best quality Fine JPEGs typically measure 5.7MB each, while lossless compressed RAW files measure 13.3MB in 12-bit or 16.3MB in 14-bit. Switch to lossy compression and the 12 and 14-bit RAW files fall to 11 and 13.8MB respectively, Opt for no compression and they increase to 18.8 and 24.7MB respectively, Finally, you’re looking at about 35.9MB for an 8-bit TIFF
Switch to the smaller DX frame at its full 5.1 Megapixel resolution and best quality Fine JPEGs typically measure 2.5MB each, while lossless compressed RAW files measure 5.7MB in 12-bit or 7.7MB in 14-bit. Switch to lossy compression and the 12 and 14-bit RAW files fall to 4.7 and 6MB respectively, Opt for no compression and they increase to 8.1 and 10.7MB respectively, Finally, you’re looking at about 15.3MB for an 8-bit TIFF. All file size figures here are quoted by Nikon.
The D700’s base sensitivity runs between 200 and 6400 ISO with additional Lo 1, Hi1 and Hi2 options representing 100, 12800 and a whopping 25600 ISO respectively. These higher sensitivities are inherited from the D3 and are another differentiator with the D300, not to mention almost every other DSLR.
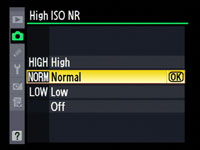 |
High ISO Noise reduction is applied at 2000 ISO and above, but you get the choice of four settings: Low, Normal (the default), High, and Off, although even when ‘Off’, there’s some noise reduction applied above Hi 0.3 (8000 ISO). You can see how the same image looks at all sensitivities and NR settings in our Nikon D700 High ISO Noise and Noise Reduction results pages.
White Balance can be set to Auto, Incandescent, Fluorescent, Direct Sunlight, Flash, Cloudy, Shade, a manually set colour temperature or a preset. Each can be fine-tuned, and bracketing is also available.
Image processing is taken care of by Nikon’s EXPEED processor, which not only races through data to provide a very quick handling experience, but also includes a number of tricks. First is the automatic removal – or at least reduction – in optical chromatic aberrations, best recognised as purple fringing. This correction is applied automatically to all JPEG and TIFF files whether you like it or not, but not to RAW files, which allows you to make a comparison if desired.
 |
In practice the correction works very well, and it’s only when you process a RAW file in Capture NX with the Colour Aberration option un-ticked that you really see what’s going on behind the scenes. That said, it’s not so heavy handed to leave undesirable processing artefacts. If you don’t like the idea of this processing taking place, you’ll need to shoot in RAW, but even with the option in Capture NX to switch it off, we invariably left it enabled unless deliberately making a comparison.
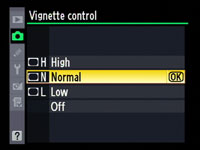
New to the D700 over the D300 and offering further corrections to lenses is the Vignette Control which helps compensate for darkening in corners on Type G and D lenses, although DX and PC models are not included. You can choose from High, Normal (the default setting), Low and Off. Again this effect is applied to JPEG and TIFF files, but not to RAW files, and the effect isn’t previewed in Live View.
Nikon D700 Vignette Control off |
Nikon D700 Vignette Control Low |
Nikon D700 Vignette Control Norm (default) |
Nikon D700 Vignette Control High | |||
 |
 |
 |
 | |||
50mm f1.8 at f1.8, FX frame |
50mm f1.8 at f1.8, FX frame |
50mm f1.8 at f1.8, FX frame |
50mm f1.8 at f1.8, FX frame |
Above are examples of the four settings taken with a 50mm f1.8 lens at f1.8 and focused to infinity; the D700 was set to record its full FX frame area. As the Vignette Control becomes stronger, the darkening effect in the corners is certainly reduced without any undesirable artefacts in this particular example. Of course this was only with one lens, so we’d recommend performing some tests with your own lenses before sticking with a particular setting.
The headline feature of EXPEED though is Active D-Lighting which adjusts the tonal curve of images in an attempt to boost darker areas without blowing highlights. Unlike Nikon’s earlier D-Lighting system, the Active version applies the adjustments to JPEG and TIFF files as they’re being processed, although normal D-Lighting is still offered in the Retouch menu for existing images.
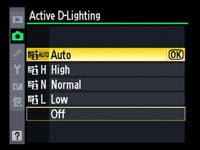 |
Active D-Lighting is offered in Low, Normal or High settings and is non-reversible on JPEGs and TIFFs. The setting is also stored with RAW files and applied as you open them in Capture NX, but the software allows you to adjust the setting, or switch it off entirely if preferred. You don’t however get this option on RAW files if they were taken with Active D-Lighting switched off.
Active D-Lighting preserves highlight areas by first reducing the exposure slightly, then boosting the darker areas with a tone curve. You can see two examples of this below taken with the D700 in Aperture Priority at f8 and 200 ISO. The first image, on the left side is a normal exposure without Active D-Lighting, and the camera metered a shutter speed of 1/ 1.6. To the right is an image taken with Active D-Lighting set to its maximum setting of High, which with the same aperture and sensitivity resulted in a faster exposure of 1/ 2.5 of a second.
|

Nikon D700 Active D-Lighting | ||
 | ||
 |  | |
Active D-Lighting Off: 200 ISO, f8, 1/1.6 sec |
Active D-Lighting High: 200 ISO, f8, 1/2.5 sec | |
The histograms below each image illustrates exactly how Active D-Lighting works. The shorter exposure above right has retained more highlight detail, which in turn has meant the bright window areas are less burnt-out; the brightness of the rear wall has also been reduced. At the other end, shadow and mid-tones have been boosted, although with some undesirable spikes. That said in this particular example there’s not a great deal of difference in the dark shadow areas. In other examples we saw a bigger impact, but like other systems which boost shadow areas, there’s inevitably the risk of increased noise.
Finally, in terms of traditional dynamic range, we found 12-bit RAW files taken at the same exposures as in-camera JPEGs contained greater tonal detail at both ends of the scale. The jump from 12 to 14-bit was much more subtle though and in some cases almost impossible to spot, but since the file sizes aren’t much greater, we’d recommend it for the ultimate potential quality – remember unlike the D300, there’s no compromise in continuous shooting speed when set to 14-bit RAW.
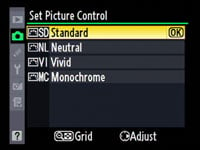
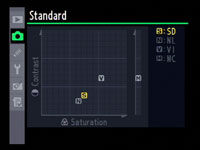
More traditional image processing options are applied using a series of Picture Controls. The Standard, Neutral and Vivid Picture Controls all offer adjustment of Sharpening (0-9), Contrast (+/-3), Brightness (+/-1), Saturation (+/-3) and Hue (+/-3), while the Monochrome Picture Style swaps Saturation and Hue for nine Toning and four Filter Effects. If you’re in a real hurry, a Quick Adjust option can boost or lessen a group of settings in one go.
 |
 |
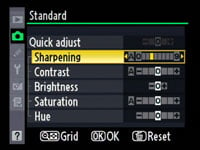 |
Like the D300 before it, we found the Standard Picture Control used throughout our results and gallery pages was quite refrained and could easily handle a boost in contrast and sharpening for punchier output.
Nikon D700 drive modes
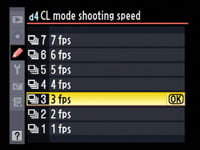
The Nikon D700 offers two continuous shooting modes on the Release dial: CL for Continuous Low and CH for Continuous High. Set to Continuous High mode, the D700 can shoot at 5fps, while Continuous Low is configurable between 1 and 5fps (or up to 7 with the optional grip). The maximum speed of 5fps is a fraction slower than the D300’s 6fps, but in its favour the D700 doesn’t slow down when set to record 14-bit RAW files.
 |
Like the D300, it’s also possible to fit the optional MB-D10 battery grip to boost the speed, with both cameras subsequently offering a very impressive 8fps – although to support this speed you’ll need to fit the MB-D10 with either a set of AAs, or the higher-capacity EN-EL4a battery pack.
|

To test the D700’s continuous shooting capabilities we fitted a Lexar Professional UDMA 300x 4GB compact flash card. With the camera set to Large Fine JPEG (optimised for quality) at 200 ISO and with Active D-Lighting switched disabled, we fired-off 45 frames in nine seconds before the D700 slowed slightly. This corresponded to a rate of exactly 5fps. The camera was ready to shoot in smaller bursts almost instantly, and the data from the first batch of 45 was fully written to the card just five seconds later – much faster than the 38 seconds required to flush the D300’s buffer after it had shot 50 frames. Clearly the D700 is exploiting the fast write times of UDMA cards.
Set to record 12-bit RAW only with lossless compression, we fired-off 18 200 ISO frames in 3.6 seconds before the camera slowed. This again worked out at exactly 5fps and the buffer cleared in just over eight seconds. Set to 14-bit with lossless compression, we again managed 18 200 ISO frames in 3.6 seconds before the camera slowed, once again confirming a rate of 5fps; this time the buffer cleared in ten seconds.
Unlike the D300 which reduces the size of its bursts from 800 ISO upwards though, our D700 continued to shoot the same number of frames at 800 and 1600 ISO as it did at lower sensitivities. The burst reduction on the D700 occurred at 3200 ISO upwards, where the total number of frames which could be captured before slowing was typically 28; note this still took place at 5fps.
 |
 |
So while the D700’s 5fps may not sound quite as impressive as the D300’s 6fps on paper, the reality is the former is more powerful overall when it comes to continuous shooting. Unlike the D300 which falls to 2.5fps when recording 14 bit RAW files, the D700 maintains its maximum 5fps shooting rate. And unlike the D300 which shoots smaller bursts at 800 ISO and above, a similar drop doesn’t occur on the D700 until you’re two stops higher at 3200 ISO. Combine this with respectable performance at high sensitivities along with the 8fps boost from the optional battery grip and you’ve got a superb DSLR for shooting action in low light.
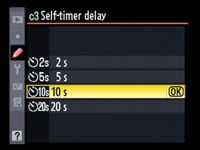
The D700 offers four different self-timer delays: two, five, 10 and 20 seconds, with the default being 10 seconds. The self-timer itself is selected from the release mode dial, while the delay can be chosen from a custom menu.
Turn the release mode dial to Mup and you can use the D700’s Mirror-lockup facility. With this selected, press the shutter release once to raise the mirror, then once again to actually take the photo. While this will eliminate shake from the mirror’s action, obviously it’s best-used with a cable release to subsequently fire the shutter.
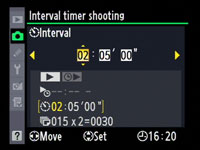
Finally, the D700 shares the D300’s built-in Intervalometer capabilities to shoot at timed periods. You can set the start time, interval period (from one second to one day) and both the number of intervals (up to 999) and shots taken per interval (up to nine). This is another handy feature to have built-into the camera and will delight anyone wanting to create a time-lapse sequence without additional equipment.


