Nikon D700
-
-
Written by Gordon Laing
Nikon D700 design and controls
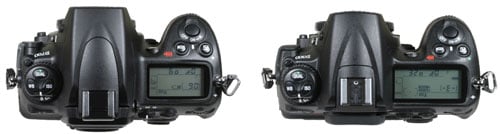
The D700 continues Nikon’s tradition of delivering tough and superbly designed high-end DSLRs. At the time of writing, it’s positioned between the semi-pro D300 and flagship D3, offering the latter’s full-frame sensor in a more portable form factor. We’ve pictured it below alongside the D300 with both models fitted with the Nikkor 50mm f1.8 lens so not to obstruct the body features.
 |
Measuring 147x123x77mm, the D700 is the same width as the D300 and only 3mm thicker, but the larger penta-prism required by the full-frame sensor makes the D700 9mm taller. This additional height is clear from the photo above, although in our view it gives the D700 better-proportions than the D300. Compared to the full-frame Canon EOS 5D, the D700 is 5mm narrower, 10mm thicker and 2mm taller.
In terms of bulk, the D700 weighs in at 995g, which makes it 170g heavier than the D300 and 185g heavier than the EOS 5D; these weights are without battery, although the two Nikons share the same pack, making their weights directly comparable.
Pick up all three bodies and there’s no doubt the D700 is comfortably the heaviest. 170g doesn’t sound like much, but the D300 really does feel noticeably lighter, as does the EOS 5D. That said, many people will be comparing the D700 against the D3, where there’s a significant size and weight difference: the D3 is 13mm wider, 34mm taller, 11mm thicker and weighs 245g more – and that’s without taking its larger battery into consideration. Of course the D3 also has a built-in portrait grip, but many will prefer the D700’s greater portability and option to fit a battery grip only when they need it.
 |
In terms of build quality, the D700 is essentially the same as the D300. Both bodies feel incredibly solid and exude confidence. Physical design is of course a very personal thing, but we’d say the D700’s build and ergonomics are a step-up from rival semi-pro DSLRs, including the Canon EOS 5D.
It’s the small things which make all the difference like the feel of the rubber coating and the slightly indented area inside of the grip for your right fingertips which acts like a hook, allowing you to hold the camera more comfortably and securely. Again nothing we haven’t already seen on previous Nikon DSLRs, but still a leader in ergonomics. The presence of a popup flash inevitably makes the head section more vulnerable than models without – like the D3 and EOS 5D – but at no point did we feel the D700 was at any risk.
Nikon describes the D700 as being ‘comprehensively sealed against dust and moisture’ with O-rings and other seals on the various controls, flaps and doors. Before you get too carried away though, remember like all DSLRs, to be properly weatherproof you’ll also need a lens with environmental sealing.
 |
In terms of controls, the D700 is virtually identical to the D300, although there are a couple of differences we’ll mention as we go along. The D700 features both finger and thumb dials, and most adjustments involve holding down a button as one of the dials is turned. Most buttons also only have one function which makes it easy to get to grips with.
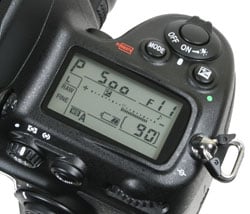
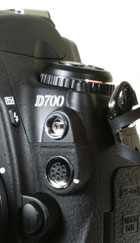
Like the D300, there’s no command dial for the shooting modes. Instead you press and hold the Mode button by the shutter release and turn the thumb dial. As a high-end model, there’s also no scene presets here, just the traditional Program, Manual, Aperture and Shutter Priority modes. To the right of the Mode button is one for Exposure Compensation which is offered in a wide range of +/- 5EV.
A rotary dial around the shutter release itself is used to switch the camera on and off, while a clockwise twist illuminates the upper screen’s backlight. Like other high-end Nikon DSLRs, this top screen dominates the upper right surface of the body, and while it’s a little smaller than the D300’s information screen, the only major detail missing is the graphical representation of the 51 AF points. Since this only indicated the AF point mode on the D300 and couldn’t be used to manually select points, it’s no great loss on the D700, and besides you can still see an equivalent on the main colour monitor by pressing the Info button – see menu section below.
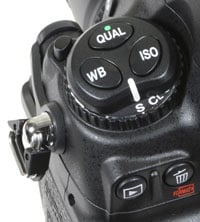 |
The upper left side of the camera is home to the Release Mode dial which gives you tactile access to the various shooting modes: Single, Continuous Low, Continuous High, Live View, Self-timer and Mirror lockup. Like the D300, this means you can’t select the self timer or continuous shooting at the same time as Live View, but the D700 offers workarounds including one new one over the D300 – see the Live View section below for details.
On top of the Release Dial are three large buttons dedicated to the Quality, ISO and White Balance. Press and hold, say, the Quality button and you can turn the thumb dial to adjust the compression and the finger dial for the resolution.
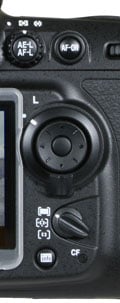 |
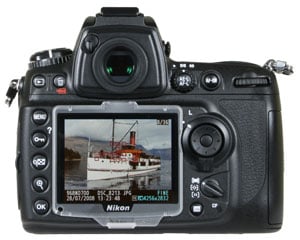
The rear of the camera shares essentially the same controls as the D300. So to the right of the viewfinder you’ll find a small rotary switch (turned 90 degrees clockwise from the D300) which adjusts the metering between Center-weighted, Matrix and Spot modes, and in the middle an AE-L / AF-L button. To the right of the metering control is the AF-ON button which offers an alternative means to fire-up the AF system – and which is also used to autofocus in Live View mode.
To the upper right of the screen is an eight-way circular pad with a rotary lock, used to adjust the focusing point, navigate menus or scroll around images in playback. Interestingly Nikon has employed the eight-way controller from the D3 here, not the D300, so in the middle you’ll find a separate confirmation button. It’s a personal choice, but we prefer this implementation over the D300’s control as there’s no doubt when you’re pressing one of the eight directions or in the middle.
Below this is a switch which sets the AF area mode to Single Point AF, Dynamic Area AF, and Auto-area AF; see the focus section on our Features page for more details.
Finally, below this switch is the D700’s only new control over the D300: a dedicated Info button. Previously on the D300, the Info control shared a button with the Help and image lock functions. So now that Nikon has extended the Info functionality – see menus below – it makes sense to dedicate a button to it.
Unfortunately though the new Info button has come at a price: it’s located where you previously found the latch for the memory card door on the D300. Perhaps it would have involved too much retooling to create a completely new location for it on the D700, so a decision was made and the latch sacrificed. In its place is a more basic sliding memory card door, similar to that on the D80 and lower-end Nikon DSLRs.
Putting this swap aside though, the controls on the D700 remain intuitive and easily operated when wearing gloves – an important consideration for many pros.
 |
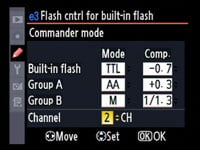
Nikon D700 flash
Like the D300 before it, the new D700 is equipped with a popup flash in addition to a hotshoe and a PC Sync port. The inclusion of a popup flash is a key differentiator between the D700 and the flagship D3, not to mention Canon’s EOS 5D. Some pros may view them with disdain, and indeed there’s an inevitable reduction in toughness around their mechanism compared to bodies without, but on the plus side they are very handy for casual fill-in applications, while additionally offering wireless flash control.
| ||
 | ||
The D700’s popup flash has a Guide number of 17 / 56 (meters / feet) at the camera’s base sensitivity of 200 ISO and can cover a wide field equivalent to 24mm; when raised, it’s also about a centimetre higher than the D300’s which will help a little when it comes to minimising red-eye.
It supports i-TTL, although Nikon advises only using this with the standard ISO range of 200 to 6400 ISO. Pressing and holding the flash button on the side of the body while turning the finger or thumb dials allows you to adjust the flash compensation or flash mode respectively. Flash compensation is offered from -3 to +1 EV in 0.3 EV increments, and flash modes include red-eye reduction, rear-curtain and slow sync down to 30 seconds
The D700 supports Nikon’s Creative Lighting System (CLS) with i-TTL flash control, wireless lighting, flash level lock and auto high speed sync. CLS compatible flashguns include the optional SB-400, SB-600, SB-800 and new SB-900. The built-in flash, SB-900, SB-800 or SU-800 units can act as wireless controllers.
 |
The fastest flash sync speed is 1/250, although there’s also an option to sync at 1/320 in a custom menu, albeit with a shorter effective range as a result. If you’re using the SB-R200, SB-600, SB-800 or SB-900 flashguns, the D700 will also support shutter speeds up to the maximum 1/8000, allowing flash use with small depths of field.
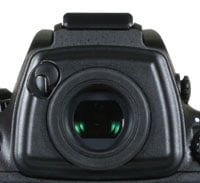
Nikon D700 viewfinder
The major physical difference between the D700 and D300 is the former’s taller head to accommodate a larger penta-prism for the full-frame viewfinder. The D700 also features a circular viewfinder eye cup with a switchable curtain to block stray light entering.
 |
In terms of specifications, the D700’s viewfinder sounds less impressive than the D300 and D3 as both those models offer 100% coverage compared to 95% on the D700. This is undoubtedly a disappointment, but it’s important to realise even with 0.72x magnification, the D700’s larger sensor means its viewfinder still appears larger than the D300’s 0.94x magnification. Ultimately only you can decide if 100% viewfinder coverage is essential, but there’s no doubt the D700’s viewfinder delivers a bigger view than the D300 – and remember you can get 100% coverage in Live View.
We also had the Canon EOS 5D to hand while using the D700 and both viewfinders appeared very similar in size. So while the D3 ultimately has the best overall viewfinder specification, the ‘affordable’ full-frame models from both companies still deliver an excellent viewfinder experience.
 |
In terms of shooting information, the D700’s viewfinder details are essentially the same as the D300. So you’ll see the shutter speed, aperture, shots remaining, exposure compensation scale and icons for various modes, along with the ISO sensitivity shown at all times.
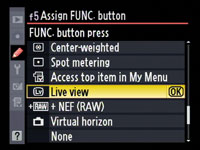
One new and welcome addition over the D300 though is the D3’s Virtual Horizon option which uses the exposure compensation scale to indicate whether the camera is tilted or level. To activate the Virtual Horizon in the viewfinder, you’ll first need to assign it to the programmable function or DOF preview button. Then with the button held, the exposure compensation scale extends left or right to indicate an anti-clockwise or clockwise tilt respectively; when the scale is at zero, the camera is level. In a feature introduced on the D700, but now also available on the D3 with a firmware update, the Virtual Horizon can additionally be used in Live View – see below.
Like the D300 (and all but the cheapest Nikon DSLRs), the D700’s focusing screen employs LCD graphics which can be switched on and off as required. This is how Nikon implements an alignment grid, along with indicating those considerable 51 AF points.
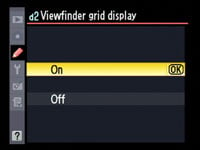 |
When these LCD details are switched off, they become invisible, which makes for a very clean and uncluttered viewfinder. Being able to electronically switch an alignment grid on and off also makes the interchangeable focusing screens of rivals like Canon’s DSLRs look like a prehistoric solution. Note, the alignment grid is not available when the D700 is shooting in DX-format mode, as four of the grid lines are actually used – in a bolder weight – to mark the border of the DX frame.
So in conclusion, while the D700 may not feature the 100% coverage of the D300 or D3, its viewfinder remains large, bright, detailed and a joy to use.
Nikon D700 Screen and Live View
The screen is another highlight of the D700. Like the D300 and D3 before it, the D700 is equipped with nothing less than a 3in monitor with VGA resolution. This ‘920k’ screen boasts 640×480 full colour pixels unlike the 320×240 pixel resolution of typical ‘230k’ screens. This allows the D700 to display very fine details during Live View and when playing back images, along with crisp-looking fonts in the well-designed menus and information screens. It’s a real step-up from Canon’s semi-pro models.
 |
Like most Nikon DSLRs, the D700’s monitor is protected by a clip-on transparent plastic shield: the BM-9 shield is supplied with the D700. The screen looks better without, but the cover doesn’t greatly compromise the quality if you’d prefer to have the protection.
The D700 features Live View facilities and the main implementation is very similar the D300, although there’s a few differences we’ll mention as we go over the options. Like the D300, there’s no button permanently dedicated to firing-up Live View. So by default, you’ll first need to turn the D700’s Release dial to LV, then press the shutter release button to actually start the Live View process. Like most DSLRs with Live View, there’s a slight pause as the D700 flips its mirror up and opens the shutter.
Once active, the D700’s Live View delivers 100% coverage and exploits the full VGA resolution of the monitor for a highly detailed view. If you’re using a DX-format lens with the D700 set to Auto DX Crop or DX area, then the cropped frame will fill the screen.
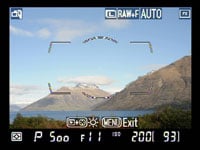
The first difference between the D700 and D300 concerns the presentation of information and graphics in Live View. Previously on the D300 if you pressed the Info button, you’d switch the additional shooting information on or off. If you wanted to see an alignment grid in Live View, you’d need to enable the Viewfinder grid option in the Custom menu – and conversely to switch the grid off you’d need to disable this function.
 |
 |
 |
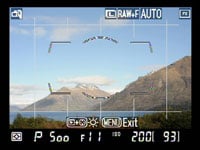
With the D700, the alignment grid now simply appears as another option as you press the Info button. So pressing the Info button once will clear the view of additional shooting info, and pressing it once more presents the grid – that’s much easier and more sensible.
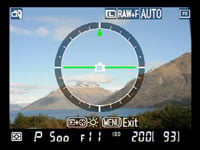
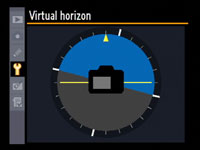
Press the Info button once more and you’ll see another new Live View feature for the D700: the Virtual Horizon. This presents a circle which rotates as the camera is tilted to either side; when the camera is perfectly level, the horizontal bar crossing the circle turns from yellow to green.
The Virtual Horizon feature is actually inherited from the flagship D3, although when it launched, it was not available in Live View. Instead the original D3s only offered it through the optical viewfinder (using the exposure compensation scale for indication), or as an on-screen graphic. The D700 still offers both of these, but complements them with the additional Live View option, which is arguably the most useful of the three. D3 owners needn’t feel like they’ve missed out though – Nikon has thoughtfully included the Live View option in a firmware update.
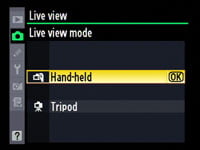 | |
Like its predecessors, there’s two main Live View modes on the D700: Handheld and Tripod. The default Handheld mode works like most existing Live View systems with a traditional phase change focusing technique which has to temporarily flip the mirror down to take a reading. You do this by either half-pressing the shutter release or pressing the AF-ON button. The lens will then auto-focus, but the Live View won’t return until you let go of either button. Then you can press the shutter release all the way down to take the photo.
In Handheld mode, the viewfinder is pretty much replicated on-screen, with the same information running along the bottom. Interestingly the active AF points are not shown on-screen though.
 |
 |
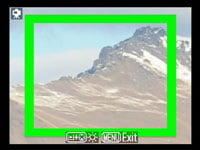 |
In Tripod mode, the view changes slightly, with the grid lines – if shown – crossing the view uninterrupted. The big difference here though is the focusing system, which being contrast-based, allows the camera to auto-focus without flipping the mirror and interrupting the view. To do this you press and hold the AF-ON button, then wait for a few seconds as the system figures it out – you’re typically looking at about three seconds before the focusing square turns green, confirming sharp focus. It’s slower, but quieter and uninterrupted. Then once again press the shutter release button all the way to take the shot.
One benefit of the Tripod mode is using the circular rocker to position the focusing square to wherever you’d like the camera to focus. So rather than having a 51-point AF system, you in fact have the entire frame at your disposal.
At any point in either Handheld or Tripod mode you can press the magnify button to take a closer look until you’re actually viewing every pixel 1:1 on the screen. This allows you to precisely confirm the focus, while also allowing accurate manual focusing. Tripod mode has the edge here as you can move the frame around the screen to different areas when zoomed-in.
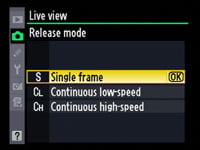
Another difference between Live View on the D700 and D300 concerns self timers. Since Live View is enabled by default on the D700 by turning its Release dial, you’ll bypass the traditional means to select the self-timer, not to mention continuous shooting. Like the D300 before it, the D700 solves the latter by offering a Release menu in Live View which allows you to choose between Single or Continuous shooting.
 |
 |
Bizarrely a Self Timer option still isn’t present here, but you can now at least assign Live View to the Function or DOF preview buttons; by doing so, you can turn the Release dial to the self-timer, or indeed any other drive mode like Continuous.
This is good news, but still a workaround rather than a sensible solution. A better workaround would surely have been to simply include the self timer on the Live View Release menu, or best of all, remove LV from the Release dial and permanently dedicate a button to it. This would allow a more consistent approach to setting the drive modes whether you’re in Live View or not.
Sadly one feature which hasn’t arrived on the D700 is a Live Histogram. This is a real shame, especially as live histograms are standard features on most other DSLRs with Live View including budget models, so it’s a key feature to lack on such a high-end camera.
Nikon wouldn’t confirm the D700’s screen refresh rate in Live View, but we believe it’s the same 15fps as the D300. When panning, it’s certainly not as smooth as the 30fps of models like the Canon EOS 40D, but what you lose in fluidity, you gain in detail on the VGA screen. It’s also worth mentioning if you’re using Live View for mostly tripod-based static work, the lower frame rate is not an issue.
So despite the continued lack of a Live Histogram, Nikon’s made some good improvements to Live View on the D700, both in terms of new features like the Virtual Horizon, and ease of use like the more accessible grid and assignable Function button.
Nikon D700 Menus
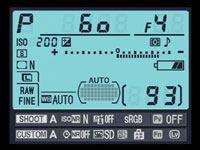
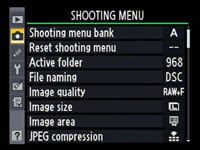
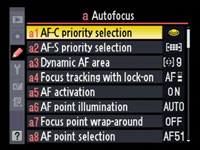
The Nikon D700 may feature a detailed upper LCD screen, but press the Info button at any time and the camera will present a wealth of shooting information on the main colour monitor – this includes the graphical representation of the 51 AF points which unlike the D300, isn’t duplicated on the upper screen.
 |
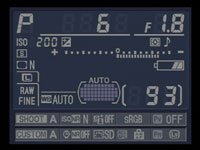 |
The information is updated in real-time and features the shooting mode, aperture, shutter speed, release mode, exposure compensation scale, vignette control, flash mode, separate battery indicators for both the main pack and the optional grip, image quality, white balance, AF details and shots remaining; like the upper screen, if the shots remaining counter is greater than 1000, it’s indicated by a letter ‘k’. The D700 also recognises when conditions are getting darker and switches its daytime colour scheme of black characters on a light blue background to white characters on a darker slate-coloured background. It all works very well and looks great on the VGA monitor.
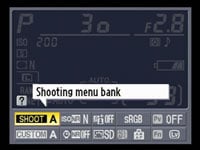
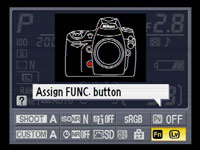
The layout of the main information has been rearranged a little from the D300, but there’s one important additional difference. The lower quarter of the screen is now divided into two horizontal bars showing details of the Shooting Menu and Custom Settings Banks, the High ISO and Long Exposure NR settings, Active D-Lighting, the colour space, Picture Control, and assignment of the AE-L / AF-L, depth-of-field preview and Function buttons.
| By pressing the Info button once more, this lower section takes priority with one of the details above highlighted in yellow. You can then use the eight-way control wheel to move the highlighter over the desired setting before then pressing the centre button to bring-up the relevant options. In practice this works in a similar way to the on-screen adjustments of Olympus DSLRs, and allows you to quickly and easily adjust a lot of settings without having to delve into menus to find the relevant page. It’s a welcome feature on the D700 and one we hope to see rolled-out on future Nikon DSLRs. |
 |
 |
 |
 |
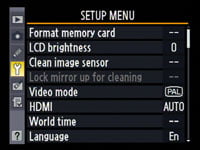 |
Pressing the Menu button fires-up Nikon’s familiar user-interface, again looking great thanks to the high resolution screen. The main sections are indicated by tabs running down the left side, for Playback, Shooting, Custom Settings, Setup, Retouch and the customisable My Menu. Pressing the Question mark button at any time will popup helpful advice. Most of the settings are the same as the D300, but there’s a few additions like switching the recording area between FX and DX, and adjusting the new Vignette Control option.
 |
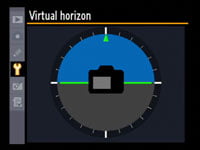 |
The Virtual Horizon mode is offered in three ways on the D700. You’ve already read about the implementation through the viewfinder and in Live View, but you can also still fire it up from the Setup menu. Like Live View, the horizontal bar turns green when the camera is held steady. It’s a handy feature when setting up a tripod, but most will find the viewfinder or Live View implementations more useful in practice.
 |
Customisation is a big aspect of the D700 with ten settings for AF, six for metering / exposure, four for timers / AE lock, 11 for shooting and display, seven for bracketing / flash, and 12 for controls. That’s 50 in all, allowing you to tweak every aspect of the camera.
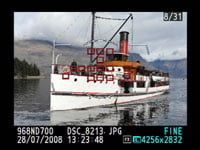
In playback the VGA screen really comes into its own with images looking highly detailed compared to average 230k monitors; even the thumbnail views look detailed. Depending on the display selected in the Playback menu, you can cycle through a great deal of information when replaying images.
 |
 |
 |
 |
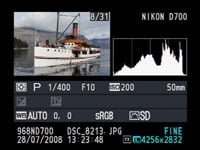
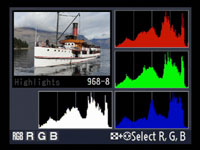
With every option selected, pressing the circular rocker up and down cycles between a full view showing the active focus points, a thumbnail with a brightness histogram and basic shooting info, three pages of shooting information, a thumbnail with RGB and brightness histograms, and finally one with flashing highlights.
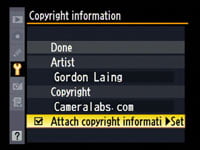
It’s also possible to add copyright information to a photo. An option in the Setup menu allows you to enter artist and copyright details which can then be tagged on images. If copyright information has been entered into the D700, or a GPS unit connected, the details will also appear on additional information pages during playback.
Nikon D700 Battery and connectivity
The Nikon D700 is powered by the same EN-EL3e 1500mAh Lithium Ion battery pack as the D300. Nikon quotes 1000 shots under CIPA conditions without Live View – we found with a mix of normal and Live View shooting, you were looking at closer to half that figure.
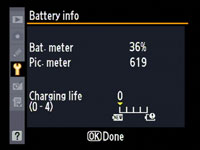 |
Like the D300, the D700 can take an accurate reading of the remaining battery life and display it as a percentage. Unlike Sony which proudly displays its percentage figures on-screen though, Nikon continues to inexplicably hide theirs away in a Setup menu. Accurate battery life indicators are a great feature, and it’s a shame Nikon doesn’t include the value on the monitor in Info mode.
| ||
 | ||
 | ||
If you’d like extended battery life, the D700 can use the same MB-D10 battery grip as the D300. Rather than employing a stalk which enters the camera’s battery compartment, the MB-D10 simply connects to the base of the D700 and works in addition to the primary battery. The MB-D10 also offers a variety of battery options: you can equip it with either the same EN-EL3e Lithium Ion pack as the D700 itself, the longer life EN-EL4a of the flagship D3, or a set of eight AA batteries.
The MB-D10 also offers portrait controls while additionally boosting the D700’s continuous shooting rate to an impressive 8fps, so long as it’s fitted with either the EN-EL4a or AA battery options. As such it’s a very flexible accessory to have and obviously gives you size and weight configuration options which aren’t possible with the D3’s built-in portrait grip.
There’s also the WT-4 Wireless transmitter which provides wireless transfer of images along with wireless control of the camera using the optional Nikon Camera Control Pro 2 software.
In terms of memory, it’s no surprise to find the D700 taking Compact Flash cards, but the actual compartment door is slid open like those on the lower-end Nikon bodies, rather than using the latch release of the D300 and D3. The D700’s Info button is located where you’d find the latch control on those other bodies, and it’s an unusual choice by Nikon. That said, we’ve never experienced any issues with the mechanism on models like the D80, but for the D700’s price it’s certainly a bit of a disappointment. It should be noted though the same type of mechanism is employed on Canon DSLRs like the EOS 5D downwards.
Like the D300, the D700 is compatible with the UDMA standard for high-speed Compact Flash cards, and we used a Lexar Professional UDMA 300x 4GB model in our tests. Interestingly, the D700’s Compact Flash slot is now only compatible with Type-1 cards, which rules out Microdrives. There’s also only one memory card slot compared to the D3’s dual slots.
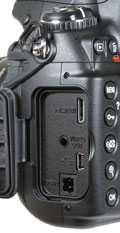 |
Again like the D300, a large rubber flap on the left side of the body opens to reveal a composite video output, an HDMI port for connection to an HDTV, a DC input and a USB port. These are however presented in a different order to the D300, and the HDMI port is now a mini connector as oppose to the full-size port on the D300.
The same HD modes are available though. You can output signals in 480p, 576p, 720p or 1080i, and like the composite output, also use the HDMI port for Live View previews and slideshows, except in high definition; this is a real treat in use.
Two smaller flaps on the front of the body open to access a PC sync port and a 10-pin remote terminal. The latter can be used for either a number of remote cords, such as the MC-30, or the MC-35 GPS adapter cord.
The GPS cord ends with an old-style 9-pin D-Sub serial port which connects to the serial cable of compatible GPS units to record your position into the headers of images. You’ll need a GPS which conforms to version 2.01 or 3.01 of the NMEA0183 specification and Nikon confirms compatibility with certain Garmin eTrex and Geko devices.
It’s nice to have built-in GPS connectivity, but a shame not to allow the direct connection of newer models with a standard USB cable rather than requiring an optional cord and messy-looking 9-pin D-Sub coupling.


