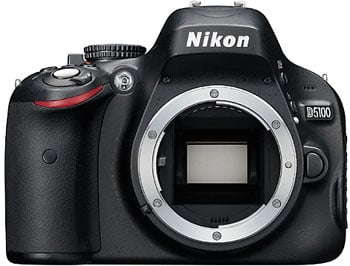
Nikon D5100
-
-
Written by Gordon Laing
In depth
Nikon D5100 design and controls
 | |
Nikon’s also managed to reduce the body plus battery weight from 611g to 558g. Revealingly this makes it fractionally lighter than its big rival, the Canon EOS 600D / Rebel T3i, and measuring 128x97x79mm, it’s also a little smaller in every dimension; the Canon measures 133x100x80mm and weighs 570g including battery. Both the D5100 and EOS 600D / T3i remain slightly larger and heavier than the Sony Alpha SLT-A55 though, which measures 124x92x85mm and weighs just 500g with battery.
 |
During my tests with the Nikon D5100, I always had the Canon EOS 600D / T3i on hand for comparisons. In terms of weight and build quality, there’s essentially nothing in it, and while the D5100 does look a fraction smaller overall, it’s not a sufficient difference to let it squeeze into smaller bags or pockets. In your hands though the two bodies do however feel quite different.
Like previous Nikon DSLRs, the D5100 employs a subtly indented groove on the inside of its grip, which provides a satisfyingly secure feel. Neither camera is sufficiently tall for a grip to accommodate all four fingers, but a few mm extra on the Canon means your little finger is left dangling a little less than the Nikon; note both feature IR sensors in their grips, although the Canon lacks the D5100’s rear IR sensor. Round the back, both cameras feature a corner bulge to push your thumb against, but this time it’s the Canon with the more pronounced and effective design. Each camera clads their grips and thumb rests with textured rubber surfaces, although Nikon’s is much finer than the Canon. Which feels better is down to personal preference, but the coarser surface of the Canon’s coating, along with its slightly taller grip and more pronounced thumb rest felt better to me overall. As always I’d recommend you pick up both cameras for yourself before buying.
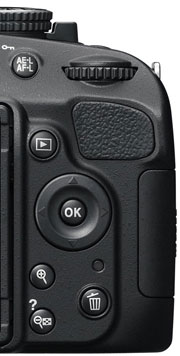 |
The D5100’s new side-hinged screen has unsurprisingly resulted in a rearrangement of some controls from its predecessor, most notably the five buttons which were previously on the left side of the screen are now relocated across the body. The Menu and ‘i’ buttons now flank the viewfinder. The Play button is repositioned where the old Live View button was, to the right of the screen, while the magnify in and out buttons can now be found under the rocker pad.
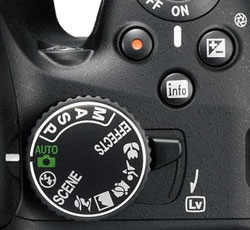
The earlier Live View button has been swapped for a new spring-loaded lever around the mode dial, and a new dedicated record button positioned by the shutter release. The mode dial itself is identical to the D5000, but one of the scene presets has been switched for a new EFFECTS position, which as its name suggests allows you to access a variety of special effects, more of which later.
Of the new controls, the Live View lever enjoys a satisfying flick operation, although arguably the drive mode lever of the cheaper D3100 would have been a better choice for the target audience – lest we forget, the D3100 also sported a spring-loaded lever to enter Live View, but on the back instead of the top.
For me though, the most important omission is the continued lack of dedicated buttons to adjust common settings like the ISO, White Balance and AF mode. In contrast, the Canon EOS 600D / T3i offers direct access to all of these without actually having any more buttons on its top and rear. I understand Nikon’s desire to keep the D5100 simple, but the number of buttons on both cameras is equally intimidating to beginners, and the only real difference between them is labelling and function. I’ll forgive it on the entry-level D3100, but by the time you’re dealing with the D5100, I’d say the typical buyer would appreciate direct access.
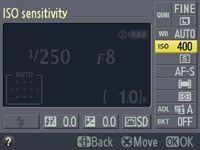 | 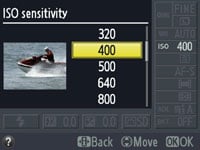 |
Instead owners of the D5100 are still forced to go through an on-screen interface which can be infuriatingly slow to make multiple adjustments. This involves first pressing the i button by the side of the viewfinder which allows you to then move a yellow highlighter over the various settings running down the right side and along the bottom of the screen. Once the desired item is highlighted, you then press the OK button to present a dedicated menu from which you can choose the required setting. As before, these are accompanied by a thumbnail photo showing a typical use for that setting – such as an indoor shot for a high ISO setting.
So far, so friendly, but like the models before it, this system can prove infuriatingly slow to navigate. While the different settings are arranged in a backwards L shape, they’re effectively navigated like a single long line, so if you have the release mode highlighted, it’ll take you several clicks to move along to, say, the bracketing option. This is in contrast to the on-screen navigation systems of Canon and Olympus where the items are arranged as a grid with only a couple of clicks between any of them. And unlike those models, once the desired item is highlighted, there’s no shortcut where you can simply turn the thumb dial to adjust it quickly – instead you need to press OK and do it from the menu.
Offering small relief is the self-timer button on the side of the body, which can be reprogrammed to offer direct access to release mode, image quality, sensitivity, white balance, Active D-Lighting, HDR mode, RAW and Auto Bracketing. But once you reconfigure this button you’ll find yourself wishing Nikon had fitted the D3100’s release mode lever. It’s also worth mentioning there’s still no optical depth-of-field preview button, unlike the Canon EOS 600D / T3i.
 | |
|---|---|
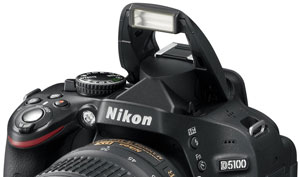
The Nikon D5100 is equipped with both a popup flash with a Guide number of 12 and a hotshoe for external flashguns; the maximum sync speed is 1/200. Flash compensation and power level is adjustable, and you can also choose from red-eye, slow-sync and rear-curtain options. The built-in flash Guide number increases to 13 with manual control, which matches that of the Canon EOS 600D / T3i. The D5100’s built-in flash can either popup automatically or by pressing a button on the side of the head, and once you’re finished with it, just push it back into place.
If you mount a compatible flashgun like the SB-400, SB-600, SB-700, SB-800 or SB-900, the D5100 can support the Nikon Creative Lighting System (CLS) which offers iTTL control. The D5100 is however lacking the wireless flash control of the Canon EOS 600D / T3i.
On the right side of the body (as it’s held for shooting) you’ll find an SD memory card slot that’s now compatible with the latest SDXC standard in addition to SD and SDHC. Cards rated as Class 6 or faster are recommended for the HD movie mode.
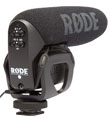
On the left side of the body you’ll find four ports behind a large flap. Like its predecessor you’ll find a combined USB and analogue AV output, a Mini HDMI port and a proprietary connector for the optional MC-DC2 wired remote control or GP-1 GPS unit. New to the D5100 over its predecessor is the addition of a 3.5mm jack to connect an external microphone, such as Nikon’s own ME-1 or a third party model like the Rode Video Mic Pro. This is a significant improvement over the D5000, although brings it in line with Canon’s EOS 600D / T3i. Returning to the HDMI port, it outputs a maximum of 720p during Live View, although we couldn’t detect a signal once you start recording video (not even through the standard AV port either), which eliminates the possibility of driving an external HD monitor while filming. The EOS 600D / T3i’s HDMI port outputs up to 1080i during Live View, and degrades it to 480p while filming, while also always keeping the AV output active.
In a compartment underneath the body you’ll find the rechargeable EN-EL14 Lithium Ion battery pack first introduced with the D3100, rated at 1030mAh and good for around 660 shots under CIPA conditions, up from the 510 of the D5000. These figures don’t however take Live View, movie recording, continuous AF, VR lenses or even RAW recording into consideration, and in general-use I found I could easily deplete the battery after a good day’s shooting; heavy use of video in particular drained the battery, although to be fair, the D5100 is no different to most in this regard, other than perhaps greater use of continuous AF. Battery life is shown on-screen using a three segment indicator, but unlike higher-end models in the range, there’s no menu showing a precise percentage of remaining charge.
Nikon D5100 viewfinder
 |
The Nikon D5100 employs a penta-mirror optical viewfinder with the same specification as its predecessor: 95% coverage with a relatively small 0.78x magnification. The Canon EOS 600D / T3i shares the same coverage, although a larger 0.85x magnification. This sounds like a clear win for the Canon, although thanks to its fractionally smaller sensor, the difference isn’t as great as it at first sounds. With both cameras side-by-side you will notice the EOS 600D / T3i’s optical viewfinder delivers a slightly bigger image area, but not sufficiently so to make a significant difference in use.
The D5100 also shares the same 11-point AF system as its predecessor, with the same arrangement through the viewfinder, although in a disappointing downgrade, the on-demand LCD grid lines and AF markers are no longer present. Instead, like the D3100 and Canon EOS 600D / T3i, the D5100 employs fixed AF markings on its AF screen and no opportunity for an alignment grid – through the viewfinder anyway. I understand Nikon’s desire to distance the D5100 from the next model up, but it’s always a shame for a new model to be a downgrade in some respect from its predecessor, and the on-demand viewfinder graphics were always a neat advantage Nikon had over the competition.
The LCD graphics may have gone, but the information running below the viewfinder image hasn’t changed. This means the D5100 still doesn’t show the ISO sensitivity at all times. It is possible to switch the shots remaining for the ISO from a custom menu, but you can’t have both displayed at the same time. This may not be a big issue for the D5100’s target audience, but it’s revealing Canon shows the ISO value at all times, albeit alongside a buffer figure rather than the total shots remaining.
Nikon D5100 screen and menus
Nikon may have removed the LCD grid from the D5100’s viewfinder, but has more than made up for it with the new screen. First the panel itself, which at 3in and 921k pixels, is both larger and considerably more detailed than the 2.7in / 230k monitor on the D5000. This brings the D5100 in-line with models like the D90 and D7000 and is a very welcome upgrade.
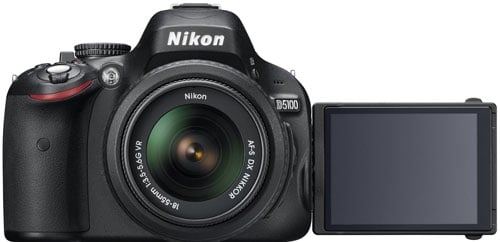 |
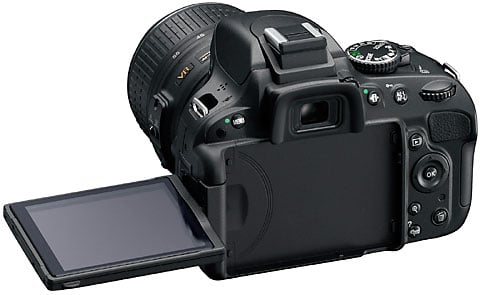
Like its predecessor, the screen is fully articulated – indeed the D5100 remains the only Nikon DSLR in the current range to feature an articulated screen. There has however been an important change with the screen on the D5100 now hinged at the side rather than the bottom. This sounds like a minor point, but I found the bottom-mounted hinge on the earlier D5000 very inconvenient at times, especially when mounted on a tripod or resting on any platform where the screen couldn’t be turned to face the subject. This arguably defeated much of the flexibility of having an articulated screen in the first place, so I’m now very pleased to find the D5100’s screen hinged at the side – just like Canon and Panasonic, so now it’s only Sony which needs convincing to make the change. Hinging the screen at the side has also allowed Nikon to significantly reduce the height of the camera body, and few will miss the relocation of the buttons which previously ran down the left side of the screen.
 |
In use the D5100’s screen can be flipped and twisted to any angle, allowing you to easily and comfortably compose at very low angles, waist-height or over the heads of crowds and fences. It’s also easy to flip it around to face the subject for self-portraits, and of course fold it back on itself for protection. Of course the benefit only applies to shooting stills in Live View or filming movies, so if you’re strictly a stills photographer with the viewfinder, you’ll wonder what all the fuss is about – but for those who shoot in Live View even occasionally, or more importantly, film video, the articulated screen is a boon to productivity and creativity.
So far so good, but it’s important to compare with the competition. Canon’s EOS 600D / T3i also features a side-mounted, fully articulated 3in high resolution screen, but there’s an important difference with the panel. Nikon uses a 4:3 shaped 921k monitor, which means photos taken at the camera’s native 3:2 aspect ratio won’t fill the vertical height of the screen. In playback, they’re positioned centrally with thin black bars above and below, while in Live View the image is pushed up to the top with a thicker black bar running below for shooting information. This means of the screen’s 640×480 pixel resolution, 3:2 images in Live View or playback will only measure 640×426 pixels and 2.8in on their diagonal. Meanwhile 16:9 video will measure 640×360 pixels and 2.7in on the diagonal.
In contrast the Canon EOS 600D / T3i (along with the 550D / T2i before it), features a slightly wider 3:2 shaped screen which matches the native shape of the still images. It’s also slightly higher resolution at 720×480 pixels. So when you’re dealing with 3:2 shaped photos, either in playback or Live View, they’ll exploit the full 720×480 pixel resolution and fill the entire 3in screen without borders. This makes for a bigger and more detailed image, and the wider shape also benefits movies, where 16:9 footage has thinner black bars than on a 4:3 screen, measuring 720×405 pixels and 2.9in on their diagonal. In use I’d say this gives the EOS 600D / T3i a small advantage over the D5100, as not only is the larger image nicer to look at, but combined with the finer resolution, it’s also a little easier to manually focus.
To enter Live View on the D5100, you flick the spring-loaded lever around the mode dial – this control has a classy and satisfyingly tactile feel to it compared to a plain button. A second flick of the lever will exit Live View unless the built-in timer does it for you first.
When first entering Live View you may notice the timer in the upper left corner counting down from 30 seconds. Pressing any button will effectively reset the counter back to 30, but once it hits zero, the camera will exit Live View. Nikon doesn’t state whether this is to save power or prevent overheating, but the manual does say it may not appear straightaway. I’m not sure when it wouldn’t appear though, as it started counting down almost every single time I entered Live View throughout my testing period during Queenstown’s brisk Autumnal weather. When attempting fine adjustments on a tripod, I frequently found the D5100’s 30 second Live View timer a little hasty and somewhat off-putting. A half-press of the shutter release may have reset it, but it did feel like the camera was constantly telling me to ‘hurry up!’
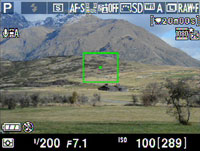 | 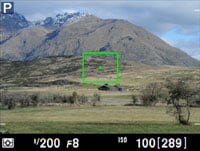 | 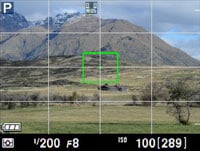 |
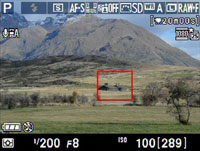
Pressing the Info button by the shutter release cycles through three display options: the default view shows basic shooting information in a black bar below the live image, with additional details super-imposed at the top. The second view removes the super-imposed details for a clean view of the image with basic exposure details below. Finally, the third view super-imposes a four-by-four alignment grid. Like other non-pro Nikon bodies, there’s still no live histogram, which seems a daft ommission when Canon offers it across its range including on the entry-level EOS 1100D / T3.
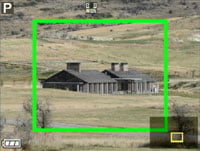
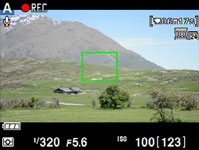
If you’re shooting in Auto, the D5100 exploits Live View to offer scene detection, picking from Portrait, Landscape, Close-up and Night Portrait presets, or reverting to plain Auto for subjects which aren’t recognised.
 |  |  |
Pressing the magnifying glass button allows you to zoom-in on the view using multiple steps up to about 7.7x, which on the 640×480 screen represents a 100% (1:1) view. On the Canon EOS 600D / T3i, there’s just two magnification options, 5x and 10x, the latter showing an area that’s one tenth the width of the full image as you’d expect, but then scales this 518 pixel wide crop to fill the 720 pixel width of the monitor. So the 10x mode on the Canon actually appears to be operating at greater than 1:1 magnification. Certainly this coupled with a slightly higher sensor resolution results in a tighter view on the Canon when both cameras are fully zoomed-in using Live View. In use then you’d expect the Nikon to deliver the crisper view, but even taking the magnification and sensor resolution into account, it’s actually the Canon which shows finer details in its maximum Live View magnification mode. With both cameras side-by-side, the magnified view from the EOS 600D / T3i is ultimately preferred, but the views on both cameras certainly allow precision focusing and confirmation. The D5000 matches the higher-end D7000 in this regard and as such is a big step-up from the D3100, D5000 and D90, which all delivered quite fuzzy views when zoomed-in during Live View.
 |
 |
 |
|
Pressing the ‘i’ button swaps the live image for the ‘classic’ information view which is also available when shooting with the viewfinder; note the shutter remains open at this time, but the live image is hidden. As before this shows the basic exposure details in a rectangle with numerous settings running down the right side, and in a strip below. You can then use the rocker control to highlight the desired option before pressing OK to see a dedicated menu for it. Pressing the ‘i’ button again returns you to the live image.
Autofocus during Live View exclusively employs a contrast-based system to ensure an uninterrupted view – unlike Canon’s DSLRs, there’s no alternative ‘Quick’ mode which temporarily interrupts the live image in order to take a reading from the phase-change system. To be honest I don’t miss this option, as by the time the mirror has flipped back and forth, it’s rarely significantly quicker, and besides, a contrast-based system avoids any focus calibration errors by taking a reading from the sensor itself.
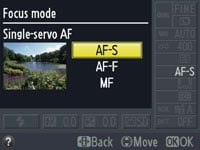
With the D5100 set to AF-S ‘Single-servo AF’, it will attempt to focus on whatever is within an adjustable rectangle with a half-press of the shutter release. The AF frame starts-off red to indicate it’s not in focus, then flashes green as it locks-on, before finally becoming steady once focus has been achieved. Like the D3100 and D5000 before it, this process involves a little searching back and forth by the lens, before locking-on roughly two seconds later. Sometimes it’s a little quicker, sometimes a little slower.
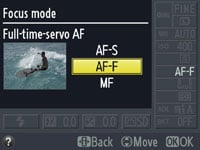
New to the D5100 over its predecessor, not to mention most DSLRs to date, is an attempt to offer continuous contrast-based autofocus during Live View. Inherited from the D3100 and D7000, this AF-F ‘Full-time Servo AF’ mode performs the process described above by itself whenever it believes the subject behind the AF frame is not in focus. Point the camera at a new subject and you’ll see the lens automatically search back and forth as it locks-on. Generally speaking it works fairly well too, so long as the subject has sufficient detail for the contrast-based system to lock-onto and stays still long enough for the process to complete. It’s technically no quicker than doing it with a half-press of the shutter release in AF-S mode, but could prove faster in practice as the camera’s already started the job as you compose. The AF-F mode is also responsible for the continuous AF in the movie mode which we’ll describe on the Features page.
In terms of AF targets and areas, the D5100 offers the same four options as the D5000 and D3100 before it: there’s Face Priority, Wide Area (the default option), Normal Area, and Subject Tracking. Wide and Normal Area will autofocus on a framed area which you can move around the screen using the multi-selector; the Normal Area mode uses a smaller frame and is better suited to tripod-based work. Face Priority can track faces and focus on the closest; like compact cameras, frames are shown around the active faces. Subject Tracking allows you to place a frame over a subject, and after pushing the OK button, the D5100 will follow it around the frame.
 |  |  |
On previous models, Face Priority and Subject Tracking were of limited use, as while the camera could keep a frame over the desired subject, it wouldn’t actually focus on it until you half-pressed the shutter release. Now with the new AF-F mode, the camera can at least attempt to stay focused on the subject by itself as it moves closer toward you or further away. Of course the practicality remains restricted by the speed of the AF-F mode, which can take several seconds to make a readjustment and obviously requires the subject to remain fairly static during that time. This rules-out fast action tracking or unpredictable people, but slower motion or people who are willing to hold a pose are within the capabilities of the camera.
Ultimately the AF-F mode is a brave attempt to offer continuous AF with a contrast-based Live View system, but it’s too slow for many applications, especially sports or kids who won’t stay still for long. Of course both subjects can be successfully captured with the D5100’s viewfinder and phase-change AF system, but if you insist on going after them in Live View, you’ll be much better off with a hybrid system like those offered on many of Sony’s current models. Take the SLT-A33 for instance, which quickly and confidently autofocuses in Live View thanks to a translucent mirror exploiting the phase-change AF system.
Nikon D5100 shooting information and menus
Like other budget DSLRs, the D5100’s screen is used to display all shooting information, and like its predecessor, there’s the choice of two presentation styles: the default Graphic format accompanies the figures with a graphical representation of the aperture iris surrounded by marks for the shutter speed, while the optional Classic format emulates the LCD status screens which adorn the top panels of higher-end DSLRs. It’s nice to have the choice of styles and you can even customise the colour scheme: Blue, Black or Orange for the Classic view, or Green, Black or Brown for the Graphic view.
 |  |  |
 |  | 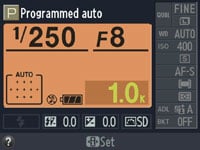 |
Like all DSLRs which use their main colour screens to show information, there’s a wealth of details, with the layout essentially unchanged since the D3000. The shutter speed and aperture sensibly take centre stage with shooting mode, battery life and a number of other icons running along the top, while AF area, flash, exposure and flash compensation run along the bottom. The shots remaining figure has been relocated to the very lower right corner in a light strip, and like all Nikon DSLRs, numbers above 1000 are abbreviated with a k – so 1100 shots is displayed as 1.1k, whereas Canon continues to stop at 999.
| |
Running down the right side of the screen are the current quality, white balance, ISO, release mode, AF mode, AF area, metering mode, bracketing and Active D-Lighting settings. To adjust any of the settings, simply press the ‘i’ button in the bottom left corner. This highlights one of the settings in yellow after which you can use the four-way rocker to highlight the desired option before clicking OK to see a screen of relevant options; each option is accompanied by a thumbnail image illustrating how or where you might use that setting.
The thumbnails are certainly helpful, but the number of button presses to access each setting can be a little laborious to say the least. For example, if the last setting you changed was the compression level, you’ll need three clicks to reach ISO or seven for metering. This could have been so much easier by either assigning double-functions to the rocker control or simply rearranging the settings into a grid rather than a long straight line. The latter, employed by almost every other DSLR, would have transformed the speed at which the D5100 could be operated and adjusted. To be fair, its target audience may rarely change any of these settings, or be happy to do so at a leisurely pace, but enthusiasts or those familiar with the camera will find quickly find this frustrating. Nikon clearly believes its approach is perfectly adequate though as it’s been in place for some years now, essentially unchanged.
 |
Some relief can be found with the programmable Self-timer / Fn button on the side of the viewfinder head, which can be set to offer direct access to the Self-timer, release mode, Image quality, ISO sensitivity, White Balance, Active D-Lighting, HDR mode, +RAW option and Auto bracketing, but the D5100 could still be improved by leaps and bounds with a grid-based user interface on the screen.
In a nice feature originally borrowed from Sony’s Alpha DSLRs though (and from Konica Minolta before that), the D5100 rotates its shooting information as you turn the camera on its sides for portrait aspect shots – this way the text always remains upright on the screen. The graphical representation of the aperture may disappear as the screen rotates, and as soon as you press the ‘i’ button to change anything you’ll also be returned to the landscape orientation, but it’s still a nice touch. In these respects, it’s the same as models dating back to the D3000.
Like its predecessor, the D5100 has also sensibly retained the context-sensitive help system which displays handy hints on the current setting or menu whenever you press the Question mark button. Sometimes you’ll see the question mark blinking in the corner of the screen, in which case the D5100 believes something’s wrong and wants to make a suggestion, such as to use the flash. If only all cameras were this friendly.
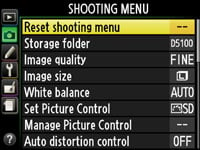
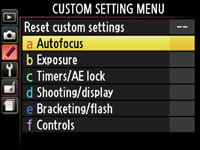
Pressing the Menu button presents the full array of options, arranged into six categories tabbed along the left side of the screen; the six menu categories, not to mention most of their contents, remain similar to the D5000, although they enjoy a redesigned appearance. The six sections cover options for Playback, Shooting, Custom Settings, Setup, Retouch, and Recent Settings.
The D5100 may be aimed at beginners, but there’s still a wealth of options to adjust if desired, with 20 custom settings including flash control, assignment of the Fn button and whether ISO should take the place of shots remaining in the viewfinder. Again, any questions, just press the question mark button for help at any time.
 |  |  |
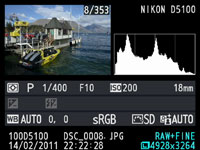
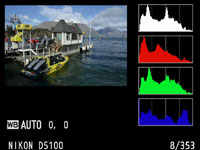
During playback you can cycle through a number of pages which match the detail of Nikon’s higher-end bodies. As such with all Display options ticked, you can view three pages of shooting information, a thumbnail with either brightness or RGB histograms, or the main image by itself, presented either clean or with blinking highlights.
 |  |  |
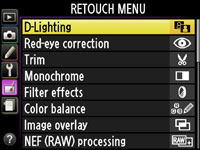
The Retouch menu offers a variety of in-camera adjustments which include D-Lighting, red-eye correction, crop, various filter effects, colour balance, image overlay, RAW processing, distortion control, an outlining effect and a Miniature option which throws everything other than a narrow strip out of focus for a tilt and shift effect. You’ll also find the new Colour Outline, Colour Sketch and Selective Colour options here.
 |  |  |
Now let’s move onto the camera’s other features, including the kit lens, focusing, exposure and drive modes, the sensor and of course the new movie mode in our Nikon D5100 Features page.
Nikon D5100 lenses, focus, sensor and drive
 | |
|---|---|
The Nikon D5100 has an F-mount which can accommodate most Nikkor lenses, with the DX-format sensor resulting in their field of view being reduced by 1.5 times; so the DX 18-55mm VR kit lens delivers an effective focal range of 27-83mm.
As with all Nikon DSLRs, you’ll need recent lenses to support the full focusing and metering modes. There’s a compatibility chart in the D5100 manual or specification sheets, but just briefly you’ll need a Type G or D AF (including AF-S and AF-I) Nikkor to support all functions including the most sophisticated 3D Colour Matrix Metering II system.
 |
Like the D40(x), D60, D3000, D3100 and D5000 before it, the D5100 does not feature a built-in motor required to auto-focus older lenses. These lenses will still work on the D5100, but they become manual-focus only. The D5100 will only auto-focus with AF-S or AF-I CPU lenses from the Nikkor range. If you want autofocus from third party lenses, look for models with built-in focusing motors like Sigma’s HSM series.
Like its predecessors, Nikon omitted the AF motor to save size, weight and cost, and while its absence will frustrate enthusiasts who want to use older lenses, it’s less of an issue for the D5100’s target audience which will mostly buy newer AF-S models.
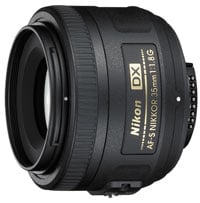
Nikon’s steadily releasing more and more AF-S lenses including a number of new primes. A great complement for a kit zoom is the Nikkor AF-S DX 35mm f1.8 which delivers standard coverage, a bright aperture and very respectable image quality at a low price; see our Nikkor DX 35mm f1.8 lens review for full details. If the lack of a focusing motor really is a deal-breaker for you though, trade-up to the D7000 (or an older D90) instead.
The Nikon D5100 is typically sold in a kit with the Nikkor DX 18-55mm VR lens. The VR stands for Vibration Reduction and provides the lens with anti-shake capabilities which you can see through the viewfinder, although with a longest equivalent focal length of 83mm, any wobbling isn’t that obvious. We found the lens stabilisation was good for around three stops of compensation in practice.
Nikon D5100 focusing
Nikon’s D5100 inherits the same 11-point AF system as its predecessor, along with the D3100 and D90. This employs the same Multi-CAM 1000 module with a single cross-type sensor, and the options appear to be identical. As such there’s three main AF modes: AF-S (Single Servo AF), AF-C (Continuous Servo AF) and AF-A (an Auto mode which selects between them depending on whether the subject is in motion – this is the default option). These are selected from the main information display screen, where you’ll also be offered a Manual focusing option.
Unlike many affordable DSLRs which strobe their built-in flashes for AF assistance, the D5100 employs a dedicated lamp – it’s pretty bright, but much more discreet than the flickering flashes of Canon’s models.
 |
 |
 |
 |
|
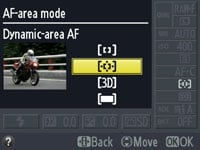
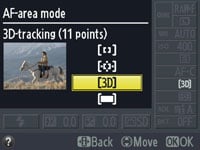
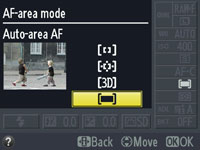
Like the D5000 before it, there’s four AF Area modes: Single Point, Dynamic Area, Auto Area, and 3D Tracking (the latter only available in AF-A and AF-C modes). In Single and Dynamic Area, you can manually adjust the focusing point using the rocker control, with Dynamic Area also considering surrounding focus points if the subject moves. In Auto Area, the D5100 chooses the focus point automatically.
With 3D Tracking, you manually select a focusing point and place it over the desired subject. With the shutter-release half-pressed, the D5100 will then attempt to keep this subject in focus even if you recompose the shot. 3D Tracking also exploits colour information to help track a subject, although obviously if it’s the same colour as the background, the system will become confused. Nikon recommends using Dynamic Area for erratically moving subjects, and 3D Tracking when recomposing photos with relatively static subjects.
We’ve detailed the Live View auto-focusing options on the previous Design page, but just briefly here, the D5100 exclusively relies on contrast-based AF in Live View, with the choice of four modes: Normal Area, Wide Area, Face Priority and Subject Tracking. Inherited from the D3100 and D7000, and new over its predecessor though is the choice of AF-S (Single) or AF-F (Full-time Servo) in Live View, where the latter attempts to continuously autofocus – again we have full details in our Live View section on the previous page.
Returning to the main 11-point phase-change AF system, the D5100 unsurprisingly performs identically to the D3100, D5000 and D90 before it. Set to the default Auto Area it generally does a good job of recognising the primary subject and locking the lens onto it, with the active AF points highlighted – albeit with red lights as opposed to the LCD graphics of the D5000 and D90. In Dynamic mode with AF-C, subjects placed under the manually chosen focus point are tracked effectively as they move towards or away from the camera.
Finally, the 3D Tracking option was effective at following subjects moving around the frame or as you recomposed with a static subject. This worked particularly well with strongly coloured subjects which stood out from the background, although as Nikon recommended, it’s best-suited to more leisurely motion. Technologically it’s also fun to watch the active AF point follow the subject around the frame, at least in the area covered by the 11 points, although in this regard Nikon’s higher-end models with their 39 and 51-point AF systems are ultimately more impressive.
As with all DSLRs which offer a variety of AF options, it’s a case of experimenting to see which works best for your particular application. But if you’re shooting a subject in motion and can keep it within the diamond area covered by the 11 AF points, the D5100’s Dynamic Area and 3D Tracking modes should keep it sharp. The only caveat is the supplied DX 18-55mm VR kit lens which as we’ve seen before is neither the quickest nor the quietest focuser in the range. If you demand snappier performance, or something quieter when recording movies, upgrade to a better model.
Is the D5100’s 11-point AF system superior to the 9-point AF system of the Canon EOS 600D / T3i? In my time shooting with both cameras side-by-side, there was no perceptible difference in speed or accuracy. If a small subject were to pass between the outer pairs of AF points, the D5100 would have an intermediate point to fall back on, but for most situations I’d rank both as being roughly equivalent in phase-change AF performance. This was certainly the case when shooting the Shotover Jet boats zooming past, and speaking of which, here’s a burst of ten frames grabbed from a continuous sequence with the D5100; I also have a full-res action sample in the Gallery.
 |  |  |  |  | ||||
 |  |  |  |  |
Finally, an interesting feature inherited from the D5000 is the Rangefinder option, enabled in the Custom Function menu. This uses the exposure compensation scale in the viewfinder (but not on the main screen) to indicate focus distance while manually focusing. As you approach perfect focus, the scale reduces to just two markers either side of zero. As you’d expect for a camera at this price-point though, there’s no AF micro-adjustment; the EOS 600D / T3i doesn’t offer this either.
Nikon D5100 exposure modes and metering
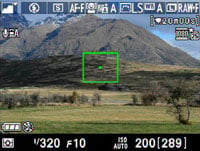 |
The Nikon D5100 shares the same exposure modes as its predecessor, with one addition. The main dial offers the traditional PASM modes, along with direct access to five scene presets, flash off, full Auto (with scene detection in Live View, see screenshot right), a SCENE position which presents access to 11 further presets, and new to the D5100, an EFFECTS mode, more of which in a moment. There’s no movie mode position on the dial as you can start shooting in any mode by simply entering Live View then pressing the red button by the shutter release.
| |
|---|---|
The D5100 offers shutter speeds between 1/4000 to 30 seconds with a Bulb option in Manual; Program Shift is also available. Exposure compensation is available in a broader than average range of +/-5EV, and basic bracketing is offered with three frames in steps between 0.3 and 2EV, but at least it is available as the D3100 has none. White Balance and Active D-Lighting bracketing is also available. I understand the shutter block is rated to the same 100,000 actuations as its predecessor.
The Nikon D5100 shares the same three metering modes as the D3100 and D5000 before it: Spot, Centre-weighted and 3D Colour Matrix II, the latter employing a 420-segment RGB sensor. Like most settings on the D5100, these are adjusted through the main information screen system. Note you’ll need a type G or D lens to deliver distance information for the 3D system, otherwise the D5100 falls back on Colour Matrix Metering II. I found 3D Matrix metering on the D5100 delivered consistently accurate exposures, and refreshingly unlike many Nikon DSLRs I’ve tested, wasn’t fooled by extremely bright scenes like our outdoor resolution test.
Regardless of your shooting mode, the D5100 is a very friendly camera. Like its predecessor, the D5100 has sensibly retained the context-sensitive help system which displays handy hints on the current setting or menu whenever you press the Question mark button. Sometimes you’ll see the question mark blinking in the corner of the screen, in which case the D5100 believes something’s wrong and wants to make a suggestion, such as to use the flash. If only all cameras were this friendly.
Nikon D5100 sensor and processing
In a major upgrade over its predecessor, the D5100 employs the same 16.2 Megapixel CMOS sensor as the higher-end D7000. This gives the D5100 four extra Megapixels over its predecessor. The DX-format sensor measures 23.6×15.6mm, so all lenses effectively have their field-of-view reduced by 1.5 times. The D5100 delivers 3:2 shaped images with a maximum size of 4928×3264 pixels, giving it 640 pixels more horizontally and 416 more vertically than its predecessor – this in turn allows you to make prints measuring 16.4×10.9in at 300dpi, or around a couple of inches bigger than the D5000.
 |  |
|  |
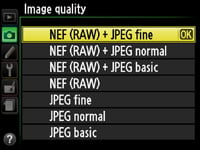
Images can be saved with Basic, Normal or Fine JPEG compression, or recorded as a 14-bit compressed RAW file either by itself or accompanied with a JPEG, again at any of the three compression levels. It’s a welcome upgrade to have 14-bit tonal range on RAW files over the 12-bits of its predecessor. Best quality Large Fine JPEGs typically measure around 7MB each, while RAW files measure around 17MB each.
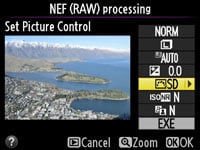
Like Nikon’s other consumer DSLRs, there’s only basic software supplied for converting RAW files – you’ll need to invest in Capture NX 2 or third party software to perform more sophisticated processing. On the upside, the D5100 allows processing of RAW files in-camera, allowing you to adjust the resolution, compression, white balance, exposure compensation and, via the Picture Control, the sharpness, contrast, saturation, brightness and hue.
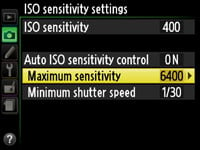
Unsurprisingly, sharing the same sensor as the D7000 means the D5100 also shares the same sensitivity range, from 100 to 6400 ISO with Hi 1 and Hi 2 options delivering equivalents of 12,800 and 25,600 ISO; new to the D5100 over any previous Nikon DSLR is the Night Vision EFFECT mode which can operate at up to Hi 4, or 102,400 ISO.
An Auto ISO option allows you to enter a maximum sensitivity and minimum shutter speed, and if enabled, will kick-in for PASM modes when the selected sensitivity fails to allow the desired shutter speed. Auto ISO is the fixed option for the Auto exposure modes. It’s worth keeping an eye on the ISOs selected in Auto mode as the D5100 can often opt for higher values than you’d prefer; a quick reduction in the maximum sensitivity can fix that if desired.
High ISO Noise reduction is available in the choice of four settings: Low, Normal (the default), High, and Off, although even when ‘Off’, there’s some noise reduction applied at 1600 ISO and above. You can see how the same image looks at all sensitivities in the Nikon D5100 High ISO Noise results pages.
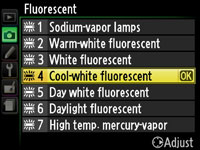 |  |
Image processing duties are carried out by Nikon’s EXPEED 2 processor. White Balance can be set to Auto, Incandescent, Fluorescent, Direct Sunlight, Flash, Cloudy, Shade or a custom preset. The D7000’s manual entry of colour temperature is not available here, but the impressive choice of seven Fluorescent sub-categories remains present, as do the fine tuning facilities for the other presets.
Like other recent Nikon DSLRs, EXPEED 2 automatically removes – or at least greatly reduces – the effect of lateral chromatic aberrations, also known as purple fringing. This correction is applied automatically to all JPEG files whether you like it or not, but not to RAW files; it’s very effective in practice as you can see by the absence of fringing in our samples and results images. This really gives the D5100 an edge over any of Canon’s DSLRs, none of which offer automatic corrections of fringing in-camera; the higher-end EOS 60D’s option to do so when processing RAW files is a step in the right direction, but it really needs to be done automatically on JPEGs.
The Vignette control of higher-end models is still not available in-camera (although it can be applied using Capture NX 2), but the D5100 inherits the D5000’s Auto Distortion Control. This applies digital correction for barrel and pincushion geometric distortion, where straight lines can appear to bend outwards or inwards towards the edge of the frame. It would appear to be the same option offered in the Playback Retouch menu, but applied automatically to JPEGs as they’re generated. It’s visually impressive at reduced sizes, but remember such adjustments involve significant pixel-wrangling with potential loss of quality or a slightly cropped image. It’s sensibly disabled by default.
The D5100’s Retouch section also offers Perspective control to straighten the converging edges of subjects when the camera’s pointed upwards – although again like Distortion control, this will stretch portions of the image with quality artefacts as a result.
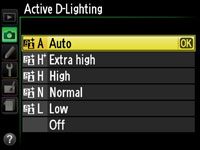 |
The headline processing feature remains Active D-Lighting which adjusts the tonal curve of images in an attempt to boost darker areas without blowing highlights. Unlike Nikon’s earlier D-Lighting system, the Active version applies the adjustments to JPEG files as they’re being processed, although normal D-Lighting is still offered in the Retouch menu for existing images.
The D5100 inherits the six settings of its predecessor: Off, Low, Normal, High, Extra High or Auto. Auto is the default option, so the one I used in the main Results and Gallery pages, however since it can introduce noise to dark areas, I disabled it for the High ISO Noise results page.
Active D-Lighting preserves highlight areas by first reducing the exposure slightly, then boosting the darker areas with a tone curve. You can see two examples of this below taken with the D5100 in Aperture Priority at f8 and 100 ISO. The first image, on the left side is a normal exposure without Active D-Lighting, where the camera metered a shutter speed of 1.6 seconds. To the right is an image taken with Active D-Lighting set to its maximum setting of Extra High, which with the same aperture and sensitivity resulted in a faster exposure of 1/1.6 of a second.
Nikon D5100 Active D-Lighting: Disabled | Nikon D5100 Active D-Lighting: Extra High | |
 |  | |
 |  | |
1.6 seconds, f8, 100 ISO | 1/1.6, f8, 100 ISO |
In this example, the most obvious difference is in the windows, where the shorter exposure of the version with Extra High Active D-Lighting has clearly retained more highlight detail, which was washed-out on the version without. There’s also a small boost in mid and shadow tones, but not sufficiently so to reveal much extra detail in the darker areas. Boosting shadow areas, especially in conjunction with a shorter exposure, inevitably increases noise though, and this has become more apparent in the dark areas.
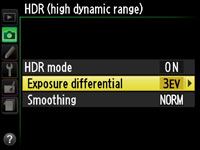 | 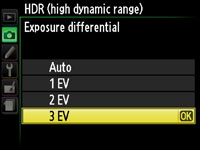 | 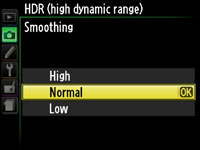 |
Making its debut on the D5100 is a new HDR option. HDR stands for High Dynamic Range, a technique which stacks multiple exposures of the same subject in an attempt to preserve both shadow and highlight details. The D5100’s HDR mode takes just two exposures (JPEGs only, RAW not allowed), but allows you to choose from either an Auto adjustment of exposure, or a set value of 1, 2 or 3EV apart; you can additionally choose from Low, Normal or High Smoothing. Unlike Sony’s handheld HDR option, the D5100’s HDR is best-performed on a tripod. Note Canon’s EOS 600D / T3i does not offer an in-camera HDR option.
The shots below were taken moments after those above for Active D-Lighting, so are absolutely comparable. The version with +1EV difference between the two exposures shows a boost in mid tones, lightening the overall image, but with little benefit to the dark shadow and bright highlight areas. The version with the maximum 3EV difference is much more dramatic, with noticeably brightened mid-tone and shadow areas; indeed the histogram looks completely different. Revealingly neither of the HDR samples has retrieved as much highlight detail as the single exposure with Extra High Active D-Lighting. This suggests one of the two HDR exposures is simply normal and the other is with positive compensation to lift shadows – so there’s little or no highlight protection by default.
In order to better preserve highlight detail with this HDR mode, you’ll need to expose to protect the brighter regions, say, by applying a little negative exposure compensation. That will take care of the saturated highlights, leaving the HDR double exposure to boost the darker areas. So with a little practice and experimentation, the HDR mode can certainly broaden the dynamic range of a shot, although like all auto HDR modes, it’s no substitute for taking multiple frames and assembling them manually with masking later.
Nikon D5100 HDR mode: +1EV with Normal Smoothing | Nikon D5100 HDR mode: +3EV with Normal Smoothing | |
 |  | |
 |  | |
1.6 seconds, f8, 100 ISO | 1.6 seconds, f8, 100 ISO |
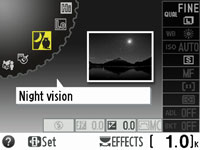
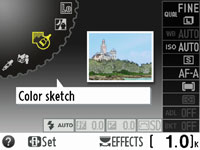
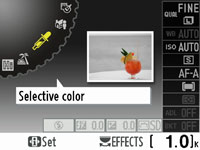
In a first for any Nikon DSLR, the D5100 now offers an EFFECTS position on the mode dial. This gives access to the choice of seven special effects which can be applied to still photos, and in some cases to video too.
 |
 |
 |
I’ll start with Night Vision, a grainy black and white effect which can boost the sensitivity of the D5100 to a massive Hi 4.0, equivalent to 102,400 ISO. This allows you to shoot under extremely dim conditions, albeit with a very grainy black and white image. The Night Vision mode operates with auto exposures and tries to keep shutter speed hand-holdable, so in cases where you have a tripod or somewhere steady to rest your camera, you’ll be better-off choosing a lower ISO and a longer exposure. Note the light levels under which Night Vision was designed are below the sensitivity of the phase-change AF system, so autofocus is only offered in Live View. That said, if it’s truly dim, such as in my example below, the contrast-based AF system will also fail to lock-on, forcing you to manually focus.
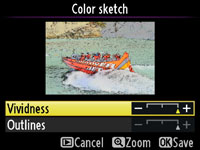
The next effect is Colour Sketch, which as its name suggests, posterises the image and applies defined outlines for a drawn effect. Again you can see a preview in Live View, although the update is understandably slow as the camera applies the effect; similarly you can film video in this mode, but it’ll appear like a series of still images in a slideshow thanks to the processing involved.
Next up is the increasingly ubiquitous Miniature, which applies a tilt-shift effect for the impression of a toy-like landscape. Again you can see a preview in Live View, where you can also adjust the point of sharp focus, but again the processing involved means the update will be jerky as you adjust the composition. The Miniature effects is also available for movies, and the camera cleverly works around the processing time by simply recording at a slower frame rate. When played back, this then appears faster than normal, further accentuating the miniature effect – see my D5100 Movie Mode page. 30-45 minutes of captured footage is reduced to about three minutes in playback.
The fourth effect is Selective Colour, which renders everything as black and white apart from the selected colour(s). In use, the D5100 presents a small square as a sampler for you to place over the desired colour. Once sampled, you can add additional colours to pass, or adjust the tolerance. This effect can also be applied in real-time for movies and can be very effective – see my D5100 Movie Mode page.
The final three options are more about exposure control than applying special effects: Silhouette ensures foreground subjects are kept dark against a bright sky, High Key maintains bright subjects, while Low Key ensures dark subjects are kept dark.
The seven effects are both fun and useful, and have an important edge over the Creative Filters on the Canon EOS 600D / T3i as the D5100 lets you apply them in real-time in Live View, and again several on movies too. In contrast, the Canon’s effects are only applied after the event in playback. The D5100 doesn’t miss out in this respect either, allowing a number of effects to be applied to existing images from the retouch menu.
Below you can see examples of four of the most dramatic effects – click the images to see the originals at flickr. Check out my D5100 movie mode page too as you’ll see samples of the Selective Colour and Miniature Effect on video…
Nikon D5100 Colour Sketch Effect | Nikon D5100 Night Vision Effect | |
 |  | |
| Click image to access original at Flickr | Click image to access original at Flickr | |
Nikon D5100 Selective Colour Effect | Nikon D5100 Miniature Effect | |
 |  | |
Click image to access original at Flickr | Click image to access original at Flickr |
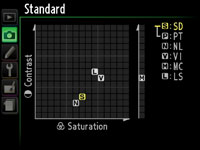
More traditional image processing options are applied using a series of six Picture Controls, matching those on the D5000 and D3100, with the same degree of adjustment too. The Standard, Neutral and Vivid, Portrait and Landscape Picture Controls all offer adjustment of Sharpening (0-9), Contrast (+/-3), Brightness (+/-1), Saturation (+/-3) and Hue (+/-3), while the Monochrome Picture Style swaps Saturation and Hue for nine Toning and four Filter Effects, the former fine-tunable by seven values. If Active D-Lighting is enabled, it takes over the Contrast and Brightness settings, and if you’re in a real hurry, a Quick Adjust option can boost or lessen a group of settings in one go. The increments are roughly similar to the EOS 600D / T3i, although there’s slightly more filter options in the monochrome setting.
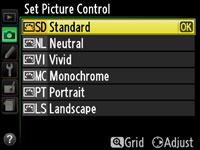 |  |  |
As always I used the default processing option for our test shots – in this instance the Standard Picture Control. As you’ll see in the Results and Sample Images Gallery pages, the D5100’s default JPEG output, like other recent Nikon DSLRs, is fairly restrained and laid back. This delivers very natural-looking images, but if you prefer something more vibrant and punchy, simply tweak the Picture Controls, select the Vivid preset, or better still, shoot in RAW and make the adjustments later.
Nikon D5100 drive modes and remote control
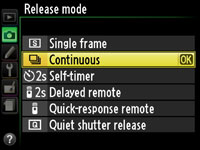
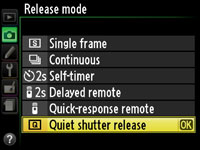
The D5100 offers six ‘release’ modes: Single frame, Continuous, Self-timer and Quiet shutter release, along with Delayed Remote and Quick Response Remote, the latter pair working with the optional IR control. Like the D5000 before it, these are all selected through a menu which seems perfectly reasonable until you look at the ‘lower-end’ D3100 which has a far more tactile release mode lever around the mode dial. I’d certainly much prefer the D3100’s control in this regard.
Set the release mode to Continuous and the D5100 can shoot at a quoted speed of 4fps for up to 100 frames, although the manual warns the speed will slow once the buffer is filled, and the buffer figure is normally around 17 shots for best quality JPEGs. This is essentially the same specification as the D500 before it.
 |
 |
 |
 |
|
To put this to the test we fitted the D5100 with a freshly-formatted 16GB Lexar Professional 133x SDHC card, rated at Class 10. With the D5100 set to 1/500, 400 ISO and Large Fine JPEG, I fired-off 23 frames in 6 seconds before the camera slowed – this corresponds to a rate of 3.8fps for the initial burst of 23 shots, after which the D5100 fired at about 1fps. Set to RAW, I managed 13 frames in 3.4 seconds before the camera stalled, which again corresponds to 3.8fps. Finally in RAW + Fine JPEG I fired-off 10 frames in 2.6 seconds, again corresponding to 3.8fps. I confirmed the speed and burst depth in the field, shooting the Shotover Jet boats zooming past – again typically 18-24 frames depending on the subject complexity at about 3.8fps, then slowing to around 1fps.
As such the D5100 only falls fractionally below its quoted continuous shooting speed of 4fps. In comparison I measured the Canon EOS 600D / T3i (which quotes 3.7fps) delivering 18 JPEGs at 3.6fps or six RAW files at 3.3fps. As such there’s minimal difference when it comes to shooting JPEGs, although the D5100 enjoys a small advantage in buffer depth and speed when it comes to RAW. That said, neither camera can exactly be described as being ideal for action and sports photography. Sony’s really taken the lead in offering fast continuous shooting speeds at affordable prices, leaving its rivals to reserve their quicker speeds for pricier mid-range and semi-pro bodies.
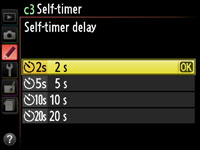
Set the release menu to Self Timer and you can choose from the same 2, 5 10 or 20 second timers as the D500 before it. Like its predecessor you can also set the D5100 to take multiple shots once the countdown is complete.
The next main position on the D5100’s release menu is Quiet shutter release. This takes the photo as normal when you press the shutter release, but doesn’t reset the mirror until you let go – so you could press the shutter release to take the shot, but keep the button held until you’re somewhere less quiet. Obviously during that time you won’t be able to take any more photos.
In practice if you press and let go of the shutter release as normal, you’ll notice virtually no difference in this Quiet mode, but by pressing and holding the shutter release, the mechanical sound is slightly reduced – or at least delayed. To be honest though it made very little difference in my tests. Probably the greatest benefit was that Quiet mode automatically switched off any beeps, so it could be a quick fix in discreet situations.
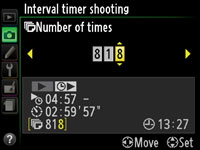
Sticking on the subject of release modes, I’m pleased to report Nikon’s retained the built-in Interval Timer of the D5000 and D7000, a feature that’s lacking on the D3100 and D90, not to mention every one of Canon’s DSLRs. You can set the start time, interval period (from one second to one day) and the number of intervals (up to 999). The option to change the number of shots taken per interval of the D300s may be missing, but it’s still an impressive feature to find on the D5100. Remember if you want Intervalometer facilities on a Canon DSLR, you’ll either need to connect it to a laptop and use the supplied EOS Utility, or go for a model which supports the optional TC-80N3 remote control – which sadly is not compatible with the EOS 600D / T3i. So while the EOS 600D / T3i can be interval-timed free-of-charge by the supplied EOS utility, you’ll need to have a laptop connected, whereas it’s all built-into the D5100 without any accessories required.
The EOS 600D / T3i does however offer a true Mirror-lockup option though, unlike the D5100 which only locks the mirror up for cleaning not exposure purposes. Interestingly the D5100 is also lacking the Stop Motion movie mode of the D5000, although to be fair it does support a variety of new effects while filming if desired.
Like other Nikon DSLRs, the supplied software bundle is also lacking compared to Canon’s models. You do get View NX for basic manipulation and RAW processing, but for more powerful features, you’ll want the optional Capture NX software, while for remote control using your computer, you’ll also have to pay extra for the Camera Control 2 package. In contrast, Canon supplies all of its DSLRs from entry-level to top professional models with its powerful Digital Photo Professional software and the EOS Utility, the latter offering complete remote control, including Intervalometer, AF and Live preview facilities over a USB cable.
What you do now get on the D5100 though is an enhanced HD movie mode, and I’ve devoted an entire page to it. So to find out the full details, please see the Nikon D5100 Movie Mode page. Alternatively if you’re not interested in movies, find out how the D5100 compares against its rivals in terms of image quality in the D5100 quality pages and D5100 sample images gallery. Or if you’ve already seen enough, head straight to my verdict.
Nikon D5100 Movie Mode
The Nikon D5100 greatly upgrades the HD movie capabilities of its predecessor, and even builds upon those offered on the higher-end D7000. As such, where the old D5000 only offered 720p HD video at 24fps, the new D5100 boasts the choice of 720p or 1080p, each at either 24, 25 or 30fps; that’s already one-up on the D7000 which only offers 1080p at 24fps.
Where the old D5000 was manual focus only when filming, the D5100 also inherits the continuous AF capabilities of the D3100 and D7000. This really separates it from Canon which doesn’t attempt to continuously autofocus while filming.
The D5000’s Motion JPEG encoding has also been dumped in favour of the much more modern and efficient H.264, and Nikon’s also equipped the new model with an external microphone input. Annoyingly there’s still no formal manual control over exposures, but like its predecessor, the D5100 can ‘inherit’ the aperture selected prior to entering Live View if desired.
 |  |  |
Overall the addition of 1080p, multiple frame rates, continuous AF, more efficient compression and a microphone input make for a significant upgrade over the earlier D5000. Indeed while it may be lacking the manual exposure control of the D7000, the support for 1080p at variable frame rates along with an articulated screen, arguably makes the D5100 Nikon’s most flexible movie-making DSLR to date. There’s certainly lots to discuss below, but before I launch into the fine details, let’s check out our first clip.
| |
|---|---|
|
|
In the handheld clip above the first thing to notice is the lack of vertical streaking around the sunlight reflections on the water – this is a benefit of a camera with a CMOS sensor. But if you’re playing the file with audio, you’ll almost immediately notice a faint squeaking or scratching in the background. This is the sound of the kit lens constantly being refocused by the D5100’s new AF-F continuous autofocus mode, and it’s quite audible on this clip.
Unfortunately in this example, the continuous autofocus isn’t doing a great job either, regularly searching for a subject with sufficiently strong contrast for it to lock onto. So while the actual video quality itself is fine, the continuous AF option hasn’t performed so well in this example; indeed disabling it would have probably produced better results. But before you write-off the D5100’s AF-F mode, check the clips below as it can work reasonably well under the right conditions.
|
 |
|
With this first example out of the way, let’s take a look at the specifics. Like previous Nikon DSLRs with video capabilities, the D5100’s Movie mode works as an extension to Live View. So first you’ll need to enter Live View by flicking the new spring-loaded lever around the mode dial. Then to start recording, simply press the red button by the shutter release, before pressing it again to stop. You can take a photo with the D5100 while filming, but there’s a pause between pressing the button and the image being captured – and it will also stop your recording. Note: the second screen grab on the left is taken from our D3100 review as the D5100’s AV output wasn’t active while recording.
Unlike Canon’s latest models, there’s no dedicated manual exposure mode, but like earlier Nikon DSLRs, the D5100 can inherit the aperture selected in Aperture Priority or Manual modes prior to entering Live View; this value can’t however be adjusted once you’re filming. If you try, the values certainly change on screen, but they don’t appear to be applied to the current recording. The ISO can also be manually set prior to entering Live View, but the shutter speed remains automatic throughout.
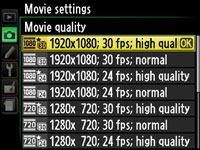
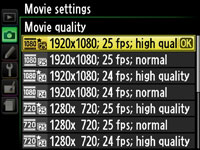
The D5100 offers a wealth of movie quality settings: 640×424 at 25 or 30fps, 720p at 24, 25 or 30fps, and 1080p, again at 24, 25 or 30fps; like Canon’s models, the 24fps options are always available, but you’ll only see either 25 or 30fps options depending on whether you’ve got the video mode set to PAL or NTSC. The D5100 also lets you choose between two compression levels for each of the quality settings above. Note this is the first Nikon DSLR to offer 1080p at anything other than 24fps, although it’s still lacking the higher 50 or 60fps 720p options of the Canon DSLRs, which allow slow motion playback in a 24, 25 or 30p project.
|
Each of the 1080p frame rates consumes 18Mbit/s with the quality set to High or 10Mbit/s when set to Normal. Switch to 720p at 30 or 25fps and it’ll consume 10Mbit/s in High quality or 6Mbit/s in Normal quality. Set 720p to 24fps and the rate decreases a little to 8Mbit/s in High or 5Mbit/s in Normal quality. Finally the 640×424 mode consumes 4Mbit/s in High or 2Mbit/s in Normal quality. So in real money, you’re looking at about 2.5 Megabytes per second in the best quality 1080p mode.
The maximum recording time is 20 minutes, double that of the D3100 and four times that of the D5000. Even at the best quality setting, you can film 1080p for 20 minutes and still comfortably make it under the additional 4GB file limit. Nikon recommends using a Class 6 card or quicker for HD movies; I used a Lexar Professional 16GB 133x SDHC Class 10 card in my tests with no problems, and confirmed the 20 minute limit with a High Quality 1080p file measuring 2.73GB. Note Canon’s HD movie modes are much more memory-hungry, consuming over twice as much data at 330MB per minute thanks to higher bit rates – so their 4GB file size will be reached after around 12 minutes of HD filming. This gives the D5100 an advantage as not only can it record for longer per clip, but the file sizes are smaller too.
The video and audio are encoded using H.264 and stored in a Quicktime MOV wrapper – this is the same compressor as Canon, but used at a lower bit rate for smaller file sizes. Like Canon’s MOV files, we found VLC Player proved best for playback under Windows, although the latest Media Player also worked fine.
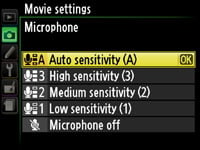
The D5100 has a built-in mono microphone, and in an important upgrade over its predecessor, a 3.5mm jack for connecting an external stereo microphone. Nikon now offers its own ME-1 microphone which mounts on the hotshoe, or you could connect a third party model like the Rode Video Mic Pro. I tried out the latter and it worked just fine on the D5100, although sadly even its highly directional nature was insufficient to hide the audible grinding of the kit lens autofocusing.
The audio recording levels can be set to automatic, or to low, medium or high sensitivity; alternatively you can disable audio recording if desired. It’s good to have the choice of recording sensitivities, but sadly there’s no level meters for immediate feedback.
| |
|---|---|
|
In the second clip, above, I’ve locked the D5100 to a tripod, disabled VR and AF on the kit lens and smoothly panned from left to right. With the Continuous AF disabled, it’s quite a relief not to hear the scratching sound of the kit lens focusing in the background, and it allows you to appreciate the quality of the video on the D5100. Like all DSLRs though, zooming smoothly, even on a tripod, is a challenge, but I’ve included several adjustments towards the end for reference. Watch out for the wind noise as I point the camera towards the steamship, and also the sound of a dog snoring in the background…
| |
|---|---|
|
Moving on, the third clip above was filmed handheld in a relatively dim bar with both VR and AF-F enabled. At first, the camera’s AF system seems happy not to make any adjustments, but around halfway through, it kicks-in and once again the scratching sound, not to mention the visual searching becomes quite distracting – epsecially towards the end when it has to perform a broad adjustment. Once again, this clip works much better with Continuous AF-F mode disabled. On the plus side, the clip itself may be noisier than those filmed outside, but the noise levels remain relatively low and the detail high. Obviously given a lens with a brighter focal ratio, the results in low light can look much better.
|
One of the D5100’s most impressive movie features, at least in theory anyway, is the Full-time Servo AF mode, inherited from the D3100 and D7000 and which delivers continuous autofocus while filming – something which continues to elude Canon’s DSLRs. For example, while Canon’s latest DSLRs technically support autofocusing while filming, it’s a Single AF operation which is initiated by hand and takes several seconds to lock-on thanks to the leisurely contrast-based AF system. Theoretically you could just keep forcing a Canon DSLR to repeatedly perform this process in an attempt to keep the subject sharp during a clip, but it wouldn’t look pleasant with constant visual searching, not to mention the sound of the lens doing it.
If you’ve watched the first clip above though, you’ll know this is effectively what’s happening with the Nikon D5100’s AF-F mode, albeit the difference here is the camera initiates the AF process, not the photographer. The D5100’s AF-F mode works exactly the same way in movies as it does within Live View. It immediately checks the selected AF area and if it’s not sufficiently sharp, it’ll use the contrast-based AF system to focus on it. Depending on the subject though, this could take an average of two seconds each time with the lens typically searching back and forth at least twice. If your lens has audible autofocusing, like the DX 18-55mm VR kit lens, you’ll also hear this squeaky scratching sound recorded quite clearly in your movies. And if the subject regularly moves, the camera will keep trying to lock-onto it, which means your video could suffer from a lot of visual searching, and of course the sound of it too. My next clip better illustrates how the system works and what kind of response you can hope for.
| |
|---|---|
|
The fourth clip, above, deliberately puts the new AF-F mode to the test. Here I moved the camera around, pointing it at various subjects near and far to see how the continuous autofocus coped. Give the D5100 some defined edges for its contrast-based AF system to lock-onto and it can actually do quite a good job. Sometimes the focusing searches a little, but at others it feels more confident as it locks-onto the desired subject. Indeed as the clip progresses, it’s hard not to be at least a little impressed by the AF-F mode as it succeeds more than it fails. It may not be as consistent as a consumer camcorder, nor as confident as the phase-change AF on the Sony Alpha A33, but the D5100 still manages to keep the subject mostly focused as the composition changes, while the ambient background sounds mostly mask the kit lens’s AF motor. This is an impressive capability for a camera that only has a contrast-based AF system at its disposal while filming (along with the challenges of a shallower depth-of-field than a camcorder); remember Canon’s DSLRs don’t even attempt to continuously autofocus while filming, making this clip impossible without constant manual adjustments.
| |
|---|---|
|
In the next clip, above, I’ve given the D5100 a more predictable subject to track with its continuous AF. I zoomed the kit lens to 55mm, adjusted the D5100’s AF area to the middle, and kept it positioned over the Skyline logo on the cable car as it steadily approached. Like most contrast-based AF systems, the D5100 searches back and forth as it attempts to lock-on, and this is quite visible at several points during the clip. This is undoubtedly off-putting, but to be fair, the D5100 does manage to keep the logo relatively sharp throughout the clip, even when it’s only a meter or so distant. Once again this is something which would have required constant manual focus pulling on a Canon DSLR. So while the D5100 continuous AF during filming may not live up to the experience of a consumer camcorder (nor the unique capabilities of the Sony Alpha A33), it remains a very impressive attempt given the available resources.
That said, for subjects where the soundtrack was critical or the subject remained mostly at a fixed distance, I switched the D5100 to manual (or single) focus. When AF-F works well, it’s pretty neat, but more often than not it spoilt our clips with its constant searching. Indeed once you’ve seen and heard the effect of the kit lens constantly search back and forth on clips, you’ll find it some relief to simply switch it off.
| |
|---|---|
|
In a first for any Nikon DSLR, the D5100 offers a number of special effects via a dedicated EFFECTS position on the mode dial. These all work for still photos, but some can also be applied to video. The first example, above, is for the Selective Color Effect, where you can sample one or more colours and adjust the tolerance, after which the D5100 turns everything else into black and white. Here I sampled the red hat on the bear and simply let the camera do the rest. It’s really nice to see this effect applied on video with zero effort, and it seems funny to think back this was a major and much talked-about effect on ‘Schindler’s List’ only a few years ago.
| |
|---|---|
|
Another one of the D5100’s special effects which can be applied to video is the Miniature option, an increasingly ubiquitous effect which simulates a tilt and shift lens for a toy-like appearance. This requires considerable processing, so can’t be captured in real-time at 24-30fps, but the D5100 uses this to its advantage and captures processed frames at a slower speed. Then when played back, they speed-up, further accentuating the miniature effect. Like still images, the Miniature effect can be applied with three different focus window thicknesses – here I used the middle option, and zoomed the kit lens in.
That’s all for the sample videos, now what about ergonomics and comparing the D5100 against its biggest rival?
|

 |
Like all DSLRs, the D5100’s body was never designed for heavy video use, and while the articulated screen allows you to more easily film at unusual angles, there’s still the fact you’re holding a body that’s ultimately designed to be held up to your eye. One solution is to employ some kind of filming rig which provides easier controls and handling. Dedicated DSLR rigs are not typically cheap accessories, but I discovered an affordable alternative which works pretty well.
Simply connect one of the larger Gorillapods to the camera and bend the legs upwards into a U shape. Two of the legs can then be twisted into vertical handles on either side of the body, allowing comfortable two-handed operation. The third leg can either be folded underneath, or bent back to provide an additional point of contact against your body, or even over your shoulder.
I found I could handhold DSLRs much more effectively with my ‘Gorilla-rig’, greatly reducing wobbles and allowing much smoother pans. And of course you can always fold the legs back for conventional operation. If this sounds appealing to you, I’d recommend using the largest Gorillapod Focus model, as its strength and rigidity ensures the legs won’t bend out of shape when you’re transporting the unit with one hand.
So with variable frame rates at 720p and 1080p, an articulated high resolution screen and an external microphone input, not to mention the opportunity to apply special effects while filming, the D5100 is a considerably more capable movie-maker than its predecessor; indeed as mentioned above, if you ignore the D7000’s more definitive control over exposures, the D5100 arguably becomes Nikon’s most flexible video-equipped DSLR to date.
|
It is however very important to compare it against the competition, and in particular its closest rival, the Canon EOS 600D / Rebel T3i. Both cameras may share 720p and 1080p recording at variable frame rates, articulated screens and mic inputs, but there are crucial differences to weigh-up.
In its favour, the D5100 offers continuous autofocusing during filming, and while the effect can be visually and audibly off-putting for some footage, it does work well in other situations. This is the key advantage all the Nikon DSLRs have over their Canon rivals. Lower bit rates also mean smaller files and longer recording times, with the D5100 filming for up to 20 minutes per clip, compared to around 12 minutes of HD for the Canons. Then there’s those effects, like Miniature and Selective Colour, which can be applied while filming.
In its favour, the Canon EOS 600D / T3i offers 720p at higher rates of 50 and 60fps, which allows slow-motion when incorporated into a 24, 25 or 30fps project. The bit rates may be higher, but these in turn mean fewer compression artefacts, which may be preferred by higher-end videographers for whom the 12 minute clip limit is more than enough. The wider screen means more if it can be devoted to the active area, and while the HDMI output is downgraded while filming, at least it remains active to drive external monitors. The EOS 600D / T3i also boasts live audio level meters for immediate feedback, along with much finer manual adjustment. Speaking of manual, the Canon also offers full manual control over the aperture, shutter and ISO, even while filming. Finally, the EOS 600D / T3i features a neat Digital Zoom mode which crops a 1080p frame from the middle of the sensor for an immediate 2.5x boost in magnification with no loss of quality.
Ultimately a pattern should be emerging here: the video capabilities of the Canon DSLRs are more targeted to high-end videographers and pros, whereas the key features of the Nikon DSLRs will appeal more to general users. If you want proper and fine manual control over exposures and audio along with basic slow motion capabilities, go for the Canon, but if you’re happy with the D5100’s attempts to autofocus while filming and want longer than 12 minutes per clip, then go for the Nikon.
Before wrapping-up though, it’s not a two-horse race. If decent continuous autofocus is your priority while filming, then Sony’s SLT A33 and A55 or Panasonic’s Lumix GH2 do a much better job than the Nikon DSLRs and should become your top choices.
Now find out how the D5100 compares against its rivals in my Nikon D5100 image quality and Nikon D5100 sample images pages. Alternatively if you’ve already seen enough, head straight to my verdict.


