Nikon D5000
-
-
Written by Gordon Laing
Nikon D5000 vs Canon EOS 500D / T1i vs Olympus E-620 Resolution
Nikon D5000 results : Real-life resolution / Studio resolution / Noise vs 500D / T1i & E-620 / Noise vs D90
Nikon D5000 with Nikkor DX 18-55mm VR |
Canon EOS 500D / T1i with Canon EF-S 18-55mm IS |
Olympus E-620 with Zuiko Digital 14-42mm | ||
 |
 |
 | ||
f8, 200 ISO |
f8, 100 ISO |
f8, 100 ISO | ||
 |
 |
 | ||
f8, 200 ISO |
f8, 100 ISO |
f8, 100 ISO | ||
 |
 |
 | ||
f8, 200 ISO |
f8, 100 ISO |
f8, 100 ISO | ||
 |
 |
 | ||
f8, 200 ISO |
f8, 100 ISO |
f8, 100 ISO |
Nikon D5000: JPEG versus RAW
|
We photographed the scene here in the D5000’s RAW plus Large Fine JPEG mode, allowing us to directly compare images created from exactly the same data. Below are crops taken from the original JPEG file alongside the RAW version, processed in Nikon’s optional Capture NX 2.2.0 software using the default settings. The processed RAW file looks a little sharper and better-defined than the in-camera JPEG, with fine details becoming more apparent which were previously a little fuzzy. With this has however come a few subtle, but unnatural-looking artefacts, such as on the white strip on the right-hand chimney stack and some of the fencing. That said, the RAW version is preferred overall, and that’s even without adjusting the settings. Capture NX 2.2.0 offers a broad range of adjustments including the ability to select different Active D-Lighting options (so long as it was enabled to some degree in the camera to start with). A small degree of tweaking can yield what most would consider to be superior output to the default JPEG processing, so if you’re willing to spend the time, we’d recommend shooting in RAW. As you’ll see on the next page, it technically delivers a little more resolution too. So without further ado, let’s look at the Nikon D5000’s resolution in a studio environment. |
Nikon D5000 JPEG with Nikkor DX 18-55mm VR |
Nikon D5000 RAW with Nikkor DX 18-55mm VR | |
 |  | |
f8, 200 ISO |
f8, 200 ISO |
Nikon D5000 results : Real-life resolution / Studio resolution / Noise vs 500D / T1i & E-620 / Noise vs D90
|
 |
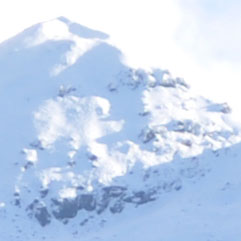
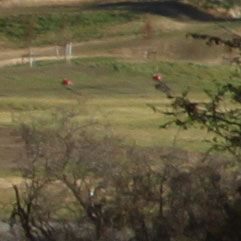
To compare real-life performance we shot this scene with the Nikon D5000, Canon EOS 500D / T1i and Olympus E-620 within a few moments of each other using their best quality JPEG settings, lowest base sensitivities and default processing options. Each camera was fitted with its respective kit lens (see details below) and adjusted to deliver the same vertical field of view. We focused on the building in the middle crop using Live View and took each shot in Aperture Priority at f8 with Auto White Balance.
The image above was taken with the Nikon D5000 at a sensitivity of 200 ISO and the kit lens set to 48mm f8; the original Large Fine JPEG file measured 6.52MB. The crops below are taken from the areas marked by the red squares and presented at 100%. Note our usual elevated view of Queenstown was unavailable as the Skyline Gondola was closed for refurbishment during the testing period.
Note the Canon 500D / T1i and Nikon D5000 capture wider 3:2 aspect ratio images than the Olympus E-620, so by matching the vertical field of view on all three, we’re effectively cropping the sides from the 3:2 models and treating them as 13.4 and 10.8 Megapixel cameras respectively, delivering 4:3 shaped images. As such, the D5000’s ‘lower’ resolution in the 4:3 frame considered here means its crops show the largest area, while the Canon crops show the smallest area because it still has effectively the highest resolution. Note if only comparing the Canon and Nikon crops, you can ignore the above as both captured exactly the same 3:2 area.
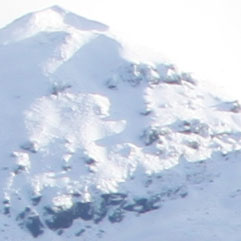
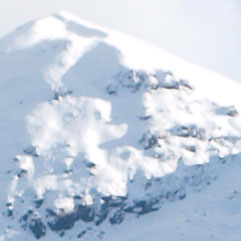
The Canon 500D / T1i takes the lead in the first row of crops with sharper details in the tricky highlighted area of the snowy mountain-top. While not obvious in these particular crops though, the Canon also suffered from the most obvious fringing of the three – not just because the kit lens suffers from it, but equally because the camera doesn’t do anything about it. The Nikon and Olympus models exhibited little to no fringing because the former corrects it in-camera, while the latter has a better-corrected kit lens to start with.
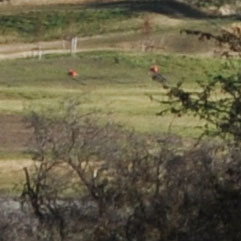
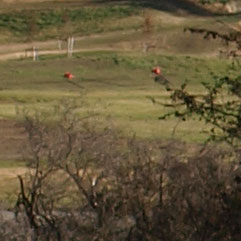
Interestingly, the 3 Megapixel advantage of the Canon sensor doesn’t help it in the second row of crops where the finely detailed branches are noticeably better-defined on the Nikon and Olympus samples. This is partly down to the average kit lens supplied with the Canon and proves if you want to see any benefit over 12 Megapixel models, you should really be equipping it with sharper optics.
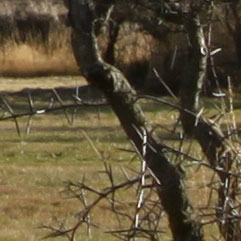
In the third row of crops, taken from a central area where all lenses should perform well, the Canon shows some detail advantages (especially in the chimney), although look closely and you’ll see the Nikon taking a lead in very fine details once more – this is particularly apparent in the grassy areas in front and behind the building, where Canon’s lens and or image processing is smearing out the finest details.
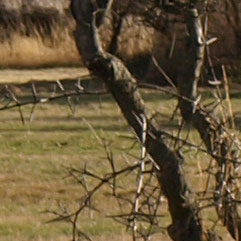
The final row of crops taken from closer to the edge again reveals the Canon suffering a little on fine details in the grasses, with the Nikon again taking a lead in this respect.
While you need to take aspect ratios and effective resolutions into account when comparing the E-620, the Canon and Nikon samples can be directly compared as both captured exactly the same area. This is a particularly interesting comparison to make as the Canon has three extra Megapixels over its arch rival, yet you’d be hard pushed to notice it in this shot taken under real-life conditions with their respective kit lenses. While the Canon kit lens is clearly a weak-point in the standard bundle, it still reveals there’s not necessarily much benefit in having those extra pixels. The advantage over the Nikon samples is subtle, and in some cases the D5000 actually has the edge.
Nikon found a great balance between Megapixels and real-life performance with the D90 and sensibly stuck with the same technology here rather than trying to compete on marketing numbers.
To really see the difference between the resolving power of the Canon and Nikon sensors, you need to enter a studio and start shooting test charts. So to see how they compare, check out our Studio Resolution page. Alternatively, scroll down to the bottom of this page to see a real-life RAW versus JPEG comparison.


