Nikon D5000
-
-
Written by Gordon Laing
Nikon D5000 design, controls, screen and live view
Externally, the Nikon D5000 most resembles the D60 it replaces, although it’s noticeably taller and chunkier thanks to its new articulated screen. Measuring 127x104x80mm, the D5000 may be almost identical in width to its predecessor but is 10mm taller and 16mm thicker; indeed while the higher-end D90 is 5mm wider than the D5000, the new Nikon is actually 1mm taller and 3mm thicker.
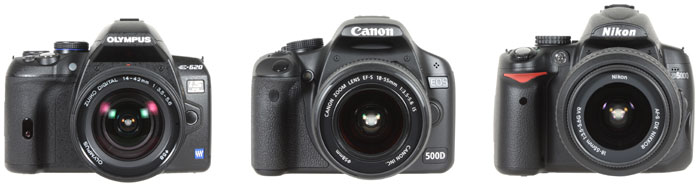 |
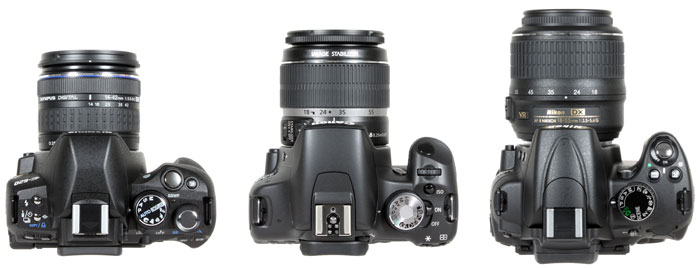
We’ve pictured the Nikon D5000 above on the right, with the Canon EOS 500D / T1i in the middle and the Olympus E-620 on the left. It’s clear to see how Nikon’s latest is the tallest of the group, and its thickness is also illustrated in the top view, as seen below. When directly comparing their vital statistics, the D5000 is actually 2mm narrower than the Canon, but 6mm taller and 18mm thicker. Compared to the Olympus E-620, it’s 3mm narrower, but 10mm taller and 20mm thicker.
As you may expect, the D5000 is heaviest of the group too, at 611g for the body with battery compared to 530g for the Canon and 521g for the Olympus, again with their respective batteries. Fit their respective kit lenses and the Nikon increases to 876g, compared to 730g for the Canon and 711g for the Olympus. Note the D90 weighs 700g for the body including battery.
While there’s no doubt the D5000 is the biggest and heaviest of this group though, it’s important to note we never found it a burden to carry around, and unless you compared all three side-by-side, you may not even notice. But if compact size and low weight are critically important to you, then we’d advise picking them up in person, paying particular attention to the E-620 and its even smaller brother, the E-450; Panasonic’s Lumix G1 / GH1 should also be considered.
 |
|
The D5000’s build quality is pretty much the same as the earlier D60, and as such we have no complaints for the price. It’s obviously at the affordable end of the DSLR scale, but feels well-assembled with no creaks or poor joins to worry about. In these respects it’s also similar to the Canon 500D / T1i and Olympus E-620, although the latter’s smaller size gives it a slightly higher density and a subtle impression of greater solidity in your hands. None are rated as having any kind of weather-proofing, although the E-620 is the only one to offer an optional underwater housing.
All three have comfortable rubber-coated grips with raised thumb rests on the rear, although Nikon and Olympus take an ergonomic lead over Canon with indented inner portions which hook onto your finger tips, giving a more secure impression. As always, we’d recommend picking up your shortlisted models in person to see which feel best in your hands.
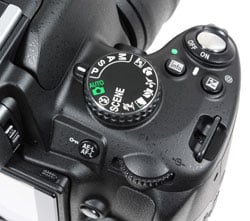 |
The control layout is essentially the same as the earlier D60, with only minor variations. As such most of the action takes place to the right of the viewfinder head, where you’ll find the main mode dial, the shutter release surrounded by a rotary power switch, and a pair of buttons. The right button still adjusts the exposure compensation (or the aperture in Manual mode), but the left button is now once again labelled Info, like the earlier D40x.
The Info button is used to manually switch the screen on and off, and was dispensed with on the D60 because proximity detectors below the viewfinder did it automatically. On the D60, this button was instead dedicated to Active D-Lighting. The D5000 is lacking those detectors, so you have to manually switch the screen off, or wait for the power-saving to kick-in and do it for you; alternatively you can of course flip the screen back on itself.
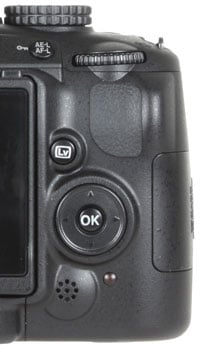 |
On the rear of the body to the right of the screen you’ll find the same thumb wheel, AE / AF lock button and four-way joypad with an OK button in the middle. The Delete button has now been relocated to the upper left corner, and the only new addition on the right side is a button dedicated to firing up the Live View mode, sensibly labelled Lv.
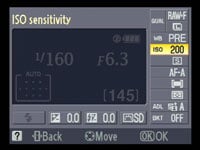
Like the D60 before it, and indeed the D90, the D5000’s joypad is only used for navigation and unlike most other DSLRs, is not as a shortcut to adjusting various settings like the sensitivity and white balance. While the higher-end D90 devotes several buttons to the left side of the screen to accessing these settings though, the D5000 sticks with the control strategy of the D60. This involves first pressing the i button in the lower left corner which allows you to then move a yellow highlighter over the various settings running down the right side and along the bottom of the screen. Once the desired item is highlighted, you then press the OK button to present a dedicated menu from which you can choose the required setting. As before, these are accompanied by a thumbnail photo showing a typical use for that setting – such as an indoor shot for a high ISO setting.
So far, so friendly, but like the D60 before it, this system can prove infuriatingly slow to navigate. While the different settings are arranged in a backwards L shape, they’re effectively navigated like a single long line, so if you have the release mode highlighted, it’ll take you several clicks to move along to, say, the bracketing option. This is in contrast to the on-screen navigation systems of Canon and Olympus where the items are arranged as a grid with only a couple of clicks between any of them. And unlike those models, once the desired item is highlighted, there’s no shortcut where you can simply turn the thumb dial to adjust it quickly – instead you need to press OK and do it from the menu.
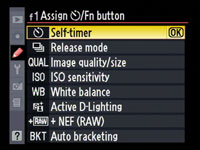 |
The only relief is a programmable Function key which can be set to directly fire-up the menus for either the self-timer, release mode, quality, sensitivity, white balance, Active D-Lighting, RAW mode, or bracketing. But remember there’s only one Function button, so assign it carefully. While we appreciate this user interface was designed with beginners in mind – for whom it works very well – it’s a shame there’s no quicker access for owners who’ve become familiar with the camera other than delving into the main menu pages. Changing a variety of settings remains a leisurely process, so if you’re the impatient type, you will almost certainly prefer rival models, or the higher-end D90.
Finally, note that like the D60 before it, there’s no depth-of-field preview button, nor is it a function that can be assigned to the Function button. If you want a depth-of-field preview, consider the Canon 500D / T1i or Olympus E-620, or again the higher-end D90.
Nikon D5000 flash
|
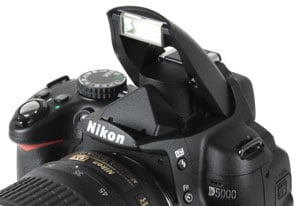 |
The Nikon D5000 is equipped with both a popup flash and a hotshoe for external flashguns, and like most DSLRs at this price point, there’s no PC Sync port.
Flash compensation and power level is adjustable, and you can also choose from red-eye, slow-sync and rear-curtain options. The strobing option of the D90 is not available here.
The built-in flash can either popup automatically or by pressing a button on the side of the D5000, and once you’re finished with it, just push it back into place. Like the D60, the D5000’s maximum flash sync speed is an average 1/200, so once again the sadly discontinued D40 scores here with its much faster 1/500 flash sync speed, inherited from the much earlier D50.
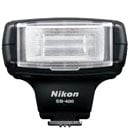
If you mount a compatible flashgun like the SB-400, SB-600 or SB-800 or SB-900, the D60 can support the Nikon Creative Lighting System (CLS) which offers iTTL control. As before, the SB-900, SB-800 or SU-800 offer wireless control of other compatible Speedlights.
Nikon D5000 Viewfinder
Like all DSLRs at this price-point, the Nikon D5000 employs a penta-mirror optical viewfinder. The D5000’s viewfinder delivers the same 95% coverage as its predecessor and the Canon 500D / T1i and Olympus E-620, although the magnification has reduced from 0.8x on the D60 to 0.78x on the D5000.
 |
Nikon explained to us the D5000’s viewfinder is based on that of the D60, but the main body is thicker due to the articulated monitor. To adjust the position of the viewfinder against the monitor, the viewfinder optics were shifted backwards, and this is responsible for the slightly lower magnification.
If you have the D60 and D5000 side-by-side, this difference is just about visible, but nothing to really worry about. Canon’s EOS 500D / T1i does however enjoy a visibly larger view with its 0.87x magnification, and even the Olympus E-620’s viewfinder image manages to be a little taller (although not quite as wide due to its squarer 4:3 aspect ratio). So of the three rivals, Canon’s 500D / T1i boasts the biggest viewfinder image, although again if you don’t have multiple models side-by-side, you’re unlikely to notice too much.
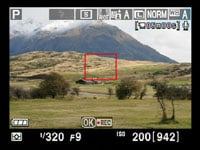
More than making up for a slight fall in magnification from its predecessor though is what you’ll see when you look through the D5000’s viewfinder. Gone are the three squares indicating the basic AF system of the D40, D40x and D60, and in their place are 11 AF markers – indeed exactly the same system as the higher-end D90. This is a decent upgrade which we’ll detail on the next page.
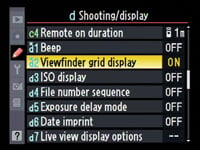 |  |
Better still, the D5000 also inherits the on-demand LCD grid lines of higher-end Nikon bodies, which allow you to switch alignment guides on and off from a menu. This is an incredibly useful facility, and makes rivals with their physically interchangeable focusing screens (if indeed they even have that option) look prehistoric. Neither the Canon 500D / T1i or the Olympus E-620 support interchangeable focusing screens, so if you want an alignment grid in the optical viewfinder, the D5000 is the one for you.
Alongside the usual shooting information running below the viewfinder image, the D5000 (like its predecessor) can display a flashing question mark. This acts as a warning when it believes the picture may be spoilt by a technical aspect; pressing the question mark button on the back of the camera then presents some helpful advice on the main screen, such as ‘Lighting is poor, flash recommended’. Another nice touch for beginners, and one that’s also replicated in the main colour screen.
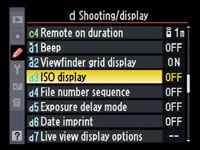
Sadly the ISO sensitivity still isn’t displayed at all times in the viewfinder. You can change a custom setting to show it, but at the cost of then losing the shots-remaining figure. It’s arguably not a big deal for the D5000’s target audience, but worth noting when the Canon 500D / T1i and Olympus E-620 show both the ISO and shots remaining at all times.
Nikon D5000 Screen and Live View
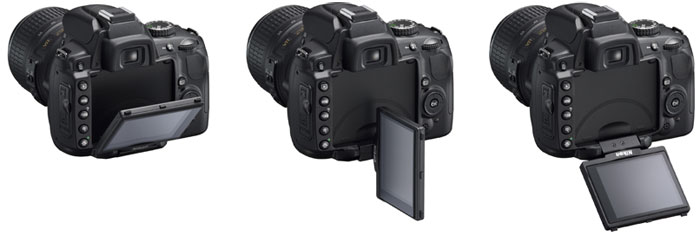
The Nikon D5000 is equipped with a 2.7in monitor with 230k pixels, so is slightly larger than the 2.5in / 230k screen on the D60, but both smaller and much less detailed than the 3in / 920k VGA screens on the D90 and Canon’s EOS 500D / T1i. The D5000 does however have one trump card over all those models, and indeed most DSLRs these days: its screen is fully-articulated, allowing you to flip it out and twist it to almost any angle.
An articulated screen gives you enormous compositional flexibility when composing in Live View, allowing you to face the screen up for shooting at very low angles, or face it down for shooting with it held high overhead – perhaps for shooting over the heads of crowds. You could also twist the screen to face the front for self-portraits or back on itself for protection.
 |
This is a capability it shares with the Olympus E-620 (along with the same screen size and detail), although the hinge implementation is slightly different. The E-620’s screen is hinged at the side, while the D5000’s is hinged at the bottom. Both mechanisms felt strong in use, but because it’s hinged at the bottom, the D5000’s screen motion can be blocked when mounted on a tripod; in particular it rules out seeing the screen in a self-portrait if it’s mounted at the time. In contrast, the E-620 manages to avoid this with its side-mounted hinge and is ultimately preferred.
This caveat aside, the D5000’s articulated screen was a joy to use in Live View, eliminating the need to crouch or lie down for low angles, and allowing you to frame your composition with the camera held high. It should however be noted that in Live View, the autofocus is slow, so you’ll only really exploit the screen’s articulation for relatively static subjects – sadly the Live View AF is insufficiently quick to capture fleeting glances of the rich and famous over the heads of crowds.
As for the D5000’s Live View itself, the straightforward implementation is identical to that on the D90 – albeit with a different type of screen; it’s also interesting to recall Live View is actually an upgrade for the D5000 over its predecessor, which was notably lacking the facility.
So like the D90, Live View is ready-to-go as standard and starts with a press of the Lv button on the rear. Again like the D90, there’s only one autofocus system in Live View (contrast-based), and you perform the process with a half-press of the shutter release. As such, entering and focusing in Live View is a lot simpler and more intuitive than Canon’s implementation which still demands you press the AE / AF lock button to autofocus.
With Live View activated, the D5000’s screen shows 100% coverage with basic shooting information including ISO value and shots remaining running horizontally under the image, while a number of superimposed icons along the top indicate aspects like the AF area and image quality.
 |
 |
 |
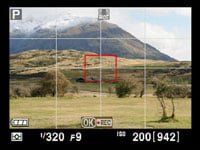
Pressing the Info button cycles between four views: first, the full shooting information including superimposed items, second, a cleaner view with just the basic information at the bottom, third, the same information again but now with an alignment grid, and fourth, a reduced view of the frame with shooting information presented along the right and under side of the image.
The D5000’s fourth view looks like the standard presentation during normal operation, only now with the shutter and aperture graphics switched for the actual live image; pressing the i button once again lets you highlight and change the desired settings, although strangely the live image is replaced by the normal shutter and aperture value while you move the highlighter. You’ll also note there’s still no live histogram option – Nikon bizarrely continues to reserve this for its top-end models only, which is odd, when entry-level Canon and Olympus DSLRs offer it.
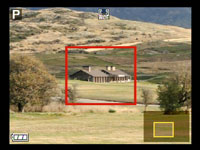
Pressing the magnifying glass button allows you to zoom-in by up to 6.7x, although like the D90 before it, the magnified live image becomes increasingly fuzzy as you approach the closest view; it’s also worth noting that with a 320×240 pixel screen, the 6.7x view on the D5000 is not even showing the image at 1:1, let alone beyond it. If you then take the photo, playback the image and zoom-in to the same extent, the detail looks much finer. This implementation is in contrast to Canon’s Live View system, which shows a much sharper view when magnified to the same level or beyond. To be fair, Nikon’s magnified assistance still helps when confirming focus, but Canon’s system is definbitely superior in this regard.
 |
 |
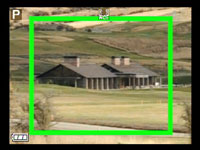 |
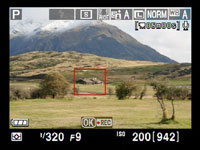
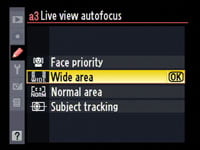
As described above, autofocus with the D5000 in Live View uses a contrast-based system only, which means it avoids the noise and interruption to the image of a phase-change system. There’s a choice of four AF modes in Live View though which can be changed using the i button: like the D90, there’s the same Face Priority, Wide Area (the default option) and Normal Area options, but new to the D5000 is an additional Subject Tracking option.
Wide and Normal Area will autofocus on a framed area which you can move around the screen using the multi-selector; the Normal Area mode unsurprisingly uses a smaller frame and is better suited to tripod-based work. Face Priority can track up to five faces and focus on the closest; like compact cameras, frames are shown around the active faces. Subject Tracking allows you to place a frame over a subject, and after pushing the joypad upwards, the D5000 will follow it around the frame; this is reasonably accurate in practice, although if the subject moves closer or further, you’ll still need to half-press the shutter to refocus.
 |
Whichever of the four modes you choose though, all employ a contrast-based system to achieve sharp focus. Again while this may avoid the noise and interruption of a phase-change system, it’s typically slower. Nikon did some good groundwork with the D90 which offered quicker contrast-based focusing than many models, but with it and the D5000, on average you’re still looking at a couple of seconds for the system to lock-on; if the system’s struggling, this could easily turn into three or four seconds.
Like other DSLRs, this poses a problem for face detection. The processor may quickly identify a face and follow it around with a frame, but once you half-press the shutter to focus, you’ll need to ensure they stay still for several seconds.
To be fair, all DSLRs to date with contrast-based AF are fairly slow, although Canon and Olympus still offer potentially quicker (albeit noisier) phase-change alternatives. Either way we applaud Nikon for opting for a straightforward approach with its Live View implementation on the D5000 and the D90 before it. Contrast-based AF may be relatively slow, but at least there’s no confusion over choosing between AF systems nor learning which button actually activates it. D90 buyers may have preferred a few more options, but the pitch is arguably right for the D5000’s target audience.
Nikon D5000 menus
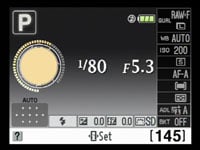
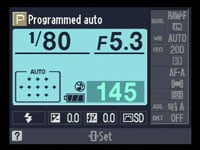
Like most budget DSLRs, the D5000 uses its main colour screen on the rear to present shooting information, and like its predecessor, there’s the choice of two styles for the exposure details: the default Graphic format accompanies the shutter speed and f-number with a graphical representation of the aperture iris surrounded by marks for the shutter speed, while the optional Classic format emulates the LCD status screens which adorn the top panels of higher-end DSLRs.
 |  |
It’s nice to have the choice of styles, and each is also available with three different colour schemes (although the D60’s option to use your own image as wallpaper is now absent).
As before, there’s a wealth of shooting information on-screen, although the D5000’s presentation has been revamped. The shutter speed and aperture still take centre stage with the shooting mode and battery life above, and the flash mode, exposure and flash compensation, Picture Control and a graphical representation of the AF area at the bottom. Running down the right hand side of the screen in a separate column are the current settings for the Quality, White Balance, Sensitivity, Release Mode, Focus Mode, AF Area mode, Metering, Active D-Lighting and Bracketing.
 | 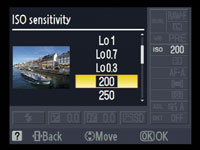 |
As described above, in order to adjust any of the items in this side column, or those running along the bottom, simply press the ‘i’ button in the bottom left corner, use the four-way controller to highlight the desired option and click OK. You’ll then be presented with a screen of relevant options and in most cases an example image of where or how you might use each setting. The thumbnails are certainly helpful, but as mentioned above, we found the required number of button presses to access each setting page a little laborious.
In a nice feature inherited from the D60 and originally borrowed from Sony’s Alpha DSLRs (and Konica Minolta before that), the D5000 rotates its shooting information as you turn the camera on its sides for portrait aspect shots – this way the text always remains upright on the screen and we have a demo in our video tour. The graphical representation of the aperture may disappear as the screen rotates, and as soon as you press the ‘i’ button to change anything you’ll also be returned to the landscape orientation, but it’s still a nice touch.
 |
Like its predecessor, there’s also still a question mark in the lower left corner, which flashes when the D5000 thinks something may not be right. Pressing the question mark button then displays the camera’s concerns, such as ‘lighting poor; flash recommended’.
You can also press this button at any other time for context-sensitive help, which can be a boon when changing settings. Yet more reasons why the D5000 is ideal for DSLR beginners.
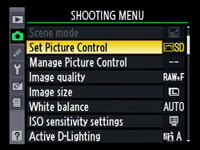
The main menu system, which will be familiar to any Nikon DSLR user, is presented in six sections, tabbed vertically down the left hand side of the screen. The six sections cover options for Playback, Shooting, Custom Settings, Setup, Retouch, and Recent Settings.
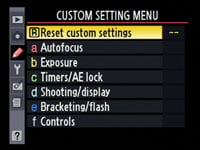
The D5000 may be aimed at beginners, but there’s still a wealth of options to adjust if desired, with 23 custom settings including assignment of the AE / AF lock button, reversing the dial rotation, and choosing whether the viewfinder grid is enabled or not. Again, any questions, just press the question mark button for help at any time.
 |
 |
 |
The Retouch menu offers a variety of in-camera adjustments which are applied to existing images. These include filter simulations, red-eye corrections, cropping, and the D-Lighting tonal enhancement. Also inherited from the D60 is a Stop Motion option which allows you to assemble a sequence of up to 100 still images into a movie clip exported in the AVI format. You can switch the output resolution between 640×480, 320×240 and 160×120 pixels, and the frame rate from 3, 6, 10 or 15fps.
It’s a shame there’s no smooth 30fps option, nor the ability to generate a stop-motion movie with HD resolution in-camera, but in a significant improvement over its predecessor, there is at least now an intervalometer function which can be setup to take the photos for you automatically; on the D60 you actually had to take each photo by hand.
 |
 |
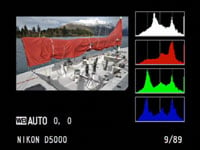 |
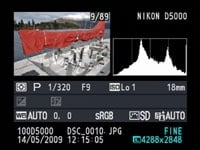
During playback you can cycle through a number of pages of information by pushing the joypad up or down. If all the options are enabled in the Playback menu, you’ll cycle between the main photo with shooting information underneath, a thumbnail with a brightness histogram, four pages of shooting details (including GPS information if the optional accessory was attached while the photo was taken), followed by a main view with flashing highlights, and finally a thumbnail with red, green, blue and brightness histograms; this RGB option during playback was absent on the D60, so nice to see here.
Nikon D5000 battery and connectivity
The Nikon D5000 employs an EN-EL9a Lithium Ion battery pack, an enhanced version of that used by its predecessor and 8% more powerful with a 1080mAh rating. Nikon claims this is good for 510 shots under CIPA conditions, although doesn’t include using Live View, the movie mode or even VR lenses. Use all the features of the D5000 and like all cameras, the battery life will deplete much faster.
|
Battery life is once again indicated by a three segment graphic on the main screen, although unlike the D90, there’s no support for Nikon’s Fuel Gauge system which provides an accurate feedback of the battery life and condition (albeit via a menu option). Like its predecessor, there’s also no official battery grip for the D5000, although hopefully third-party models will become available. It’s worth noting official battery grips are available for both the Canon EOS 500D / T1i and Olympus E-620.
 |
The Nikon D5000 has an SD memory card slot behind a door on the right side and the camera can handle SDHC cards; like most DSLRs no card is supplied as standard. If more than 1000 pictures are available, the number is rounded and abbreviated to read, say, 1.1K for 1100 photos.
There’s no official Wifi accessory, but like the D90, there’s support for a number of third party Eye-Fi models on the D5000 including the Eye-Fi Card, Eye-Fi Home, Eye-Fi Share and Eye-Fi Explore. If one of these cards is inserted in the D90 and the Eye-Fi Upload option is Enabled, you can transfer JPEGs to a pre-selected destination – signal strength permitting.
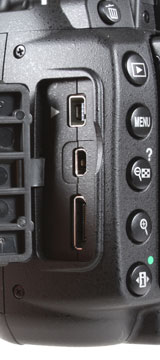
The D5000 also inherits two ports from the D90: Mini HDMI and an accessory terminal. HDMI can be used for HD slideshows or watching Live View on a compatible HDTV (and you can choose to output 480p, 576p, 720p, or 1080i signals), while the accessory terminal can be used to connect the optional MC-DC2 remote cord or GP-1 GPS unit, which mounts on the hotshoe and allows the camera to embed location and time details into the EXIF header of images.
The USB and standard TV outputs are now also combined into a single port, and thankfully unlike the D60, cables for both are supplied; like other cameras equipped with an HDMI port though, you’ll need to supply your own cable for an HD connection.


