Nikon D300
-
-
Written by Gordon Laing
Nikon D300 sensor and processing
Nikon D300 features continued…
Lenses and viewfinder / Screen and menus / Sensor and processing / Anti dust
The Nikon D300 is equipped with a new 12.3 Megapixel CMOS sensor which conforms to Nikon’s DX format and measures 23.6×15.8mm. We believe it’s manufactured by Sony, but the specification (and implementation in the D300) suggests it’s a different chip to that used in the Alpha A700.
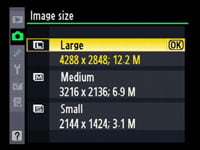
It generates 3:2 aspect ratio images with a maximum resolution of 4288×2848 pixels and there’s the choice of two lower resolutions, along with a variety of compression settings. For starters, there’s three JPEG settings: Fine, Normal and Basic, and you also get to choose whether the compression is prioritised to maintain a consistent file size or for quality. Unusually for a modern camera, there’s also the addition of an 8-bit TIFF option.
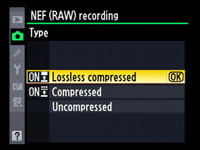
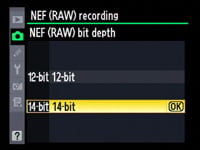
In terms of RAW files, the D300 gives you plenty of choice. You can record them as uncompressed data or with lossy or lossless compression. You can choose between 12 bit and 14 bit tonal depth, although the latter significantly reduces the continuous shooting rate from 6 to 2.5fps. And finally, once you’ve chosen your desired RAW type, you can accompany it with a JPEG at any compression setting
 |
 |
 |
|
Best quality Large Fine JPEGs typically measure 5.8MB each, while lossless compressed RAW files measure 13.6MB in 12-bit or 16.7MB in 14-bit. Switch to lossy compression and the 12 and 14-bit RAW files fall to 11.3 and 14.2MB respectively, Opt for no compression and they increase to 14.2 and 25.3MB respectively, Finally, you’re looking at about 36.5MB for an 8-bit TIFF; (figures from Nikon).
 |
 |
Nikon supplies basic conversion software for RAW files, and we’re pleased to report that for the first time you also get a free copy of Capture NX which previously was an optional purchase. You’ll need to download the latest version and at the time of writing Nikon only committed to offering it for an initial period, but we can hope it does the right thing and includes a free copy with all its DSLRs in the future – remember all Canon DSLRs come with its Digital Photo Professional software for free.
The D300’s sensitivity runs between 200 and 3200 ISO with additional L1.0 and H1.0 options representing 100 and 6400 ISO respectively. High ISO Noise reduction is applied at 800 ISO and above, but you get the choice of four settings: Low, Normal (the default), High, and Off, although even when ‘Off’, there’s some noise reduction applied above 3200 ISO. You can see how the same image looks at all sensitivities and NR settings in our Nikon D300 noise results page.
Image processing is taken care of by Nikon’s new EXPEED processor, which not only races through data to provide a very quick handling experience, but also includes a number of tricks. First is the automatic removal – or at least reduction – in optical chromatic aberrations, best recognised as purple fringing. This correction is applied automatically to all JPEG and TIFF files whether you like it or not, but not to RAW files, which gives us a chance to make a comparison.
Below are crops taken from our resolution test chart taken with the D300 and DX 17-55mm f2.8 lens at f8. We shot this using Large Fine JPEG and 14-bit lossless RAW mode. Below left is a crop taken from the JPEG file which still shows some fringing, but not as much as is visible in the RAW file, middle. Below right is the same RAW file, with Capture NX’s default CA Correction applied, and as you can see it’s essentially eliminated any fringing.
Nikon D300 JPEG from camera |
Nikon D300 RAW without Auto CA |
Nikon D300 RAW with Auto CA | ||
 |
 |
 | ||
100% crop |
100% crop |
100% crop |
The in-camera reduction of chromatic aberrations varies in effectiveness depending on the lens in question. Our example shows there’s some reduction, but others have reported an eerily complete removal of fringing from lenses which regularly suffer from the problem. We understand the feature looks for CA in the image, irrespective of the lens used, so it should hopefully work with non-Nikkor optics; we will report back with details as we find them.
Another feature of EXPEED is Active D-Lighting which adjusts the tonal curve of images in an attempt to boost darker areas without blowing highlights. Unlike the previous D-Lighting system, the Active version applies the adjustments to JPEG and TIFF files as they’re being processed, although normal D-Lighting is still offered in the Retouch menu for existing images.
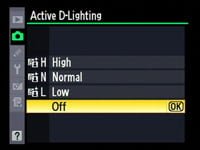 |
Active D-Lighting is offered in Low, Normal or High settings and is non-reversible on JPEGs and TIFFs. The setting is also stored with RAW files and applied as you open them in Capture NX, but the software allows you to adjust the setting, or switch it off entirely if preferred. You don’t however get this option on RAW files if they were taken with Active D-Lighting switched off.
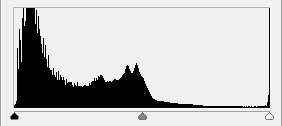
Active D-Lighting preserves highlight areas by first reducing the exposure slightly, then boosting the darker areas with a tone curve. You can see two examples of this below taken with the D300 in Aperture Priority at f8 and 100 ISO. The first image, on the left side is a normal exposure without Active D-Lighting, and the camera metered a shutter speed of 1 /2 a second. To the right is an image taken with Active D-Lighting set to its maximum setting of High, which with the same aperture and sensitivity resulted in an exposure of 1 /3 of a second.
Nikon D300 Active D-Lighting | ||
 |
 | |
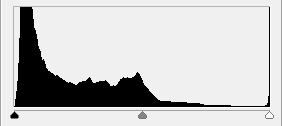 |  | |
Active D-Lighting Off: 100 ISO, f8, 1/2 sec |
Active D-Lighting High: 100 ISO, f8, 1/3 sec | |
The histograms below each image illustrates exactly how Active D-Lighting works. The shorter exposure has retained more highlight detail, which in turn has meant the bright window areas are less burnt-out. At the other end, shadow and mid-tones have been boosted, although with some undesirable spikes.
We applied Active D-Lighting to other images and it was always quite a subtle effect even when set to High. Some highlights were definitely better preserved, but mid-tones rather than shadows seemed to receive greater apparent boosts to the eye. There’s also inevitably some detrimental impact on noise levels, but it’s a feature you may like if you want in-camera tonal corrections.
Finally, in terms of traditional dynamic range, we found 12-bit RAW files taken at the same exposures as in-camera JPEGs contained greater tonal detail at both ends of the scale. The jump from 12 to 14-bit was much more subtle though and in some cases almost impossible to spot, but since the file sizes aren’t much greater, we’d recommend using it unless you need faster continuous shooting.
 |
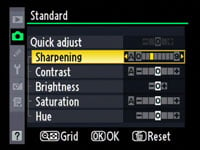 |
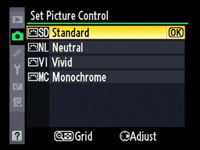
More traditional image processing options are applied using a series of Picture Controls. The Standard, Neutral and Vivid Picture Controls all offer adjustment of Sharpening, Contrast, Brightness, Saturation and Hue, while the Monochrome Picture Style swaps Saturation and Hue for Toning and Filter Effects. If you’re in a real hurry, a Quick Adjust option can boost or lessen a group of settings in one go. We found the Standard Picture Control used for our results and gallery pages was quite refrained and could easily handle a boost in contrast and sharpening for punchier output.
 |
Nikon D300 continuous shooting
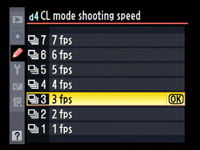 |
The Nikon D300 offers two continuous shooting modes on the Release dial: CL for Continuous Low and CH for Continuous High. Set to Continuous High mode, the D300 can shoot at 6fps, while Continuous Low is configurable between 1 and 7fps. The 7fps setting is applicable when the optional MB-D10 battery grip is fitted as this can also boost the Continuous High speed to an impressive 8fps.
To test the D300’s continuous shooting capabilities we fitted a Lexar Professional UDMA 300x 4GB compact flash card. With the camera set to Large Fine JPEG (optimised for quality) at 100 ISO and with Active D-Lighting switched disabled, we fired-off 50 frames in eight seconds before the D300’s buffer filled. This corresponded to a rate of 6.25fps. The camera was ready to shoot in smaller bursts almost instantly, and the data from the first batch was fully written to the card 38 seconds later.
Set to record 12-bit RAW only with lossless compression, we fired-off 20 100 ISO frames in 3.3 seconds before the buffer filled. This again was just over 6fps. Set to 14-bit with lossless compression, we managed 30 100 ISO frames in 11.5 seconds before the buffer filled, corresponding to a rate of 2.6fps.
 |
Increase the camera’s sensitivity and the buffer reduces. The drop occurs at 800 ISO, where the frame rate remains the same, but you’re only looking at smaller bursts. We fired-off 21 Large Fine JPEGs in 3.5 seconds before the camera paused momentarily.
So in terms of speed, the D300 performs as well or slightly better than its quoted specification, which coupled with the impressive AF capabilities, makes it an ideal camera for action and sports photography.
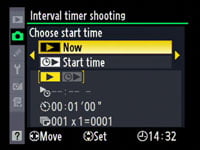
Finally, the D300 also features built-in Intervalometer capabilities to shoot at timed periods. You can set the start time, interval period (from one second to one day) and both the number of intervals (up to 999) and shots taken per interval (up to nine).


