Nikon D500 review
-
-
Written by Gordon Laing
In depth
The Nikon D500 is a professional DSLR with a 20 Megapixel APSC / DX format sensor. Announced in January 2016 alongside the full-frame D5, it brings many of the features of the flagship body to a comparatively smaller, lighter and more affordable form factor, and is aimed at sports, wildlife and event photographers.
The D500 is also the long-awaited successor to Nikon’s previous high-end DX body, the D300s, launched a considerable six and a half years ago. That’s a long time in the digital age and many believed Nikon had given up on high-end DX bodies, leaving the market open to Canon with its EOS 7D and 7D Mark II. Suffice it to say, the D500 significantly improves every aspect of the D300s, making it a highly desirable upgrade for owners of that series, not to mention D7x00 users who fancy a tougher, faster and more sophisticated body without the expense of building a full-frame system.
The headline features of the D500 include a new 20 Megapixel CMOS sensor, 10fps continuous shooting with a huge buffer to accommodate up to 200 RAW files (when recording to an XQD card), a new 153-point AF system inherited from the D5 which covers almost the entire DX frame, a large viewfinder with 1x magnification, weatherproof sealing equivalent to the D810, a 3.2in tilting touch-screen monitor with XGA resolution, dual memory card slots (SD and XQD), 4k movie capabilities and built-in Wifi, NFC and Bluetooth, the latter exploited by the new SnapBridge technology which can keep the camera and phone connected with a low-power link to tag images with GPS co-ordinates and trickle photos across without the involvement of Wifi. Find out how it all comes together in practice and whether it’s the high-performance camera you’ve been waiting for in my in-depth Nikon D500 review!
Nikon D500 podcast / video review
In the following video, Doug Kaye and I discuss the Nikon D500 in detail. My full review follows.
Nikon D500 design and controls
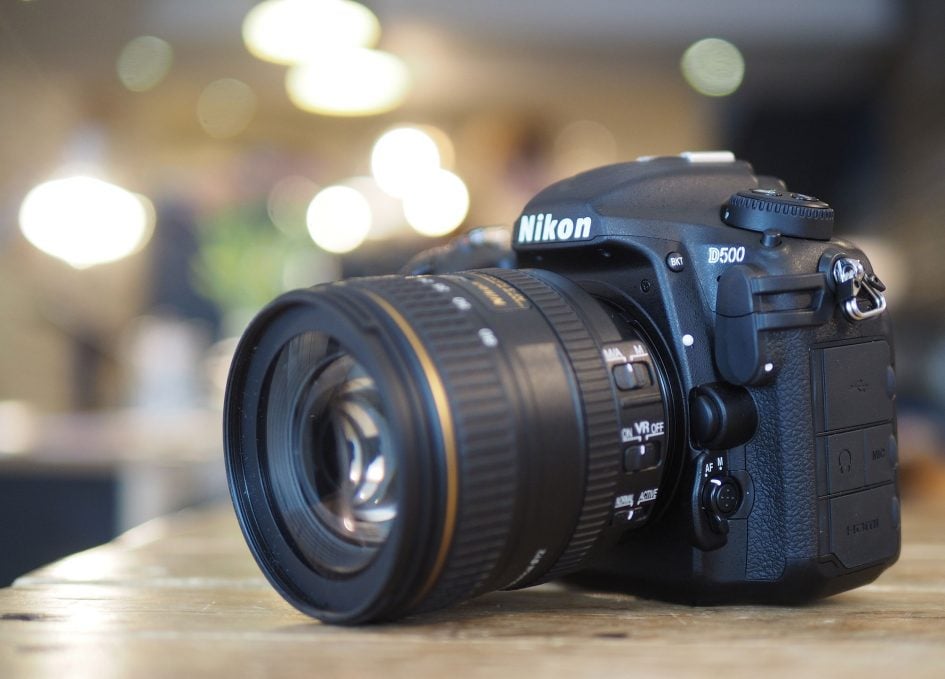
The Nikon D500 is immediately recognizable as one of the company’s higher-end DSLRs, based on styling and a number of tried-and-trusted controls from earlier models. There are of course improvements and additions here, but even they feel like they’ve been part of the family for many generations. As with earlier bodies, it all adds up to a very reassuring and familiar experience that lets you get shooting without delay. Nikon is a master at this and while the D500 is designed as a seamless partner for the flagship D5, owners of the D300s, D700 or even D7x00 models will equally feel right at home.
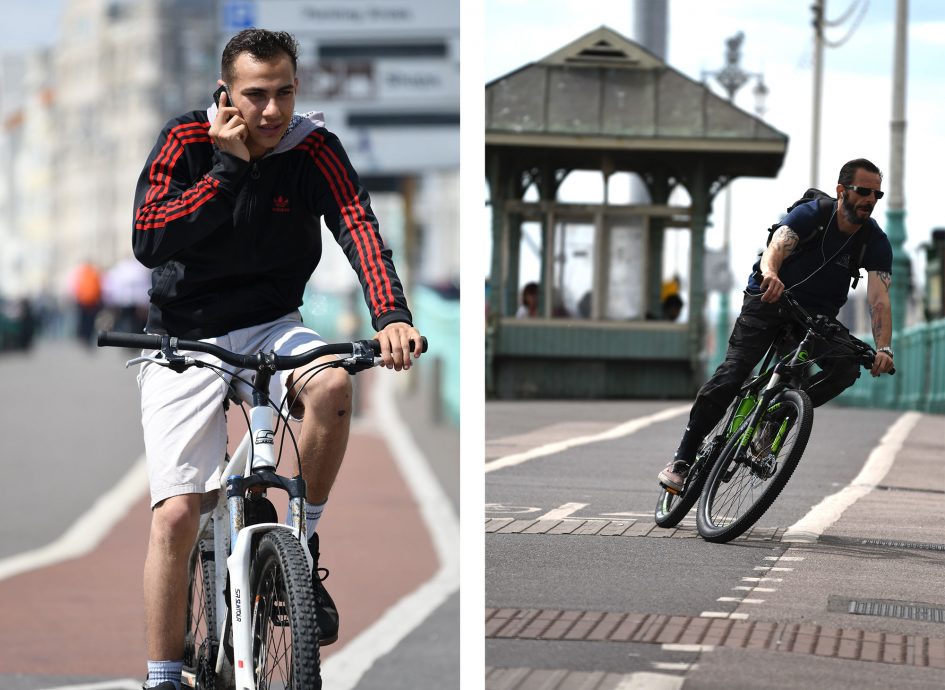
As a higher-end DSLR aimed at enthusiasts and professionals, the D500 is understandably substantial. Measuring 147x115x81mm and weighing 860g with battery but no lens, it’s roughly similar in size and weight to the D300s and even the full-frame D750. Canon’s EOS 7D Mark II is also similar in size, although a little heavier at 910g. While these vital statistics will be the norm to anyone who’s used to shooting with a semi-pro DSLR, they still come as a shock to those who – like me – have mostly been shooting mirrorless in recent times. Similarly when it came to taking the D500 out for testing, I was surprised how much of my bag it consumed with just two lenses compared to my typical mirrorless kit, and also how much more attention it attracted on the street compared to, say, an Olympus OMD EM1 or Fujifilm XT1.
To be fair, it’s a little like saying a truck is larger than a car – of course it is, but the market has changed considerably since the D300s. Six years ago, models like the D300s were bought not just for tough sports and wildlife environments, but by people who simply wanted a high-end camera for general use. Since then though, mirrorless systems have provided smaller and lighter alternatives that are equally appropriate for many styles of photography, so if size and weight are important to you, I’d advise picking up a variety of bodies in person to see which would be acceptable for your use.
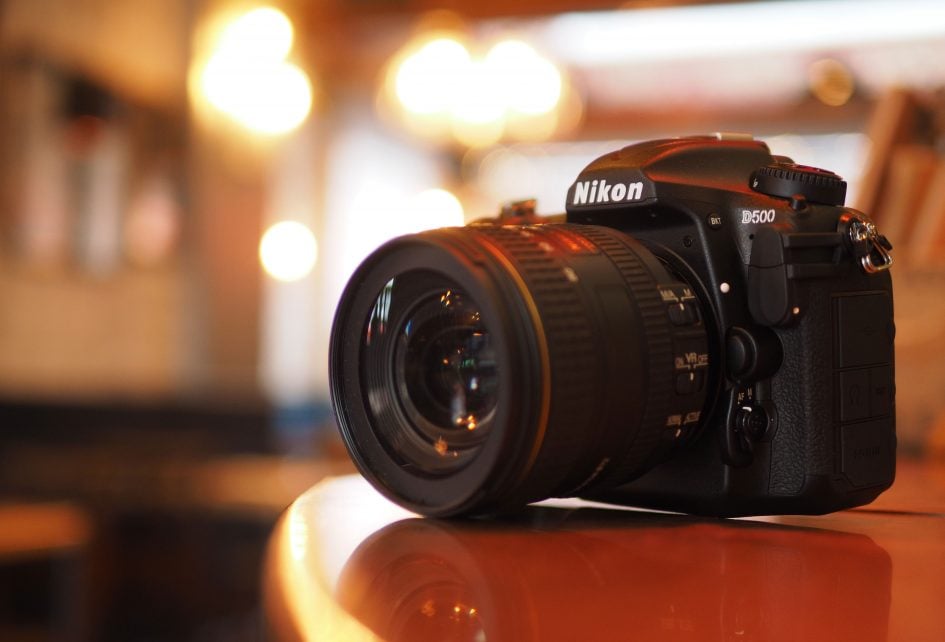
If you like your cameras substantial though, you won’t be disappointed by the D500, especially if you have large hands. Like earlier semi-pro and pro bodies from Nikon, it feels great in your hands, exuding confidence. The weatherproof body and generous grip feel tough but comfortable, and again all the controls fall easily to hand. The chunky thumb and finger dials also feel very tactile with positive clicky feedback when turned – it seems obvious, but so many companies get this wrong with unnecessarily small dials that are easy to spin too far.
Like earlier high-end Nikon bodies, most of the adjustments involve holding down a button like a shift key while turning either the thumb or finger dial. This includes the actual shooting mode: there’s no command dial here, just a Mode button (now on the upper left side) which with the thumb dial cycles through the options. Apart from an HDR mode in the menus, there’s no frivolities like special effects, scene presets, panoramas or even a fully Auto mode; instead the Mode button and thumb dial simply cycle through Program, Aperture Priority, Shutter Priority and Manual. A pure approach shared with other Nikon pro bodies.
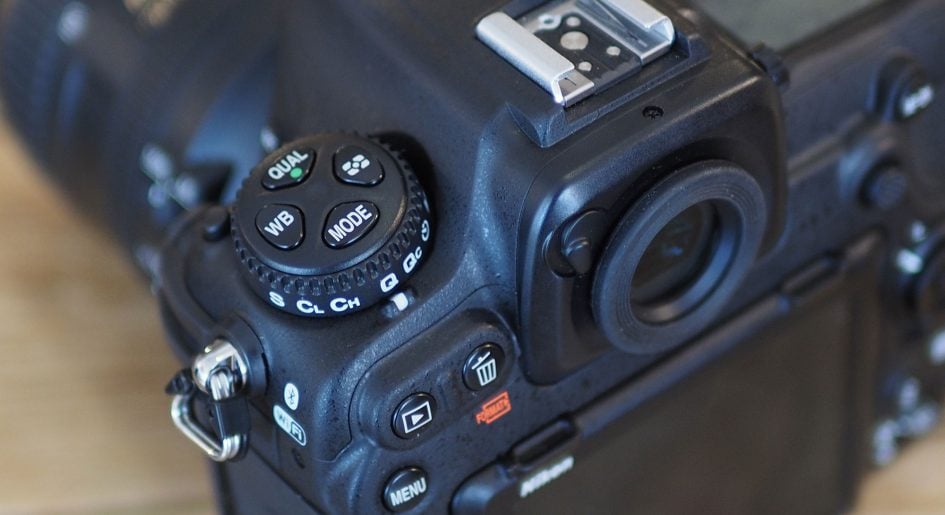
Joining the Mode button on a circular mound on the upper left side of the body are three more buttons for the image quality, white balance and metering. In the case of white balance and quality, you can use both the thumb and finger dials to adjust different aspects – for image quality, the thumb dial adjusts the compression while the finger dial adjusts the resolution.
Beneath the four chunky buttons on the upper left side is the drive mode dial, as usual, locked in position with a button to one corner. This lets you set the D500 to Single, Continuous Low, Continuous High, Quiet, Quiet Continuous, Self Timer and Mirror Lockup; note if you’re looking for the electronic front-curtain option to reduce vibrations from the actual shutter itself opening, it’s only available during Live View.
Another tell-tale sign of a high-end Nikon DSLR is the generous LCD panel occupying most of the upper right surface. In normal handheld operation, you’d typically use this panel to check the settings as you adjust them, but you can alternatively mirror them using the main screen on the rear by pressing the Info button. In either case, there’s a wealth of shooting information clearly presented. The only thing you’ll need to make a decision on, regarding the upper screen, is whether to display the ISO or the number of shots remaining in the lower right corner. I choose ISO, since the camera switches back to shots remaining when the metering goes into standby or to the remaining buffer when the shutter is half or fully pressed.
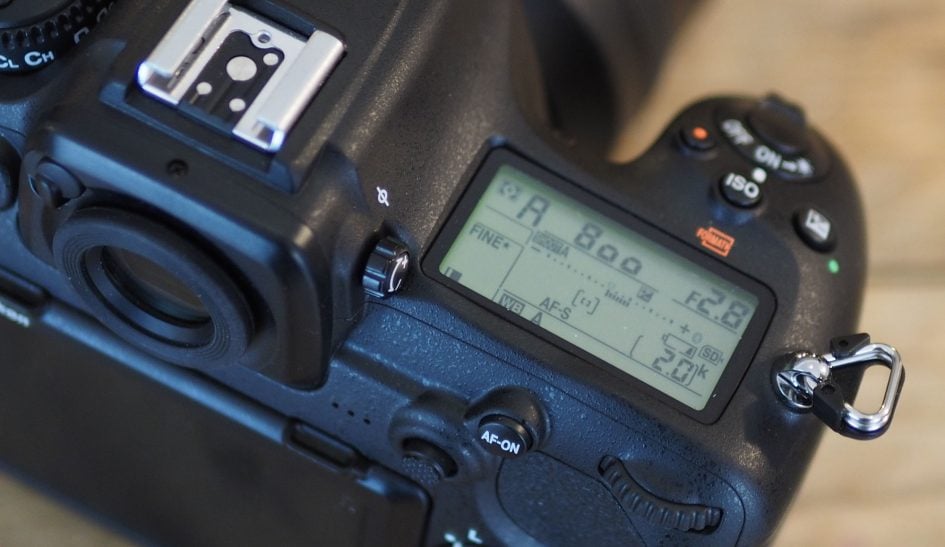
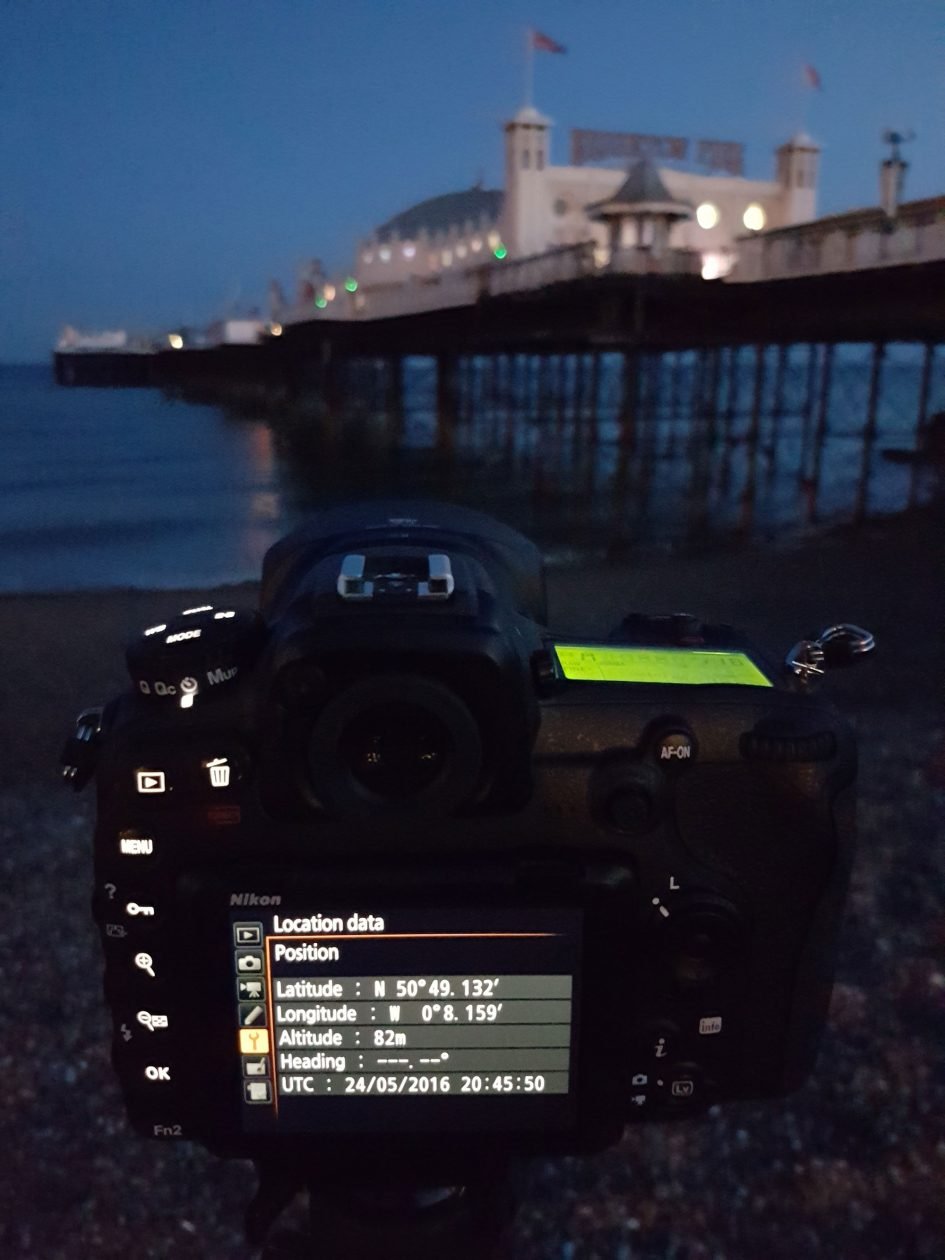
On top of the grip you’ll find three dedicated buttons for movie record, ISO and exposure compensation, alongside the shutter release with a power On and Off collar. Again like older models, a small spring-loaded clockwise twist of the collar illuminates the upper LCD display, but in a welcome first for a DX-format body, now also back-lights a number of buttons on the camera, making them much easier to find in dim or dark conditions. All the buttons on the left side of the body, including the drive modes and main four buttons on top become backlit. These cover most of the operations that you couldn’t otherwise feel around, and make the camera so much easier to use in the dark. You can see this clearly below, and also see how the location is on-screen via SnapBridge.
To the right of the screen on the back of the camera you’ll find Nikon’s usual lockable eight-way control pad, used to navigate menus along with repositioning the AF area, but it’s now joined by a new chunky joystick above and to the left a little which by default is dedicated to the AF area position alone. I love having a control dedicated to the AF area and although the eight-way pad already offered similar functionality, I’m not complaining. The joystick and AF-ON button also fall easily under your right thumb as you shoot through the viewfinder – well, unless you have shorter digits anyway.
Like other recent Nikon bodies, a small collar switch to the lower right of the screen controls the Live View and movie modes: first switch between stills or movies, then press the LV button in the middle to start composing with the screen. To capture stills in Live View, just use the normal shutter release and to start and stop movies, use the red button alongside the shutter release.
Moving onto composition, the D500 is equipped with a large bright optical viewfinder and a 3.2in tilting touchscreen. Starting with the optical viewfinder, the D500 penta-prism head delivers a view with 100% coverage and 1x magnification. This matches the specification of Canon’s EOS 7D Mark II viewfinder, although the fractionally smaller sensor used by Canon’s APSC bodies means the actual view is a tad smaller.
While the viewfinder is undoubtedly large for an APSC DSLR, I think it’s important to compare it against alternatives. In full-frame terms – the measurement also quoted by mirrorless cameras – the magnification of the D500 is actually equivalent to 0.67x. In comparison the full-frame D750 squeezes 0.7x for a slightly larger view, but if you want a noticeably larger viewfinder experience you should have a look at the Fujifilm XT1 (0.78x) and Sony Alpha A7r II (0.78x). I had both bodies on-hand when testing the D500 and switching between their viewfinders really revealed the difference in scale. The Fuji and Sony viewfinder images were so much larger they delivered, to me, a much more immersive compositional experience.
Of course an optical viewfinder is a completely different technology to an electronic one, and a larger magnification would require a giant head, but when weighing up the pros and cons of each type, the apparent image size is an important one. On the upside, as an optical technology, the D500’s viewfinder doesn’t slow-down or become noisy in low light and neither does it suffer from lag when panning while shooting bursts – an important factor when shooting subjects in motion. Beyond the LCD overlay, it doesn’t consume any power either, allowing you to extend your battery life.
Electronic viewfinders still enjoy a lot more potential for superimposing graphics and guides, but Nikon pioneered LCD overlays in DSLR viewfinders so the D500 unsurprisingly offers a switchable alignment grid, along with indicating the active AF area from a broad array. The viewfinder can also display icons to indicate if the camera’s in black and white mode, if it’s set to capture a 1.3x crop, or if flicker is detected. All handy, but again worth remembering an EVF would actually preview any colour effects or cropped modes as you compose. The D500 will of course preview any crop or colour adjustment when composing with the screen in live view though. My point though is it’s not a one-sided argument for viewfinders – there are pros and cons to both optical and electronic viewfinders.
Small scales along the bottom and right sides of the D500’s viewfinder can also act as a dual-axis leveling gauge, although it’s a little convoluted to enable the feature as you’ll first need to assign ‘viewfinder horizon’ to one of the function buttons, and annoyingly this option is not available to all function buttons. I had to re-program the Pv button by the lens barrel, which I normally reserve for power aperture adjustments in movies. But the feature is there is you want it – and can find it. Alternatively you can view a graphical dual-axis gauge on the main screen in live view or by itself via a Setup menu option if preferred.
Below the viewfinder image is the usual array of shooting information including shutter, aperture, exposure compensation, ISO or shots remaining, metering mode and more.
Just before moving onto the screen, it’s worth mentioning the D500’s optical viewfinder also offers a built-in curtain to block extraneous light entering the camera with a flick of a small switch. This is another feature of high-end Nikon DSLRs versus lower-end ones which employ slide-on covers.
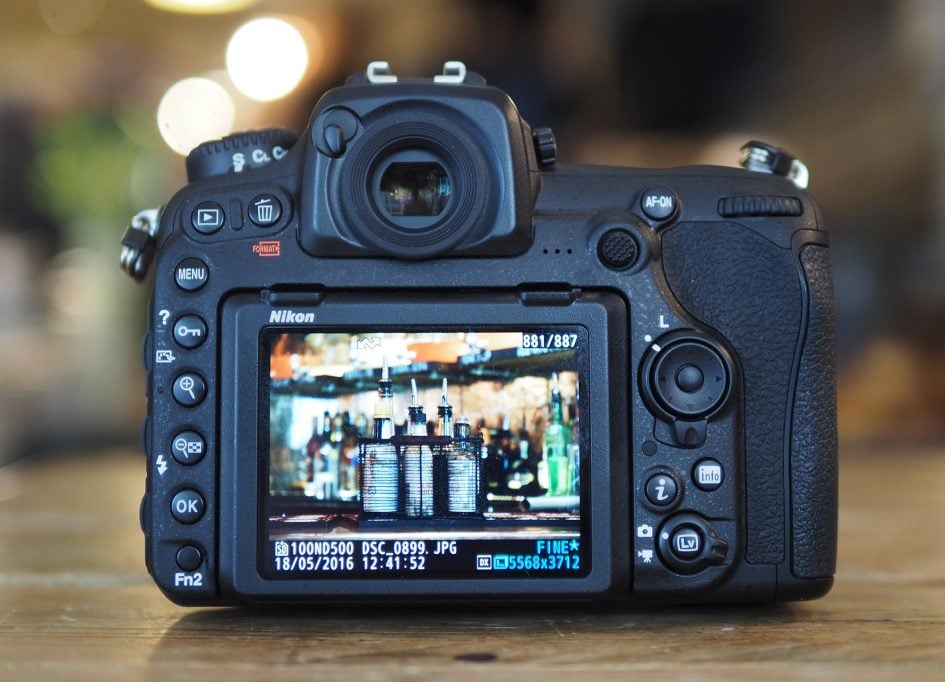
Nikon DSLRs may be known for their traditional photographic values, but it’s important to remember they have also debuted a number of very modern technologies including the first DSLR to film video (the D90). I also remember them deploying the first VGA screens on DSLRs and now the D500 takes monitor resolution a step further than most with a generously-sized 3.2in panel sporting 2359k dots – that’s equivalent to XGA resolution or 1024×768 colour pixels, a significant step-up over the 640×480 colour pixels of the VGA screens on most digital cameras at the time of writing.
I should note though the D500’s screen, like previous Nikon bodies, is 4:3 shaped which means images shot in the native 3:2 shape are composed or played-back with a black bar at the bottom. Nikon uses this spare space for shooting information, but it does mean the active image area on the screen measures closer to 3in across the diagonal. In contrast, Canon normally employs 3:2 shaped screens which match the shape of its images. While this means shooting information is always superimposed at some point on the photo, it does at least fill the panel for a larger apparent image. You really notice it on Canon bodies which also employ 3.2in screens as the image is visibly bigger. But the higher resolution of the Nikon panel to start with at least means it now enjoys a detail benefit over the typical 720×480 pixels of the Canon screens.
In practice the images delivered during composition and playback on the D500, not to mention menu fonts, look very crisp and detailed, although to my eyes it’s not the same degree of difference between VGA panels and the lower resolution ones preceding them; it’s a bit like Retina or High DPI screens, where the effect in some situations can be subtle.
When composing in Live View or for movies on the D500 you can zoom slightly beyond a 1:1 view and easily confirm precision focus, although once you start filming you can no longer take a closer look; to be fair this isn’t unusual, although it is annoying not to have any focus peaking to aid manual focusing when filming. This is a stumbling block for people filming with Nikon DSLRs, especially in the less forgiving 4k format, although you could connect an external display to the HDMI port with focus peaking viewing options.
A neat option when composing in Live View is Split Screen Display View, which as the name suggests, splits the screen down the middle to show two different areas of the composition at high magnification. One application for this is to move the magnified areas to show the horizon at the far left and right sides of the image. With the magnification you’ll easily be able to spot if the horizon is slightly higher or lower on one side compared to the other, indicating a mild skew. Once they’re in-line with each other though, you’ll know you have a perfectly straight and square horizon. I used this technique for a straight horizon in my long exposure image of Brighton’s Pier later in the review.
In photo playback you can zoom-in by seven steps, with the fifth representing a 1:1 view. The sixth view may be a step beyond 1:1, but thanks to the very fine resolution of the screen still looks very crisp. Like other Nikon DSLRs, you can tab through pages of shooting information by pushing the rocker control up and down. It’s also possible to select a view which allows you to tag images for subsequent downloading via SnapBridge wireless, see later in the review.
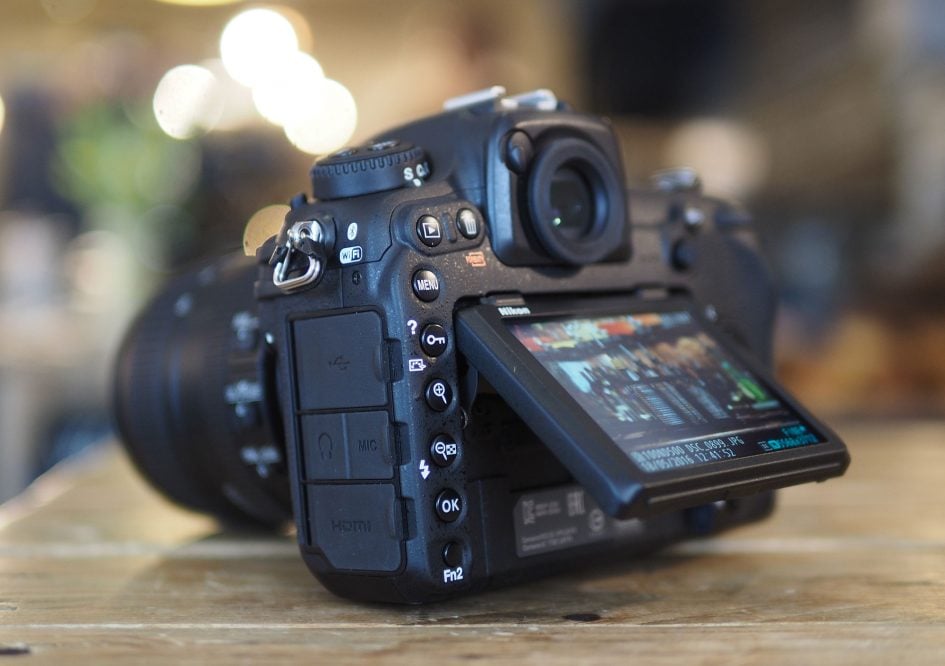
So the Nikon D500 screen is large and detailed, but there’s two other things that make it special. First is that it can tilt vertically, angling up or down by 90 degrees for easier composition at low or high angles – and the mechanism feels very sturdy in use, more so than most mirrorless cameras with the same articulation. Secondly it’s touch-sensitive – hurrah! I’ve long campaigned for more articulated touchscreens, so to find one on a high-end DSLR is a welcome move.
Nikon’s been a little conservative over what you can do with the touchscreen, limiting most of it to shooting in live view and movies or navigating playback, so there’s no tapping through menus or adjusting settings other than to enter copyright text. In playback you can swipe through images and pinch to zoom, and in live view or movies you can tap to reposition the AF area. In stills mode you can also configure a tap to fire the shutter if desired and in movies you can tap to pull-focus, albeit with the risk of visible and audible hunting – see clip. A double-tap in playback zooms-in on the tapped area and lets you drag the image by touch, but you can’t navigate in magnified view using the thumbnail frame and there’s no vertical swipe to go cycle the shooting information page views either. But I’m not complaining – I’m just delighted to find a tilting touchscreen on a high-end DSLR.
Moving onto storage, ports and connectivity, you’ll find two memory card slots within the grip on the right side of the body: one for SD, the other for XQD. The D500 exploits the speed of XQD cards to achieve its impressively deep RAW buffer, but even with a decent SD card it can still rattle-off plenty of shots – see the continuous shooting section later. Like other dual-slot cameras, you can configure them to either overflow (when one is full it switches to the other), backup (the same image is recorded to both cards) or configure it to record RAW files to the primary card and JPEGs to the secondary card; it’s also possible to set whether XQD or SD is the primary card.
Note at the time of testing I didn’t have access to an XQD card, so I used SD cards exclusively. I’ve heard some people reporting lockups with the D500 and certain cards, but I didn’t experience any during my tests. If you’re concerned, search for a card type and the D500 to see if anyone’s reporting any issues with that combination.
On the left side of the body you’ll find three rubber flaps: the first at the top houses a full-size USB 3 port, the one in the middle has a pair of 3.5mm jacks for a mic input and headphone output, while the third at the bottom is home to a Type-C HDMI port; Nikon also considerately supplies a plastic surround for use with the HDMI port to help prevent plugs from coming loose. Meanwhile in the upper right corner of the front of the body you’ll find two flaps covering the PC Sync port for external lighting and Nikon’s ten-pin terminal for connecting accessories like remote cords or GPS receivers. You can alternatively trigger the shutter remotely or tag images with GPS positions using Bluetooth and Wifi via SnapBridge which I’ll discuss in detail later.
On top of the body there is of course a hotshoe for mounting Speedlite flashguns, or the optional wireless WR-R10 remote flash controller which can control up to 18 SB-5000 flashes over distances up to 30m using radio waves. You can also use the hotshoe to slide-on optional microphones including Nikon’s own ME-1, although all electrically connect to the jack on the side of the camera. Cementing its pro credentials, the D500 does not have a popup flash, although interestingly looking back, the D300s did.
In terms of battery, the D500 is powered by an EN-EL15 Lithium Ion pack rated at 1900mAh. When used to shoot still photos under CIPA conditions, the packs should be good for over 1000 shots (1240 according to Nikon), but if you start using Live View, filming some video or have SnapBridge’s always-on Bluetooth connection enabled you’ll unsurprisingly find this figure dropping. When shooting still photos in bursts using the optical viewfinder I found I could easily achieve over 800 photos even with SnapBridge tagging their GPS positions, but include a few minutes of Live View composition, video or some Wifi access and it could fall to just a few hundred images. To be fair, it’s still more than you’d typically get from a mirrorless camera, as the battery is larger than most and the presence of an optical viewfinder is a great saver of power compared to electronic composition. In terms of filming movies, I found half an hour’s worth of 4k video generally consumed about 40 to 45% of a fully-charged battery, allowing me to film two clips lasting an hour in total with a little over 10% remaining.
If you want longer life or more comfortable shooting in the portrait orientation, you can fit the optional MB-DB17 battery grip which effectively doubles the shots using an EN-EL18a battery or roughly matches an EN-EL15 with eight AA alkaline batteries if preferred.
Finally a quick note to owners of older EN-EL15 batteries. A compatibility issue has been identified with the D500 and EN-EL15 packs manufactured before 2013 and labeled with Li-ion01. If you have any of these batteries and can provide a proof of purchase for the D500, Nikon will replace these packs free of charge if desired. At the time of writing, the incompatibility only affected the D500.
Nikon D500 lenses
The Nikon D500 features an F-mount which can accommodate most Nikkor lenses, with the DX-format sensor resulting in their field of view being reduced by 1.5 times – so the DX 16-80mm f2.8-4 zoom that’s optionally bundled with the D500 delivers a field-of-view equivalent to 24-120mm. Here’s how that coverage looks in practice.

Above: Nikkor AF-S 16-80mm coverage on D500. Left at 16mm (24mm equiv) and right at 80mm (120mm equiv)
The new DX 16-80mm f2.8-4 is a very practical general-purpose zoom lens, covering a useful range of focal lengths from wide to short telephoto, while unusually sporting a brighter than average focal-ratio. This is both useful in lower light as well as achieving slightly shallower depth-of-field effects than typical f3.5-5.6 zooms. It’s also the first DX lens to feature Nano coatings, a move I welcome, although there’s still no weather-sealing. I used the lens extensively when testing the D500 and was very satisfied with its performance – you can see a variety of sample images with it on my gallery page.
As with all Nikon DSLRs, you’ll need recent lenses to support the full focusing and metering modes. There’s a compatibility chart in the manual or specification sheets, but just briefly you’ll need a Type G, E or D AF (including AF-S and AF-I) Nikkor to support all functions including the most sophisticated 3D Colour Matrix Metering III system. As a higher-end body, the D500 can also drive the AF on older non-AF-S lenses.
Nikon D500 shooting modes
The Nikon D500 offers just four main shooting modes: Program, Aperture Priority, Shutter Priority and Manual. There’s no exposure mode dial – instead like other high-end Nikon DSLRs, you hold down the Mode button as you turn the thumb dial to select the desired option.
Unlike the D750, which is pitched as a lower-end model despite its full-frame sensor, you won’t find any scene presets or effects on the D500. There may be HDR and multiple exposure options buried in the menus and of course the chance to adjust colour, tone and sharpness with the Picture Controls, but otherwise it’s pretty serious shooting only on the D500.
The shutter speed range operates between 1/8000 and 30 seconds with a 1/250 flash sync. Like other recent Nikon DSLRs, there’s two options for longer exposures: Bulb and Time, the latter conveniently opening the shutter with a single press and keeping it open until you press the shutter release again.
It’s also possible to trigger a Time exposure remotely over Wifi using the smartphone app, although counter-intuitively this won’t work with the camera pre-set to Time; instead you’ll need to select Bulb in Manual mode on the camera then initialise a remote shooting session with the smartphone app, at which point the app asks if you’d like to make a Time exposure instead. Other caveats to be aware of include a lack of live view on the smartphone when the camera’s set to Bulb, preventing remote composing, and also the absence of any on-screen timers other than the phone’s own clock – and watch out, as switching to another app on your phone, like a stopwatch, will end the exposure. So with all that said, it might be easier to start and end a Time exposure with a simple press of the shutter release and a black hat over the lens. Indeed that’s what I did for the four minute, unfiltered exposure below, straight out of camera without long exposure noise reduction. Note I also employed the magnified split screen option in live View during composition to ensure the horizon was straight.
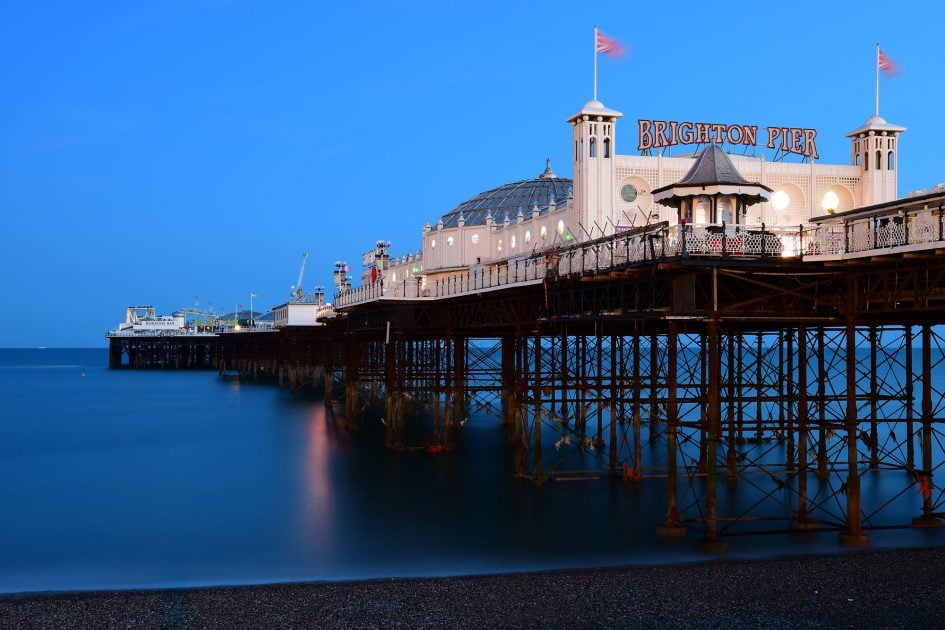
Above: Nikon D500: 4 minute exposure without ND filters or noise reduction. Out-of-camera JPEG
The shutter is rated for an impressive 200k actuations and makes a reassuringly solid ‘ker-chick’ sound as you shoot; I’d say it’s a more traditional, mechanical sounding shutter and mirror-slap than Canon’s recent models which in contrast sound more electronic and motorised.
Like other DSLRs to date, there’s no electronic shutter option in Live View, so no means to either shoot faster than the top 1/8000 mechanical shutter nor the chance to shoot in true silence. There are a pair of ‘Quiet’ drive modes on the D500, one for stills, the other for continuous, but essentially all they do is delay the period between the ‘ker’ and the ‘chick’, giving the impression of quieter operation, but it’s far from silent. For me this is another advantage of mirrorless cameras, most of which now offer electronic shutters for truly silent operation and deploying quicker shutters which are handy for shooting with very large apertures in bright conditions.
While there’s no 100% electronic shutter option on the D500, there is the chance to deploy an electronic first-curtain to eliminate the chance of shutter shock at the start of an exposure. This is only available in Live View though, so the necessity of entering this mode and using the slow contrast-based AF system means it’s only really practical for more considered shooting, probably on a tripod. There’s also a Mirror-lockup option on the Drive mode wheel for use when composing through the viewfinder – this opens the mirror with one press of the shutter release, but waits for a second press to fire the shutter.
Metering duties are performed by a new 180k dot RGB sensor, compared to the 91k dot sensor of the D750 and D810. Like those models, it’s sufficiently high resolution to actually perform face-detection even when framing with the optical viewfinder, and thanks to the broad array of AF areas, the camera stands a good chance of focusing on it too. Previously the ability to perform face detection anywhere on the frame was something reserved for electronic composition, but the ever-increasing resolutions of metering sensors now means it’s not just possible but very practical with the optical viewfinders of DSLRs. You may not see a box around a detected face when framing with the optical viewfinder, but if the feature is enabled in the menus, the D500 will meter for the face and if the wide area AF mode is active, it’ll focus on it too.
On previous Nikon bodies I found the Matrix metering often slightly over-exposed for my taste, especially for bright outdoor compositions. Maybe this was to protect shadow detail or to try and capture the optimal tonal range for subsequent post-processing. But for good-looking JPEGs out of camera, I’d invariably need to dial-in some negative compensation or deploy Active D-Lighting.
For the first time with the D500 though, the new metering sensor and 3D Matrix Metering III delivered the exposures I was looking for. Every single shot you see on my sample images page was taken with Matrix metering and no compensation or Active D-Lighting necessary. As someone who mostly shoots with the live preview of a mirrorless viewfinder these days, I found the D500’s Matrix metering very reassuring. I could shoot (blind to exposure preview) with the optical viewfinder and know the camera would almost always get it absolutely spot-on.
Or of course you could choose one of the alternative metering options. In addition to Matrix metering which deploys the full technology of the sensor to figure out what’s in the scene, you can choose more traditional Center-weighted (with a choice of circle sizes), Spot (3.5mm circle which can also be linked to a single AF area), or the recent Highlight-weighted option inherited from the D810 and D750 which places greater importance to the highlights in the scene and is ideal when shooting brightly-lit subjects against a dark background like stage performers.
If however you do want to deliberately under or over-expose, the D500 is well-catered for. Exposure compensation is offered in a broad +/-5EV range, and I’m pleased to report exposure bracketing is inherited from the higher-end models with the choice of two to nine frames at increments up to 1EV, or two to five frames at bigger gaps up to 3EV apart. This is a differentiator with the lower-end bodies, although at least the D750 shares the same capabilities.
HDR fanatics will appreciate the D500’s AEB, while those who want to experiment with the technique in an easier environment can deploy the camera’s built-in HDR mode which takes two exposures and combines them into a single JPEG. You can choose an automatic exposure differential or set it manually between 1 and 3 EV, and there’s the choice of three smoothing options for the composite. Note the HDR mode is not available when RAW or RAW+JPEG is selected in the image quality. Below is a comparison of a normal JPEG against the HDR mode set to 3 EV.
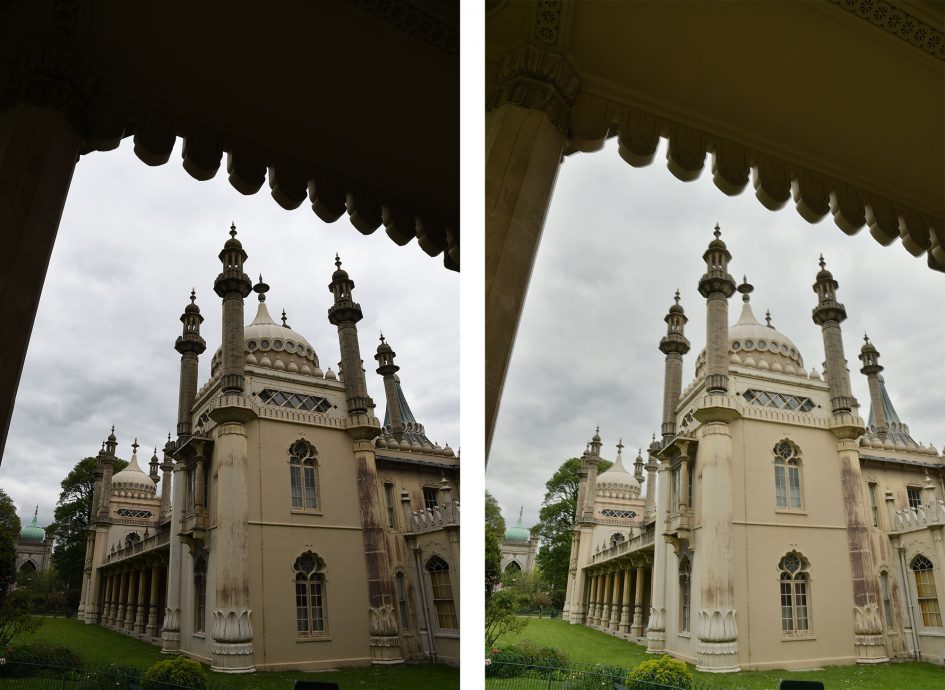

Above: Nikon D500 HDR (disabled, left / enabled with 3EV range, right)
If you’re into more surreal multiple exposures, the D500 can alternatively combine two to ten different exposures into one image with a choice of Add, Average, Lighten or Darken to combine them.
A highlight of many Nikon cameras are their built-in intervalometers. The Interval Timer Shooting menu lets you choose a start time from one minute to one week in advance, interval times of one second to 24 hours, and numbers of intervals from one to 9999; there’s even the chance to record one to nine frame at each interval. So there’s loads of options to cover timelapse shooting, and the D500 considerately lets you know when the process will complete, adjusting its forecast as you make changes to the settings.
If your goal is simply to produce a timelapse movie, you could alternatively choose the Timelapse Photography option in the Movie menu. This has more basic interval options, but conveniently encodes the images as they’re captured into a video with the current movie quality. You can set the intervals between one second and ten minutes, and the shooting time to a minute shy of eight hours. The actual still photos aren’t kept in this mode, but instead are appended to a steadily growing video that you can terminate at any point in the process and still end up with a playable file. There’s also an exposure smoothing option which seems to eliminate distracting steps between shutter speeds, thereby avoiding flickering. At the end of the process, or if you interrupt it by pressing the OK button, a video is automatically encoded at the current quality settings, so be sure to have these set to the desired quality before you start. Note if you’re aiming for a 4k movie, be sure to frame it in the Movie Live View mode first as there’ll be the same 1.5x crop applied as when filming 4k movies normally.
To try it out I filmed for 35 minutes (using the AF-S 70-200mm f4 at 70mm) at three second intervals for the sunset timelapse below, using Aperture Priority, fixed ISO, fixed focus, fixed white balance and the 4k movie setting; I let the camera work out the shutter speed, and the exposure smoothing option has avoided any flickering. Sadly the sunset wasn’t the most spectacular, but you get the idea.
Above: Download the original file (Registered members of Vimeo only). Sample movie filmed with the Nikon D500 in its Timelapse Movie mode. I shot for 35 minutes at one frame every three seconds, using Aperture Priority and a fixed ISO. I used the AF-S 70-200mm at 70mm which the camera cropped further thanks to using its 4k quality option.
Nikon D500 autofocus and continuous shooting
The AF system is arguably the highlight of the D500, which employs the same 153-point MultiCAM 20K module as the flagship D5. This includes 99 cross-type sensors and the low-light sensitivity is also impressive with the centre point working down to -4EV and the remaining 152 points working at -3EV.
While the specification of the AF sensor in the D500 matches the D5, its smaller sensor area means the array extends over more of the frame, virtually reaching the far left and right sides. This provides it with the broadest tracking area of any DSLR to date which coupled with the DX field-reduction makes it ideal for photographing distant and unpredictable subjects like birds. Indeed some photographers will actually prefer the D500 over the D5 for these reasons.
It’s worth a comparison with the EOS 7D Mark II at this point which has a 65-point all-cross-type AF system, with the centre point sensitive to -3EV. So the D500’s AF array features more AF points, more of which are cross-type and it’s more sensitive in low light too. The Canon AF array may be respectably wide, but again can’t match the coverage of the D500 which is both broader and denser. A solid win for Nikon there, especially with its traditionally superior tracking algorithms.
Do however note that the maximum number of cross-type sensors on the D500 is influenced by the lens in use. For the full 99 cross-type sensors you’ll need an AF-S lens with an aperture of f4 or faster, but there are some exceptions even at f4. The AF-S 600mm f4 G, E or D will reduce the system to 63 cross-type sensors, while both of the AF-S 200-400mm f4 lenses and AF-S 500mm f4 G or D models will only use the 45 cross-type sensors concentrated in a strip in the middle of the frame. Teleconverters impose further restrictions, so if this concerns you, check the manual.
The D500 has a small lever by the lens mount that switches it between AF and Manual focus, and if set to AF you can press a button in the middle and turn the thumb dial to choose between AF-S (single) and AF-C (continuous) or AF-F (continuous in Live View). You can activate the focus with a half-press of the shutter release or pushing the dedicated AF-ON button.
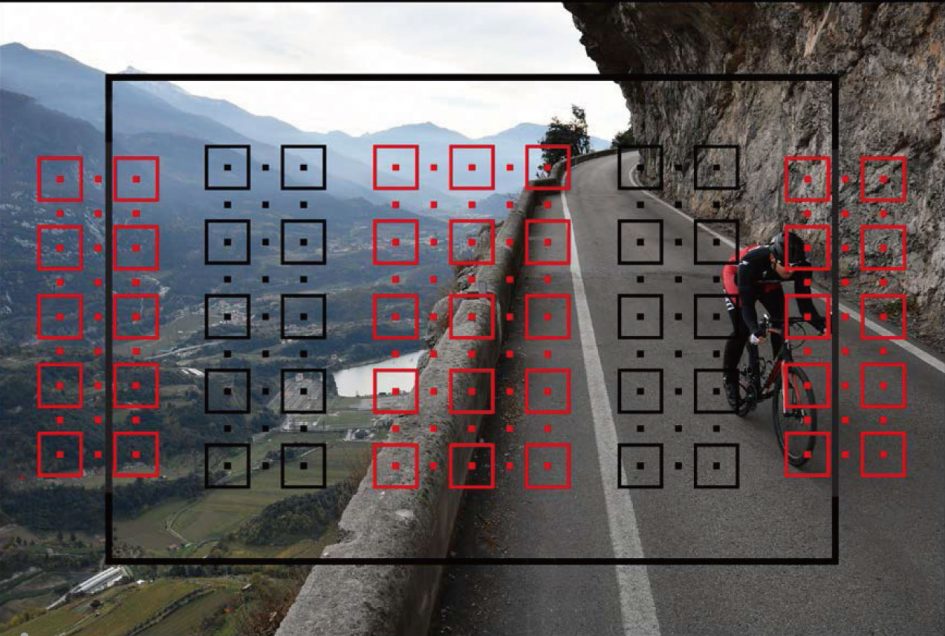
Holding the button and turning the finger dial lets you configure the AF area mode. There’s five options for configuring the 153 AF areas: Single Point, Dynamic Area, 3D Tracking, Group Area AF and Auto Area AF. In Single and Dynamic Area, you can manually adjust the focusing point from a choice of 55 (indicated by squares) using the rocker or joystick controls on the rear, with Dynamic Area also considering 25, 72 or 153 surrounding focus points if the subject moves (you can choose how many it should consider). In Auto Area, the D500 chooses the focus point automatically, while in Group Area the camera automatically chooses from a reduced area of points. If the D500’s metering system detects a face in the composition, it’ll work with the AF system to place the AF points over the subject – so long as they’re within the area covered by the AF system of course.
With 3D Tracking, you manually select a focusing point and place it over the desired subject. With the shutter-release half-pressed, the D500 will then attempt to keep this subject in focus even if you recompose the shot. 3D Tracking also exploits colour information to help track a subject, although obviously if it’s the same colour as the background, the system will become confused. Nikon recommends 3D Tracking for quickly composing shots where subjects are moving erratically, such as tennis players. Meanwhile 25-point Dynamic is best for predictable motion, like runners or racecars, 72-point Dynamic is more suited to unpredictable motion like football players, while the 153-point Dynamic option is best for subjects which are moving quickly and can’t easily be framed, like birds in flight. Speaking of which, here’s one I photographed circling Brighton Pier.
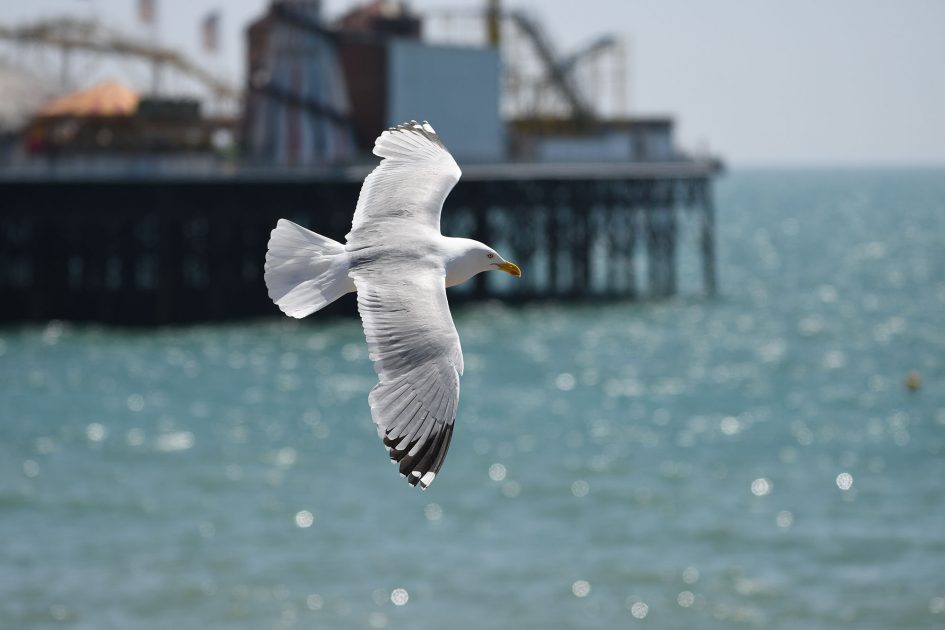
Above: Nikon D500: 1/4000, f4, 200 ISO, AF-S 70-200mm f4 at 150mm f4
As with all cameras which offer a variety of AF options, it’s a case of experimenting to see which works best for your particular application. It also pays to be flexible in your choice as the one Nikon thinks is best for a certain activity might not quite fit the one you’re trying to shoot. In use I found the Auto area worked well for general use and spontaneous portraits. The Dynamic modes were great for tracking steadily approaching action. Group was more precise for approaching bikes. Meanwhile the 3D mode did an eerily good job when there was sufficient contrast between the subject and background, like a brightly coloured skier or snowboarder against a white backdrop, or a boat or surfer against a mostly flat-coloured ocean.
Above: Nikon D500: 1/1600, f4, 200 ISO, AF-S 70-200mm f4 at 200mm f4
Indeed out of all the AF modes, I found 3D Tracking the most fun. So long as you could successfully place the AF point over the desired subject for long enough to half-press the shutter, the camera would track it with ease over the frame. And again the thing that makes the D500 really special is the broad array of AF points which means even if the subject finds itself at the edges of the frame, the camera will still be able to keep it in focus. Here’s a series of shots with the D500 and AF-S 70-200mm f4 at 200mm f4 to illustrate it in practice. I’ve shown the full-frame, followed by a 100% crop and here it’s delivered a 100% hit-rate.
Nikon D500 CAF series with AF-S 70-200mm f4 at 200mm f4


The viewfinder-based AF system of the D500 is without a doubt one of the major highlights of the camera, but like all DSLRs, there can be calibration issues resulting in front or back-focusing errors. As you’d expect, the D500 offers AF Fine Tuning, but like the D5 it can now be performed automatically – or at least with the help of Live View. All you do is enable AF Fine Tune, fix the camera to a tripod then focus on a subject in Live View (either using the contrast-based AF system or manual focus). Using on-screen magnification in Live View you can confirm the focus is correct.
Now that the camera knows the image is absolutely in focus, it can compare your setting against what it would have done if it had used the viewfinder-based AF system instead. To tell it to make the comparison you press the movie record and AF selection buttons at the same time, and any difference is stored for that lens. You may wish to perform this process multiple times at the most common focusing distance for each lens and save the average for the best results. I hope to put this feature through its paces more thoroughly when I have access to a greater variety of lenses, but it’s certainly easier than using charts for calibration.
So far I’ve only discussed the AF using the viewfinder. The D500 also offers autofocus during Live View with the choice of AF-S for single and AF-F for full-time continuous. In Live View – and for movies – the D500 continues to use a 100% contrast-based AF system that’s certainly accurate, but sadly still quite leisurely in execution. In AF-S mode you’re looking at one to two seconds for the camera to lock-on under fairly good conditions and longer when the light levels fall. The AF-F mode bravely tries to make adjustments continuously, but while it’s just about adequate for adjusting the focus as you pan around a room, it’s not up to the task of tracking an approaching or receding subject in constant motion.
So while the tilting screen encourages you to shoot more spontaneously at high or low angles with the D500 in Live View, I found the slow AF means it’s best reserved for confirming focus on static compositions like landscapes and buildings. Don’t get me wrong, I still find the tilting screen useful for static compositions shot from a tripod, but shooting street over the heads of crowds is only really practical if you manually focus and choose an aperture for a sufficient depth-of-field. If you mostly shoot with a screen in Live View and want a more responsive autofocus experience I’d recommend the Canon EOS 70D / 80D / 7D II (all of which feature Dual Pixel CMOS AF, albeit with the 7D II sporting a fixed screen only) or a native mirrorless camera.
Moving onto continuous shooting, the D500 makes impressive claims with a buffer quoted at 79 uncompressed RAW files or up to 200 RAWs with lossless compression. That’s seriously impressive stuff, although requires the speed of an XQD card to achieve it. Sadly I didn’t have an XQD card at the time of testing, so had to resort to a UHS-3 SD card instead.
I performed my usual tests by timing bursts with a freshly-formatted SD card at a shutter speed of 1/500 and a sensitivity of 400 ISO. Set to Large Fine JPEG, optimised for quality, I fired-off 124 frames in 12.48 seconds, corresponding to a speed of 9.94fps. From that point on the camera continued, but at a slower rate.
Set to RAW with lossless compression and 14 bit tonal depth, I captured 32 frames in 3.2 seconds for a speed of exactly 10fps. Again the camera slowed down afterwards, albeit understandably more so than when shooting JPEGs.
Compare this to the EOS 7D Mark II which in my tests captured 85 Large JPEGs at 9.41fps or 23 RAW files at 9.83fps and it’s clear the D500 shares a similar speed but enjoys a deeper buffer when both are fitted with similar SD cards. Both cameras can also be fitted with alternative cards, but I believe XQD is quicker than Compact Flash, allowing the D500 to capture much deeper bursts of RAW files if that’s what you desire.
Either way, I’m pleased to report the D500 can maintain these speeds in the field when shooting action with continuous autofocus.
Nikon D500 Wireless features
The D500 becomes one of Nikon’s first cameras to feature the company’s new SnapBridge technology which exploits not just Wifi and NFC, but also Bluetooth. Indeed Bluetooth is the cornerstone of the system, allowing the D500 to maintain a low-power wireless link with your smartphone at all times, allowing it to embed GPS positions or watermarks on images as you take them, while also trickling photos from the camera to phone without intervention – even when the camera’s switched off if desired.
As someone who loves wireless technology, I was excited to try out SnapBridge in a variety of environments. Like most new technologies, there’s definitely a few aspects that could do with some work, but on the whole, the core premise is strong and works well.
Setting up SnapBridge is certainly very simple. First you install the app on your Android or iOS device (I tested the former on my Galaxy S7) then start a pairing process with the camera. If, like me, you have a phone with NFC, this simply involves holding the handset against the side of the camera for a couple of seconds before both devices display passcodes for you to confirm. Once confirmed, the phone and camera are connected by Bluetooth and you’ll never need to do it again. It’s no more difficult than any other Bluetooth pairing.

From this point on the camera can be set to automatically transfer all JPEG images going forward to your phone or just the ones you select, at a reduced size of 2 Megapixels or in the original resolution up to 20 Megapixels. The thing that makes this process different from existing Wifi solutions is SnapBridge employs Bluetooth to automatically initiate a connection once in range and take care of the data transfer. If you have ‘Send to Smart Device’ set to Auto, then you don’t have to do a thing. The camera and phone will automatically connect themselves when they’re within range and start trickling data across. If they’re separated, they’ll simply pause the transfer, then seamlessly resume once they’re within range again. If you have ‘Send While Off’ enabled in the Bluetooth menu on the camera, this process will even continue when the D500’s switched off. There’s no buttons to press, no networks to connect, nor passwords to enter, it just happens in the background by itself.
The app can also superimpose credits in the corner of the images copied onto the phone, including shooting information, the time or a logo. Once images are on your phone, the SnapBridge app can be configured to upload them onto Nikon’s Image Space website (using cellular or Wifi only if you don’t have an unlimited plan) which offers up to 20GB of free storage for full resolution images or unlimited storage for the down-sized 2 Megapixel versions. Again this entire process can operate automatically without intervention, trickling photos from camera to phone and then onto online storage, providing backup as you shoot.
The communication works both ways as the phone can also be configured to send its GPS position to the camera for instant location embedding as you take photos. The location is embedded in the photo on the camera’s memory card, and also on the version sent to the phone if it’s also tagged for transfer. Cleverly the app can additionally synchronise the camera’s clock with the one in the phone, which is particularly useful when you travel to different time zones – as soon as your phone updates its clock, the camera’s clock automatically follows suit. The app will also tell you if or when a firmware update is available.
Impressive stuff, but I’m sure you already have a number of concerns – I know I did, primarily about battery life and the practicality of using Bluetooth to transfer images even at a reduced resolution, let alone at the full 20 Megapixels – after all it isn’t anywhere near as quick as Wifi.
First, battery life. Yes, having an always-on Bluetooth link will inevitably have an impact on battery life, but unless the devices are actually sending data, the connection employs a very low-power link; and once they are sending data, the consumption is still quite modest.
In my tests I had the location embedding enabled most of the time and still managed over 800 shots per charge. If all images were set to copy across at the reduced size, the battery life fell further, but I was still averaging several hundred per charge. It’s also possible to disable the always-on connection, so that when you switch the camera off, everything is really off. As for my Galaxy S7 phone, I didn’t notice any additional drain on my handset in day-to-day use.
Moving onto speed, the data rates of Bluetooth are fairly modest even at close range. It took about two seconds for the D500 to request a GPS position from my phone and embed it in a single image. To transfer an image at the reduced resolution of 2 Megapixels took roughly ten seconds per photo, and for original 20 Megapixel images measuring around 11MB, took closer to three minutes, again per photo.
But here’s the thing: the tagging and transfers are typically configured to automatically take place immediately after shooting a photo without you having to initiate the process. This means the GPS location is invariably embedded before you’ve even had a chance to play the shot back, while the 2 Megapixel downsized version will have already arrived on your phone before you’ve put your camera away and pulled the phone from your pocket. Wifi may be faster once the data is being transferred, but it’s a process you normally have to initiate manually, and having done it many times myself, I feel most comfortable doing it sat down somewhere. In contrast SnapBridge is doing it autonomously and while the actual data transfer is slower, the end result of having a photo copied onto your phone for sharing is often quicker and easier than doing it with Wifi.
When it’s working smoothly, SnapBridge is a brilliant solution and it’s great fun to view photos on the large screen of your phone moments after taking them. But it’s not quite perfect yet. If you shoot a burst of images, they effectively become queued in the system, waiting their turn to be tagged and transferred. The transfer isn’t so much of a problem as once an image is tagged for transfer (indicated by a zig-zag icon in playback), it simply waits its turn; obviously if you shot a large burst or are transferring 20 Megapixel versions, this could take some time to complete, but it will happen eventually. It’s also possible to untag images for transfer in playback, something I had to do when I unintentionally tagged hundreds of shots while testing the burst capabilities of the camera. Indeed you’ll probably prefer to untick the option to send all when shooting bursts, and just tag the ones you want by hand.
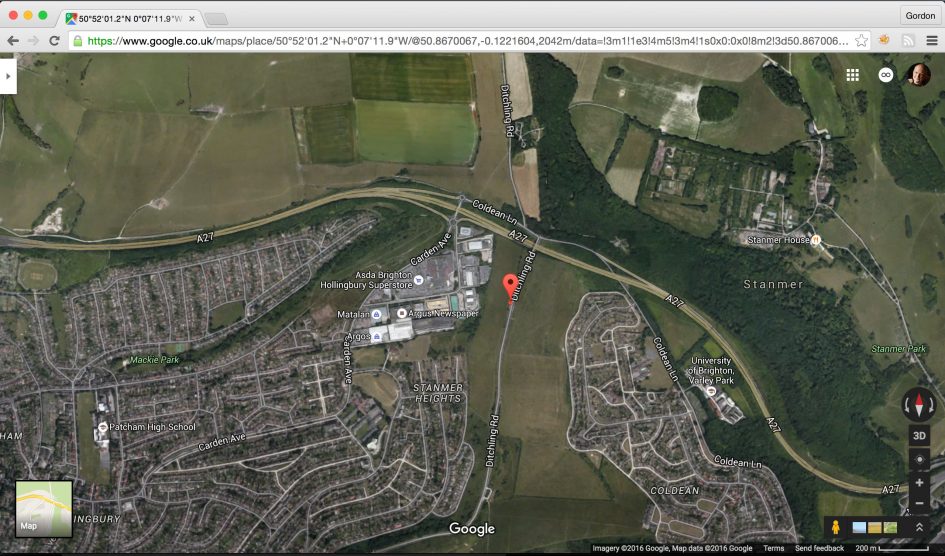
More problematic though is the GPS tagging which needs to take place at the location where the image was captured. I’m still trying to confirm what’s happening behind the scenes, but in my tests I found when there’s a queue of images waiting to be dealt with, the GPS tagging sometimes failed to take place, especially if you’ve moved on even a little. Maybe the system recognizes that your position has changed and decides not to bother rather than record a less accurate location. If this is the case, perhaps Nikon could implement a short log when it knows you’re shooting, so that it can sync them over the following few minutes if you move on. Anyway, to prove it works, here’s a sunset photo I took near to the South Downs prior to filming a timelapse; SnapBridge embedded the GPS location from my phone and I entered it into Google Maps below.

I should also mention the commenting option, which allows you to super-impose information on the version of the photo sent to the phone, leaving the one in the camera untouched (although there is a commenting option in-camera too). The app allows you to overlay a logo or watermark in the corner, but I couldn’t find an option to upload my own, instead having to choose only from a selection of SnapBridge logos. Surely this must be a mistake on my part. If not though, there really should be an option to use your own logo / watermark.
At this point you may be wondering where Wifi fits into the equation, as the D500 is equipped with this radio system too. Wifi comes into play when you tap the camera tab in the SnapBridge app and choose either Remote Photography or Download Selected Pictures. Tapping either option will initiate a Wifi connection to either remote control the camera with your phone or copy selected images over at high speed; I timed full resolution images taking only six seconds to transfer over Wifi compared to around three minutes on Bluetooth. SnapBridge also takes care of setting up the connection for you, so again there’s no networks to choose or passwords to enter – it’s all done for you.
This all sounds great in theory, but in practice the experience can be disappointing and frustrating. First the actual connection: SnapBridge may take care of switching networks, but the process took almost a minute on my phone from tapping either option and something actually beginning to take place. Of course this may be down to an issue with my Galaxy S7 and your mileage may vary, so do let me know.
Once the Wifi is connected you can fire-up the remote control option, see a live image on your phone, tap to reposition the AF area and take a photo, but that’s about it. Like the WMU app before it, there’s no control over exposure or indeed any other setting. You can literally just see the image, focus it and take the photo. Very basic compared to all of the competition.
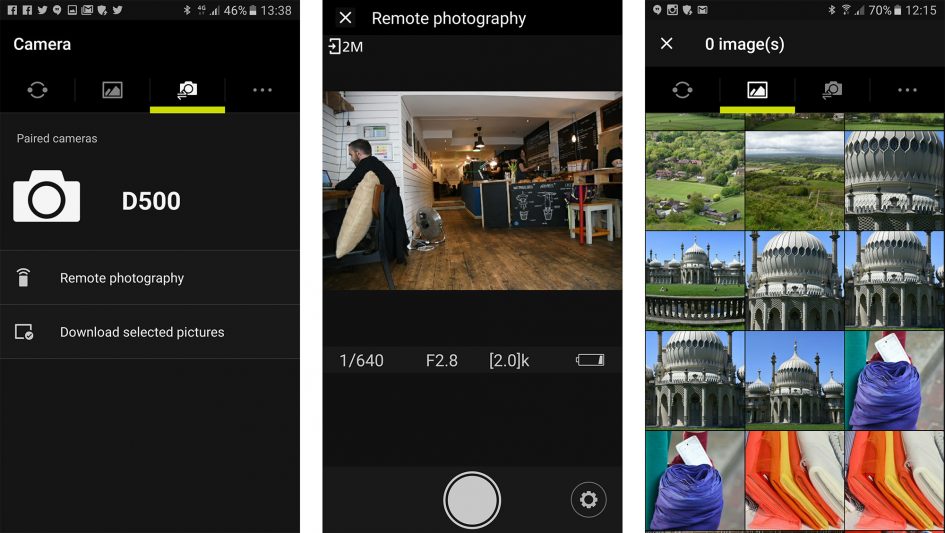
The option to Download Selected Images also inherits a frustrating performance issue from the previous WMU app: before you can select any image, you need to load a thumbnail view which in my tests, could take 30 seconds. Yep, 30 seconds just to see a bunch of thumbnails, and this following the minute taken to initiate the Wifi connection to start with. So while it may only take five or six seconds to finally copy a full resolution image over Wifi, there was a delay of at least a minute and a half before I could get to that point. And worse, if you want to select another image afterwards, you’ll need to wait to load the thumbnails again.
The irony is trickling photos over the Bluetooth link is invariably faster than doing it over Wifi because there’s none of the faffing around with switching connections or loading thumbnails. You just tag the image for transfer in playback on the camera (or have it tagged automatically as you shoot), then let SnapBridge trickle it over. I can almost guarantee it’ll be on your phone faster than it would be with Nikon’s Wifi alternative and there’ll be less hair-tearing too.
Of course that’s not to say SnapBridge is superior to all Wifi solutions, it’s just that Nikon’s Wifi is one of the slowest and least-featured. In contrast I feel Sony has one of the best Wifi implementations, allowing you to transfer an image to your phone by simply playing it on the camera’s screen, then holding an NFC-equipped phone to the side for a moment to initiate the process. From that point on, the Sony cameras set up the Wifi, copy then image over, then disconnect again, all very gracefully and without intervention or prompts. But even them the entire process (when it works) from start to finish takes around 30 seconds and while I have done it standing up, I feel much more comfortable doing so sat down. And again by the time I do sit down to transfer the image and do it again if it fails the first time, SnapBridge would almost certainly have copied – and tagged – my photo which would simply be waiting for me on my phone.
Ultimately if you sit down with a stopwatch and time the SnapBridge process, you’ll think it’s slow, especially compared to Wifi. But the key is to take into account how you’ll actually be using it in practice to achieve a certain goal. Assuming we’re talking about getting a photo onto your phone, I found SnapBridge was almost always quicker as the process starts the moment after you take the photo even when your phone’s in your pocket or bag.
Yes there are some limitations. I’d definitely turn off the option to automatically send images when you’re shooting large bursts to avoid a bottleneck, although GPS tagging can still work so long as you’re staying in the same location for a short while. I also think Nikon urgently needs to upgrade the remote control aspect of the app to offer exposure control and, assuming it’s an issue with handsets beyond my own, speed-up the process of switching to Wifi and loading thumbnails.
But when shooting small bursts or single images, I think SnapBridge works very well, especially for a version 1 solution. With a little tweaking here and there, Nikon could well have one of the quickest and easiest ways to get images tagged and copied onto your phone.
Nikon D500 movie mode
The D500 becomes Nikon’s first DX-format DSLR to capture 4k video at 24 to 30p. In addition it’ll film 1080p video at frame rates between 24 and 60p, allows full control over exposure while filming, supports Auto ISO in Manual, offers a Flat Picture Control profile for later grading, features microphone and headphone jacks with adjustable levels and on-screen meters, and if desired, attempts to continuously autofocus in the AF-F mode. Not a bad spec, but sadly still no focus peaking.
In terms of quality, the movie frame size / rate menu offers 4k UHD at 30p, 25p or 24p, or 1080p at 60p, 50p, 30p, 25p or 24p, along with 720p at 60p or 50p. Refreshingly all of the frame rates are available on all versions of the D500 regardless of where they originate from, and there’s no need to reboot the camera or insert / format memory cards when switching between regional frame rates. Cheers Nikon!
The longest recording time is the usual 29:59 and I confirmed it’s possible to record uninterrupted clips this length in the 4k modes, albeit split into 4GB files on my memory card lasting about five minutes each. Filming a half hour 4k clip consumed roughly 40% of a full battery in my tests and resulted in the body becoming warm around the right side, but not hot. I managed to shoot another half hour 4k clip straight afterwards with no ill effect, apart from leaving the battery with a little over 10% remaining. Here’s a ten minute 1080p clip showing the Dr Blighty projection as part of the 2016 Brighton Festival.
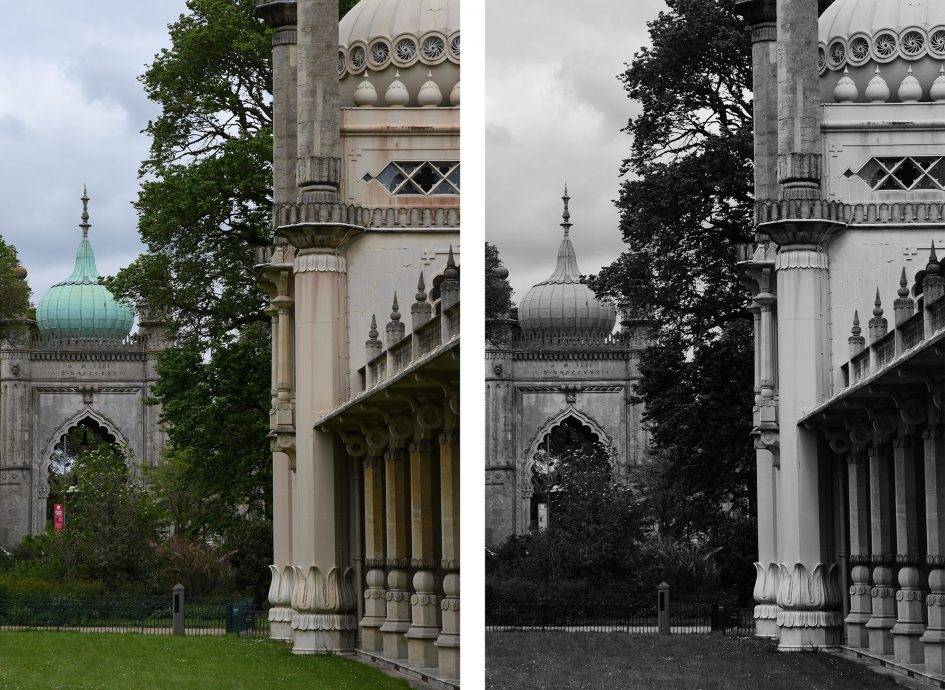
Above: Download the original file (Registered members of Vimeo only). Sample movie filmed with the Nikon D500 in 1080 / 25p / 3200 ISO. The movie captures the projections on the Brighton Pavilion as part of the Dr Blighty installation, commemorating the Indian soldiers who fought for the Allies during the First World War. The Pavilion was used during WW1 as a hospital for these wounded soldiers. The projection was developed by QED and shown as part of the 2016 Brighton Festival.
To enter the movie mode you’ll need to first turn the collar on the rear of the camera from Live View to Video, then press the button inside to fire-up the live image (cropped to the selected movie format); after this just press the dedicated record button near the shutter release to start and stop recording.
In Program and Shutter Priority modes the exposure including ISO is automatic but you can adjust the compensation, and in Aperture Priority you can adjust the Aperture as well. For full manual control over exposure and sensitivity you’ll need to set the D500’s movie mode to Manual, after which you can set the shutter speed (between 1/25 and 1/4000), the aperture and the sensitivity.
Two neat exposure options inherited from the D750 and D810 are Auto ISO and Power Aperture. Auto ISO works for movies as it does for stills, letting you define a maximum sensitivity and automatically compensating for varying light while you film with a fixed shutter and aperture. Meanwhile Power Aperture provides smoother and quieter adjustments of the aperture while filming (and it works for movies recorded internally onto the memory card). Normally when you adjust the aperture with the finger dial the camera opens or closes the lens iris as quickly as possible which is great for stills, but results in sudden and visible brightness steps during video even at 0.3 EV increments – plus turning the actual finger dial results in a loud click and a possible wobble. If you enable Power Aperture on the D500 though you can use the front Pv and Fn buttons to adjust the aperture values, but crucially the mechanism which opens or closes the iris is slowed down. The result is a smoother transition between f-numbers while also avoiding the clicking controls; depending on the lens, the process is still audible, but it’s much quieter than turning the finger dial, and again visually much more discreet. Here’s a video I filmed to demonstrate the feature using the DX 16-80mm f2.8-4 at 16mm, and the aperture adjustment is one of the quietest and smoothest I’ve tested.
Above: Download the original file (Registered members of Vimeo only). Sample movie filmed with the Nikon D500 in its 4k UHD / 24p mode to demo the Power Aperture control with the Nikkor DX 16-80mm f2.8-4 zoom at 16mm.
Contrast-based autofocus is available in single or continuous (AF-F) options. The latter works similarly to previous Nikon DSLRs where the camera attempts to refocus regularly with variable results. When moving the camera from one subject to another, the refocusing process can actually be quite effective at times, with a smooth rack, but at other times you get the impression the camera is less confident, attempting to refocus even when there’s no need. During this time the lens focusing is also quite audible, especially when the camera’s performing lots of little adjustments. The problem is Nikon doesn’t yet have a lens that focuses quietly for video, so it’s fallen behind options from Canon, not to mention the almost universally quieter mirrorless crowd. But equally I appreciate there’s probably few people who’ll use the full-time continuous AF mode on the D500 as it’s aimed at higher-end film makers. Conversely though, if we are to manually focus with the D500 while filming we could really do with focus peaking, a feature that’s sorely missing on Nikon DSLRs.
Saturation, sharpening, contrast and other image parameters are applied – as with stills – using a selection of adjustable Picture Controls; and like the D750 and D810 there’s a Flat option which turns the sharpening almost all the way down (set to 1 on a scale of 0-9), and sets all other parameters to zero for grading purposes. I have a few Flat sample clips below.
The D500 applies different crops depending on whether you’re shooting in 1080p or 4k, and there’s an additional 1.3x crop available for the former if desired. The image below, generated with videograbs of real footage I filmed, illustrates their respective sizes: filming in 1080p uses the full 5568 pixel width of the sensor before reducing it to 1920 pixels with no reduction in the horizontal field of view. Applying the 1.3x crop does what it says on the tin, taking a crop measuring approximately 4262×2397 pixels and again scaling it down to a 1920×1080 frame. And finally, the 4k UHD mode takes a 1:1 crop measuring 3840×2160 pixels and encodes it without any scaling at all.
In the diagram below, the outer blue frame represents the standard 1080p coverage, which only crops the image vertically into a 16:9 shape. The middle green frame represents the 1080p mode with the 1.3x crop, and finally the innermost red frame represents the crop when filming 4k video.
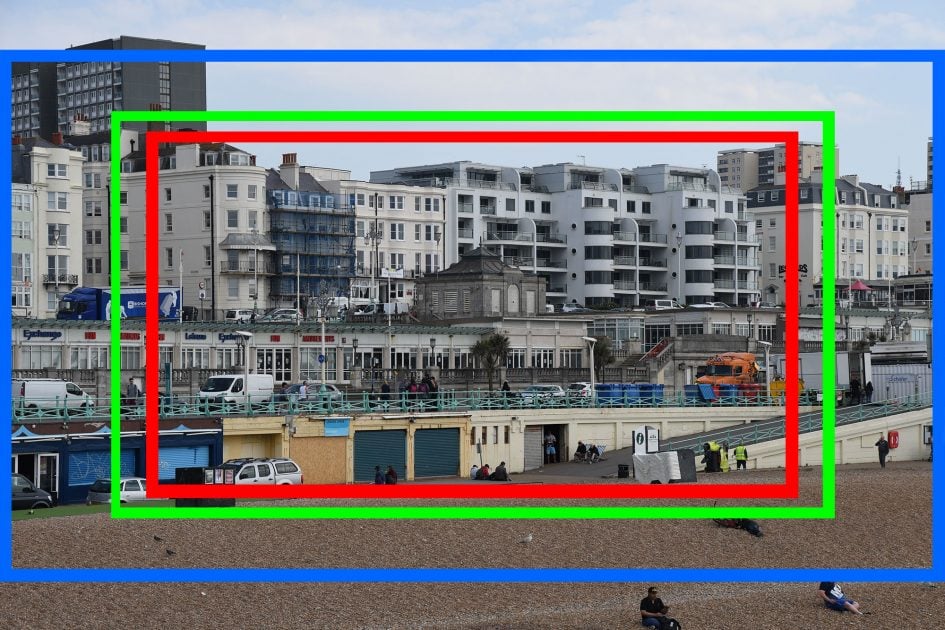
Above: Nikon D500 movie crops: 1080p (blue), 1080p with 1.3x crop (green), 4k UHD (red)
I’m fond of movie modes that take 1:1 crops to avoid scaling, but the downside is a reduction in the field-of-view if the total sensor resolution is any bigger than a 4k frame. In the case of the D500, filming in 4k results in a 1.5x crop on what is, lest we forget, already a 1.5x crop / DX / APSC sensor – making a 2.25x field-reduction in total. As such, the 16mm end of the bundled zoom becomes equivalent to 36mm and it becomes clear if you want to film wide in 4k on the D500 you’ll need to fit a pretty extreme lens. Even with the DX 10-24mm zoom at 10mm, you’ll only manage a 22.5mm equivalent field-of-view when filming 4k on the D500. Here’s how the 1080p coverage compares with the 4k coverage when both are using the same focal length.

Above: Nikon D500 movie crops with same lens and location: 1080p left, 4k UHD right
Below are 100% crops from the middle of each framegrab to illustrate the additional detail captured by 4k, although of course in this comparison it also benefits from a tighter crop to start with.

Above: Nikon D500 movie quality. 100% crops from frame grabs above. 1080p left, 4k UHD right
The 2.25x effective field-reduction for 4k means the active portion of the sensor used to capture 4k on the D500 is actually a little smaller than a Micro Four Thirds sensor – indeed it’s roughly similar in area to many of Panasonic’s Lumix G models after they’ve applied a 1.1x crop for 4k. But while the active area is similar, remember the 4k crop on the D500’s sensor results in no pixel-wrangling, whereas the Panasonics are performing some scaling, so the potential for artefacts is greater. But the bottom line is when filming 4k with the D500 you’re using nowhere near the full APSC sensor area, and effectively missing out on some light gathering as well as wide coverage. If you want to capture the full coverage and use data from the entire APSC sensor to generate 4k video, you’ll need to look to Sony’s A6300.
Moving on, here’s a comparison of noise levels at high ISOs using 1080p and 4k from the same position and focal length. As above, there’s a tighter crop on the 4k frame. Here’s how the full video frames looked, followed by 100% crops made from the areas marked in red; the 4k crop is smaller because it is higher resolution. The actual pixel dimensions of the crops are identical.
Nikon D500 movie noise at 25mm f8. 1080 / 24p (left), 4k / 24p (right)

Above: full video frames at 1080p (left), 4k (right)

Above: 100% crops from D500 movie at 1600 ISO, in 1080p (left), 4k (right)

Above: 100% crops from D500 movie at 3200 ISO, in 1080p (left), 4k (right)

Above: 100% crops from D500 movie at 6400 ISO, in 1080p (left), 4k (right)

Above: 100% crops from D500 movie at 12800 ISO, in 1080p (left), 4k (right)

Above: 100% crops from D500 movie at 25600 ISO, in 1080p (left), 4k (right)
The severe crop for 4k along with the lack of focus peaking and ineffective continuous AF are the three main downsides to the D500’s movie capabilities, but if you can work around them, the quality and control can certainly be very good. Here’s a selection of clips to demonstrate it in practice.
Above: Download the original file (Registered members of Vimeo only). Sample movie filmed with the Nikon D500 in its 4k UHD / 24p mode at 100 ISO and Standard Picture Control with the Nikkor DX 16-80mm f2.8-4 zoom at 50mm f8. I also filmed additional versions: Nikon D500 movie 4k 25p, Nikon D500 movie 4k 30p, and for those who like to try grading footage, here’s one using the Flat Picture Control: Nikon D500 movie 4k 24p Flat profile. Compare the crop at 4k with that in 1080p below – the lens focal length and camera position were unchanged.
Above: Download the original file (Registered members of Vimeo only). Sample movie filmed with the Nikon D500 in its 1080 / 24p mode at 100 ISO and Standard Picture Control with the Nikkor DX 16-80mm f2.8-4 zoom at 50mm f8. I also filmed additional versions: Nikon D500 movie 1080 60p and for those who like to try grading, Nikon D500 movie 1080 24p Flat Profile.
Above: Download the original file (Registered members of Vimeo only). Sample movie filmed with the Nikon D500 in its 1080 / 24p mode at 100 ISO with the 1.3x crop frame and Standard Picture Control with the Nikkor DX 16-80mm f2.8-4 zoom at 50mm f8. Compare the framing with the versions above.
Above: Download the original file (Registered members of Vimeo only). Sample movie filmed with the Nikon D500 in its 4k UHD / 24p mode at 1600 ISO and Standard Picture Control with the Nikkor DX 16-80mm f2.8-4 zoom at 25mm f8. Also see Nikon D500 movie noise 4k 3200 ISO, Nikon D500 movie noise 4k 6400 ISO, Nikon D500 movie noise 4k 12800 ISO, Nikon D500 movie noise 4k 25600 ISO, Nikon D500 movie noise 4k 51200 ISO.
Above: Download the original file (Registered members of Vimeo only). Sample movie filmed with the Nikon D500 in its 4k UHD / 25p mode at 400 ISO and Standard Picture Control with the Nikkor DX 16-80mm f2.8-4 zoom at 16mm f2.8. AFF mode was enabled, so the camera attempts to continuously autofocus, both audibly and visibly.
Above: Download the original file (Registered members of Vimeo only). Sample movie filmed with the Nikon D500 in its 4k UHD / 25p mode at 160 ISO and Standard Picture Control with the Nikkor DX 16-80mm f2.8-4 zoom at 35mm f3.5.
Nikon D500 sensor and processing
The D500 is equipped with a new 20.9 Megapixel cropped-frame APSC ‘DX-format’ CMOS sensor. Delivering images with 5568×3712 pixels, it’s a big step-up over the 12.3 Megapixel / 4288×2848 pixel images of the earlier D300s. It also roughly matches the image size from Canon’s EOS 7D Mark II, although both fall a few Megapixels short of the average 24 Megapixel resolution of most APSC cameras today.
The D500 lets you record images with two areas: the full DX coverage, or a cropped 1.3x mode which reduces the effective resolution from 20.9 Megapixels to around 12 Megapixels, while applying an additional 1.3x field reduction on top of the 1.5x applied by the APSC sensor over full-frame. If you’re shooting in the 1.3x mode with the viewfinder, the cropped area is indicated, while in Live View, it simply scales-up to fill the screen. Note there’s no benefit to continuous shooting speed in the 1.3x mode, it’s really mostly about generating smaller files to extend burst depth or space on your card in situations where you were going to crop anyway.
In either mode, you can set the JPEG resolution between Small, Medium and Large. In DX mode, these correspond to 2784×1856, 4176×2784 and 5568×3712 pixels. Set to the 1.3x crop, the sizes correspond to 2128×1424, 3200×2136 and 4272×2848 pixels.
JPEG files can be recorded with Fine, Normal or Basic compression and with the additional choice of ‘Optimal quality’ now indicated by a star icon in the menus. RAW files can be recorded with 12 bit or 14 bit tonal range, and with the choice of lossy or lossless compression, or no compression at all. There’s also an RGB TIFF option if desired.
I shot mostly in RAW+JPEG with RAW set to 14 bit lossless and JPEG set to Large Fine with Optimal Quality; my JPEGs typically measured between 10 and 15MB each while RAW NEF files measured 25-45MB each.
A number of imaging parameters can be applied with the Picture Controls. You can adjust sharpening, clarity, contrast, brightness, saturation and hue, along with filter effects and toning for monochrome images, or go for an overall adjustment with the Quick Adjust slider. The D500 offers seven presets including the Flat profile from the D810 and D750 which sets all sliders to 0 and sharpening to 1 (on a scale of 0 to 9). You can customise any of the Picture Controls. Unlike many new cameras Nikon’s resisted updating the Monochrome profile, but it still looks good, especially with the red digital filter and a slight boost in contrast. Here’s an example.
Above: Nikon D500: out-of-camera JPEGs with Standard (below left) and Monochrome (below right) Picture Controls
The D500 also offers very capable in-camera processing of RAW files. Once you’ve selected a suitable NEF file, you can generate a new JPEG with your choice of quality, resolution, white balance, exposure compensation, Picture Control, High ISO noise reduction, colour space, vignette control and D-Lighting. It’s also possible to overlay two RAW files from the retouch menu, and perform crops too. I enjoy processing RAW files in-camera, to fully explore the different Picture Control options.
The D500’s sensitivity runs from 100 to 51200 ISO as standard, extendable down to 50 ISO (Lo1) and up to 1638400 ISO (Hi5) – yes, over one and half million ISO, although the results ain’t pretty much beyond 51200 ISO. Below is an example taken in very low light at the maximum 1638400 ISO and even without looking closely it’s understandably noisy. I have other versions of this image at the other High ISO settings on my sample images page. Obviously they’re only for special circumstances, and to be fair Nikon admits as much.

Above: Nikon D500 out-of-camera JPEG at 1638400 ISO
You can apply High ISO Noise reduction with High, Normal, Low or Off settings, and there’s also an Auto ISO option with customisable limits including minimum shutter speed; if CPU lenses are used, the Auto setting can take the focal length into account for the minimum shutter speed. Long exposure noise reduction is also available, but I found exposures of four minutes looked pretty clean with it disabled – see my sample images for an example.
Now it’s time to check out the quality of the camera in practice, so head over to my Nikon D500 quality, Nikon D500 sample images, or skip back to my verdict.