MacBook Air battery repair
-
-
Written by Gordon Laing
Has your MacBook battery failed? Is Apple quoting a fortune for a repair, or even ruled it our entirely due to age? In this article I’ll show you how I repaired my trusty 13in Apple MacBook Air (Model A1369) from 2011 for just $55 when everyone told me it was a lost cause. It gave me eight years of sterling service before the battery condition worsened to a point it would no longer startup even under mains power. My full guide is in the video below, or just scroll beyond it if you prefer the written version. I used this Egoway replacement battery.
Weirdly the magsafe charger light would stay lit green when connected, implying a full charge, but the system still wouldn’t start. In its final days of operation it indicated the battery needed a service, but the Apple store said it was so old they no longer had official spares, and independent repair shops had no luck with it either.
At this point, most folk told me I should just buy a new model, but I hate waste and wondered if I could get it working again with a third-party replacement battery. After all, while I’d upgraded to a MacBook Pro a couple of years ago, the old Air was still perfectly good for family projects and as a spare computer.
Before proceeding with a Macbook repair, you’ll need to identify your model for the correct tools and parts. It’s written in tiny lettering on the underside and here you can see mine is a model A1369, indicating a MacBook Air 13in from 2011. I should also say any repair you attempt is obviously at your own risk and your mileage may vary. Mine was a last-ditch attempt at revival when everyone was telling me to chuck it out.
The first step is to open it up and to discourage end-users from mucking around, Apple uses unusual screws which require a special tool called a pentalobe – don’t even try using a normal screwdriver. Pentalobe tools are readily available though, just search for one with your Macbook model name – this one just cost me a few pounds – then carefully use it to remove all the screws on the underside – ten in my case – and since they’re often different lengths, make a note of which one went where for re-assembly. Make sure you’ve disconnected the power supply before opening the case.
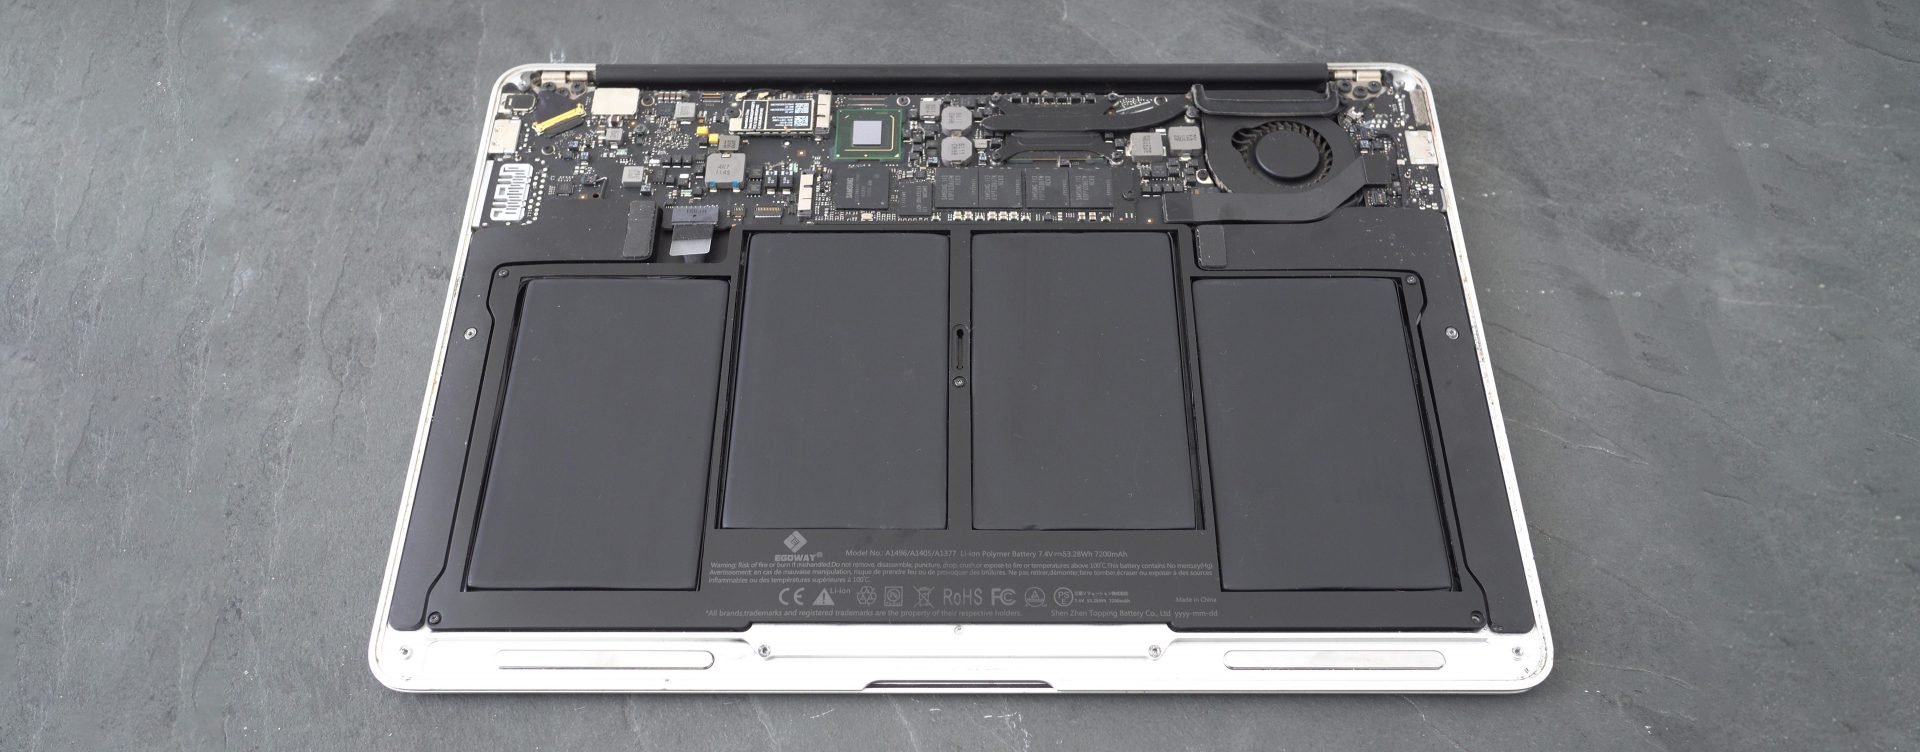
Opening the case reveals the battery which here is the large rectangular shaped part with four main cells, occupying most of the internals. First you’ll need to unplug it from the motherboard and you’ll see a handy plastic tab to grip as you gently pull the plug out of the socket. Next you’ll need to unscrew the battery – mine had four pentalobe screws in the corners and one in the middle – again put them aside carefully and remember which one went where.
With the battery removed I wondered if the MacBook would power up, so closed the case, re-connected the power supply and to my surprise it actually worked and booted up for the first time in months. At first I thought I had a solution as I didn’t mind using the laptop under mains power only, but there’s two catches. First, with no battery backup, if you accidentally knock the power cord out the machine will switch off immediately, losing any unsaved work. Secondly, MacBooks deliberately run slowly with their batteries disconnected, as a kind of protected mode, so even if you secured the power plug, you’d have a much slower system than before – it’s ok for very basic tasks – or for retrieving and backing work you thought you’d lost – but not much more. So I had a catch-22: for normal speed, and protection from the power plug falling out, I needed to have a battery connected, but if I used my original battery, my machine wouldn’t even start.
So I went shopping for a spare battery using my model name and there’s loads of third party options. There’s also highly varying reviews, with even the best ones not apparently working on some people’s MacBooks, so check the returns policy and again proceed at your own risk. I went for an E Egoway model which costs around 55 pounds or dollars – I didn’t mind if the battery life wasn’t great, I just wanted the machine to power-up and run at full speed under mains power.
The E Egoway battery on the left looks almost identical to the original Apple battery on the right, with only their labelling to tell them apart, and the new part slotted perfectly into the gap left by the old one. Just pop it in, screw it carefully in place and connect the battery to the motherboard – you may find this easier to connect it first and screw the battery in afterwards. Most third party batteries are also supplied with the tools to fit them, so if you think your issue is a battery-related one, there may be no need to buy the tool separately.
With the battery fitted in place, just close the lid and you’re ready to start testing. I reconnected the power lead and was reassured to see the light turn amber to indicate charging – something I’d not seen for months. And lo and behold, the machine started up, indicating 47% charge on the battery. At this point it’s tempting to just start using the machine as normal, but it’s important to calibrate the battery first with a full charge and discharge cycle.
So first fully recharge the battery until the magsafe plug indicates green. If it’s still amber after half a day, just unplug and reconnect to see if it changes.
Next we’re going to run the battery down with fairly normal use, so open the power saver settings and drag the sliders all the way to the right and untick the option to put the disks to sleep for both mains and battery power. Then disconnect the power cord and leave it playing a video or doing some other task. I set it to go through one of my YouTube playlists, playing full-screen in 1440p with the screen brightness on full. I checked the battery remaining every hour and it seemed to discharge in a linear fashion, eventually draining fully three hours and 20 minutes later – not bad for constant streaming of HD content over Wifi at full brightness. Then recharge it again fully.
Here’s the green light on mine, followed by the reassuring startup gong, and once I’ve started the system and disconnected the power lead, you can see the battery charge indicating 100%. It seems happy to run under battery power, and also behaves well when the lid’s closed and reopened again. I’ve also left it for several hours closed, before reopening, and again it seems fine.
It’s still early days though and during further testing I found that shutting down fully sometimes prevented a restart under battery power only – and some fixes required me to disconnect then reconnect the internal battery. Obviously that’s not ideal, but I’m hoping just closing the lid when not in use and keeping it topped-up with mains power may be a solution. Either way, my trusty MacBook Air, condemned to death by the experts, lives to fight another day thanks to a fairly simple DIY repair costing 55 pounds. If you’re experiencing similar issues with your MacBook, I hope some of my tips will help breathe new life into an old faithful friend.
Check prices at Amazon, B&H, Adorama, eBay or Wex. Alternatively get yourself a copy of my In Camera book, an official Cameralabs T-shirt or mug, or treat me to a coffee! Thanks!