 The Leica Q3 43 becomes by far the best quality fixed lens compact I’ve tested, as indeed it should be for the money. The 60 Megapixel sensor and 43mm lens deliver some of the best images I’ve seen from any full-frame system, packed with detail and sharp across the frame, even wide-open at f2. Meanwhile the build quality is excellent and the user interface refreshingly simple. I was also struck by the flexibility of the 43mm focal length. Long enough for flattering portraits, yet wide enough that it never felt cramped. I’m surprised how much I enjoyed it over 35 or 50mm. But don’t get me wrong, the images may look great, but you could achieve similarly good-looking photos given a 60 Megapixel Sony A7C R or A7R V coupled with one of their best G Master lenses, such as the 35 or 50 for roughly two thirds the money. Plus you’ll get a brighter lens, more sophisticated autofocus, a bigger grip and the chance to swap lenses. But the Q3 43 packs this quality into a more compact body with clean controls and menus that avoid the complexity of many modern cameras. It’s all about the experience and the fact is I enjoyed shooting with the Q3 43 more than I did with either of those Sony’s. Ultimately there’s no other camera with this particular combination of features: a 60 Megapixel full-frame sensor with a top quality 43mm prime and a great viewfinder, all packed into a compact but well-built weatherproof body. It’s genuinely unique, but like all high-end or luxury goods, only you can say whether it’s worth the asking price. Personally if I had the money and felt secure carrying something that valuable in the places I shoot, I’d go for it.
Leica Q3 43 review
-
-
Written by Gordon Laing
Intro
The Leica Q3 43 is a high-end compact with a 60 Megapixel full-frame sensor and a fixed 43mm f2 lens. Launched in September 2024 and costing around $6900 or £5900, it’s essentially identical to the earlier Q3 from May 2023, but swaps the 28mm f1.7 Summilux lens for a 43mm f2 Apo-Summicron. Why 43mm? Well it roughly matches the magnification of the human eye, delivering a natural-looking view that’s well-suited for general-use.
It’s particularly exciting for Leica fans as it’s a brand new optical design and the first time the Q series has departed from the 28mm Summilux since the original Q in 2015. By coupling this earlier wide lens with a 60 Megapixel sensor in the original Q3, it became practical to make crops for narrower coverage and still have plenty of resolution to play with, but many owners – or potential ones – still desired a lens that was closer to standard length to start with. So while the new Q3 43 lacks the wider coverage of its predecessor, some will find it preferable out of the gate, while cropping allows it to reach even further.
The Leica faithful will lap it up, but I wanted to test it like I would any other camera and lens to see how it performs in practice and whether it’s worth the high price tag. You can see my full in-depth review in the video below, but if you’d prefer to read the written highlights, keep scrolling!
First things first: there’s actually little competition if you’re after a new high-end fixed lens compact with a viewfinder. The closest model is of course the previous Leica Q3 from 2023, almost identical other than its 28mm f1.7 lens, and currently a little cheaper at around $6300 or £5500. But that’s still a chunk of change.
Sony’s RX1R series comes close in concept with a full-frame sensor, viewfinder and fixed Zeiss 35mm f2 lens, but it’s not been updated since the 42 Megapixel Mark II model in 2016. You might find a used model for around two grand, but remember the spec is now eight years old and aspects like the 2.36 million dot viewfinder are looking dated.
You could alternatively build your own full-frame compact using a small body and lens combination at a lower price, and save yourself even more by going for a used model from MPB. For example in my tests you can essentially match the quality of the Q3 43 using a Sony 60 Megapixel body coupled with one of their best G Master lenses. The best deals I found at the time of making this video were on the A7R V, costing from £2700 in excellent condition at MPB, a saving of £1000. I also like that they show photos of the exact model you’ll be buying and include a six month warranty. Meanwhile you could pair them with an FE 35 1.4 GM or FE 50 1.4 GM for around £1000 also in excellent condition, saving around £500 over a new version. I’m quoting pounds, but they also operate across Europe and the US.
Choosing a Sony body and lens over a Q3 43 makes a lot of sense for some, while also offering more sophisticated autofocus, a bigger grip and the flexibility of swapping lenses. Plus if you get a G Master prime, you’ll have a brighter aperture too.
But Sony’s best lenses are typically larger and heavier, and aren’t available in the 43 length. Meanwhile the body user interface is more complex, the build is mass produced, and they use a focal plane shutter versus the leaf shutter in the Leica. Plus if you were choosing the A7CR on size, you’ll also have an inferior viewfinder to the Leica. There’s a lot to weigh-up.
If you’re looking for a high-end compact with a fixed prime lens and built-in viewfinder that’s still for sale, one the closest rivals is actually Fujifilm’s X100 series, with the latest 40 Megapixel X100 VI costing around $1600 or pounds.
The APSC sensor is of course smaller than the Q3, but the body is thinner and lighter, and while the EVF isn’t as detailed, it does offer an optical hybrid option. Some may also prefer the wider 35mm equivalent lens. But again it’s a smaller sensor, not weatherproof nor even filter-ready out of the box, and not coupled with the allure of a Leica lens either.
Meanwhile the even cheaper Ricoh GR IIIx may have similar coverage equivalent to 40mm, but it’s an f2.8 lens with a 24 Megapixel APS-C sensor behind it, and no viewfinder either.
When evaluating the Q3 43, the unique lens, sensor, viewfinder and build quality are the arguments you’ll keep coming back to, and while it’s undeniably expensive, it’s actually cheaper than trying to build a similar system with a Leica M. Plus you’re getting autofocus. Ultimately there’s nothing that provides this combination of features, so for me the question becomes just how good is this lens and sensor pairing.
So in this video I’ll be showing you how the Q3 43 performs in my usual landscape, portrait and macro tests, while also including some comparisons with the Fujifilm X100 VI to see how close this model gets at a quarter of the price. If you’re interested in how a Sony measures-up, I’d encourage you to watch my GM lens reviews which include similar sample images for comparison.
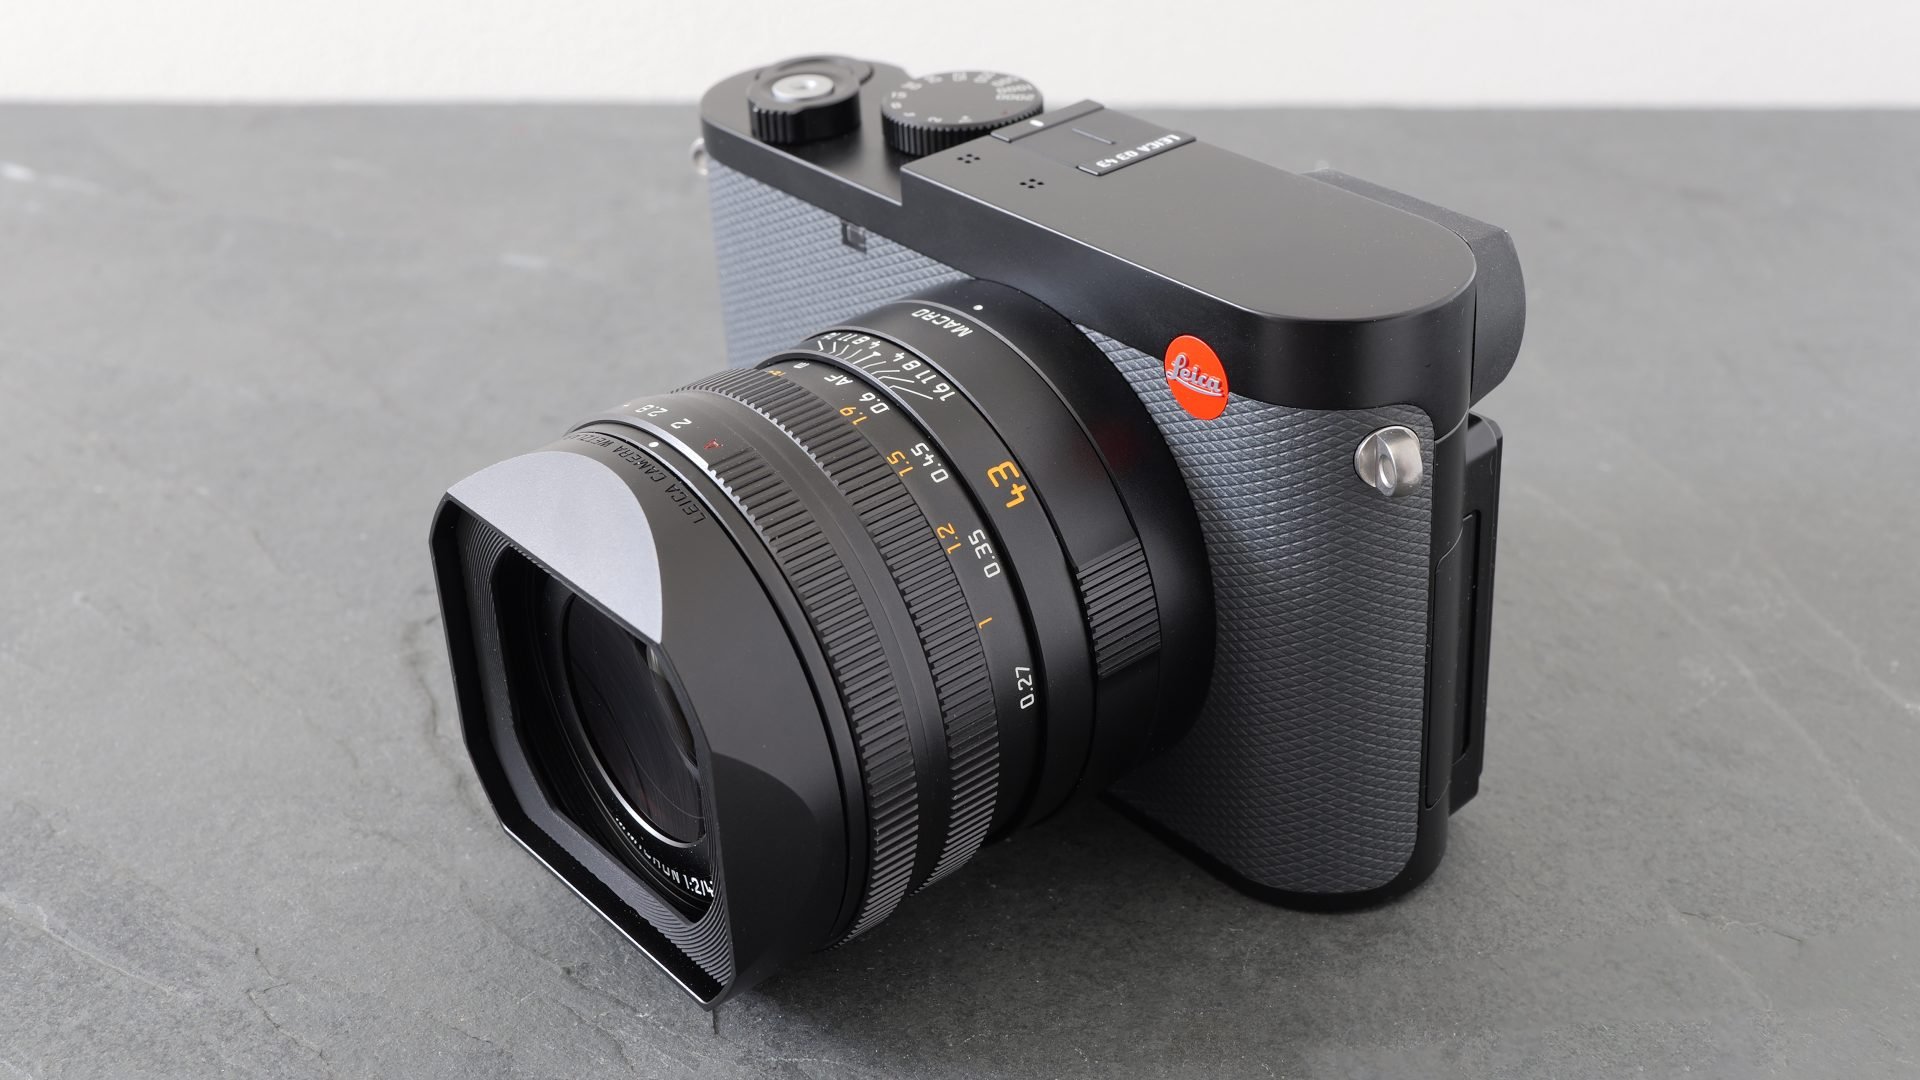
Let’s start with design and build quality, with the Q3 43 sharing essentially the same body and control layout as the original Q3, albeit now with a grey-coloured leatherette finish on the front.
Built in Germany, it looks and feels excellent in your hands and while there’s no grip on the flat front, the indent for your thumb on the rear allows you to hold it securely. Optional grip accessories give you more to hold onto or push up against, but I found the Q3 43 surprisingly comfortable out of the box.
The camera measures 130x80x98mm, with the main body being just 32mm thick. This makes the main body similar in width and thickness to the Fujifilm X100 VI and only 5mm taller, impressive given the larger sensor inside. It’s also roughly similar in body size to the Lumix S9.
The X100 VI is of course thinner than the Q3 43 when you include the lens, just 55mm without cap or accessories versus 98mm for the Leica, in turn allowing it to squeeze into smaller pockets or bags. But in my time with the Q3 43, it never felt large, nor heavy either at 795g including cap and hood. Sure the X100 VI is lighter at 533g, but both are very portable cameras you’d be happy to carry everywhere.
An important physical difference though is the Q3 43 is weatherproof out of the box, meeting IP52 standards, whereas the X100 series requires you to mount an optional filter adapter to fully protect it, in turn thickening the body.
Leica also includes a smart-looking rectangular hood that screws into the outer lens barrel, again an optional accessory for the X100. Leica also supplies a lens cap that’s pushed over the hood and held by friction, but this won’t stay in place without the hood fitted first. If you want a cap that works without a hood, you’ll need to buy an optional accessory.
There’s also an important gotcha regarding the supplied hood. The Q3 43’s lens features an E49 thread for filters, and it is possible to screw the hood on over them. But when engaging the macro mode for focusing closer than 60cm or two feet, the entire lens shifts forward by about 3mm. The hood can accommodate this movement, unless you have a filter attached, in which case there’s not enough room.
Leica acknowledges this in the manual and explains you’ll need to buy an optional circular hood if you want to use filters with a hood in macro mode. Or you could simply unscrew the standard hood when shooting in macro, or of course not use a filter. But these are workarounds and I’m a little disappointed something this price should have any gotchas at all.
To power-on the camera, twist the collar control and you’re good to go just over a second later. The clicky shutter release is threaded for manual cabled accessories.
In terms of exposure, the Q3 43 has the same two main controls as the Q3: an aperture ring on the lens running between f2 and f16 with third stop clicks, and a shutter dial between 1/2000 and one second in single stops. Both the aperture ring and shutter dial also have A positions.
Turn both to A and the Q3 is in Program Auto. Leave the shutter dial on A and turn the aperture ring for Aperture Priority, or vice versa for Shutter Priority. Meanwhile turn both for full Manual.
By default when the shutter dial is set to A, the unlabelled thumb dial in the corner adjusts exposure compensation. Or when you have manually selected a shutter speed, the thumb dial can fine-tune it in one third increments.
With the shutter dial set to one second, the thumb dial lets you keep dialling-in longer exposures up to two minutes, after which you’re in T mode which opens the shutter with one press and closes it with another.
At the faster-end of the range, 1/2000 is the fastest mechanical shutter speed, although as a leaf shutter you can synchronise a flash right up to this speed – a key benefit they have over the much slower flash syncs of focal plane models. And like other leaf shutters, it’s also very quiet, with only the faintest click making it very discreet and perfect for street photography. If you need faster speeds though, the Q3 43 offers an optional electronic shutter which extends the top speed to 1/16000, allowing you to deploy the maximum f2 aperture in even very bright conditions.
But beware: like other 60 Megapixel sensors, the readout speed is fairly slow which means potential skewing for subjects in motion when using the electronic shutter.
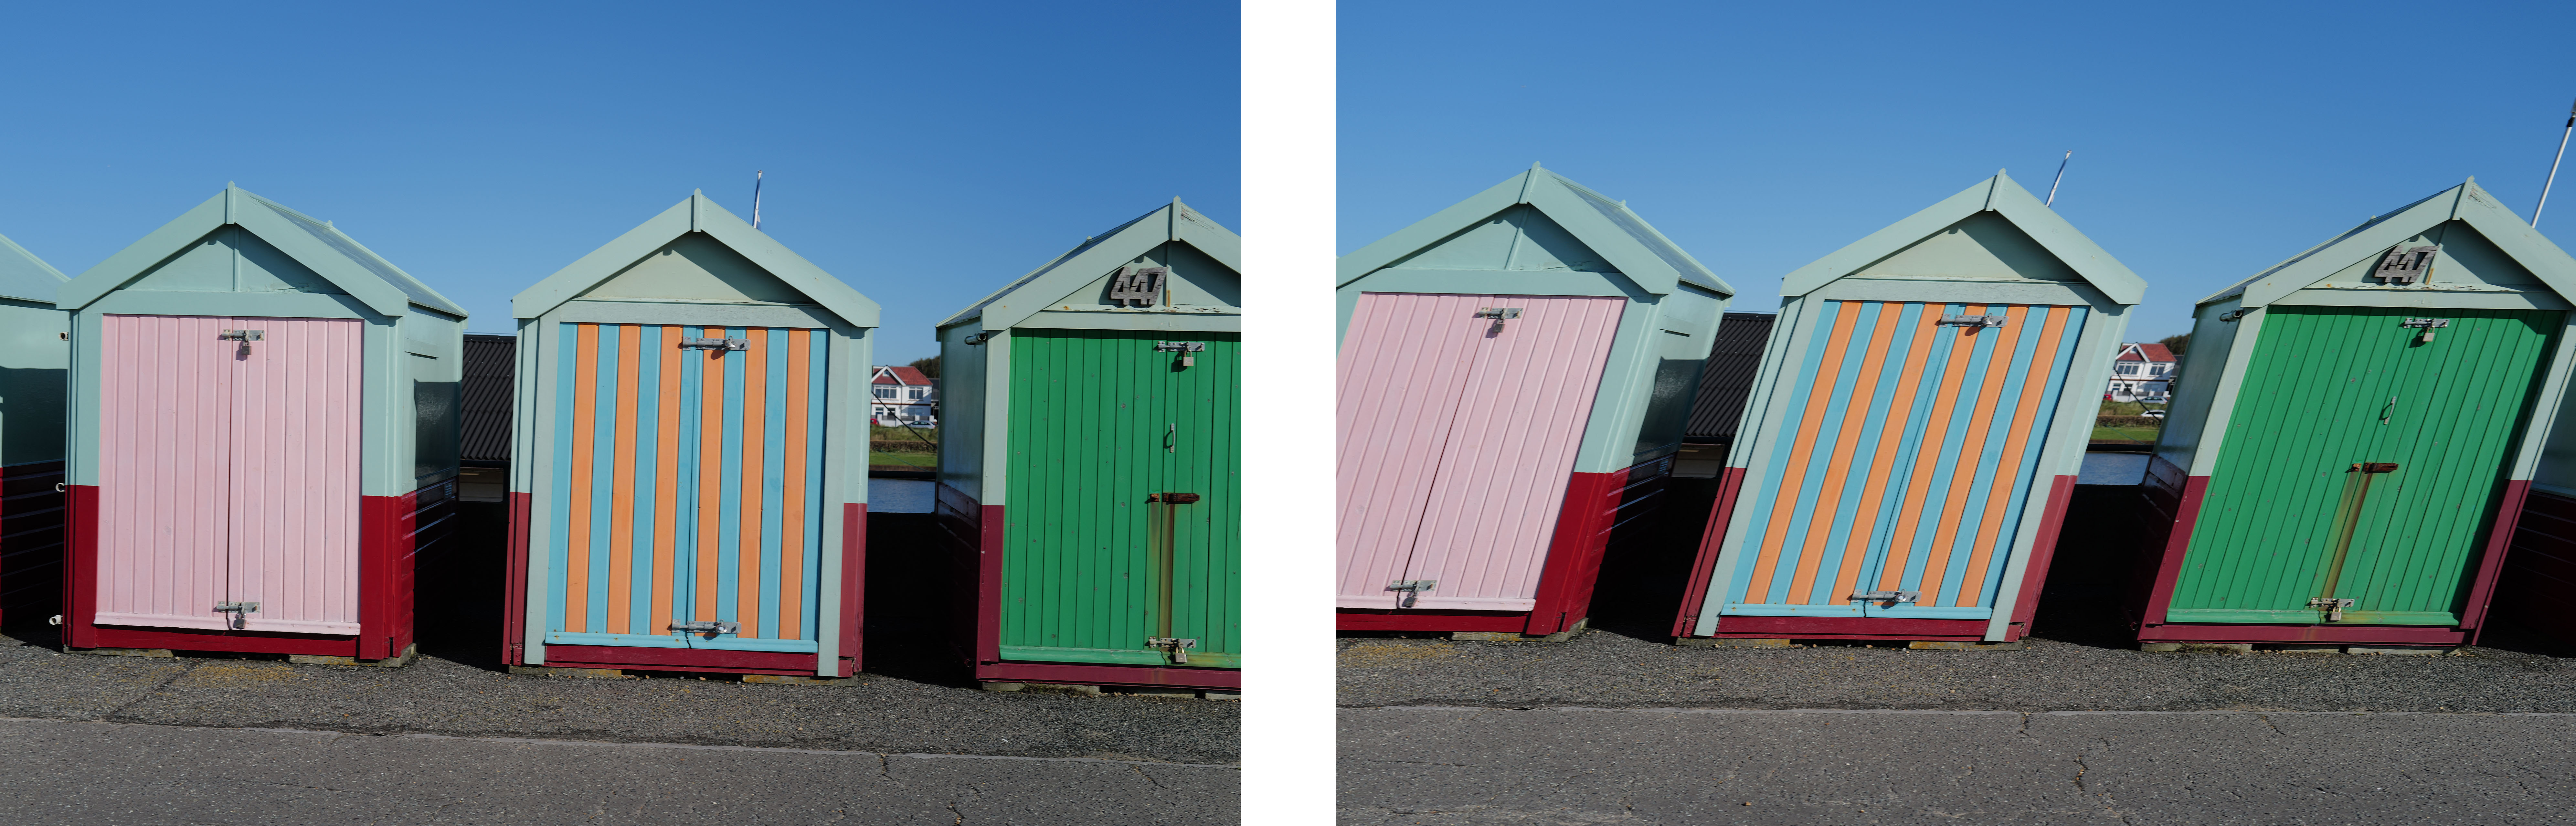
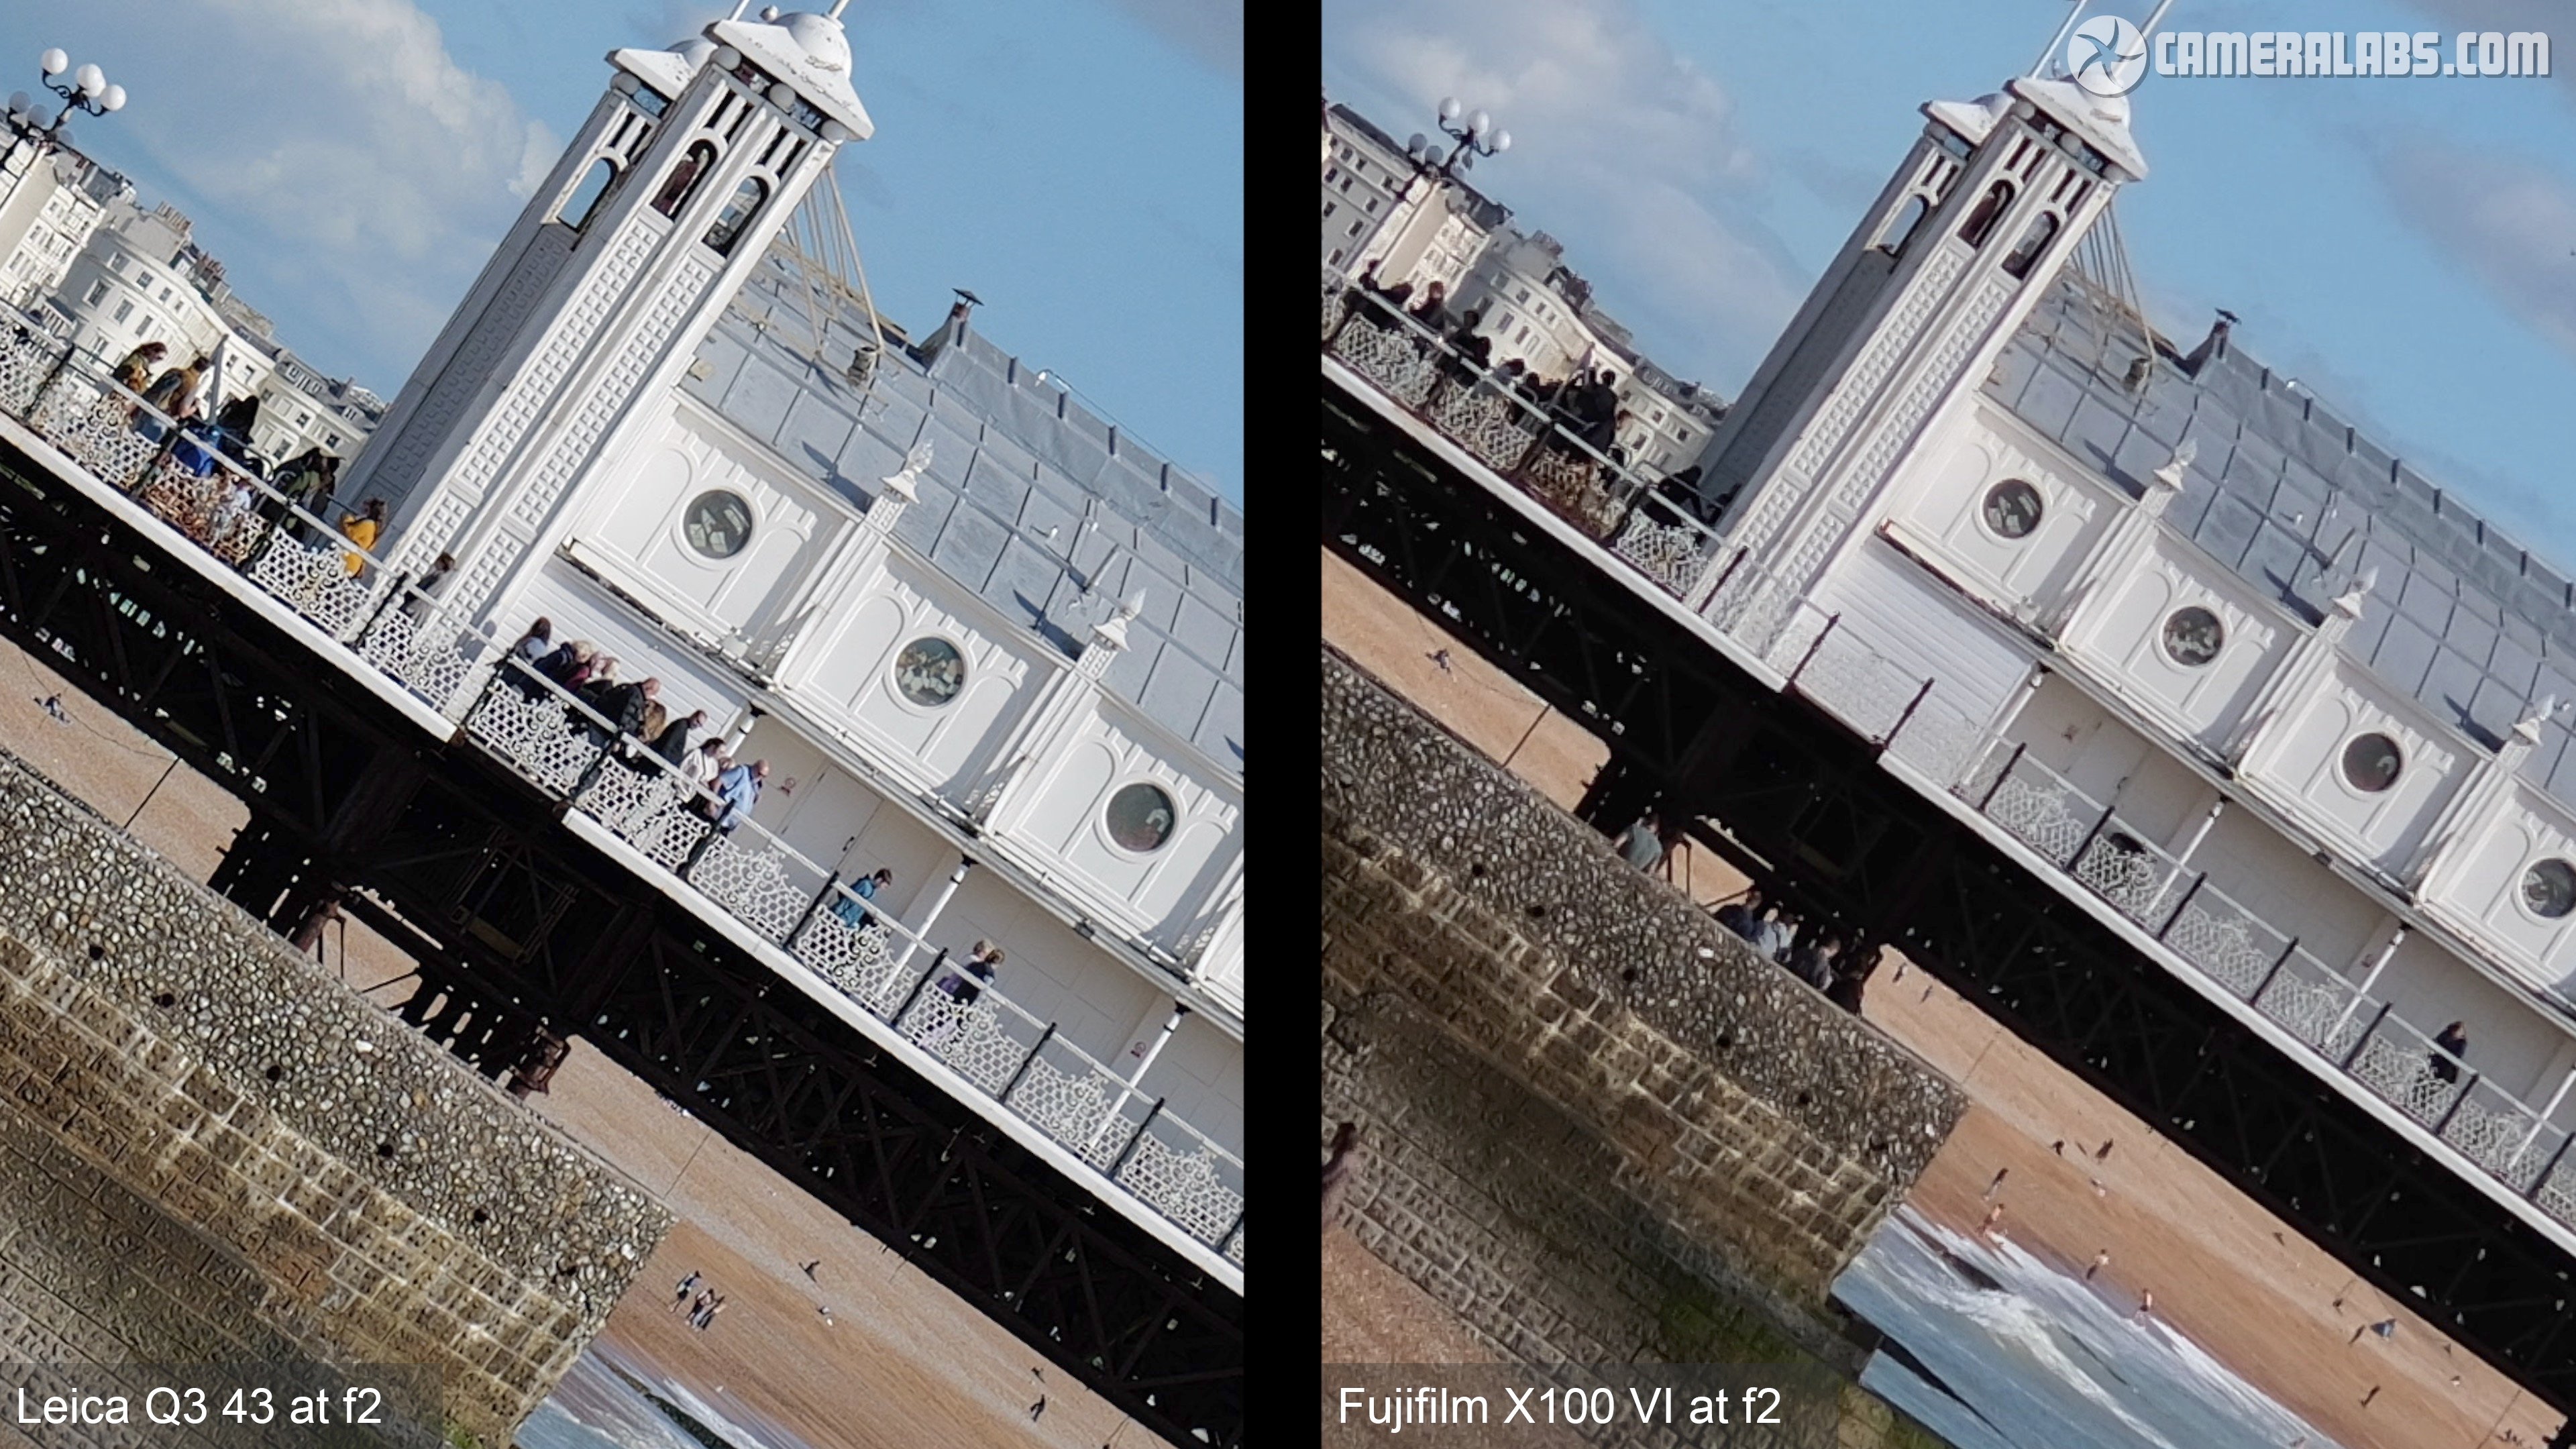
Above: To illustrate this, here’s a shot I took at 1/1600 while panning, using the mechanical leaf shutter (left), and as you’d expect, the beach huts are vertical. Compare it the version with the same exposure and the same panning speed on the right, but this time using the electronic shutter, where the skewing is terrible. To be fair, I’ve seen a similar effect on other cameras including the Sony A7R V, so like those models, only use the electronic shutter when both the camera or subject are still, or you could suffer from skewing artefacts.
You could of course alternatively just use the mechanical leaf shutter only, but with a top speed of 1/2000, you won’t be able to use the maximum f2 aperture under very bright conditions. For example using f2 in bright daylight at 100 ISO on my samples page required 1/8000, and therefore the electronic shutter. The Fujifilm X100 VI has the advantage here, not only with its own leaf shutter firing one stop faster at 1/4000, but also with the lens including an internal ND filter which can be activated in the menus to give an extra three stops before you ever have to trouble the electronic shutter. It would have been nice if the Q3 43 also had an internal ND.
Moving on, the rear controls are kept nice and simple with a joypad flanked by menu and play buttons, along with two unlabelled function buttons. Push and hold either function button to change their operation. Likewise for the buttons inside the joypad and thumbwheel at the top.
If you have Spot, Field or Zone focusing area enabled, you can use the joypad to move the position on the frame, or alternatively use the touchscreen. It’s also possible to reposition the AF area by touch when composing through the viewfinder, but left-eyed shooters beware as your nose will end up inadvertently moving it for you. This is why I’d have preferred a joystick. That said, while the X100 VI has a joystick, it doesn’t have a joypad, so you can’t have everything.
The user interface also reflects the clean, simple controls. Push the menu button once and you’re presented with a quick menu showing exposure details and direct access to common settings like the AF mode, metering, drive, white balance, quality and Film Style. You can navigate and confirm using the joypad or touchscreen. Pushing Menu again cycles through six pages of menus, so the options are kept to the minimum without the sprawl of most modern cameras.
In terms of composition, the Q3 43 shares the same viewfinder and screen as the original Q3. So you’re getting a large and detailed electronic viewfinder with 5.76 million dots and 0.76x magnification in the 3:2 shape. In practice it looks great, although like many high-res EVFs, the resolution will temporarily drop as the camera is autofocusing. Fujifilm’s X100 VI has a smaller and less detailed 3.69 million dot viewfinder, so in electronic terms, the Q3 43 is certainly a step-up, although the Fujifilm does have that hybrid optical view if you prefer.
For the screen, the Q3 sports a 3in panel with 1.8 million dots, mounted on a tilting mechanism that can angle-up by almost 90 degrees for more comfortable waist-level shooting, or down by about 45 to be more viewable when held overhead. It’s a little odd not to fold up by exactly 90 degrees to be completely square, but it works fine.
On the left side a plastic flap opens to reveal Micro HDMI and USB C ports. There’s no analogue mic or headphone jacks, but apparently the USB C port will support some USB C mics in the future. It’s possible to recharge the battery or remote control the camera over USB, or connect an external recorder to the HDMI.
Underneath you’ll find a tripod thread in line with the optical axis, with the card and battery compartments flanking it. The card slot door pushes forward with a click and springs open to reveal a single SD slot. Most cameras this size also only have one slot, but at this price it’d be nice to have either tried squeezing-in two slots or perhaps including some built-in memory to allow for redundancy. I’d find that more reassuring for unrepeatable events like weddings.
Meanwhile twisting a lever pops out the actual battery which, with an additional little push, can be ejected whole. So the battery itself includes the compartment door. As expected, it’s the same BP-S CL6 as the Q3, quoted for around 350 shots under CIPA conditions. In my tests it typically lasted longer than the X100 VI battery. Oh and if wired USB charging is too pedestrian for you, the Q3 43 also supports an optional wireless charging pad accessory.
Atop the body is a flash hotshoe, with the model number engraved alongside. As mentioned earlier, you can synchronise flashes up to 1/2000, versus 1/4000 on the X100 VI; both are still way faster than focal plane sync speeds.
The lens is arguably the most exciting part of the Q3 43, not only a brand new optical design from Leica, but the first new lens in the Q series since it was launched in 2015. Like the original 28mm version, there’s three rings on the barrel. Closest to the front is the aperture ring, running between f2 and f16 in one third increments, with an A position for automatic control.
In the middle is the manual focusing ring which turns very smoothly with hard stops at infinity and just beyond 60cm or two feet. Alongside the distance markings is a depth of field scale showing the range of sharpness at f4, 8, 11 or 16, making zone-focusing easy. As you manually adjust the focus, the camera briefly magnifies the screen at the last focusing point, along with applying focus peaking for further assistance.
While supporting the lens with your left hand, your thumb will naturally rest on a tab which includes a tiny button that lets you lock the camera into autofocus instead. With this button pushed, just turn the focusing ring a little beyond infinity to engage the AF position. Once set to AF, the focusing ring is locked in place until you push the tiny button in again while twisting back to the manual distances. It works fine, but the button is a little fiddly until you get used to it.
In normal operation, the camera will auto or manually focus down to around 60cm or two feet, but by twisting the third ring closest to the camera body, you can force it into a macro mode where the range becomes 60 to 27cm. As you turn this ring, the entire optical group is shifted outwards, neatly unveiling a new distance scale, although as before you’ll need to engage the AF position at the end if you want the camera to autofocus.
Interestingly as you turn the Q3 43 into its macro mode, the aperture actually closes by one stop to f2.8, and this isn’t just a light-gathering difference: the actual diaphragm system closes to f2.8 regardless of where the aperture ring is set between f2 and f2.8. It’ll just be 2.8 until you close it further. And as you’ll see, this will mean bokeh blobs will show a geometric shape in the macro mode even at the maximum aperture. Plus as noted earlier, the optical group shifting outwards will cause issues when trying to use filters with the supplied rectangular hood.
Moving on, behind the lens, the Q3 43 shares the same 60 Megapixel full-frame CMOS sensor as the original Q3 with the same quality options. You can record images in 8-bit JPEG or 14-bit DNG RAW, or both if desired, and it’s possible to set them independently to lower resolutions of 36 or 18 Megapixels if the full 60 is too much. There’s no compression options, but you can record in four different aspect ratios.
The substantial resolution provides plenty of latitude for cropping and Leica leans into this with the Digital Zoom menu offering settings for 60, 75, 90, 120 and 150mm, each employing increasingly severe crops. The camera doesn’t attempt to upscale, so as the crops become tighter, the resolution simply reduces.
You can also cycle through these options during composition, with a progressively smaller frame indicating the coverage. There’s pros and cons to this approach. On the upside, you’ll effectively see subjects outside the frame a bit like a rangefinder, allowing you to prepare or recompose.
On the downside, as the frame becomes ever smaller, it becomes harder to compose accurately with it, and I wish there was an option to just fill the screen or EVF with the active area instead. Maybe I missed it in the menus.
Either way, the native image with 43mm coverage can record at the full 60 Megapixel resolution. Choose the 60mm crop and the resolution falls to 31 Megapixels. At 75mm the resolution becomes 20 Megapixels. At 90mm the resolution is 14 Megapixels. At 120mm the resolution has fallen to eight Megapixels. And finally at the tightest 150mm coverage, the substantial crop only leaves five Megapixels.
When viewing the full image on YouTube or on social posts, that’s still enough detail, but you obviously can’t zoom into it much further. Note if you’re recording DNG files, these will include the full 43mm view, but with cropping instructions that are applied automatically in post – most applications will however let you revert to the broader view if preferred.
To be honest I personally found the 43 focal length so flexible, I rarely if ever felt the desire to enter any of the cropped modes, and of course I could just make crops in post later if desired.

Above: Let’s now have a look at noise across the ISO range, starting with the Q3 43 at its lowest sensitivity of 50 ISO. I’m going to zoom-in by 600% for a closer look to reveal any differences and use out-of-camera JPEGs to evaluate the image processing and noise reduction strategy. See the full sequence in my video review above.
I also wanted to see how the Fujifilm X100 VI compared, as much academically as anything else, so will include it on the right at the same magnification. Note I moved the camera forward a little to compensate for the wider lens and to match the subject size on the frame. Obviously the sensor is smaller and the resolution lower, but it’ll be interesting to see how their detail compares throughout the range.
The lowest extended sensitivity on the X100 VI is 64 ISO, with the second image using its base of 125 ISO. Next for them both at 200 ISO, and now at 400 ISO… meanwhile at 800 ISO there’s a faint sprinkling of noise on the Leica, while the Fujiflm’s NR is delivering similar detail to its lower ISOs. At 1600 ISO, both cameras are allowing more noise to become visible, beyond which it’s a steady decline on both models.
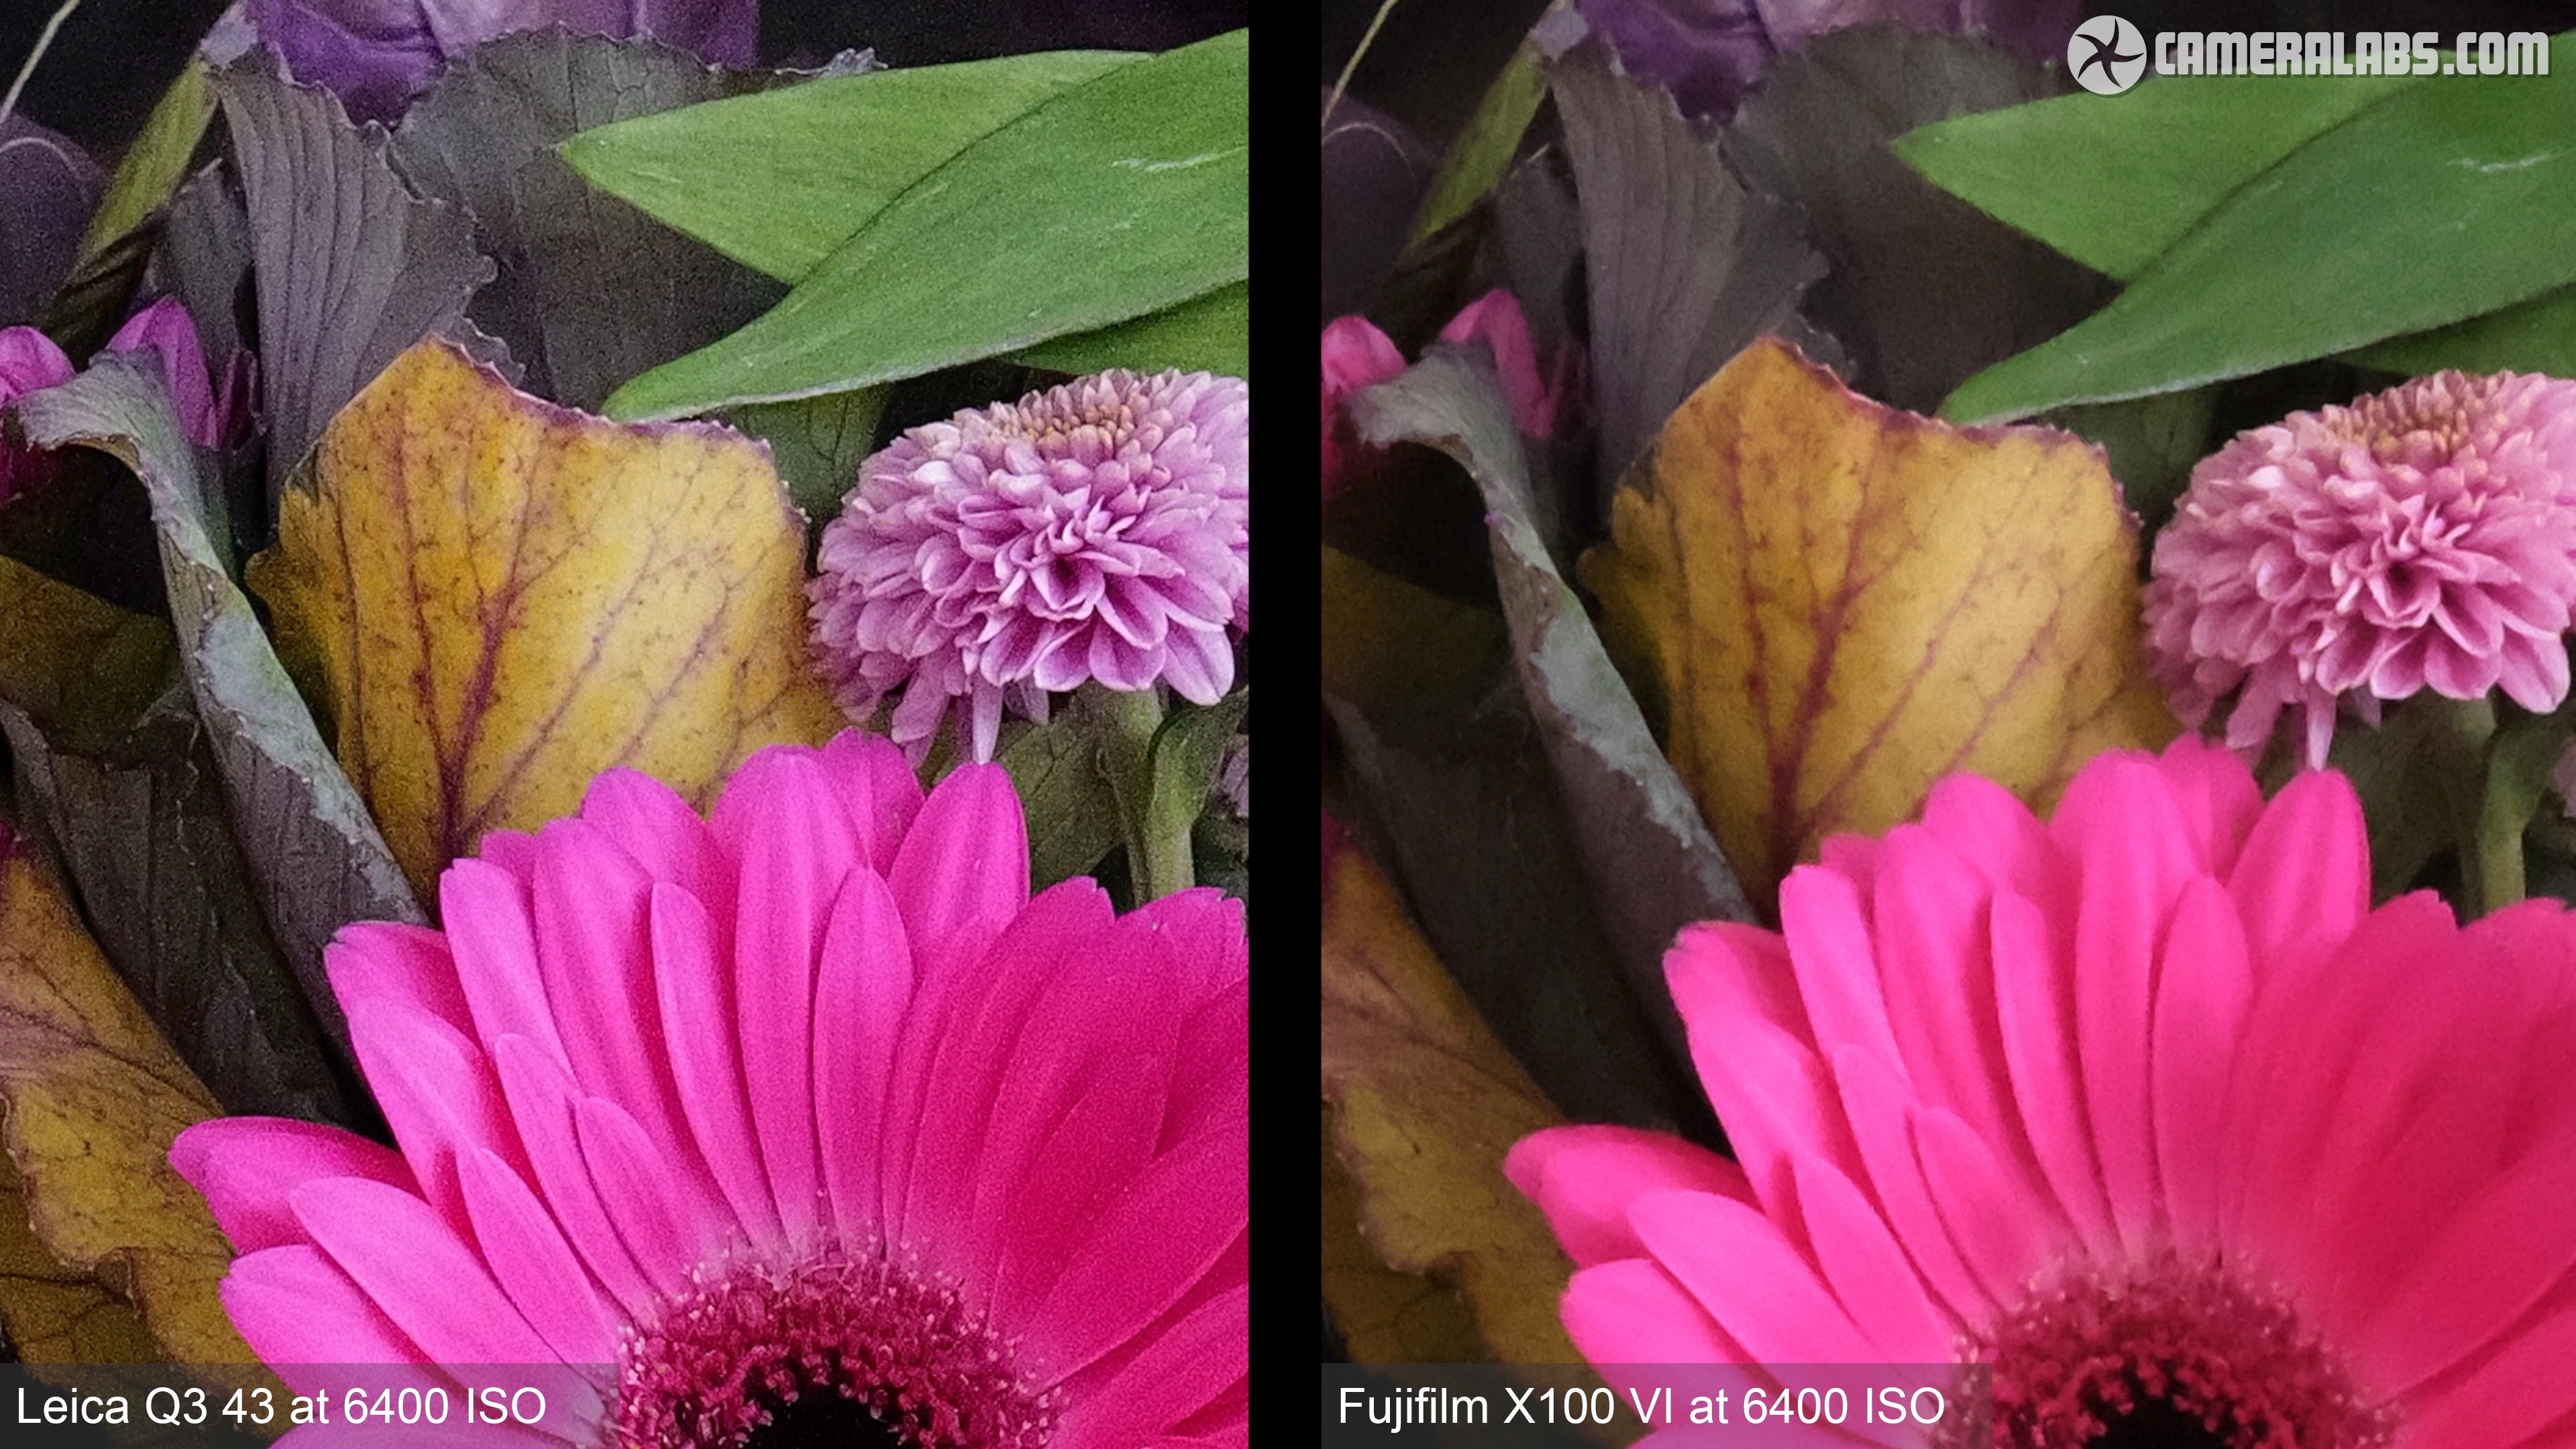
Above: Both cameras at 6400 ISO. It’s interesting to see at which point the noise reduction systems on both cameras ease-off to reveal more speckles. Leica’s noise pattern becomes gradually worse, while Fujifilm’s strategy seems to completely change from 12800 ISO onwards. Meanwhile at their top sensitivities, neither camera is looking great.
Moving onto autofocus modes, you can choose between single or continuous or let the camera figure out which is best for the subject, but as noted earlier the viewfinder resolution will temporarily reduce while continuously autofocusing.
AF areas include Multi Field where the camera figures it out, or spot, field and zone which allow you to drill-down as desired. Next comes tracking which allows you to place a frame over a subject that’s then tracked while you keep the shutter half-pressed. By default the frame starts in the middle, but you can move it using the joypad or touchscreen, and choose whether it resets back to the middle afterwards, or the last active position. In practice it can follow a subject successfully around the frame, but the AF drive itself is best-suited to slow movements.
If the subject is human, choose the Eye / Face / Body detection option. This places squares over both eyes, looking a little like the subject’s wearing glasses, but prioritising the closest one. And finally, you can add animal detection to the mix, but Leica only mentions typical pet types rather than specifics, so beyond cats and dogs, your mileage may vary.
Ok, let’s see that focusing in practice, starting with the single AFS mode and a spot area in the middle of the frame. Here the camera’s positioned so the bottle falls within the standard non-macro focusing range, and with the aperture wide-open you can see the camera refocusing quickly and without fuss.
Set it to continuous AFC though and it performs less confidently, at least in this environment. Couple this with the reduced viewfinder resolution in continuous AF and I found myself preferring to use single AFS mode instead, where the camera feels quicker and more confident. That said in general use, the only time I came across focusing issues was when the subject fell outside of the standard range, and that was resolved with a quick twist into the macro mode. Oh and in my focus breathing test across the standard range from infinity to 60cm, the view broadens a little.
Moving on, the lens features optical image stabilisation to help iron out any wobbles on photos and video, as well as during composition. This can be switched on or off, or set to Auto, but in my tests it still only seemed to activate during a half press whether set to On or Auto.
Here’s an example of the slowest shutter speed I could handhold with OIS enabled, at ⅛, although my result at one quarter of a second wasn’t bad. I’ll keep the ⅛ sample on the left with OIS and show you the same exposure without OIS on the right where it’s much more blurred.
In fact on the day, I needed a shutter speed of 1/125 to handhold a sharp result on the Q3 43 without stabilisation, so the OIS was giving me four to five stops of compensation in practice. So it’s a valuable feature to make the most of the unforgiveably high resolution sensor.
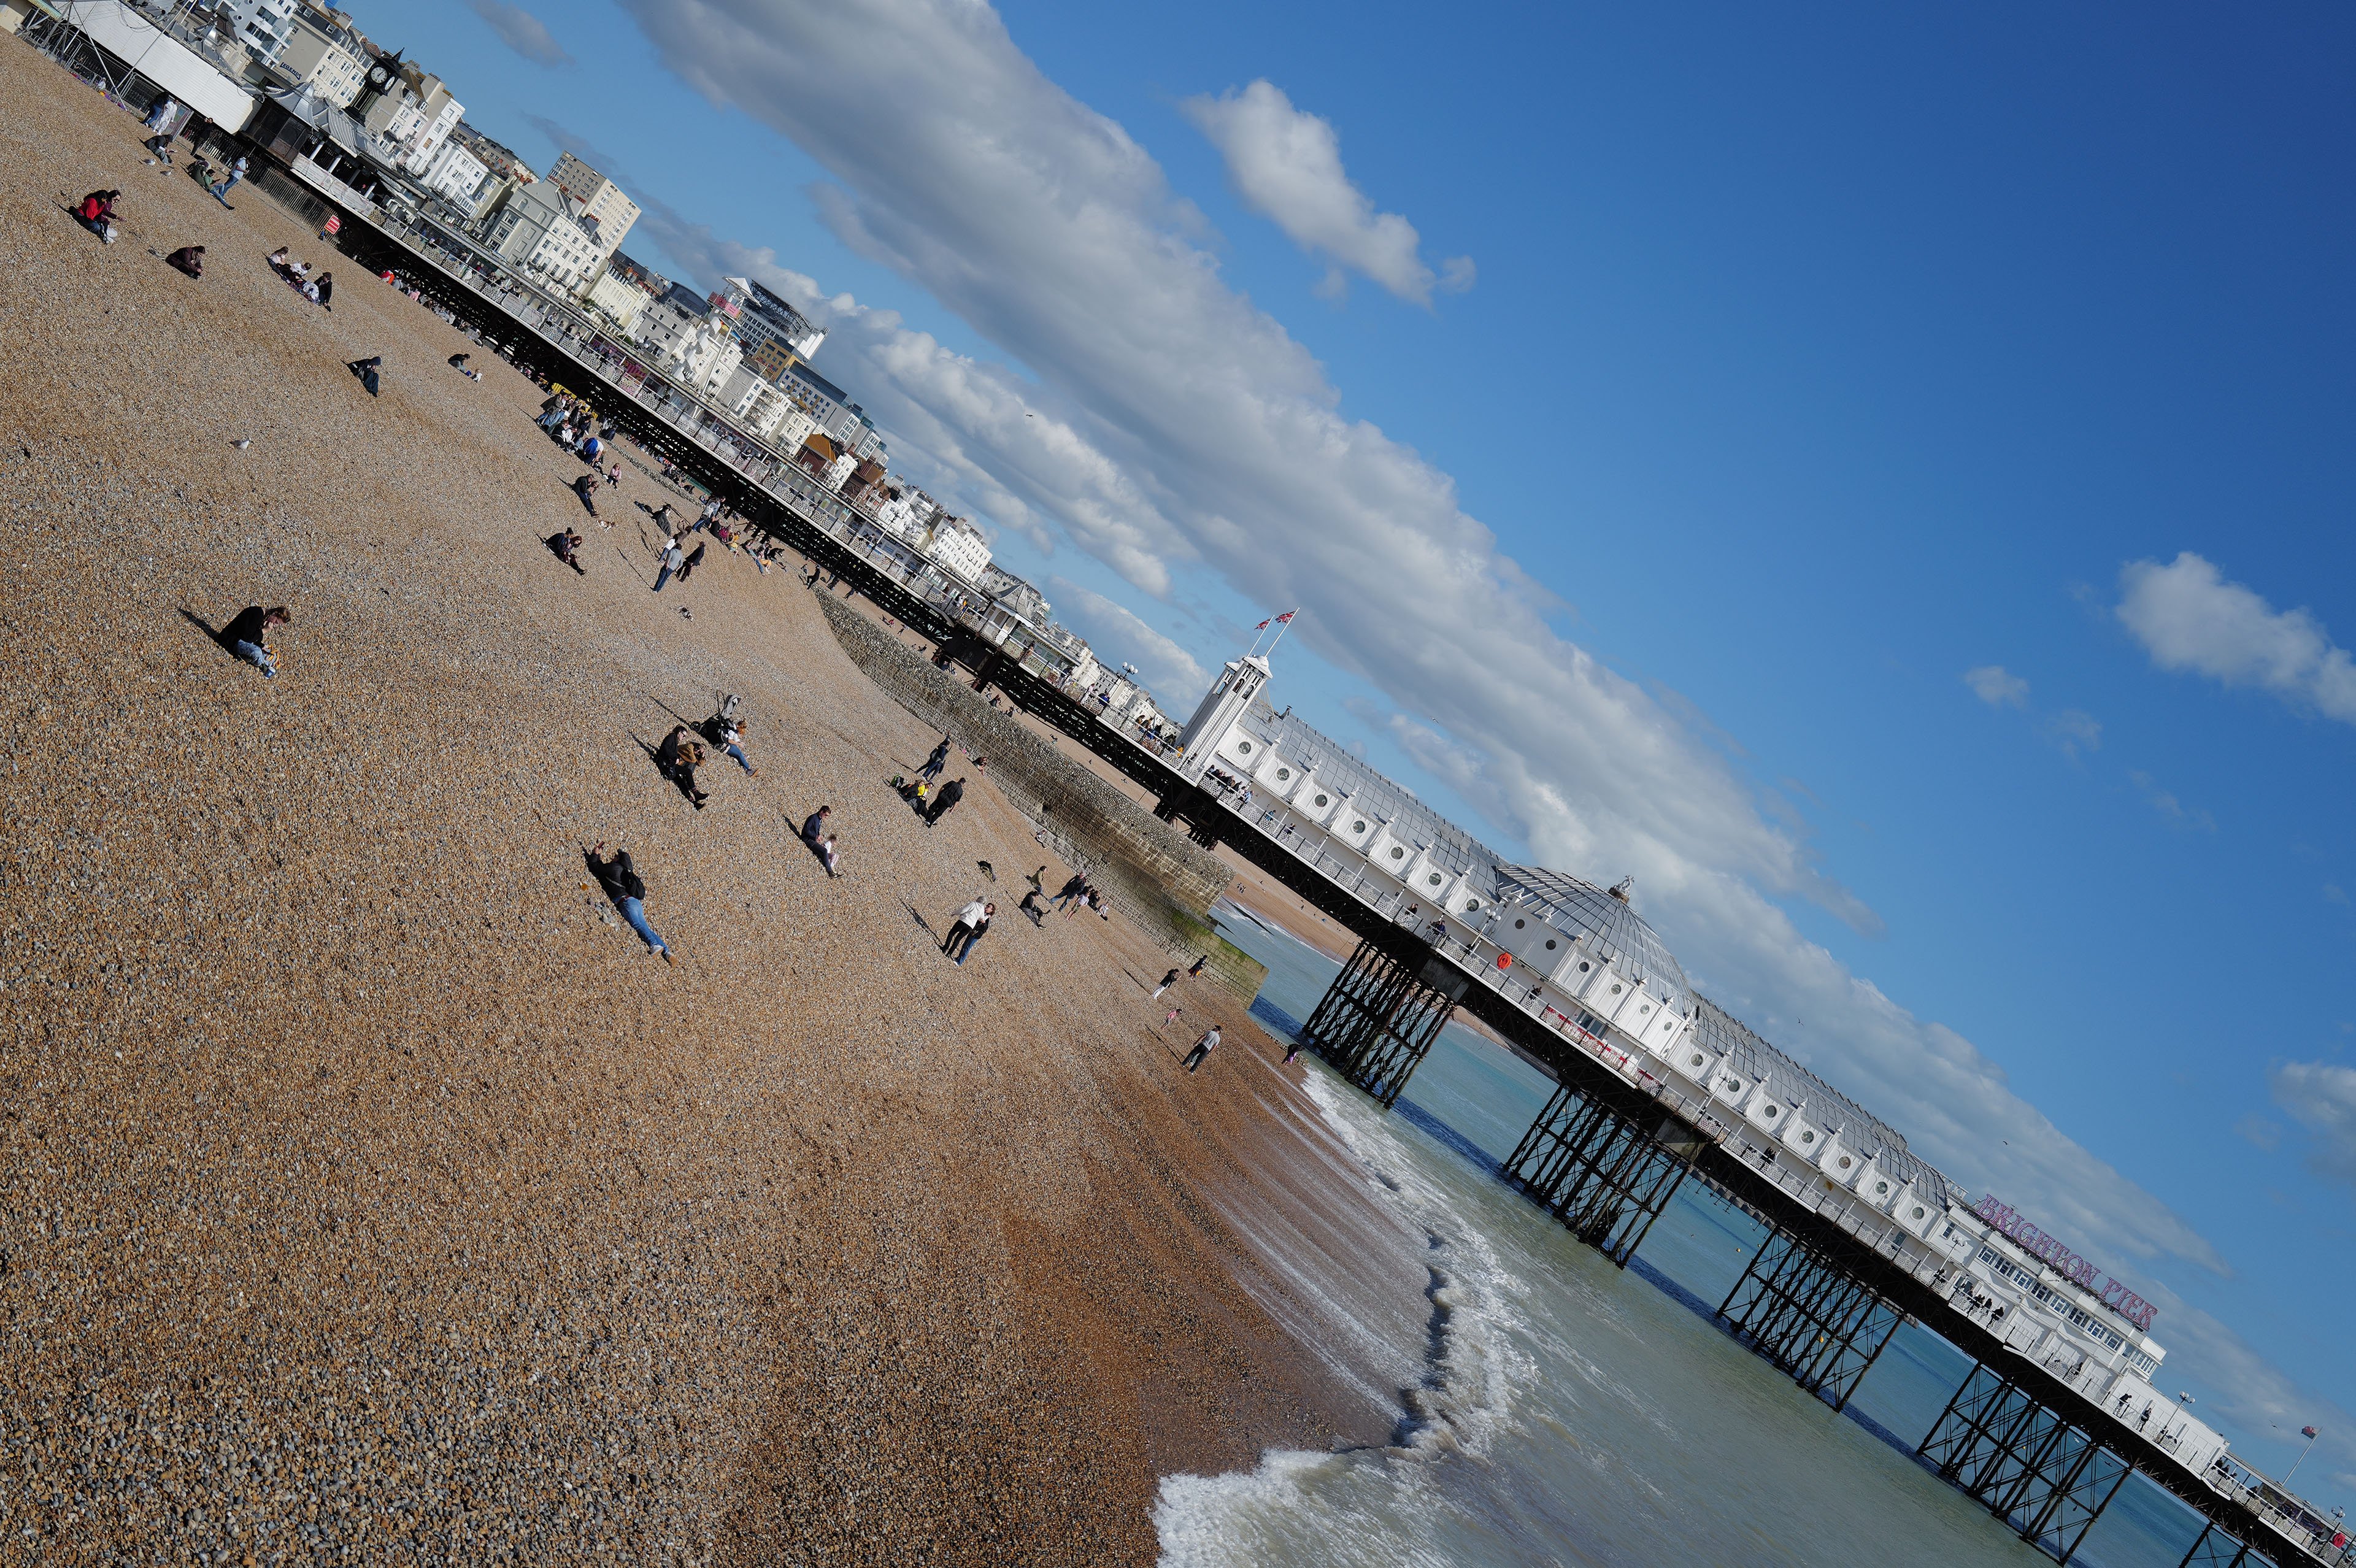
Above: Ok now for my optical quality tests, starting with my distant landscape view, angled so that details run into the corners. As always I prefer to test lenses with a real-life distant subject as it’s more meaningful for evaluating landscape quality than shooting a chart at close range. So here’s the Q3 43 with the aperture wide-open at f2 and taking a closer look in the middle at 600% reveals really crisp, well-corrected details out of the gate. For a full analysis and to see all the versions and comparisons, see my video review at the top.
Closing the aperture to f2.8 will bring a fractional boost if you’re really pixel-peeping, but to all intents and purposes, this lens is already performing really well in the middle when wide-open.
As you close the aperture further, the maximum quality is maintained up to f5.6, although at f8 there’s a mild drop in contrast and sharpness. At f11 this becomes more apparent, and at the minimum aperture of f16, diffraction has noticeably reduced the overall crispness. So if depth-of-field isn’t an issue, I’d try to shoot between f2.8 and 5.6 for the sharpest results.
Let’s return to the f2 sample – see how much sharper this looks – before heading into the far corner, where you’ll only see a mild impact on sharpness. As I gradually close the aperture, the corner sharpness improves and peaks around f5.6, before softening at smaller apertures due to diffraction.
Out of interest, let’s return to the middle of the frame at f2 and compare the Q3 43 on the left with the Fujifilm X100 VI on the right. Both are magnified by the same amount here, but the details are smaller on the Fujifilm due to the wider lens.
So there’s a few variables here including resolution, sensor size and focal length, but it’s clear how the X100 VI lacks the bite and ultimate detail of the Q3 43 wide-open.
Closing the aperture can improve the Fujifilm, but it’s clear how the lens and sensor combination of the Leica is capturing much finer details, as you’d expect for the specification and price.
It’s not just about pixel-peeping detail though, so I thought it would be interesting to see how each camera rendered the same scene moments apart in their high contrast monochrome modes.

Above: you’re looking at the Leica Q3 43 on the left in its Monochrome High Contrast Film Style.
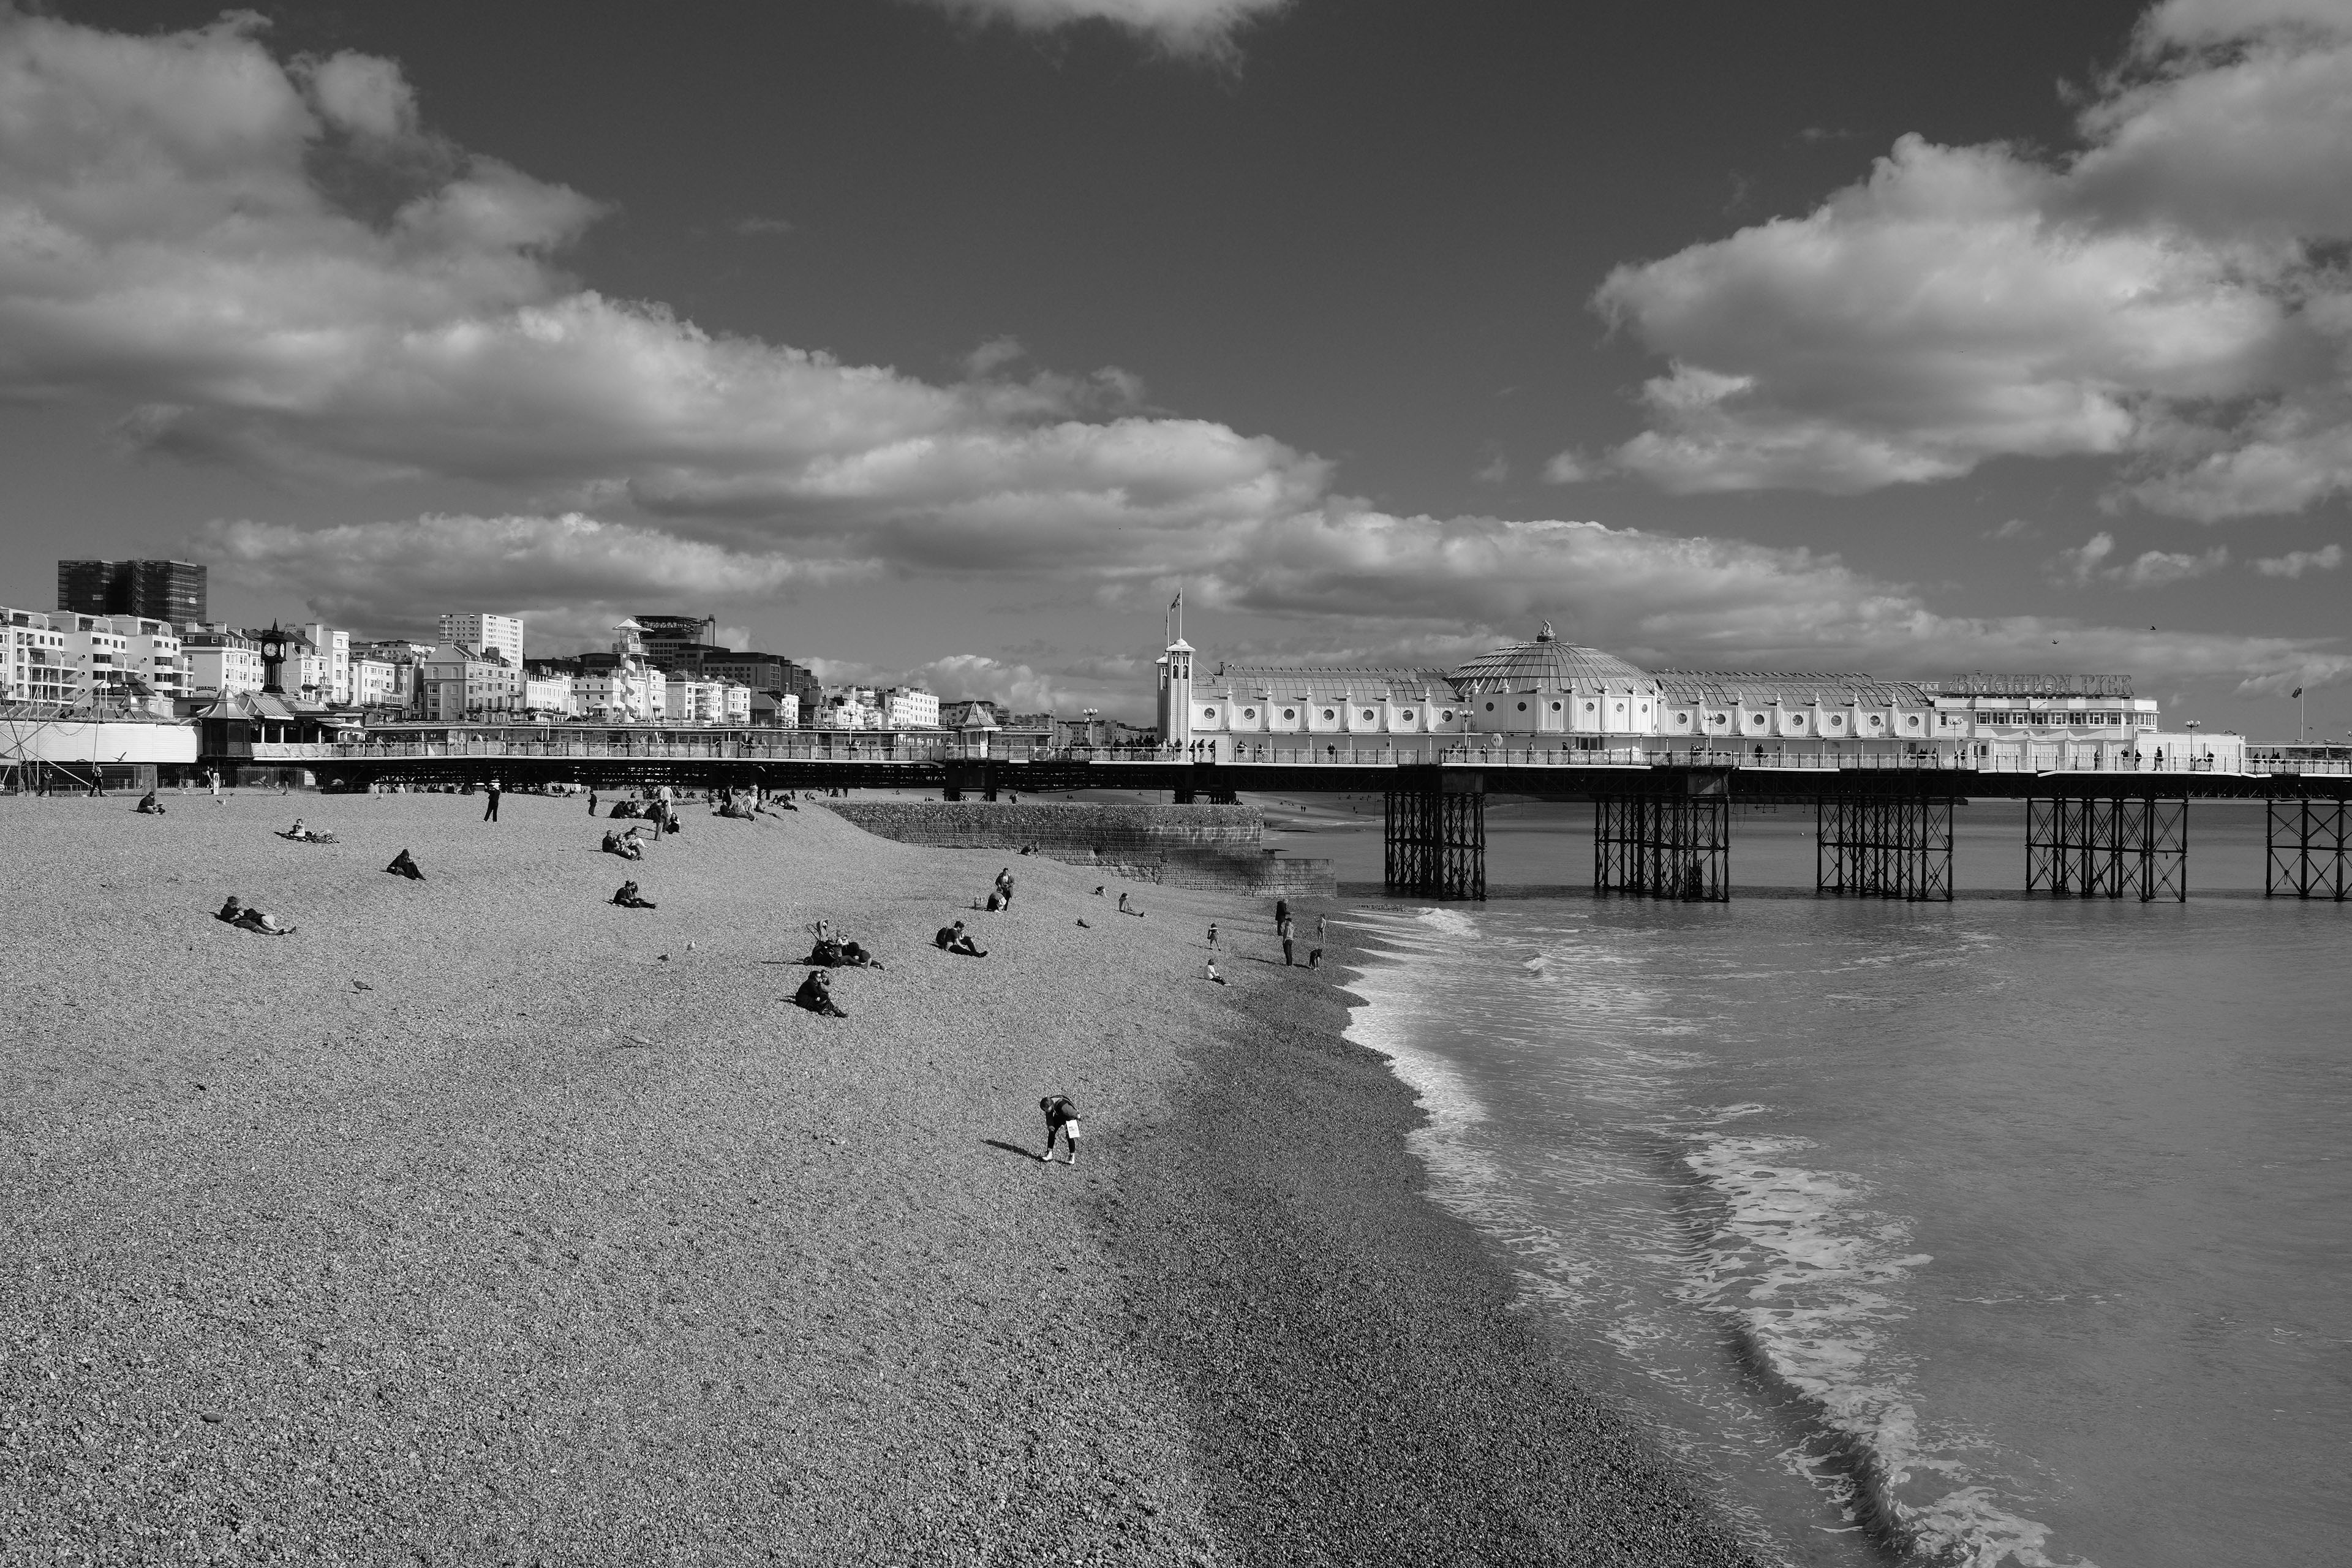
Above: and here’s the Fujifilm X100 VI on the right in the ACROS Film Simulation with the digital Red filter.
The red filter effect has darkened the blue sky on the X100 VI sample on the right, which I personally prefer, but in terms of the style as a whole, I’d say they’re both looking quite similar here. Do you have a preference?
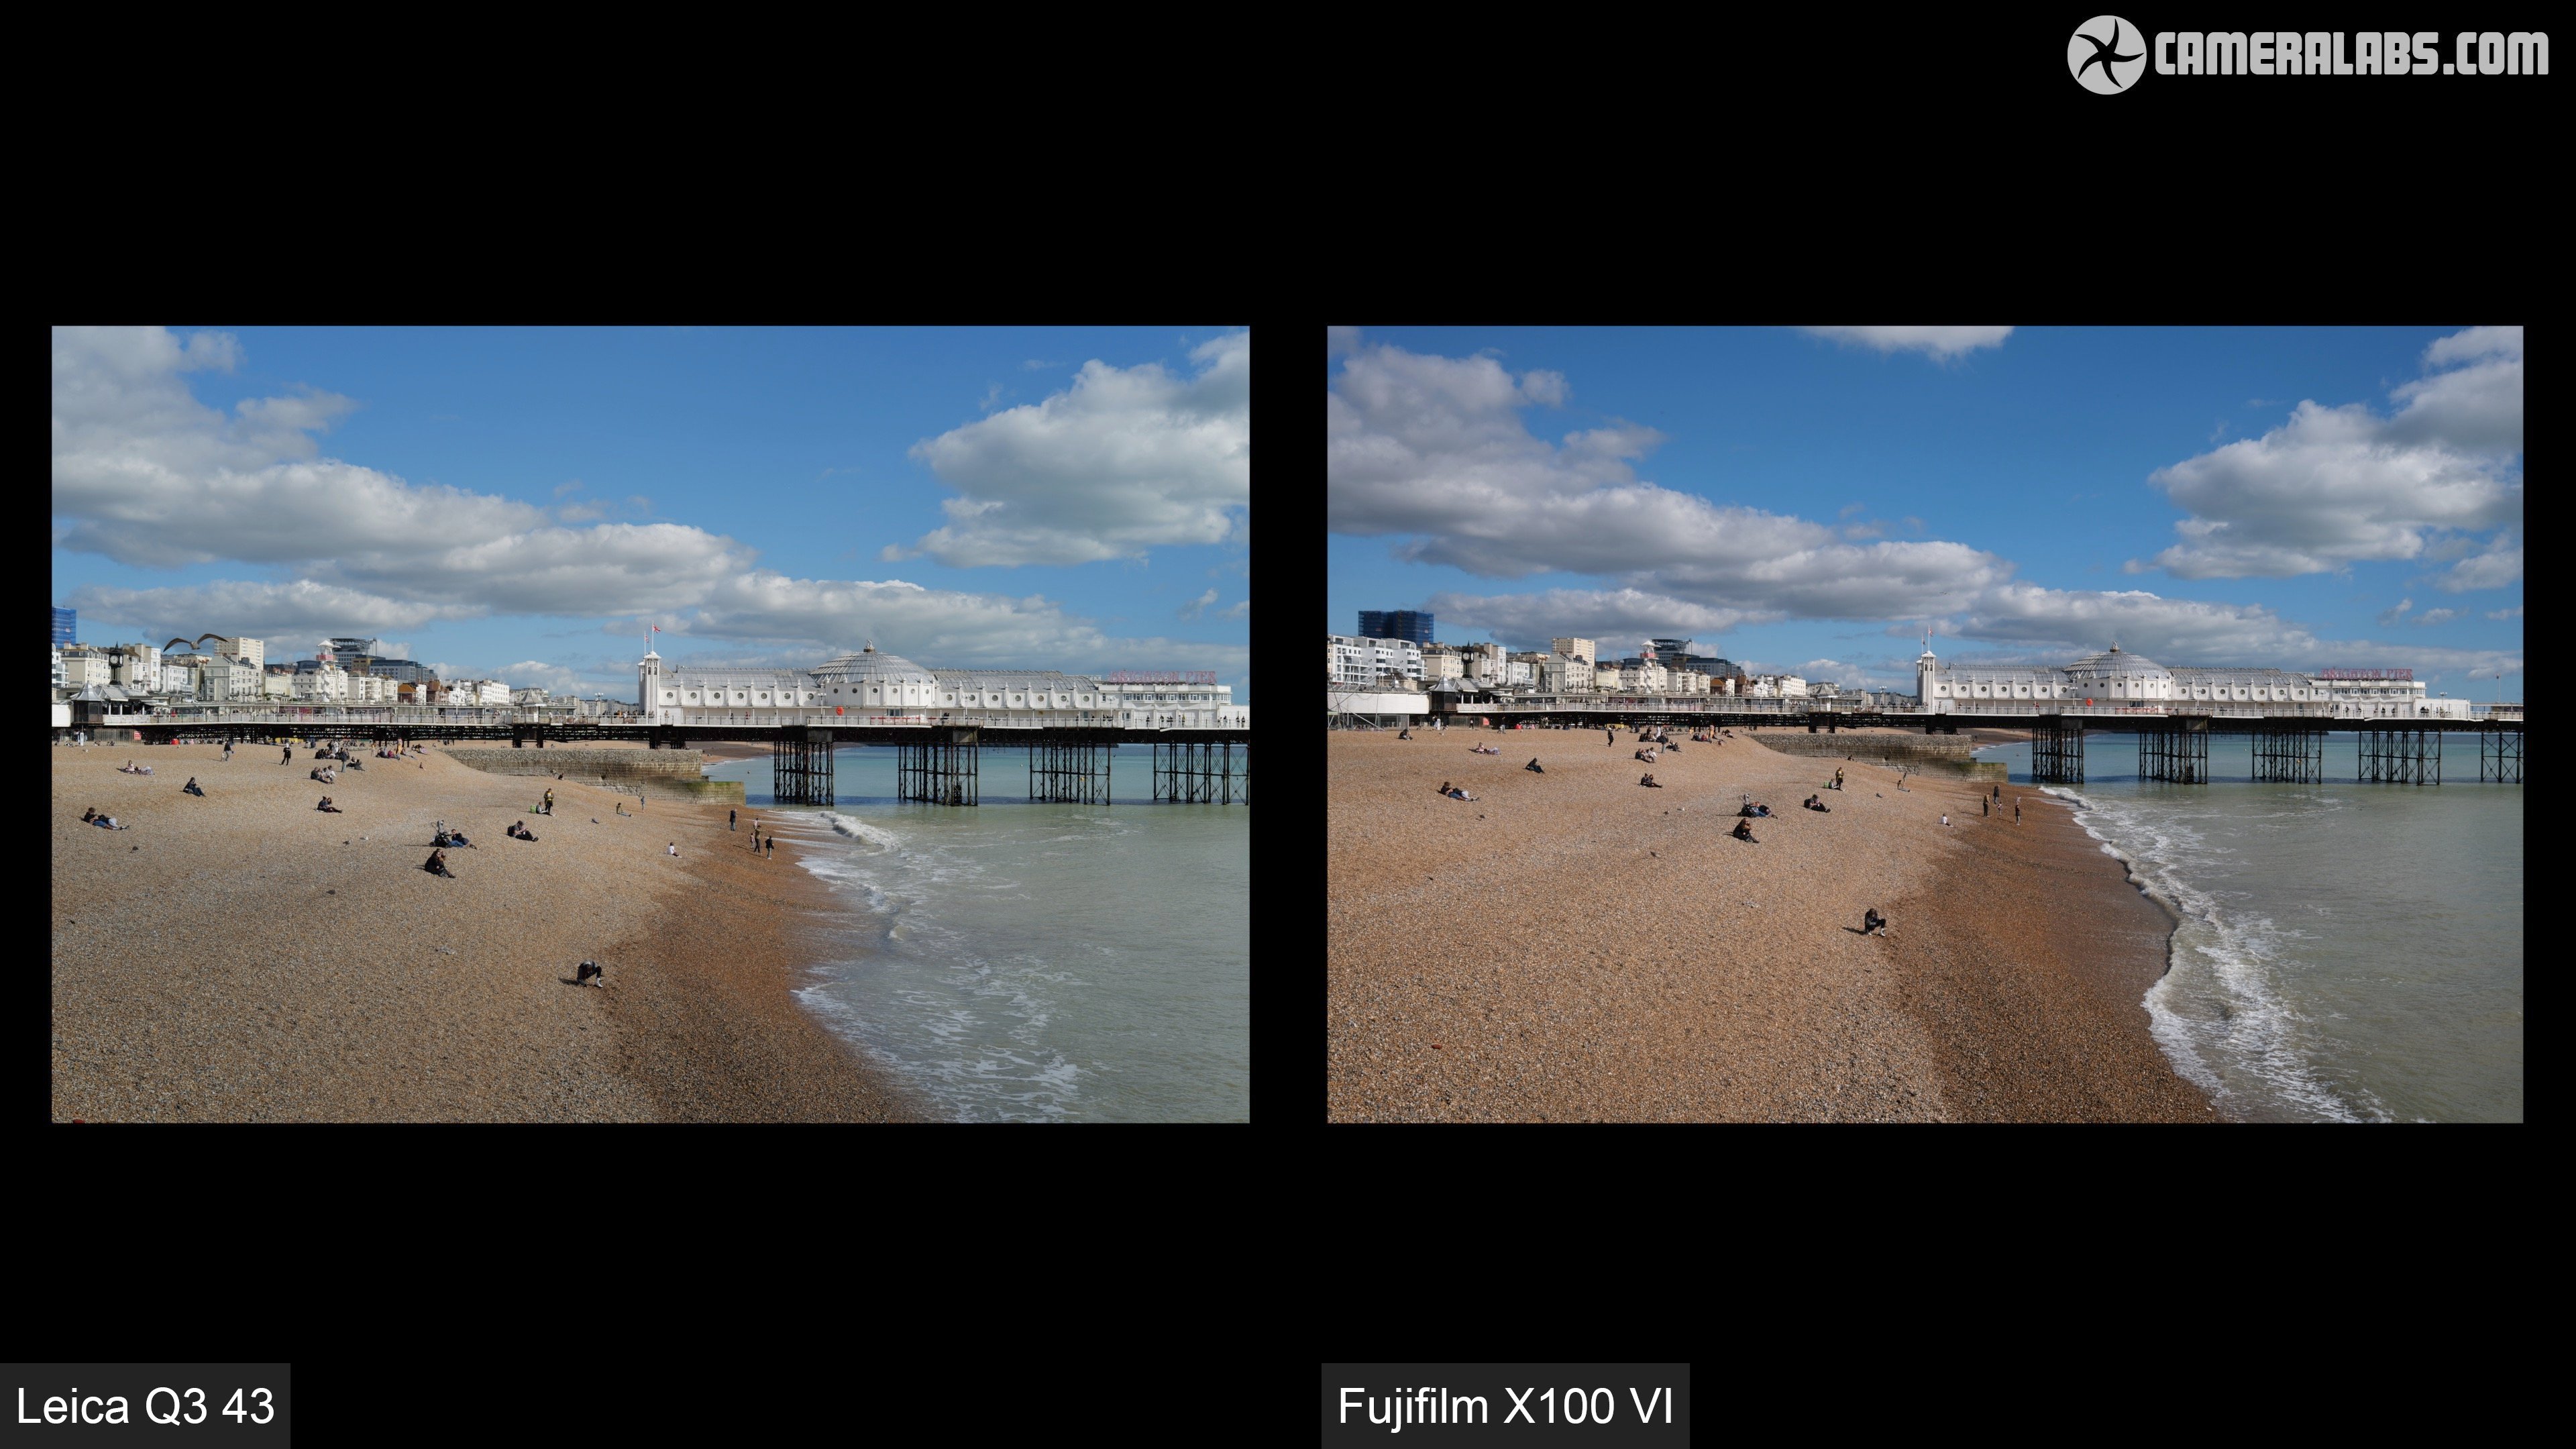
Above: and for fun, here’s the colour versions from each camera, both in their standard profiles, and again these are JPEGs out of camera. Here the difference is more obvious with the X100 VI’s standard Provia simulation delivering higher contrast and greater saturation. I like the punchiness of Provia, but have always felt it’s a bit heavy-handed for a standard profile, and certainly the default profile of the Leica on the left more natural. But as always these are personal preferences and both cameras offer plenty of alternative profiles to choose from, including via the Fotos app on the Leica.
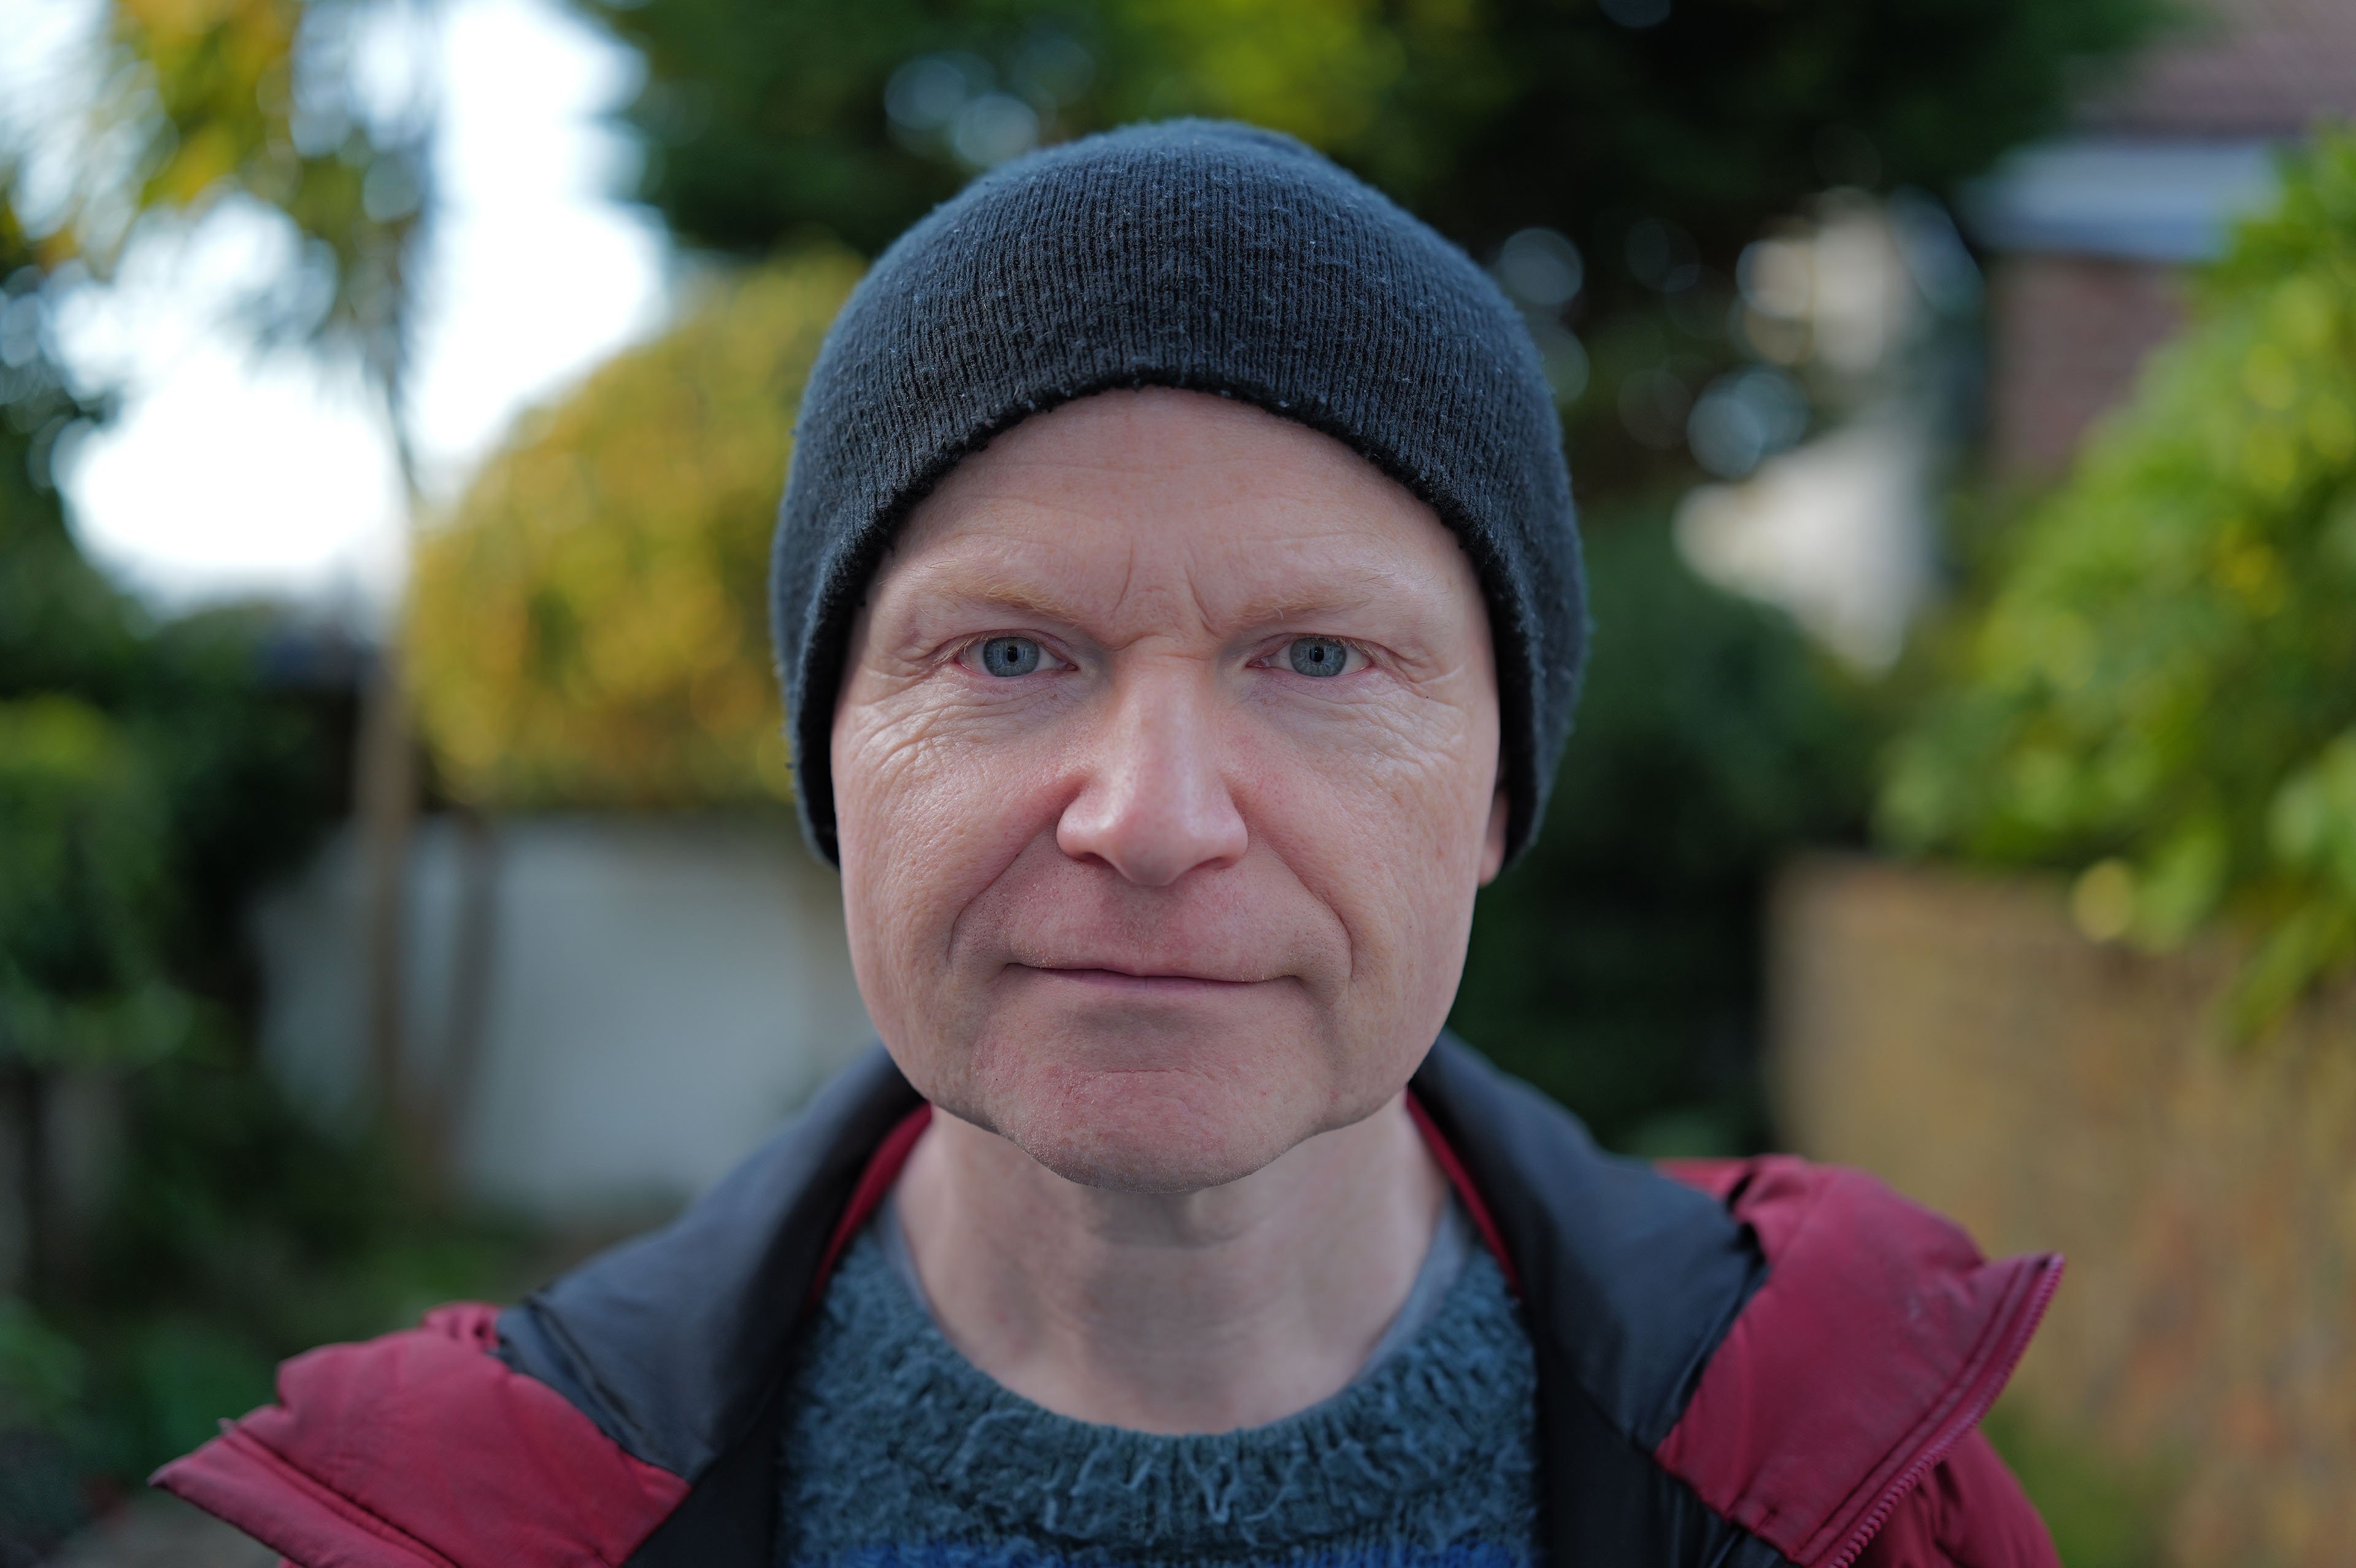
Above: Next for a portrait test, here with the Leica Q3 43 at f2 again and using face and eye detection to lock onto me. Zooming-in for a closer look again reveals tremendously crisp details, I’d say comparable to the best Sony GM lenses in my tests.
43 f2 may not deliver as shallow a depth-of-field as a 50 1.4 prime, but there’s still plenty of background blur and separation here, with a nice fall-off between the focused area and the back of my garden. I’d say the 43 f2 lens works very well for portraits at closeish range.
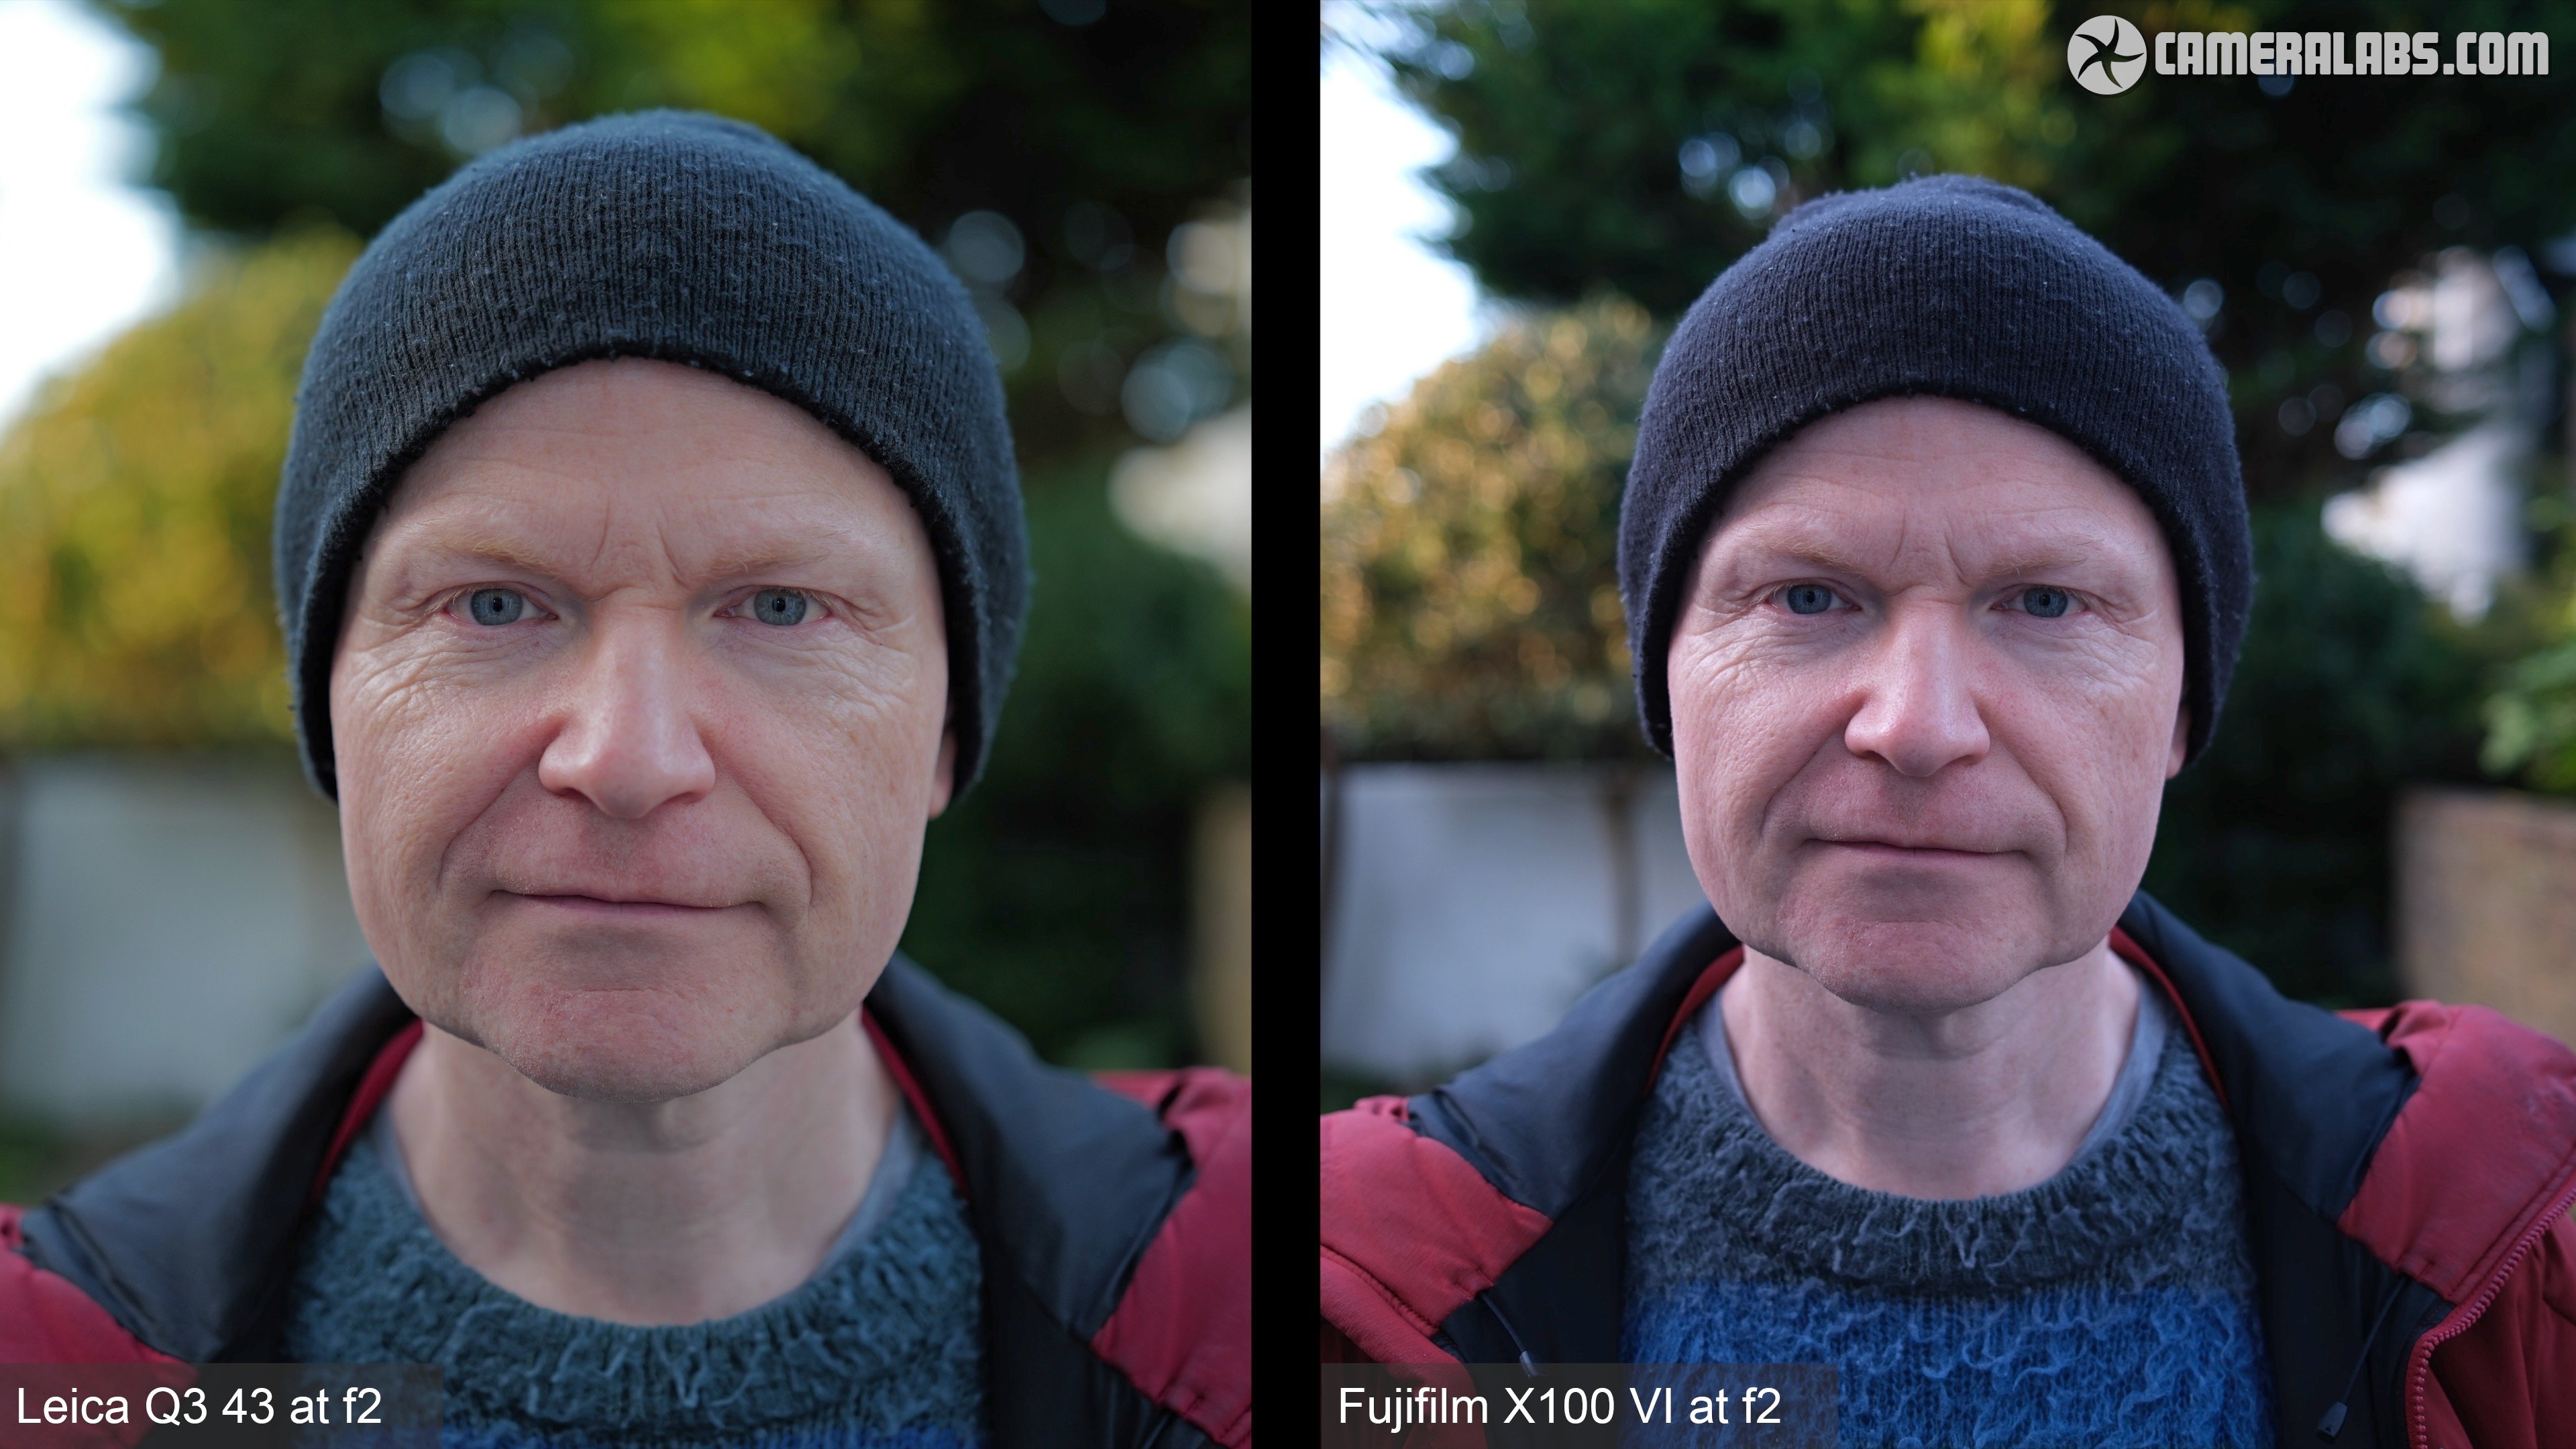
For comparison, let’s place the Q3 43 on the left and the X100 VI on the right, both at f2 and with me at the same distance. Under the same lighting conditions, it’s interesting how their evaluation of white balance and skin tones differs, with the Leica again looking more natural here.
The smaller sensor and wider coverage of the X100 VI is also delivering much less background blur as you’d expect. If I edge a little closer to the Fujifilm to roughly match the subject size, you’ll see a little more blurring in the background, but this is becoming a bit too close for a 35 equivalent lens with some distortion now on my face.
Like the landscape view earlier, there’s also a lot more detail from the Q3 43, again as you’d expect from the lens and sensor combination.

Above: For a more formal look at bokeh and background blur, here’s my ornament test, photographed with the Q3 43 from its closest focusing distance and starting here with the aperture wide-open, which in macro mode becomes f2.8.
Here the blobs are looking mostly clean with minimal outlining, but you’ll notice them lacking a curved shape at the maximum aperture. Instead you can see many of them rendered as nine-sided shapes, reflecting the nine-bladed diaphragm system which has now kicked-in. Meanwhile in the far corner, there’s some inevitable stretching of the blobs, but again the impact of the aperture blades. So in macro mode, the reported f2.8 aperture even with the ring set to f2 isn’t just about an exposure difference. The diaphragm system really has now closed a tad, hence the non-rounded bokeh in this mode even at the maximum setting.

Above: Just briefly, for comparison here’s one of my sample images taken at the close end of the standard focusing range at f2, where the bokeh blobs are curved as you’d expect at the maximum aperture. So if you want to avoid nine-sided bokeh blobs, shoot in the normal focusing range.
Let’s now return to my ornament test in the macro mode, where turning the aperture ring between f2 and f2.8 makes no difference as the maximum aperture remains f2.8 regardless, but at f4 you’ll see the blobs shrink and become a little more rounded and consistent across the frame. As the aperture gradually closes further, the blobs keep shrinking, and the geometric shape becomes more obvious.
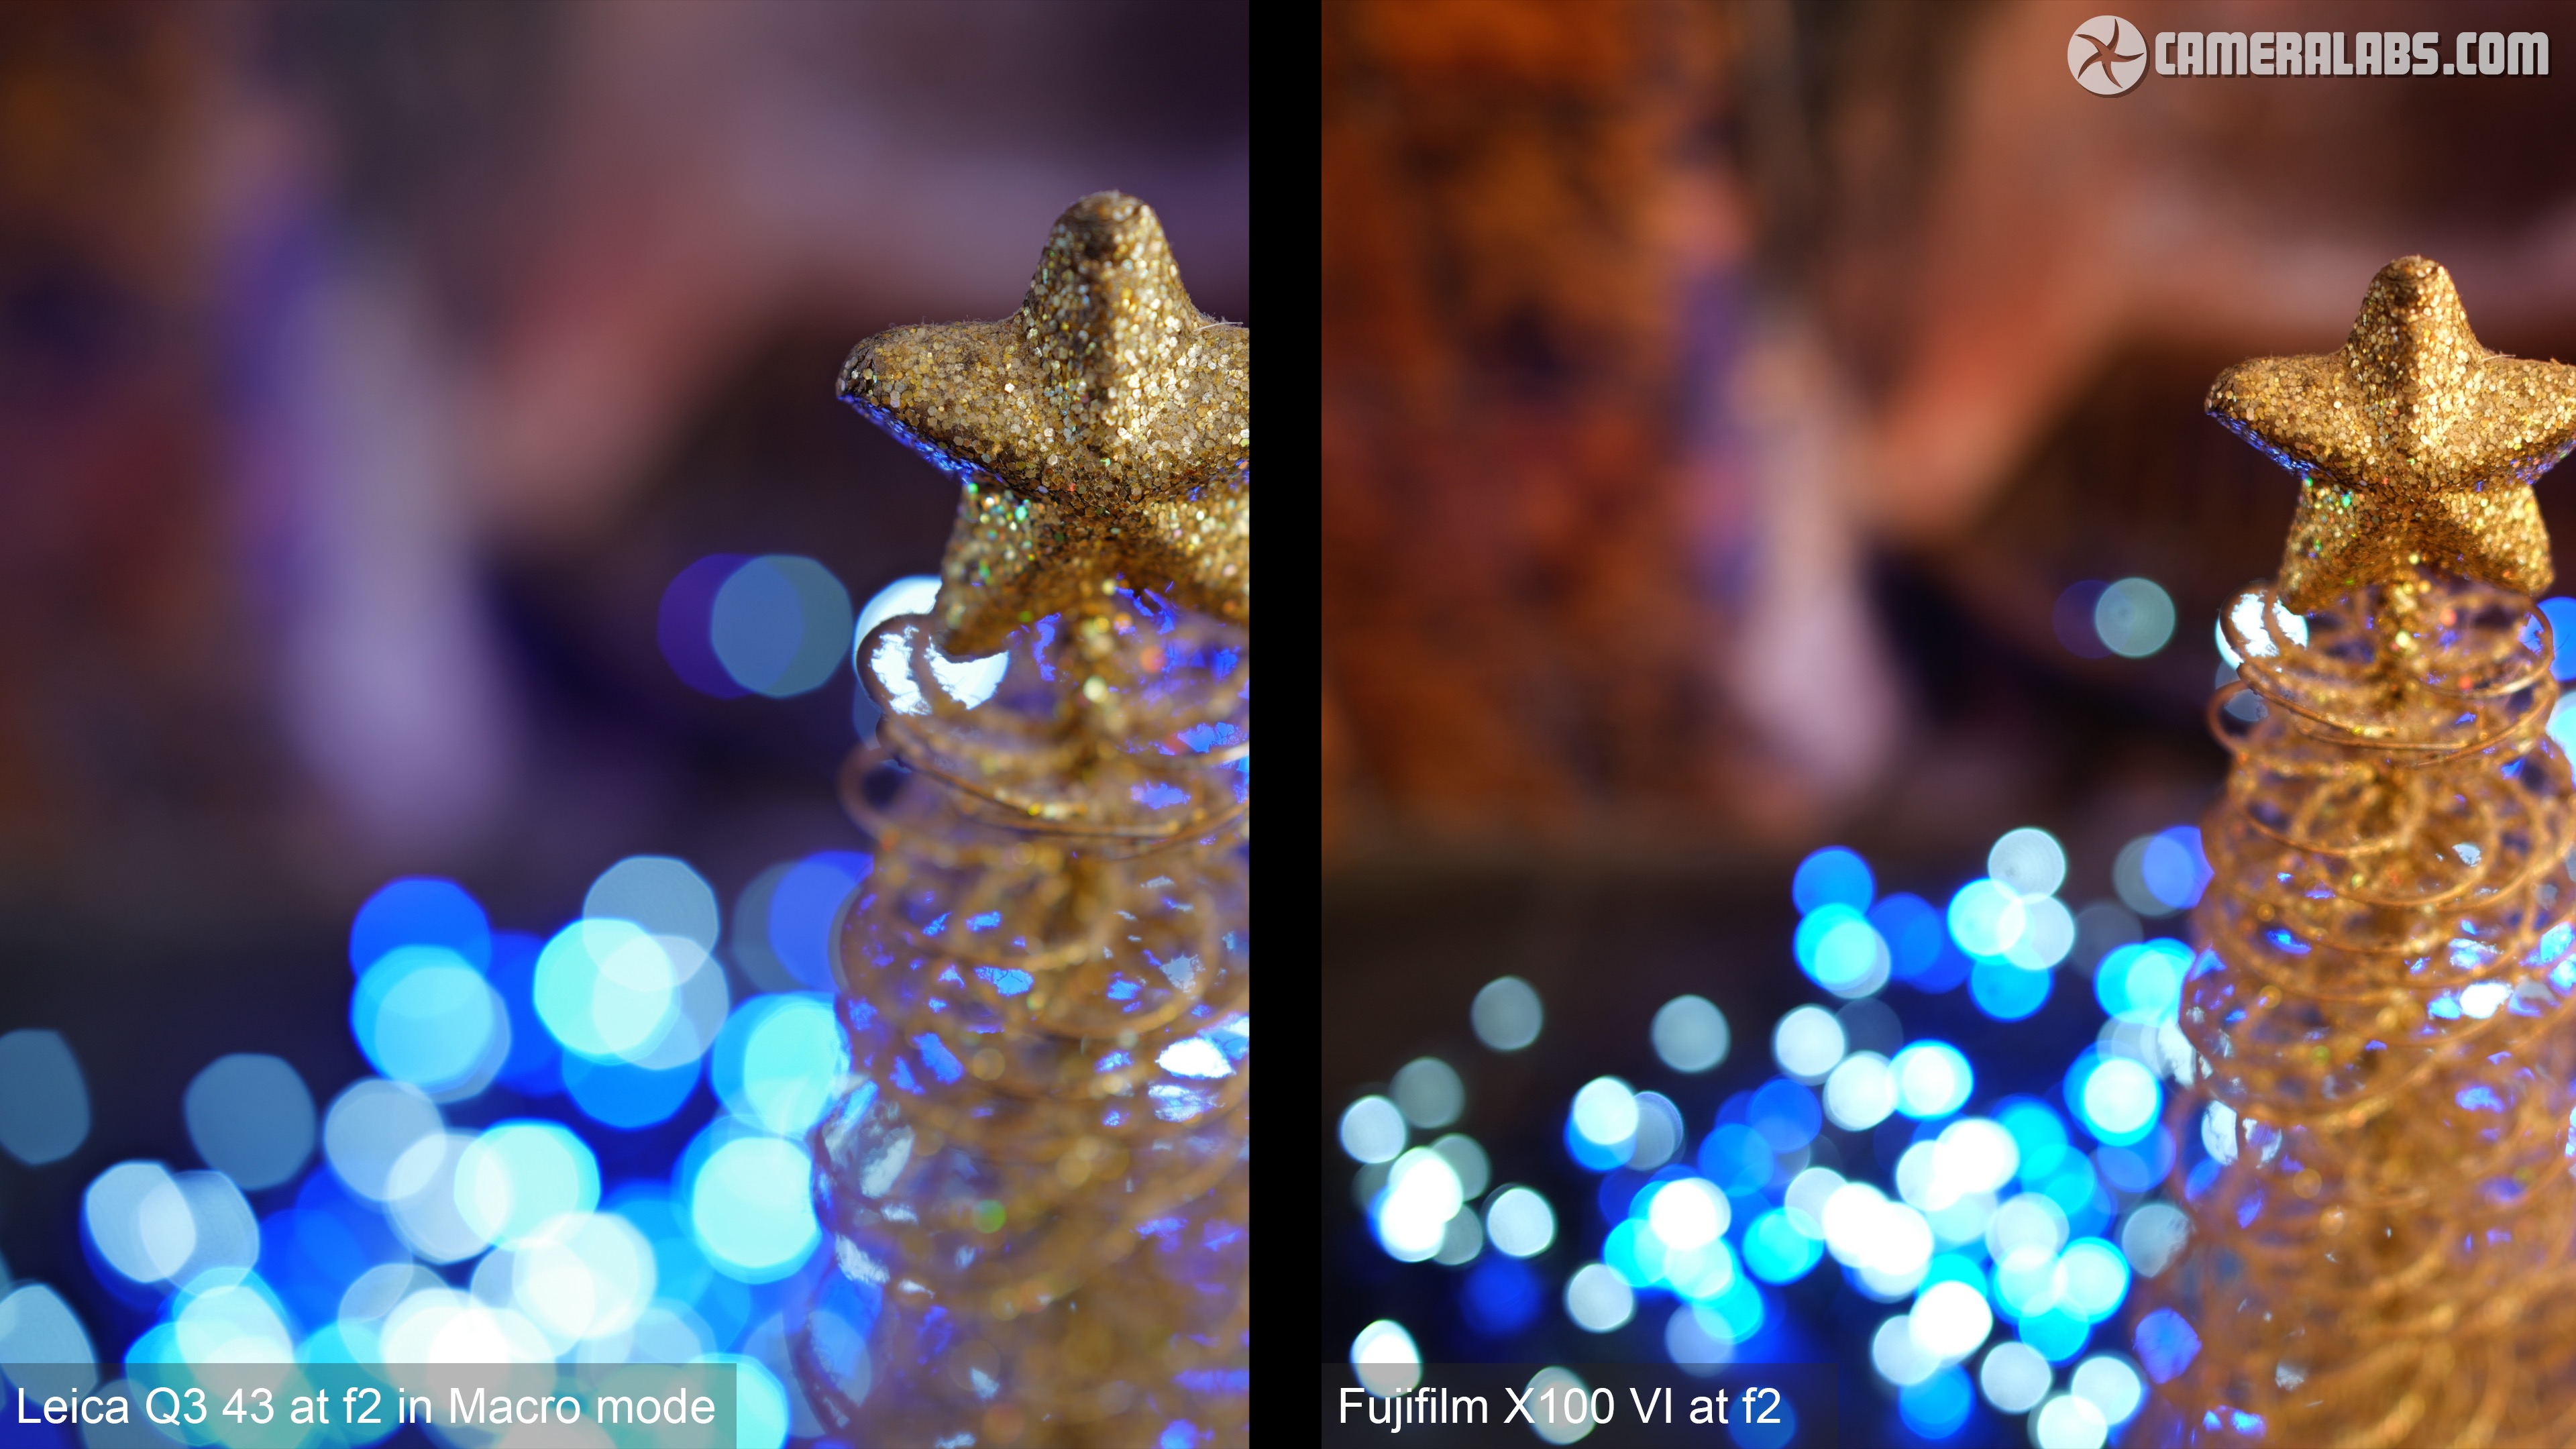
So let’s return to the sample at the maximum aperture of f2.8 on the left and compare it to the X100 VI at f2 on the right. This was taken from the same distance, so again the wider lens of the Fujifilm means the ornament and the blobs are inevitably smaller, but at the maximum aperture, they are at least rounded in shape.
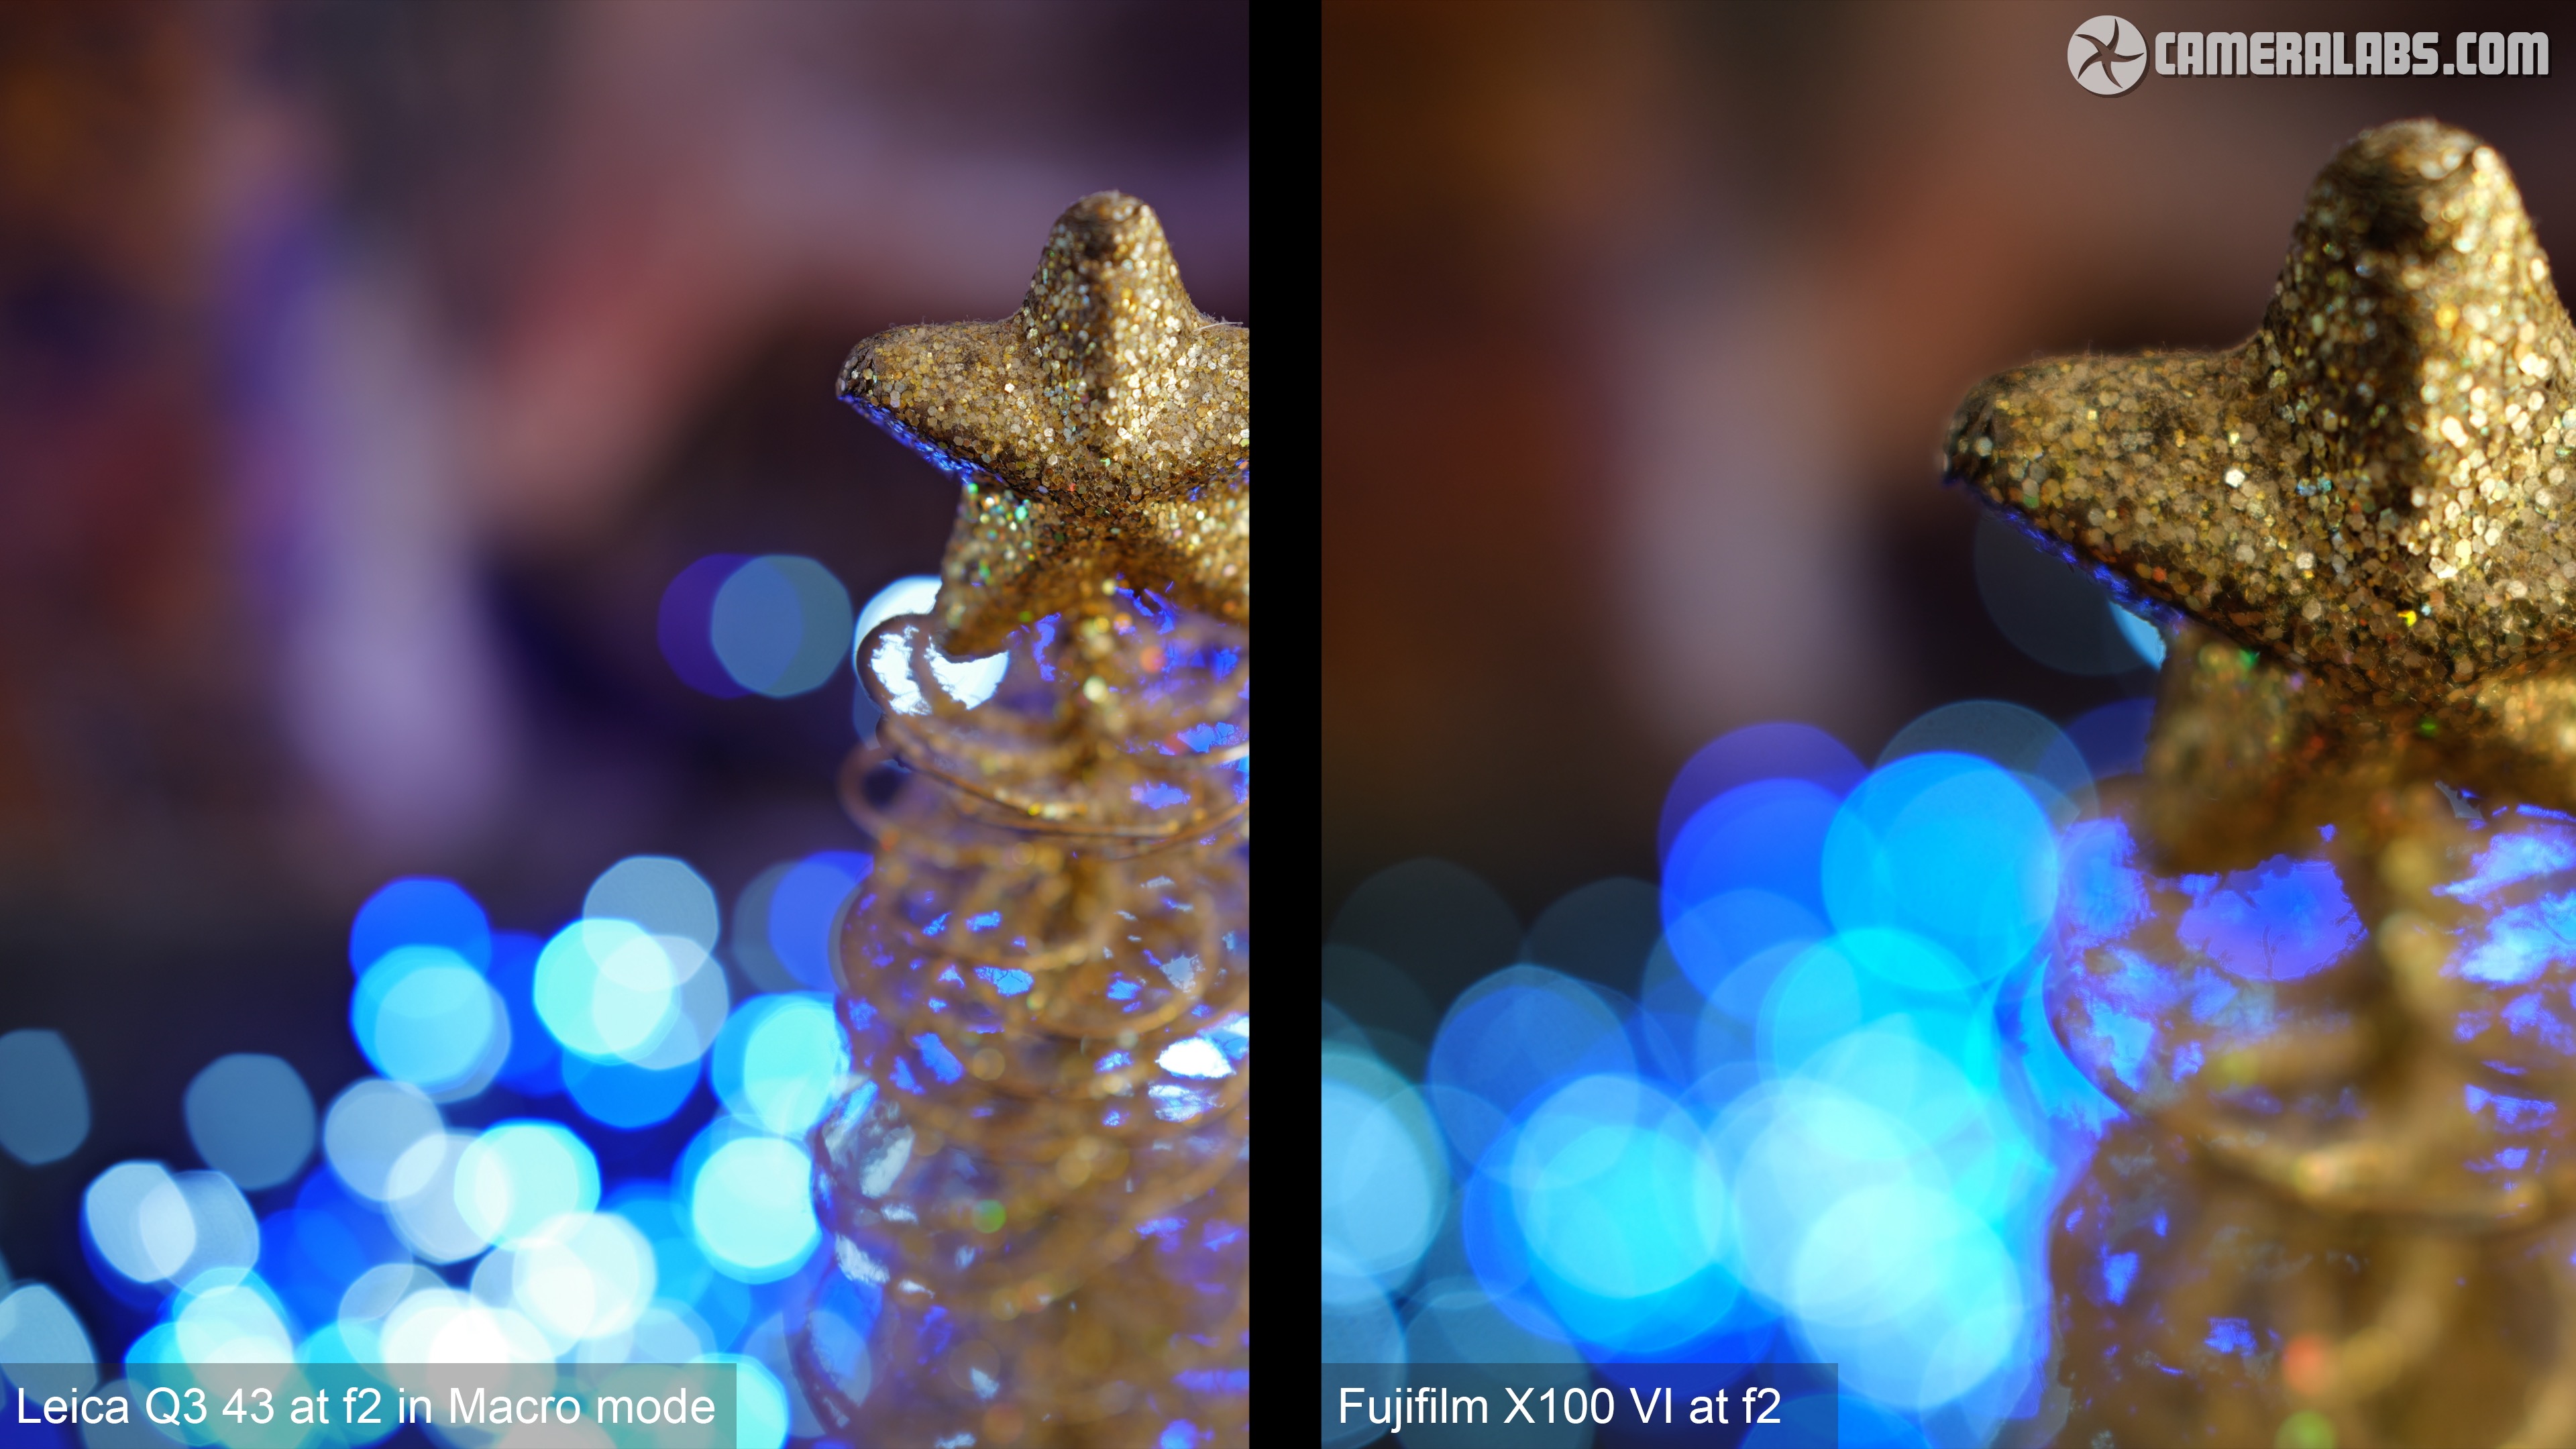
Above: Plus the X100 VI has a secret power of being able to focus closer, so let’s now swap the image on the right for the X100 VI at its closest focusing distance where both the ornament and the blobs have become larger.
I’d say the blobs are also staying well-behaved here, nice and clean with no outlining, and again the diaphragm system staying out of the way. A good result here if you can exploit the closer subject distance.
To measure the maximum reproduction on the Q3 43’s lens, I photographed my ruler as close as the camera would focus in its macro mode, where it delivered 168mm across the frame. That’s not huge in macro terms, but at least the details are nice and sharp right up to the edges even at f2.8 here.
In comparison the Fujifilm X100 VI’s closer focusing allows it to capture 94mm across the frame, but it’s relatively soft at the extremes until closed down to about f5.6.
Before wrapping-up, I wanted to briefly mention video, as while most Q3 43 owners will probably be stills shooters, it also captures respectable-looking video up to 8k. There’s also a wealth of compression options in the menus including LongGop, All-i and even internal ProRes, albeit the latter only up to 1080 60p.
To compare the resolution and the coverage, here’s a clip filmed with the Q3 43 in 1080 at 25p where there’s no crop to the field of view. And now in 1080 at 50p, again with the same coverage. Next in 1080 100p which is recorded at normal speed and with sound, ready for you to slow-down in post later. Note the crop and the reduced quality.
Now back to 1080 at 25p to show the broader coverage before switching to 4k at 25p, which captures more detail, but with a tighter crop than 1080 even at 100p. And next at 4k 50 where the crop remains the same but you may notice reduced detail. And finally in 8k 25p where the crop again remains the same as 4k, but with greater potential detail. Notice how I can magnify this by two times on a 4k timeline, while maintaining 4k detail.
How about a focus pulling test? Here’s the Q3 43 filming in 4k with continuous AF and a single spot area in the middle of the frame. It’s not the most reactive or confident result, at least with the default settings, and in this respect reminds me a little of Fujifilm’s movie autofocus, which also hesitates at times.
How about face tracking? Here again there’s some hesitation before the AF system reacts to my changes in distance, so it’s not suitable for any subject that’s in constant motion. But if you pause for a moment and allow the system to catch up, you can see it’ll nail the focus and deliver the attractive rendering I showed in my portrait tests earlier.
And finally hold onto your lunch as I show you some rolling shutter tests, starting here in 1080 25p where there’s minimal skewing. Likewise for 1080 at 50p which remains well-behaved. But take a look at 4k 25p where the skewing from rolling shutter becomes very pronounced, due to its slower readout – likewise for 8k. Interestingly switching to 4k 50p shows much less skewing thanks to faster readout, although this in turn is responsible for potentially reduced detail too.
Check prices on the Leica Q3 43 at B&H, Adorama, WEX UK or Calumet.de. Alternatively get yourself a copy of my In Camera book, an official Cameralabs T-shirt or mug, or treat me to a coffee! Thanks!


