 Portable USB drives may be getting faster in theory, but depending on your port, you may not be achieving anywhere near their advertised speeds. Thunderbolt 3 drives are more expensive, but if your computer has a compatible port, you can typically unlock faster speeds, while building your own drive gives you the flexibility of not only choosing the exact SSD within it, but swapping it for a faster or bigger version in the future, or indeed upgrading the enclosure itself to exploit future connectivity. My combination of a Samsung SSD and Orico housing may have cost roughly double a SanDisk Extreme Pro of the same capacity, but ran two to three times faster on both my new and old MacBooks.
Build the fastest portable SSD
-
-
Written by Gordon Laing
In this article I’ll show you how to build the fastest portable SSD I’ve ever tested – and it only took two parts and a few minutes to assemble! See the video guide below, or keep scrolling for the written highlights!
A portable SSD essentially consists of two parts: the storage drive itself and an enclosure to house it and provide connectivity. The most common portable SSDs connect to standard USB ports, but these run at different speeds and often cause a bottleneck. I’d originally planned to explain all the standards and issues, but to be honest it’s becoming boring even to a geek like me.
If you are interested I’ve gone into detail in my SanDisk Extreme Pro Portable SSD review, but the bottom line is the vast majority of USB connections are limited to 10 Gigabit/s in practice. A handful of lucky people with computers and drives that both support USB 3.2 Gen 2×2, or both support USB 4 may enjoy quicker speeds, but most of us will hit a wall with practical rates limited to just under 1000 Megabytes/s.
Frustratingly this also includes connecting a 3.2 Gen 2×2 drive like the SanDisk Extreme Pro on any Mac to date including the 2021 14in and 16in MacBook Pros which boast USB 4 ports. I tried it on mine and the combination still remains limited to 10 Gigabit/s.
Now 10 Gigabit/s is still fast enough for many situations, but if you want the fastest possible speeds from an external drive, I’ve found the easiest solution is to dump USB in favour of Thunderbolt 3, which supports speeds up to 40 Gigabit/s.
On the downside, Thunderbolt 3 drives and DIY enclosures are more expensive than plain USB models – and of course you’ll need a matching port on your computer – but in my experience they deliver reliably faster speed in practice with less fuss and confusion.
The good news for Mac owners is Thunderbolt 3 has been a standard port since late 2016, and if your PC doesn’t have a Thunderbolt 3 port, you can add one with an expansion card for around the same price as a card offering USB 3.2 Gen 2×2.
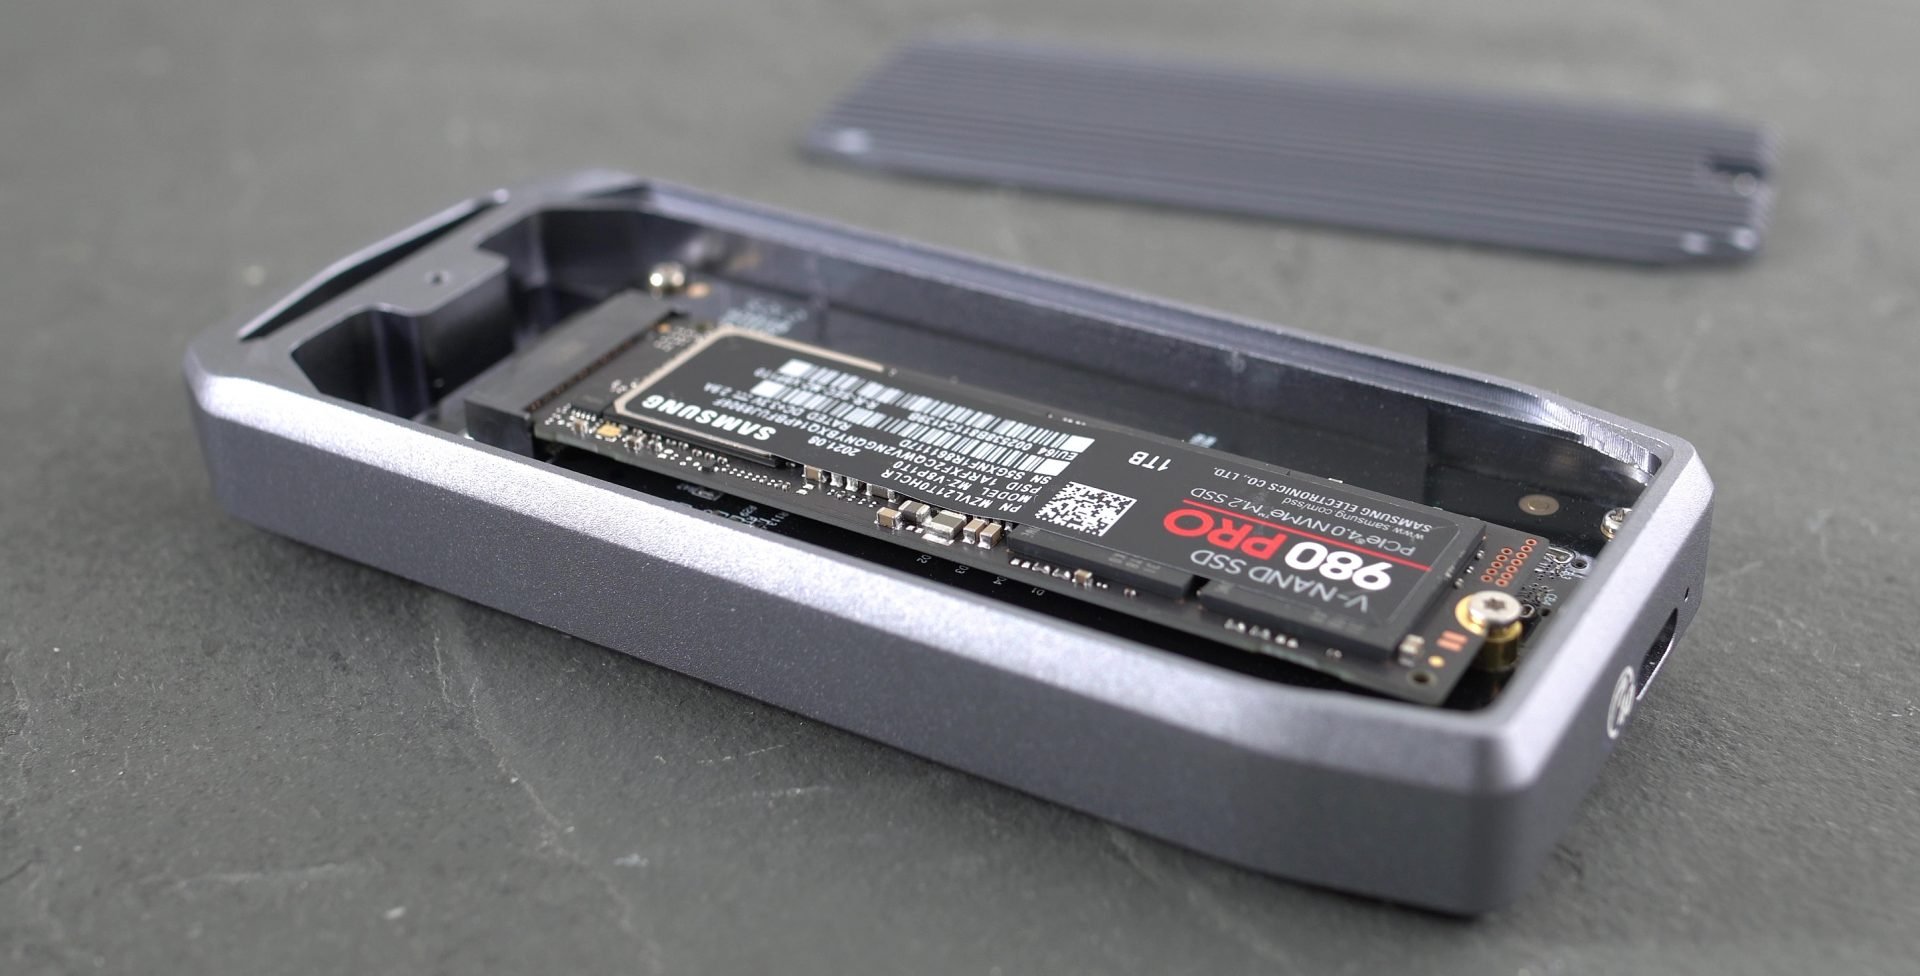
While there are plenty of Thunderbolt 3 drives on sale, I chose to build my own for the maximum performance and flexibility, so started by shopping for a Thunderbolt 3 enclosure that could exploit the fastest SSD drives.
I went for the Orico M2V01-C4 which supports both Thunderbolt 3 and USB 4 connections up to 40 Gigabit/s, and is backwards compatible with older ports and devices, which means I can plug it into almost any device I own, albeit running at slower speeds. The enclosure by itself costs around $180 and is designed for NVMe M.2 M-key SSD drives, and the beauty of a DIY project is being able to choose the exact model you want, and upgrade it in the future too.
I chose the Samsung 980 Pro which remains one of the fastest drives around, claiming up to 7000 Megabyte/s read speeds. Now I’m not going to get anywhere near that in a Thunderbolt enclosure but my goal here was to achieve noticeably faster speeds than a respectable USB drive like the SanDisk Extreme Pro. I went for the 1TB version which costs around $180 and in terms of lifespan has a quoted TBW of 600 TB, a figure often lacking on pre-built drives. Also beware smaller capacities that typically run slower and have shorter TBWs. I’d recommend the 1TB size or larger.
To assemble the drive, undo the single external screw on the case using the tool provided, insert the SSD drive into the slot, screw it down with the supplied screw, unpeel and apply the heat-spreader pad, then screw the case back together. You’re done in less than five minutes.
So my total cost was around $360, making it roughly double the price of a 1TB SanDisk Extreme Pro, so let’s see how they compare! SanDisk supplied a 2TB drive for testing this time, but it delivered essentially the same speed as the 1TB version in my original review.
Before the benchmarks, a quick note on some physical differences. Most obviously while my DIY drive isn’t exactly large, it is much bigger than the SanDisk drive and won’t slip as discreetly into thin pockets. The SanDisk drive is also lighter which meant I was happy for it to occasionally dangle from my laptop when lifting it up, whereas I’d feel more comfortable having the Orico staying on a surface. I also preferred the look and feel of the rubberised case on the SanDisk although the aluminium shell of the Orico with its fins will be more effective at dissipating heat, and while it lacks the splash and dust resistant rating of the SanDisk, it is tougher.
Ok now for the benchmarks for both drives, which I’m going to run on two different laptops: first my 2018 13in MacBook Pro followed by my 2021 14in MacBook Pro, both configured with 16GB RAM and with drives measuring 500GB and 1TB respectively. Both my MacBooks have USB C ports supporting Thunderbolt 3, and for these benchmarks both external drives were formatted using APFS as I find this delivers slightly better performance than ExFAT if you only intend to use it on Macs
Let’s start with the BlackMagic Disk Speed Test utility for the SanDisk Extreme Pro drive connected to my older 13in 2018 MacBook Pro. Here you can see the drive delivering between 900 and 940 Megabyte/s for both reads and writes, whether using the 1GB or 5GB stress size. These speeds are being limited by my old MacBook’s ports and if you had a USB 3.2 Gen 2×2 port, you should hopefully achieve faster speeds.
Now it’s the turn of my DIY drive connected to the same 2018 MacBook and the difference is dramatic with around 2300 Megabyte/s for writes and around 2600 for reads. The drive may be connected to the same port, but it’s now talking to the computer using Thunderbolt 3 rather than USB and it’s significantly boosted the bandwidth with the speed working out roughly two and a half times quicker – and that’s also faster than a USB 3.2 Gen 2×2 port could have achieved as well. I’m delighted with this result, especially on a three year old computer, but wondered if my newer computer could unleash anything quicker from each drive?
So back to the SanDisk Extreme Pro drive, but this time connected to my newer 14in 2021 MacBook Pro. I’d hoped the ports, supporting the newer USB 4 standard, might unlock more from this drive, but sadly not as Apple’s chipset doesn’t specifically exploit USB 3.2 2×2. The speeds of 920 to 980 Megabyte/s may be a tad faster than on my 2018 MacBook, but they’re in the same ballpark
And now for my DIY Thunderbolt drive, again connected to the same port and again delivering dramatically quicker speeds than the SanDisk USB drive. This time the overall speed was faster than on my 2018 MacBook with write speed improving the most to around 2800 Megabyte/s, and read speeds a little to around 2750 Megabyte/s. So roughly three times faster than the SanDisk Extreme Pro drive.
Moving onto real-life tests, I timed the transfer of a 117 GB ProRes video file between MacBook and drive. Starting with my older 2018 MacBook, the SanDisk Extreme Pro took 117 seconds to copy the file from the MacBook to the portable drive, and 118 to copy it back onto the MacBook again.
Switching to my DIY drive connected to the same 2018 MacBook took 46 seconds to copy the file to the portable drive, and 69 to copy it back onto the MacBook again. Between each read and write test I restarted the MacBook to clear any caches. So in this test my DIY drive was between 1.7 and 2.5 times faster.
And now for my newer 2021 14in MacBook Pro which has faster internal storage. This time it took 121 seconds to copy the file from the MacBook to the SanDisk Extreme Pro drive, and 122 to copy it back onto the MacBook again. Interestingly a fraction slower than my 2018 MacBook, but within testing error.
And now for my DIY drive connected to the same port on my 2021 MacBook Pro, which took 44 seconds to copy the data to the portable drive, and 44 to copy it back again. So this time the faster internal storage of my newer MacBook allowed my DIY drive to operate roughly 2.8 times faster than the SanDisk Extreme Pro. So now for my final verdict.
Verdict
Portable USB drives may be getting faster and faster, but depending on your port, you may not be achieving anywhere near their advertised speeds.
This particularly applies to Mac owners who are unlikely to enjoy anything faster than 1000 Megabyte/s from a portable USB drive in practice. Thunderbolt 3 drives are more expensive, but if your computer has a compatible port, you can typically unlock faster speeds, while building your own drive gives you the flexibility of not only choosing the exact SSD within it, but swapping it for a faster or bigger version in the future, or indeed upgrading the enclosure itself to exploit future connectivity.
My combination of a Samsung SSD and Orico housing may have cost roughly double a SanDisk Extreme Pro of the same capacity, but ran two to three times faster on both my new and old MacBooks. So the question becomes how fast do you need your storage to go and how big is your budget?
Pre-built USB drives provide affordable and compact solutions and while I couldn’t unlock the top speed of the Extreme Pro on my own computers, read and write speeds up to 1000 Megabyte/s are still fast enough for most. But if you desire faster still, perhaps for transferring or working on big video projects, then you’ll appreciate the speed of a Thunderbolt 3 drive and the flexibility of a DIY build.
Check prices on the Orico M2V01-C4 at Amazon or the Samsung 980 Pro at Amazon. Alternatively get yourself a copy of my In Camera book or treat me to a coffee! Thanks!


