 Fujifilm’s X-T3 is a highly satisfying mirrorless camera and my favourite model in the X-series. It may look a lot like the earlier X-T2, but Fujifilm’s latest 26 Megapixel X-Trans IV sensor brings big improvements to autofocus (now across the entire frame), burst speed (up to 11fps mechanical or 30fps electronic), and especially to video (4k up to 60p with 10-bit internal recording). Indeed the X-T3 becomes the best APSC camera for video to date and will confidently take on the Sony A6300 / A6500 for action shooting too. On the downside there’s no built-in stabilisation, fairly average battery life, and skewing restricts the usefulness of the electronic shutter modes; vloggers will also wish it had a screen that flipped forward. That said I still personally feel the X-T series strikes the perfect balance of size, style and usability, and while I miss IBIS and would prefer a bigger battery, I wouldn’t want them if they made the body any larger. Again it’s all very personal, but I find the X-T series one of the most satisfying to shoot with: attractively-styled, tactile controls, small enough to never leave at home, and crucially delivering images (and now also video files) that look great out-of-camera, requiring little or no post-processing. If you won’t exploit the improvements to autofocus, burst speed or video, then the previous X-T2 remains a tempting option if you can find one at a lower price, but for me the X-T3 becomes one of my favourite all-round cameras and one that easily takes-on full-frame rivals; Highly Recommended.
Fujifilm XT3 review
-
-
Written by Gordon Laing
Intro
The Fujifilm X-T3 is a high-end mirrorless camera with a 26 Megapixel APSC-sized sensor, embedded phase-detect autofocus, 4k video at up to 60p and with 10 bit internal recording, a large detailed electronic viewfinder and tilting touchscreen packed into a compact retro-styled body. Announced in September 2018, the X-T3 debuts Fujifilm’s X-Trans IV sensor and X-Processor IV image processor. The new 26 Megapixel sensor continues with Fujifilm’s unique colour filter array and absence of low pass filter, but is now slightly higher resolution than the previous generation while delivering superior autofocus, burst shooting and movie capabilities.
At first glance the X-T3 shares the same classic styling as the earlier XT2, but inherits the XH1’s higher resolution viewfinder, gains a touchscreen, includes a headphone jack, and slightly boosts the thickness and size of the control dials and buttons. In terms of processing, the X-T3 inherits the Eterna film simulation of the XH1, but now adds new monochrome adjustment and colour chrome options.
The faster sensor readout now impressively supports 4k at up to 60p, even more impressively with 10 bit recording at 60p now available internally direct to the SD card (4:2:0 internally or 4:2: over HDMI). It’ll also shoot at 11fps with a mechanical shutter without the need for the optional booster grip, or at 20fps with the electronic shutter, or up to 30fps with the electronic shutter and a 1.25x crop, all with continuous autofocus.
While Fujifilm may not have been able to squeeze-in sensor-shift stabilisation nor deploy a stronger battery, the X-T3 remains a highly compelling camera with a huge amount of interest from new buyers and the Fujifilm faithful alike. It also arrives at a time when most of its rivals are promoting full-frame models with larger sensors. Can the X-T3 with its APSC sensor stay competitive and enjoy the success of its predecessors? Find out in my in-depth review! I’ll start with my first-looks overview video which describes and demonstrates the core features and upgrades.
Fujifilm X-T3 design and controls
Above: The Fujifilm X-T3 is certainly a very familiar-looking camera – at first glance it looks physically identical to the earlier X-T2, but while most of the major upgrades are indeed electronic ones, there are a number of physical improvements worth mentioning. First the build quality with the X-T3’s shell now employing four rather than three magnesium alloy pieces: on the top, front, rear and now also the bottom too. As before if you’d like more to hold onto, there’s two optional grips: the MHG-XT3 which boosts the grip depth and height, and the VG-XT3 vertical grip which can accommodate two additional batteries as well as providing portrait controls. Fujifilm fans will notice this is no longer known as a Power Booster because the X-T3 already includes the performance enhancements which the previous booster brought to the X-T2, and now sports a headphone jack too.
Above: Like its predecessors, the X-T3 adopts a retro approach to controls with a dedicated shutter speed dial on the upper right side. The shutter dial has manually selectable speeds from 1 second to 1/8000 in one EV increments, and uses the control dial to access finer 0.3EV increments; if you prefer you can set the shutter dial to T and use the control dial to cycle through the full range of shutter speeds all the way down to 15 minutes. The overall layout is similar to the X-T2 here, but Fujifilm has raised the height of the metering collar below the shutter dial, and changed the texture of the shutter dial itself. The control dial now has better-defined clicks and a deeper push, and the exposure compensation dial less likely to turn by accident. Meanwhile the shutter release remains threaded for retro cables although there’s also electronic and wireless release options too.
Above: there’s a similar story on the upper left side with the drive collar now taller than before and the dedicated ISO dial now sporting a different texture, inherited from the X-H1. Note the viewfinder diopter dial now needs to be pulled-out for adjustments, thereby preventing accidental operation – a considerate enhancement.
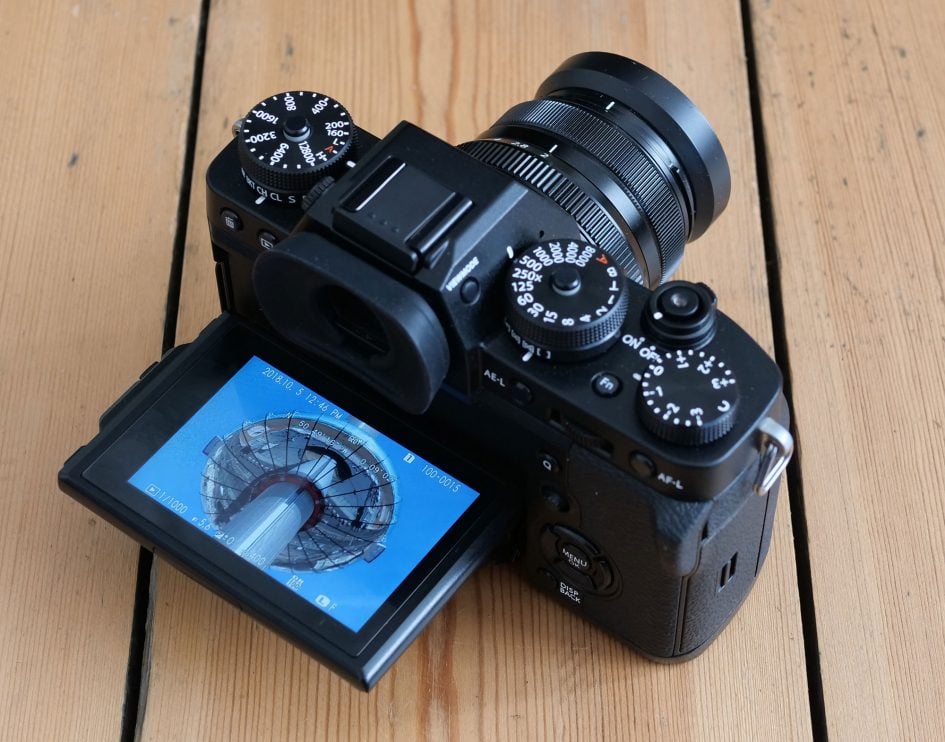
Above: The X-T3 inherits the screen mechanism of the X-T2 which allows the screen to angle up, down and sideways, albeit not forwards to face the subject for vlogging or selfies. Here you can see the conventional part of the mechanism allowing a vertical tilt up by 90 degrees or down by around 45 degrees.
Above: Push a button on the left side of the screen and you can angle it out sideways, allowing you to more easily compose at high or low angles in the portrait orientation. It’s a unique mechanism which literally covers most angles in one motion while also remaining central to the lens axis; the push-button release on the side is also more convenient than the slider which released it on the X-T2. It really does work very quickly and easily, although again won’t satisfy one-person vloggers who need to see themselves; that said, you could always connect an external HDMI monitor if seeing yourself is critical.
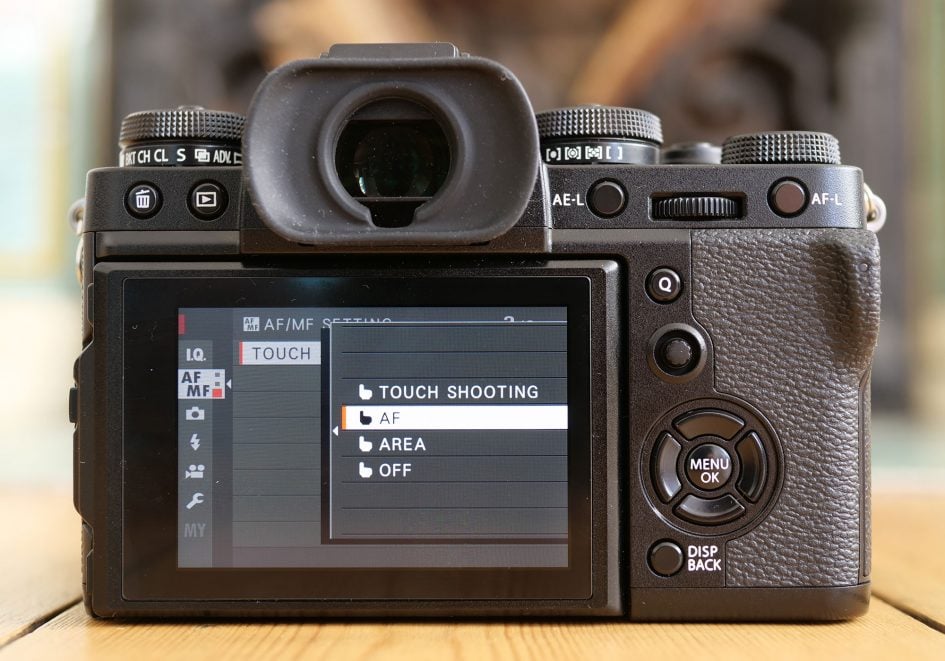
Above: In a welcome but expected upgrade over the X-T2, the X-T3’s screen is now touch-sensitive, making it easy to reposition the AF area and tap to pull focus on movies. Touch sensitivity also makes the super-imposed Q menu much easier to navigate than on the X-T2, and a new Night mode shows red text to help preserve night vision. The X-T3 also inherits the gesture controls introduced on the X-E3, allowing you to access customisable functions by swiping. By default a swipe right increases the font size for easier legibility, a swipe left enables the new Sports Finder display which I’ll discuss in a moment, a swipe-up displays live RGB histograms (when most cameras only offer a live brightness histogram), and finally a swipe down displays the new dual axis leveling gauge. The X-T3’s touchscreen feels more sensitive than earlier models which makes swiping much easier, although you may need to reduce the active touchpad area to avoid accidental nose operation when using the viewfinder.
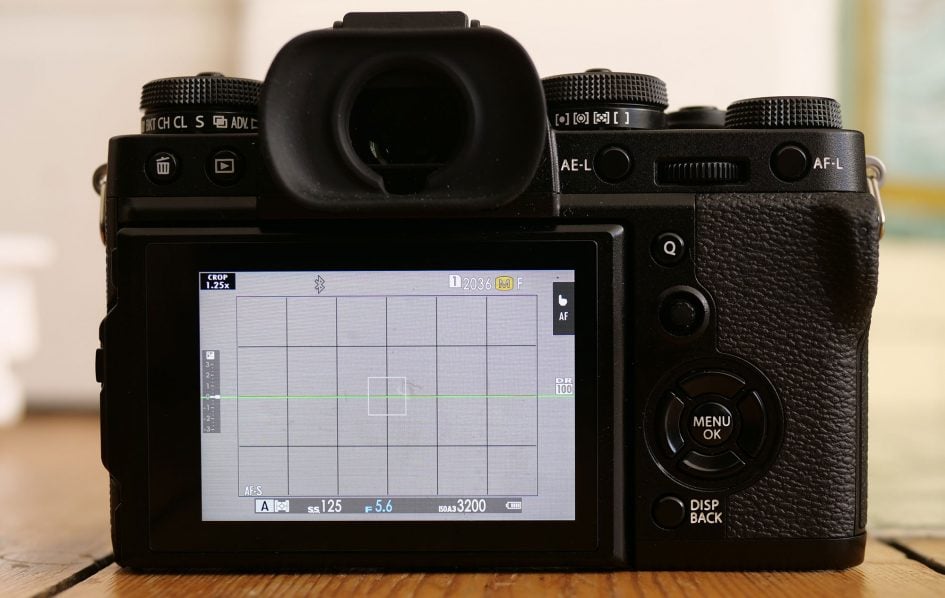
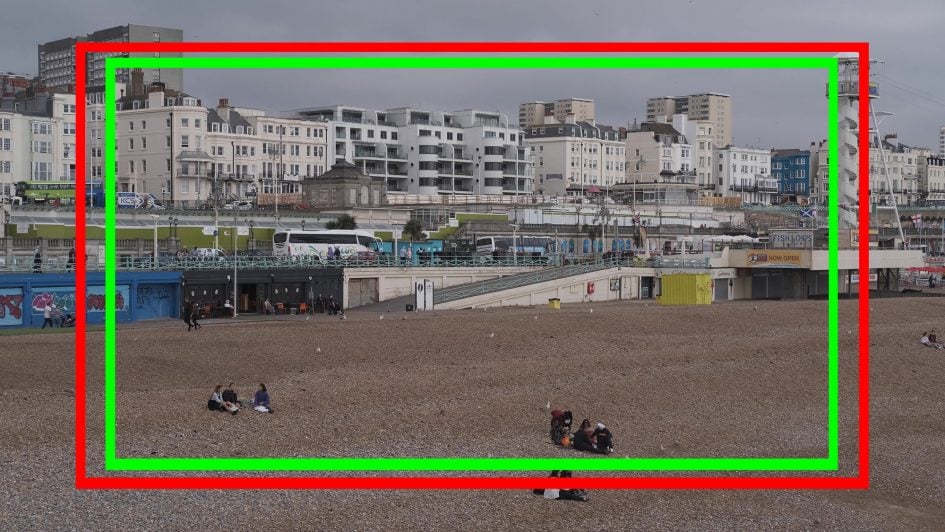
Above: A new feature on the X-T3 is the Sports Finder mode which captures a smaller 1.25x cropped region (at a reduced resolution of 16 Megapixels), but lets you view the entire frame so you can see when a subject is approaching the active cropped area – a bit like using a rangefinder. You can see the active area indicated on the screen above where I’ve also enabled the alignment grid inside to make it more obvious – anything inside the frame is recorded, while anything outside is cropped. Thing is, there’s no performance boost when using the Sports Finder, so it does nothing you couldn’t achieve by simply cropping a full normal image later. But some photographers may still find it a time-saver if they need to deliver a pre-cropped image without post-processing.
Above: The X-T3 inherits the viewfinder of the X-H1 which means a minor reduction in the magnification compared to the X-T2, but a noticeably higher resolution OLED panel with 3.69 million dots or 1280×960 pixels. You’re unlikely to notice the slightly reduced magnification unless switching between it and an X-T2, but the boost in resolution makes a big difference, showing finer details, reducing moire and making it easier to manually focus too. As before, the shooting information considerately rotates to remain upright when composing in the portrait orientation, and again the diopter wheel can now be locked.
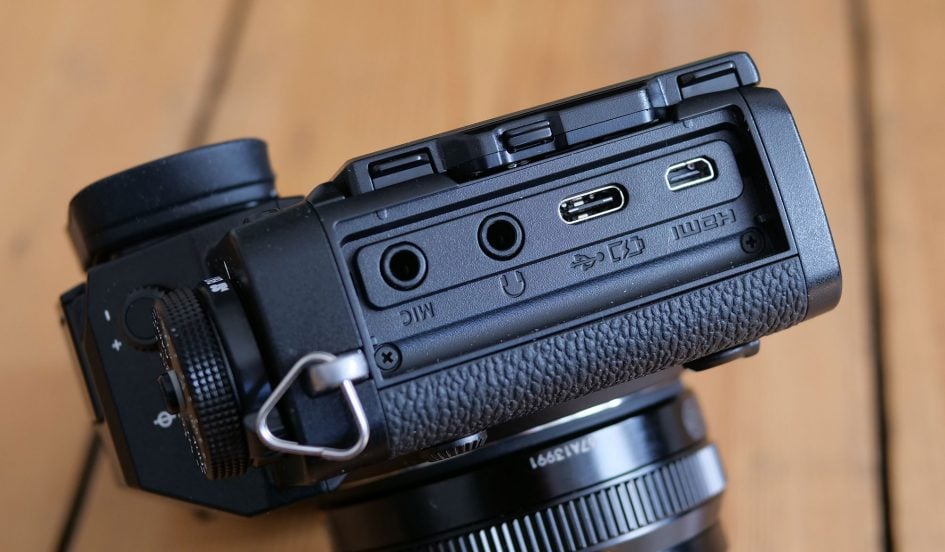
Above: behind a door on the left side you’ll find micro HDMI, USB C, and both microphone and headphone jacks, the latter no longer forcing you to buy the optional battery grip. You can charge the battery internally over USB and I successfully used the charger which came with my Apple MacBook Pro 13in (2018 Touchpad 61 Watt version); it took two hours with the Apple charger. Meanwhile the HDMI impressively outputs 4k at up to 60p in 10 bit 4:2:2. The port flap can also be removed entirely for easier access in a video cage, another considerate detail.
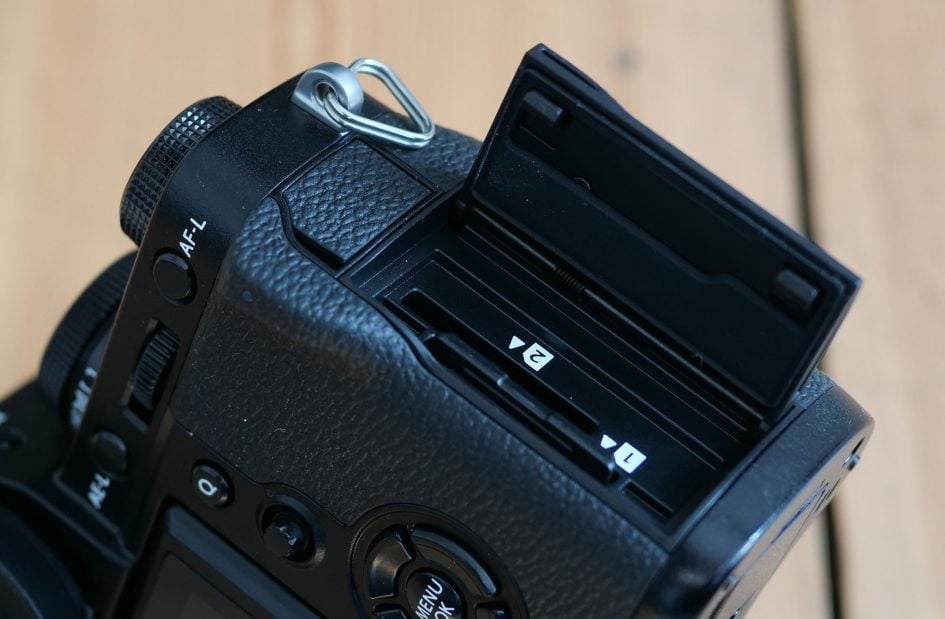
Above: on the right side you’ll find twin SD card slots, both of which support UHS-II speeds – take that Canon and Nikon with your measly single slots! Above the card slot is a 2.5mm remote jack, although again you can trigger the camera wirelessly or by an old style threaded cord if preferred.
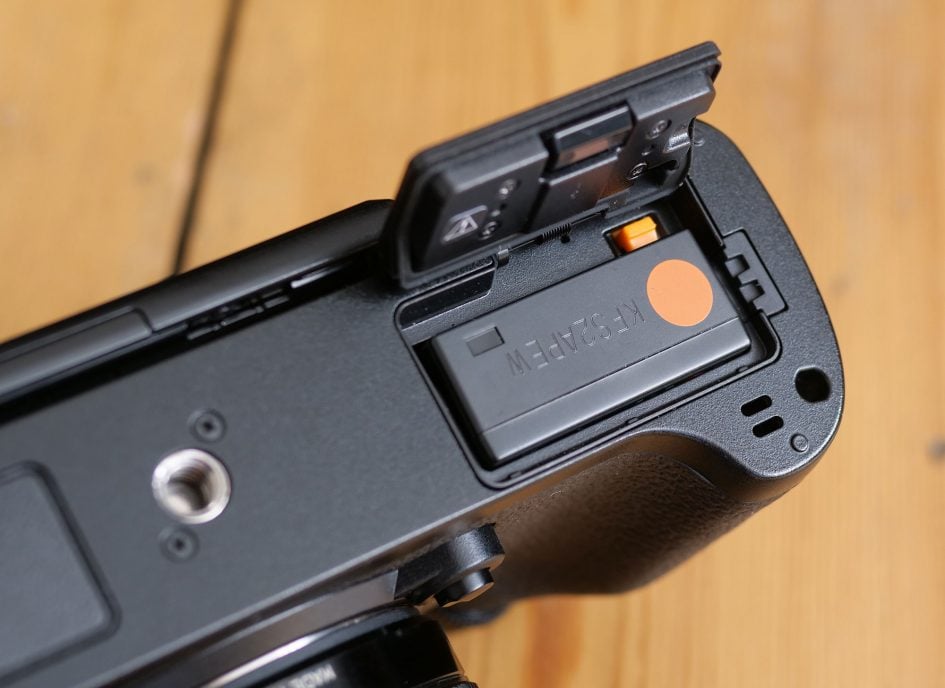
Above: The X-T3 is powered by the NP-W126S battery, modified for better USB charging and 4k video, and Fujifilm’s squeezed a few extra shots out of it with a CIPA rating of 390 frames. This may be roughly similar to many of its rivals but falls behind Sony’s third-generation full-frame bodies. Indeed looking at the overall specification and improvements of the X-T3, the battery is now looking like one of the weakest aspects which could do with an overhaul. That said, if we want Fujifilm to maintain the X-T3’s slim form factor, it literally doesn’t give them much room to manoeuvre, and as before, there’s always the option the fit the vertical grip which lets the camera use two additional batteries to triple the overall life beyond 1000 shots.
Fujifilm X-T3 lenses
The X-T3 is fitted with Fujifilm’s X-Mount which, with the APS-C sensor behind it, applies a 1.5x field reduction factor to lenses – so the XF 18-55mm f2.8-4 zoom will deliver a field-of-view equivalent to 27-83mm.

Above: Fujifilm XF 18-55mm coverage at 18mm (left) and 55mm (right)
Sadly Fujifilm did not manage to squeeze the built-in sensor-shift stabilisation of the earlier X-H1 for use in the smaller X-T3 body, so it remains an unstabilised camera. If you want to iron-out the wobbles when filming or composing on the X-T3, you’ll need to either fit lenses with optical stabilisation, or use a gimbal or simply hold steady. I’m not surprised the X-T3 didn’t feature built-in stabilisation given its compact body size and the company’s statements around the X-H1, but it’s still worth remembering most of its mirrorless rivals now sport the capability, including Sony, Panasonic, Olympus and Nikon. Of the competition, only Canon has resisted with the EOS R.
If you’re using Fujifilm’s own lenses, the X-T3 offers an enhancement first seen on the XE2: Lens Modulation Optimiser, or LMO for short, attempts to counteract the blurring introduced by diffraction when shooting at smaller apertures, and also corrects softening towards the edges and corners of the image.
Fujifilm has extensively profiled all of its X-Mount lenses, and by default LMO is enabled on the X-T3 when you fit one of them. In previous comparisons with small apertures around f16, I found the versions with LMO enabled were crisper, especially towards the edges, but equally never felt over-sharpened.
Fujifilm’s X-series may be younger than Micro Four Thirds and Sony’s E mount, but at the time of writing, there’s 25 quality models, and several more from third parties; indeed having covered the basics, Fujifilm is now free to explore more exotic options like ultra-wides and super-telephoto primes with the XF 8-16mm f2.8 and XF 200mm f2.8. Importantly the majority of the Fujifilm lenses I’ve tested have been of a very high standard. Check out my Best Fujifilm lenses guide for the models I’ve tested and can personally recommend.
The X-T3 is typically sold body-alone or in a ‘kit’ bundled with the XF 18-55mm f2.8-4 OIS. This may be one of the first XF lenses, but remains a favourite with a brighter than average aperture and crisper results than typical kit zooms- and importantly it also has optical image stabilisation. Be sure to update it to the latest firmware though or you may experience the wavy ‘Scooby Doo’ effect when filming video.
Fujifilm X-T3 autofocus and burst shooting
The X-Trans IV sensor brings a raft of autofocusing improvements to the X-T3 over the previous generation, most notably now sporting embedded phase-detect coverage across the entire sensor: 100% horizontal and vertical versus a much smaller area on the earlier X-Trans III which covered a square region just 75% of the frame height and 50% of the width.
On top of this, the sensor is coupled with the latest X-Processor IV which drives the autofocus faster (with Fujifilm claiming a 1.5 times improvement), low-light performance has been extended from -1 to -3 EV, eye-detection now works with continuous AF, and thanks to a much higher quantity and density of phase-detect pixels, the X-Processor IV can deploy four times the amount of data per single AF area, allowing it to track and focus more accurately than before.
While the technology has been greatly enhanced behind the scenes, the front-facing user interface and options remain similar to the previous generation. As such you get to choose from Single Area (now from a 13×9 or 25×17 array with an adjustable size), Zone (using a 3×3, 5×5 or 7×7 array), or Wide which considers the entire frame. Face with or without eye-detection is also available.
As before you can move around a single or zoned area using the small but tactile AF joystick or by tapping on the touchscreen. You can also use the screen as a touchpad while composing through the viewfinder, and if you adjust the active area in the menus it’s possible to avoid accidental operation by nose. In my tests I found the touchpad operation a little laggy, but it doesn’t matter because there’s still the AF joystick for more immediate control.
The X-T3 also inherits the customizable continuous AF profiles introduced on the X-T2. There’s five presets configured for different scenarios (Multi-Purpose, Ignore Obstacles, Accelerating / Decelerating Subjects, Suddenly Appearing Subjects, and Erratic Motion), or you can customize a sixth if preferred, adjusting tracking sensitivity in a scale of 1 to 4, speed tracking sensitivity from 0 to 2, and Zone are switching between centre, auto and front.
In terms of continuous shooting, the X-T3 enjoys further enhancements over its predecessors. First the mechanical shutter has accelerated from 8 to 11fps, a speed which previously required the Vertical Power Booster to be fitted to the X-T2 or X-H1. Secondly the X-T3 gains faster bursts using the electronic shutter, up from 14fps on the previous generation to 20fps here, and still with continuous autofocus. If you’re willing to work with a 1.25x crop (resulting in 16 Megapixel images), you can accelerate this further to 30fps.
In terms of single AF modes, the X-T3 felt a little snappier than the previous generation, although as always, much of the autofocus speed was influenced by the lens in use – lenses with LM autofocus work fastest of all. In low light, the X-T3 also felt a little more confident than its predecessor, although when the conditions got very dim I found I needed to manually find a bright point on the composition for it to focus on – in this respect it still falls a bit behind the best of its rivals, but in most situations it worked well and remained an improvement over X-Trans III models.
Face and eye detection also felt more reliable than before, particularly in terms of the system not mistaking random shapes as human faces – something which seemed to happen surprisingly frequently on previous models in my tests. It’s still nowhere as sticky or consistent as Sony’s face and eye-detection, but in my side-by-side tests it certainly felt better and more successful than on the Canon EOS R.
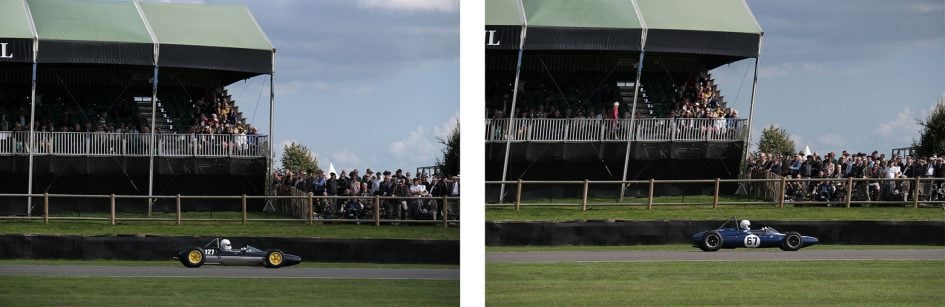
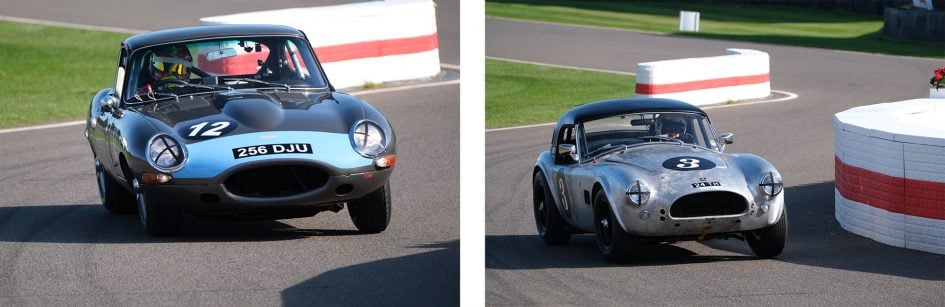
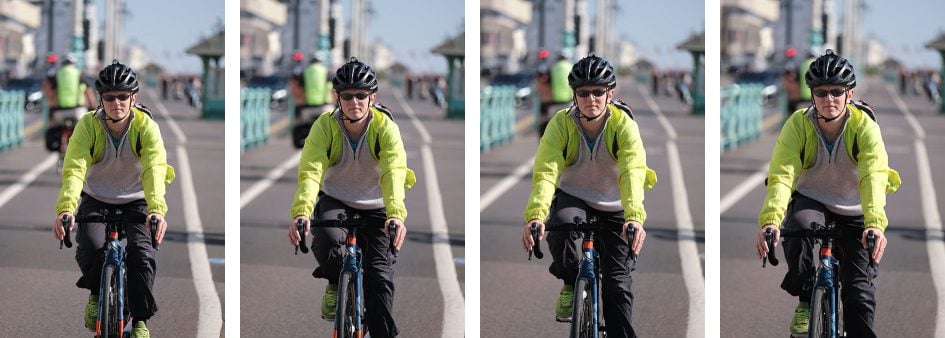
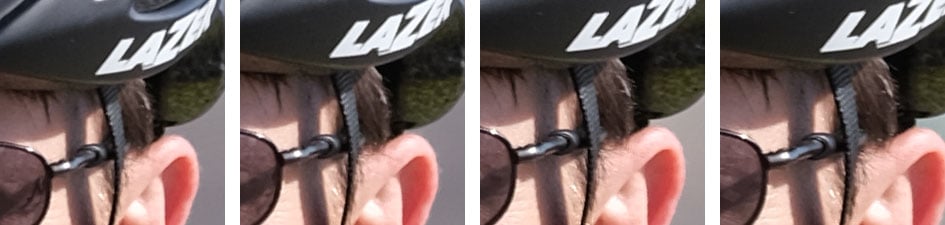
To find out how the continuous autofocus and burst modes all added-up in practice, I performed a wide variety of tests with the X-T3 and a bunch of long lenses. I initially shot vintage cars and bikes with the X-T3 fitted the XF 50-140mm f2.8 and XF 100-400mm at the Goodwood Revival motor racing event. Back in Brighton I performed more tests with the X-T3 and XF 50-140mm f2.8 for my friend Ben cycling towards me, as well as the more chaotic antics of the local seagull population.

Above: full image, below, 100% crops. Burst mode at 20fps

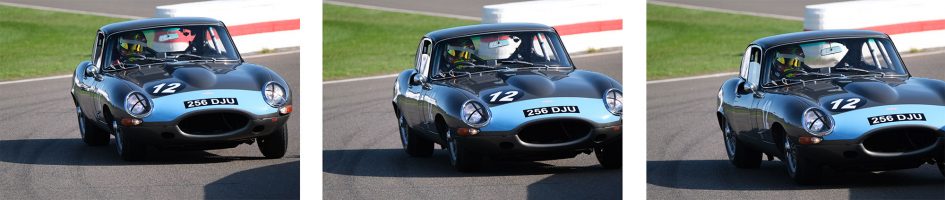
Above: full image, below, 100% crops. Burst mode at 20fps

Above: full image, below, 100% crops. Burst mode at 20fps

Above: full image, below, 100% crops. Burst mode at 20fps
Starting at Goodwood, I was impressed to find the X-T3 delivering a very high hit rate of focused images of cars and bikes during all of its burst speeds. It felt a little faster and more confident than previous X-Trans III bodies, but the most noticeable difference was the much broader phase-detect coverage across the entire frame, meaning nowhere was off limits. Previously on X-Trans III bodies you needed to ensure the subject was within the smaller square phase-detect region if you wanted to track it successfully, but now you have the freedom of positioning the subject anywhere on the frame and knowing you still stand a good chance of the camera keeping it in focus.

Above: full image, below, 100% crops. Burst mode at 20fps

Above: full image, below, 100% crops. Burst mode at 20fps


Above: full image, below, 100% crops. Burst mode at 20fps


Above: full image, below, 100% crops. Burst mode at 20fps
During my day at Goodwood, I regularly switched between the 11fps mechanical and 20fps and 30fps electronic shutter modes, giving me a chance to directly compare them. While there’s no live feedback at any of these top speeds, the period between each frame is sufficiently short for you to be able to follow erratic motion with relative ease using a zoned area. When I analysed the results later, I was delighted to find a very high hit rate with virtually every frame in sharp focus, although I did notice the two electronic shutters generally delivered slightly slower speeds than advertised: 20fps worked out more like 15fps in practice, while 30fps was closer to 22fps, although these could have been influenced by focus priority settings I’ve yet to fully explore.
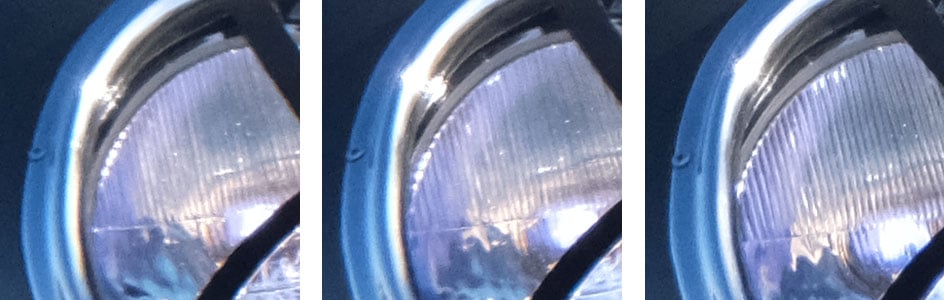
What became more noticeable though was evidence of rolling shutter skewing artefacts on my images shot with the electronic shutter. Fujifilm may have improved the response time and reduced the effect of rolling shutter on X-Trans IV, but if you swing the camera around with a long lens, you’ll still experience some skewing with the electronic shutter. To illustrate this, I performed the same panning motion with the XF 50-140mm as racing cars drove past, first with the mechanical shutter at 11fps, then with the electronic shutter at 20fps and the difference below is clear.
Above: panning with the X-T3 using the 11fps mechanical shutter (left) and the 20fps electronic shutter (right)
This doesn’t just affect panning either: any part of the frame in motion can suffer, including a subject moving quickly across a static frame. Below you can see two examples of a car zig-zagging through a chicane while I kept the framing moistly static. See how the shape of the car looks more elongated at times than it should be. These aren’t G-forces on a flexible body, they’re electronic shutter artefacts.
Above: subjects moving quickly within the frame can result in skewing when using the electronic shutter.
Shortly after the Goodwood event, Fujifilm released firmware 1.01 for the X-T3 which promised ‘Compensation of distortion is optimized in CH shooting with electronic shutter’. I’m not sure if this refers to skewing artefacts, but I made sure my second batch of X-T3 tests were running on the new firmware, and I continued to observe similar results. Here’s two examples with the XF 80mm Macro lens while panning across a landscape view – see how the tall vertical tower of Brighton’s i360 is straight with the mechanical shutter and skewed with the electronic.

Above: panning with the X-T3 running firmware 1.01. Mechanical shutter (left), electronic shutter (right).
To be fair, the rolling shutter is no worse on the X-T3 than on rival cameras, and indeed in my tests it was better-behaved than models like Canon’s EOS R. As I said in that review, the only camera that’s noticeably better in this respect is the Sony A9, so the same caveats apply here: use the electronic shutter with caution.
This inevitably puts a damper on the new high speed burst shooting modes as they’ll undoubtedly be used to capture subjects moving quickly, and as such stand a good chance of suffering from some skewing or distortion. Some subjects are impacted less than others though. In the following burst I captured Ben cycling straight towards me using the 20fps electronic shutter and there’s no visible distortion to worry about.
Above: full image, below, 100% crops. Burst mode at 20fps
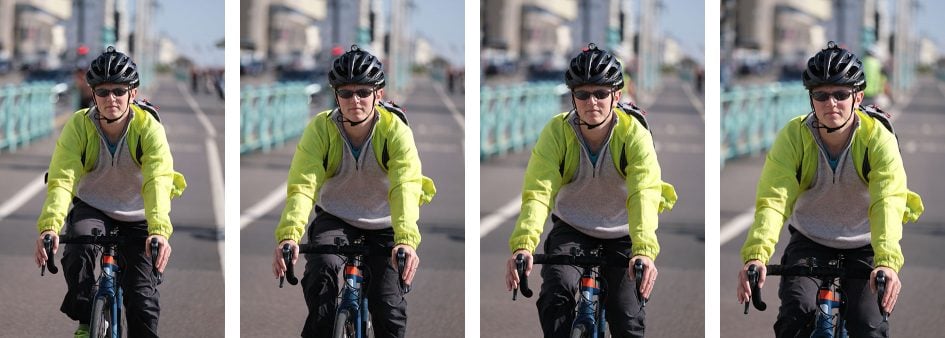
Above: full image, below, 100% crops. Burst mode at 20fps
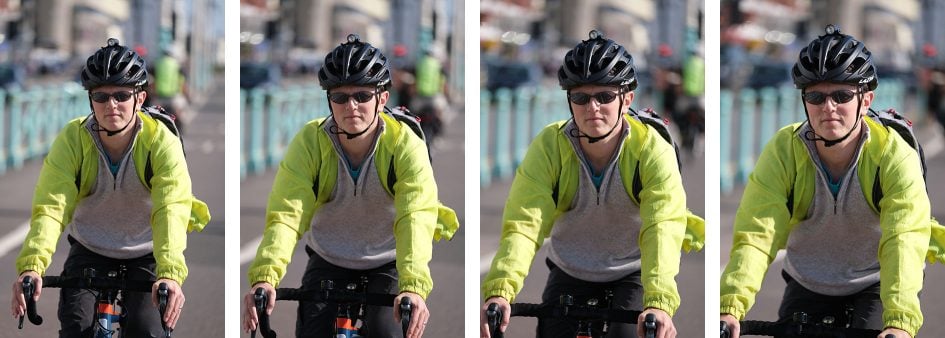
Above: full image, below, 100% crops. Burst mode at 20fps
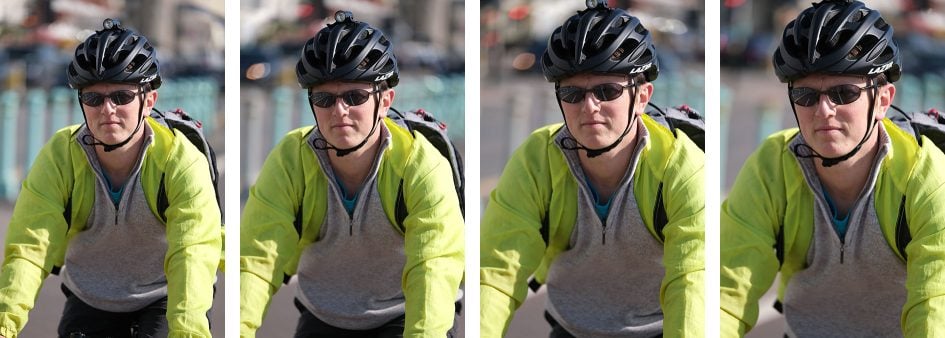
Above: full image, below, 100% crops. Burst mode at 20fps

Ultimately your mileage will vary with the electronic shutter depending on what and how you shoot, but the bottom line is the X-T3 still has its 11fps mechanical shutter which is as fast or faster than most of its rivals, while avoiding all the artefacts mentioned above. Personally speaking, 11fps is more than fast enough for my needs and I was very happy using the X-T3 in this mode for my action photography.

Fujifilm X-T3 burst shooting with XF 50-140mm. Above: full image, below: 100% crops


Fujifilm X-T3 burst shooting with XF 50-140mm. Above: full image, below: 100% crops


Fujifilm X-T3 burst shooting with XF 50-140mm. Above: full image, below: 100% crops

Just before moving on, I also performed a series of formal tests to measure some the burst speeds and buffer depths. First using the mechanical shutter at 11fps and Large Fine JPEGs, I captured 92 frames in 8.22 seconds for an average rate of 11.2fps before the speed slowed to around 5fps. Switching to Compressed RAW, I captured 39 frames in 3.53 seconds for an average rate of 11.05fps.
Turning to the electronic shutter at 20fps with Large Fine JPEGs again, I captured 87 frames in 7.58 seconds for an average rate of 11.5fps, although in the initial burst of 30 frames it ran at 20.7fps. Switching to Compressed RAW, I captured 35 images in 1.77 seconds for an average rate of 19.8fps. These figures prove the 20fps electronic shutter mode can deliver its quoted speed and that my earlier tests in practice were being slowed by the continuous autofocus.
Finally, there’s one more burst feature new to the X-T3: Pre-Shot which exploits the electronic shutter to keep a rolling buffer of up to one second’s worth of frames as you keep the shutter button half-pressed. Once you push the shutter button fully, these buffered frames are committed to memory along with a number following them. The buffered frames effectively allow you to capture and record moments which you’re not fast enough to react to, like a bird suddenly taking flight.
Pre-shot works in the 10, 20 or 30fps electronic shutter modes, buffering 10, 20 or 20 frames before the shutter-press, followed by up to 300, 45 or 22 frames afterwards respectively. The buffered frames represent one second of action in the 10 and 20fps speeds or two thirds of a second in the 30fps speed. This isn’t a huge amount of time, but really does allow you to capture moments you’d otherwise just miss.
To put it to the test I set the X-T3 to the 20fps electronic shutter mode and asked fellow camera journalist Jon Devo to jump the instant I pushed the shutter all the way down. He actually started jumping a fraction before I pushed the button fully-down, but the Pre-shot mode still allowed me to capture the entire movement. I’ve presented a bunch of the images below, including those from the start of the burst. Notice how many frames were captured before he even jumped, even though I pushed the button down a fraction after his feet left the ground. There was also a bunch more images recorded after he landed, but I’ve skipped them here.
Fujifilm X-T3 Pre-shot burst


We’ve seen pre-capture capabilities before on Panasonic and Olympus cameras, but it remains really useful, particularly for capturing the moment a bird – or Jon here – takes flight.
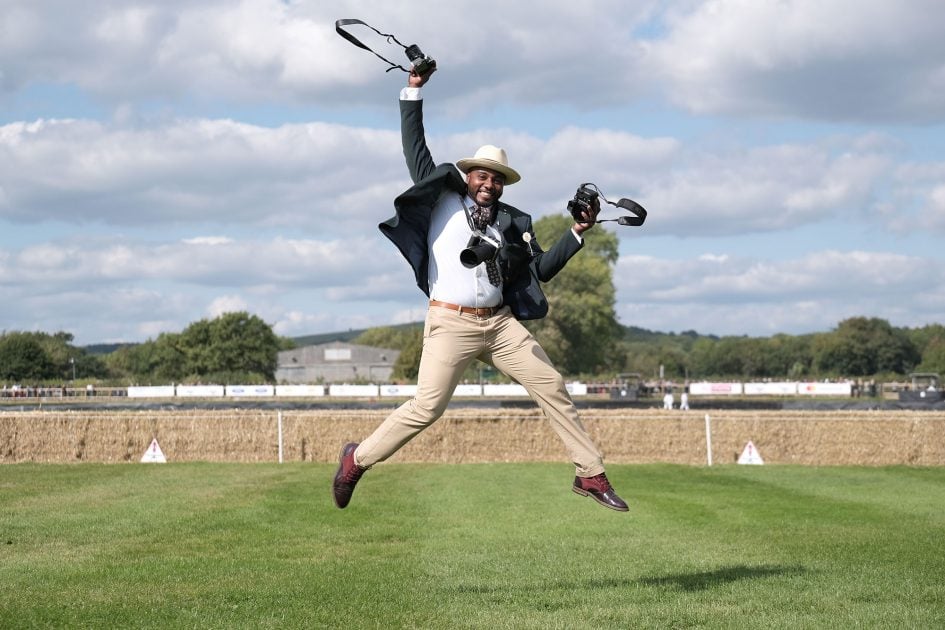
Above: frame from Pre-shot Burst
Finally while many of the X-T3 headlines concern autofocus and burst shooting, Fujifilm has also had some fun with manual focus. So in addition to focus peaking and the split image options of previous models, the X-T3 now includes a new digital microprism mode which simulates the ground glass viewfinders of old film SLRs. I’m not sure I’d personally use it over peaking, but it’s a fun option.
Fujifilm X-T3 shooting modes
Like all X-series bodies to date, the Fujifilm X-T3 doesn’t have an exposure mode dial; instead it adopts the same technique employed by older film SLRs for many years. The body has a shutter speed dial and (most of) the lenses have aperture rings; both offer an A position. Set both the shutter speed dial and the lens to A and the X-T3 enters Program mode. Set the shutter dial to A, but turn the aperture ring and you’ll be in Aperture Priority. Set the lens to A, but turn the shutter speed dial and you’ll be in Shutter Priority. And finally if you turn both the shutter speed dial and aperture ring away from A, you’ll be in full Manual. If you’ve used this system before it feels natural, but even if you’re coming from a system with a PASM mode dial, it’s easy to get to grips with.
As a camera aimed at experienced photographers though, the X-T3 lacks the full Auto mode switch of recent lower-end models. Despite further upgrades to the movie mode, videographers will also notice there’s still no traditional red button to start recording – instead you’ll need to set the drive mode to Movie then start and stop recordings with the shutter release button.
The X-T3 offers a wealth of shutter types: fully mechanical (the default), fully electronic (for operation in complete silence as well as to access the fastest shutter speeds and burst modes), electronic front curtain (to minimise shutter shock without the risk of skewing artefacts but with some possibility of banding), and various combinations of them all. I generally stuck with the default fully mechanical shutter for my day-to-day photography as I didn’t notice any shutter shock and, like previous models, found the mechanical shutter sound to be barely more than a faint click. This is one of the joys of shooting with Fujifilm, especially for street or events as the shutter is virtually inaudible; indeed the environment would have to be extremely quiet for you to choose the electronic shutter out of discretion.
If you absolutely need silence though, the electronic shutter will let you shoot without a sound, as well as accessing faster shutter speeds up to 1/32000 and the faster burst modes of 20 or 30fps. That said, use with care as despite a faster electronic shutter readout than previous generations, the X-Trans IV still suffered from skewing artefacts in my tests when panning or capturing subjects in fast motion. I’ve gone into much more detail in the previous burst and autofocus section.
To be fair, the skewing with the electronic shutter isn’t any worse than rival cameras – it’s an issue which faces virtually all rivals with only Sony’s A9 managing to reduce (but still not completely avoid) it. So the trick is to understand the limitations and only use it when you need it – for example, exploiting the faster shutter speeds to deploy large apertures in bright conditions or to capture a subject approaching head-on with minimal sideways movement.
Moving on, the X-T3’s Shutter dial lets you select speeds from one second to 1/8000 in single EV increments, but if you’re in Shutter Priority or Manual mode, it’s possible to fine-tune shutter values using the rear dial by +/-0.6EV in 0.3EV increments. If you set the shutter speed dial to T, you can use the rear dial to choose from the entire shutter speed range of 1/8000 (or 1/32000 if using the e-shutter) to as long as 15 minutes, a valuable feature over the majority of cameras which offer a maximum shutter of 30 or 60 seconds before handing you over to Bulb for anything longer.
That said, there is a Bulb mode if you want to deploy exposures as long as 60 minutes using a cable release, but most photographers won’t need to as it’s possible to manually select exposures of 30, 40, 50 or 60 seconds, or two, four, eight of 15 minutes using the T mode and rear dial. It’s a feature Fujifilm debuted on the X-E3 and as a long exposure photographer I absolutely love it. No restrictions, no exploring unfamiliar menus, no need for accessories, just keep turning the dial until you get the exposure you want and fire-away. I wish all cameras worked like this. Like earlier models, the X-T3 also considerately displays a timer on-screen during long exposures, either counting-up in Bulb mode, or down from a selected shutter speed.

Above: 30 second exposure with Fujifilm X-T3
Around the base of the shutter dial is a ring control to adjust the metering mode. There’s four options on the X-T3: Spot (2% of the total are in the centre), Center-weighted, Multi and Average. The last option is an interesting one, averaging the entire frame, but for the majority of my shots I stuck with Multi and that’s what you’ll see deployed in my sample images. As you’ll see, the Multi metering mode does a good job at evaluating the majority of the subjects I pointed the camera at, and I only needed to intervene for my long exposures or shots of distant birds against a bright sky.
As before, the ISO sensitivity is adjusted using a dedicated dial to the left of the viewfinder head as you’re shooting with the camera. You can manually dial-in sensitivities from 160 (the new base level for X-Trans IV) to 12800 ISO in one third EV increments. Meanwhile L represents 80 ISO and H represents either 25600 or 51200 ISO, chosen from a camera menu; I still find the latter a bit messy as surely if there’s two H settings, why not just have two H positions on the dial? The good news though is RAW is available in the Low and High ISO positions.
The A position on the dial sets the X-T3 to Auto ISO with the choice of three customisable banks in the menus, allowing you to adjust the default sensitivity, maximum sensitivity (up to 12800 ISO), and the minimum shutter speed (from 1/4 to 1/500). There’s also an Auto option for the minimum shutter speed that takes focal length into account, using the one-over-equivalent-focal-length rule; I welcome this enhancement, but there’s a further opportunity to be more sophisticated like Sony which lets you additionally prioritise faster shutters in Auto ISO when shooting moving subjects, or slower shutters when motion isn’t an issue. I actually exploit this feature all the time.
Circling the base of the ISO dial is another ring control, this time dedicated to the drive mode with options for Movie, Bracketing, Continuous High, Continuous Medium, Continuous Low, Single frame, Multiple Exposure, Advanced Filter (effects), and Panorama.
The Bracketing menu offers a wealth of options including exposure, ISO, film simulation, white balance, dynamic range, and focus. Auto Exposure Bracketing (AEB) is available in three, five, seven or a whopping nine frames, unlike the basic three-frame option of earlier models (at least with their original firmware anyway). Even more impressive, you can dial-in up to 3EV increments regardless of the number of frames, allowing you to achieve a +/-12EV maximum range if desired (nine frames at 3EV increments). You can also deploy the entire sequence with a self-timer, after which it’ll capture all the frames without intervention. There’s still no in-camera HDR generation, but certainly enough bracketing to keep HDR enthusiasts satisfied.
ISO, Film Simulation, Dynamic Range and White Balance bracketing are also available from the Drive menu should you want them, and each can be recorded with a RAW version if desired. Strangely on some earlier Fujifilm bodies, RAW recording was disabled in these bracketing modes, with the cameras switching to JPEG only, although this has been resolved on some models with firmware updates.
Fujifilm’s focus bracketing made its debut on a firmware update for the X-T2 and X-H1 in early 2018 and is deployed here on the X-T3 as standard. It’s very useful for increasing the depth-of-field in macro photography without having to deploy small apertures. The Focus bracketing menu lets you capture up to 999 frames at increments of 1 to 10, and like other focus bracketing modes, it’s a case of experimenting to judge the number of frames and their increments to cover the desired range. The X-T3 won’t stack the images for you in-camera, so you’ll need to use third-party software like Helicon Focus. I found the increments between frames could be very small when using the macro len even when set to the maximum of 10; I needed over 200 frames to focus from the front to the back of a British two pound coin when it roughly filled the frame using the XF 80mm Macro lens as illustrated below.

Above: Fujifilm X-T3 with XF 80mm Macro at f4
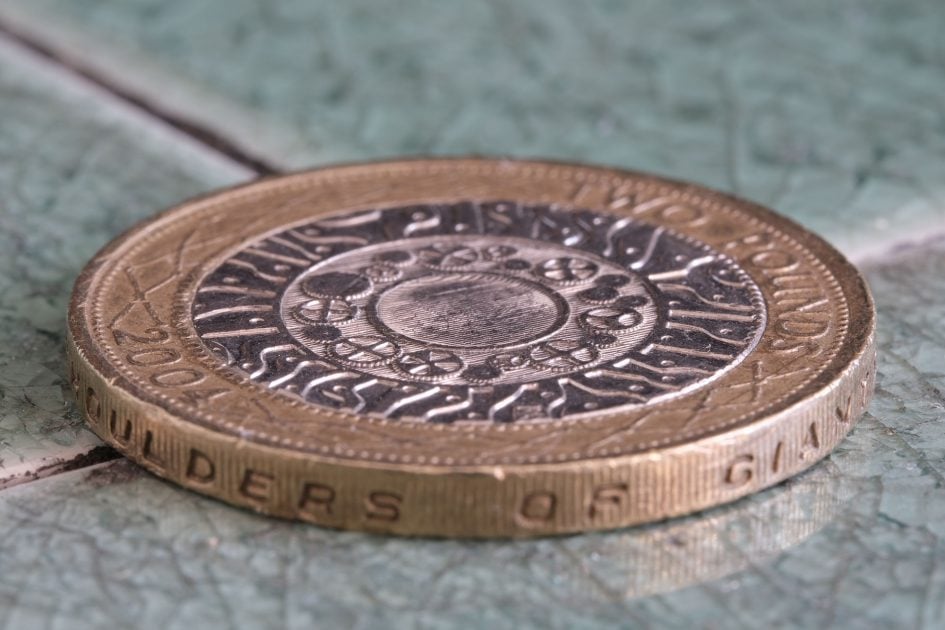
Above: Fujifilm X-T3 with XF 80mm Macro at f22

Above: Fujifilm X-T3 with XF 80mm Macro at f5.6. Focus-stacked with 232 images using Helicon Focus
The ADV position lets you apply one of eight Advanced Filter effects included on earlier models: Toy Camera, Miniature, Pop Colour, High Key, Low Key, Dynamic Tone, Soft Focus and Partial Colour (with six sub-options to pass red, orange, yellow, green, blue or purple, leaving the rest of the image in monochrome). The effects deliver the usual results, but sadly you still can’t apply them to video, so no chance of capturing a miniature movie with the X-T3.
The final option on the Drive mode dial is Panorama. You can choose the direction of the pan and the size from the menus with typical horizontal and vertical orientations generating images with 6400×1440 or 6400×2160 pixels respectively.
Delve into the menus and you’ll also find an interval timer, with up to 999 (or infinite) frames captured at intervals between one second and 24 hours. You can also set a delay up to 24 hours before the sequence begins, although the camera still won’t assemble them into a timelapse video afterwards, something Canon, Olympus and Panasonic now offer as standard, sometimes even at 4k resolutions. Unlike some timers though, there doesn’t appear to be any restriction in the shutter speeds you can use at short intervals: I was able to shoot half second exposures at one second intervals for example without an issue.
Meanwhile the Multiple Exposure option lets you take two shots and have the camera combine them into one. If you don’t like the shots as you take them, you have the chance to retry, but other than that there’s no other options.
Fujifilm X-T3 Film Simulations and processing
Like previous bodies, the X-T3 applies its main image processing parameters using a set of Film Simulations that emulate classic Fujifilm film stock. The X-T3 inherits the ten simulations of the X-H1, and debuts a new Monochrome Adjustment option as well as inheriting the Colour Chrome options introduced on the GFX. Film Simulations can be applied to photos or videos.
The default Film Simulation remains Provia, and that’s what you’ll see in all my sample images unless otherwise stated; it delivers a good balance of contrast and colour without being too punchy or saturated. If you fancy something more vivid, then choose Velvia, which coincidentally was always my favourite colour film for shooting landscapes. If you prefer a more subdued look, go for Astia, while portrait photographers may like Pro Neg Hi and Standard. For a classy vintage look, try Classic Chrome or Sepia. And if you’re into Black and White, go for the standard Monochrome or the higher-contrast Acros, both of which are available with additional yellow, red and green digital filters. I’m particularly fond of Acros with the Red filter option to darken blue skies and bring out cloud detail. Here’s how a few of them look on the same scene.

Above: Fujifilm X-T3 Film Simulations: Provia and Velvia

Above: Fujifilm X-T3 Film Simulations: Astia and Classic Chrome

Above: Fujifilm X-T3 Film Simulations: Pro Neg High and Pro Neg Standard

Above: Fujifilm X-T3 Film Simulations: ACROS and Sepia
The tenth simulation, introduced on the X-H1, is Eterna. It’s a fairly muted style that’s aimed more for video than still photography, although again you can apply it to either. I personally love the way Eterna looks on video where it saved me from ever needing to grade footage; you can see a bunch of examples in my movie section.
Above: Download the original file (Registered members of Vimeo only).
The Film Simulations are another part of the equation behind the lovely output from Fujifilm’s cameras. I find I can achieve the exact mood I want using these subtle but effective processes, rather than resorting to often heavy-handed filters on other systems. I also appreciate being able to apply different simulations after the event on RAW files using the in-camera RAW processing option in playback.
The X-T3 also inherits the Grain simulations introduced on the X-Pro2, with a weak and strong option to choose from and, like film simulations, you can apply these to RAW files after the event using the in-camera processing.

Above: Grain Simulation: Off, Weak Grain Simulation, Strong Grain Simulation. 100% crops
Making its debut on the X-T3 is the Monochrome Adjustment mode, which is only available if you’ve previously selected the Monochrome or ACROS film simulations. This unlocks a new menu which lets you warm or cool the image by ten steps in either direction, and can emulate different types of paper stock. Here’s three examples below with the neutral 0 position in the middle, flanked by -10 on the left and +10 on the right.

Above: Monochrome Adjustment: -10, 0, +10
As always it’s down to personal taste. I felt the strongest setting was a bit much in either direction, but going for one to five, especially in the warm direction, could really add something to a monochrome image. At first I thought it would end up being another Sepia variant, but I ended up really enjoying the effect. Sadly it can only be applied at the time of capture though as it’s not available in the RAW processing playback menu. Here’s an example with ACROS and +5 warming.

Above: Fujifilm X-T3 Monochrome Adjustment +5
As noted earlier, the X-T3 also inherits the Colour Chrome mode first seen on the GFX medium format bodies. This adjusts the gradation in highly saturated areas for a more natural-looking effect, and it can also be applied to RAW files after the event using the playback menus, so feel free to experiment! It’s available in Weak or Strong, and here are three examples using the same original file.
Above: Colour Chrome: Off, Weak, Strong
Fujiifilm X-T3 movie mode
The Fujifilm X-T3 becomes one of the most capable cameras for video to date – an enormous achievement for a company which seemed to view video with some suspicion only few generations previously. The X-T3 joins an exclusive club of cameras which can film 4k at 50 or 60p internally, and with the option of 10 bit too (4:2:0 if recording internally or 4:2:2 over the HDMI to an external recorder).
In a raft of other upgrades over the previous generation, you can now film 4k up to 30p with no crop and for clips lasting 30 minutes long, and there’s also built-in mic and headphone jacks (so no need to fit the grip for the latter). Combined with great-looking footage out-of-camera, f-log for graders, silent adjustments via the touchscreen, and phase-detect autofocus available across the entire frame, the X-T3 becomes the best APSC camera for video so far, and challenges many of the full-framers too. In the video below I’ve demonstrated all of the movie features in action, and gone into further detail afterwards.
The X-T3 lets you film 1080p or 4k video in 16:9 or the wider 17:9 shape in a wealth of frame rates and bit rates. 1080p at 24 to 60p, or 4k at 24 to 30p use the full frame width and are available for clips lasting up to 30 minutes each. Set the X-T3 to 4k in 50p or 60p and a mild 1.18x crop is applied, and the maximum clip length reduced to 20 minutes, but this is still impressive compared to the X-T2 which could only film up to 4k 30p with a 1.17x crop and shorter 10 minute clips; plus of course the X-T2 didn’t offer 4k at 50p or 60p either.
If you want higher speed recording than 60p, you can enable the High Speed mode which films up to six minutes of 1080p without sound at 100p or 120p then interprets it in-camera to 24, 25 or 30p for a four or five times slowdown. The High Speed mode applies a 1.29x crop. I’ve illustrated the crops below using videograbs from actual footage. The full image represents 1080 up to 60p or 4k up to 30p and again uses the full sensor width. The outer red frame represents 4k at 50 or 60p, while the inner green frame represents 1080 at 100 or 120p – the exact coverage is indicated by the outer edges of these frames.
Above: Fujifilm X-T3 movie crops: 1080 up to 60p or 4k up to 30p (full image with no crop), 4k 50 / 60p (outer edge of red frame), High Speed 1080p (outer edge of green frame)
In terms of encoding, you have the choice of H.264 or H.265. Set the X-T3 to H.264 and you can encode at 100 or 200Mbit/s in 8-bit internally using Long GOP. Set the camera to H.265 and you can unlock a 400Mbi/s / All-i option with 10-bit internal recording, although only up to 30p in 4k; if you set the camera to 4k at 50p or 60p, you have to use Long GOP. Note 10-bit is only available in 4:2:0 when recording internally, but always output over HDMI at 4:2:2 regardless of the camera’s settings, so you could connect an Atomos Ninja V to capture the best quality if desired.
Above: Download the original file (Registered members of Vimeo only). Also see my Fujifilm XT3 10-bit h265 F-log movie.
As for processing, you can apply any of the film simulations to video, including the most recent Eterna option which delivers slightly muted results that look attractive with no extra effort. If you prefer to grade footage though, F-Log is also available. Fujifilm is also claiming better results at higher sensitivities thanks to improved noise reduction and the chance to enable a new inter-frame noise reduction option. Eagle-eyed videophiles will notice there’s no HDR at the time of writing, but Fujifilm has promised 4k Hybrid Log Gamma HFR in a firmware update in late 2018.
In terms of battery life, Fujifilm quotes 55 minutes of 4k on a full charge, but I managed a tad longer with two complete 30 minute 4k / 25p clips on one charge with the battery expiring a couple of minutes into my third clip. The camera felt very warm after my first clip, but at no point over-heated. At the time of testing, the X-T3 employed a FAT-32 file system with a 4GB limit which meant my 4k footage was generally split into files lasting around six minutes each, but which could be stitched together for seamless playback; I’m hoping exFat will be supported in a future firmware update to allow a 30 minute clip to be stored in a single file for greater convenience.
There’s full manual control over exposure and the chance to enable silent movie controls which are operated via the touchscreen. This has the benefit of ignoring the physical dials and effectively allowing you to set separate values for aperture, shutter and ISO for stills and video. I often made use of this, setting the exposure in Manual for movies with a motion-friendly shutter of, say, 1/50, while leaving the stills mode to Aperture Priority with generally much faster shutter speeds.
Continuous autofocus is possible while filming in any mode (including High Speed video), and thanks to the touch-screen you can now tap to pull-focus. Face detection is also supported in video and I’ve demonstrated both in my compilation video above. In practice the video AF works well, and while it remains a little hesitant under some conditions it does at least reduce the breathing of earlier models; it may be possible to tweak the AF speed and response for better results, and I’ll try this for a future update.
Above: Download the original file (Registered members of Vimeo only).
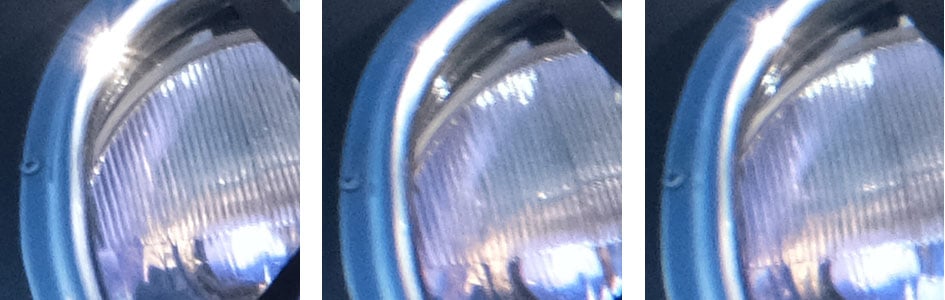
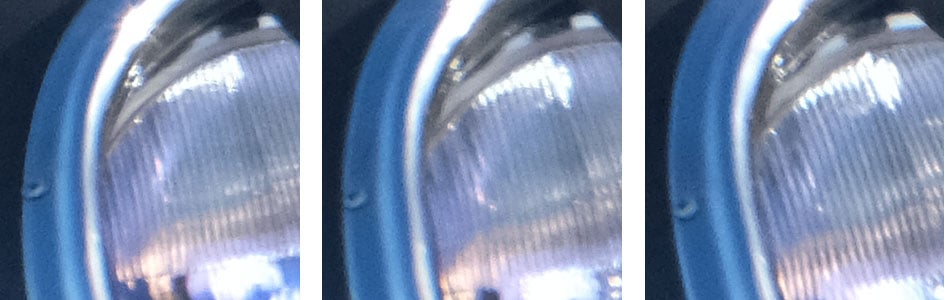
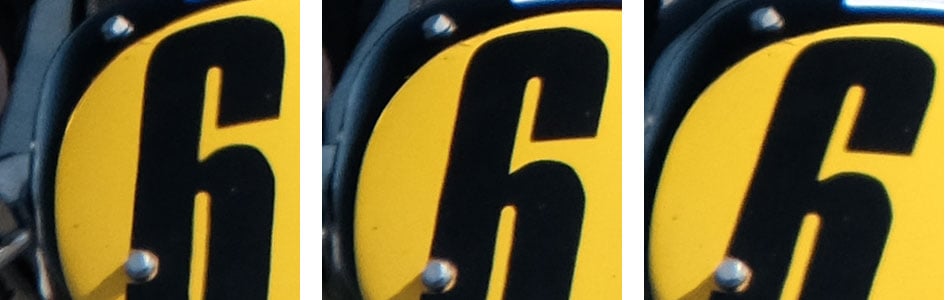
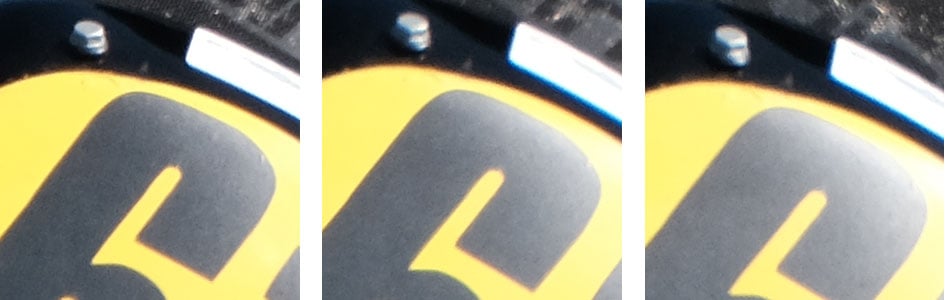
In terms of video resolution, the X-T3 (in the middle crops below) shows an improvement over X-Trans III bodies (represented by the X-E3 below) and manages to keep-up with the Sony A7 III which, lest we forget, is a full-frame body.
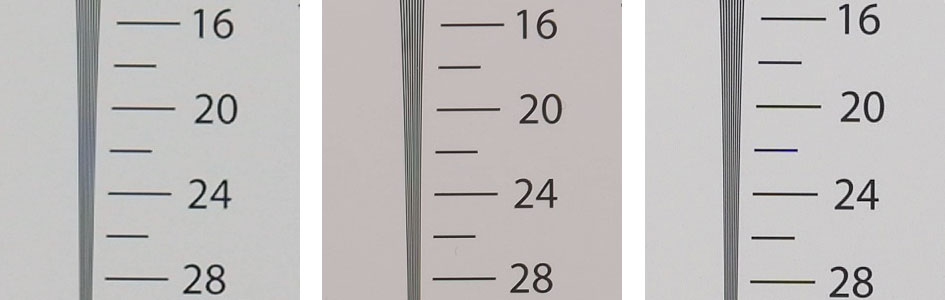
Above: 4k horizontal resolution. 100% crops from left to right: Fujifilm X-E3, Fujifilm X-T3, Sony A7 III.
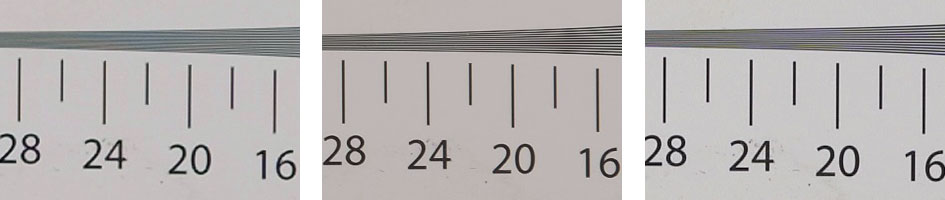
Above: 4k vertical resolution. 100% crops from left to right: Fujifilm X-E3, Fujifilm X-T3, Sony A7 III.

Above: 1080p vertical resolution. 100% crops from left to right: Fujifilm X-E3, Fujifilm X-T3, Sony A7 III.
Ultimately as I noted at the start of this section, Fujifilm has done a great job with the movie mode on the X-T3 and it becomes the best overall APSC camera for video to date. Fujifilm has confidently thrown down the gauntlet in this regard and it remains to be seen how its rivals will respond.
Fujifilm X-T3 Wifi and Bluetooth
The X-T3 is equipped with Wifi and Bluetooth for remote control using your smartphone, and Fujifilm provides a free app for iOS and Android devices; I used the latter (v3.3.0.5) on my Samsung Galaxy S7.
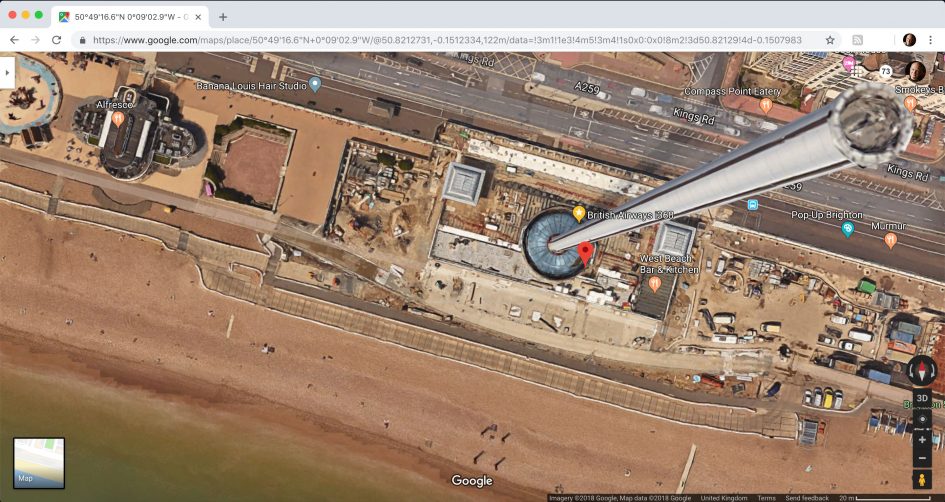
When you first fire-up the app, it encourages you to pair the camera and phone over Bluetooth. Once paired, you can select an option in the X-T3 menus for the camera to sync its time and or location with your smartphone, the latter allowing it to finally geo-tag images as you shoot them without having to first connect to the app over Wifi. This not only avoids the delay of initiating a Wifi connection, but also that bizarre implementation of earlier Fujifilm bodies where one geo-location could be applied to multiple images even if you moved away from the point where you started the process. Now it mercifully works as it should, smoothly geo-tagging in the background if desired without interaction. Like other systems which take the position from your phone, the accuracy of course depends on the phone itself, so for the best results try to give your phone a clearish view of the sky, perhaps keeping it in the top of a backpack rather than buried in a trouser pocket. Here’s an image I geo-tagged over Bluetooth and the position entered into Google Maps.
With the camera and phone paired, it should also be possible for the app to use Bluetooth to remotely initiate a Wifi connection for remote control or image transfer, taking care of the network and passwords itself. This process seems to be getting smoother and more successful with each app update, but in my tests with the X-T3 and the Android version running on my phone, I was still often prompted to manually select ‘Wireless communications’ from the X-T3’s menus to start it broadcasting a Wifi signal. So not yet quite as smooth or hassle-free as the best Bluetooth implementations out there, but a steady improvement over my tests with earlier models.
Once the app is connected to the camera over Wifi, it can be set to automatically check if a firmware update is available for the camera, before downloading it and guiding you through the update process. This is a brilliant idea and one I’m surprised not to see on rival systems. At the time of writing it only looked for body updates, leaving lens updates to the traditional manual process, but it’s still a very handy and considerate function – thanks Fujifilm!

When connected to the X-T3, the home screen for the Fujifilm Camera Remote app is divided into four functions, three of them inherited from earlier versions. You have Remote Control, Receive, and Browse Camera, and in a recent update the earlier Geotagging option (now redundant thanks to Bluetooth) has been replaced with the new Remote Release option.
The first three options work as before: The Remote Control option shows a live image from the camera, surrounded by shooting information and a selection of buttons underneath. A slider at the bottom lets you choose between shooting stills or filming video, after which pressing the big red and silver release button above will trigger your choice.
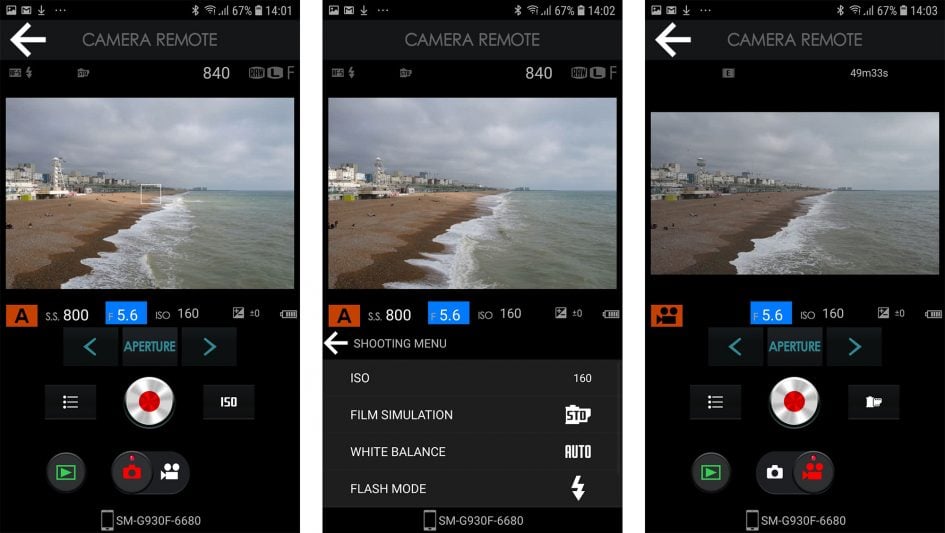
Gratifyingly you can tap anywhere on the live image on your phone to reposition the AF area, and the X-T3 will refocus straightaway. A button to the left of the release lets you change the ISO, Film Simulation, White Balance, Flash mode and Self timer. If you’re in Aperture Priority you can adjust the aperture on-screen by tapping the value below the live image. Same for the shutter speed in Shutter Priority, or indeed either of them in Manual, but you can’t change the actual exposure mode remotely. You can however now adjust exposure compensation in the non Manual modes.
The second option in the app is Receive. This initiates playback on the camera, with the option to send a photo as you browse through them. Received images are graphically shown on your handset’s screen like stacked paper photos. An option to Receive may seem redundant when you have various thumbnail views for importing on the app, but it’s actually very useful. There’s many times I’ll have gone through a series of almost identical images on the camera in playback, then got completely lost when viewing them all as tiny thumbnails on a remote control app – which was the one I liked best? Was it third or tenth along from the end of that sequence? But Fujifilm’s Receive mode solves this by letting you initiate the transfer from the playback mode of the camera and push them to the handset.
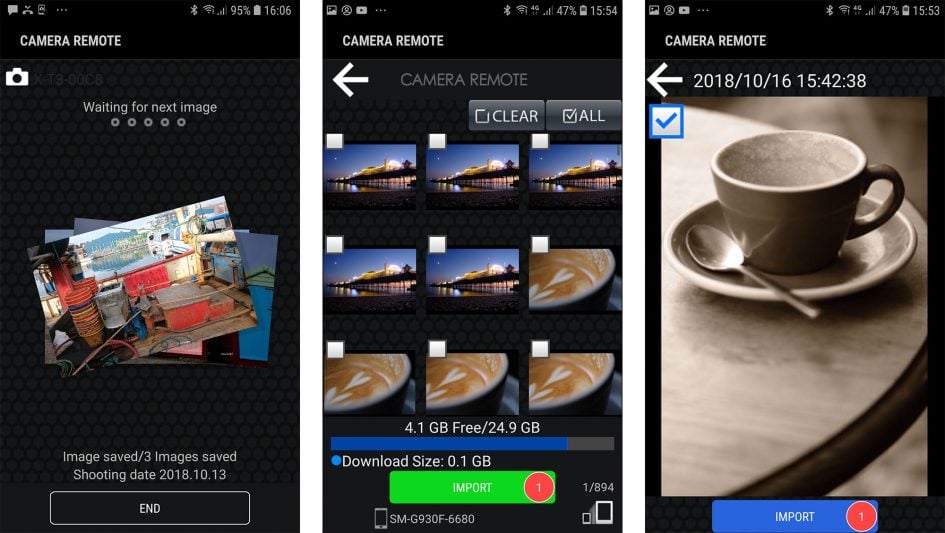
The third option is Browse Camera, which presents exactly the same thumbnail view as tapping play in the Remote Control option described earlier. Like that option, you can view thumbnails in two different sizes, tap to enlarge for a closer look and choose to import if desired. In either Receive or Browse Camera modes, you can import JPEGs at either 3 Megapixels or in the original size, an option set in the camera.
The fourth option, recently added to the app, is Remote Release. This presents a simple button to trigger the shutter, or to lock it open for Bulb exposures by sliding it down to a Hold position. We’ve seen similar functions on Panasonic and Canon apps, but the difference is Fujifilm’s requires you to first connect the camera and phone over Wifi, a process that can take over 30 seconds, and maintain that connection too. In contrast, Panasonic and Canon’s simple triggers exploit Bluetooth to work immediately without the delay of Wifi – you just choose the option in the app and tap the button to take the shot. Since the X-T3 is equipped with Bluetooth, it seems a shame to force you to go through Wifi to access this basic feature – indeed once you’re connected over Wifi, it’s just as quick to fire-up the full Remote Control option with live view.
I hope Fujifilm’s engineers manage to support a fully Bluetooth remote trigger in future versions of the app – like geo-tagging, it’s so much quicker and easier to perform these simple tasks with Bluetooth alone rather than going through Wifi. But equally I’m relieved Fujifilm has finally resolved the geo-tagging issues of earlier bodies and it’s a delight to see it working over Bluetooth on the X-T3. I also assume it now works smoothly on other X-series bodies equipped with Bluetooth, although of course those without Bluetooth will have to continue to use third party logging utilities and sync them later.
Check prices on the Fujifilm X-T3 at Amazon, B&H, Adorama, or Wex. Alternatively get yourself a copy of my In Camera book or treat me to a coffee! Thanks!