The Fujifilm X-H1 is the new flagship in the mirrorless X-series. It takes the X-T2 with its 24 Megapixel APSC X-Trans III sensor and adds built-in stabilisation (a first in the X-series), a touch-screen, tougher build, a bigger grip, enhanced movie features, a more detailed viewfinder, and Bluetooth connectivity. Stabilisation transforms the usefulness of Fujifilm's primes and the larger body makes the X-H1 feel right at home with the bigger zooms. Despite the heftier body though, the battery remains underpowered and the 4k movies limited to 15 minute clips; both are resolved by fitting the optional booster grip, but it's revealing the X-H1 needs it to match many of its rivals. And while I'm personally very satisfied by the quality of the X-H1, the fact remains the sensor is two years old and now available on bodies half the price. Ultimately the X-H1 is a confident all-rounder, but one that's beaten in many respects by rivals. If however you're wedded to the X-system, the X-H1 becomes the most capable body to date and one that's a joy to shoot with, delivering excellent quality out-of-camera with the benefit of built-in stabilisation.
Fujifilm XH1 review
-
-
Written by Gordon Laing
In depth
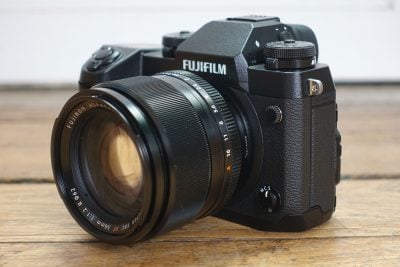
The Fujifilm X-H1 is a high-end mirrorless camera aimed at pro photographers and demanding enthusiasts. Announced in February 2018, it claims the flagship position in the current X-series, above the earlier X-Pro2 and X-T2. The X-H1 employs the same 24 Megapixel APSC X-Trans III sensor as most of the bodies in the current X-series line-up, but is the first to stabilize it within the body; Fuji claims this new 5-axis system delivers up to five stops of compensation. The X-Trans III sensor also equips the X-H1 with embedded phase-detect autofocus, although Fuji has improved its low-light sensitivity from 0.5 to -1 EV and now supports focusing at f11 (handy if you’re using teleconverters).
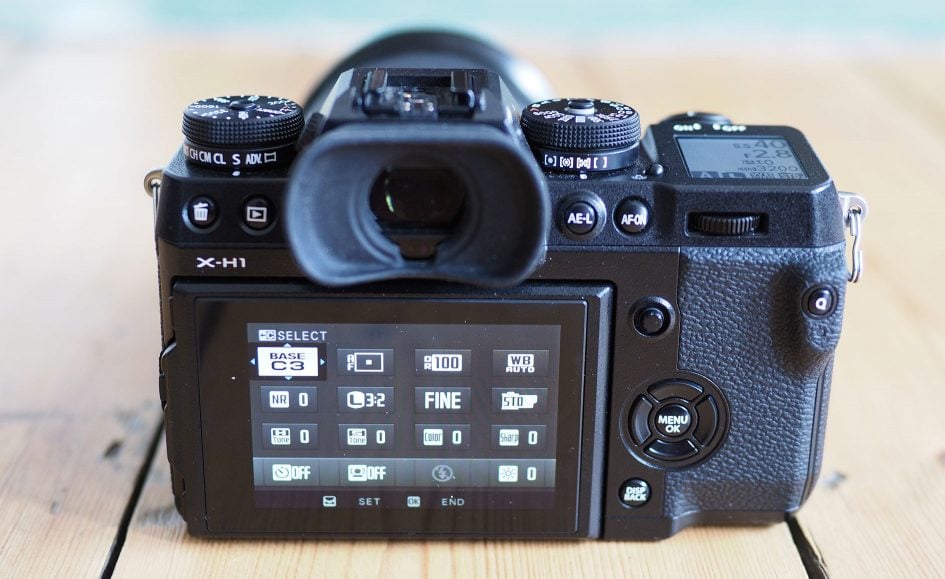
The weather-sealed body is Fuji’s toughest yet in the series with a shell employing magnesium that’s 25% thicker than the X-T2, and a harder, more scratch-resistant surface coating. The chunky grip is also the largest in the X series to date, and swaps the exposure compensation dial for the customizable LCD panel of the GFX medium format body. The X-H1 inherits the dual card slots and AF joystick of the X-T2, but adds a new AF-ON button as well as enlarging some of the buttons on the rear. The X-H1 also inherits the 3in screen of the X-T2 which supports vertical and horizontal tilting, albeit still unable to face forward to the subject for selfies or filming pieces to camera; on the plus side it’s now touch-sensitive, allowing you to tap to reposition the AF area, pull-focus while filming, as well as swiping through various options. Meanwhile the electronic viewfinder now employs a higher resolution 3.69 million dot OLED panel with 0.75x magnification. As you’d expect, the X-H1 also now complements its Wifi with Bluetooth.
The X-H1 can film 4k video in UHD and now also the wider Cinema 4k formats (for clips up to 15 minutes in length), and 1080p is now available up to 120p for slow motion, and there’s also a new Eterna Film Simulation designed for a cinematic look out-of-camera, although you can alternatively record in 8-bit F-Log direct to the SD card. Like the X-T2, burst shooting with continuous autofocus is available at 8fps with the mechanical shutter or 14 with the electronic shutter, and thanks to new shock absorbers, the mechanical shutter is quieter than before. Again like the X-T2, an optional booster grip (the VPB-X-H1) allows you to accommodate two extra batteries, boost mechanical burst shooting to 11fps and extend all movie clips to half an hour, while also sporting an AC input and headphone jack.
The X-H1 certainly inherits a great deal of the X-T2 – indeed it could be described as an X-T2 with built-in stabilisation, a touch-screen, bigger grip, enhanced video and Bluetooth. Considering these resolve essentially my only complaints about the XT2, it looks set to be one of the most satisfying cameras this year, although possibly the last to use the X-Trans III sensor. I’ve been shooting with the X-H1 over an extended period, so read on for my in-depth review, comparing it to key rivals and other bodies in the X-series. If you’re looking for a high-end mirrorless camera, you’ve come to the right place! I’ll start with two video reviews: my First Looks which explains the headline features, followed by my podcast review with Doug Kaye for a deep-dive.
Check prices on the Fujifilm XH1 at Amazon, B&H, Adorama, or Wex. Alternatively get yourself a copy of my In Camera book or treat me to a coffee! Thanks!
If you prefer an audio version of my in-depth podcast review, use the following player. It can be fun to have it playing in the background as you go through this page…
Fujifilm X-H1 design and controls
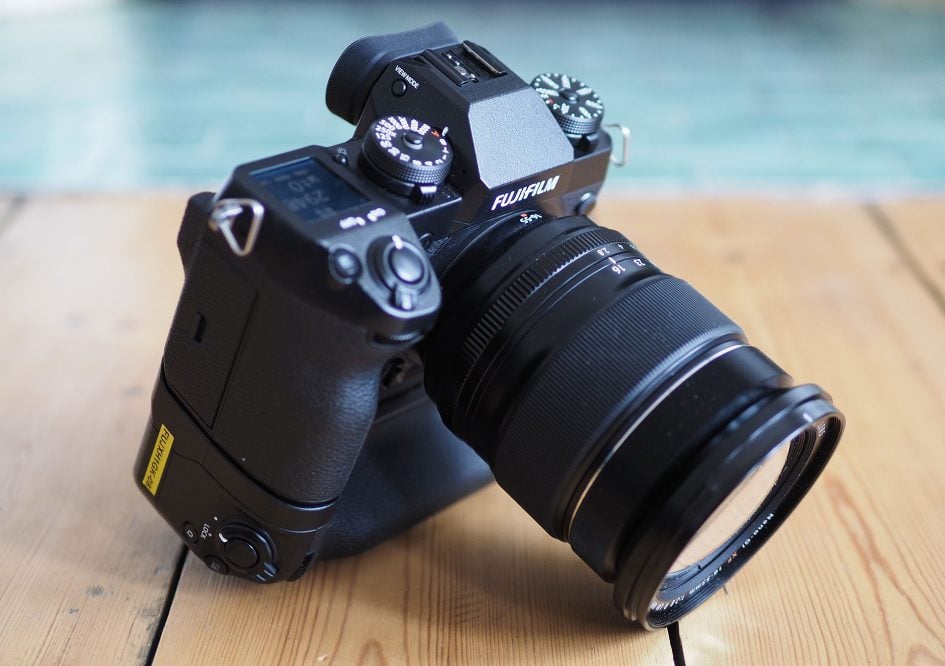
The Fujifilm X-H1 looks like a chunkier version of the X-T2 with some aspects of the medium format GFX-50S thrown into the mix; indeed if the X-T2 and GFX got together, the X-H1 could be their offspring. This makes the X-H1 by far the largest and heaviest X-series body to date, most obviously sporting a substantially deeper grip and larger viewfinder head than the models that came before it. The larger body is to accommodate the built-in stabilisation and more substantial heatsink to keep the sensor cool, especially when filming video at the higher bit rates, but obviously the additional heft will be welcomed by anyone with larger hands or those who’ll more regularly shoot with Fujifilm’s bigger lenses. The overall look is more modern than many of the X-series bodies which preceded it and you may or may not like this direction in design.
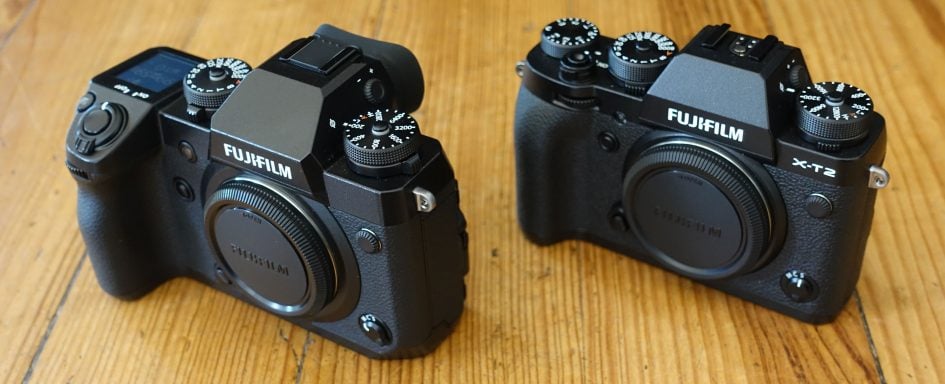
Above left: Fujifilm XH1, above right: Fujifilm XT2
Size-wise the X-H1 measures 140x97x86mm (40mm at its thinnest point) and weighs 673g including battery. Compare that to the X-T2 at 133x92x49mm (35.4mm at its thinnest point) and a weight of 507g including battery, and it’s clear the X-H1 is comfortably larger in every dimension, especially the thickness; indeed it begins to approach the GFX body in this regard.
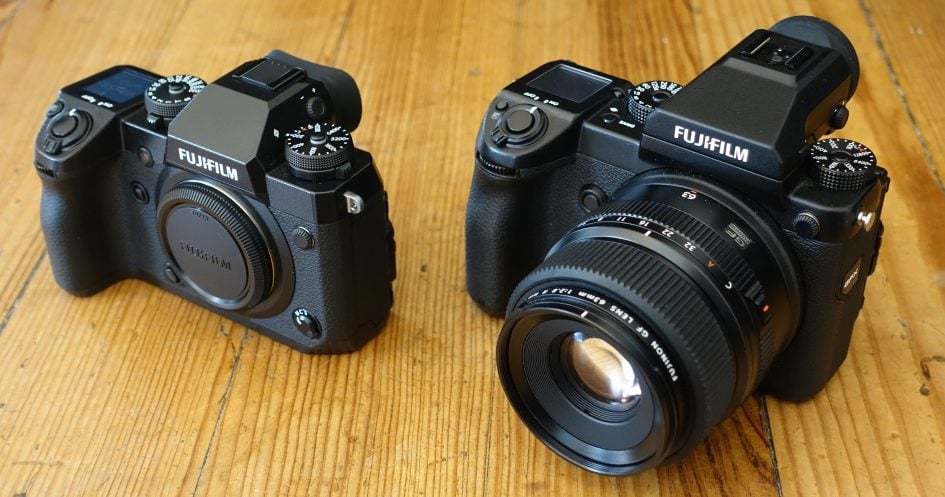
Above left: Fujifilm XH1, above right: Fujifilm GFX
Compare that to the Sony A7 III which measures 127x96x73.7mm (62.7mm at its thinnest point) and weighs 650g including battery. Meanwhile, Panasonic’s Lumix G9 measures 137x97x91.6mm and weighs 658g including battery.
For the record, Nikon’s D500 DSLR measures 147x115x81mm and weighs 860g including battery, so the X-H1 remains a little smaller and noticeably lighter, but it’s certainly one of the heftiest mirrorless cameras to date, and it’s revealingly a tad larger than the full-frame Sony A7 III.
Of course a body is only half a system. Add the XF 16-55mm f2.8 to the X-H1 and the total length (including eyecup) measures 165mm and the combined weight becomes 1328g. Add the Sony E 24-105mm f4G OSS to the A7 III and the length becomes 176mm and the weight becomes 1313g. These lenses are actually pretty close matches when the respective sensor’s behind them are taken into consideration: both start at 24mm equivalent, both deliver the same equivalent depth-of-field across the 24-83mm range, although the Sony extends a little further to 105mm.
On Micro Four Thirds, the closest match in coverage is the Olympus 12-40mm f2.8 with its 24-80mm equivalent range, but the f2.8 focal ratio delivers a less shallow depth of field, roughly equivalent to f4 on APSC or f5.6 on full-frame. That said, it is smaller, lighter and cheaper. Mounted on a G9, the total weight becomes 1040g. If you fancy more reach, there’s the Leica 12-60mm f2.8-4, which with the G9 weighs 978g.
In your hands the X-H1 certainly feels very confident and comfortable. Like other pro-grade bodies, there’s a reassuring heft and density, while the taller grip means there’s plenty to hold onto and no fingers left dangling underneath. The magnesium alloy shell is also 25% thicker than the X-T2, making it twice as strong overall, and the surface coating is more scratch-resistant too. The X-H1 is also weatherproof with 94 points of sealing.
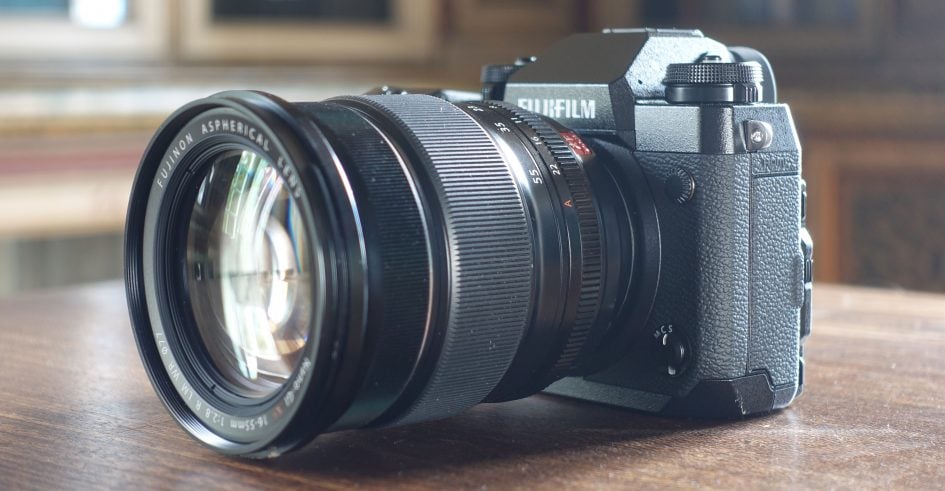
Fujifilm’s larger lenses, like the XF 100-400mm, XF 50-140mm and the (larger than you think) XF 16-55mm all feel right at home on the X-H1 in a way they never did on the previous bodies, except perhaps the X-T2 when fitted with its optional Vertical Power Booster grip. Conversely the smaller lenses, like the XF 35mm f2, look slightly out of proportion on the X-H1.
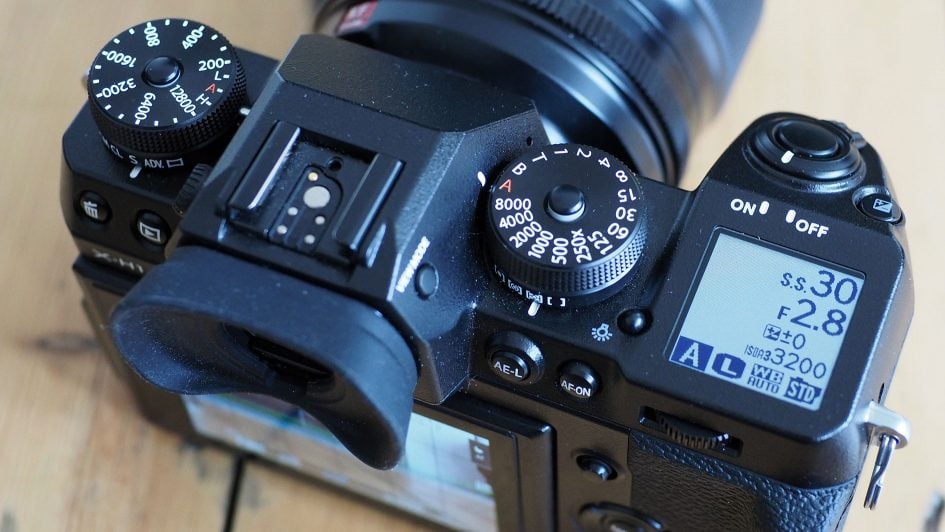
Moving onto controls, the X-H1’s top panel shares the dedicated and lockable shutter speed and ISO dials of the X-T2 with their respective drive and metering collars, but loses the exposure compensation dial in favour of the LCD screen. To be honest, I don’t miss the compensation dial as it invariably turned by mistake when I’d take the camera out of my bag. To adjust the compensation on the X-H1, you’ll need to push and hold the EV button like a shift key as you turn the rear thumb wheel; I couldn’t do this one-handed and needed to support the camera in my left hand in order to use my thumb and index finger simultaneously.
In a departure for Fujifilm’s X-series bodies, the shutter release has been shifted forward onto the grip and is no longer threaded for a retro-style cable release. The shutter release is a softer ‘feather-touch’ button that lacks a defined click in line with many higher-end bodies; I had no complaints and it’s certainly nowhere near as sensitive as the Lumix G9, so you should experience no issues achieving a half-press. Note in the absence of a dedicated movie record button, you’ll be using the shutter release to start and stop movie recordings.
The big news on the upper surface though is the 1.28in LCD information panel inherited from the GFX-50S. This 128×128 pixel display can show a wealth of information that changes depending on whether you’re shooting stills or video. It’s also possible to customize what information is displayed for still photos and the movie mode. The display is also highly visible in any conditions whether backlit on a white background, or reversed with white text on a dark background. I also love the way the display remains active when the camera’s switched off, indicating the shots and battery life remaining at glance. When I first encountered this panel on the GFX-50S, I wasn’t 100% convinced, but over time I’ve grown to find it very useful and while it means the X-H1 departs from its purely retro styling, it is simply very useful. Since it’s a dot matrix LCD, you could in theory display anything and I think it’d be fun to be able to upload custom graphics, like a logo, for display on startup.
Turning to the rear, there’s been some minor juggling of buttons with AF-L now becoming AF-ON. This top row of buttons are also slightly larger and more rounded than on the X-T2, making them easier to press especially with gloves. Sadly the cross keys remain unnecessarily small though, especially given the larger real-estate of the rear panel. I’d have preferred the larger more tactile buttons of the X-Pro2 here, or something even chunkier still. At least the AF joystick is still present and correct, as well as the clickable finger and thumb dials.
You can customize the function of most of the buttons, including the exposure compensation, AE-L, AF-ON and cross keys, as well as choosing what happens when you swipe the screen in one of four directions; the rear dial is also customizable, although weirdly, the front dial is not. I also felt it was odd that despite six pages of options for the various buttons, none of them allowed you to assign movie record to any of them.
Like the X-T2, the X-H1 employs a 0.5in OLED panel for its electronic viewfinder and while the quoted magnification has fallen fractionally from 0.77x to 0.75x (a difference that’s not visible in real life), the panel resolution has been boosted from 2.36 to 3.69 million dots – that’s an upgrade from 1024×768 pixels to 1280×960 pixels. It can be a subtle difference day-to-day, but point the X-T2 and X-H1 viewfinders at very fine details and you’ll notice the latter resolves them better with less moire or blurring, leading to a more natural view. It also makes manual focusing with or without peaking easier to perform without magnifying the image.
The resolution also allows the X-H1 to match the detail presented by the best of its rivals including the Lumix G9 and Sony A7r III (albeit not the Sony A7 III’s viewfinder which stays at 2.36 Million dots). Note the Lumix G9 takes the crown for the largest actual image size with a 0.83x magnification that really does look bigger, especially since the native shape of Micro Four Thirds will fill the viewfinder panel height, whereas the APSC and full-frame models normally use the wider 3:2 shape which has to be displayed with letter-boxing in most viewfinders.
The X-H1’s viewfinder 23mm eye-point may be the same as the X-T2, but the eyecup is larger and the viewfinder head also positioned further back so to avoid your nose accidentally interacting with the touchscreen. I don’t use glasses myself but some of those who do have told me they prefer the X-H1 viewfinder to the X-T2. Either way, one of my favourite things about the Fujifilm viewfinders is how the information is reformatted to remain upright when you turn the camera into the portrait orientation – it’s such an obvious thing to do (and easy too with a digital display) and yet hardly anyone else does it.
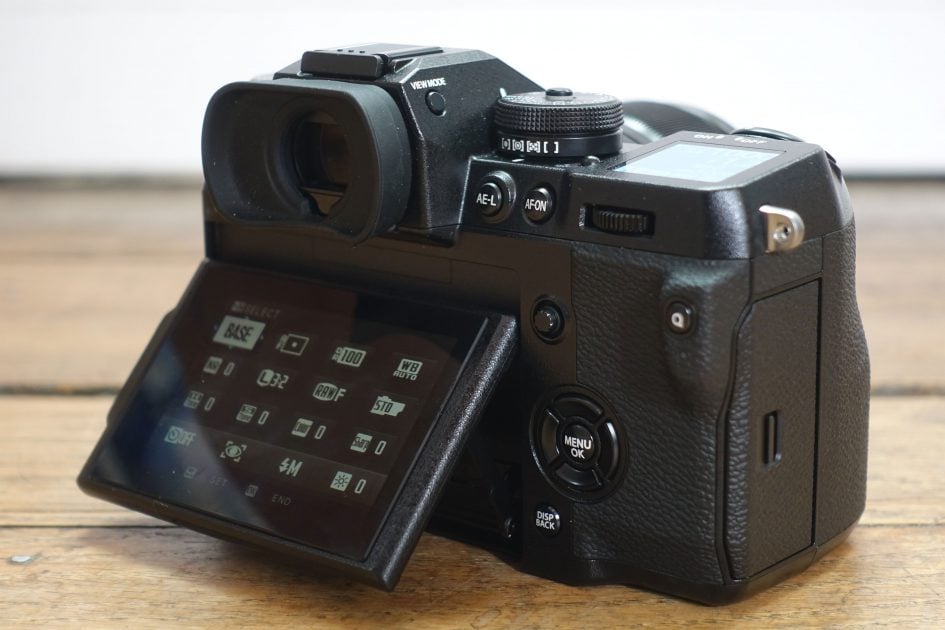
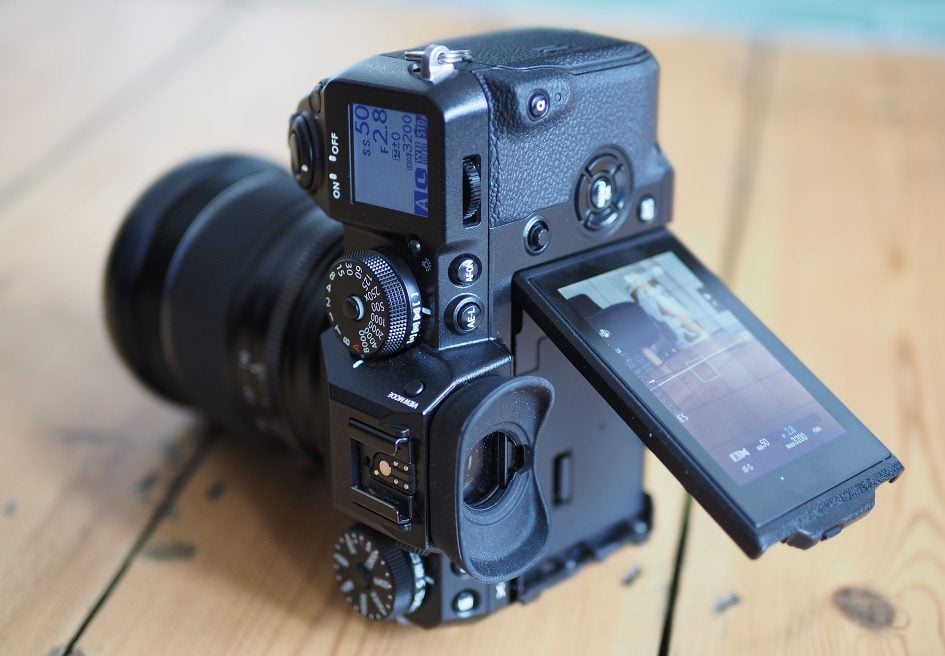
Moving onto the screen, the X-H1 inherits the unique articulation first seen on the X-T2 and refined on the GFX-50S. This allows the 3in / 3:2 shaped display to fold up vertically by 90 degrees or down by around 45 degrees. So far so normal, but if, like me, you prefer to shoot in the portrait orientation, just push a button on the side and angle it out sideways by about 60 degrees (this is also easier than the sliding lock on the X-T2). Like the viewfinder, the shooting information cleverly rotates to remain upright.
The unusual screen mechanism may be quick to use, but still can’t flip forward to face the subject for selfies or filming pieces to camera, and I also found the substantial viewfinder eye cup blocked a large portion of the view when the screen was angled-up. A side-hinged screen, like on Panasonic’s G9, the Olympus OMD EM1 II or Canon EOS M50 resolves these issues and also opens the camera up to the possibility of vlogging.
In a useful upgrade over the X-T2, the X-H1’s screen is now touch sensitive, allowing you to tap to change focusing area or pull-focus during movies, as well as swiping through images, pinching to zoom and dragging during playback. I’m also delighted those big chunky icons in the Q menu are now tappable too, although you can of course still use the AF joystick or cross keys for navigation.
Like the X-E3 before it, the X-H1 also offers gesture controls. During composition you can swipe-up to display RGB and brightness live histograms, or down to utilize the new dual-axis leveling gauge; this also works when composing through the viewfinder, although strangely once you half-press the shutter release the gauge returns to the old-style single-axis style.
In terms of connectivity, the X-H1 inherits the same four ports of the X-T2 before it: a 2.5mm remote jack, mini HDMI port, USB 3 port and a 3.5mm microphone input; if you want a headphone jack, you’ll need to fit the optional Vertical Power Booster grip. There’s also a PC Sync port for external lighting. I’m pleased to report you can now charge the battery internally over USB (I confirmed with an external Anker USB battery), although Fujifilm also supplies a more traditional AC external charger if you prefer; note you can’t power the camera over USB though, a feature still only offered by Sony and Panasonic.
If you’re into tethered shooting, Fujifilm offers two solutions: the simple and free Fujifilm X-Aquire utility which allows you to save images direct to your computer, or the more advanced Tether Shooting Plug-in Pro for Adobe Lightroom which costs $79 and provides broader remote control with live view.

Above: Fujifilm X-Acquire utility
I tried the X-Acquire utility on my Mac which can connect over USB or Wifi; you’ll first need to set the camera’s connection settings to the desired connection type. I tried a USB 3 connection first and the utility connected quickly, and allowed me to backup or restore my camera settings as well as automatically saving images direct to a desired folder on my computer. If you opt to ‘display window’, you’ll see a thin strip showing the camera model, shutter speed, aperture, ISO, compensation, white balance, and a small thumbnail of the latest picture taken. Note this is just for indication, not control – you’ll still need to change settings on the camera and use the camera’s shutter release to take the shot. All the utility is doing is letting you view the exposure settings and save the images direct to your computer / or launch them into an application. I also tried the wireless version, connecting my laptop and the camera to my home Wifi network. This time the X-Acquire utility connected slowly, but disconnected before I could do anything useful. So if you’re experiencing wireless issues, I’d stick with a USB cable instead.
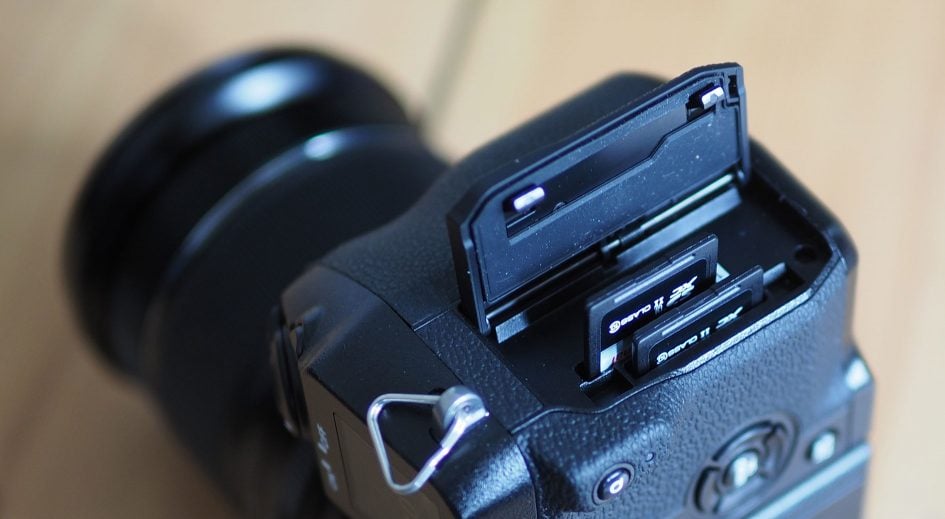
Moving on, behind a weather-sealed door in the grip are twin SD memory card slots, both of which will exploit the speed of UHS-II cards, although as I discovered in my tests (see later), one was still a little slower than the other (but nowhere near as big a difference as on the Sonys). On the X-H1 you can configure the slots to record duplicate still photos for backup purposes on both cards, but sadly not video to both cards simultaneously (something the Sony A7 III can do). Alternatively you can set the second card to take over when the first one fills, or record JPEGs to one card and RAWs to the other.
Disappointingly despite its substantially enlarged grip, Fujifilm continues to power the X-H1 with the same compact NP-W126S battery of the X-T2, itself just a modified version of the X-T1’s old battery pack to better handle over-heating with 4k video. Fujifilm reckons the battery is good for about 310 frames, but enable the built-in image stabilisation, deploy the wireless connectivity or start shooting movies and you’ll find the power depleting quite alarmingly. I easily found myself running dry halfway through a day of typical stills shooting and in my video tests I managed a fairly modest 50 minutes worth of video on a single charge. So carrying a spare is an absolute necessity.
I feel this is an area Fujifilm really needs to address, especially on a larger flagship camera with built-in stabilisation. Olympus, Panasonic and Sony now all have new larger batteries on their flagship bodies with roughly twice the power of their earlier generations, eliminating the short battery life worries of their predecessors. But by sticking with the already modest older battery and making the body potentially hungrier than before, power becomes the Achilles’ heel of the X-H1. Fujifilm’s solution is the same as the X-T2 before it: fit the optional Vertical Power Booster and triple the life with three batteries at your disposal. Having three batteries certainly makes power worries a non-issue, but makes an already fairly large camera even bigger, not to mention more expensive. Several years ago it was normal for mirrorless photographers to carry several spare batteries, but in 2018 it should be a thing of the past, again especially for a large flagship body and particularly when your rivals have banished this issue on their latest generations.
Which leads me onto the Vertical Power Booster. Like the X-T2 before it, the X-H1’s performance can be increased by mounting the optional Vertical Power Booster, in this case, the VPB X-H1. This provides a duplicate set of controls for more comfortable shooting in the portrait orientation, along with accommodating two additional batteries that work alongside the one in the body to triple the overall lifespan. You’ll also notice three indicators in the top and rear displays, showing the remaining life of each battery.
The grip also provides a headphone jack and an AC input for use with an AC adapter supplied with it; this allows you to power the X-H1 from the mains, and when the camera’s switched off it’ll also charge the two batteries in the grip, albeit sadly not the one in the camera body itself. I feel this is a missed opportunity as being able to recharge all three batteries unattended with a single power source would be so much easier at the end of a day.
Like the X-T2 before it, the X-H1’s Vertical Power Booster also enhances the performance of the camera, increasing the mechanical burst speed from 8 to 11fps, improving the overall response and extending all movie clips to a maximum of 30 minutes.
I quite liked the Vertical Power Booster approach on the earlier X-T2, where you could effectively choose between a small and light body with some performance limitations, or a slightly larger one that unlocked the full power. The theory’s the same on the X-H1, but you’re starting with a larger, heavier, not to mention more expensive body. And yet in order to match the battery power, movie clip length, burst speed and connectivity of rival bodies, you still have to fit this grip accessory. To me this feels like a less satisfactory solution than on the X-T2, where the smaller body could be used as an excuse for reduced performance. As it stands, the X-H1 really needs its booster accessory in order to compete in a number of regards with similarly-priced rivals, and having it fitted all the time transforms it into a different beast.
Fujifilm X-H1 lenses and stabilisation
The X-H1 is fitted with Fujifilm’s X-Mount which, with the APS-C sensor behind it, applies a 1.5x field reduction factor to lenses – so the XF 16-55mm f2.8 zoom will deliver a field-of-view equivalent to 24-83mm.
If you’re using Fujifilm’s own lenses, the X-H1 offers an enhancement first seen on the XE2: Lens Modulation Optimiser, or LMO for short, attempts to counteract the blurring introduced by diffraction when shooting at smaller apertures, and also corrects softening towards the edges and corners of the image.
Fujifilm has extensively profiled all of its X-Mount lenses, and by default LMO is enabled on the X-H1 when you fit one of them. In previous comparisons with small apertures around f16, I found the versions with LMO enabled were crisper, especially towards the edges, but equally never felt over-sharpened. It’s this kind of clever, balanced processing which makes the out-of-camera JPEGs from modern Fujifilm cameras a dream.
Fujifilm’s X-series may be younger than Micro Four Thirds and Sony’s E mount, but in six years they’ve launched 25 quality models, and there’s several more from third parties, covering most bases. Importantly the majority of the Fujifilm lenses I’ve tested have been of a very high standard. Check out my Best Fujifilm lenses guide for the models I’ve tested and can personally recommend.
The X-H1 is typically sold body-alone or in a ‘kit’ bundled with the XF 16-55mm f2.8 zoom. This is a great quality general-purpose lens with a 24-83mm equivalent range taking you from wide-angle to short telephoto, with a constant and bright f2.8 focal ratio. Here’s how the coverage looks when mounted on an X-series body.

Above: Fujifilm XF 16-55mm at 16mm (left) and 55mm (right)
The aperture is sufficiently large for some separation from the background, especially when focused at close range. Sure it’s nowhere near what you’d achieve with the XF 56mm f1.2, but you’ll still enjoy some pleasant effects. Here’s some examples, all at 55mm f2.8.

Above: Fujifilm XF 16-55mm at 55mm f2.8

Above: Fujifilm XF 16-55mm at 55mm f2.8
Above: Fujifilm XF 16-55mm at 55mm f2.8
I tested the XF 16-55mm a few years back (see my Fujifilm XF 16-55mm f2.8 review) and was impressed by the quality and flexibility, but was disappointed it didn’t include optical image stabilisation. This however no longer matters when paired with the X-H1, as it’s the first body in the X-series to feature built-in sensor shift stabilisation.
The X-H1’s sensor shift stabilisation operates in five axes and delivers up to 5.5 stops of compensation depending on the lens in use. Lenses without any optical stabilisation employ all five axes of the body-based system. Lenses with OIS use their two optical axes for pitch and yaw, leaving the remaining three (X shift, Y shift and roll) to the body; the exception here is the recent XF 80mm macro which sports four axes of optical stabilisation and only utilities the single roll compensation from the X-H1 body. It makes sense to exploit optical stabilisation where available in a lens, since it’s optimised for that particular focal length and proves more effective, especially for telephotos. Meanwhile, Fujifilm’s MK-X cinema and Zeiss lenses use the full five axes of the body-based system, while adapted M-mount lenses or those mounted with a macro extension tube utilise three axes.
Within each category, the degree of compensation varies depending on the lens in question, and rather than simply quoting a best-case scenario, Fujifilm’s been honest about what you can expect from specific models. All of the non-OIS lenses, a selection consisting mostly of XF primes, should enjoy five stops of compensation under CIPA conditions, with the XF 35mm f1.4 and XF 16-55mm f2.8 boasting the best results approaching 5.5 stops. Of the lenses with OIS, the XF 18-135mm, XF 80mm Macro, XF 50-140mm and XF 100-400mm should all enjoy up to five stops of compensation. The remaining models offer gradually less: the XF 55-200mm delivers 4.5 stops, the XF 18-55mm 3.5 stops, the XC 16-50mm and XC 50-230mm both three stops, leaving the XF 10-24mm with 2.5 stops, implying its design mostly uses the optical stabilisation alone. I suspect some of the differences in performance are due to a combination of the focal length and the actual imaging circle delivered by that particular optical design.
Regular readers of Cameralabs may remember Fujifilm previously stated sensor-shift stabilisation wouldn’t be possible due to the tight constraints of the X-series’ imaging circle. I quizzed the Japanese engineers about this and was told in-camera processing can now correct for any vignetting caused by the sensor protruding slightly outside the imaging circle into an optical region of lower quality. This in turn could explain the differences in compensation between lenses – perhaps the system deliberately reigns itself in when the imaging circle on a certain model is tight with little breathing space beyond. I can certainly live with vignetting or software correction for it, but am more concerned with softening in the corners.
So far I’ve not noticed any particular issues in the corners of my images shot with the X-H1. When shooting handheld with body-stabilisation with lenses like the XF 16-55mm f2.8 or XF 90mm f2, the corners looked fine to me, and you can see several examples on my sample images pages. I didn’t get to try a side-by-side with the X-H1 and another X-series body shooting the same subject with the same lens, so I’ll try to revisit this in the future, but for now I’m satisfied the built-in stabilisation is not having a negative impact on the corner quality of the frame.
More importantly what I did notice was a very welcome absence of shake while composing. In particular, this was one of my major bugbears with the XF 16-55mm and XF 90mm, both superb lenses, but both models that I struggled to handhold as accurately as I wanted for prevision framing. But now on the X-H1, the view with both was satisfyingly steady, allowing me to easily fine-tune and nail the composition. For me this is a major benefit of stabilisation when it comes to stills photography, as it’s possible to avoid camera shake by simply using a fast enough shutter speed. But an unstabilised system can be hard to compose with, especially when you’re attempting to get it right in-camera with no cropping or rotating later. Now it’s no longer an issue on the X-H1 and it really does breath a new lease of life into their unstabilised lenses. It also makes them much more usable for handheld video, more of which in a moment.
To test the effectiveness of the built-in stabilisation for stills with the XF 16-55mm f2.8 lens, I set it to 55mm (83mm equivalent) and shot a sequence of inages with progressively slower shutter speeds, first without stabilisation enabled, then with it working in continuous mode; as with all stabilised systems, I allowed it to settle-down for a second or so with a half-press before pressing fully to capture the shot. On the day with stabilisation disabled, I required at least 1/100 to capture an image without wobble, but with stabilisation enabled, I achieved perfect results down to 1/10 and a handful of good ones down to 0.4 seconds. I’d say I was getting at least three stops of compensation in this particular example, or a little more if you didn’t mind some very minor shake.

Above: Fujifilm X-H1 and XF 16-55mm at 55mm, 1/10. 100% crops with IBIS off (left) and IBIS enabled (right)
Moving onto the XF 90mm f2, on the conditions of the day I required a shutter speed of 1/200 for a perfectly sharp result when stabilisation was disabled. Once I enabled stabilisation though, I achieved the same result down to 1/20, and again the slower results at 1/10 and 1/5 were pretty good too. So again, a reliable three to three and a half stops of compensation and a little more if you could accept minor blurring.

Above: Fujifilm X-H1 and XF 90mm at 1/5. 100% crops with IBIS off (left) and IBIS enabled (right)
Throughout my tests with unstabilised lenses on the X-H1, I experienced similar results: typically a reliable three stops of compensation, or in some instances a little more. I did occasionally experience the five stops quoted by Fujifilm, but not consistently. In use it felt very much like Sony’s Mark II A7 bodies when stabilisation was first introduced to that system: certainly very beneficial, but not quite up to the more mature systems of Olympus and now Panasonic.
But again the experience on the X-H1 was transformational for me when shooting with the longer unstabilised lenses. I could now frame comfortably and precisely with the XF 16-55mm at 55mm, as well as the XF 56mm and especially the XF 90mm, all fabulous lenses which I previously struggled with.
The X-H1’s built-in stabilisation also works when filming video, allowing you to handhold footage with non-OIS lenses. If you’re keeping the camera mostly still or making very small adjustments, I found it proved quite effective at eliminating the wobbles, but once I started to pan, the system would often mistake deliberate motion for shake and correct it – the effect being a shudder as it caught up with itself and reset; I saw this when panning or walking with the camera. Here’s two examples using the XF 16-55mm, one panning, the other walking.
Above: Download the original file (Registered members of Vimeo only).
Above: Download the original file (Registered members of Vimeo only).
The effect above reminds me of earlier stabilised systems on rivals before gradual refinement began to better understand the differences between unwanted wobble and deliberate movement. Certainly in my initial tests with the X-H1 and XF 16-55mm for video, it lacks the eerily smooth, floating experience of the latest Olympus and Panasonic bodies. To be fair, they’re not immune to this effect either, but I noticed it a lot less in my tests with them.
Of course it’s early days for the X-H1, both in terms of the stabilisation being a version one system, and also my test sample being one of the first out the factory. I’m hoping this performance may be improved with new firmware, but at the time of writing, this is an illustration of what you can expect. I have several other clips demonstrating this effect in my first-looks video at the top of this page.
But while it could benefit from some refinement for video use, I’m delighted with it for stills photography. Not only can I now handhold at much slower shutter speeds than before, I can finally enjoy a nice steady view when composing. Once again it’s breathed a new lease of life into Fujifilm’s collection of fabulous prime lenses without optical stabilisation.
Fujifilm X-H1 autofocus and burst shooting
Like most mirrorless cameras, the Fujifilm X-H1 employs a combination of phase-detect and contrast-based autofocus systems. By sharing the same sensor as the X-T2, the core capabilities are the same, although Fujifilm has enhanced a number of aspects.
Like other bodies employing the X-Trans III sensor, the X-H1’s phase-detect system embeds 169 autofocus points within a 13×13 square area on the frame – occupying roughly 75% of the height and 50% of the width. If you’re shooting with continuous autofocus, the X-H1 exclusively uses this AF system and area, but if you switch to single autofocus, the coverage expands widthways using a contrast-based system to fill in the gaps at the sides for a total of 325 areas in a 25×13 array. It’s possible to select any of these points individually in the Single Point mode, or if you prefer you can opt for a coarser array of 91 points in a 13×7 array for single autofocus, or 49 points in a 7×7 array for continuous autofocus. The latter is the default option.
In terms of phase-detect coverage, the X-H1 is beaten by most of its mirrorless rivals. The Olympus OMD EM1 Mark II phase-detect coverage is broader, while the Sony A6500 and A7 III, not to mention all of Canon’s Dual Pixel CMOS sensors, support phase-detect autofocus across almost their entire frames. Panasonic remains the exception, choosing to enhance its DFD system that’s contrast-based only. But even though Fujifilm’s phase-detect coverage is smaller than most of its mirrorless rivals, it remains a very usable area and one that’s still comfortably larger than the typical lozenge or diamond-shaped AF coverage of most DSLRs.
Set the X-H1 to Single Point AF area and you can manually select any of the AF points (whether using the default 91-points or the finer 325-point array) using the AF joystick or by tapping the screen (if you have touch controls enabled). Set the X-H1 to Zone AF or Wide / Tracking AF modes and it switches to the 91-point system only, reducing to the 49-point phase detect region only if you’re using continuous autofocus.
In Zone AF you can concentrate the autofocus to a square measuring 3×3, 5×5 or 7×7 points, and adjust its position using the AF joystick or cross keys; again if you’re in Single AF mode you can choose from the 91-point / 13×7 array, or in Continuous AF, the smaller 49-point / 7×7 array.
In Wide / Tracking AF mode with focus set to Single AF, the X-H1 automatically selects one or more AF points of its choice from the 13×7 array. When set to Continuous AF, the array again reduces to a 7×7 grid and lets you choose the starting area for tracking; the idea is you position a single AF area over the desired subject and once you hold the shutter in a half-press, the camera will attempt to track it, moving the AF area(s) as required within the 7×7 array.
There’s also face detection with optional eye detection. Face detection does however only work with contrast-based AF, and if you have focus set to continuous, the additional eye detection capability becomes disabled. This reduces its usefulness for refocusing on subjects that can’t keep still, such as restless kids in a portrait session; Sony’s taken the lead here with face and eye detection that works with the continuous phase-detect AF system, and again with a phase-detect area that covers a larger area on the frame.
The X-H1 also inherits the customizable continuous AF profiles introduced on the X-T2. There’s five presets configured for different scenarios (Multi-Purpose, Ignore Obstacles, Accelerating / Decelerating Subjects, Suddenly Appearing Subjects, and Erratic Motion), or you can customize a sixth if preferred, adjusting tracking sensitivity in a scale of 1 to 4, speed tracking sensitivity from 0 to 2, and Zone are switching between centre, auto and front.
So far so similar to the X-T2, but as mentioned at the start, the X-H1 offers some AF enhancements. Most notably the phase-detect AF system now works at lower light levels down from 0.5EV to -1EV, and can continue to operate at f11 which is useful when using the 100-400mm with a 2x teleconverter. Note like other models, the contrast-based AF system can continue working down to even lower light levels, I believe -3EV for Fujifilm. I’ll discuss the real-life AF performance in a moment.
In terms of continuous shooting, the X-H1 shares the same capabilities as the X-T2: a top burst speed of 8fps if you’re using the mechanical shutter, or 14fps if you switch to the electronic shutter. If you fit the optional Vertical Power Booster, you can increase the mechanical shutter burst speed to 11fps. Like the X-T2, all of these top speeds can operate with continuous autofocus and without viewfinder blackout, but none will provide live feedback – instead you’re looking at the last image taken, so there’s some lag to take into account when trying to follow a subject. Lower the speed to 5fps or less and there’ll be minor blackout but the benefit of live feedback between frames, allowing you to more easily follow erratic subjects.
Ok, that’s the theory, how about the experience in practice? Like earlier X-series bodies, the autofocus experience is highly dependant on the lens you use. Some of them, particularly the primes, can be fairly leisurely to focus, while others, typically the sporty zooms with Linear Motors (LM on the model name), snap into focus much faster.
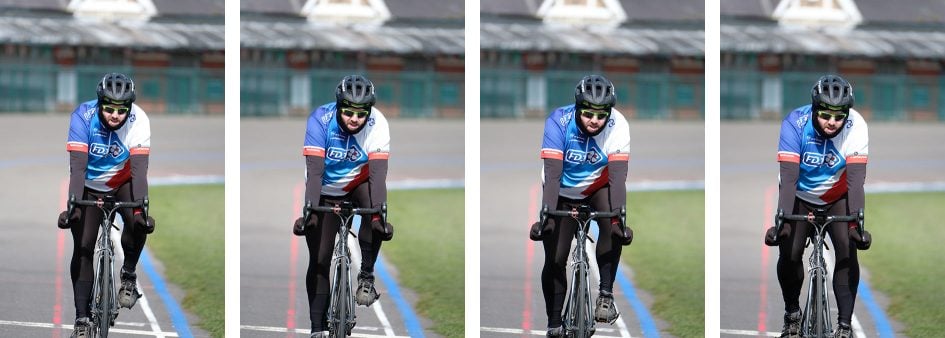
For day to day shooting I found the X-H1 and XF 16-55mm were a responsive combination, quickly focusing without issue whether I was photographing street, architecture, landscapes, details or portraits. Switching to the longer primes for portraiture, like the XF 56mm f1.2 and XF 90mm f2, challenged the system more, but still generally performed well. I did however notice if face detection was enabled, the experience slowed-down and the X-H1 felt less confident. Sometimes it would detect a face, but at other times just lose it. Likewise for the eye detection which felt a lot less ‘sticky’ than many rival models. For staged portraits it wasn’t an issue as it would generally pick up the subject given a few seconds or a couple of attempts, but for quicker spontaneous situations I found I couldn’t rely on it as much as I’d like. For example, in these portraits of Harry using the XF 90mm, the X-H1 regularly flipped in and out of face detection and only rarely engaged eye-detection, forcing me to disable the feature and simply select a single area instead.

Above: Harry with the Fujifilm X-H1 and XF 90mm. Face detection proved inconsistent here.
Switching to action, I photographed various combinations of birds in flight and cyclists using the XF 100-400mm. In both cases I found the X-H1 wasn’t sufficiently quick to consistently identify and lock-onto a moving subject when set to Wide area, even with the custom profiles adjusted to better suit a subject suddenly appearing in the frame. It would work sometimes, but not at others, and I found the experience quite frustrating when trying to capture Brighton’s seagulls.
With the AF area set to Zone or Single Point though, the X-H1 felt much more confident. Brighton’s swooping seagulls still provided a challenge but my hit rate increased dramatically compared to the wide area mode. I did however have to keep an eye on the exposure, often applying compensation to handle the overcast skies.

Above: Fujifilm X-H1 and XF 100-400mm at 400mm
If the subject is fairly predictable, like an approaching cyclist on a track, the X-H1 has no problems at all, even at 400mm (600mm equivalent). I successfully captured long bursts of my friend Nick cycling round Brighton’s velodrome at approximately 30mph. The only issue I faced was when shooting with a zoned area, the X-H1 sometimes focused on his body rather than his face, resulting in some shots being a tad soft, but the fast bursts meant I had plenty of frames to choose from. Here’s a typical burst taken at 11fps using the Vertical Power Booster.
Above: Fujifilm X-H1 and XF 100-400mm at 400mm, 11fps, Zone AF. Below: 100% crops


Above: Fujifilm X-H1 and XF 100-400mm at 400mm, 11fps, Zone AF. Below: 100% crops

Above: Fujifilm X-H1 and XF 100-400mm at 400mm, 11fps, Zone AF. Below: 100% crops

Above: Fujifilm X-H1 and XF 100-400mm at 400mm, 11fps, Zone AF. Below: 100% crops
In terms of being able to follow subjects through the viewfinder, I found the lack of feedback at 8 to 14fps made it difficult with all but the most predictable subjects when shooting at long focal lengths. Even as Nick the cyclist began to turn the corner of the track, it was hard to keep him centred on the frame at 11fps. Reducing the speed to 5fps allowed the X-H1 to deliver live feedback though and made it much easier to follow the subject – this was useful for cycling, but a necessity for random birds in flight.
To measure the X-H1’s burst speeds and buffer depth in a more formal environment, I timed a number of bursts using a freshly-formatted UHS-II card, initially in Slot 1. With the quality set to Large Fine JPEG and the drive set to 8fps with the mechanical shutter, I fired-off 142 frames in 17.91 seconds for a speed of 7.92fps, after which the camera continued to shoot, but at a reduced speed of around 5fps. I then fitted the Vertical Power Booster grip, set the drive to 11fps and managed to fire-off 79 Large Fine JPEGs in 7.46 seconds for a speed of 10.59fps.
I then removed the booster grip and set the speed back to 8fps. Set to compressed RAW, I captured 27 frames in 3.54 seconds for a speed of 7.63fps. Set to uncompressed RAW, I managed 22 frames in 2.74 seconds for a speed of 8.03fps. I repeated my tests with the card in Slot 2 and measured essentially the same results in terms of burst depth and speed.
I wanted to confirm if both slots really were the same speed, so then timed how long it took to flush a burst of uncompressed RAW files onto the card. With the card inserted in Slot-1, a burst of 28 uncompressed RAW files took 7.47 seconds to finish writing to the card. Switching the same card into Slot-2 and a burst of 26 uncompressed RAW frames took 10.49 seconds to finish writing. With identical cards in both slots, the time matched the Slot-2 figure of just over ten seconds. I repeated the test several times with the same result. So while Fujifilm quotes both slots as being UHS-II compatible, in my own tests I found Slot-1 was a little quicker to flush large bursts. To be fair though, on Sony’s A7 III I found its Slot-2 was half the speed of Slot-1 when using UHS-II cards, so at least the X-H1 suffers nowhere near that fall in performance.

Above: Fujifilm X-H1 and XF 100-400mm
So the X-H1, like the X-T2 before it, is certainly capable of capturing fast action. It’ll stay focused on a subject at 8 to 14fps and at long focal lengths, although for the best success you’ll be using a smaller AF region, and for ease of tracking you’ll want the slower burst speeds with feedback. I’d also recommend fitting the Vertical Power Booster and setting it to Performance mode for the most responsive experience. And again while the face and eye detection can work well in some situations, I found them sufficiently inconsistent that I was wary to use them outside of controlled posed situations.
When testing the X-H1’s rivals under similar conditions, I found them were generally more confident. Sony’s A6500 and A7 III both have very confident autofocus systems that operate across virtually the entire frame, respond well to subjects suddenly entering, offer live feedback at 8fps, and allow eye detection to work with continuous AF. I also felt the Olympus OMD EM1 Mark II felt more confident with birds in flight than the X-H1, and both it and the Lumix G9 can shoot even faster bursts while additionally boasting various pre-capture modes that can buffer a few frames before you fully push down on the shutter, ensuring you never miss the moment. Then there’s Nikon’s D500 which feels supremely confident for shooting action, especially if its unpredictable. So ultimately while the X-H1’s autofocus and burst capabilities are respectable and capable of good results, there’s simply better options out there if your primary focus is sports or action photography.
Fujifilm X-H1 shooting modes
Like all X-series bodies to date, the Fujifilm X-H1 doesn’t have an exposure mode dial; instead it adopts the same technique employed by older film SLRs for many years. The body has a shutter speed dial and (most of) the lenses have aperture rings; both offer an A position. Set both the shutter speed dial and the lens to A and the XT2 enters Program mode. Set the shutter dial to A, but turn the aperture ring and you’ll be in Aperture Priority. Set the lens to A, but turn the shutter speed dial and you’ll be in Shutter Priority. And finally if you turn both the shutter speed dial and aperture ring away from A, you’ll be in full Manual. If you’ve used this system before it feels natural, but even if you’re coming from a system with a PASM mode dial, it’s easy to get to grips with.
As a camera aimed at experienced photographers though, the X-H1 lacks the full Auto mode switch of recent lower-end models. Despite further upgrades to the movie mode, videographers will also notice there’s no traditional red button to start recording – instead you’ll be using the shutter release button. I couldn’t find a way to assign movie record to one of the many customisable keys either.
Fujifilm’s made some improvements to the shutter mechanism and new shock absorbers mean the already quiet operation of earlier bodies is now even quieter. In use the X-H1’s mechanical shutter really is one of the quietest around with just the faintest click that’s virtually inaudible if there’s any ambient noise. If you’d prefer complete silence, you can switch the X-H1 to its electronic shutter with the same benefits and caveats as before: on the plus side, you’re shooting in complete silence with the chance to deploy faster shutter speeds up to 1/32000 and quicker bursts up to 14fps, but on the downside there can be skewing artefacts due to rolling shutter if you pan the camera while shooting or try to capture subjects in motion (see below), and possible banding under some types of artificial light.
Above: Distortion when panning with e-shutter at 14fps. Two consecutive frames from a sequence.
New to the X-H1 is an electronic front curtain mode which uses an electronic shutter to start the exposure and a mechanical one to end it; this can help reduce the risk of shutter shock, although I never experienced any with the X-H1, so I stuck with either the fully mechanical shutter or the electronic one when I needed silence or the fastest burst shooting or quicker shutter.
The X-H1’s Shutter dial lets you select speeds from one second to 1/8000 in single EV increments, but if you’re in Shutter Priority or Manual mode, it’s possible to fine-tune shutter values using the rear dial by +/-0.6EV in 0.3EV increments. If you set the shutter speed dial to T, you can use the rear dial to choose from the entire shutter speed range of 1/8000 (or 1/32000 if using the e-shutter) to 15 minutes, an enhancement over the original X-T2 (as well as most other cameras) that stop at 30 or 60 seconds before handing you over to Bulb for anything longer.
That said, there is a Bulb mode if you want to deploy exposures as long as 60 minutes using a cable release, but most photographers won’t need to as it’s possible to manually select exposures of 30, 40, 50 or 60 seconds, or two, four, eight of 15 minutes using the T mode and rear dial. It’s a feature Fujifilm debuted on the X-E3 and as a long exposure photographer I absolutely love it. No restrictions, no exploring unfamiliar menus, no need for accessories, just keep turning the dial until you get the exposure you want and fire-away.
Like earlier models, the X-H1 also considerately displays a timer on-screen during long exposures, either counting-up in Bulb mode, or down from a selected shutter speed. I should also add I didn’t experience any issues with light leaks, trying two and four minute exposures at 400 ISO f4 in daylight with the lens cap fitted, and no evidence of any light entering the camera even with the port door wide open and nothing connected. Meanwhile the performance of the X-Trans III sensor is well-known, delivering clean images with long exposures even when noise reduction is disabled; here’s an example where I dialled-in a four minute exposure using a 10-stop ND filter from Lee.

Above: 240 second exposure with X-H1 and XF 10-24mm. 200 ISO with Lee Big Stopper.
Around the base of the shutter dial is a ring control to adjust the metering mode. There’s four options on the X-H1: Spot (2% of the total are in the centre), Center-weighted, Multi and Average. The last option is an interesting one, averaging the entire frame, but for the majority of my shots I stuck with Multi and that’s what you’ll see deployed in my sample images. As you’ll see, the Multi metering mode does a good job at evaluating the majority of the subjects I pointed the camera at, and I only needed to intervene for my long exposures or shots of distant birds against a bright sky.
The ISO sensitivity is adjusted using a dedicated dial to the left of the viewfinder head as you’re shooting with the camera. Like earlier models, you can manually dial-in sensitivities from 200 to 12800 ISO in one third EV increments. Meanwhile L represents 100 ISO and H represents either 25600 or 51200 ISO, chosen from a camera menu; I find the latter a bit messy as surely if there’s two H settings, why not just have two H positions on the dial? The good news though is RAW is available in the Low and High ISO positions.
The A position on the dial sets the X-H1 to Auto ISO with the choice of three customisable banks in the menus, allowing you to adjust the default sensitivity, maximum sensitivity (up to 12800 ISO), and the minimum shutter speed (from 1/4 to 1/500). There’s also now an Auto option for the minimum shutter speed that takes focal length into account, using the one-over-equivalent-focal-length rule; I welcome this enhancement, but there’s an opportunity to be more sophisticated still like Sony which lets you additionally prioritise faster shutters in Auto ISO when shooting moving subjects, or slower shutters when motion isn’t an issue.
Circling the base of the ISO dial is another ring control, this time dedicated to the drive mode with options for Movie, Bracketing, Continuous High, Continuous Medium, Continuous Low, Single frame, Advanced Filter (effects), and Panorama.
The Bracketing menu offers a wealth of options including exposure, ISO, film simulation, white balance and dynamic range. Auto Exposure Bracketing (AEB) is available in three, five, seven or a whopping nine frames, unlike the basic three-frame option of earlier models (at least with their original firmware anyway). Even more impressive, you can dial-in up to 3EV increments regardless of the number of frames, allowing you to achieve a +/-12EV maximum range if desired (nine frames at 3EV increments). You can also deploy the entire sequence with a self-timer, after which it’ll capture all the frames without intervention. There’s still no in-camera HDR generation, but certainly enough bracketing to keep HDR enthusiasts satisfied.
ISO, Film Simulation, Dynamic Range and White Balance bracketing are also available from the Drive menu should you want them, and each can be recorded with a RAW version if desired. Strangely on some earlier Fuji bodies, RAW recording was disabled in these bracketing modes, with the cameras switching to JPEG only, although this has been resolved on some models with firmware updates.
The ADV position lets you apply one of eight Advanced Filter effects included on earlier models: Toy Camera, Miniature, Pop Colour, High Key, Low Key, Dynamic Tone, Soft Focus and Partial Colour (with six sub-options to pass red, orange, yellow, green, blue or purple, leaving the rest of the image in monochrome).
The effects deliver the usual results, but sadly you still can’t apply them to video, so no chance of capturing a miniature movie with the X-H1. I should however add that in an update over some earlier models, the X-H1 can at least record RAW files when shooting with Advanced Filters, although sadly you won’t be able to subsequently apply an alternative filter effect later or indeed remove it altogether – you’re stuck with the filter selected at the time of shooting and limited to adjusting the usual things like the white balance and film simulation. Anyway, here’s how some of the effects look in practice.

Above left: Fujifilm X-H1 Toy Camera effect, above right: Fujifilm X-H1 Miniature effect

Above left: Fujifilm X-H1 Dynamic Tone effect, above right: Fujifilm X-H1 Soft Focus effect
The final option on the Drive mode dial is Panorama. You can choose the direction of the pan and the size from the menus with typical horizontal and vertical orientations generating images with 6400×1440 or 6400×2160 pixels respectively. Here’s an example.


Delve into the menus and you’ll also find an interval timer, with up to 999 (or infinite) frames captured at intervals between one second and 24 hours. You can also set a delay up to 24 hours before the sequence begins, although the camera still won’t assemble them into a timelapse video afterwards, something Canon, Olympus and Panasonic now offer as standard, sometimes even at 4k resolutions. Unlike some timers though, there doesn’t appear to be any restriction in the shutter speeds you can use at short intervals: I was able to shoot half second exposures at one second intervals for example without an issue.
Meanwhile the Multiple Exposure option lets you take two shots and have the camera combine them into one. If you don’t like the shots as you take them, you have the chance to retry, but other than that there’s no other options.
Fujifilm X-H1 Film Simulations
Like previous bodies, the X-H1 applies its main image processing parameters using a set of Film Simulations that emulate classic Fujifilm film stock. The X-H1 inherits the standard nine simulations of earlier X-Trans III bodies, and debuts a tenth: Eterna which is designed to deliver a cinematic style to video without post processing. As with previous bodies, Film Simulations can be applied to photos or videos, and while you can apply Eterna to stills, it’s really aimed at video use.
The default Film Simulation remains Provia, and that’s what you’ll see in all my sample images unless otherwise stated; it delivers a good balance of contrast and colour without being too punchy or saturated. If you fancy something more vivid, then choose Velvia, which coincidentally was always my favourite colour film for shooting landscapes. If you prefer a more subdued look, go for Astia, while portrait photographers may like Pro Neg Hi and Standard. For a classy vintage look, try Classic Chrome or Sepia. And if you’re into Black and White, go for the standard Monochrome or the higher-contrast Acros, both of which are available with additional yellow, red and green digital filters. I’m particularly fond of Acros with the Red filter option to darken blue skies and bring out cloud detail. Here’s how a few of them look on the same scene.

Above left: Fujifilm X-H1 Provia, above right: Fujifilm X-H1 Velvia

Above left: Fujifilm X-H1 Astia, above right: Fujifilm X-H1 Classic Chrome

Above left: Fujifilm X-H1 Acros, above right: Fujifilm X-H1 Sepia
As for Eterna, here’s how it looks applied to the same scene as above, although you may prefer to judge its muted output on video. To put it through its paces, I used Eterna on all the video samples you’ll find in this review, unless otherwise stated.

Above: Fujifilm X-H1 Eterna Film Simulation

Above: Portrait processed in-camera using, from left to right, Provia, Pro Neg Hi and Pro Neg Standard
The Film Simulations are another part of the equation behind the lovely output from Fujifilm’s cameras. I find I can achieve the mood I want using these subtle but effective processes, rather than resorting to often heavy-handed filters on other systems. I also appreciate being able to apply different simulations after the event on RAW files using the in-camera RAW processing option in playback.
The X-H1 also inherits the Grain simulations introduced on the X-Pro2, with a weak and strong option to choose from and, like film simulations, you can apply these to RAW files after the event using the in-camera processing.
Fujifilm X-H1 movie mode
The X-H1 becomes Fujifilm’s most capable camera for video to date, building upon the features and quality of the earlier X-T2. Like the X-T2 you can film 4k UHD video at 24, 25 or 30p (with a 1.17x crop), as well as 1080 Full HD (with no crop) at 24 to 60p, and there’s no need to change the video region to access the different frame rates. Again like the X-T2, there’s a 3.5mm microphone input built-into the body, while a headphone jack is provided on the optional Vertical Power Booster grip. In the video below I’ll demonstrate the X-H1’s movie features.
New to the X-H1 over the X-T2 are higher bit rates for 4k: previously the X-T2 was limited to 100Mbit, whereas now the X-H1 offers an additional 200Mbit option. The X-H1 additionally offers a Cinema 4k / 17:9 format, again at up to 200Mbit/s, although only at 23.976 and 24p frame rates. If you like this wider format, the X-H1 also lets you film 1080p video in the 17:9 shape, although again at only cinematic 23.976 and 24p frame rates. Note 1080 video (in any shape) can be encoded at 50 or 100Mbit/s.
Above: Download the original file (Registered members of Vimeo only). I have several other versions available: Fujifilm X-H1 C4k F-Log sample movie, Fujifilm X-H1 4k UHD sample movie, Fujifilm X-H1 1080p sample movie.
Like the X-T2 before it, recording times are limited per clip when filming with the body alone, although the additional heft of the X-H1 has at least allowed Fujifilm to extend them a little. So when filming in 4k with the body alone, the X-H1 allows 15 minutes per clip versus ten on the X-T2. Switch to 1080p and you can film 20 minute clips with the X-H1 body alone versus 15 minutes on the X-T2. Fit the optional Vertical Power Booster grip though and both cameras can extend any format to half hour clips.
The earlier X-T2 offered a flat F-Log profile (at a base of 800 ISO) but only through the HDMI port to external recorders. Now the X-H1 allows you to record F-Log in-camera onto SD cards in 8-bit / 4:2:0. Note you can record to the SD card and output over HDMI simultaneously, but if you’re filming 4k you can only do it to one at a time – a menu lets you choose whether the 4k is going to be saved onto the SD card or output over HDMI, the latter having the benefit in F-Log of supporting 8-bit / 4:2:2.
The X-H1 also debuts a new Film Simulation designed for movie use: the new Eterna profile is designed to deliver a cinematic style to video without post processing, although is sufficiently flat to handle additional grading if desired. I became very fond of Eterna while testing the X-H1 and found it became my default option, although like previous models you can alternatively apply any of the Film Simulations to video.
Fujifilm’s also enhanced the touch capabilities in the movie mode. Like the X-E3 you can tap to pull-focus while filming, but the X-H1 now additionally offers a new Movie Silent Control option which ignores the positions of the aperture, shutter and ISO dials in favour of touch-screen controls. Tap an icon on the right side of the screen and a tray pops-out, letting you adjust the shutter speed, aperture, compensation, sensitivity, microphone levels, wind filter, headphone volume, film simulation and white balance. Tapping your way through these nested menus can take time, but does allow you to make adjustments without visible clicks and also neatly allows you to maintain very different settings for photos and video without constantly having to readjust things like the shutter speed.
In terms of exposure, you can manually set the aperture, shutter and ISO, and if desired, shoot with auto ISO when the shutter and aperture are fixed and effectively in manual mode. There’s sadly no zebra patterns, nor indication of blown highlights or crushed shadows when filming, although manual focus fans will appreciate the chance to display focus peaking as well as exploiting the extra detail of the viewfinder to nail the exact position. Interestingly, the fly-by-wire focusing system of the X-series lenses can also be set to linear or non-linear, the former allowing you to mark points to hit focusing spots if desired.
Before moving on, an additional respectful nod to Fujifilm for offering a 24p-friendly shutter speed of 1/48 when the camera’s set to the movie mode, and I also like the way the upper LCD screen switches to display video-related information like the time remaining.
Fans of slow motion will appreciate the ability to film 1080 up to 120p and have the camera interpret it to the desired output frame rate – for example filming in 120p and outputting at 30p or 24p for a four or five times slowdown respectively, or in 100p and outputting at 25p for a four times slowdown.
Above: Download the original file (Registered members of Vimeo only).
Perhaps the most important new movie feature for the X-H1 over previous models though is its built-in sensor-shift stabilisation. This can stabilise footage from lenses with no optical stabilisation of their own, transforming their usefulness for handheld filming. I’m compiling a video showing the effect with multiple lenses which I’ll add to this review soon! In the meantime, here’s a quick vlogging test.
In terms of battery life and overheating, I recorded consecutive 15 minute clips in 4k UHD / 24p at 200Mbit/s with stabilisation enabled using a fully charged battery in a cool room. After the first 15 minute clip, the base and grip of the camera were slightly warm and the battery meter indicated full strength. After the second clip, the base and grip were a little warmer still, but still far from hot and the battery indicated three bars remaining. After the third 15 minute clip, the base and grip were warmer, but again nothing to be concerned about, and now the battery meter showed two bars remaining. I started the fourth clip assuming the camera would have sufficient battery to complete the job, but after only four minutes and ten seconds, the battery reported exhaustion and the camera shut down.
Out of curiousity I repeated the test with the bit rate set to 100Mbit/s, but the battery lasted virtually the same time – just three minutes longer, so within experimental error. Interestingly though, the camera became hotter by the end (despite starting from fully cooled-down), perhaps due to the heavier compression in use, but again it didn’t actually overheat.
So while the X-H1 didn’t overheat even when filming 4k / 24p at 100 or 200Mbit/s with stabilisation active, it still only managed just under 49 minutes worth of video at 200Mbit/s or 52 minutes at 100Mbit/s on a single charge, and in 15 minute chunks too. To be fair, that’s longer than Fujifilm estimates in its specs, but compare it to the Lumix G9 which in my tests managed to record almost two and a half hours of 4k / 24p footage at 100Mbit/s on a single charge, and in more useful 30 minute chunks too.
Fujifilm’s clearly improving its movie capabilities and there’s no denying the X-H1 is capable of capturing good quality footage; in particular the new Eterna simulation produces very usable footage out-of-camera without the need to grade and Fujifilm’s optics division are producing some high-end cinema lenses too.
But equally its rivals aren’t standing still either and when comparing the X-H1’s movie features side-by-side with models like the Panasonic Lumix G9 (let alone the video-oriented GH5) and Sony’s A6500 and A7 III, you notice some key differences. Fujifilm may offer focus peaking but there’s no zebra patterns for judging exposure. The longest clip length of 15 minutes for 4k or 20 minutes for 1080p falls behind the half hour clips of rivals, and while I know the X-H1 can extend to half an hour with the optional battery grip, its rivals don’t face this limitation. The X-H1 may have phase-detect autofocus, but when pulling focus in movies it can still be strangely hesitant compared to rivals. The battery life too is noticeably shorter than the best of the rest, again demanding that you shoot with the optional battery grip more often than not. The body may have twin card slots, but you can’t record video to both simultaneously. There’s no headphone jack either unless again you’re using the optional grip.
Meanwhile the X-H1’s stabilisation may work a treat when you’re trying to frame a steady shot, but once you start to pan even slowly, the system becomes visibly jerky, whereas more mature rivals can support smoother handheld pans. It’s also worth remembering that while the Lumix G9 has a smaller sensor, its stabilisation is even better still, the screen can flip forward for filming pieces to camera, and there’s the option of filming 4k up to 60p; the GH5(s) adds unlimited recording times and 10-bit internal recording. The bottom line is while the X-H1 is a fine movie camera, it’s still beaten on features by many rivals if video is your primary focus.
Fujifilm X-H1 Wifi and Bluetooth
The X-H1 is equipped with Wifi, allowing you to wirelessly transfer images or remote control the camera with a compatible smartphone. It’s Fujifilm’s second camera to complement the Wifi with Bluetooth which, in theory, should ease the initial connection. Fujifilm’s Camera Remote app is available for iOS and Android devices and I tried the latter (v3.1.0.9) on my Samsung Galaxy S7 phone.
When you first fire-up the app, it encourages you to pair the camera and phone over Bluetooth, a process that went smoothly for me, but it didn’t subsequently make the Wifi connection as easy as rivals with Bluetooth. Despite being paired, the app asked me to manually select ‘Wireless Communications’ from the X-H1’s menus and also manually enable the phone’s own Wifi before it would connect them. The only thing the Bluetooth made easier was not having to manually select the X-H1’s Wifi network in the phone.
Once connected, the app offered the same four options as previous versions: Remote Control, Receive, Browse Camera and Geotagging. I’ll cover each in turn. The Remote Control option shows a live image from the camera, surrounded by shooting information and a selection of buttons underneath. A slider at the bottom lets you choose between shooting stills or filming video, after which pressing the big red and silver release button above will trigger your choice.

Gratifyingly you can tap anywhere on the live image on your phone to reposition the AF area, and the X-H1 will refocus straightaway. Sadly you can’t tap to refocus when filming video though, or even when composing prior to filming video – it only works when the app slider is set to take still photos.
A button to the left of the release lets you change the ISO, Film Simulation, White Balance, Flash mode and Self timer. If you’re in Aperture Priority you can adjust the aperture on-screen by tapping the value below the live image. Same for the shutter speed in Shutter Priority, or indeed either of them in Manual, but you can’t change the actual exposure mode remotely, nor can you effectively hold down the release button for Bulb exposures. You also can’t change the image quality or the exposure compensation remotely, although the current setting for each is shown on your device.
The remote control view also has a play button which presents a series of thumbnails with the chance to tick the ones you’d like to import into your handset. Bucking the trend for remote control apps, the choice of quality is actually set within the camera, not the app – you can choose the original image size or a reduced one at 3 Megapixels. Like most rivals, you’ll only be transferring JPEGs, not RAW files.
This leads me to the second option of the app, named Receive. This initiates playback on the camera, with the option to send a photo as you browse through them. Received images are graphically shown on your handset’s screen like stacked paper photos. An option to Receive may seem redundant when you have various thumbnail views for importing on the app, but it’s actually very useful. There’s many times I’ll have gone through a series of almost identical images on the camera in playback, then got completely lost when viewing them all as thumbnails on a remote control app – which was the one I liked best? Was it third or tenth along from the end of that sequence? But Fujifilm’s Receive mode solves this by letting you initiate the transfer from the playback mode of the camera and push them to the handset.
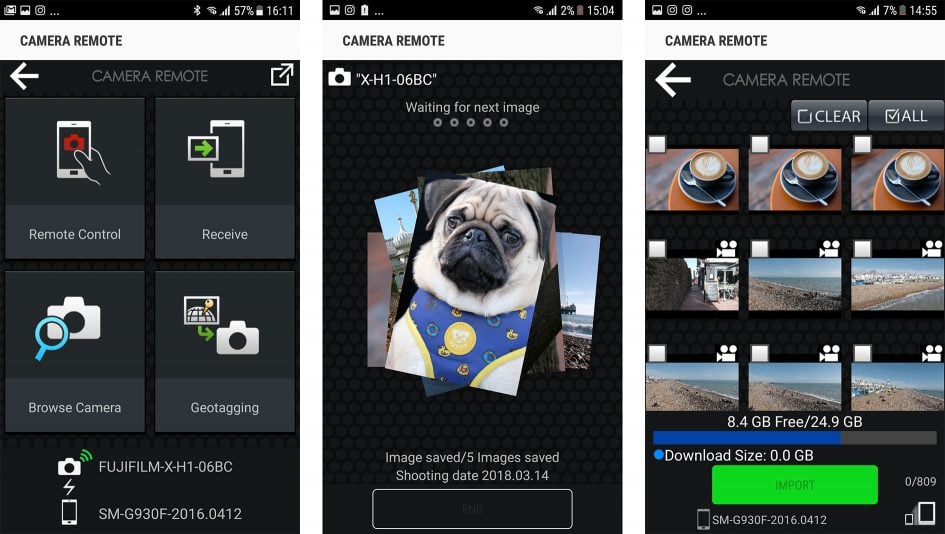
The third option is Browse Camera, which presents exactly the same thumbnail view as tapping play in the Remote Control option described earlier. Like that option, you can view thumbnails in two different sizes, tap to enlarge for a closer look and choose to import if desired. You can import JPEGs at either 3 Megapixels or the original size, but again not RAW files.
The fourth and final option on the app is Geotagging which as its name suggests, uses your handset’s GPS to deliver co-ordinates which are embedded on your photos. If you enable this, the app proudly states it’ll provide and embed location details for the next 60 minutes, but what it doesn’t tell you is it’ll be the same position for every single picture you take over the next hour, even if you move to a different location.
This is a frustrating limitation inherited from earlier models and something that really should be fixed by now. I spoke to Fujifilm about this and was told it had already been resolved for the X-E3 with an update in January 2018 and that a future firmware update would fix it for the X-H1, but I wasn’t provided with any timescales. So if you’re an early adopter of the X-H1, you won’t be enjoying updated GPS positions yet. If you’re an owner of an earlier body hoping for a fix, I believe you’re completely out of luck as the updating will require Bluetooth hardware in the camera and at the time of writing that’s just the X-E3 and X-H1. I hope to retest the X-E3 and will update my review of that as an indication of what we can expect from the X-H1 when it’s similarly-updated.
The X-H1’s wireless implementation – at the time of writing in March 2018 anyway – is disappointing when you compare the overall experience to rivals like Sony and Panasonic, both of which deploy Bluetooth to seamlessly geo-tag images as you shoot. No need to do anything other than make the initial pairing before then leaving the app running on the phone. No Wifi connection, no delay, no hit on battery life, no configuration, just constantly updated locations automatically embedded on your images. Bluetooth on those models also take care of the Wifi connection for you, so there’s no need to access any other menus in the camera or phone, they just connect. Panasonic and Canon also offer simple remote shutter release apps that operate using Bluetooth only for a responsive experience and no connection delays. Sony also nailed the process of image transfer a long time ago using NFC to simply copy a photo onto your phone during playback with nothing more than touching the two devices together.
I hope Fujifilm can improve their Bluetooth implementation in the near future, starting with proper geotagging. I feel I’m one of the few people who bother to test this, so I’ll report back when there’s any news.
Fujifilm X-H1 quality
Now it’s time to examine the image quality of the X-H1. I’ll be adding a page with detailed analysis over the performance throughout the sensitivity range, but for now, please head over to my sample images page which features a broad selection of pictures taken with a variety of lenses.
Check prices on the Fujifilm XH1 at Amazon, B&H, Adorama, or Wex. Alternatively get yourself a copy of my In Camera book or treat me to a coffee! Thanks!