Fujifilm X100F review
-
-
Written by Gordon Laing
In depth
Fujifilm’s X100F is a high-end compact aimed at enthusiasts and street photographers. Announced in January 2017, it’s the fourth model in the series and succeeds the two year old X100T. Incidentally, the letter at the end refers to its position in the series, S for second, T for third and now F for fourth, but that does beg the question of what happens if or when a fifth is launched. But back to the present.
The X100F, like its predecessors, packs the latest Fujifilm sensor and image processing into a fixed-lens 35mm f2 compact with a hybrid viewfinder; as such the X100F can essentially be considered as a compact fixed-lens version of the X-Pro2, sharing the same 24 Megapixel / APSC / X-Trans III sensor, the same 1080p video up to 60p, the same image processing which includes the ACROS monochrome simulation, the same embedded phase-detect AF system, and the same hybrid viewfinder with its optical, electronic and combined modes. It even shares a number of the same controls.
While the retro-styled body looks similar to the earlier models, Fujifilm has made some useful physical tweaks. On the front there’s a new finger dial, on the top the shutter dial now includes a lift-up ISO dial, and on the rear the screen has shifted all the way to the left side to accommodate the dedicated AF joystick of the X-Pro2 and XT2. Meanwhile new versions of the conversion lenses make electronic contact with the body so you no longer need to select them in menus; the old adapters still work as before though. It all adds up to a significant upgrade over the previous models, making the X100F tempting not just for upgraders but those wanting a high-end compact camera.
Is it the right camera for you? To find out, Doug Kaye and I discuss and compare the X100F in the following video review; I also have an audio podcast of this discussion if you prefer to listen to this segment: you can subscribe to the Cameralabs Podcast at iTunes, or use the audio player below the video.
Check prices on the Fujifilm X100F at Amazon, B&H, Adorama, or Wex. Alternatively get yourself a copy of my In Camera book or treat me to a coffee! Thanks!
Fujifilm X100F design
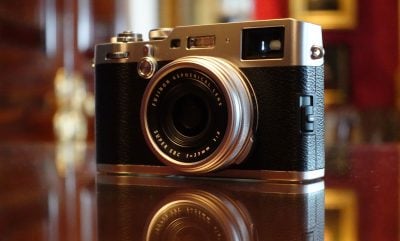
The X100F shares the retro-style philosophy of its predecessors, greatly influenced by classic Leica cameras, and which will delight enthusiasts who are hard-wired to like this kind of thing. It’s not an age thing either – I find most people who look at the X100 series simply find it a very attractive camera that encourages you to go out shooting with it. The camera’s available in all-black or silver and black and to me the latter is the better-looking of the two.
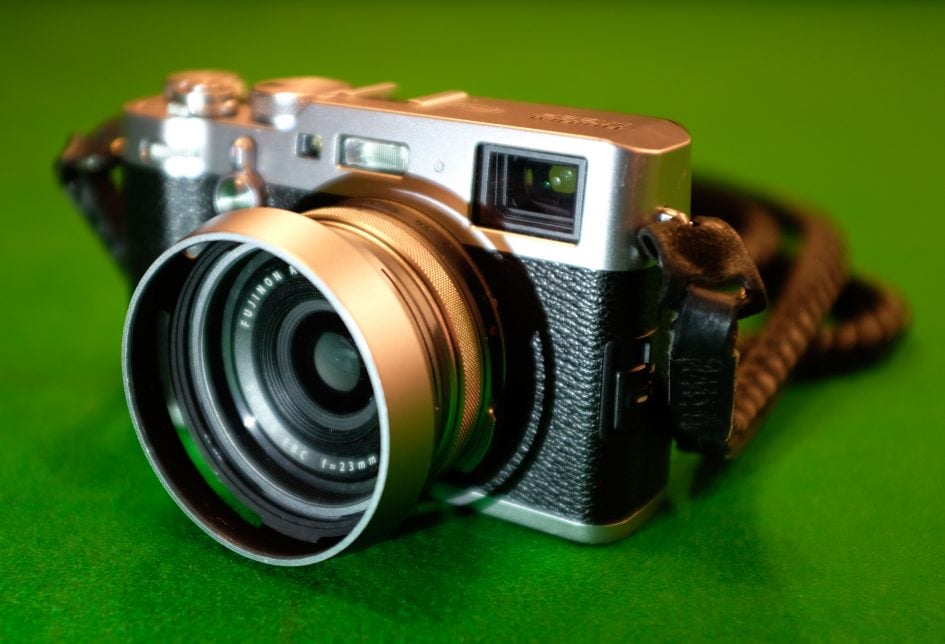
While the X100F looks almost identical to its predecessors at first glance though, Fujifilm has made a number of key changes and additions to the control system which I’ll detail in a moment. Plus of course there’s the new sensor and image processor within which have improved image quality, movie performance and autofocus, again all of which you’ll find out about later in the review.
Like its predecessors, the X100F feels satisfyingly solid in your hands, although by inheriting much of the same shell, it continues to lack any kind of formal weather or environmental sealing. While most fixed lens compacts don’t have sealed bodies, I don’t feel it’s unreasonable to expect it in a body of this size and price. I hope Fujifilm consider this for future high-end compacts.
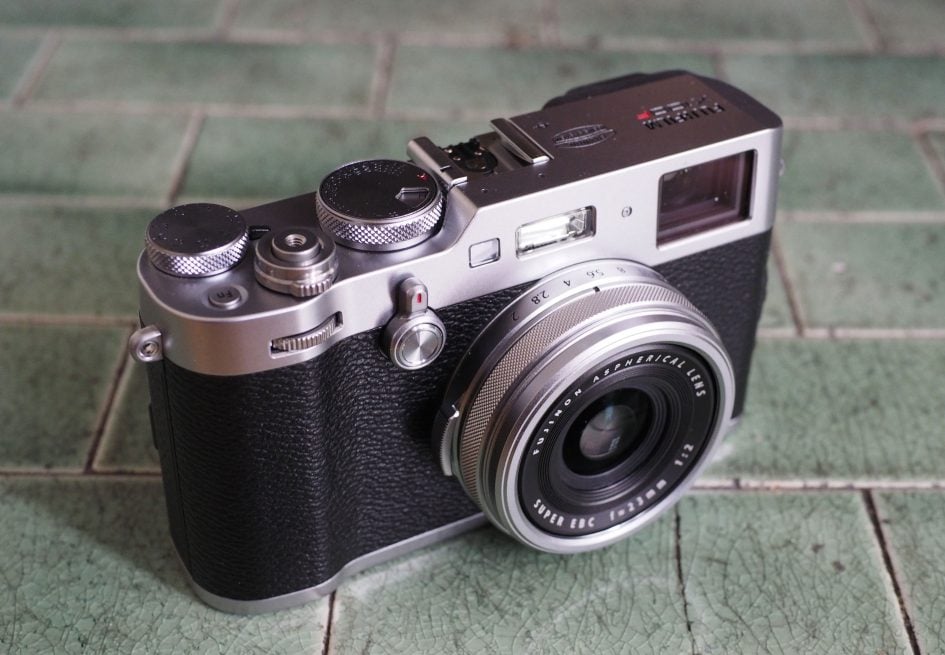
Another issue inherited from previous generations is a very modest grip. There’s little more than a mild bump on the front and still no thumb rest to speak of on the rear – only the friction of the rear coating to stop it slipping. Fujifilm offered a grip-booster accessory for the previous three generations, but slight physical differences mean it’s no longer compatible with the X100F and I’m told there’s no plans to make a new one. Luckily there are a wealth of third party grip accessories available though, so if you feel you need more to hold onto, there are options out there.
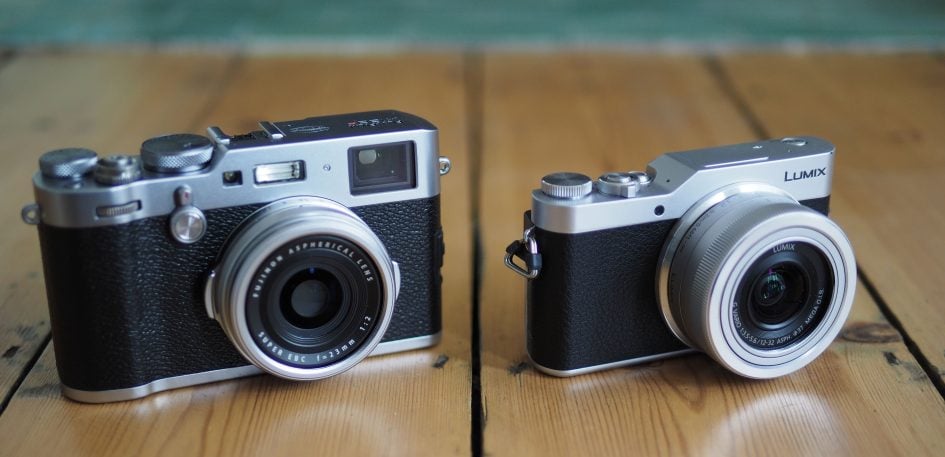
Above: Fujifilm X100F (left) next to the Panasonic Lumix GX800 / GX850 (right). The Lumix has a slightly smaller sensor and no viewfinder, but is a full interchangeable lens camera with an articulated touchscreen and 4k video.
Again like its predecessors, the X100F may be described as a compact, but it’s not exactly a small or featherweight camera. Measuring 127x75x52.4mm and weighing 469g including battery, it’s considerably larger than most rival compacts aimed at the enthusiast market. For example if you’re willing to adopt a slightly smaller 1in sensor, you can achieve a much smaller body with a zoom and a tilting screen – for example Sony’s RX100 V which measures 102x58x41mm and weighs 290g including battery. Of course the X100F sports a physically larger APSC sensor and a fixed prime lens, so a closer rival would be Ricoh’s GR II. This is more similarly-sized at 117x63x34.7 (for the body) but weighs considerably less at weighs 251g, although it doesn’t sport a viewfinder. I should also add sensor size isn’t an excuse as Sony squeezes an even larger full-frame sensor and fixed 35mm f2 lens into the RX1R II which measures 113x65x72mm and weighs 480g with battery. The bottom line is the X100F is a camera you’ll be carrying in a coat pocket or a bag, rather than squeezing it into a trouser pocket.
If you want a Fuji sensor in a smaller body, there’s the X70, although it employs the previous 16 Megapixel X-Trans II sensor. The obvious question then is whether it’ll be updated to an ‘X80’ in the future with the latest 24 Megapixel X-Trans III, but I’m told the sensor and processor are too power-hungry for the smaller battery and form factor of the X70. So right now if you want a Fuji sensor in the smallest possible body, it’ll be the older X70 for X-Trans II or the X100F if you want the latest X-Trans III.
If you’re happy with the size of the X100F, it’s also worth comparing it to a small interchangeable lens body. Fujifilm’s own XT20 springs to mind: it shares the same sensor and measures 118x83x41.4mm and weighs 383g with battery. Of course this doesn’t include a lens, but fit the XF 23mm f2 (to share the coverage and focal ratio of the X100F) and you’ll increase the thickness to 93.3mm and the overall weight to 563g. So with an equivalent lens fitted, the XT20 comes in at almost twice the thickness not to mention roughly 100g heavier, making it much less pocketable than the X100F, and it also misses out on the hybrid viewfinder that can switch between optical and electronic views, not to mention the leaf shutter beloved by strobists who love the faster flash sync. But on the other hand, the XT20 has a tilting touchscreen, 4k video, deeper grip and of course the opportunity to swap lenses. As always you should think carefully about what and how you like to shoot to make the best decision. Even the higher-end XT2 enters the equation as it too is remarkably small for an interchangeable lens camera, while additionally boasting weather-sealing, twin card slots, a larger viewfinder image, a screen that tilts sideways as well as vertically, and performance-boosting accessories over the XT20. And of course if you’re drawn to the X100F for its hybrid viewfinder, there’s its bigger sibling, the X-Pro2 to consider.
Fujifilm X100F controls
At first glance the X100F looks a great deal like its predecessor, but Fujifilm’s made a number of key changes and additions to the controls, greatly improving the overall handling and day-to-day operation of the camera. As before though, the X100F adopts Fujifilm’s philosophy of trading a modern PASM mode dial for a separate aperture and shutter dial. The aperture ring around the lens barrel offers an f2-16 range in third-stop increments, while the shutter dial atop the body offers a range of 1 second to 1/4000 in single stop increments. Both the aperture ring and shutter dial also offer A positions. Set them both to A and the X100F is set to Program Auto. Set the shutter dial to A and you’re effectively in Aperture Priority, choosing the desired focal ratio from the lens ring. Set the lens ring to A and you’re in Shutter Priority, using the shutter dial to manually select the desired speed. Or set them both to the desired value and you’re in full Manual. It’s how all cameras used to operate and some photographers still prefer this approach. I’ll go into more detail in the shooting section later.
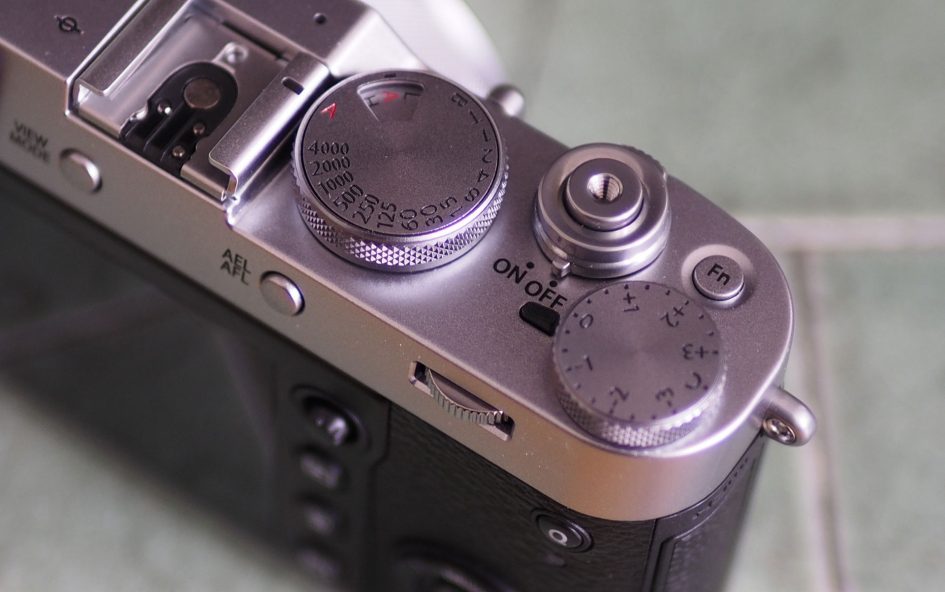
Like the X100T before it, the top panel is also home to a threaded shutter release with a power collar, a programmable function button and a dedicated exposure compensation dial. Like other recent Fuji cameras, the exposure compensation dial now features a C position to extend the range from +/-3EV to +/-5EV using the new front finger dial. Yes, the X100F now features a finger dial in addition to the previous thumb dial and both also offer push-to-click operation. Strangely though, like the XT20, the rear dial may be programmable, but the front dial isn’t, limiting its functionality to exposure compensation, scrolling through images in playback, adjusting sensitivity (if configured to do so), or adjusting the AF area size. It does work well in playback though, where the rear dial can be clicked-in to magnify the image and the front dial used to scroll through images while maintaining the magnification.
Usefully, the X100T inherits the combined shutter dial and ISO control of the X-Pro2. In another throw-back to older film cameras, the outer ring of the shutter dial can be lifted-up in order to adjust the sensitivity, glimpsed in a window. When you let go of the ring, it springs back into place, allowing it to adjust the shutter speed instead. To be honest I find these combined dials as fiddly now as I did back when shooting film SLRs, but I still appreciate having direct access to the ISO on the X100F as previously I’d need to go through a menu. What still annoys me though is how Fujifilm continues to include a position on the dial for every ISO value apart from one: the X100F has two High ISO values, 25600 and 51200 ISO, but only one H position on the dial. So you have to set the dial to H and enter a menu to select whether you want 25600 or 51200 ISO; surely it’s possible to squeeze-in two H positions. It’s the same on the other Fuji models and drives me a bit loopy, but then arguably I’m one of the few people who’ll routinely go through the entire ISO range for a test sequence.
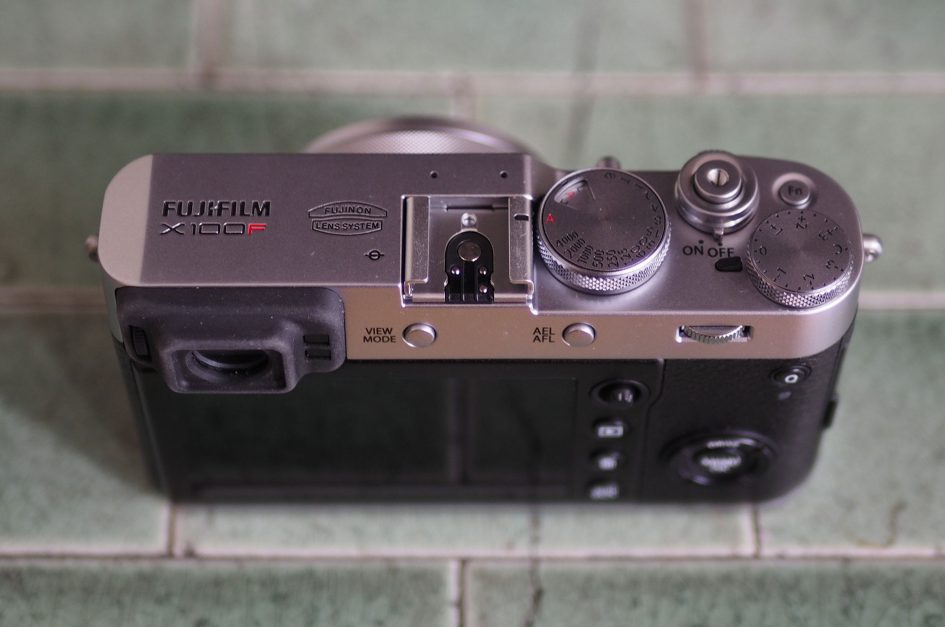
Eagle-eyed Fuji fans will also notice the power collar around the shutter release has rotated a little to match the position on the X-Pro2, so the Off position is now directly facing the photographer; indeed with this and the combined shutter / ISO dial, there’s a definite feeling the X100F is designed as a companion to the X-Pro2. As before, the shutter release button remains threaded for use with old style mechanical cable releases.
Round the back, the screen has been shifted all the way to the left side of the body, relocating the buttons to the right side. More importantly, the X100F inherits the AF joystick (or lever as Fuji calls it) of the X-Pro2 and XT2. This falls perfectly under your thumb whether composing with the viewfinder or screen and allows you to very quickly reposition the AF area; it also makes up in some part for the continued absence of a touchscreen, at least for adjusting the AF area. The X100F also loses the separate drive button of the X100T, instead assigning it to the top of the four cross-keys. The remaining three cross keys are programmable, as are the top and front Function buttons, the rear dial and the AEL / AFL button. The smooth manual focusing ring around the lens barrel is also customisable, although from a limited choice of white balance, film simulation and the digital tele-converter; movie shooters will be disappointed it can’t be assigned to settings like the sensitivity for silent adjustments while filming, but then if you’re into video you probably won’t be going for the X100F.
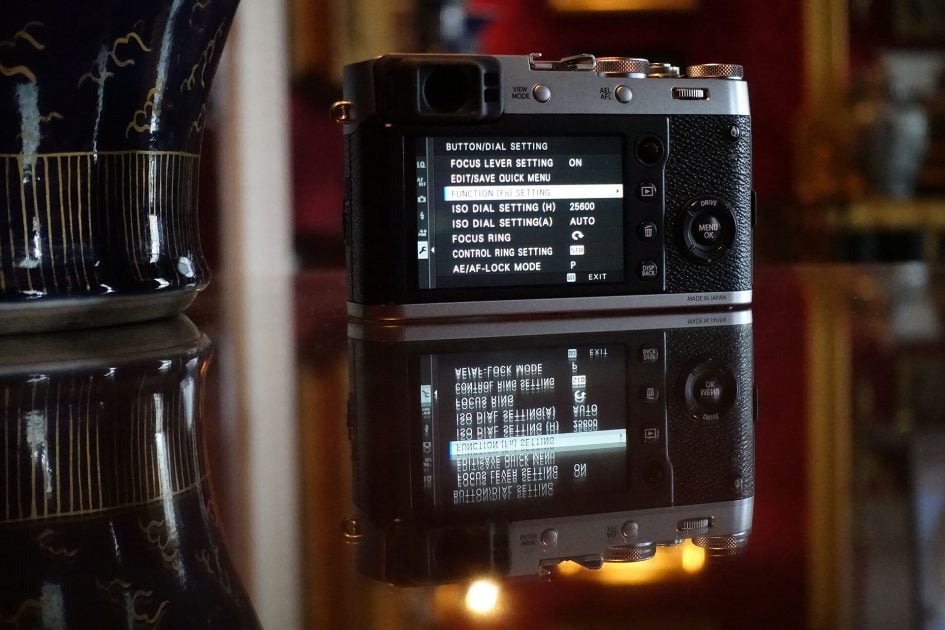
But the addition of a AF joystick, dedicated ISO dial, extended exposure compensation range and a front clickable dial are all valuable enhancements to the X100F over its predecessors, even if the front dial is currently underused.
In terms of connectivity the X100F is equipped with the same ports as its predecessor: a Type D HDMI Micro connector, Micro USB port and a 2.5mm microphone input, and as before, the mic input and USB port can be used with optional remote controls. The USB port can also be used to charge the battery while it’s in the camera, something that’s now also possible on the XT2 and XT20. I love USB charging as it means I can topup or even completely recharge without having to carry an AC adapter and look for an AC socket; instead I simply connect the camera to my laptop, a vehicle adapter or a portable USB battery (like my Anker PowerCore 10000) and I’m good to go. Fujifilm also supplies the X100F with an external AC-powered charger too, allowing you to recharge batteries outside the camera if preferred. So maximum points to Fuji for offering both types of charging.
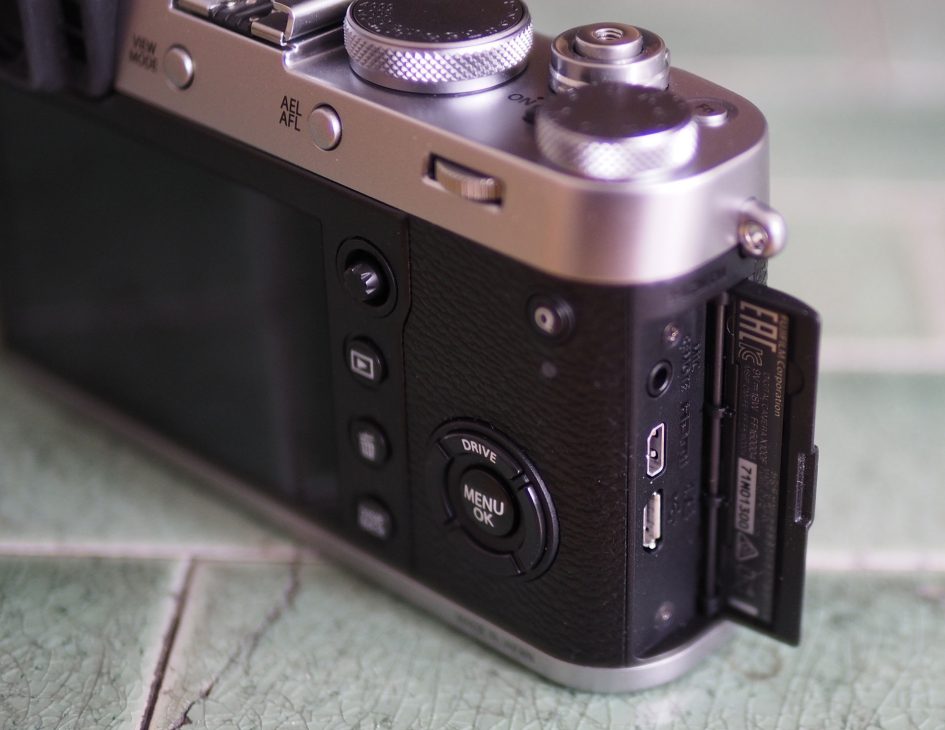
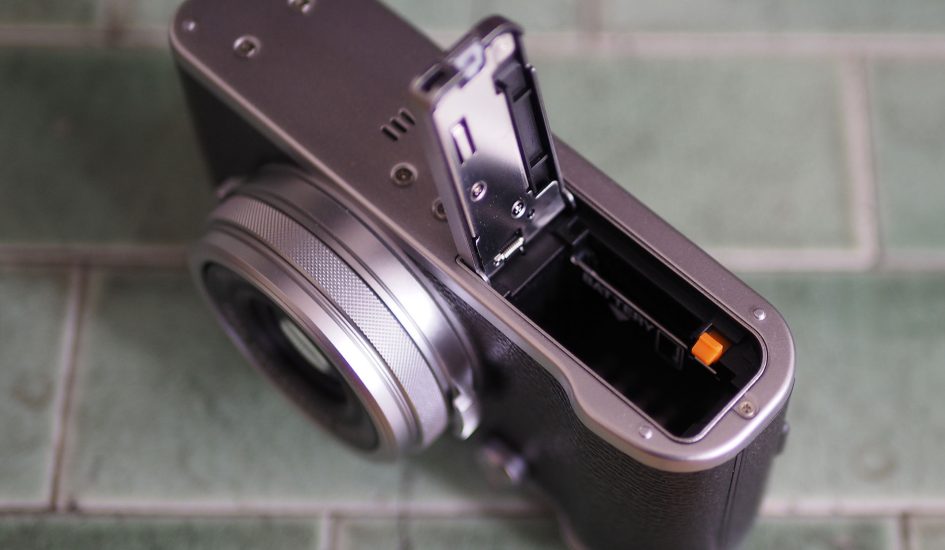
As for the battery itself, it slots into a compartment under the camera which also accommodates the SD memory card. The X100F employs the latest NP-W126S which Fujifilm quotes as being good for 270 frames with the electronic viewfinder or 390 with the optical viewfinder. This is a welcome improvement over the 320 shots quoted for the earlier X100T, and while it will of course deplete more quickly if you’re filming video and or using Wifi, I rarely found myself caught out thanks to the USB charging. I should also add that the X100F now displays finer increments on its battery icon and in some display views will also offer the percentage remaining. In general use with plenty of chimping and Wifi transfers, I’d typically get around 220 images per charge.
The X100F is also equipped with a hotshoe for external lighting, and like earlier X100 models, enjoys a major benefit over its siblings with interchangeable lenses and focal-plane shutters: thanks to the leaf shutter in the X100F’s lens, it supports much faster flash sync speeds, up to 1/2000 compared to 1/250 on the XT2. This allows you to use a flash in bright conditions with a wide aperture, something that’s tricky with a slower sync speed.
I’m not a strobist, so haven’t pushed this aspect of the camera, but I can tell you there are some restrictions: Fujifilm quotes 1/2000 as the actual fastest shutter you can sync with, or 1/1000 if you’re using the maximum aperture of f2. As far as I understand, the hotshoe and internal flash are also disabled for the electronic shutter, ruling-out even faster flash syncs up to 1/32000. But even with the caveats, 1/1000 at any aperture is still a lot faster than the 1/180 or 1/250 of most focal plane cameras. It’s also worth mentioning the X100F manages to squeeze-in a small flash for basic work, whereas the XT2 doesn’t have one built-in at all, instead relying on accessories that mount on its hotshoe.
Fujifilm X100F viewfinder and screen
The X100F is equipped with an innovative hybrid viewfinder or a screen for composition. I’ll briefly mention the latter as the real excitement of the camera lies with its viewfinder.
The screen employs a fairly normal 3in / 3:2 shaped / 1040k dot panel and like its predecessors, Fuji has resisted making it touch-sensitive or articulated in any way. Personally speaking I feel it could benefit from both, with touch controls allowing even faster repositioning of the AF area than the joystick (particularly handy for focus-pulling in movies), and a tilting screen allowing comfortable shooting at high or low angles. In these respects, the X100F really does feel like a fixed lens version of the X-Pro2 – they’re both primarily eye-level viewfinder cameras, where the screen is mostly used for menus and playback. I should also add when you’re remote-controlling the camera over Wifi with your smartphone, you do get touch-focusing (for stills) and of course as much screen articulation as you like.
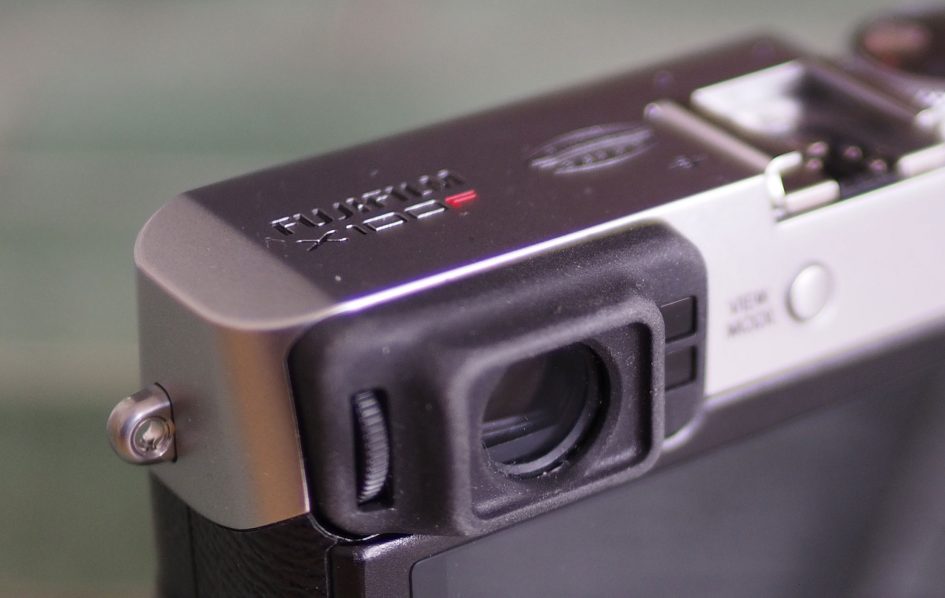
Okay, now onto the viewfinder which remains the unique selling point of the X100 series. Like the X-Pro2, it’s a hybrid design which cleverly allows you to switch between optical and electronic views, the former with a wealth of shooting aids including a magnified window in the corner, first introduced on the X100T.
When you power-up the X100F it defaults to the optical viewfinder, a rangefinder view with the lens barrel just peeking into the lower right corner. What makes it really special though is Fujifilm applies a transparent electronic overlay showing not just a wealth of exposure and shooting information, but also a thin frame indicating the actual coverage corrected for parallax due to focusing distance, and the focus area too. Tick a few options in a custom display menu and you can add a live histogram, alignment grid and leveling gauge. Interestingly, Fuji has rearranged many of the details from the X100T and enhanced the battery indicator (to match the X-Pro2 as well as possibly catching-out less scrupulous reviewers), but the basic concept is the same as before.
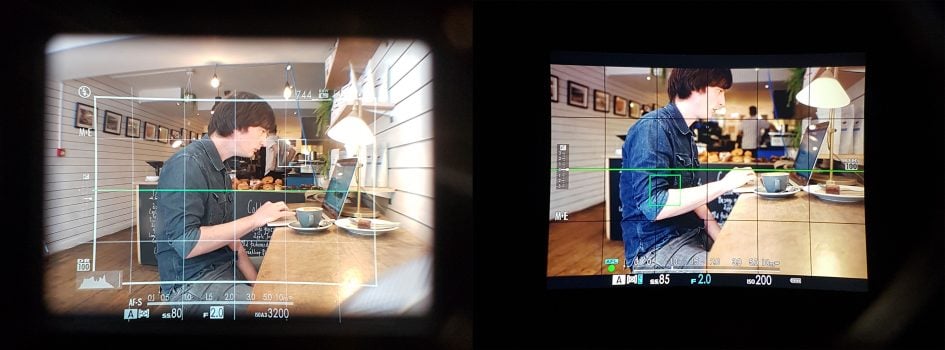
Above: Here are the two main views through the X100F viewfinder, both reproduced at their same relative scale – so in real life, the optical rangefinder view is larger than the electronic panel. Note the wealth of shooting aids overlaid in the optical version on the left, all of which are customizable.
Like all rangefinders, the optical view extends beyond the frame of capture, allowing you to see subjects just outside and recompose or pause if desired. The optical view also avoids blackout and lag, not to mention noise in low light, although it should be noted the overlay does fractionally dim the view compared to the area around it.
Flick the lever (styled like an old-school self-timer) on the front of the camera to the right and the camera switches to a 100% electronic view which may be potentially noisier and laggier than the optical view in low light, but which can preview the effect of exposure, depth of field, white balance or Film Simulation amongst many things. The X100F’s electronic view also rotates the shooting information when you’re composing in the portrait orientation, although due to the technology in the overlay this isn’t possible in the optical view.
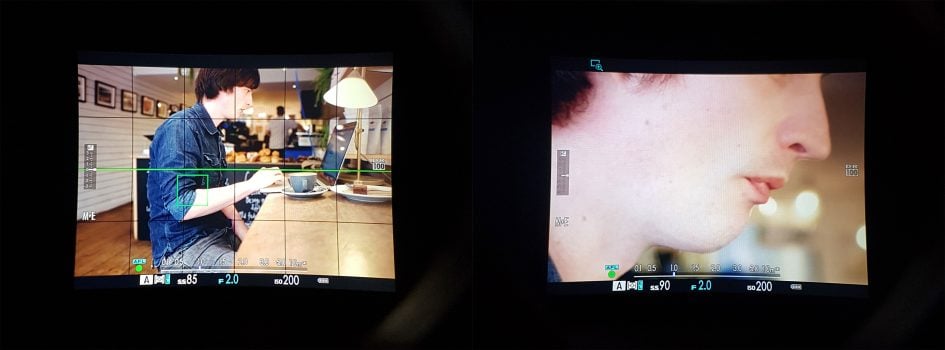
Above left: the electronic viewfinder showing the entire image. Above right: the magnified view of the active focusing area filling the viewfinder for focus and confirmation.
But wait, there’s more. Switch back to the optical view and flick the front lever to the left and you’ll see one of the features introduced on the previous X100T: a small portion of the EVF is revealed in the lower right corner of the view, masked-off from the optical view, and used to deliver a magnified view of the focus area. This is incredibly useful for confirming the focus, whether you’re using Auto or Manual focusing and further enhances the optical viewfinder experience. It also rather neatly blocks-out the corner where the lens barrel intruded into the view.
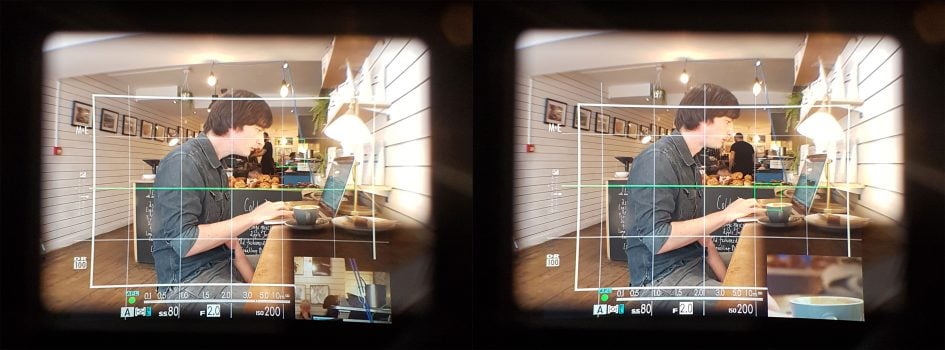
Above: the hybrid view in action, with the electronic overlay in the lower right corner showing a magnified view of the active focus area.
New to the X100F is the ability to switch between three magnifications for the little window in the corner. By pushing the rear dial in, you can zoom-out to a slightly less magnified view, or again to show the complete composition, before cycling back to the maximum magnification to absolutely confirm focus.
We may have seen most or all of it before on previous Fuji bodies, but it remains very impressive none-the-less. The hybrid viewfinder technology does however contribute to the cost of the camera, so you have to be serious about wanting it. Every time I shot with the X100F I marveled at the optical viewfinder, but found myself invariably switching to the 100% electronic view, I guess mostly because it’s the presentation I’m most familiar and comfortable with from my time shooting with mirrorless cameras.
If I owned the X100F I’d almost certainly end up using the hybrid optical view more and more until it became my default (and of course if you’re an existing rangefinder shooter you’ll feel immediately at home), but I urge you to try it for yourself and think seriously about whether it’s something you’d regularly use or not. I shot side-by-side with the XT2 for comparison, and while it obviously lacks the optical view, its electronic viewfinder image is considerably larger and more immersive – and it also has its own split-screen magnified view option. It’s a tough one to weigh-up, but either way I commend Fujifilm for developing some of the best viewfinders on the market today.
Fujifilm X100F Lens and focus
The X100F shares the same lens as its predecessors, a fixed 23mm f2 prime, delivering coverage equivalent to 35mm. As before, some of the elements are housed within the body, allowing the X100F with its built-in lens to be comfortably thinner than, say, an XT20 fitted with an XF 23mm f2 lens. It also employs a different optical design, exploiting the closer distance to the sensor.
Like its predecessors, the X100F employs a leaf shutter in the lens which enjoys a number of benefits over the focal plane shutters of the X-series bodies. First is very quiet operation – little more than a very faint click – making it very discreet in operation. Second is the ability to deploy much faster flash sync speeds, which in turn makes it much easier to balance artificial and natural lighting. And again, as before, there’s the additional option to deploy a built-in 3-stop ND filter from the menus, a considerate facility given you’d otherwise need to buy an accessory in order to mount external filters to the lens barrel.
But back to the fixed focal length. Depending on your view and style of photography, the idea of a compact with a fixed lens as opposed to a zoom will either concern or delight you. Obviously it lacks the flexibility of a zoom range, but the simplicity of a prime remains seductive and of all the focal lengths to choose from, 35mm equivalent is arguably the most versatile.
It’s wide enough to capture landscapes or interiors, long enough for a waist-up portrait, perfect for group shots and a classic choice for street shooting. With its f2 focal ratio, it’s also possible to introduce some subject isolation through a shallow depth of field – obviously you’re not going to obliterate the background on a portrait or even macro shot, but some effect is possible. It’s also possible to get quite close to your subject with a minimum focusing distance of 10cm. You can see a variety of shots below and a broad selection in my sample images page.


If you want broader or tighter coverage, Fujifilm offers a choice of two conversion lenses: the WCL-X100 applies a 0.8x factor to deliver a 28mm equivalent field of view, while the TCL-X100 multiplies it by 1.4x for a 50mm equivalent. These are the same conversion lenses designed for previous X100 bodies, but if you go for the latest version II models, they’ll electronically communicate with the X100F so you don’t need to select them in the menus. They’re neat, but I think if I were seriously considering using both lens converters, I reckon I’d be better-served by an interchangeable lens camera instead like the XT20.
A smooth manual focusing ring on the X100F coupled with some neat electronic assistance means manual focus photographers should nail the desired distance. You can choose between focus peaking (in a choice of colours and sensitivities) or a simulated split-screen effect, and if desired, also apply a temporarily magnified view as you turn the focusing ring.
The focusing ring can be reconfigured to control other aspects of the camera if preferred, while behind it, a second ring with two handles is permanently dedicated to aperture adjustments between f2 and f16 in satisfyingly clicky 1/3 increments. There’s no filter thread as standard, but considerately a three-stop ND filter is built-into the camera and deployed using the menus. If you prefer to fit your own filters, you’ll need the optional AR-X100 adapter which equips it with a 49mm thread.
The X100F’s lens isn’t optically stabilized and neither does the camera shift its sensor to counteract the wobbles. So you’ll need to find out what sort of speeds you can reliably handhold and keep an eye on the shutter speed, or set a minimum for Auto ISO. On the upside, the leaf shutter introduces much fewer vibrations than a focal plane shutter, so you should be able to handhold at slower speeds than normal. But it does serve as a reminder that interchangeable lens cameras normally have the option to fit optically-stabilised lenses if necessary, and Olympus, Panasonic and Sony systems all now offer bodies with sensor-shift stabilisation that works with any lens you attach.
So far so similar to the X100T before it, but the lens on the X100F is now driven by the more sophisticated autofocus system of the latest X-Trans III sensor. This embeds a much broader array of phase-detect AF points across a large square area which extends to almost the full height of the frame, leaving only small strips down the left and right sides where the camera reverts to contrast-based AF only.
By sharing the same sensor as the XT2, XT20 and X-Pro2, the X100F essentially inherits the same core AF system, and the result is faster and more confident focusing than its predecessors. In good light, the X100F can snap-onto its subjects in about half a second without hunting, and only searches minimally as light levels fall. Select an AF area outside the phase-detect region and it’ll inevitably hunt more visibly, but given sufficient contrast, the performance is still good.
But like all Fuji cameras, the AF performance is very much related to the lens in front of the sensor and in the case of the X100 series, the built-in 23mm f2 optics are a little sluggish compared to the latest XF lenses mounted on X-series bodies. In my tests the X100F, when set to burst shooting and Continuous AF, was certainly up to the task of refocusing on someone walking towards me indoors or out, but give it a faster subject and it’ll begin to struggle. Cyclists, vehicles or even simply exuberant kids and pets can result in lower hit rates.
Of course to be fair, these are not the subjects the X100 series was designed to shoot. It’s more of a street camera, aimed at snapping individual moments rather than an action sequence. As such it’s not a major complaint, more of an observation, but for a fifth generation – or indeed a new line – I’d like to see a lens that focuses faster and does justice to the sensors behind it.
More problematic is the performance at close range, an issue recognized on earlier generations and inherited here. Yes, the X100F can focus as close as 10cm, but at close range, the subject is disappointingly soft. This especially applies when the aperture is wide-open, but even closed a stop to f2.8 makes little difference. You really need to step-back or close the aperture to f4 for sharp results, which in turn greatly reduces your potential for a shallow depth-of-field.
I have many examples shot at close range with soft results, and have picked the following to illustrate the issue. It’s one of my usual test shots in Brighton’s Bison Beer shop, focused fairly close to the beer bottle label on the right side. Even on the full image you can see the softness in the lettering, but to make it clear I’ve made 100% crops below from versions shot at f2, f2.8 and f4.

Above: Fujifilm X100F at f2 and close to minimum focusing distance.

Above: 100% crops from image above. Left at f2, middle at f2.8 and right at f4.
Here’s another test showing the impact of increasing the subject distance, and while the quality certainly sharpens as you pull-back, it takes a while before it’s completely sharp.

Above: 100% crops from composition above. From left to right at gradually closer distances.
This personally frustrates me as I’m fond of shooting close-up details, but again it’s not what this camera was designed to do. Again, it’s a camera designed for street shooting at subject distances of a couple of meters or more, and I should add it can deliver sharp results at large apertures, but again only for subjects that aren’t too close. But I feel it’s important to point out what it won’t do well – this is not a broad, general-purpose compact. Here’s a couple of shots at f2 where the greater subject distance has allowed the lens to perform more comfortably.

Above: Fujifilm X100F at f2 with subject at 1-2m distance. (Image on left by Doug Kaye).
One final point – like its predecessors, the X100F employs a removeable lens cap, making it closer in operation to interchangeable lens cameras than compacts with built-in sliding lens covers. There’s no denying a separate cap is stronger and offers better protection, but equally it’s not as quick or convenient as a cover that slides across automatically as the camera’s powered up or down.
Fujifilm X100F Shooting modes
The Fujifilm X100F doesn’t have an exposure mode dial. Instead, like previous X100 cameras – and indeed X-mount bodies – it adopts the same technique used by older film SLRs for many years. The body has a shutter speed dial and the lens has an aperture ring, and both offer an A option. Set both the shutter speed dial and the lens to A and the X100F enters Program mode. Set the shutter dial to A, but turn the aperture ring and you’ll be in Aperture Priority. Set the lens to A, but turn the shutter speed dial and you’ll be in Shutter Priority. And finally if you turn both the shutter speed dial and aperture ring away from A, you’ll be in full Manual. If you’ve used this system before it feels natural, but even if you’re coming from a system with a PASM mode dial, it’s easy to get to grips with. Note the X100F doesn’t have the full Auto switch of the XT20 though.
The X100F offers the same mechanical shutter speed range as its predecessors, from 30 seconds to 1/4000. You can select shutter speeds between one second and 1/4000 directly from the dedicated dial in 1EV increments, and use the rear thumb dial to fine-tune by +/-0.6EV in 0.3EV increments. If you set the shutter speed dial to T, you can use the rear thumb dial to choose from the entire shutter speed range of 1/4000 to 30 seconds in 0.3EV increments.
There’s also a B option on the shutter dial for Bulb exposures which can last up to 60 minutes so long as the shutter release is kept pressed by hand or using an optional USB or mechanical-threaded cable release; sadly it’s not possible to trigger exposures longer than 30 seconds remotely using the smartphone app, nor pre-program a Bulb timer. A firmware update for the higher-end XT2 allowed the T position on the dial to directly access longer exposures, so I hope to see this implemented on the X100F in the future.
During a Bulb exposure, the X100F usefully displays the exposure time so far on-screen, and in a welcome update over previous X-Trans II bodies, you can now also record RAW files at the L (100 ISO) setting (allowing you to extend exposures with the flexibility of greater post-processing), although the dynamic range may be reduced compared to shooting at the base 200 ISO. This is a benefit of the latest X-Trans III sensor and image processor.
The X100F also offers an electronic shutter option, allowing the camera to shoot in complete silence while also accessing faster speeds up to 1/32000 – an impressive top speed when rival e-shutters generally stop at 1/16000. Like all electronic shutters, there can be issues with skewing if the camera or subject are in horizontal motion while the sensor is still being read, but under the right conditions the faster shutters offered by an electronic shutter can be useful for exploiting bright apertures in equally bright conditions without having to enable the ND filter. They also allow silent shooting in discreet environments. That said, the mechanical leaf shutter on the X100F can hardly be described as loud – it’s little more than a faint click.
Exposure compensation is available in a range of +/-5EV, with +/-3EV directly accessible using the dedicated dial and the extended range via the C position and the front finger dial. The standard sensitivity range is 200-12800 ISO with extended Low and High options of 100, 25600 and 51200 ISO; the standard range is available in 0.3EV increments. There’s also three Auto ISO banks where you can adjust the default and maximum sensitivities, and the minimum shutter speed at which the camera will ramp up the ISO; I boosted the default 1/60 minimum shutter to 1/125 as I often found my shots were suffering from camera shake.
Auto Exposure Bracketing (AEB) is available but remains surprisingly modest with just three frames at increments up to 2EV, making it little more capable than a point-and-shoot for HDR fanatics. There’s still no in-camera HDR for those who prefer an automatic life. The only positive aspect is that the entire three frame AEB sequence can be triggered with a single press of the shutter release or the self-timer, allowing the camera to grab all the frames without further presses. This makes it all the more annoying there isn’t five or seven frame bracketing, or broader increments available. Note the high-end XT2 also suffered from this basic AEB depth when launched, but again a firmware update resolved it with the option to capture more frames – hopefully the X100F may gain this capability in a future update.
Film Simulation, Dynamic Range and White Balance bracketing are also available via the Drive button, but they’re greyed-out if you have RAW or RAW+JPEG selected in the image quality. This is odd since each of the modes allows RAW or RAW+JPEG shooting in the non-bracketing modes. Note this has also been fixed on the recent XT2 firmware update, so finger’s crossed here.
There’s no Multiple Exposure option on the X100F, but the Drive menu does offer an ADV option which lets you deploy one of eight Advanced Filter effects: Toy Camera, Miniature, Pop Colour, High Key, Low Key, Dynamic Tone, Soft Focus and Partial Colour (with six sub-options to pass red, orange, yellow, green, blue or purple, leaving the rest of the image in monochrome).
The effects deliver the usual results, but sadly you still can’t apply them to video, so no chance of capturing a miniature movie with the X100F. Annoyingly the X100F also won’t record a RAW file when using the Advanced filters – I prefer the approach of other manufacturers where if you’re in RAW+JPEG mode, the effect is only applied to the JPEG, leaving an untouched RAW file for backup. Anyway, here’s how the effects look in practice.

Above left: X100F Toy Camera Effect. Above right: X100F Miniature Effect.

Above left: X100F Dynamic Tone Effect. Above right: X100F Soft Focus Effect.
Also available on the Drive menu is the Panorama mode, which lets you choose from medium and long, with panning in any of four directions. Like Sony and Panasonic, the X100F will capture multiple images during the pan and stitch them together in-camera for you. The stitching works fairly well as demonstrated in the examples below, but vertical banding can become visible, particularly on outdoor scenes with varying sky brightness. I’d recommend shooting multiple tries and also a single frame version of a scene just to ensure you definitely have one without banding.

Above: Fujifilm X100F panorama (horizontal).

Above: Fujifilm X100F panorama (vertical).
Delve into the menus and you’ll find an interval timer, with up to 999 or infinite frames captured at intervals between one second and 24 hours. You can also set a delay up to 24 hours before the sequence begins, although the camera still won’t assemble them into a timelapse video afterwards, something both Olympus and Panasonic now offer as standard.
A further set of picture effects are available with the X100F’s Film Simulations which emulate classic Fujifilm film stock, and by inheriting the sensor and image processor of the XT2 and X-Pro2, you enjoy the full set.
The default setting is Provia, and that’s what you’ll see in all my sample images unless otherwise stated; it delivers a good balance of contrast and colour without being too punchy or saturated. If you fancy something more vivid, then choose Velvia, which coincidentally was always my favourite colour film for shooting landscapes. If you prefer a more subdued look, go for Astia, while portrait photographers may like Pro Neg Hi and Standard. For a classy vintage look, try Classic Chrome or Sepia or one of the four monochrome modes, three of which feature yellow, red and green filters. I enjoyed using the Monochrome Red option which really darkened blue skies and brought out cloud detail.

Above left: X100F Provia Film Simulation. Above right: X100F Velvia Film Simulation.

Above left: X100F Astia Film Simulation. Above right: X100F Classic Chrome Film Simulation.

Above left: X100F Monochrome Film Simulation. Above right: X100F Sepia Film Simulation.
The X100F also inherits the latest ACROS film simulation which applies a high contrast monochrome style with optional yellow, red and green digital filters. Fujifilm describes ACROS as delivering smoother gradation, deep blacks and beautiful textures and unlike the introduction of Classic Chrome, it’s not going to be available on earlier models with a firmware update – it’s something that’s wired-into the latest image processor so it’s only present on the XT20, X100F, XT2, X-Pro2 and future bodies only.
Here’s a couple of shots taken with the ACROS simulation and the red filter applied. I personally love the look of ACROS and since first using it on the X-Pro2 it’s become my go-to simulation for monochrome photography.

Above: Fujifilm X100F in ACROS mode. Out-of-camera JPEG.

Above: Fujifilm X100F in ACROS mode. Out-of-camera JPEG.
The Film Simulations are another part of the equation behind the lovely output from Fujifilm’s cameras. I find I can achieve the mood I want using these subtle but effective processes, rather than resorting to often heavy-handed filters on other systems. I also appreciate being able to apply different simulations after the event on RAW files using the in-camera RAW processing option in playback.
The X100F also inherits the Grain simulations introduced on the X-Pro2, with a weak and strong option to choose from and, like film simulations, you can apply these to RAW files after the event using the in-camera processing. To illustrate the effect, I took the following composition in ACROS using the three grain options. Here’s the complete image in black and white first, followed by 100% crops showing the grain options.

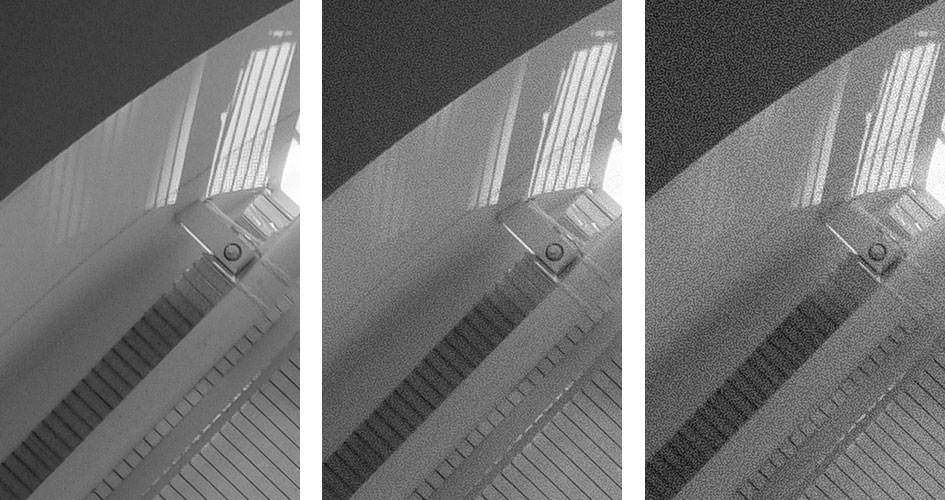
Above: 100% crops from full image with Grain Effect Off (left), Weak (middle) and Strong (right)
Above are 100% crops showing, from left to right, no grain, weak grain and strong grain. The original image was shot at 200 ISO with the ACROS simulation. Below is a colour shot with the Provia simulation at 200 ISO, followed by three more crops presented at 100% to show the grain effect on a colour image.

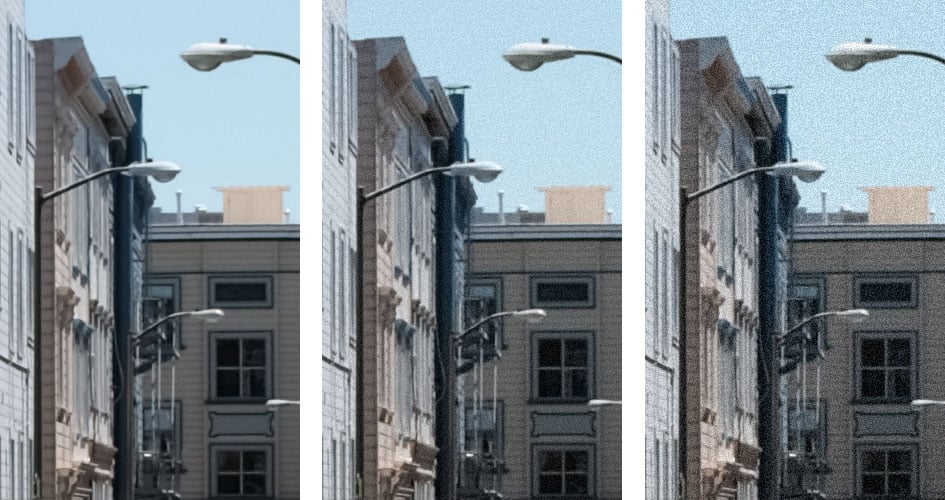
Above: 100% crops from full image with Grain Effect Off (left), Weak (middle) and Strong (right)
The option to simulate film grain in-camera, whether at the point of capture or during playback, is another useful tool in producing images that are ready to go without external processing. It’s also possible to apply the grain settings after the event in playback to RAW files using the RAW conversion menu; this also lets you adjust the Film Simulation, White Balance (and shift), highlight and shadow tone, saturation, sharpness, noise reduction, colour space and whether the lens modulation optimiser is enabled or not; it’s also possible to ‘push-process’ the exposure by up to -2EV or +3EV in one third increments. While in-camera RAW processing doesn’t go anywhere near what’s possible in applications like Lightroom, it does provide enough adjustment for many photographers to explore and experiment with the camera’s effects and basic conversion settings – plus without having to leave the camera. All reasons why I love to shoot with the Fujifilm X system and why you’ll see it featured in my In Camera book.
Continuous shooting and autofocus
The X100F supports burst speeds up to 8fps with continuous autofocus, and while the lens and form factor aren’t aimed at action shooting, you can still exploit the capabilities for street photography. Indeed while the electronic viewfinder of the X100F lags while shooting bursts, the optical view delivers a real-life view bereft of lag or even blackout, giving it an advantage over DSLRs for following movement.
To put the burst capabilities to the test, I fitted it with a Lexar Professional 32GB UHS-II SD card, rated at 2000x / 300MB/s. With the X100F set to Large Fine JPEG only, I fired-off 132 images in 16.41 seconds before it began to slow, working out at a speed of 8fps on the nose. Switching to Compressed RAW, allowed me to capture 26 frames in 3.33 seconds before it started to stutter, working out at a speed of 7.88fps. So in both cases, the X100F delivered its quoted top speed. As for flushing the buffer, it took nine seconds to clear after a full burst of Compressed RAW files.
As noted earlier in the review, the X100F may inherit the embedded phase-detect AF capabilities of models like the XT2 and XT20, but its fixed and fairly leisurely lens limits the speed at which it can react and refocus on moving subjects. I enjoyed success with people walking towards me, but anything faster resulted in a much lower hit rate. As such the X100F’s speed – not to mention its coverage – aren’t ideal for sports, action or even enthusiastic kids and pets, but you could still exploit its burst speed for grabbing the decisive moment in street photography and use the continuous AF to maintain focus on small movements. Plus again, if you use the optical viewfinder option, you’ll be able to follow any movement without lag or blackout.
Fujifilm X100F Wifi
The X100F features built-in Wifi, although continues to resist including NFC nor any new-fangled Bluetooth options. As such, the implementation is essentially the same as previous models, but that’s no bad thing as it mostly worked well on those cameras and continues to mostly work well here.
Wifi on the X100F allows you to wirelessly transfer images and remote control the camera with an iOS or Android smartphone. I tested the free Camera Remote app on my Samsung Galaxy S7 and the experience was identical to earlier X bodies. In the absence of NFC, there’s no tapping the phone against the camera body to initiate the connection; instead you’ll need to manually fire-up Wireless Communications from a menu or Function key on the camera to broadcast a Wifi network, before then using the Camera Remote app on your phone to connect to it. Once the app’s connected, you’re offered four main options: Remote Control, Receive, Browse Camera and Geotagging. I’ll cover each in turn.
The Remote Control option shows a live image from the camera, surrounded by shooting information and a selection of buttons underneath. A slider at the bottom lets you choose between shooting stills or filming video, after which pressing the big red and silver release button above will trigger your choice. If you slide the control to video, the live view reformats to 16:9 for easier framing.
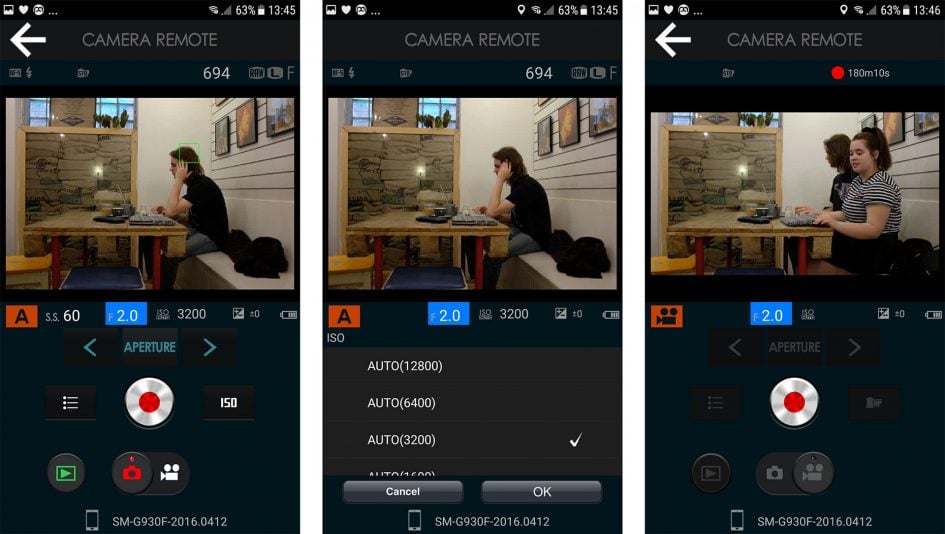
If you’re shooting still photos, you can tap your phone’s screen to reposition the AF area, although like previous Fuji cameras, you can’t tap to pull-focus by remote control in the video mode. I still wish Fuji would equip the X100 series with a touchscreen.
A button to the left of the release lets you change the ISO, Film Simulation, White Balance, Flash mode and Self timer; all but the last two options are also available when the app is set to video. Whichever setting you choose to adjust will subsequently appear as a quick shortcut icon to the right of the release, giving to direct access if you need to make any further changes; the default is ISO.
You can’t change the exposure mode remotely, but you do have access to the shutter, aperture and or exposure compensation depending on the position of the shutter dial and lens switches prior to entering remote control. For example if the shutter dial is set to A and the lens set to use its aperture ring or the control wheel, then under remote control you’ll be able to adjust the aperture and or exposure compensation using the phone app. With both the shutter dial and lens set to manual control, you can subsequently adjust either remotely, although the longest shutter speed is 30 seconds with no access to Bulb for anything longer.
The remote control view also has a play button which presents a series of thumbnails with the chance to tick the ones you’d like to import into your handset. Bucking the trend for remote control apps, the choice of quality is actually set within the camera, not the app – you can choose the original image size or a reduced one at 3 Megapixels. Like most rivals, you’ll only be transferring JPEGs, not RAW files.
This leads me to the second option of the app, named Receive. This initiates playback on the camera, with the option to send a photo as you browse through them on the camera’s screen. Received images are graphically shown on your handset’s screen like stacked paper photos. An option to Receive may seem redundant when you have various thumbnail views for importing on the app, but it’s actually very useful. There’s many times I’ll have gone through a series of almost identical images on the camera in playback, then got completely lost when viewing them all as thumbnails on a remote control app – which was the one I liked best? Was it third or tenth along from the end of that sequence? But Fujifilm’s Receive mode solves this by letting you initiate the transfer from the playback mode of the camera and push them to the handset.
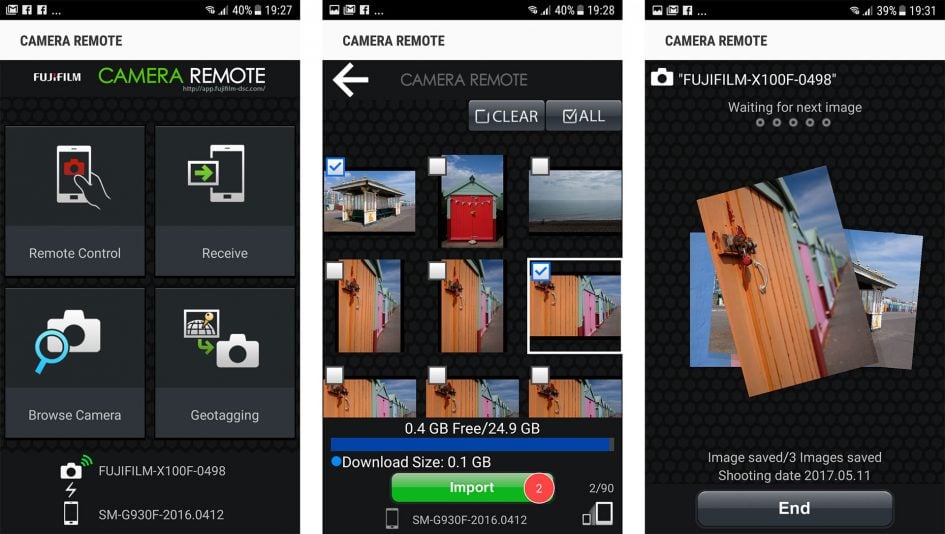
The third option is Browse Camera, which presents exactly the same thumbnail view as tapping play in the Remote Control option described earlier. Like that option, you can view thumbnails in two different sizes, tap to enlarge for a closer look and choose to import if desired. You can import JPEGs at either 3 Megapixels or the original size, but again not RAW files. The app also allowed me to import movies, but I couldn’t find them on my phone afterwards.
The fourth and final option on the app is Geotagging which as its name suggests, uses your handset’s GPS to deliver co-ordinates which are embedded on your photos. However Fujifilm goes about this in a different way to rivals. Rather than having your handset store a GPS log which is later synced with the images in the camera, the X100F actually imports and embeds the co-ordinates as you compose and take the photo, so there’s nothing for you to do afterwards.
Choosing Geotagging on the app presents an almost bare page indicating that it will now make GPS co-ordinates available for the next 60 minutes; returning to it during this time shows how long you have left. If you now initiate Wifi on the X100F it’ll connect to your handset and a few seconds later report that it has searched your device and (hopefully) knows where it is in the World. Returning to composition on the camera, you’ll now see the actual GPS co-ordinates can be displayed on-screen, while a small icon of the World indicates a successful and active connection.
You’re now free to put your phone in your pocket and shoot as normal; you can even turn the camera off and on again, and it should quickly re-establish the connection with your phone by itself. Meanwhile every image you take is automatically embedded with the GPS co-ordinates delivered by your phone. Here’s one I took with the co-ordinates entered into Google Maps.

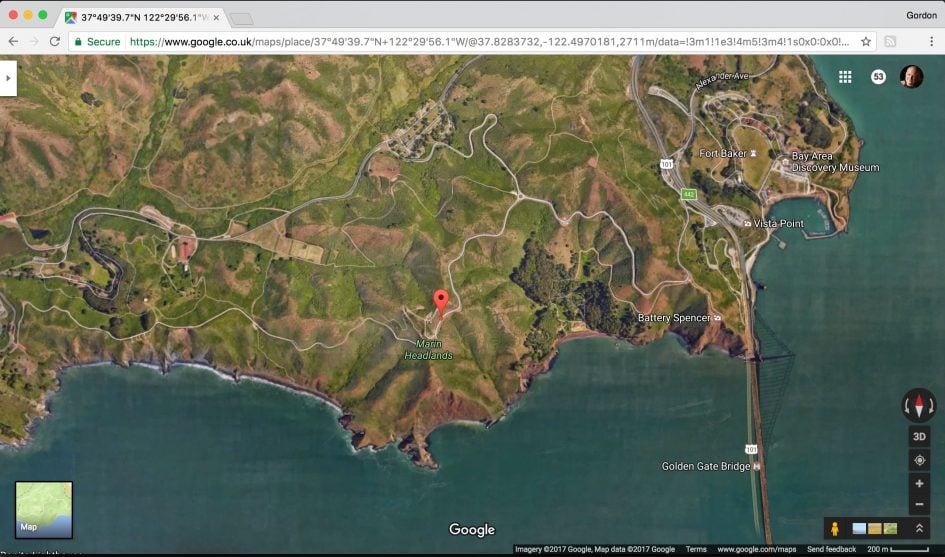
There is however an important catch: the app may deliver the location for up to 60 minutes worth of shooting, but the actual co-ordinates themselves won’t be updated during this time – even if you move from the original position where you initiated the process. The result is you could end up with multiple images taken in different locations, all tagged with the exact same co-ordinates as the first image in the sequence.
To be slightly fair, the app does seem to know the game’s up after a short while, forcing the World icon on the camera’s screen to turn red and flash. This is the system telling you the co-ordinates may be out of date, but it’ll still continue to embed them unless you tell it otherwise. In my tests, the icon started to flash once I had moved a few hundred meters from the starting position, but by this point the co-ordinates were effectively useless, at least in an urban environment.
So unless you intend to take a bunch of photos from one single location, the Fujifilm geo-tagging implementation is really single-use only. Turn it on for one photo, then be sure to turn it off again lest all your images form that point become incorrectly geo-tagged. So at best the system is limited, but at worst, the fact it remains active for up to an hour could seriously catch you out.
Fujifilm really needs to fix this as soon as possible. If it’s a single-use system, then make that clear and don’t leave it running for up to an hour. Better still, fix the software so that it’ll provide updated co-ordinates as you move around, or record a log instead for later syncing. Until then I think I’ll stick with third party logging apps.
Note the Fuji app has always worked this way, but it’s only recently that I’ve absolutely confirmed it. So my complaint equally applies to earlier models and reviews.
Fujifilm X100F movie mode
The X100F inherits essentially the same movie capabilities of the X-Pro2: as such you can film 1080p or 720p scaled-down from the full sensor width at 24, 25, 30, 50 or 60p, but there’s no higher frame rates for slow motion, nor any 4k either. The X-Trans III sensor and its accompanying image processor are capable of recording and encoding 4k video, but Fujifilm feels it’s only relevant to models like the XT2 and XT20. So the X-Pro2 and X100F miss out on 4k, despite having the electronics to cope. Assuming there aren’t heat dissipation or power issues, I’d prefer if the X100F and X-Pro2 simply allow you to film 4k if you want them to; I don’t like it when manufacturers remove or disable features based on an assumption of the market rather than an actual physical or electronic restriction. But as it stands, if you want 4k in the smallest Fuji body, you’ll need the XT20.
There’s no movie mode button on the X100F, nor any dedicated red record button either. As such it can be a bit of a mystery at first to work out how to start recording movies. You’ll find the option in the Drive menu, next to the effects, bracketing, panorama and continuous shooting modes.
Audio is recorded by internal stereo mics or via an external mic connected to a 2.5mm jack, and it’s possible to adjust the levels using graphical meters. The longest recording time for single clips in 720p and 1080p are 28 minutes and 15 minutes respectively.
You can set the focus to Single or Continuous using the same control as for stills, and set to the latter, the X100F will rack focus between near and far subjects. But what you can’t do is tell it where to focus unless you have face detection enabled and a nearby human for it to recognize.
Like other X-Trans III bodies, you can apply any of the Film Simulations to movies, including the high contrast ACROS monochrome. There’s no flat profile for subsequent grading, but the Astia simulation is fairly muted.
In terms of the movie quality, Fujifilm has made great improvements on these latest generations, but the X100F is held-back by its inability to record 4k and the absence of a stabilized lens, not to mention a longest clip length of 15 minutes in 1080p. I feel the lack of stabilisation really impacts the usefulness of the X100F for movies as while you can increase the shutter speed to combat camera shake for stills, you can’t for video. As such handheld footage invariably suffers from wobbles compared to cameras with stabilized sensors or lenses. Here’s a couple of examples to illustrate it.
Above: Download the original file (Registered members of Vimeo only).
Above: Download the original file (Registered members of Vimeo only).
Fujifilm X100F sensor and processing
The X100F employs Fujifilm’s latest X-Trans III sensor which made its debut on the X-Pro2. This boosts the resolution from the 16 megapixels of the X100T to 24 Megapixels and also increases the area of phase-detect coverage.
Like previous X-Trans sensors, the latest version III employs an APS-C area with Fujifilm’s unique colour filter array that allows the absence of an optical low pass filter for the ultimate crispness without suffering from moire. The difference now is the image resolution has increased from 4896×3264 to 6000×4000 pixels, allowing you to output 2in taller and 3in wider than the X100T at 300dpi.
As noted elsewhere in the review you can now save RAW files with lossless compression or no compression, and unlike the X-Trans II models, it’s possible to also record a RAW file at 100 ISO. Since this is below the base sensitivity of 200 ISO there may be dynamic range compromises, but it does give long exposure photographers a useful extra stop while retaining the chance to make more edits after the event. I know there’s been a few occasions when lighting and my choice of filters have forced me to shoot with X-Trans II bodies at 100 ISO and when doing so I was reliant on getting the processing right first-time in-camera with JPEG only. Luckily the Fuji system is remarkably good at this, but it’s still useful to have the option of RAW at 100 ISO. As for file sizes, uncompressed RAW files weigh-in at around 50MB each, while losslessly compressed ones were typically around 25MB each.
As I’ve mentioned earlier in the review, the X100F offers a wide selection of processing options, including the company’s popular Film Simulations and Dynamic Range adjustments, along with Grain Effects introduced on the X-Pro2. In addition you can adjust the Highlight Tone, Shadow Tone, Colour Density, Sharpness and Noise Reduction. I have to say though I’m already sufficiently fond of the Film Simulations alone that I rarely feel the need to adjust the other processing options available. You can see a variety of examples in my Fujifilm X100F sample images. If you’d like to see a formal report on the high ISO performance, I’ll direct you to the quality pages of my Fujifilm XT20 review as it shares the same sensor and image processor. Meanwhile, keep scrolling for my final verdict.
Check prices on the Fujifilm X100F at Amazon, B&H, Adorama, or Wex. Alternatively get yourself a copy of my In Camera book or treat me to a coffee! Thanks!

 The X100F takes Fujifilm's high-end compact series into its fourth generation, upgrading the earlier X100T with the latest X-Trans III / 24MP sensor (and its superior AF system), along with additional controls including an AF joystick and ISO dial. As before the core premise remains: a retro-styled body with a fixed 35mm equivalent f2 lens and a cunning hybrid viewfinder with optical and electronic views. There's no 4k movies, no weatherproofing, nor any stabilisation, and as before the lens remains soft at close distances. Indeed there's better high-end compacts for general use, or you could always go for an XT20 with a 23mm lens if you want the latest Fuji quality in a smallish body. But the X100F is a specialist camera, excelling at eye-level street photography, and will be adored by anyone who wants the X-Pro2 - and in particular its viewfinder - in a more compact form. If you understand and can exploit its unique benefits, I can recommend the X100F, and in the (likely continued) absence of an X70 update, it remains the smallest body with Fuji's best quality sensor.