Canon PowerShot S100
-
-
Written by Gordon Laing
Quality
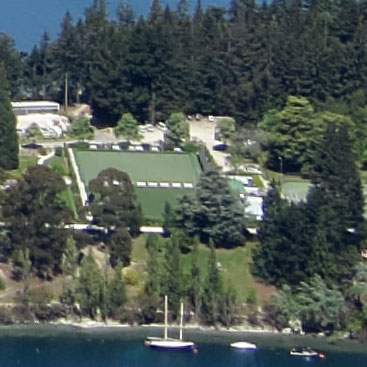
Canon PowerShot S100 Handheld Night Scene
In this first example, the S100’s Handheld Night Scene mode automatically selected 1600 ISO. It’s immediately clear from the crops below that the single-frame version in Program at the same sensitivity exhibits much greater visible noise than the composite Handheld Night Scene version. Meanwhile, the degree of detail is roughly similar. So Handheld Night Scene mode is acting like ideal noise reduction, greatly reducing the amount of visible noise without smearing-out fine details. A very successful result here for the S100. Scroll down for another comparison, or check out a selection of single-exposure shots in my Canon S100 sample images gallery. Alternatively skip to the chase and head over to my verdict!
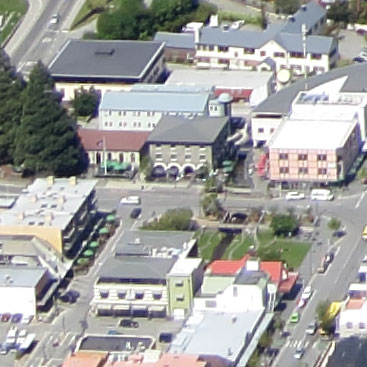
Canon PowerShot S100: Handheld Night Scene versus Program mode (at 3200 ISO)
For this second example, the PowerShot S100 selected 3200 ISO in Handheld Night Scene, making it easy to make a comparison in Program mode. As above, the degree of fine detail on both samples is roughly similar, but the Program version shows far more visible noise textures. In contrast the version taken with Handheld Night Scene is much smoother and cleaner, with virtually no visible noise speckles. Again it’s as if noise reduction has been applied, but without the compromise of smearing-out fine details. So in conclusion, Handheld Night Scene can prove to be a valuable ally when shooting under dim conditions at high ISOs. It really lives-up to its description too, as while this second example was shot from a tripod, the first really was handheld. Now head on over to my Canon S100 sample images for more real-life examples, or skip to the chase and check out my verdict!
| ||||||||||||||||||||||||||||||||||||||||||||||||||||||||||||||||||||||||||||||||||||


Canon S100 results : Quality / RAW vs JPEG / Noise vs S95 / Noise vs V1 / Noise Reduction / Handheld Night Scene
Canon PowerShot S100 vs PowerShot S95 Noise
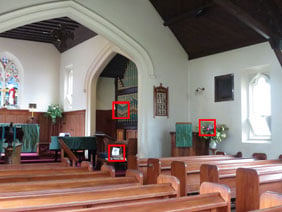
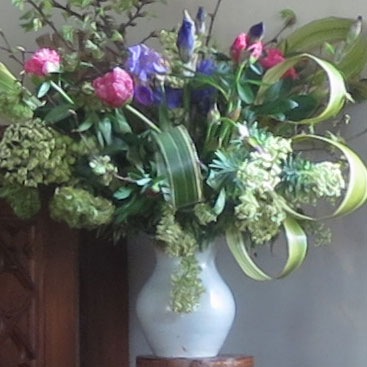
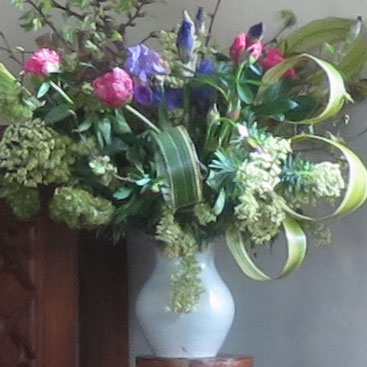
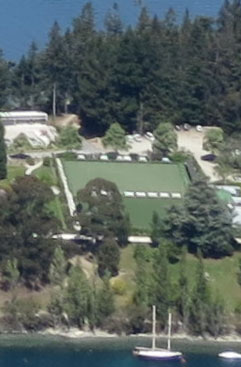
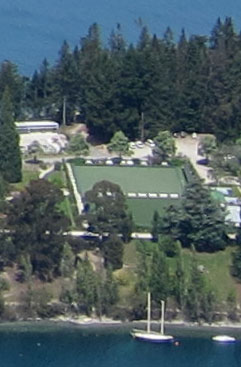
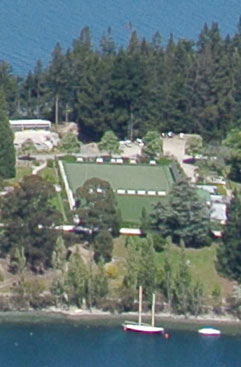
The image above was taken with the Canon PowerShot S100 with the lens set to 9mm (41mm equivalent) and the aperture set to f4 in Aperture Priority mode. At its base sensitivity of 80 ISO, the S100 metered an exposure of 0.8 seconds for this composition. The earlier PowerShot S95 metered an identical exposure moments later, so you’re comparing like-with-like for these two models below. Since the S100 has 12 Megapixels to its predecessor’s 10 Megapixels, its crops below show a slightly smaller area when cropped to the same size and viewed at 1:1. Just glancing at the crops, you’ll immediately notice a difference in processing style with the newer S100 delivering slightly softer-looking, more laid-back JPEGs using the default settings compared to the earlier S95 which looks quite punchy in comparison. We’ve seen similar differences before when comparing cameras which have switched from CCD to CMOS sensors, but the good news for anyone who prefers the punchier style of the earlier S95 is it can easily be achieved on the S100 by simply boosting the sharpness and contrast. You can do this via the Custom My Colours menu on the S100, or better still, apply it to a RAW file after the event. But if you stick with the default settings, expect to find JPEGs from the S100 appearing softer than those from the S95. Taking a closer look at the 80 and 100 ISO images, both cameras are recording roughly the same degree of real-life detail. There’s certainly no visible advantage to the S100’s extra two Megapixels here, so don’t upgrade from the S95 hoping for greater resolving power. But the good news is both cameras are delivering sharp and detailed images at these lowest sensitivities without any noise to speak of – and that’s not a foregone conclusion for cameras with small sensors these days. You may also notice the S100 lacking the coloured fringing of the S95 around the right edge of the vase. I suspect this is more down to in-camera reduction rather than superior optics, but either way it’s a relief to find Canon doing something about it on in-camera JPEGs at last when Nikon and Panasonic have been auto-correcting fringing for years. The edge of the vase also appears smoother on the S100. At 200 ISO, there’s minor evidence of noise textures on both images, but more so on the S95; it’s hardly anything to be concerned about yet though. But at 400 ISO those textures become more apparent on the S95 and by 800 ISO there’s a roughness to the edges on the earlier model. Meanwhile the S100’s images are definitely become slightly softer and less defined, but overall look cleaner. Some of this is due to noise reduction on the S100, and in my S100 Noise Reduction results page you’ll see with the setting turned down to Low, there’s certainly more speckles at this point. At 1600 ISO, both cameras are suffering with edges becoming less defined and fine details gradually disappearing. But while the S100 is still delivering a cleaner image with the default settings, both models are still pretty respectable. This is the benefit of having a slightly larger sensor than most point-and-shoot cameras, not to mention a sensible resolution. The Low noise reduction version of the S100 at 1600 ISO is also very usable. 3200 ISO is a step too far when viewed at 100%, but again the S100 enjoys a visible edge over the S95. Again though, these are still respectable results from a camera with a relatively small sensor. The S95 bows out at this point, leaving the S100 to bravely offer a 6400 ISO option at the full resolution; this isn’t particularly useful though and best left to emergencies and very small reproductions. The story doesn’t quite end there though as the S100, like Canon’s other HS models, offers a composite mode which stacks multiple images to reduce noise. The ISO setting in this Handheld Night Scene mode is set automatically, and under the conditions of the day, the camera selected 3200 ISO. Comparing the crop from the Handheld Night Scene mode to the single frame taken at 3200 ISO and it’s clear the former is much cleaner. There’s no additional detail, but the noise has been smoothed-out without any further loss of detail, which remains a good result. In the meantime, the earlir S95 only has its Low Light mode to offer, at a much reduced resolution. Here it’s also selected 3200 ISO, but the S100 image is clearly far superior. So if you use the S100 at its default settings, expect to enjoy cleaner but slightly softer-looking results than the earlier S95. It certainly enjoys slightly lower noise at higher sensitivities, but to get the best from the S100, I’d shoot in RAW and boost the sharpening and contrast. Either way, the bottom line is the S100 does deliver superior high sensitivity performance to the S95, but it’s not the difference between night and day. The old model still turns-in a respectable performance, and you’d have to look to the S100’s other benefits to consider whether it’s worth upgrading. As I mentioned earlier though, it’s great to see such good performance from a pair of cameras with relatively small sensors. They may be a step-up in surface area over typical point-and-shoot models, but their sensors remain much smaller than those we’re finding in mirrorless ILCs / system cameras, and of course the S100 and S95 boast zooms which start at a bright focal ratio of f2.0 and bodies which are truly pocketable. It’s nice to see these cameras can still cut-it in a market with increasing numbers of larger-sensor compacts. That’s not the end of the story for the Canon S100’s low light performance though. You can now adjust the Noise Reduction settings for in-camera JPEGs and in my S100 Noise Reduction page you can see how the settings compare. Like most recent Canon models the S100 also offers a composite Handheld Night Scene mode which stacks multiple shots in an attempt to reduce noise. Find out how it measures-up in my S100 Handheld Night Scene results, or Alternatively skip to my S100 sample images or straight to the S100 verdict.
|


Canon S100 results : Quality / RAW vs JPEG / Noise vs S95 / Noise vs V1 / Noise Reduction / Handheld Night Scene
Canon PowerShot S100 vs Nikon 1 V1 vs Panasonic Lumix G3 Noise
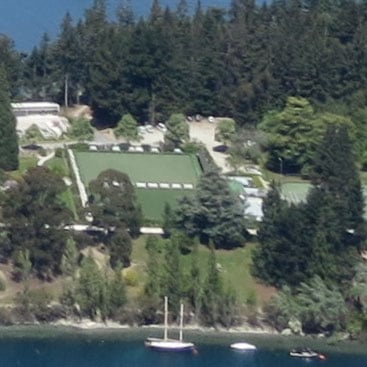
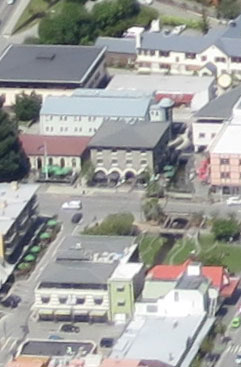
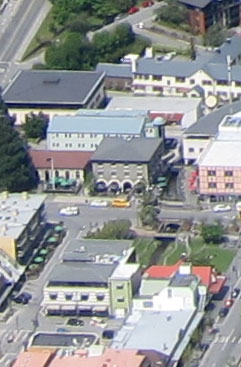
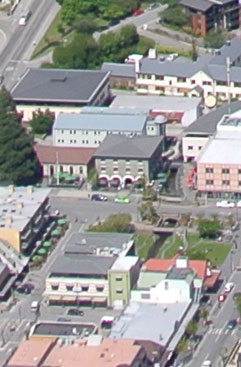
The V1 and G3 were fitted with their respective kit lenses: the 10-30mm and 14-42mm. The lenses on all three cameras were adjusted to deliver the same vertical field of view. Since the Nikon 1 V1 records slightly wider 3:2 shaped images, we’re effectively only using a 4:3 crop from the middle and ignoring thin strips on either side. As such when matching the vertical field of view with a camera sporting a 4:3 aspect ratio, we’re only using approximately 9 of the 10 total Megapixels on the Nikon frame. As such the Nikon 1 V1 has the lowest resolution of the three cameras tested here, which means its crops below show a slightly larger area when cropped to the same size and viewed at 1:1. Next comes the PowerShot S100 with 12 Megapixels and the Panasonic G3 with 16 Megapixels. I’ve arranged them below by sensor size though, with the Nikon V1 in the middle, flanked by the S100 and the G3. At first glance, the most obvious difference between the three cameras are their processing styles. The Canon S100 looks a little soft, while the Panasonic G3 has opted for a warmer white balance than the other two. Looking beyond these processing styles to actual noise and detail, the Nikon V1 crop exhibits minor noise textures at 100 ISO, but is crisper and arguably more pleasing than the S100. Meanwhile, the Panasonic G3 enjoys the cleanest, most detailed image of the three. At 200 ISO, all three cameras exhibit similar characteristics to the previous crops, although pixel-peepers may notice the S100 beginning to deteriorate very slightly. At 400 ISO though, noise textures have become more apparent on the V1 crop, and while they’re minimised on the S100 image, there’s some evidence of noise reduction at work. Meanwhile the Panasonic G3 again looks fairly unperturbed. At 800 ISO, the Nikon V1 looks almost the same as it did at 400 ISO, but while the Canon S100 is still showing lower visible noise, it’s now visibly doing so at the cost of higher noise reduction with an already soft image becoming softer still. As for the Panasonic G3, it’s now also beginning to show some faint noise speckles, but remains impressively clean none-the-less. With the sensitivity doubled again to 1600 ISO, the noise levels gradually increase on both the V1 and G3, but both are still delivering good-looking images, again with the G3 enjoying a lead. Meanwhile the S100 is struggling with an image becoming marred by high noise reduction and a gradual loss of both fine detail and overall saturation. At 3200 ISO, edges in the Nikon V1 crop are becoming indistinct with noise levels ever-increasing. The G3 image is also becoming pretty noisy at this point, but still holds onto reasonable detail. Meanwhile the S100 bravely continues, but its image is really falling apart now. All three cameras max-out at 6400 ISO and none are looking pretty. Unsurprisingly the G3 fairs the best of the three, followed by the Nikon V1 and as you’d expect the S100 is having the worst time of it. Overall this page confirms what you’d expect from traditional sensor technology: that the bigger the sensor, the better its light-gathering capabilities, which in turn means lower noise, so long as the real-estate isn’t squandered on too high a resolution of course. Most of us would expect the G3 to out-perform the V1, which in turn should outperform the S100 and that’s exactly what you see here. Drilling-down, it’s revealing to find visible noise on the V1 images from 200 ISO, although to be fair, Nikon has never been one to shy away from noise, preferring to reveal a few fine speckles in favour of smearing them and fine detail away with noise reduction. I prefer this approach, and while the V1 may not deliver clean noise-free images across most of its ISO range, the images are at least crisp and detailed. So while the Nikon 1 CX-format sensor may be relatively small compared to rival mirrorless ILCs, it really does deliver superior results in low light to point-and-shoot models – even top-of-the-range ones like the Canon S100. But there’s equally no denying that cleaner results at high sensitivities can be achieved with a camera sporting a bigger sensor, such as a Micro Four Thirds or Sony NEX model. That’s not the end of the story for the Canon S100’s low light performance though. You can now adjust the Noise Reduction settings for in-camera JPEGs and in my S100 Noise Reduction page you can see how the settings compare. Like most recent Canon models the S100 also offers a composite Handheld Night Scene mode which stacks multiple shots in an attempt to reduce noise. Find out how it measures-up in my S100 Handheld Night Scene results, or Alternatively skip to my S100 sample images or straight to the S100 verdict.
|


Canon S100 results : Quality / RAW vs JPEG / Noise vs S95 / Noise vs V1 / Noise Reduction / Handheld Night Scene
Canon PowerShot S100 Noise Reduction
Canon doesn’t disclose at which point the ‘High ISO NR’ kicks-in, but pixel-peepers might spot evidence of it in the highest setting pretty much from the start. The crops at 80 and 100 ISO look very similar at vifrts glance, but there’s a very mild texture on the Low and Standard NR crops that’s absent on the High setting. This becomes more obvious at 200 ISO, especially on the Low versus High NR crops, although again the difference remains fairly subtle. By 400 ISO though, the difference is becoming clearer, with mild speckles on the Low NR crop, faint speckles on the Standard and none at all on the High NR crop. The effect is even more apparent at 800 ISO where the speckles become clearer on the Low and Standard NR crops, but again are absent on the High NR crop. Noise reduction normally works by smearing out these speckles, often at the cost of fine detail, but judging from the crops below the S100’s Standard and High NR modes are doing a pretty good job at keeping the noise under control without compromising detail. It’s only at 1600 and especially 3200 ISO where the High NR setting has begun to visible deteriorate the fine detail. With these sensitivities, you may prefer to reduce the NR to Low and apply noise reduction after the event. At the top sensitivity of 6400 ISO, you might enjoy a superior result with the same technique, but the image data is already severally compromised at that point. Those who like tweaking JPEG engines will definitely appreciate the ability to adjust the noise reduction on the S100, but if you’re reducing it in order to apply third party NR in software later, it would make more sense to simply shoot in RAW and do it then. In that case, the presence of NR settings on the S100 aren’t really an advantage over the S95. But again, it’s nice to have them there. That’s not the end of the story for the Canon S100’s low light performance though. Like most recent Canon models it also offers a composite Handheld Night Scene mode which stacks multiple shots in an attempt to reduce noise. Find out how it measures-up in my S100 Handheld Night Scene results. Alternatively skip to my S100 sample images or straight to the S100 verdict.
|


Canon S100 results : Quality / RAW vs JPEG / Noise vs S95 / Noise vs V1 / Noise Reduction / Handheld Night Scene
Canon PowerShot S100 RAW vs JPEG
|
Canon PowerShot S100 (JPEG using in-camera defaults) |
Canon PowerShot S100 (RAW using DPP defaults + levels) | |
 |  | |
f4, 80 ISO |
f4, 80 ISO | |
 |  | |
f4, 80 ISO |
f4, 80 ISO | |
 |  | |
f4, 80 ISO |
f4, 80 ISO | |
 |  | |
f4, 80 ISO |
f4, 80 ISO |
Canon S100 results : Quality / RAW vs JPEG / Noise vs S95 / Noise vs V1 / Noise Reduction / Handheld Night Scene
Canon PowerShot S100 vs PowerShot S95 vs Nikon 1 V1 image quality
|
Canon PowerShot S100 |
Canon PowerShot S95 |
Nikon 1 V1 | ||
 |  |  | ||
f4, 80 ISO |
f4, 80 ISO |
f5.6, 100 ISO | ||
 |  |  | ||
f4, 80 ISO |
f4, 80 ISO |
f5.6, 100 ISO | ||
 |  |  | ||
f4, 80 ISO |
f4, 80 ISO |
f5.6, 100 ISO | ||
 |  |  | ||
f4, 80 ISO |
f4, 80 ISO |
f5.6, 100 ISO |
Canon S100 results : Quality / RAW vs JPEG / Noise vs S95 / Noise vs V1 / Noise Reduction / Handheld Night Scene


