Canon PowerShot G9
-
-
Written by Gordon Laing
Canon PowerShot G9 screen and menus
Canon PowerShot G9 features
Lenses / Screen and menus / Sensor and processing / anti-shake
The Canon PowerShot G9 employs a 3in colour monitor with 230,000 pixels. This is both larger and more detailed than the 2.5in, 207,000 pixel screen of its predecessor the G7, although fans of classic PowerShot G models will still lament the absence of a fully flip-out monitor. If you want a Canon with a flip-out screen, you’ll need to go for the PowerShot S5 IS or the PowerShot A650 IS.
On the upside, the screen isn’t just bigger and slightly more detailed than its predecessor; it also delivers an improved image. The colours look better than before and the viewing angle widened. That said, if Canon relented to give us RAW recording on the G9, could we put in a collective request for a flip-out screen on its successor?
Canon PowerShot G9 recording display
Like most compacts, the PowerShot G9 offers a choice of on-screen shooting details and guides. Pressing the display button cycles between three different states showing basic information, detailed information or switching the screen off altogether – you should select the latter to save power when using the viewfinder. A neat option is being able to fully customise what details are shown in the first two modes, with the G9 giving you the choice of displaying any combination of the shooting information, grid lines, 3:2 guides or a live histogram.
Like its predecessor, the PowerShot G9 employs a thumb wheel on the back to adjust items like the aperture and shutter, and we’re pleased to report it also retains the neat way of displaying the settings. In a smart piece of graphic design, the current aperture or shutter are not just shown numerically, but additionally on a scrolling scale which reveals the settings on either side. For example in aperture priority mode, if you select f5.6, you’ll see f4.0 to the left and f8.0 on the right in the graphical scale, with marks for the third-stop increments between them.
|
This is used to particularly good effect during auto-exposure AE lock, where scales are shown for both the aperture and shutter speed. As you turn the thumb wheel, the scales indicate what alternative shutter and aperture combinations could maintain the desired exposure. So if you locked the exposure with the camera reading, say, f5.6 and 1/60, the scales would show you could alternatively head in one direction for f8 matched with 1/30, or go the other way for f4 matched with 1/120. In practice it’s a very quick and intuitive way to see what exposure options are available and we have a full demonstration in our video tour.
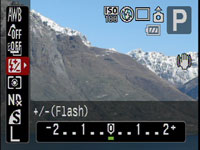
The PowerShot G9 has also inherited the useful Function menu system of its predecessor, providing quick and easy access to common settings. Pressing the Func Set button overlays a list of options running vertically down the left side of the screen which you can select using the up and down buttons. The currently selected item reveals its available settings in a horizontal line at the bottom of the screen and you can use the left and right buttons or the thumb wheel to adjust them.
 |
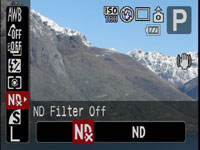 |
In P, A, S or M Modes for example, the options running vertically consist of White Balance, ‘My Colours’ options, Bracketing (for both exposure and focus), Flash Compensation, Metering, options for the built-in Neutral Density filter, Compression and Resolution. It’s a really quick and easy way to make adjustments to these settings, and we’ll discuss these in more detail on the next page.
Canon PowerShot G9 playback display
During Playback, pressing the Display button cycles between a clean full view, a full view with basic file information, a thumbnail view accompanied by a brightness histogram and full exposure details, and finally a focus confirmation option which shows two images, one of the entire frame, and a second showing the actual focus area enlarged.
This last option really comes into its own when you’ve used the G9’s Face Detection mode as it allows you to quickly cycle-through close-ups of people’s faces to check for red eyes or blinking. Pressing the G9’s Menu while in playback presents a number of options for adjusting images including a neat red-eye correction mode. This again uses face detection to frame the eyes of the subjects on your photos. You can then choose which frames to apply correction to and also whether you’d like the result to overwrite the original or create a new file.
The G9 also uses its orientation sensor to flip images by 90 degrees during playback if you physically turn the camera. This can be handy for viewing portrait aspect images full-screen. The thumb wheel on the back of the camera can also be used to quickly scroll through thumbnails.


