Canon PowerShot G10
-
-
Written by Gordon Laing
Canon PowerShot G10 lens and stabilisation
The Canon PowerShot G10 is equipped with a new 5x optical zoom delivering an equivalent range of 28-140mm and a focal ratio of f2.8-4.5; the actual focal length is 6.1-30.5mm and we counted 14 discrete steps when zooming from wide angle to telephoto. The closest focusing distance in Macro mode with the lens set to wide is just 1cm.
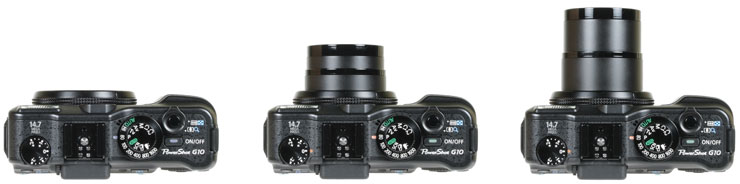 |
Upon power-up the lens barrel extends by 24mm with the camera ready for action in a fraction over one second – quicker than the 1.5 seconds of the G9. You can see examples above of the G10 when powered down, switched on, and zoomed-in. When powered-down, the barrel retracts within the lens housing which protrudes by 8mm from the main body itself – that’s only a couple of mm beyond the G10’s grip, meaning the camera when powered down has a fairly flat front.
The G10’s lens range is one of the major differences between it and its predecessor. The G9 featured a 6x range equivalent to 35-210mm, and now while the G10 has a slightly shorter 5x range, it starts at a much wider 28mm equivalent. There’ll be some who’ll miss the 50% longer reach of the G9, but most will prefer the G10’s wider angle coverage – something that’s been requested of Canon for a long time. To illustrate the G10’s coverage, we mounted it on a tripod and shot the same scene fully zoomed-out, then fully zoomed-in. You can see examples of this below.
|
Canon PowerShot G10 coverage | ||
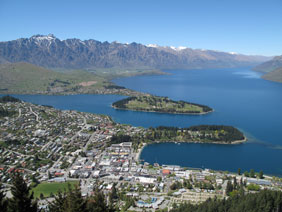 |  | |
6.1-30.5mm at 6.1mm (28mm equivalent) |
6.1-30.5mm at 30.5mm (140mm equivalent) | |
In use the G10’s wider angle coverage makes it feel completely different to the G9. When shooting our Gallery images, the G10 captured a noticeably larger field of view, which is a boon whether you’re shooting expansive landscapes, large buildings, cramped interiors or big group shots. There’s unsurprisingly higher geometric distortion on the G10 when fully zoomed-out compared to the G9 but most will be very happy with its new, wider coverage.
G9 owners who miss their longer coverage may be interested in fitting the optional TC-DC58D converter which fits onto the optional LA-DC58K accessory mount and multiplies the G10’s range by 1.4 times, effectively extending it to 196mm. These accessories do greatly increase the size of the G10 though.
While discussing optics, it’s also important to compare the G10 against its major rival, the Panasonic Lumix LX3 which has a quite different offering. At 2.5x, the LX3’s optical range is only half that of the G10, but it starts wider still at an equivalent of 24mm. This allows it to capture even larger fields of view, although with a maximum equivalent focal length of just 60mm, it won’t zoom anywhere near as close as the 140mm on the G10. Interestingly while Panasonic does offer a teleconverter for the LX3, it won’t extend the long-end of the range, instead multiplying it by 0.75x to deliver even wider angle coverage equivalent to 18mm.
The LX3’s range may be shorter, but its lens is optically brighter with an f2.0-2.8 focal ratio. This captures twice as much light as the G10 when both cameras are zoomed-out and just over twice as much when they’re both fully zoomed-in (albeit with the G10 delivering a much tighter field of view). This brighter focal ratio allows the LX3 to use faster shutter speeds or slower sensitivities under the same lighting conditions as the G10, and is a key advantage to the Lumix.
Beyond a shorter optical range though, the other downside to the LX3’s lens is the fact it requires a separate lens cap. Not only does this add extra thickness to the lens barrel, but it also delays the time taken for the camera to be ready for action – while additionally running the risk of getting lost.
Canon PowerShot G10 image stabilisation
 |
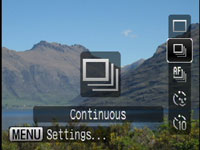
The G10’s optical range may have widened, but still thankfully features Image Stabilisation to counteract camera-shake. Canon offers three modes: Continuous where the system operates all the time, Shoot Only which only applies stabilisation as you take the photo, and Panning which only stabilises in the vertical axis for when you’re moving the camera horizontally as you take the photo – for an example of using the latter, see the Blurring Action tutorial at our sister site, DSLR Tips.
To put the G10’s stabilisation to the test we photographed a distant building with the lens fully zoomed-into its maximum equivalent focal length of 140mm, first with stabilisation disabled, then with stabilised set to the default Continuous mode. Traditional photographic advice would recommend a shutter speed of 1/140 to completely eliminate camera shake without stabilisation.
Canon PowerShot G10 Image Stabilisation off / on (Continuous) | ||
 | 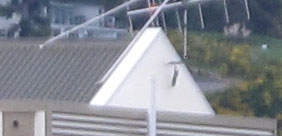 | |
100% crop, 6.1-30.5mm at 30.5mm, 1/10, 100 ISO, IS off |
100% crop, 6.1-30.5mm at 30.5mm, 1/10, 100 ISO, IS on | |
Above are 100% crops from the samples taken without, then with stabilisation at a shutter speed of 1/10 – the slowest we could reliably handhold with stabilisation. The version without stabilisation is unsurprisingly shaky, but the version with stabilisation is almost 100% shake-free. Achieving this at a shutter speed of 1/10 corresponds to just over three stops of compensation, which is an impressive result for the G10.
Canon PowerShot G10 focusing
 |
The Canon PowerShot G10 offers the choice of three AF modes: Face Detect, AiAF and FlexiZone. Like its predecessor, AiAF selects from nine AF frames concentrated on the middle of the frame, while FlexiZone allows you to manually move a single focus area over a wider area of the frame; in either mode, the actual size of the focusing areas can be adjusted between normal and small by pressing the DISP button. Focusing felt a little quicker than the G9, although not by a considerable margin.
In Face Detect mode, the G10 will track up to 35 faces and depending on the shooting mode, will automatically adjust the exposure, white balance and if necessary, the flash power for the faces. The G10’s latest DIGIC 4 processor also offers improved face detection over its predecessor, better locking onto subjects turned to almost complete profile.
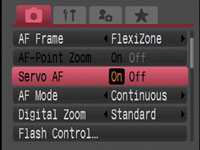 |
DIGIC 4 also equips the G10 with a new Servo AF mode which can track subjects in motion. This worked in practice with subjects approaching face-on, although the camera’s disappointing continuous shooting rates (see bottom of page) make it unsuitable for capturing action sequences.
 |
Pressing the MF button on the rear of the camera puts the G10 into its Manual Focus mode, after which you can use the thumb wheel to adjust the focusing distance, indicated by an on-screen scale. If MF Point Zoom is enabled in the menu, the portion in the AF frame is magnified by approximately two times. Given the higher resolution of the screen over its predecessor, manual focusing is easier to perform than the G9 and generally successful since the depth of field is never that small.
If you would like a little extra help with manual focusing though, the G10’s Safety MF option lets you get the focusing close by hand, then finishes it off automatically at a press of the focus point select button; in use though this had variable success. Alternatively you can opt for the G10’s focus bracketing mode which takes three shots: one at the manually focused distance, and the others a little closer and further. The nearer and further increments can be set to small, medium and large.
Canon PowerShot G10 sensor and processing
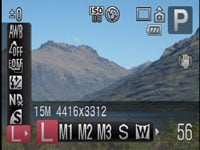
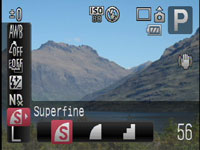
The Canon PowerShot G10 is equipped with a new 14.7 Megapixel CCD sensor, measuring 1 /1.7in and delivering 4:3 shaped images with a maximum resolution of 4416×3312 pixels. There’s the choice of four lower resolutions (9, 5 and 2 Megapixels plus a VGA mode) along with a cropped 16:9 aspect ratio. Images can be recorded in the choice of three JPEG compression settings of Normal, Fine and SuperFine, or you can record in a RAW mode at the full resolution, with or without an accompanying Large Fine JPEG.
 |
 |
The G10’s higher resolution sensor is one of headline differences between it and its predecessor. The G9’s 12.1 Megapixel sensor delivered images with 4000×3000 pixels, so the G10 boasts an extra 416 pixels horizontally and 312 pixels vertically; this allows you to make prints approximately one inch taller or up to 14.7x11in at 300dpi.
SuperFine JPEGs at the G10’s full resolution typically measure between 5 and 7MB, while RAW files weigh-in around 17MB each; there’s no built-in memory, but Canon bundles a 32MB SD card to get you started.
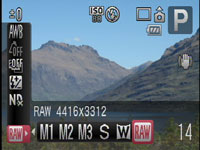 |
RAW recording is a key feature of the G10, and while also present on its predecessor, it was unforgivably removed from the G7 before that; indeed the G10 is the only non-DSLR in the current Canon range to feature RAW facilities. Canon supplies the G10 with its Digital Photo Professional software for processing RAW images and we have examples from both outdoor and studio environments in our results pages. Note, DPP’s lens correction options for DSLRs are greyed-out with the G10’s RAW files, so sadly there’s no adjustments for peripheral lighting, vignetting or distortion.
While Canon has fully embraced the Megapixel race with the G10, its arch rival the Panasonic Lumix LX3 held back by offering 10.1 Megapixels using a 1 /1.63in sensor. With a maximum resolution of 3648×2736 pixels, the LX3s images can only be printed up to 12.1×9.1in at 300dpi. This gives the G10 an advantage of around two inches in both axes when printed at the same resolution, although its higher pixel density raises concerns over noise levels. See our results pages to find out how the G10 performs. Note the LX3 also offers RAW facilities.
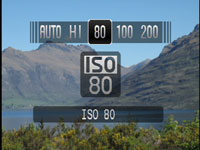
The sensitivity at full resolution runs from 80 to 1600 ISO and is selected using the dedicated dial on top of the camera. A 3200 ISO option is offered through the Scene preset menu, but operates at a greatly reduced resolution of just 2 Megapixels.
 |
Along with Auto and Auto Hi ISO settings on the dial, the G10 offers an Auto ISO Shift option for use when manually selecting the sensitivity. If the Shift option is enabled in a menu, the G10 will illuminate the Direct Print button when it believes the shutter speed will be too low to avoid camera shake. By pressing this button, the G10 will then temporarily switch to a suitably higher ISO to achieve a sufficiently quick shutter speed. The G10 tells you what ISO it’s proposing to use, so there’s no surprises. It’s a quick way of avoiding camera shake on spur-of-the-moment shots when the sensitivity’s manually set to a low value and you don’t have time to calculate what ISO would be more appropriate.
Canon claims the G10’s DIGIC 4 processor delivers superior noise reduction, although interestingly the camera doesn’t offer any settings to adjust it. You can see samples using the complete range of sensitivities on our G10 High ISO Noise results page.
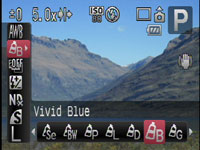
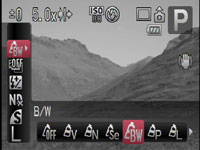
Contrast, Sharpness, Saturation and other colour settings are applied using a variety of options in the My Colours section of the Function menu. Along with the default Off setting, the G10 offers Vivid, Neutral, Sepia, Black and White (but no filter options), Positive Film, Lighter Skin Tone, Darker Skin Tone, Vivid Blue, Vivid Green, Vivid Red and a Custom option which lets you adjust the Contrast, Sharpness, Saturation, Red, Green and Blue channels, along with Skin Tone by +/-2 steps.
 |
 |
We used the default Off setting and found the G10 delivered natural colour and tone, but with relatively high sharpening at its lowest sensitivities. While this brought out all the fine detail captured by the very high resolution sensor, it also resulted in more obvious sharpening artefacts and noise textures when viewed at 100%. If you prefer a more toned-down approach you may wish to turn the sharpening down a notch in the Custom My Colours, or better still, shoot in RAW and apply more sophisticated sharpening not to mention noise reduction later.
Finally, the Function menu also lets you adjust the White Balance between Auto, Daylight, Cloudy, Tungsten, Fluorescent, Fluorescent High, Flash, Underwater or two Custom settings; like most non-DSLRs, there’s no manual entry of colour temperature, nor fine tuning of the white balance.
|
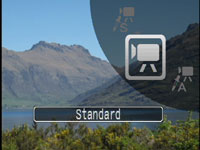
Canon PowerShot G10 Movie mode
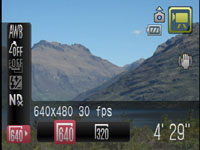
Like the PowerShot G9 before it, the G10 can record movies in either 640×480 or 320×240 pixels at 30fps. This may seem like the new model’s standing still, and indeed it’s disappointing there’s still no HD or even widescreen options, but there are differences between the G10 and its predecessor when it comes to video.
The DIGIC III processor in the older G9 encoded video in the ageing Motion JPEG format and stored it in an AVI wrapper. The DIGIC 4 processor in the new G10 employs the much more up-to-date H.264 format and stores it in a QuickTime Movie wrapper. H.264 is a more efficient compressor and allows the G10 to store its 640×480 pixel 30fps video using approximately 1.2MB/s. In contrast, the G9 set to the same video mode consumed closer to 1.8MB/s, making the G10’s files around one third smaller.
 |
 |
Of course the quality level could simply have been reduced, but movie files from the G10 look very good when played back: smooth motion with lots of detail and few artefacts to mention. The maximum file size for movies is 4GB, or one hour in length, whichever occurs first.
Sadly like the G9 there’s still no optical zooming while filming, just a 4x digital boost from whatever focal length you started filming at. Interestingly there’s also some options from the G9 that are missing on the new model. The slightly odd XGA mode which recorded 1024×768 video at a jerky 15fps is no longer present, and neither are the lower resolution 160×120 mode or the long play VGA option, although the latter is effectively redundant given the more efficient compression system.
We don’t particularly miss any of those extra modes, but it is a shame the G10 no longer features the time-lapse mode of its predecessor. This could capture some good-looking footage which otherwise requires significant manual shooting over an extended period, followed by assembly in software later.
Ultimately though the biggest missed opportunity on the G10 is an HD movie mode. The more efficient H.264 compression may be a nice bonus, but it seems slightly backward to only offer standard definition 4:3 video on a flagship compact – especially when Panasonic has been offering widescreen and HD options for some time. The Lumix LX3 is typical in featuring 1280×720 / 720p video at 30fps, along with an optional component output for connecting to an HDTV – even the lower-end Lumix FX35 has that.
It’s not like HD has passed Canon by in 2008 either. The DIGIC 4 processor is one part of the equation which allows the EOS 5D Mark II and the PowerShot SX1 IS to both offer full HD recording in the 1080p format. Both of these models may also employ CMOS sensors which Canon would argue is the other part of the equation, but many will still look at the G10 and wish it featured the HD movies and HDMI output of its super-zoom counterpart – and likewise, many will wish the SX1 IS featured the G10’s RAW recording.
Canon PowerShot G10 Drive modes
The Canon PowerShot G10 offers just one continuous shooting option, and disappointingly it’s getting slower with every generation. Two generations ago, the G7 offered a modest 2fps with the focus locked and the screen switched off, or 0.8fps with the screen and AF switched on. The G9 followed with 1.5fps with the focus fixed or 0.7fps with AF enabled. Now the G10 falls to just 1.3fps with fixed focus, albeit the same 0.7fps with continuous AF.
 |
To put this to the test we fitted the G10 with a formatted SanDisk Ultra II 1GB SD card and timed its continuous shooting in various configurations. We captured 50 Large Superfine JPEGs at 80 ISO in 35.8 seconds, corresponding to a slightly quicker than quoted 1.4fps. Switching to RAW only mode though saw the G10 fire-off 20 frames in 25.3 seconds, corresponding to a much slower rate of 0.8fps – although this is at least quicker than the 0.5fps measured with the G9 in RAW. While the earlier G9 would also slow down at 400 ISO or above, the G10 maintains its shooting rate up to and including 1600 ISO.
Despite those minor upsides over the G9, continuous shooting on the G10 remains a disappointment considering its premium status, even if it is shifting a considerable 15 Megapixels of data with every frame. It’s effectively unable to capture any kind of action sequence, and the ability to keep shooting until you run out of memory or track in AF is no real consolation.
In contrast, the Panasonic Lumix LX3 takes a more sensible approach to continuous shooting. Its buffer can capture eight standard quality JPEGs at 2.5fps – a speed that may still not be that impressive, but is almost double that of the G10. Alternatively there’s the High Speed Scene preset which drops the resolution to a mere 3 Megapixels, but allows you to shoot up to 100 images at 6fps. Both modes involve compromises and can’t match what you’d enjoy from a typical DSLR, but they do better-equip the LX3 for action sequences than the G10.
Finally, it’s worth noting the PowerShot SX1 IS along with its HD movie recording, also becomes the fastest continuous shooter in Canon’s 2008 compact range, firing off an unprecedented 4fps at its full 10 Megapixel resolution. Again, Canon attributes this to its CMOS sensor.
 |
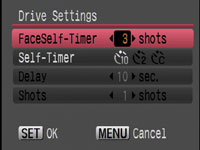 |
While continuous shooting on the G10 is a disappointment, Canon has at least put in some considerable effort to the self-timer section. Along with traditional ten and two second timers, the Custom option lets you set the countdown to as long as 30 seconds, and have the camera take one to ten shots at the end. This is handy for maximising your chance of successful poses and expressions in timed group shots.
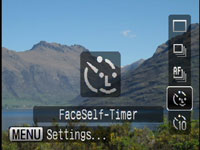
Cleverer still is the new Face Timer option, courtesy of DIGIC 4. This waits until a new face enters the frame before taking the photo two seconds later; you can also change the number of shots taken from one to ten. The photographer’s traditional sprint from the camera to join a group in self-timed composition may be a thing of the past.


