Canon PowerShot G10
-
-
Written by Gordon Laing
Canon PowerShot G10 design and controls
The Canon PowerShot G10’s exterior design is strongly based on the earlier G9 with only minor physical differences between the two. So like its predecessor, the new G10 is a solid block of a camera which borrows design cues from classic rangefinders to greatly appeal to photographic enthusiasts. We’ve pictured it below alongside Canon’s EOS 450D / XSi to illustrate the difference in size between it and a typical entry to mid-level DSLR.
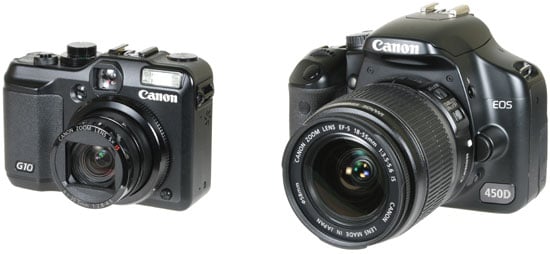 |
Measuring 109x78x46mm and weighing 397g with battery, the G10 may be larger and heftier than most compacts (and indeed a little bigger and heavier than the G9), but it’s considerably slimmer and more pocketable than a DSLR or even most super-zoom models. Its arch rival the Panasonic Lumix DMC-LX3 though is more pocketable still at 109x60x27mm and weighing 265g with battery. While those dimensions don’t include the LX3’s lens barrel which protrudes by 18mm even when powered down (plus a further 5mm with its lens cap), it remains a noticeably smaller and lighter camera overall.
 |
Like its predecessor though, the G10’s high density lends it an air of great confidence. Compare it side-by-side with the LX3 and the latter feels relatively empty, whereas the G10 gives the impression of being packed to the brim. Canon’s build quality here is superb, with the G10 feeling like a solid block.
Note: several owners of the PowerShot G9 have complained of dust getting into their cameras and onto the sensor, requiring a subsequent service to clean. Canon hasn’t reported any differences in the mechanical design of the G10’s lens assembly, so while we didn’t experience any dust while testing, we assume the new model could be equally susceptible. Like all dust issues, only anecdotal evidence over time will reveal a clearer picture – check our forum for updates.
The G10’s brick-like design and build may be similar to its predecessor, but Canon’s listened to comments and improved the ergonomics. The G10 features a thicker grip than its predecessor which offered little more than a slight bulge with a thin vertical strip on the front. This makes the G10 more comfortable and easier to hold for one-handed operation if necessary.
In terms of controls, the G10 may employ the same relatively tall and narrow shutter release button as its last two predecessors (albeit now coloured black), but there’s a number of changes on the upper surface. The dedicated ISO dial from the upper left side has now been replaced with a new dial for exposure compensation. There’s still an ISO dial on the G10, but it’s been relocated to the upper right side of the body, where it now sits below a smaller Command dial in a new two-tier arrangement.
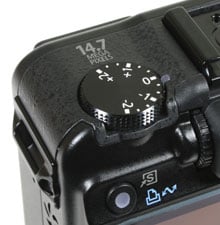 |
Canon’s thought-through the ergonomics and in practice the dials work very well. While there’s obviously some risk of them being turned when being removed from a bag or pocket, they’re sufficiently stiff (especially the dial for exposure compensation) for this rarely to be a problem – indeed one we never encountered while testing.
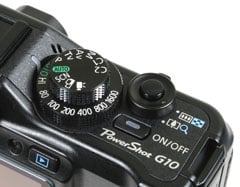 |
The two-tiered Command mode and ISO dials are also easy to turn independently without one affecting the other, even when gloved. Owners of older analogue film cameras may wonder why Canon chose to perch the Command dial on top of the ISO dial rather than the traditional compensation control, but that’s being a little pedantic. In use they’re a welcome and classy addition to a compact.
The G10’s Command dial offers the same modes as its predecessor: Auto, PASM, two Custom modes, stitch-assist, movie mode and a SCN position which accesses 15 presets and Canon’s colour swap and colour accent modes via an on-screen menu. Like its predecessor, the G10 offers complete manual control over both the aperture and shutter, and we have full details in the next section below.
 |
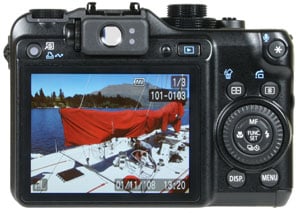
Round the back, the G10’s controls remain essentially unchanged from the G9. As before, they’re dominated by a thumb wheel which looks like a slightly smaller version of those on Canon’s mid to high-end DSLRs. By spinning the wheel in various modes, it’ll adjust the aperture, shutter speed or manual focus distance, along with quickly navigating menus or scrolling through images in playback. Like its bigger EOS brothers, it provides a very tactile and satisfying experience, and one which will be familiar to owners of Canon’s better DSLRs.
Unlike Canon’s DSLRs though which feature a single large SET button in the centre of the wheel, the G10 uses this space to accommodate the traditional cross keys with the FUNC / SET button in the middle. Pushing up, down, left or right will set the G10’s manual focus, drive mode, macro mode and flash modes respectively, while pressing the FUNC / SET button either confirms an action or fires-up the superimposed Function menu for quick access to various settings – see further details below.
Finally if you want to make a splash with the G10, it’s compatible with the optional WP-DC28 underwater housing, rated to depths up to 40m; note this is a different model to the DC21 which was designed for the G9.
Canon PowerShot G10 exposure and metering
The Canon PowerShot G10 offers shutter speeds from 1/4000 to 15 seconds, along with 10 apertures from f2.8 to f8 (when zoomed-out), and you have complete control over both settings in its Manual, Aperture or Shutter Priority modes.
 |
 |
Like many compacts, there’s some restrictions concerning the faster shutter speeds with certain apertures. With the lens zoomed-out, the fastest shutter speed of 1/4000 is only available between f5.6 and f8. Between f4 and f5, the fastest speed drops to 1/2500, while at f3.5 to wide open at f2.8, the maximum is 1/2000. With the lens fully zoomed-in, the maximum shutter speed is 1/2500, and then only between f6.3 and f8.
Interestingly, the Panasonic LX3 doesn’t suffer from similar restrictions, but then its maximum shutter speed is 1/2000. Fans of longer exposures though may be drawn to the LX3’s slowest shutter speed of 60 seconds. It is however worth noting the G10 makes it much easier to adjust its aperture and shutter with a spin of the large thumb wheel, whereas Panasonic forces you to prod a small, fiddly joystick; Canon’s solution is ergonomically superior, and also makes good use of graphics described in the screen section below.
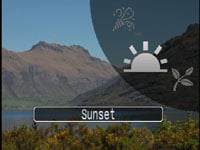 |
If you prefer an easier life for exposure, the G10 has Program AE and Auto modes, along with 15 scene presets and Canon’s Colour Accent and Colour Swap; like other Canon compacts, the Colour modes allow you to select a colour and either change it to something different (such as turning a red London bus green) or make it the only colour in an otherwise black and white image (like the girl with the red balloon in Schindler’s List).
The various automatic modes work well in practice, although Canon has resisted the temptation to offer intelligent scene recognition on any of its 2008 range, unlike Panasonic which offers it throughout including on the LX3. It’s not that big a deal when you’re talking about a higher-end product like the G10 which will normally find itself in experienced hands, but once you’ve used Panasonic’s Intelligent Auto mode, you wish all auto modes were as good.
 |
 |
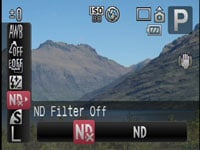
As before though, an interesting and fairly unique option on the G10 is its built-in Neutral Density filter, selected from the Function menu – this effectively reduces the sensitivity by three stops, allowing you to select long exposures or large apertures under very bright conditions. It’s a handy feature which eliminates the need to buy and attach a filter, let alone a filter mounting accessory.
 |
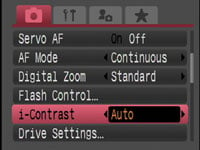
A new i-Contrast feature (disabled by default) can automatically boost shadow areas or detected faces darkened by strongly backlit scenes. In use it works like other dynamic range optimisers, effectively brightening darker portions of the image, albeit at the cost of increased noise in those areas; i-Contrast can also be applied to images in playback. For traditionalists or HDR fans who prefer to use multiple exposures to accommodate tough lighting conditions, exposure bracketing is also available, but fairly basic with three frames up to 2EV apart.
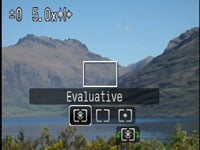
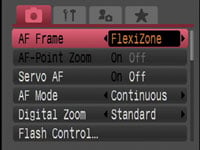
Finally, the G10 offers three main metering modes: Evaluative, Centre Weighted and Spot; the latter can be locked to either the central AE point or a selected AF frame in FlexiZone mode. We used Evaluative for all our test shots in Program mode and found few occasions when we wanted or needed to intervene with compensation.
Canon PowerShot G10 flash
 |
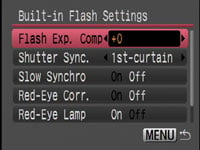
The Canon PowerShot G10 has a built-in flash that can be set to On, Off or Auto. A dedicated flash control menu offers flash compensation between +/-2EV, rear curtain and slow sync options along with red-eye correction. If face detection AF is enabled, the face brightness is also evaluated before firing the flash.
 |
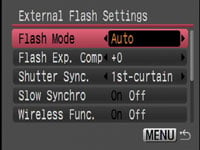 |
Like its predecessors, one of the G10’s highlights is a fully-functional flash hotshoe which can be used to mount an external Speedlite 220EX, 430EX II or 580EX II. With the 430EX II or 580EX II mounted, the flash control menu switches to external control, offering the same options as Canon’s latest DSLRs.
This allows you to again adjust flash compensation (albeit with a broader +/-3EV range), set rear curtain and slow sync options along with red-eye correction and wireless control. The maximum sync speed is 1/250. If you’d prefer something smaller, there’s also an optional HF-DC1 High Power flash unit which attaches to the side of the camera using a tripod bracket and supplements the built-in flash.
Support for external flashguns, especially proper Speedlite units, was always one of the aspects which took the G-Series beyond normal compacts and we’re pleased to find it the on the G10 along with the same built-in control as the company’s DSLRs. The G10’s improved grip also makes it easier to hold with a Speedlite mounted, but it can still be a challenge with some of the larger models like the 580EX II.
Canon PowerShot G10 Viewfinder
We’re pleased to see Canon’s resisted the temptation to remove the optical viewfinder from the G10. Despite fitting the camera with a superb screen (details below), you still have the option to compose with the camera held up to your face if preferred. This may be easier with very bright light shining on the screen, or at times when you want to save power.
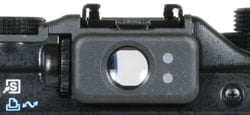 |
The G10’s optical viewfinder is however pretty small and only offers 77% coverage, compared to 100% on the main screen. Like its predecessor, feedback is limited to just two coloured lights, and you’ll also see the lens barrel in the corner of the view when zoomed-out. In the absence of proximity detectors, you’ll also need to manually switch the display off using the DISP button.
So the viewfinder is pretty basic, but it still gives the G10 advantages over rivals which don’t have one built-in, most notably the Panasonic Lumix LX3. Note the LX3 does offer a clip-on viewfinder accessory, but it’ll occupy the hotshoe and also doesn’t zoom with the lens.
Canon PowerShot G10 Screen and menus
 |
The Canon PowerShot G10 is equipped with a 3in screen with 460k pixels. This matches the size and resolution of the screen on the Panasonic Lumix LX3, although the G10’s screen is a squarer 4:3 in shape whereas the LX3’s has a wider but shorter 3:2 aspect ratio.
While the G10’s screen is the same 3in size as its predecessor, the boost in resolution from 230k to 460k pixels represents a decent upgrade. This corresponds to an increase in screen resolution from 320×240 to 480×320 pixels, and while that won’t make any difference to the recorded image quality, it does allow the screen to show more detail in composition and playback, along with smoother fonts in menus. It’s not as big a leap as the jump to the 920k, 640×480 pixel displays on many new DSLRs, but it’s still a very welcome improvement and looks great in practice.
The G10 may not feature the flip-out monitor of much earlier G-series models, but the viewing angle on its screen is very impressive, with the picture visible from extreme angles whether held high above your head or very low down. It’s also bright and reasonably easy to view in direct sunlight, although as mentioned above, there’s always the optical viewfinder to fall back on.
 |
 |
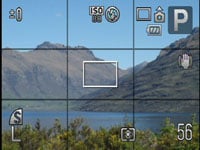 |
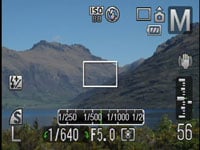
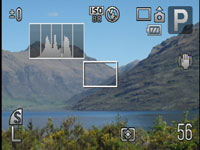
Pressing the DISP button while shooting cycles between two viewing modes and switching the screen off altogether. Like the G9, you can choose which options you’d like to see in the two viewing modes, customising them with shooting information, a live histogram, a three-by-three alignment grid and 3:2 shooting guides. Canon’s graphic designers have also tweaked the look of the histogram by using subtle graduations from grey to white as the bars increase in height; it’s also on a transparent background so not to block much of the view.
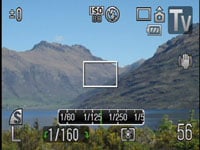
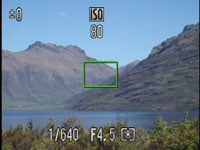
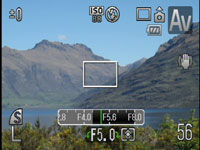
Like its predecessor, the PowerShot G10 employs a smart piece of graphic design where the current aperture or shutter are not just shown numerically, but additionally on a scrolling scale which reveals the settings on either side. For example in aperture priority mode, if you select f5.6, you’ll see f4.0 to the left and f8.0 on the right in the graphical scale, with marks for the third-stop increments between them.
 |
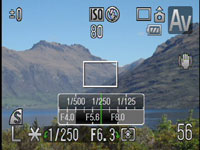 |
This is used to particularly good effect during auto-exposure AE lock, where scales are shown for both the aperture and shutter speed. As you turn the thumb wheel, the scales indicate what alternative shutter and aperture combinations could maintain the desired exposure. So if you locked the exposure with the camera reading, say, f5.6 and 1/60, the scales would show you could alternatively head in one direction for f8 matched with 1/30, or go the other way for f4 matched with 1/120. In practice it’s a very quick and intuitive way to see what exposure options are available.
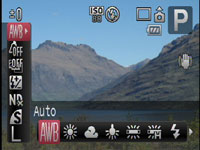 |
The PowerShot G10 has also inherited the useful Function menu system of its predecessor and other Canon compacts, providing quick and easy access to common settings. Pressing the FUNC SET button overlays a list of options running vertically down the left side of the screen which you can select using the up and down buttons. The currently selected item reveals its available settings in a horizontal line at the bottom of the screen and you can use the left and right buttons or the thumb wheel to adjust them.
 |
In P, A, S or M Modes for example, the options running vertically consist of White Balance, ‘My Colours’ options, Bracketing (for both exposure and focus), Flash Compensation, options for the built-in Neutral Density filter, Compression and Resolution. It’s a really quick and easy way to make adjustments to these settings.
Pressing the MENU button presents four tabs for recording options, setup, custom options and the configurable My Menu. Canon’s exploited the higher resolution of the screen with smoother fonts, finer details and backgrounds with coloured graduations.
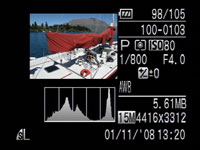
During Playback, pressing the DISP button cycles between a clean full view, a full view with basic file information, a thumbnail view accompanied by a brightness histogram and full exposure details, and finally a focus confirmation option which shows two thumbnails, one of the entire frame, and a second showing the active focus area enlarged.
 |
 |
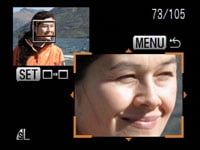 |
|
This last option comes into its own when you’re viewing photos taken with the G10’s face detection as it allows you to quickly cycle-through close-ups of people’s faces to check for focus, red eyes or blinking.
Pressing the G10’s Menu while in playback presents a number of options for adjusting images including a red-eye correction mode. This uses face detection to frame the eyes of the subjects on your photos. You can then choose which frames to apply correction to and also whether you’d like the result to overwrite the original or create a new file.
 |
The G10 also uses its orientation sensor to flip images by 90 degrees during playback if you physically turn the camera. This can be handy for viewing portrait aspect images full-screen. The thumb wheel on the back of the camera can also be used to quickly scroll through thumbnails, although when you settle on an image, there’s a slight pause as it enlarges to full screen. Zooming in and out of images and scrolling around them though feels very quick, and once again they look great on the high resolution screen.
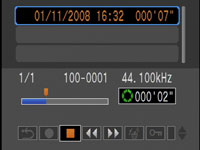
From the Playback menus you can also access the G10’s built-in Sound Recorder. Audio is captured with 16 bit resolution, at sampling rates of 11.025, 22.050 or 44.100 KHz for up to two hours per file. You can also set a wind filter and adjust the recording level for all audio capture. It’s a useful facility for taking spoken notes or even conducting an interview, although slightly odd to find it with the camera set to play rather than record.
Canon PowerShot G10 Battery and connectivity
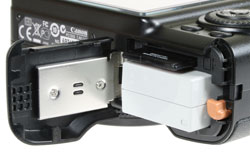 |
Canon’s switched to a new Lithium Ion rechargeable battery for the G10, called the NB-7L. This may be physically smaller than the NB-2LH employed by its predecessor, but with 1050mAh it sports around 50% more power. Along with additional power savings in the camera itself, this allows Canon to claim the G10 can take 400 photos under CIPA conditions with the monitor, or a whopping 1000 with the optical viewfinder alone.
 |
This is a big improvement over the 240 shots of the G9 with its screen or 600 with its optical viewfinder. So while anyone upgrading from a G9 won’t be able to reuse any spare batteries, most will be very pleased with the improvement in battery life. It also compares very favourably against the Panasonic LX3 which quotes just 290 shots under CIPA conditions, despite having a slightly more powerful 1150mAh battery.
The G10’s battery is housed in a compartment under the body which also accommodates an SD memory card slot. Like most compacts, this door is blocked when mounted on a tripod.
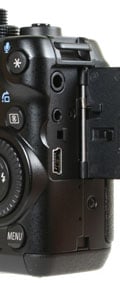
As before, the G10’s ports are hidden behind a small door on the right side of the body, although alongside the separate USB and TV ports is a new one for an optional RS60-E3 cabled remote. What you won’t find on the G10 though is any kind of HD connectivity, be it analogue component or digital HDMI. This puts it behind the Lumix LX3 which offers optional component video output for HD slideshows – not to mention HD video recording which we’ll discuss on the Features page.


