Canon EOS 7D
-
-
Written by Gordon Laing
Canon EOS 7D design and controls
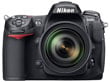
Canon’s EOS 7D greatly resembles the existing EOS 50D when viewed from the front, although the 7D’s head is chunkier to accommodate the bigger prism for its viewfinder; that said, the head isn’t as tall as the EOS 5D Mark II, which of course needs a bigger prism still to handle the full-frame format. We’ve pictured the EOS 7D below, alongside its arch rival, the Nikon D300s.
 | ||
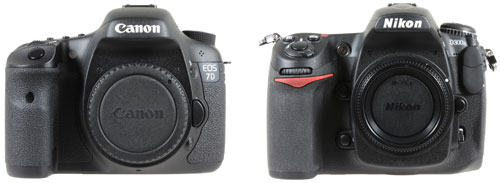 |
The Canon EOS 7D body measures 148x111x74mm and weighs 900g with battery. This makes it only fractionally larger than the EOS 50D (2mm wider and 3mm taller), although it’s 88g heavier. The EOS 5D Mark II is slightly larger overall (4mm wider, 3mm taller and 1mm thicker), although actually weighs 10g less.
At 147x114x74mm, the Nikon D300s is 1mm narrower, 3mm taller and the same thickness, but is slightly heavier at 920g including battery. With only a few grams between them, the EOS 7D, EOS 5D Mark II and Nikon D300s bodies (plus batteries) unsurprisingly feel roughly the same weight in your hands, although you do notice the EOS 50D feeling a little lighter.
The three Canon bodies may look roughly similar in terms of styling and finish, but the EOS 7D actually feels quite different in person. The EOS 50D and 5D Mark II share similar inside grips which like earlier Canon bodies curve round to a flat edge which meets the main body at 90 degrees. The EOS 7D’s inner grip however dips subtly inwards to provide slightly better purchase for your finger tips. It’s in no way as pronounced as the curved inner grip of Nikon’s bodies which almost act as a hook for your fingers, but in our view it’s an improvement over the earlier design.
 |
More obviously on the rear of the EOS 7D, the entire length of your thumb presses up against a diagonal ridge which extends almost to the bottom of the body. This is in stark contrast to the EOS 50D and 5D Mark II which both employ little more than a bulge for the top section of your thumb only in the upper right corner of their bodies. This makes the EOS 7D feel much more comfortable and secure to hold than the other two Canons. Revealingly, Nikon’s D300s also features an extended thumb rest, so Canon’s clearly taken ergonomical inspiration from its rival – and in our view that’s no bad thing as we’ve felt Nikon has previously enjoyed a lead in this respect.
The EOS 7D also has a sense of greater solidity than the EOS 50D and 5D Mark II – it feels more like a shrunken EOS 1 series body in your hands. Indeed Canon additionally describes the EOS 7D as having environmental sealing that’s equivalent to the EOS 1N, a pro film SLR of the mid-Nineties. Canon explained to Cameralabs that the EOS-1N is used as a comparative model because it has better weather resistance than previous XXD models. So the weather sealing on the 7D is superior to that of the 50D, and slightly better than that of the 5D Mark II, but not as much as the 1D series. In addition to the various gaskets and seals on the 7D, the fit of the body panels where they meet is much tighter than the 50D. It all adds up to a body which simply feels more confident in your hands.
Indeed for the first time in our comparisons, the rival Nikon body no longer feels like it enjoys an ergonomical advantage. We still personally prefer the more pronounced hooked inner grip on the D300s (especially for those with smaller hands), but overall, it and the EOS 7D actually feel quite similar. Both feature reassuringly solid bodies with comfortable grips coated with tactile rubber finishes. As always personal preferences will almost certainly see you favouring one over the other, but in our view it’s the closest the two companies have yet come on their non-pro bodies and essentially an even draw. Canon’s certainly put some effort into the design and build quality of the EOS 7D and it really shows – in your hands it’s the best non-pro EOS yet.
 |
In terms of controls, the EOS 7D shares a number of similarities with earlier Canon models, meaning anyone familiar with an existing EOS DSLR will be up and running with ease. There are however a few key differences, especially involving Live View and the Movie mode which we’ll highlight as we go over the controls.
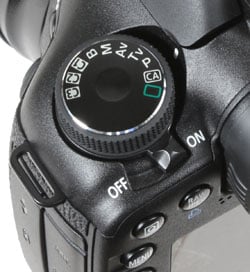
Starting on the upper left side of the body, the EOS 7D shares essentially the same Command dial as the EOS 5D Mark II. As such there’s the traditional PASM, Bulb, Green Square Auto, three Custom modes and Canon’s Creative Auto setting; unlike the EOS 50D, there’s no scene presets, confirming the 7D as a more ‘serious’ camera.
 |
That said, the presence of Creative Auto on the Command dial is slightly contradictory in this respect, as it essentially offers a beginner-friendly version of Aperture Priority. So instead of dialling-in an f-number, the Creative Auto mode presents an on-screen slider to adjust the background sharpness. A second slider is used to adjust the exposure compensation. It’s a friendly approach to controlling depth-of-field, but arguably better-suited to entry-level models than the EOS 7D.
In an interesting move, Canon’s shifted the power switch from its usual position below the thumb wheel to around the base of the Command dial. This new chunky switch feels much more tactile than the previous system, and also unlikely ever to get knocked accidentally. In case you’re wondering, the thumb wheel can still be locked, this time with a new equally chunky switch.
 |
| |||||||||||

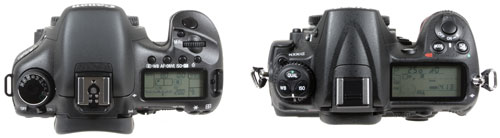
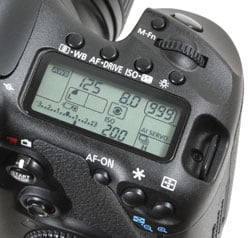
Like most semi-pro DSLRs, the EOS 7D’s upper right surface is dominated by a detailed LCD information screen, which on the 7D indicates the Shutter Speed, Aperture and shots remaining, the White Balance, quality, metering, bracketing and AF modes, an exposure compensation scale from -3 to +3EV, the ISO value and drive mode. That pretty much covers all bases, although Nikon’s D300s trumps it by also showing each of its active focusing points along with usefully abbreviating the shots-remaining counter so figures greater than 999 are shown as, say, 1.1k for 1100 shots.
Like earlier semi-pro Canon DSLRs, three dual-function buttons run along the top side of the screen, although strangely these are smaller than those on the EOS 50D and 5D Mark II, while also lacking the latter’s useful protruding surrounds. Their functions remain the same as these two models though.
The first button on the left adjusts the metering and White Balance, the second adjusts the AF and drive modes, while the third adjusts the sensitivity and flash compensation. While each button can be pressed and held like a shift key as you turn either the finger dial or thumb wheel, it’s also possible to adjust the settings by pressing the button once, then moving your finger or thumb to the appropriate dial within a few seconds. This allows you to easily make the required adjustments without removing your right hand from the main grip.
Like the EOS 5D Mark II and Canon’s other higher-end DSLRs, the shutter release is a soft-touch type, avoiding the half-press click of the EOS 50D and cheaper models. This further aligns the EOS 7D with the pro models, although some people actually prefer the click-half-press of the lower-end range.
You’ll also find a new M-Fn button to the upper left side of the shutter release which can be configured as a shortcut to various settings. By default it acts as a flash exposure (FE) lock, firing a pre-flash to calculate the required level. It also allows you to switch between the various AF modes having first pressed the AF area button.
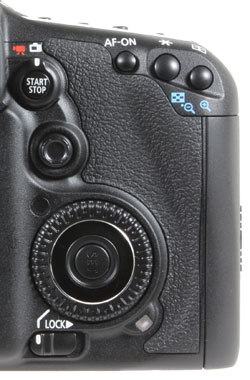 |
The rear of the camera remains dominated by one of Canon’s large thumb wheels, a standard fixture on all but its entry-level DSLRs. In Program, Shutter and Aperture priority, the wheel is used to adjust the exposure compensation, while in full Manual it controls the Aperture value. As mentioned above, it also adjusts the White Balance, Drive mode and Flash compensation when these respective buttons are pressed first. In the 7D’s menus, it’s used to scroll up and down options on a page, and in playback it’ll scroll between images. It’s a very tactile control that allows quick adjustments, with a satisfyingly large SET button in the middle to confirm options.
Canon regulars will also recognise the small joystick to the upper left of the thumb wheel, which again allows you navigate menus along with the options on the on-screen Q Menu. Unlike previous models though, a dedicated Q button in the upper left corner of the body fires-up this control system, rather than having to push the joystick in.
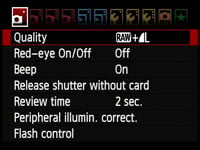
Alongside the Q button you’ll find a new one-touch RAW+JPEG button, which shares the Direct print control. By default, if you’re shooting JPEGs alone, pressing this button will temporarily switch the 7D into RAW plus JPEG mode. Similarly if you’re shooting RAW files alone, pressing this button will set the camera to record JPEGs too. A dedicated menu area allows you to set the RAW and JPEG quality settings for use with this button, so that, say, the accompanying RAW or JPEG files are recorded at a lower resolution.
Arguably the biggest operational change though concerns the means by which you enter Live View and the Movie mode. On previous Canon DSLRs, you almost got the feeling the company was either uncomfortable promoting either feature or simply didn’t know where to fit the controls for it. The resulting operation was unsurprisingly unintuitive and left most first-timers reaching for the manual.
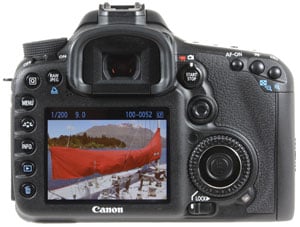
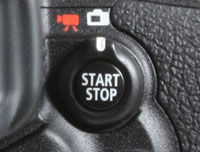
In stark contrast, the EOS 7D now features a brand new circular switch to the right of its viewfinder with a Start / Stop button in the middle. The switch has two positions: Live View and Movie mode. When set to Live View, pressing the button in the middle flips open the mirror and shutter to deliver a live feed to the screen, and pressing it again exits live view. When switched to Movie mode, the mirror and shutter open straightaway to allow you to frame with the screen, while the button starts and stops recording.
This is so much more intuitive than previous Live View and Movie mode implementations on Canon DSLRs and a very welcome improvement. Conflicting menus are also avoided by simply only showing movie options when the camera’s set to Movie mode, and at long last, you can trigger the autofocus with a half-press of the shutter release. Canon’s finally got it right and we look forward to seeing a similar implementation rolled-out across its future DSLRs. See below for full details on the Live View system.
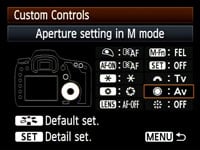 | 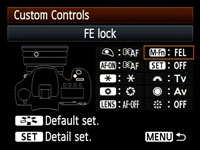 |
Finally, the EOS 7D offers broad customisation of its various controls through a new Custom Controls menu.
This graphically highlights the position of the control on a schematic diagram of the body so you’re in no doubt what you’re changing. It’s a nice interface to use, although yet another idea borrowed from Nikon’s latest DSLRs.
Canon EOS 7D flash
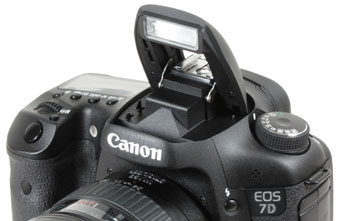 |
The Canon EOS 7D features a built-in flash, which can popup by itself in the fully automatic modes, or at a push of a button in other modes; like the 50D, this flash is flickered for AF assistance rather than using a dedicated lamp like Nikon’s bodies.
The 7D’s fastest flash sync speed remains 1/250, although the Guide number has slightly reduced from 13 to 12m at 100 ISO. This is because the flash coverage on the EOS 7D has been widened to match lenses with a 15mm focal length, such as the new EF-S 15-85mm IS kit zoom.
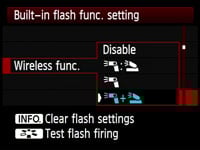
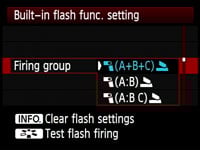
More importantly, the EOS 7D’s built-in flash becomes the first on a Canon DSLR which can act as a wireless Speedlite transmitter. This is a very welcome feature which allows the 7D to control multiple groups of Speedlites without the need for an additional master unit. It’s a great upgrade for the 7D, although one that’s long overdue having been present on rival Nikon bodies for some time.
 |
 |
 |
There is of course a hotshoe on the top of the body, which like the EOS 50D and 5D Mark II features a plastic surround which mates with Canon’s higher-end Speedlites to provide environmental sealing. Behind one of the side flaps there’s also a PC Sync port for connecting to studio lighting – see port section at the bottom of this page.
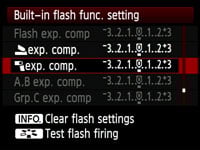
Like recent Canon DSLRs, the EOS 7D offers options to configure both the internal and compatible external flashguns. Options for both types include flash compensation, curtain sync, wireless setting and E-TTL II mode. External Speedlites which support camera-control include the 430 EX II and 580 EX II. Connect one of these and the camera controls additionally offer flash bracketing and zoom options.
Canon EOS 7D viewfinder
The Canon EOS 7D’s viewfinder is one of the highlights of the new body. It becomes the first Canon DSLR to deliver 100% coverage with 1.0x magnification – in simple terms, this means the view is both large and an accurate representation of what you’ll capture. The view is delivered by an over-sized prism which is responsible for a head section that’s chunkier than the 50D; the eyepiece also protrudes further out and has a larger rubber surround.
 | |
In terms of numbers, the EOS 7D’s viewfinder is larger and more accurate than the 95% / 0.95x viewfinder of the EOS 50D. It’s also slightly more accurate than the 98% coverage of the EOS 5D Mark II’s viewfinder, although as a full-frame model, the Mark II delivers a larger overall view. The Nikon D300s matches the 100% coverage of the EOS 7D, although numerically sounds like it’s at a slight disadvantage with 0.94x magnification; these figures don’t tell the whole story though as you also have to take the exact sensor size into consideration.
During our tests with the EOS 7D we had the EOS 50D, EOS 5D Mark II and Nikon D300s all to hand and were able to make direct side-by-side comparisons. In terms of the size of the view itself, the EOS 7D’s viewfinder certainly looks a little larger than the EOS 50D, although it’s not as dramatic as the numbers suggest. Compared to the Nikon, the fractionally larger sensor of the D300s actually compensates for its slightly smaller magnification, with the final viewfinder size being roughly equivalent to that of the EOS 7D. Finally, the EOS 5D Mark II comfortably trumps them all – it may only have 0.71x magnification, but that’s against a much larger full-frame sensor, which in turn makes its viewfinder view the largest of the four models.
In terms of coverage, the reality matches the figures quoted above: the EOS 7D and D300s both enjoy the full 100% coverage, so there’s no surprises around the edges of your captured frame. The EOS 5D Mark II is only slightly behind at 98%, but the EOS 50D at 95% does capture a fraction more around the edges of the frame than you’ll see through the viewfinder. You can of course turn to Live View on any of these models for 100% coverage, but it’s certainly nice to also have it in the viewfinder of the EOS 7D and D300s.
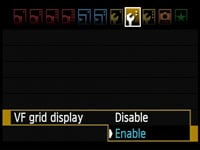 |
The EOS 7D borrows yet another technology popularised by Nikon by becoming the first Canon DSLR to feature a transmissive LCD panel in its viewfinder. Like the D300s, this allows the 7D to electronically switch a handy alignment grid on and off in the viewfinder, rather than relying on optional focusing screens which were never convenient to swap. Canon also uses this technology to display a circle indicating the spot-metering area when this option is selected.
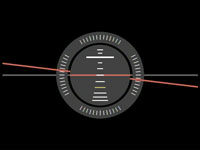
Like most of Nikon’s bodies, this transmissive panel is additionally used to display the active focusing points, and in another significant upgrade, the EOS 7D features a brand new 19-point AF system. We’ve fully-detailed this on the next page, but for now the image pictured here shows the EOS 7D’s viewfinder with everything switched-on. It looks cluttered here, but like Nikon’s models, you’ll only normally see a few AF points in use, with non-active graphics effectively becoming invisible.
Both the D300s and EOS 7D feature electronic levelling gauges which indicate whether the camera is tilted. Canon’s is a more sophisticated system though, offering two axes to the D300s’ one, and while both cameras can show the gauge on-screen, the 7D alternatively offers it through the viewfinder using the AF points. To be fair to Nikon though, its full-frame D700 also offers a viewfinder gauge, this time using the EV scale, albeit to indicate horizontal tilt only. You can find out more about the EOS 7D’s on-screen version right now in the screen and Live View section below.
Canon EOS 7D screen and live view
The Canon EOS 7D is equipped with a 3in 920k VGA screen which matches the size and resolution of both the EOS 50D and EOS 5D Mark II, but employs a new Clear View II panel which claims to reduce glare by removing the air-gap between the screen cover and the actual liquid crystal below. This is instead filled with an elastic optical material.
 |
This actually works quite effectively in practice. Many of the shots in our results and gallery pages were taken with very bright sunlight shining directly onto the camera’s screen, and in each case, the EOS 7D’s monitor remained more visible than the EOS 50D, EOS 5D Mark II or Nikon D300s. Don’t expect miracles though: under extremely bright conditions, the 7D’s screen will still become hard to see, but it’s certainly an improvement over the other models in terms of suppressing reflections and glare.
Like the EOS 5D Mark II before it, the EOS 7D also features a sensor to the side of the screen which can detect the ambient surroundings and adjust the screen brightness to match. In use this can help in bright conditions, while equally dimming the screen when it’s dark so not to blind you. Beware though as it can sometimes give a slightly skewed representation over the brightness of the image you’ve just captured, especially under very Sunny conditions when it’s at its maximum brightness. We’d recommend anyone shooting with this auto brightness setting check their histograms in playback for a more accurate representation, or set the screen brightness manually.
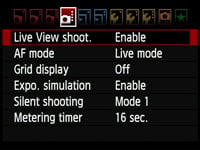
The EOS 7D is equipped with Live View facilities, which once operational work similarly to those on previous Canon models. But Canon has listened to feedback and made some sensible improvements to entering Live View in the first place while also avoiding the often confusing menus of the EOS 5D Mark II.
 |
Unlike the EOS 50D and 5D Mark II which featured buttons to the left of their viewfinders to enter Live View, the EOS 7D now features a small dial to the right with a Start / Stop button in the middle. With the dial pointing upwards at the Live View icon, just press the Start / Stop button to enter Live View and again to exit. And unlike those two older models, there’s no need to enable Live View first from a menu – it’s already enabled by default.
Even better Canon finally allows you to autofocus in Live View by simply half-pressing the shutter release. This is much more intuitive than pressing the AF-ON button on the back, although you can still do this if you prefer. These changes of enabling Live View by default, providing an obvious control for entering and exiting the mode, and auto-focusing with the shutter release may be simple modifications, but they greatly improve the overall user experience.
 | 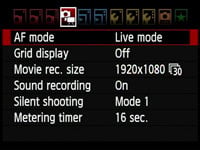 |
The small dial’s second position switches the EOS 7D straight into its Movie Mode, after which the Start / Stop button begins and ends filming. With the 7D set to Movie Mode, it also swaps the normal Live View menu for one with Movie options, so if you were wondering where the video quality settings were, you’ll need to enter Movie Mode first. Again this is much more intuitive than having pages of often confusing options for both Live View and Movies as found on the EOS 5D Mark II. A big improvement all round Canon, thanks.
Once Live View is active, the presentation and options are essentially the same as the EOS 5D Mark II, with a few minor changes. Live View on the EOS 7D offers 100% coverage and exploits the full VGA resolution of the screen, refreshed at a smooth 30fps. The effect of different apertures can be previewed by pressing the depth-of-field preview button below the lens release. The camera will temporarily increase the screen brightness to maintain a consistent image; this may result in greater on-screen noise, but it won’t appear in the final image.
 |
 |
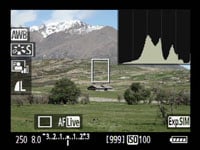 |
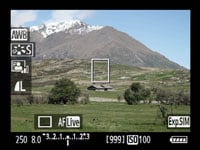
Pressing the Info button cycles between a clean view, one with shooting information running beneath the frame and a third view which superimposes additional information over the image. If Exposure simulation is enabled in the Live View menu, a fourth view adds a Live Histogram to the frame, which looks very detailed thanks to the VGA resolution.
 |  |
 |  |
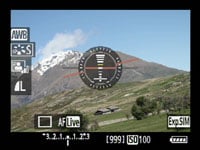
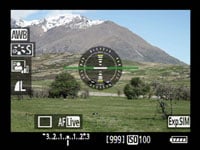
New to the EOS 7D is a fifth page which super-imposes a small levelling gauge in the middle of the screen. This is yet another feature borrowed from Nikon’s DSLRs, although Canon trumps the D300s by indicating vertical tilt in addition to horizontal. It may not look as pretty as Nikon’s level gauge, but with two axes of tilt, it’s more useful. The gauge is also available outside of Live View, again by pressing the Info button – see Menus section below.
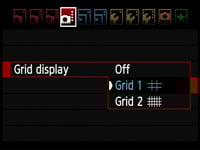
There’s also the option to superimpose one of two alignment grids on-screen, although these are still enabled from the Live View menu, when it would surely be quicker and more intuitive to have them appear while pressing the Info button. The Nikon D300s toggles its grid in Live View using the Info button and it’s much easier, although it should be noted the D300s still doesn’t feature a Live histogram – these are unforgivably (and inexplicably) absent on all Nikon DSLRs other than the top-end pro models.
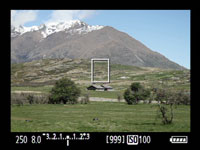
Like the EOS 50D and 5D Mark II before it, the 7D offers the choice of three AF modes in Live View, although they’ve had a minor reshuffle: the default option is now Live Mode which employs a silent and uninterrupted contrast-based system. The second option sticks with contrast-based focusing, but adds face detection. Finally, the Quick Mode flips the mirror down to take a reading from the traditional 19-point phase-change AF system. Once again we’re pleased to report an intuitive half-press of the shutter release can be used to trigger the autofocus in any mode, although pressing the AF-ON button on the rear has the same effect if preferred.
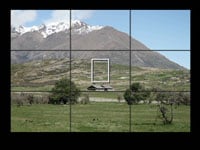
With the EOS 7D set to Live mode, you’ll see a single large white frame which can be moved around the screen using the joystick. Half-press the shutter release and the 7D will focus on whatever’s in the frame. At best this will take just under two seconds before the frame turns green with a double-beep to confirm, but with trickier subjects the process can take closer to four seconds. There isn’t any interruption to the display though, nor the sound of the mirror flipping.
 |
 |
 |
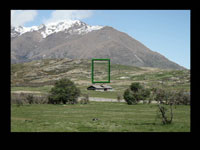
The Live mode with face detection (indicated by a smiley icon) uses the same contrast-based system as normal Live Mode, but if it recognises a human face, it’ll frame it with a box and focus on that when you half-press the shutter release; if there’s more than one face in the scene, you can use the joystick to select the one to focus on. As you might expect, the 7D’s DIGIC 4 processors can certainly track faces around the frame with ease, but the actual focusing process itself can still be slow, and if the face isn’t already sufficiently sharp to start with, the system won’t even recognise it. If you’re lucky, the camera will lock on and confirm within a couple of seconds, but if it ends up being longer, it’s easier to exit Live View and frame portraits through the viewfinder instead.
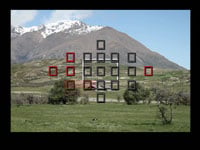
In Quick mode you’ll see a graphical representation of the 19 AF points on-screen. Half-press the shutter release and the mirror briefly flips down to take a reading, indicates the active AF points in red with a double beep if sounds are enabled, then flips back up again to continue the view. There’s obviously some noise and an interruption to the image, but it remains the quickest of the three AF modes in Live View – indeed, if the AF system locks onto the subject without a problem, the entire process can take less than a second.
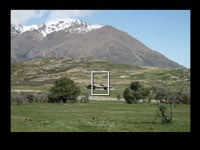
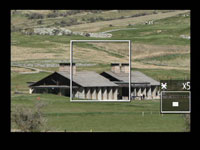
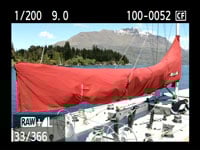
At any time during the Quick or Live AF modes, you can press the magnify button to show a 5x view, then a 10x view. The 7D will zoom-in on wherever the white frame is positioned on screen, which can be moved before or during using the joystick. At 10x, the 7D shows an area that’s one tenth the width of the full image as you’d expect, but then scales this 518 pixel wide crop to fill the 640 pixel width of the monitor. So the 10x mode actually appears to be operating at slightly greater than 1:1 magnification.
 |
 |
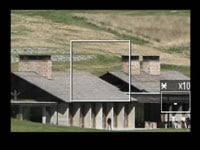 |
Purists may have preferred an exact pixel-mapped 1:1 viewing mode, but at 10x there’s little evidence of scaling or fuzziness; indeed the image looks pin-sharp and allows you to make very precise focus adjustments. The 30fps frame rate is also very smooth when panning the camera.
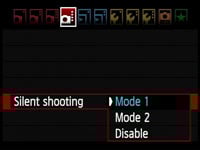 |
The EOS 7D also inherits the silent shooting options of the 50D and 5D Mark II. Mode 1, the default, is quieter than normal shooting and also supports continuous shooting at around 7fps, although you’ll be shooting blind with both the screen and viewfinder blanking out while you keep the shutter release pressed.
Mode 2 is quieter still by employing an electronic first curtain shutter to actually take the picture, but delaying the noisier re-cocking of the physical shutter so long as you keep the shutter release held. The idea is to press the shutter release button to take the photo (with a very faint click), but keep it held until you’re out of ear shot, after which you can let go, allowing the 7D to audibly re-cock the physical shutter. You may only be able to take one photo with this technique, but it could be useful in certain situations.
Note there’s also an option to disable Silent Shooting altogether, which sounds like the camera’s taken two shots; Canon only recommends using this to avoid exposure issues with extension tubes or Tilt and Shift lenses.
Finally, Live View on the EOS 7D is also available at a higher resolution when the camera’s connected to an HDTV using the HDMI port, or connected to a PC or Mac and using the supplied EOS Utility – see our Features page for more details on the latter. Note, the image seen on the live HDMI output will however reduce in resolution if you start filming video in the HD mode, although this won’t affect the quality of the recording.
Canon EOS 7D shooting information and menus
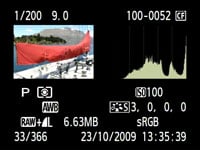
Like the EOS 50D and 5D Mark II before it, the 7D can show a wealth of shooting information on its main colour monitor, although immediately after powering-up, you won’t see anything. To view any shooting information, you’ll need to press the Info button, which cycles through up to three pages of details before then switching the screen back off again; there’s no eye sensors below the viewfinder to automatically switch the screen off.
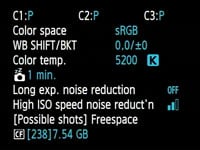
The pages on offer can be chosen from the ‘Info button options’ menu, and if all three are selected (as they are by default), you’ll see the Camera Settings page first. Unusually this isn’t the page with the aperture, shutter and shooting mode though – instead it’s the page with advanced details like the noise reduction, colour space and power saving options.
 |
 |
 |
The second page shows the EOS 7D’s brand new Electronic Level gauge, a feature seen on recent higher-end Nikon DSLRs. This indicates both horizontal and (unlike Nikon), vertical tilt with a heads-up style aviation display. It may not look as pretty as Nikon’s level gauge, but with two axes of tilt, it’s more useful. When shooting through the viewfinder, the gauge fills the screen. It’s also available in Live View, but shrunk to occupy a much smaller area in the middle of the frame – see Live View section above. A custom option allows the EOS 7D to alternatively indicate two axes of tilt through the optical viewfinder by illuminating various AF points – see viewfinder section above.
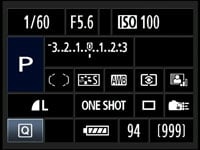
The third Info page is the most useful and arguably the one Canon should have made the first – you can of course disable the other two Info pages though if you want to see it with a single press of the button. It’s the main Shooting Settings page which shows all the really important stuff like the aperture, shutter, sensitivity, exposure compensation, although to be fair, the major items are also seen on the upper LCD screen with a half-press of the shutter release.
The main shooting settings page works with Canon’s Quick menu system which allows you to highlight and adjust many of the settings on-screen. This works similarly to the EOS 50D and 5D Mark II, although Canon’s managed to squeeze in a couple more options here.
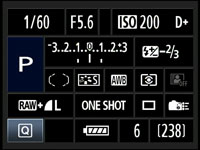 |  |
Set to PASM, this page shows the shutter speed and aperture, sensitivity, whether Highlight Tone Priority is active, the shooting mode, an exposure compensation and bracketing scale, flash compensation expressed numerically, the selected AF point, Picture Style, White Balance, Metering and Auto Lighting Optimiser setting, the image quality, AF, drive mode and an icon for Custom Controls. An extra icon indicating White Balance correction, along with battery life and shots remaining are also shown. Dedicated Canon followers will note the Auto Lighting Optimiser, Custom Controls and White Balance correction are the new additions over the EOS 5D Mark II.
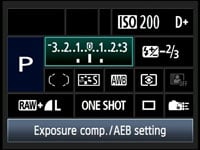
In the bottom left corner of the screen you’ll still see a letter Q, representing the Quick Control system, although unlike previous models you activate it on the 7D by pressing the new Q button in the top left corner of the body. You can then move a blue highlighter over the desired setting using the joystick and then either turn the thumb wheel or finger dial to directly adjust it, or press the SET button to view a dedicated menu for that item. These dedicated menus also appear when you press the Metering / WB, AF / Drive or ISO / flash compensation buttons alongside the upper screen.
It’s similar in practice to other on-screen adjustment systems like those pioneered on Olympus DSLRs, and offers quick access to numerous settings. Unfortunately Canon’s still resisted the temptation to rotate the characters to remain upright when shooting in the portrait orientation though.
 |
 |
 |
Pressing the Menu button enters the main menu system. Like the EOS 50D and 5D Mark II before it, there’s a number of tabbed pages with no vertical scrolling and no more than seven items on each. The extra features of the EOS 7D has however seen the number of tabbed pages increase from nine to 11: there’s now four for recording, followed by the same two for playback, three for setup, and one each for custom functions and My menu settings.
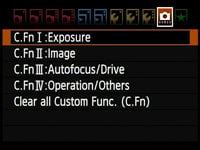
As before you can exclusively use the joystick for navigation, or use the finger dial to switch pages and the thumb wheel to scroll through the options on each. The Custom Function section is split into four sub-sections for Exposure, Image, Autofocus / Drive and Operation / Others; there’s now 27 Custom Functions in total and throughout the review we’ll highlight some of the options.
|
|
Unlike the EOS 5D Mark II, Canon’s sensibly separated the Live View and Movie mode settings on the 7D, but scroll through the standard menus and you won’t see any evidence of the latter. This is because the Movie mode settings only appear when you’ve actually switched the camera into Movie mode.
This makes sense, while also effectively hiding any evidence of video functionality from disapproving conservative owners under normal operation – we just hope having the mirror and shutter open in order to simply view this menu won’t consume unnecessary battery power.
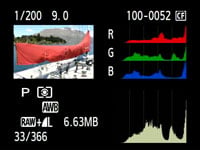
In playback mode, pressing the Info button cycles between a clean image, one overlaid with a little shooting information, then a thumbnail with extended shooting information and a brightness histogram, and finally a thumbnail with less shooting information, but both brightness and RGB histograms. The page with just the brightness histogram and extended shooting information can be switched to display RGB histograms instead if preferred.
 |
 |
 |
You can also use the magnify buttons to zoom-in on an image or zoom out to display either four or nine thumbnail views. The maximum zoom shows the same area as the 10x option during Live View, and allows you to easily confirm focus on the lovely VGA screen.
If you’re directly connected to a PictBridge-compatible printer, the 7D also allows you to perform a number of manipulations including trimming and fine rotation, along with manual Levels adjustments.
Canon EOS 7D Battery and connectivity
The EOS 7D is powered by the same LP-E6 as the EOS 5D Mark II: an 1800mAh Lithium Ion pack which Canon claims is good for up to 1000 shots (taken with the viewfinder with no flash under CIPA conditions), 230 shots when exclusively shooting in Live View, or up to 80 minutes of video recording. This compares favourably with the EOS 5D Mark II, which with the same battery (and obviously no flash given it doesn’t have one built-in) offers 860 shots, although interestingly Canon quotes up to 90 minutes of video recording for this model.
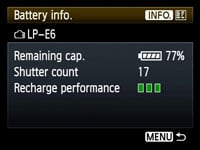 |  |
Like the EOS 5D Mark II before it, the LP-E6 allows the EOS 7D to offer accurate feedback on the exact charge remaining. Like Nikon, it inexplicably hides the percentage figure in a menu, but at least it’s there and the main icons indicating battery life on the main screen, upper panel and in the viewfinder feature more segments than before.
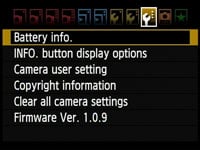
The Battery Info menu page shows the exact percentage of charge remaining, along with the number of shots fired during this charge so far, and an indication of the recharge performance using three squares. With all three lit green, the battery recharging performance is in good condition. Two lit squares indicate the recharging performance is reduced, while a single red square means it’s time to buy a new battery.
|

If you’d like extended battery life, you can fit the optional BG-E7 Battery grip which takes two LP-E6 while additionally providing a portrait grip and controls. Canon also offers a new WFT-E5(A) wireless transmitter which equips the 7D with Wifi, wired networking, GPS connectivity and the option to connect external USB storage devices, along with a portrait grip and controls. This shares a similar feature-set to the WFT-E3(A) for the 40D and 50D (albeit now supporting 802.11a as well as b and g), so check out our Canon WFT-E3(A) review for an idea of what’s possible.
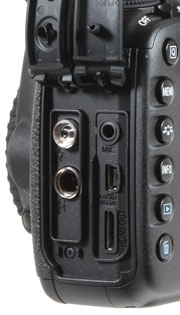 |
Like the EOS 50D and EOS 5D Mark II before it, the 7D has two large rubber flaps on its left side covering the ports, although there’s been a little rearrangement. Behind the left flap you’ll find a PC Sync for external lighting and an N3-type remote port, while behind the right flap are a 3.5mm stereo microphone input for the movie mode, a combined USB and TV output, and a Type C Mini HDMI port.
Interestingly unlike Nikon’s DSLRs with HDMI, there’s still no option to force different resolutions over HDMI; instead Canon says the 7D will display images at the TVs optimum resolution (normally outputting a 1080i signal). Note the 7D can output its Live View over HDMI with greater detail than on the rear screen, but if you’re recording a movie, the HDMI output will temporarily reduce in quality.
In terms of memory, the EOS 7D sticks with Compact Flash, and can accommodate Type I or Type II cards. The 7D can exploit the extra speed of UDMA cards (indeed it’s advisable for the movie mode) and its interface also supports Class 6 UDMA cards which will maximise the burst-depth in continuous shooting.
What the EOS 7D doesn’t have though are dual card slots. Until the Nikon D300s arrived, a single card slot was perfectly normal on anything other than a top-end pro camera. But then the D300s redefined the semi-pro category by featuring both Compact Flash and SD memory card slots, and the crucial ability to write to both of them simultaneously. This allows the D300s to backup images as you take them, or organise formats with JPEGs recorded to one card and RAW files to the other. This is a key advantage the D300s has over the EOS 7D, and we hope Canon will also implement dual card slots on more than just its pro bodies in the future.
Now let’s check out the Features section which includes details on the sensor, autofocus, drive modes, image processing and of course the 7D’s new Movie modes.


