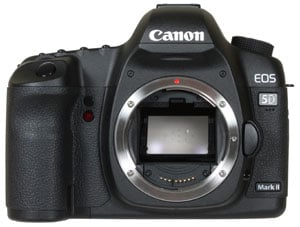
Canon EOS 5D Mark II
-
-
Written by Gordon Laing
Quality
Canon EOS 5D Mark II vs Sony A900 vs EOS 5D High ISO Noise
|


 | To compare noise levels under real-life conditions we shot this scene with the Canon EOS 5D Mark II, EOS 5D and Sony Alpha A900 within a few moments of each other using each of their ISO settings. We tested both Canon bodies with the same EF 24-105mm f4.0L IS lens, and the Sony A900 with the Carl Zeiss 24-70mm f2.8 set to same focal length and f8 aperture for optimum sharpness. We hope to add direct comparisons against the Nikon D700 in the future, but in the meantime, visit this page for an earlier comparison which includes samples taken at the same location. |
The 5D Mark II’s High ISO Noise Reduction was set to its default Standard, but the Auto Lighting Optimizer was Disabled for this test since it can artificially increase noise levels. You can see examples of the different noise reduction settings on the following page. Similarly, the Sony A900 had its High ISO Noise Reduction set to Normal, but its Dynamic Range Optimizer disabled for this test.
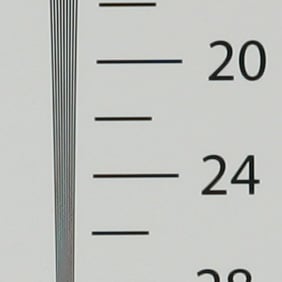
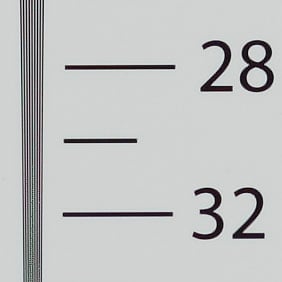
The image above was taken with the Canon EOS 5D Mark II at a sensitivity of 100 ISO, using the EF 24-105mm f4.0L IS lens at 24mm f8; the original Large Fine JPEG file measured 5.20MB. The crops are taken from the centre and presented at 100%. The 5D crops show a larger area due to its lower resolution.
The images seen below for the 5D Mark II and Sony A900 were as each metered the scene, without any compensation applied, although the A900’s exposure was consistently 0.3EV quicker than the new Canon. Since the brightness measured in Photoshop was the same though, the A900 appears to be approximately one third of a stop more sensitive than the 5D Mark II. The original 5D required -0.3EV compensation to match both the exposure and brightness of the new model.
At their lowest extended sensitivities of 50 ISO, both Canon’s are unsurprisingly delivering very clean, detailed results, although interestingly the original 5D’s sample looks a little sharper; we’ve seen this effect before on previous images taken with the 5D at 50 ISO.
At 100 and 200 ISO, both Canon’s again deliver very clean, noise-free results, although at 200 ISO, the Sony A900 is already exhibiting very faint evidence of chroma noise – albeit nothing to be too concerned about. Increased to 400 ISO, pixel-peepers will notice a very fine texture appearing in the background of the original 5D’s images – hardly anything to worry about at this point, but it’s not present on the 5D Mark II’s JPEGs. The A900’s chroma noise has however become more apparent at this point.
With the sensitivity increased to 800 ISO, this texture on the original 5D and Sony A900 images becomes more obvious, with greater evidence of chroma noise. Alongside, the new 5D Mark II still looks smooth and clean, although there’s a very faint texture appearing in flat areas.
At 1600 ISO, the original 5D’s chroma noise is now becoming quite apparent when viewed at 100%, and the A900’s noise has become quite blotchy. The new 5D Mark II is also exhibiting some noise textures now, but it remains a cleaner, preferable result. The Sony’s really beginning to suffer at this point.
At 3200 ISO, the upper limit for the original 5D, the old model is suffering from quite visible chroma noise, which the new 5D Mark II is managing to avoid. There may be increased noise and softening on the 5D Mark II sample, but few would prefer the original 5D’s version. Meanwhile the Sony A900 is having problems: the chroma noise has become very blotchy with a noticeable loss of detail and there’s also red hot pixels in darker areas of the image which the Mark II is managing to avoid.
Increased to its maximum normal sensitivity of 6400 ISO, the 5D Mark II becomes visibly noisier, but there’s still a fair amount of detail which would look fine on smaller prints or emailed images. In contrast, the Sony A900’s image looks pretty bad at its maximum sensitivity, with lots of visible noise artefacts. From this point on, the 5D Mark II is on its own.
The extended sensitivity of 12800 ISO suffers from another big increase in noise and is only really usable for much smaller prints or greatly reduced screen images. To be fair though, there were no hot pixels in this image and no visible banding even with the Levels adjusted.
The maximum extended sensitivity of 25600 ISO is clearly suffering from greatly reduced quality viewed at 100% or even lower magnifications. It’s really not particularly useful other than the novelty of grabbing a shot under very dim conditions, but again it should be noted there’s only a handful of hot pixels and very faint banding. We have another example in our Sample Images Gallery.
So while the top two sensitivities are of limited use, the results here are still impressive overall. Judging from the samples below, the Mark II enjoys around a one-stop advantage over the original 5D when viewed at 100%, along with less of the chroma noise which often plagued high ISO 5D images. The icing on the cake is we’re comparing samples viewed at 100% here – if you were to print images from both cameras at the same size, the 5D Mark II’s higher resolution would mean any artefacts would be less visible.
As for the A900, we’d say the Mark II’s in-camera JPEGs enjoy at least a one stop advantage over the Sony at lower sensitivities, and closer to two stops at higher sensitivities. Judging from the exposures and measured brightness, the Sony may work out about 0.3EV more sensitive than the 5D Mark II at any ISO setting, but the new Canon is clearly out-performing it in terms of noise levels on in-camera JPEGs.
As for the Nikon D700, we hope to publish direct comparisons against the 5D Mark II in the future, but in the meantime, you may want to compare the page from our Sony A900 review which includes in-camera JPEGs from it, the Sony A900 and Canon’s flagship EOS 1Ds Mark III. Obviously these were taken on different days, but comparing the noise levels in the background and the detail on the images, we’d say while the Nikon D700 is clearly applying lower noise reduction, it doesn’t take a decisive lead over the new Canon.
So an impressive result here for the new EOS 5D Mark II against both its predecessor and current rivals. Now see how different noise reduction settings affect the 5D Mark II in our Canon 5D Mark II Noise Reduction page, or head over to our Canon 5D Mark II Gallery for additional sample images.
Canon EOS 5D Mark II with Canon EF 24-105mm IS | Sony Alpha DSLR-A900 with Sony Carl Zeiss 24-70mm | Canon EOS 5D with Canon EF 24-105mm IS | ||
 |  |  | ||
L (50 ISO) | 50 ISO not available | L (50 ISO) | ||
 |  |  | ||
100 ISO | 100 ISO | 100 ISO | ||
 |  |  | ||
200 ISO | 200 ISO | 200 ISO | ||
 |  |  | ||
400 ISO | 400 ISO | 400 ISO | ||
 |  |  | ||
800 ISO | 800 ISO | 800 ISO | ||
 |  |  | ||
1600 ISO | 1600 ISO | 1600 ISO | ||
 |  |  | ||
3200 ISO | 3200 ISO | Hi (3200 ISO) | ||
 |  | | ||
6400 ISO | 6400 ISO | 6400 ISO not available | ||
 | | | ||
H1 (12800 ISO) | 12800 ISO not available | 12800 ISO not available | ||
 | | | ||
H2 (25600 ISO) | 25600 ISO not available | 25600 ISO not available |
Real-life resolution – Canon EOS 5D Mark II vs EOS 5D
Canon EOS 5D Mark II with Canon EF 24-105mm IS | Canon EOS 5D with Canon EF 24-105mm IS | |
 |  | |
f8, 100 ISO | f8, 100 ISO | |
 |  | |
f8, 100 ISO | f8, 100 ISO | |
 |  | |
f8, 100 ISO | f8, 100 ISO | |
 |  | |
f8, 100 ISO | f8, 100 ISO | |
Canon EOS 5D Mark II: JPEG versus RAW
| We photographed the scene here in the EOS 5D Mark II’s RAW plus Large Fine JPEG mode, allowing us to directly compare images created from exactly the same data. Below are crops taken from the original JPEG file alongside the RAW version, processed in Canon’s supplied Digital Photo Professional (DPP) 3.5 software using the default Sharpness of 3, Peripheral Illumination of 70 and the Chromatic Aberration correction set to 100.Like other recent Canon DSLRs, the processed RAW file looks more refined with greater detail across the image, most notably in the trees. There may be sharpening artefacts around some buildings, but it proves there’s visible gains to be enjoyed even without tweaking the RAW processing settings. To see a technical difference comparing the 5D Mark II’s JPEG and RAW files with a prime lens, see our EOS 5D Mark II Studio resolution page. In the meantime, what this particular cropped area below doesn’t show is DPP’s effective elimination of coloured fringing on the RAW file. This greatly improved the appearance of areas which visibly suffered from fringing as seen in the samples above; the mountain ridge in particular cleaned-up very effectively. |
Canon EOS 5D Mark II JPEG with Canon EF 24-105mm IS | Canon EOS 5D Mark II RAW with Canon EF 24-105mm IS | |
|  | |
f8, 100 ISO | f8, 100 ISO |
|
|
The 5D Mark II’s Peripheral Illumination Correction, Highlight Tone Priority and Auto Lighting Optimiser were set to their default Enabled, Off and Standard settings respectively. As such this test compares how each body’s in-camera JPEGs compare with their default settings; there are RAW comparisons at the bottom of the page. Note, in our High ISO Noise results we’ll disable the Auto Lighting Optimiser.
The image above was taken with the Canon EOS 5D Mark II at a sensitivity of 100 ISO, using the EF 24-105mm IS lens at 24mm f8; the original Large Fine JPEG file measured 9.41MB. The crops are taken from the upper left, centre, lower right and left of centre, and are presented here at 100%. The 5D crops show a larger area due to its lower resolution. The exposures were identical, and no compensation was applied.
One glance at the crops from both cameras below reveals Canon adopting a similar approach to image processing using the default settings. There may be significantly different sensors and processors behind the scenes, not to mention three years between them, but in terms of colour and tone, the 5D Mark II’s in-camera JPEGs look remarkably similar to its predecessor.
As such Canon has once again gone for a more consumer-friendly approach with the 5D Mark II than its flagship 1D series, although you are of course able to style the output as desired using the Picture Style controls, or shoot in RAW and tweak later.
The processing may be similar in style, but the new model clearly has significantly more pixels to play with. The 5D Mark II is resolving finer detail that’s most noticeable in the buildings across the second and third row of crops, along with the tennis court markings on the third row.
Of course a finer pixel pitch also means any optical aberrations will appear bigger when viewed at 100%, and this is apparent in the fringing seen in the first row of crops. If the images were printed the same size, the fringing wouldn’t look any worse on the 5D Mark II, but anyone viewing 1:1 will see any issues with their lenses magnified with the new model.
It’s a shame Canon didn’t include reduction of coloured fringing on JPEGs in its latest DIGIC 4 processor. Nikon has offered it on several DSLRs now, and even Panasonic’s superzooms sport the facility (the latter showing-up Canon’s own SX10 IS superzoom). It should be noted Canon’s supplied DPP software can greatly reduce coloured fringing on RAW files, with the composition here cleaning-up very nicely – but again it’d be great to find it applied to in-camera JPEGs too.
Ultimately though, the crops here show the 5D Mark II delivering a similar style to its predecessor, but packed with greater detail – given a good lens of course. This may be all existing owners of the 5D need to hear, but there’s still our studio resolution, high ISO and noise reduction pages to go yet; and to see how the same image here compares in RAW, scroll to the bottom of this page.
Canon EOS 5D Mark II Studio Resolution comparison
| Support this site by shopping below | |||||||||||||||||||||||||||||||||||||||||||||||||||
|
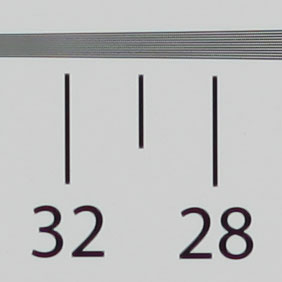
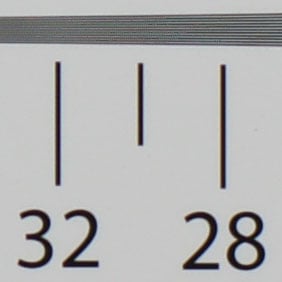
 | To measure and compare the Canon EOS 5D Mark II’s resolving power we photographed the Enhanced Digital Camera Resolution Chart with it and a number of rival cameras, each using their best quality JPEG and default image tone and sharpening settings. Each lens was tested at every aperture setting and the best result selected for this page.The crops are taken from the original images, saved as High Quality JPEGs in Photoshop CS2 and presented here at 100%. Each number represents 100 lines per picture height (lpph), so a figure of 20 means a resolution of 2000 lpph. |
| In terms of in-camera JPEG resolving power, the Canon EOS 5D Mark II delivered 3000 and 2950 lpph of horizontal and vertical resolution respectively when equipped with the EF 85mm f1.8 lens. We found the sharpest, cleanest result was with the aperture opened to f3.5, and that’s what you’ll see in the 5D Mark II crops below. The versions at smaller apertures down to f8 resolved the same detail, but weren’t as crisp. Certainly diffraction will be a bigger issue for the 5D Mark II’s high pixel density compared to its predecessor, so anyone upgrading should retest their lenses to discover new optimum apertures. The measurements for the 5D Mark II represent a significant increase over JPEGs from its predecessor which scored 2400 and 2300 lpph using the same lens (at f8). They’re also comfortably higher than the scores measured for in-camera JPEGs from the 1Ds Mark III (2775 and 2650 lpph), again using the same lens (at f8). Switching to RAW files from the 1Ds Mark III delivered much better results than its own in-camera JPEGs, essentially matching the 5D Mark II’s JPEGs in terms of horizontal resolution, but still falling behind on vertical resolution. Clearly the in-camera JPEG processing of the 5D Mark II is superior to that of the 1Ds Mark III, at least in terms of measured resolution in tests like these. The 5D Mark II scores are roughly the same as the Sony Alpha DSLR A900, although the crops below show the Canon’s output to be cleaner and crisper. Punchier image processing is certainly playing a part here, but it’s important to note Sony’s higher resolution sensor isn’t delivering any greater detail here with the lenses tested. It’ll be interesting to see how Nikon’s D3x compares. So an impressive result here for the 5D Mark II, which roughly matches the A900’s resolving power, despite falling a few Megapixels short. To see whether shooting in RAW can yield better results still, scroll to the bottom of this page. Alternatively, if you can’t wait to see how the camera performs in terms of noise at higher sensitivities, head straight over to our Canon 5D Mark II High ISO page. |
Canon EOS-5D Mark II with Canon EF 85mm f1.8 USM | Sony Alpha DSLR-A900 with Sony 50mm f1.4 | |
 |  | |
3000 lpph, EF 85mm, f3.5, 100 ISO | 2950 lpph, 50mm, f3.5, 100 ISO | |
Nikon D700 with Nikkor AF 50mm f1.8 | Canon EOS-5D with Canon EF 85mm f1.8 USM | |
 |  | |
2400 lpph, 50mm at f8, 200 ISO | 2400 lpph, EF 85mm, f8, 100 ISO |
Canon EOS-5D Mark II with Canon EF 85mm f1.8 USM | Sony Alpha DSLR-A900 with Sony 50mm f1.4 | |
 |  | |
2950 lpph, EF 85mm, f3.5, 100 ISO | 2950 lpph, 50mm, f3.5, 100 ISO | |
Nikon D700 with Nikkor AF 50mm f1.8 | Canon EOS-5D with Canon EF 85mm f1.8 USM | |
 |  | |
2400 lpph, 50mm at f8, 200 ISO | 2300 lpph, EF 85mm, f8, 100 ISO |
Canon EOS 5D Mark II Studio resolution: JPEG versus RAW
We photographed our test chart in the EOS 5D Mark II’s RAW plus Large Fine JPEG mode, allowing us to directly compare images created from exactly the same data. Below are crops taken from the original JPEG file alongside the RAW version, processed in Canon’s supplied Digital Photo Professional 3.5 software using the default settings (Sharpness of 3).
Like most Canon DSLRs tested recently, RAW files processed using DPP’s default settings reveal cleaner and better defined details with a slight boost in resolution: we measured 3050 and 3000 lpph for horizontal and vertical resolution below. The converging lines are also crisper and better defined in the RAW sample, although moiré in the JPEG has been resolved here as dots which may produce undesirable artefacts on some subjects. Now let’s check out the camera’s performance at different sensitivities in our Canon EOS 5D Mark II noise results page.
Canon EOS 5D Mark II JPEG with EF 85mm f1.8 | Canon EOS 5D Mark II RAW with EF 85mm f1.8 | |
|  | |
3000 lpph, EF 85mm, f3.5, 100 ISO | 3050 lpph, EF 85mm, f3.5, 100 ISO |
Canon EOS 5D Mark II JPEG with EF 85mm f1.8 | Canon EOS 5D Mark II RAW with EF 85mm f1.8 | |
|  | |
2950 lpph, EF 85mm, f3.5, 100 ISO | 3000 lpph, EF 85mm, f3.5, 100 ISO |
Canon EOS 5D Mark II High ISO Noise Reduction
Canon EOS 5D Mark II High ISO NR Disable | Canon EOS 5D Mark II High ISO NR Low | Canon EOS 5D Mark II High ISO NR Standard (default) | Canon EOS 5D Mark II High ISO NR Strong | |||
 |  |  |  | |||
L (50 ISO) | L (50 ISO) | L (50 ISO) | L (50 ISO) | |||
 |  |  |  | |||
100 ISO | 100 ISO | 100 ISO | 100 ISO | |||
 |  |  |  | |||
200 ISO | 200 ISO | 200 ISO | 200 ISO | |||
 |  |  |  | |||
400 ISO | 400 ISO | 400 ISO | 400 ISO | |||
 |  |  |  | |||
800 ISO | 800 ISO | 800 ISO | 800 ISO | |||
 |  |  |  | |||
1600 ISO | 1600 ISO | 1600 ISO | 1600 ISO | |||
 |  |  |  | |||
3200 ISO | 3200 ISO | 3200 ISO | 3200 ISO | |||
 |  |  |  | |||
6400 ISO | 6400 ISO | 6400 ISO | 6400 ISO | |||
 |  |  |  | |||
H1 (12800 ISO) | H1 (12800 ISO) | H1 (12800 ISO) | H1 (12800 ISO) | |||
 |  |  |  | |||
H2 (25600 ISO) | H2 (25600 ISO) | H2 (25600 ISO) | H2 (25600 ISO) |
 | The Canon EOS 5D Mark II offers four different High ISO Noise Reduction settings: Disable, Low, Standard (the default) and High. To compare their effect, we photographed our High ISO Noise composition throughout the 5D Mark II’s sensitivity range, at each of the Noise Reduction settings. Canon states noise reduction is applied at all ISO speeds when enabled, so we’ve included samples at every setting. |
Note: Auto Lighting Optimizer was Disabled for this test since it can artificially increase noise levels; Highlight Tone Priority was again Disabled by default. The image above was taken with the Canon EOS 5D Mark II at a sensitivity of 100 ISO, using the EF 24-105mm f4.0L IS lens at 24mm f8; the original Large Fine JPEG file measured 4.93MB. The 5D Mark II slightly underexposed this shot, so we applied +0.3EV compensation. The crops are taken from the centre and presented here at 100%.
From 50 to 400 ISO, the crops essentially show no difference between the different noise reduction settings. At 800 ISO, there’s a very slight hint of chroma noise in the background of the sample taken with noise reduction disabled, but it’s pretty subtle.
At 1600 ISO, this chroma noise has become more apparent on the crop taken without noise reduction, and a little texture – albeit without the chroma element – has crept into the version with Low noise reduction. The versions with Standard and Strong noise reduction remain clean without noticeable loss of detail.
At 3200 ISO, the crop taken without noise reduction exhibits greater chroma noise, and again the version with Low noise reduction shows roughly the same degree of textures, but little to no chroma noise. The version with Standard noise reduction has again smoothed-out much of the texture, but at the cost of some fine detail. The version with Strong noise reduction is beginning to apply noticeably greater smearing.
6400 ISO upwards essentially repeats the same story, but with greater artefacts at each step. Interestingly at first glance, the Disabled and Low noise reduction settings appear to deliver roughly the same amount of noise textures, but upon closer inspection (including the entire frame not seen in the crops below), the version without noise reduction suffers from chroma artefacts, whereas the version with Low noise reduction manages to eliminate most of them.
While the top two sensitivities remain off-limits for all but emergency situations, some may prefer to shoot with noise reduction Low or even Disabled between 800 and 6400 ISO, as there’s potentially a small amount of fine detail which could be retrieved with more sophisticated processing later. In the meantime, the Standard noise reduction setting appears to offer a fair compromise between lack of visible noise and retention of fine detail, although it’s revealing to find the chroma noise familiar to many 5D owners is still present behind the processing at high sensitivities. The Strong setting is a step too far for all but the most noise-averse.
Now let’s have a look at some more real-life examples including several low-light indoor compositions in our Canon EOS 5D Mark II sample images gallery.
Canon EOS 5D Mk II lenses, focusing, sensor and drive
The Canon EOS 5D Mark II employs an EF lens mount and thanks to its full-frame sensor, there’s no field-reduction factor to take into consideration. So mount a 24-105mm zoom, and you’ll really get 24-105mm coverage in practice.
 |
Like the 5D before it though, not to mention Canon’s other full-frame bodies, the Mark II is not compatible with EF-S lenses. This is in contrast to Sony and Nikon’s full-frame bodies which will allow DT and DX lenses respectively, albeit either in a cropped mode, or in full-frame with the acceptance there’ll be significant vignetting and softness outside their corrected area.
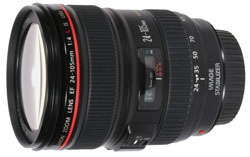 |
The EOS 5D Mark II will be available body alone, or in a kit which in most regions will include the Canon EF 24-105mm f4.0L IS.
This is one of Canon’s best general-purpose lenses, offering a flexible 4.4x optical range, a constant f4.0 aperture, quick and quiet USM focusing, Image Stabilisation, and L build quality which includes a smooth zoom ring, full-time manual focusing, environmental sealing on the mount and a lens hood.
We used this lens throughout our tests with the EOS 5D Mark II and found it an ideal partner; you can see samples taken with it in our results and gallery pages. We also thoroughly reviewed this lens using the earlier EOS 5D, and you can find out more in our Canon EF 24-105mm review.
Canon EOS 5D Mark II focusing
The Canon EOS 5D Mark II employs the same 9-point AF system (with 1 cross-type and 6 invisible assist points) as its predecessor, the EOS 5D, although the AF algorithm has been improved. Like the 5D, the AF points are arranged in a diamond pattern and represented by small rectangular outlines which illuminate red when active; you can switch the red lights off if preferred in a custom menu.
 |
Press the focus area button and you can use the joystick, finger dial or thumb wheel to manually select a single focus point using the screen or viewfinder. For AF assistance in low light though, you’ll need to be using an external flashgun.
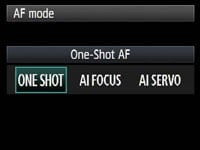
Like all Canon DSLRs there’s three auto-focusing modes: One Shot AF for still subjects, AI Servo AF for moving subjects, and AI Focus AF which automatically switches from One Shot to Servo when it detects a subject starting to move.
 |
Sticking with a three year old AF system, albeit with the latest algorithm, has been a disappointment for many who compare specifications. Sony’s A900 may be similar with a 9-point system (with 10 assist points), but Nikon’s 51-point AF system on its D700 sounds much more impressive. It is however important to not trust numbers alone and to actually compare them in real-life tracking environments.
Fitted with the EF 24-105mm f4.0L lens fully zoomed-in, we found the EOS 5D Mark II was perfectly capable of tracking subjects in fast motion. It easily passed our test of maintaining sharp focus on vehicles approaching face-on at speeds of 50kph over a 100m stretch. So long as the subject was covered by an AF point, we were fine.
This is where Nikon’s D700 has an advantage with many AF points, spread over a larger area, but with smaller gaps between them. This gives it the edge when a subject changes distance unpredictably between focusing points or moves over a wider area, but again if you can keep the action around the Mark II’s diamond capture area, you’ll be fine in most situations.
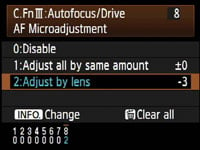 | 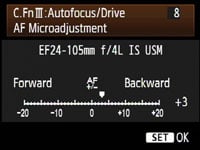 |
New to the EOS 5D Mark II over the 5D is support for AF Micro-adjustment. Inherited from the professional 1D series and the recent 50D, this allows you to adjust the point of focus forward or back in +/- 20 very fine increments. You can apply adjustments globally to all lenses, or register individual settings for up to 20 different models of your choice.
When you attach that particular lens, the 5D Mark II recognises it and applies whatever settings you’ve stored. Should you try and register more than 20 lenses, the Mark II will ask which ones you want to overwrite. We’re pleased to find this facility on the 5D Mark II (not to mention the 50D) as it addresses a serious issue that affects many photographers.
Canon EOS 5D Mark II metering, exposures and bracketing
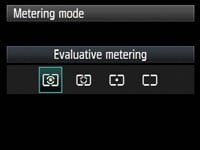 |
The Canon EOS 5D Mark II offers the same four metering modes as the 5D: 35-zone TTL Evaluative, Partial (8% of v/f area), Spot (3.5% of v/f area) and Center-weighted; the viewfinder also indicates the spot metering area with a circle. As before, we used Evaluative metering for all our sample images and found very few occasions when we’d want to apply any compensation.
 |
The EOS 5D Mark II offers shutter speeds from 1/8000 to 30 seconds plus a Bulb option; the fastest flash sync speed is 1/200 and the shutter block is now rated for 150,000 cycles (same as the Nikon D700, but more than the 100,000 of the Sony A900). The shutter sound is a little different from its predecessor, but not as motorised as the 40D / 50D – check out our Canon EOS 5D Mark II video tour to hear it for yourself.
Exposure bracketing is available with three frames up to 2EV apart in 0.3EV increments, which puts it in line with most budget or mid-range DSLRs; Sony’s A900 offers up to five frames (albeit only offering the full +/- 2EV range for three frames), while Nikon’s D700 takes the lead with a far more useful nine-frame option which will be preferred by HDR enthusiasts. White balance bracketing is also available on the 5D Mark II, again with three frames, and at +/-3 levels in one level increments. If both exposure and white balance bracketing are active, the Mark II will take nine frames.
Canon EOS 5D Mark II anti-dust
The EOS 5D Mark II finally brings anti-dust facilities to the series – the original 5D was one of the last models to not offer it, and dust could certainly be a problem with that camera. Like other Canon DSLRs, the 5D Mark II offers three techniques to combat dust: anti-static coatings and materials to reduce it sticking in the first place, a vibrating filter which tries to shake-free the more stubborn particles, and a software-based solution which maps the position of any pesky marks and appends them to images for automatic removal later using the supplied Digital Photo Professional software. The anti-static coating on the 5D Mark II’s low pass filter now employs fluorine which Canon claims better repels dust.
 |  |
Following our usual DSLR torture-test we left our 5D Mark II face-up without a lens, inside and outside for ten minutes each; we can’t know how much dust entered the body during this time, nor even how much was present to start with, but we know such a process would result in dust being a problem for most models. We then updated the Mark II’s Dust Delete Data and powered the camera on and off twice to vibrate the filter.
We then took a series of photos at every aperture setting of a plain white surface at close range with the EF 24-105mm IS lens zoomed-into 70mm and manually focused to infinity. Dust marks normally become most apparent at the smallest apertures (eg f16 and f22), but it’s also important to test at more common apertures.
|
Canon EOS 5D Mark II dust example at f22 / f8 | ||
 |  | |
100% crop, 24-105mm at 70mm, f22 | 100% crop, 24-105mm at 70mm, f8 | |
With the 5D Mark II set to f22 we spotted just one mark on the image, a small hair on the far left hand side. Upon closer examination at 100%, there was a second tiny mark nearby, but barely visible. Applying Auto Levels to the whole image revealed a number of fainter marks, but these weren’t visible under normal conditions even at f22.
As the aperture was opened, the mark became more diffused and trickier to see. We’ve pictured the exact same area above right from the sample taken at f8 where the mark has become almost invisible. The supplied Digital Photo Professional software identified that Dust Delete Data was present on both JPEG and RAW files, but failed to remove the hair. We have seen DPP remove more conventional dust marks before though, so assume it’s looking out for circular targets.
Reviewing our images and video footage taken before this anti-dust test revealed this tiny hair had in fact been present throughout, although effectively invisible at all but the smallest apertures. Interestingly it was easiest to spot in video footage, because as discussed on the next page, the 5D Mark II often selects f16 or f22 under bright conditions in its movie mode.
But this small hair aside, we were very impressed by the anti-dust performance of the 5D Mark II. The body was left open without a lens inside and out for 20 minutes, and yet it didn’t show any more visible dust marks than prior to the test. This is a huge improvement over the original 5D which could attract a wealth of dust even during the few short seconds of a lens change, so anyone upgrading should be very satisfied. As for the hair, we eliminated it with a burst of air from a Giotto Rocket.
Canon EOS 5D Mark II sensor and processing
The headline feature of the Canon EOS 5D Mark II is its 21.1 Megapixel full-frame sensor, measuring 36x24mm. It generates 3:2 aspect ratio images with a maximum resolution of 5616×3744 pixels, which gives it 1248 more pixels horizontally and 832 pixels vertically than its predecessor the EOS 5D; at 300 dpi, this allows the 5D Mark II’s images to be printed at 18.7×12.5in to the 5D’s 14.5×9.7in, which is quite a boost. Behind the scenes is Canon’s latest DIGIC 4 image processor – only the second time it’s been used in a Canon DSLR.
It’s obviously not gone unnoticed the 5D Mark II’s sensor shares the same resolution and dimensions as that in the flagship 1Ds Mark III, but Canon describes it as a new sensor which employs an improved output amplifier, more advanced colour filter with superior light transmission, and other enhancements also seen in the recently announced EOS 50D. Canon claims the result is the highest quality seen from any EOS DSLR to date, and you can see for yourself in our results and gallery pages.
 |
The 5D Mark II’s JPEGs can be recorded at two lower resolutions (11.1 and 5.2 Megapixels) and with the choice of Fine or Normal compression. RAW files are of course offered, and like the 50D, there’s additionally the choice of two lower resolution RAW modes labelled SRAW1 and SRAW2.
Like the 50D, the RAW and JPEG options can be set separately, allowing you to choose any combination. So if recording both JPEG and RAW, you could have RAW, SRAW1 or SRAW2, accompanied by a JPEG at any of the three resolutions or two compression settings. Best quality Large Fine JPEGs typically measure between 6 and 9MB each, while full-size RAW files measure between 25 and 35MB each.
Like other recent EOS DSLRs, the 5D Mark II employs 14-bit analogue to digital conversions, and this 14-bit tonal detail is also recorded in the RAW images. See our Results pages for examples comparing its JPEG and RAW output. Copyright data can now also be added to images, but unlike the Nikon D700 this can’t be edited in-camera; instead you’ll need to use the supplied EOS Utility.
The sensitivity runs between 100 and 6400 ISO, with the option of L, H1 and H2 settings offering an equivalent of 50, 12800 and 25600 ISO respectively; note L, H1 and H2 will only be available if you enable ISO Expansion in the Custom settings. This gives the 5D Mark II the broadest range of sensitivities of any Canon DSLR to date, and an impressive three stops more than its predecessor (with their respective expanded ranges). To see how they compare in terms of detail and noise levels, see our High ISO Results page. If Highlight Tone Protection is enabled, the 5D Mark II’s sensitivity range is reduced to 200-6400 ISO.
 |
Like recent Canon DSLRs, the sensitivity sticks at 400 ISO when the ISO is set to Auto in Manual or Bulb, so if you want lower sensitivities in these modes, ensure you also manually set the sensitivity; the 5D Mark II will at least tell you on its screens and in the viewfinder what ISO value it’s going to use when set to Auto though, so there shouldn’t be any nasty surprises.
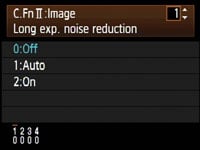 |  |
Like the EOS 40D and 50D, two noise reduction modes are available in the Custom Functions: Long Exposure Noise Reduction is applied to exposures longer than one second and can be set to Auto, On or Off, while High ISO Noise Reduction is applied throughout the range, but more so at higher sensitivities. High ISO Noise Reduction is now available with four settings: Standard (the default), Low, Strong or Disable, and we have examples of each in our High ISO Noise Reduction results page. Note Strong NR will reduce the maximum burst during continuous shooting.
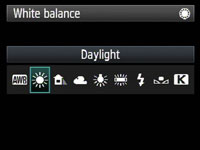 | 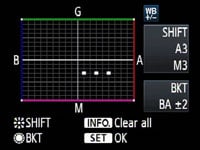 |
White Balance settings offer Auto, Daylight, Shade, Cloudy, Tungsten, White Fluorescent, Flash and Custom, followed by the option to manually enter a colour temperature from 2500 to 10000 Kelvin. White Balance correction and bracketing is also available.
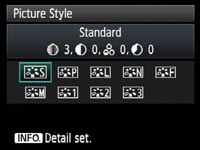
Sharpness, Contrast, Saturation and Colour Tone are applied using a number of Picture Styles: for colour photography, you have the choice of Standard, Portrait, Landscape, Neutral and Faithful, while a further Monochrome option offers four filter and four toning effects. Contrast, Saturation and Colour Tone can be adjusted in a new wider range of +/-4, while Sharpness is offered from 0 to 7. While it’s possible to tweak these presets or configure your own with the three custom modes in-camera, software supplied with EOS 5D Mark II lets you create and edit precision Picture Styles to your absolute requirements – just like the EOS 50D, 40D and 450D / XSi before it.
 | 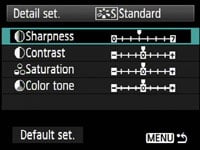 |
We used the default Standard Picture Style for all our sample images, and found it delivered a natural-looking balance which was neither overly punchy, nor too restrained. Like most of Canon’s recent DSLRs, the output is very smooth and can handle additional sharpening if you prefer crisper results.
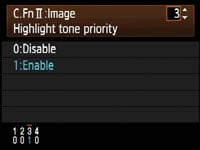 |
Leveraging the EOS 5D Mark II’s 14-bit A-D conversion is the Highlight Tone Priority (HTP) option, inherited from the EOS 50D, 40D and 450D / XSi, and buried away in one of the custom function menus; it’s disabled by default. According to Canon, this improves the highlight detail by expanding the dynamic range from the standard 18% grey to bright highlights. This option is only available between 200 and 6400 ISO and Canon warns noise could be increased in shadow areas. Like the 50D before it, ‘D+’ icons to indicate Highlight Tone Priority in the viewfinder and on both the upper and rear screens, so you should be in no doubt when it’s enabled.
 |
To put this to the test we shot our standard outdoor resolution composition using the EOS 5D Mark II and EF 24-105mm IS with and without Highlight Tone Priority enabled. Bright Sunlight reflected from white roofs in the town often blow highlights, so are a good test for Highlight Tone Priority.
Below you can see crops taken from the lower middle area with and without Highlight Tone Priority, and on a good quality monitor, you’ll see the version with the feature enabled has better retained highlight details which have become blown-out on the normal image. Checking the histograms reveals a slight compression to the tonal range which has then been shifted to the left to avoid saturation of the highlights. We didn’t notice any increase in noise in darker areas of this particular image, although it was taken under bright daylight.
Highlight Tone Priority will undoubtedly be a popular option for wedding photographers along with anyone shooting in bright wintery conditions, but we wouldn’t recommend it for all situations. As always, check the result with examples of your own to see if its having a benefit. Note: the effect is also applied to RAW files and non-removable if enabled, so use with caution.
Canon EOS 5D Mark II JPEG Highlight Tone Priority Disabled (default) | Canon EOS 5D Mark II JPEG Highlight Tone Priority Enabled | |
 |  | |
1/250, f8, 100 ISO | 1/500, f8, 200 ISO |
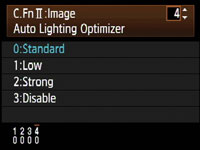 |
The EOS 5D Mark II additionally inherits the Auto Lighting Optimizer from the 50D, 450D / XSi and 40D (the latter only applying it in Auto and Scene presets). Auto Lighting Optimizer adjusts the brightness and contrast of images with dark areas (such as backlit portraits), and the implementation is the same as the 50D.
Like the 50D, the 5D Mark II offers the choice of four different Auto Lighting Optimizer settings: Standard, Low, Strong and Disable. The Standard setting is always applied when the 5D Mark II is set to Auto or CA, and is also applied by default in PASM modes, although you can adjust it in the custom menu to one of the other three settings.
Canon EOS 5D Mark II Auto Lighting Optimiser: Off / Strong | ||
 |  | |
 |  | |
Auto Lighting Optimiser Off: 100 ISO, f8, 0.5 sec | Auto Lighting Optimiser Strong: 100 ISO, f8, 0.6 sec | |
Above you can see two examples of the same composition taken with the Auto Lighting Optimizer disabled (above left) and with its Strong setting (above right). In this particular example which includes dark shadow areas and blown highlights, we can see very little evidence of the Auto Lighting Optimiser in action. The shadows remain dark and the bright window highlights remain saturated. Lest you think it’s the same image, we’ve included histograms of each which reveal minor differences in the range, but like the 50D before it, little difference overall in this particular composition; certainly nowhere near the dramatic changes seen with Sony’s Dynamic Range Optimizer on the same scene.
 |
Following our policy of using default settings when testing cameras, most of the sample images you’ll see in this review were taken with Highlight Tone Priority off and the Active Lighting Optimizer set to Standard. Since both can result in artificially higher noise levels though, we ensured both were disabled for our High ISO Noise and Noise Reduction Results pages.
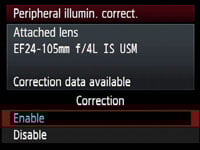
The EOS 5D Mark II inherits the Peripheral Illumination Correction first seen on the EOS 50D. This is optionally applied to JPEG images to reduce the effect of vignetting where the image darkens towards the corners. Like the 50D, data for up to 40 lenses can be loaded (or removed) via the supplied EOS Utility, and Canon’s pre-loaded a selection of popular models to get you started. If the lens model is recognised, the correction will be applied by default to JPEG images, although you can switch the option off if preferred. Canon describes the resulting effect as similar to that offered on RAW images in recent versions of its Digital Photo Professional (DPP) software, although DPP itself can offer additional optical corrections.
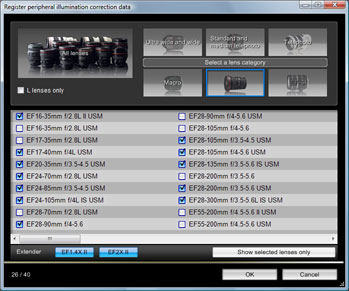 |
Any lens for which DPP offers corrections can be entered into the 5D Mark II’s internal database using the EOS Utility – see right. At the time of writing, the latest version of DPP offered correction data from a choice of 82 Canon lenses, although when connected to the 5D Mark II, the EOS Utility sensibly greys-out the EF-S section. DPP also offers data for each lens fitted with a 1.4x or 2x Extender, although these will count as additional entries in the Mark II’s 40-model database.
Since Peripheral Illumination Correction is enabled by default, you’ll see the effect of it on our JPEG sample images throughout this review taken with the EF 24-105mm IS. To test its effectiveness, we took examples with and without correction enabled using this lens zoomed-out to 24mm and with its aperture open to f4, at which point it normally suffers from quite noticeable vignetting. As a popular EF zoom, this lens was already loaded in the 5D Mark II’s internal database. The tests were taken of an evenly-lit white surface using a diffused filter and the lens focused to infinity.
|
Canon EOS 5D Mark II with EF 24-105mm IS Peripheral Illumination Correction: On (default) / Off | ||
 |  | |
EF 24-105mm at 24mm f4 Peripheral Illumination Correction Enabled | EF 24-105mm at 24mm f4 Peripheral Illumination Correction Disabled | |
As you can clearly see above, the 5D Mark II’s in-camera Peripheral Illumination Correction has greatly reduced the effect of vignetting on our sample, although there’s still some darkening in the extreme corners. It remains a big improvement over the version without though, but remember any digital brightening will result in potentially greater visible noise in the applied areas. Indeed Canon warns the effect will be reduced at higher sensitivities.
Canon EOS 5D Mark II drive modes and remote control
 |
|
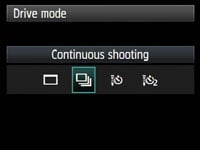
The Canon EOS 5D Mark II offers one continuous shooting mode which operates at 3.9fps – this is approximately one third faster than the 3fps on its predecessor, although slower than its rivals. Sony’s Alpha A900 and Nikon’s D700 both shoot at 5fps, which the latter can boost to 8fps with a battery grip.
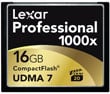
Like the 50D, the 5D Mark II now supports quick UDMA Compact Flash cards which allow it to capture impressive bursts and clear its buffer quickly. Canon quotes up to 14 RAW images or an unlimited number of JPEGs in a continuous sequence. Support for even faster Class 6 UDMA cards in the future may see the RAW buffer size increase.
To put these figures to the test we fitted the EOS 5D Mark II with a formatted Lexar Professional UDMA 4GB 300x Compact Flash card and set the camera to Continuous. In Large Fine JPEG mode, the 5D Mark II certainly appeared happy to keep shooting while we held the shutter down. We got bored at 60 seconds after which the camera had fired-off 232 shots, corresponding to a rate of 3.86fps. Set to RAW mode, the 5D Mark II squeezed out 15 RAW frames before stalling, in four seconds, corresponding to a rate of 3.75fps. Writing to the UDMA card was very fast, with the buffer clearing the 15 RAW frames in just three seconds.
We retimed the continuous JPEG rate in 20-shot bursts at higher sensitivities and found the 5D Mark II maintained its speed throughout its ISO range, including 6400, 12800 and even 25600 ISO. While it’s still disappointing not to have 5fps on the 5D Mark II, the boost from 3 to 3.9fps actually makes a big difference in practice, and allows the new Canon to capture action sequences which were over too quickly for its predecessor.
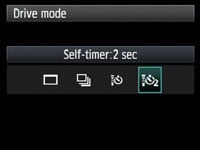 | 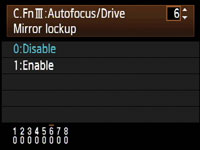 |
In terms of the self-timer, the EOS 5D Mark II gives you the choice of 10 or 2 second countdowns, although it doesn’t share the additional custom timer of the 450D / XSi which can take multiple shots as insurance. A mirror lockup option is available in the custom menu, which applies to either normal or self-timed shots. Unlike the Nikon D300, there’s no built-in Intervalometer, but in its favour, the 5D Mark II can achieve this and more when connected to a computer with supplied software.
In a feature which first made its debut on the EOS 40D, the EOS 5D Mark II can be connected to a PC or Mac with a USB cable and remote controlled using the supplied EOS Utility. Still images can be recorded to your computer’s hard disk, the internal memory card or both, and there’s Intervalometer facilities for programmed shoots. The EOS Utility also allows you to start recording a movie from its live preview screen, although sadly this isn’t stored on your computer’s hard disk – it’ll be written to the internal memory card only, regardless of your settings.
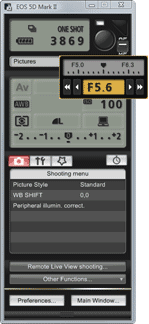 |
The EOS Utility lets you remote control and adjust pretty much any setting that doesn’t involve a physical dial or switch. So you can’t change the exposure mode from, say, Aperture to Shutter Priority using the software, but you can adjust the aperture or shutter value, the image quality, white balance, metering or sensitivity for example. Impressively the software also lets you see the Live View on your computer monitor and even lets you manually focus the lens with a magnified view for assistance. We have a demonstration of this in our EOS 5D Mark II video tour.
Version 2.5 which comes supplied with the EOS 5D Mark II (and the 50D) also lets you switch the camera between autofocus and manual focus. If the former is selected, the camera will autofocus if you pass the mouse over the graphical shutter release ‘button’ on-screen – thereby acting as a virtual half-press. You’ll also see a Peripheral Illumination Correction section which lets you choose which 40 lenses from the entire Canon EF catalogue should populate the 5D Mark II’s internal database.
Software-based remote control is a wonderful feature to have and if you have a laptop handy, it could even eliminate the need for certain photographers to invest in a cable release. If you have the optional WFT-E4(A) wireless transmitter connected, you can also dispense with the short USB cable and either use a considerably longer CAT-5 Ethernet cable or exploit the wireless freedom of a Wifi connection – check out our Canon WFT-E3(A) review for a report on the essentially identical version for the EOS 40D / 50D along with a video demonstration.
Note: remote control with the EOS Utility is also supported on the EOS 50D, EOS 40D, EOS 450D / XSi and even the entry-level EOS 1000D / XS. So while Canon can be tight about not supplying lens hoods with its non-L models, it certainly doesn’t skimp on the bundled software. Similar remote control software – often without the Live View capabilities – is an optional extra from other manufacturers, and Canon also bundles decent RAW processing software with its Digital Photo Professional.
Real-life resolution – Canon EOS 5D Mark II vs EOS 5D
Canon EOS 5D Mark II with Canon EF 24-105mm IS | Canon EOS 5D with Canon EF 24-105mm IS | |
| | |
f8, 100 ISO | f8, 100 ISO | |
| | |
f8, 100 ISO | f8, 100 ISO | |
| | |
f8, 100 ISO | f8, 100 ISO | |
| | |
f8, 100 ISO | f8, 100 ISO | |
Canon EOS 5D Mark II: JPEG versus RAW
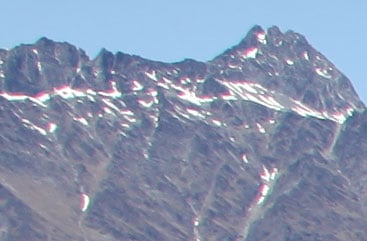
| We photographed the scene here in the EOS 5D Mark II’s RAW plus Large Fine JPEG mode, allowing us to directly compare images created from exactly the same data. Below are crops taken from the original JPEG file alongside the RAW version, processed in Canon’s supplied Digital Photo Professional (DPP) 3.5 software using the default Sharpness of 3, Peripheral Illumination of 70 and the Chromatic Aberration correction set to 100.Like other recent Canon DSLRs, the processed RAW file looks more refined with greater detail across the image, most notably in the trees. There may be sharpening artefacts around some buildings, but it proves there’s visible gains to be enjoyed even without tweaking the RAW processing settings. To see a technical difference comparing the 5D Mark II’s JPEG and RAW files with a prime lens, see our EOS 5D Mark II Studio resolution page. In the meantime, what this particular cropped area below doesn’t show is DPP’s effective elimination of coloured fringing on the RAW file. This greatly improved the appearance of areas which visibly suffered from fringing as seen in the samples above; the mountain ridge in particular cleaned-up very effectively. |
Canon EOS 5D Mark II JPEG with Canon EF 24-105mm IS | Canon EOS 5D Mark II RAW with Canon EF 24-105mm IS | |
| | |
f8, 100 ISO | f8, 100 ISO |
|
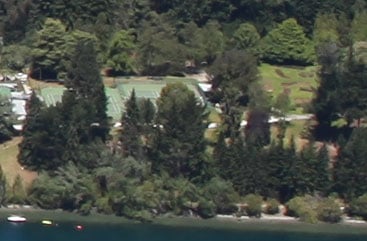
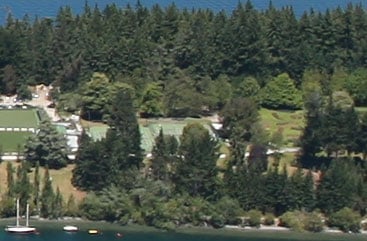
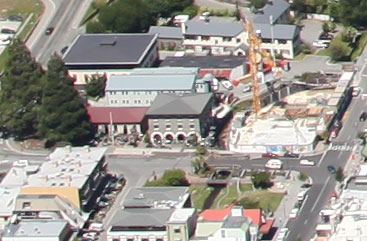
The 5D Mark II’s Peripheral Illumination Correction, Highlight Tone Priority and Auto Lighting Optimiser were set to their default Enabled, Off and Standard settings respectively. As such this test compares how each body’s in-camera JPEGs compare with their default settings; there are RAW comparisons at the bottom of the page. Note, in our High ISO Noise results we’ll disable the Auto Lighting Optimiser.
The image above was taken with the Canon EOS 5D Mark II at a sensitivity of 100 ISO, using the EF 24-105mm IS lens at 24mm f8; the original Large Fine JPEG file measured 9.41MB. The crops are taken from the upper left, centre, lower right and left of centre, and are presented here at 100%. The 5D crops show a larger area due to its lower resolution. The exposures were identical, and no compensation was applied.
One glance at the crops from both cameras below reveals Canon adopting a similar approach to image processing using the default settings. There may be significantly different sensors and processors behind the scenes, not to mention three years between them, but in terms of colour and tone, the 5D Mark II’s in-camera JPEGs look remarkably similar to its predecessor.
As such Canon has once again gone for a more consumer-friendly approach with the 5D Mark II than its flagship 1D series, although you are of course able to style the output as desired using the Picture Style controls, or shoot in RAW and tweak later.
The processing may be similar in style, but the new model clearly has significantly more pixels to play with. The 5D Mark II is resolving finer detail that’s most noticeable in the buildings across the second and third row of crops, along with the tennis court markings on the third row.
Of course a finer pixel pitch also means any optical aberrations will appear bigger when viewed at 100%, and this is apparent in the fringing seen in the first row of crops. If the images were printed the same size, the fringing wouldn’t look any worse on the 5D Mark II, but anyone viewing 1:1 will see any issues with their lenses magnified with the new model.
It’s a shame Canon didn’t include reduction of coloured fringing on JPEGs in its latest DIGIC 4 processor. Nikon has offered it on several DSLRs now, and even Panasonic’s superzooms sport the facility (the latter showing-up Canon’s own SX10 IS superzoom). It should be noted Canon’s supplied DPP software can greatly reduce coloured fringing on RAW files, with the composition here cleaning-up very nicely – but again it’d be great to find it applied to in-camera JPEGs too.
Ultimately though, the crops here show the 5D Mark II delivering a similar style to its predecessor, but packed with greater detail – given a good lens of course. This may be all existing owners of the 5D need to hear, but there’s still our studio resolution, high ISO and noise reduction pages to go yet; and to see how the same image here compares in RAW, scroll to the bottom of this page.


