Canon EOS 550D / Rebel T2i
-
-
Written by Gordon Laing
Canon EOS 550D / Rebel T2i design and controls
The Canon EOS 550D / Rebel T2i greatly resembles the earlier EOS 500D / T1i, and indeed the EOS 450D / XSi before that. Indeed without knowing what to look for, all three models are easy to mistake for each other. All three share very similar dimensions, weight, build, styling and controls, with only subtle external differences to tell them apart – at least when viewed from any angle other than the rear.
We’ve pictured the EOS 550D / Rebel T2i alongside the Nikon D90 below. The D90 may be an older model, but in the absence of an updated version at the time of writing, it still represents one of the biggest rivals for the Canon EOS 550D / Rebel T2i. At the time of testing, both cameras shared a similar body price, and were also available in kits with longer than average zoom lenses – and it’s these lenses we’ve pictured them with below.
 | ||
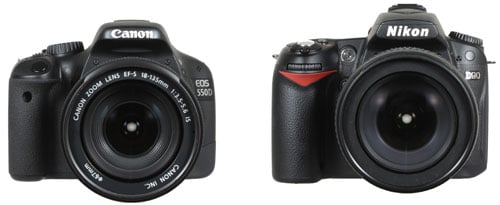 |
In the absence of a successor to the Olympus E-620, the Canon EOS 550D / Rebel T2i is the smallest and lightest of its peer-group, measuring 129x97x75mm (including the protruding flash head) and weighing 527g for the body including battery. The D90 body is slightly larger at 132x103x77mm and noticeably heavier too at 700g including battery, while the lower-end D5000 falls roughly in-between at 127x104x80mm and 611g including battery. Sony’s Alpha DSLR-A550 is the largest at 137x104x84mm and one of the heaviest at 677g including battery, although to be fair it does include built-in stabilisation and a tilting screen – then again neither stopped the Olympus E-620 from being smaller than the rest.
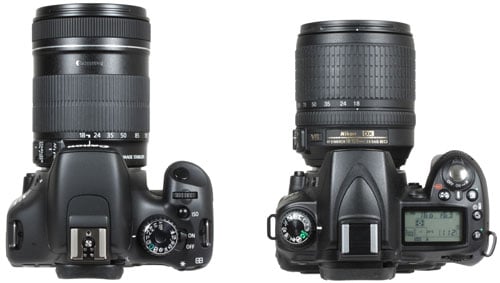
Add their respective kit lenses and some of the differences become less apparent. We’ve pictured the EOS 550D / Rebel T2i and Nikon D90 with their longer than average kit zoom options, which add 455g and 420g to their respective weights. While the combined weight of the D90 kit remains heavier than the EOS 550D / T2i with the EF-S 18-135mm IS, the difference feels less in your hands than the bodies alone. As you can see in the photos below, the longer focal length of the Canon combination also makes for a slightly longer physical package too. Obviously the alternative EF-S 18-55mm IS kit is a smaller combination, albeit much shorter in focal range too.
 |
But again the EOS 550D / T2i body itself remains the smallest of its peers, which may or may not be a blessing. Since it’s essentially the same size, weight and shape as its two predecessors, most interested parties will already know what to expect. There’s only a narrow gap between the grip and lens barrel, which could potentially be uncomfortable for those with bigger hands, although equally some may prefer the portability of a small and light camera. We found it small but perfectly usable in our hands, although if the vital statistics are a deal-breaker, consider one of its larger rivals from Nikon or Sony.
In terms of build quality, the EOS 550D / Rebel T2i is no different from its predecessor, or indeed the model before that. All are well-assembled and fairly solid with no creaks or poor joins to worry about, although as you’d expect at this price point, there’s no weather-proofing. The grip and thumb rest sport comfortable rubber grips which allow you to hold the camera securely, even single-handedly so long as the lens isn’t too large. As with previous comparisons though, we felt the Nikon D5000 and the D90 in particular were ergonomically preferable, with their larger grips and hooked inner areas for your fingertips. This is obviously a very personal choice though, and as always we’d recommend picking up a variety of cameras before buying to see which feels best in your hands.
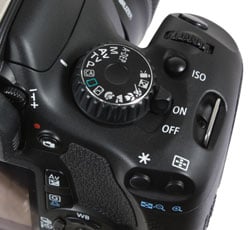 |
In terms of controls, the 550D / T2i is essentially the same as its predecessor with only a handful of tweaks. The upper left side is again left bare, with the bulk of the controls located on the right side of the body. Starting on the upper right surface, there’s the main Command Dial, rotary power switch, dedicated ISO button, finger dial and shutter release button. Like most entry-level models, there’s no thumb dial or wheel, although it’s worth noting Nikon’s D90 features both finger and thumb dials.
The biggest aesthetic difference between the 550D / T2i and its predecessor when viewed from the top is the Command dial, which has reverted to the black finish of the earlier 450D / XSi. The options remain the same as the 500D / T1i though, so alongside the usual P, A, S and M modes, are Canon’s green square full Auto, CA and A-DEP modes, along with the Movie Mode and direct access to the same five scene presets or flash-off option. Strangely the latter has shifted position from the 500D / T1i and now lies between green square Auto and the Portrait preset.
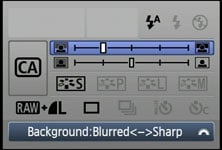 |
CA stands for Creative Auto and is essentially a beginner-friendly version of Aperture Priority. So instead of dialling-in an f-number, the CA mode presents an on-screen slider to adjust the background sharpness. A second slider is used to adjust the exposure compensation. It’s a friendly approach to controlling depth-of-field, which is more appropriate to the 550D / T2i’s target market than the 50D and 7D which also feature it. We’ll fully detail the exposure options and movie mode on the Features page, and continue with the physical tour here.
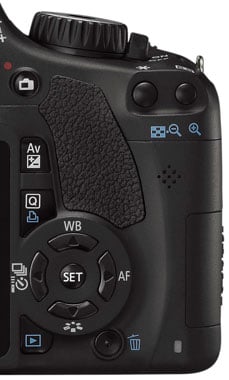 |
The AE / AF lock and AF point selection buttons remain in the top right corner of the rear and as before double-up as zoom controls during playback – along with manual focus assist controls in Live View. Thankfully you no longer need to press the AE / AF lock button to autofocus in Live View. This was never an intuitive option, so we’re very pleased to find the 550D / T2i now using a half-press of the shutter release to autofocus in Live View – just like the EOS 7D, and, ahem, pretty much all of the competition.
The rear of the camera remains dominated by a 3in screen, although while it’s the same size as its predecessor, it’s now in a wider 3:2 aspect ratio which matches the shape of the images – the first for any Canon DSLR and a feature we’ll fully describe in the screen section below.
The control layout on the rear remains the same with two minor differences. The first being the Direct Print button still having a shared use, but instead of firing-up Live View, it’s now used to activate the Quick Access menu. The second difference is a new dedicated button for Live View to the right of the optical viewfinder; it may not be as sophisticated as the switch on the EOS 7D, but it’s an improvement over the 500D / T1i. Finally, the exposure compensation, Direct Print / Q and Play buttons have been redesigned from conventional circles to larger, squarish shapes.
The traditional four cross-keys share the same functions as the earlier 500D / T1i. Push up for White Balance, right for AF mode, down for Picture Style and left for the drive modes. A final point worth noting is Canon has kept the depth-of-field preview button which can be found just below the 550D / T2i’s lens release button; this works when composing with either the optical viewfinder or in Live View.
Canon EOS 550D / Rebel T2i flash
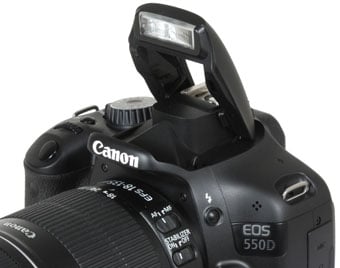 |
The EOS 550D / Rebel T2i is equipped with the same internal flash as its predecessor and the 450D / XSi before it, which pops-up 55mm above the top of the lens mount and has a guide number of 13. As before, there’s a hotshoe for mounting external Speedlite flashguns, and like the 500D / T1i, there’s a subtle plastic ridge around it which affords a little environmental protection when mated with the seals on the latest models, but with some metal still exposed, it doesn’t offer the weatherproofing of the semi-pro DSLRs.
As you’d expect for its price point, there’s no PC sync port on the 550D / T2i for studio lighting – for that you’ll also need a semi-pro model. The fastest flash sync speed also remains the same as its predecessor: 1/200.
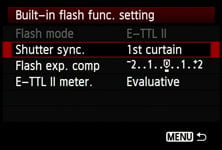
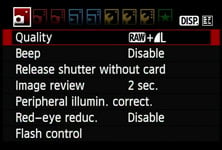
The 550D / T2i also offers the same flash control options as its predecessor, and like that model these can be found on the first menu page. As before, there’s a dedicated page of options for the internal flash which allow you to set the curtain sync, compensation and E-TTL II mode.
 | 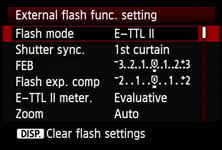 |
Like its predecessor these are also joined by a second page of options for controlling compatible Speedlite flashguns (including the 580EX II, 430EX II or 270EX), allowing you to adjust the compensation, bracketing, sync, zoom and wireless options without touching the flash; as before you can also adjust the external flash’s custom functions. Finally, we’re pleased to report, the 550D / T2i’s internal flash is sufficiently high to clear the fairly long barrel of the EF-S 18-135mm IS kit lens without casting a shadow.
Canon EOS 550D / Rebel T2i viewfinder
The EOS 550D / T2i is equipped with the same optical viewfinder as the 500D / T1i (along with the 450D / XSi before that) which employs a penta-mirror arrangement to deliver 95% coverage with 0.87x magnification. The coverage is the same as the Sony Alpha A550, Nikon D5000 and Olympus E-620, although all employ different magnifications (and varying sensor sizes), making their viewfinder experiences a little different.
 | |
Nikon’s D5000 has a relatively small viewfinder magnification of 0.78x, which in practice makes its viewfinder image appear the smallest in the group, although not by as much as the figures imply. The Olympus E-620 has an impressive-sounding magnification of 0.96x, although it’s coupled with a physically smaller sensor that also has a squarer 4:3 aspect ratio. As such, the E-620’s viewfinder approaches a similar height to the 550D / T2i, but isn’t as wide; it is however taller than the view through the D5000, although again not as wide. The Sony Alpha A550 comes-in fractionally larger than the D5000 at 0.8x, but again the difference between them is minor.
So with 0.87x magnification, the 550D / T2i would appear to deliver the biggest viewfinder image, but once you take its fractionally smaller sensor size into account, the difference between it and, say, the Sony A550, becomes virtually imperceptible in side-by-side comparisons.
For a significantly better viewfinder experience, you’ll need to go for a model with a larger pentaprism system, such as the Nikon D90, which delivers 0.94x magnification. Pentaprism viewfinders may add weight to the body, but also deliver a brighter image. So if you’re really into composing and manually focusing with the viewfinder, you’ll definitely find the D90 preferable in this regard.
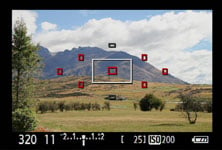
In terms of markings, the 550D / T2i’s viewfinder shows the same nine focusing points as its predecessor, with the centre-point circled to indicate the spot-metering area. As you’d expect for a camera at this price point, you can’t swap the focusing screen, and unlike Nikon’s D5000 and D90, not to mention Canon’s higher-end EOS 7D, there are no on-demand LCD grid lines.
There is however detailed information running along the bottom of the image, and in large, clear characters. The details and layout are the same as the 500D / T2i, including the ISO value displayed at all times, and icons indicating whether B&W or Highlight Tone Priority modes are enabled. In one minor difference, there are now tiny triangles pointing outwards on either end of the viewfinder EV scale indicating under or over exposures of more than +/-2EV; previously the outermost bar would simply flash.
Canon EOS 550D / Rebel T2i Screen and Live View
The EOS 550D / Rebel T21i’s screen measures the same 3in as the 500D / T1i, but is the first on a Canon DSLR to employ a wider 3:2 aspect ratio which perfectly matches the shape of its images. Previous Canon DSLRs – and indeed most rivals – used squarer 4:3 aspect ratio screens which meant images in Live View or playback had black bars above or below when the entire frame was viewed. Now on the EOS 550D / T2i, images in Live View or playback fill the screen.
 |
The 550D / T2i’s screen also sports a slightly higher resolution of 1040k dots compared to the 920k of earlier models. While this may not sound like a big leap, the crucial difference is the entire vertical resolution can now be devoted to the image. When viewing 3:2 images on earlier 4:3 shaped / 920k screens, letterboxing meant the actual image only occupied a portion measuring 640 pixels wide by 427 pixels tall. Now on the EOS 550D / T2i, the full 720×480 pixel resolution of the screen can be used to display images, giving it almost 15% more detail in each axis. And while framing wider 16:9 HD video will still involve some letterboxing, the 3:2 shape is a better fit than previous 4:3 models, again with the image filling more of the screen.
In use, this makes a big difference. Previous VGA screens already looked good, but having the image filling the screen without letterboxing makes for a much preferable composing and viewing experience. Indeed you wonder why it’s taken so long for DSLR manufacturers to fit screens which match the shape of their sensors – we know 4:3 shaped screens are more commonly available, but that hasn’t stopped Panasonic from fitting 3:2 shaped screens for some time now, albeit – ahem – on cameras with 4:3 shaped sensors.
The Canon screen itself is bright and crisp, but like most is not immune to the effects of bright sunlight. With the Sun shining directly on the screen, the image can be hard to see, and any smears or fingerprints become obtrusive. In less stark conditions, the viewing angle is sufficient for a fair squint with the camera held at high or low angles, but again try and do this under bright Sunlight and you’ll struggle to see anything usable.
So it’s another bitter-sweet experience compared to a number of its rivals which are equipped with articulated screens. Sony’s Alpha A550 has a screen which can vertically tilt up and down, while the Nikon D5000 and Olympus E-620 feature screens which can twist and flip to any angle. This in turn makes them much easier to view at high or low angles, and also allows you to better avoid direct sunlight by twisting the screen away. If you frequently find yourself composing images close to the ground or over the heads of crowds, we’d recommend one of these models over the Canon. But once again for a fixed screen, the EOS 550D / T2i takes the lead over the competition.
 |  |
The EOS 550D / T2i is equipped with Live View facilities which allow you to compose with the main screen. The implementation is essentially the same as the EOS 550D / T1i before it, with a couple of minor but useful alterations.
The first is Live View now has its own dedicated button positioned to the right of the viewfinder. It’s already enabled as standard, so just press this button to enter Live View and start composing.
The second alteration now allows the 550D / T2i to autofocus in Live View with a half-press of the shutter release, just like framing with the viewfinder. This is much more intuitive than having to press the AE / AF lock * button, and will greatly reduce support enquiries from confused owners who haven’t read their manual. It’s a small but very welcome change, although one the competition have been using for some time now. So two small changes from Canon here, but both will greatly improve the initial Live View experience for first-timers.
Like the EOS 500D / T1i, the default AF mode in Live View is the contrast-based Live option (see below), which again matches the defaults of its main rivals. While this remains the slowest of the Live View AF modes, the lack of noise and interruption to the image – not to mention support for face detection – makes it the most sensible choice, at least in a lower-end model.
Once you’re in Live View, the EOS 550D / T2i delivers 100% coverage and exploits the full resolution of the screen, with a smooth refresh rate. The effect of different apertures can be previewed by pressing the depth-of-field preview button below the lens release, and under most conditions the camera will temporarily brighten the screen to maintain a consistent image; if the subject’s already quite dark though, the screen will become darker during the preview, like the optical viewfinder.
 |
 |
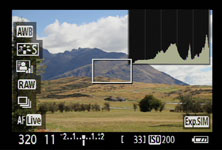 |
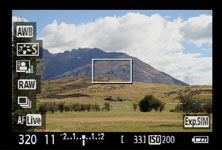
Pressing the Disp button cycles between four views: a clean image, one with basic shooting information at the bottom (now super-imposed thanks to the image filling the screen), one which adds additional information down the left side of the image, and finally one which places a live histogram in the upper right corner. The option of a live histogram is a key advantage the Canon 550D / T2i has over most of Nikon’s DSLRs; strangely Nikon continues to reserve a live histogram for its top-end pro models only.
 |  |
 |  |
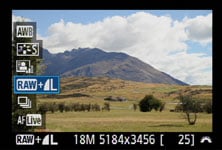
The Display view which adds details to the left side of the image is slightly different to the earlier 500D / T1i. First there’s more information with (from top to bottom) the White Balance, Picture Style, Auto Lighting Optimizer, quality, drive and AF modes all indicated. Addressing a criticism of earlier models, these can now all be adjusted on-screen by pressing the Q button. This allows you to highlight the required detail using the cross-keys, before turning the finger dial to adjust it. This view may not offer the full array of settings as the Q system presents when composing out of Live View (see menu section below), but it remains a handy update. Note you cannot use the cross keys to fire-up dedicated menus for the White Balance, AF, Drive or Picture Style in Live View – you have to use the new Q system instead. You can however adjust ISO by pressing the ISO button on the top surface as usual.
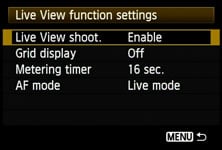
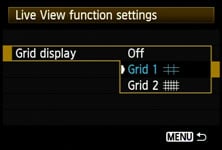
Canon also offers the choice of two alignment grids in Live View, although like the 500D / T1i you’ll need to enable them in the Live View menu; while this means you can see a grid and histogram at the same time, we’d prefer it simply appeared as an option when cycling through the Display views. As you’d expect for a camera in its class, the EOS 550D / T2i also doesn’t share the virtual horizon facility of the higher-end 7D.
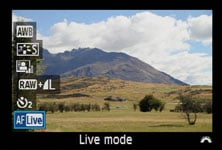
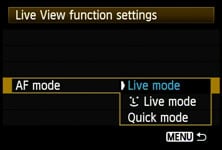
The EOS 550D / T2i inherits the same three Live View autofocus modes as the 500D / T1i: the default contrast-based Live mode, followed by Live mode with face detection and finally Quick mode which uses the traditional phase-change AF system. As described above, all three are activated with an intuitive half-press of the shutter release rather than having to press the AF / AE lock of earlier models.
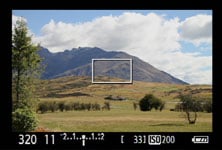
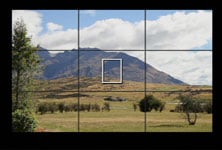
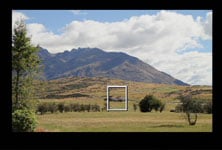
With the EOS 550D / T2i set to its default Live mode, a white rectangle is shown in the middle of the frame, which can be moved around using the cross-keys. Half-press the shutter release and the 550D / T2i will focus on whatever’s in the frame using a contrast-based system. Like other DSLRs, contrast-based autofocus in Live View is relatively slow, but operates very quietly without the sound or interruption of the mirror flipping.
 |
 |
 |
|

Like earlier Canon models, Live mode adjusts the lens roughly at first before slowing down to fine-tune the focus. At best this could take around two seconds, but it’s not uncommon to find it taking as long as four. Beyond a lack of interruption, the technical benefit is taking a focus reading direct from the sensor’s image, so Live mode doesn’t suffer from the potential AF inaccuracies of a traditional phase-change system.
The EOS 550D / T2i’s Live mode with face detection (indicated by a smiley icon) uses the same contrast-based system as normal Live Mode, but if it recognises a human face, it’ll frame it with a box and focus on that instead when you half-press the shutter release; if there’s more than one face in the scene, you can use left and right cross keys to select the one to focus on.
As you might expect, the 550D / T2i’s processor can recognise and track faces as quickly as a compact, but the actual focusing process itself remains the same speed as normal Live mode – as such it can take several seconds. If you’re lucky, the camera will lock on and confirm within a couple of seconds, but if it ends up being longer, it’s easier to exit Live View and frame a portrait shot through the viewfinder instead.
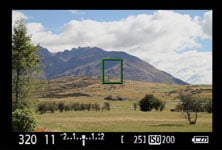
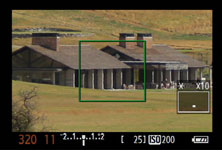
Finally, the EOS 550D / T2i’s third AF option, Quick mode, employs the traditional 9-point phase-change AF system used when composing through the optical viewfinder. As such, the camera shows a graphical representation of the nine AF points on-screen in the same diamond configuration, with the active point(s) illuminating red. An adjustable white frame remains in the middle for magnified focusing assistance – see below.
Like other phase-change AF modes in Live View, the camera needs to flip its mirror down to take a reading before flipping it back up again to continue the live feed. There’s obviously some noise and an interruption to the image during this time, but it remains the quickest if the three AF modes in Live View – indeed, if the AF system locks onto the subject without a problem, the entire process can take less than a second.
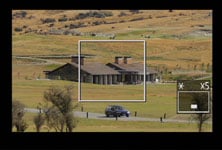
At any time during the Live or Quick AF modes, you can press the magnify button to show a 5x view, then a 10x view. The 550D / T2i will zoom-in on wherever the white frame is positioned on screen, which can be moved before or during using the cross-keys. At 10x, the EOS 550D / T2i shows an area that’s one tenth the width of the full image as you’d expect, but then scales this 518 pixel wide crop to fill the 720 pixel width of the monitor. So the 10x mode actually appears to be operating at greater than 1:1 magnification.
 |
 |
 |
For purists it may be shame there’s still no exact pixel-mapped 1:1 viewing mode, but at 10x there’s little evidence of scaling or fuzziness; indeed the image looks pin-sharp and allows you to confirm auto-focusing or make very precise manual focus adjustments. This view is also sharper than that of the Nikon models which become relatively fuzzy at their maximum magnification, including the D90 with its VGA screen. Canon’s magnified view also lets you better-preview the effect of a lens with Image Stabilisation facilities which you can see kick-in when you half-press the shutter release.
Finally, Live View on the EOS 550D / T2i is also available at a higher resolution when the camera’s connected to an HDTV using the HDMI port, or connected to a PC or Mac and using the supplied EOS Utility – see our Features page for more details on the latter. Note, the Live View Silent Shooting options of the higher-end 50D are not available. We have a full demonstration of the 550D / T2i’s Live View options in our video tour.
So all-in-all, by making some minor but sensible changes, Canon’s enhanced what was already a very capable Live View system. Dedicating a button to Live View and using a half-press of the shutter release to autofocus make the process much more intuitive, while devoting the entire screen to the composition delivers a superior image. The main contrast-based AF system hasn’t become any faster though and like most equivalent systems, you still can’t continuously autofocus for tracking action. If you want a DSLR which can track moving subjects in Live View as quickly as through the viewfinder, then you’ll need a model like the Sony Alpha A550.
Canon EOS 550D / Rebel T2i shooting information and menus
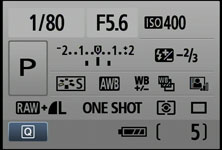
Like its recent predecessors, the 550D / T2i uses its main colour screen to display all shooting information and the high resolution allows the fonts to look very smooth. At first glance the details displayed look the same as the earlier 500D / T1i, but the wider shape of the screen has seen a few minor changes.
 |  |
 |  |
On the top row you’ll still find the shutter speed, aperture, ISO sensitivity and a D+ icon indicating whether Highlight Tone Priority is enabled or not. On the second row there’s the shooting mode, exposure compensation scale, and flash compensation value. Next down on the third row are the Picture Style, White Balance mode, icons for White Balance compensation and bracketing, although the metering mode has been swapped here for a new icon indicating the Auto Lighting Optimizer setting. On the fourth row you’ll find the image quality, AF, drive modes and metering modes, leaving a four-segment battery indicator and the shots remaining at the bottom. This lower strip also indicates the transmission status of an Eye-Fi card if present.
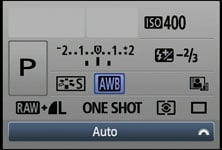
Also at the bottom, in the lower left corner is a box labelled Q, indicating that pressing the new Q button will activate the camera’s Quick Control mode. Inherited from the EOS 500D / T1i, this allows you to move a highlighter over many of the options listed above, before then turning the finger dial to directly adjust it, or pressing SET to present a dedicated menu for that item.
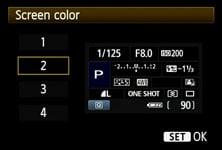
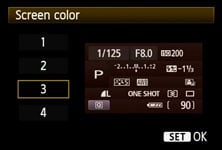
It’s similar in practice to other on-screen adjustment systems like those pioneered on Olympus DSLRs, and like its predecessor you can also choose from four different colour schemes. Sadly unlike the Nikon D5000 and the entire Sony Alpha range though, the new Canon still won’t rotate its information to remain upright when you turn the camera. Note: pressing the Disp button will switch the screen on and off, although proximity detectors will do this automatically as you bring your eye to compose through the optical viewfinder.
 |
 |
 |
The menus are essentially identical to the earlier 550D / T1i, exploiting the high resolution monitor and processing for smooth fonts, colourful icons and fading transitions between pages; it’s a good-looking system. As before you can exclusively use the cross-keys for navigation, or use the finger dial to switch pages.
In terms of the actual pages, the wider screen now allows for three devoted to Recording options, followed by two for Playback, three for Setup (including Custom Functions), and one for ‘My Menu’ settings; there’s 12 Custom Functions in total and throughout the review we’ll highlight some of the options. Note that switching to the Movie mode adds two new pages dedicated to this function, while temporarily losing the Custom Functions, My menu and third Recording pages; we’ll detail these in the Movie mode section under the Features tab.
 |
 |
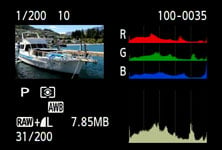 |
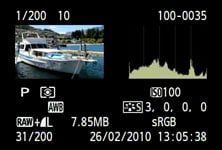
In playback mode, pressing the Disp button cycles between a clean image, one overlaid with basic information, followed by a thumbnail with extended shooting information and a brightness histogram, and finally a thumbnail with less shooting information, but both brightness and RGB histograms. You can also use the magnify buttons to zoom-in on an image or zoom out to display either four or nine thumbnail views.
If you’re directly connected to a PictBridge-compatible printer, the 550D / T2i also allows you to perform a number of manipulations including trimming and fine rotation, along with manual Levels adjustments.
Canon EOS 550D / Rebel T2i Battery and connectivity
The Canon EOS 550D / T2i is powered by a new LP-E8 Lithium Ion battery pack with a much higher 1120mAh rating than the 720mAh of the LP-E5 which powered the 500D / T1i and 450D / XSi. With approximately 50% more capacity, you’d expect a considerable boost in the number of shots you can take, but Canon quotes just 10% more than its predecessor: 440 under CIPA conditions with 50% flash usage.
The number of shots also falls considerably when composing with the screen. If you exclusively use Live View (admittedly unlikely), each charge should be good for around 180 shots with 50% flash usage, compared to 170 on the 500D / T1i.
So Canon’s either being conservative with its estimation, or some components within the 550D / T2i are much hungrier than before. On the upside, the estimated movie recording time per charge has increased from around 70 minutes on the 500D / T1i to around 100 minutes on the 550D / T2i. Either way if you regularly compose in Live View or shoot movies, you’ll find your battery depleting sooner rather than later, so we’d definitely recommend carrying a spare.
Sadly there’s still only four levels on the battery life indicator, compared to the accurate percentage remaining shown by Sony’s Info Lithium models. If you require longer lifespan not to mention something more to hold onto, the optional BG-E8 battery grip can take two LP-E8 packs or six AA batteries, while providing portrait controls and grip. Alternatively if you prefer mains power, there’s an optional ACK-E8 adapter.
 |
|
In terms of connectivity, a flap on the left side of the body opens to reveal a socket for the optional RS-60E3 remote switch, a combined USB / TV output and a mini HDMI port, and new to the 550D / T2i over its predecessor (not to mention most rivals at this price-point), a 3.5mm jack for connecting an external stereo microphone to greatly improve the audio in movies; we have more details on the microphone input in our movie mode section under the Features tab. The HDMI port also now supports CEC for remote control with compatible TV sets.
Standard TV and USB cables are provided, and the latter can be used in conjunction with supplied software to remote trigger the camera, rendering the remote switch redundant – so long as you have a computer in close range of course. If you prefer wireless remote control, the optional RC-6 can trigger the shutter via infra-red.
An HDMI cable isn’t supplied, but any standard model with a mini-jack at one end will work. Note while the 550D / T2i will deliver a great-looking high-resolution version of its Live View over HDMI, the output will be temporarily switched to a lower resolution (or disabled) while recording a movie. If you need to monitor the signal while filming though, the standard definition composite TV output remains active.
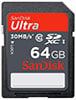
Like the models preceding it, the 550D / T2i unsurprisingly sticks with the SD memory card format, and as always you’ll need to supply your own. New to the 550D / T2i over its predecessor though is support for SDXC cards which allow cards bigger than 32GB. Note if you want to record movies, Canon recommends using a card rated as Class 6 or higher; we used a Lexar Professional 8GB SDHC 133x model in our tests which is rated as Class 6 and worked fine with all the movie modes. SanDisk’s Ultra III cards are also rated as Class 6, so should be a great match for the 550D / T2i; note the cheaper Ultra II cards are only Class 4, so while fine for still photography on this camera, will be too slow to support the HD movie modes for longer recording times.
Now let’s head-onto the Canon EOS 550D / Rebel T2i Features section where we’ll detail the lenses, anti-shake, focusing, anti-dust, the sensor, image processing, continuous shooting, PC-based remote control, and of course the improved movie mode.


