Canon EOS 500D / Rebel T1i
-
-
Written by Gordon Laing
Canon EOS 500D / Rebel T1i design, controls, screen and live view
Externally, the Canon EOS 500D / Rebel T1i is a virtual clone of the earlier EOS 450D / Rebel XSi, and without knowing their specific differences, it’s easy to mistake one for the other. Both share exactly the same dimensions, the same shape and virtually identical controls. Beyond the model badge and a new shiny EOS logo at the front, the most obvious physical differences are a silver Command dial, tiny holes for the built-in microphone and subtle changes in button and port labelling. Beyond these minimal tweaks and a 5g weight difference, which you’d only notice by comparing the specs, the 500D / T1i looks and feels essentially the same as its predecessor.
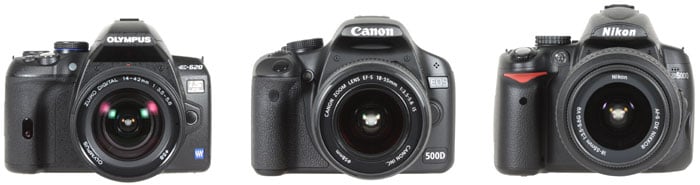 |
We’ve pictured it above flanked by its two major rivals: the Olympus E-620 (on the left) and Nikon’s D5000 (on the right). When taking all dimensions into consideration, the 500D / T1i falls roughly in-between the two other models. Measuring 129x98x62mm, it’s 6mm shorter and 18mm thinner than the relatively chunky D5000, although a little taller and thicker than the compact E-620.
In terms of weight, the E-620 unsurprisingly comes in lightest at 521g including battery or 711g with its 14-42mm kit lens, followed by the 500D / T1i at 530g with battery or 730g with its EF-S 18-55mm IS kit lens, leaving Nikon’s D5000 as the heaviest at 611g including battery, or 876g when fitted with the DX 18-55mm VR kit lens.
The 500D / T1i’s build quality is identical to the earlier 450D / XSi: it feels well-assembled and fairly solid with no creaks or poor joins to worry about. The build quality is roughly similar to the Olympus E-620 and Nikon D5000, although the former’s smaller size gives it a slightly higher density and a subtle impression of greater solidity in your hands. None are rated as having any kind of weather-proofing, although the E-620 is the only one of the three to offer an optional underwater housing.
 |
|
All three have comfortable rubber-coated grips with raised thumb rests on the rear, although Nikon and Olympus take an ergonomic lead with indented inner portions which hook onto your finger tips, giving a more secure impression. Interestingly while the E-620 had physically the smallest grip of the three, it felt the most comfortable and secure in our hands. This is obviously a very personal choice though, and as always we’d recommend picking up a variety of cameras before buying to see which feels best in your hands. The differences noted above are fairly subtle though, with all three sharing similar levels of build and comfort.
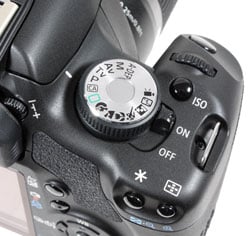 |
In terms of controls, the 500D / T1i is essentially the same as its predecessor with only a handful of tweaks. The upper left side is again left bare, with the bulk of the controls located on the right side of the body. Starting on the upper right surface, there’s the main Command Dial, rotary power switch. Dedicated ISO button, finger dial and shutter release button.
The biggest difference here (beyond a slightly higher ISO button) is the Command dial, which like the EOS 50D is now coloured silver with black writing and a finer textured grip. Like the 450D / XSi before it, there’s the usual P, A, S and M modes, Canon’s green square full Auto and A-DEP modes, along with direct access to the same five scene presets and the flash-off option.
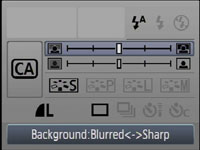 |
New to the EOS 500D / T1i are two additional positions on the dial: one labelled CA and the other dedicated to the movie mode. CA stands for Creative Auto and is essentially a beginner-friendly version of Aperture Priority. So instead of dialling-in an f-number, the CA mode presents an on-screen slider to adjust the background sharpness. A second slider is used to adjust the exposure compensation. It’s a friendly approach to controlling depth-of-field, which is more appropriate to the 500D / T1i’s target market than the 50D on which it made its debut. We’ll fully detail the exposure options and movie mode on the Features page, and continue with the physical tour here.
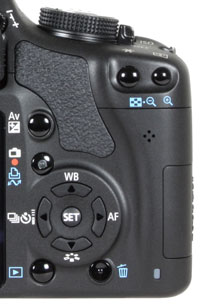 |
The AE / AF lock and AF point selection buttons remain in the top right corner of the rear and as before double-up as zoom controls during playback – along with AF and manual focus assist controls in Live View.
The rear of the camera remains dominated by a 3in screen, although while it’s the same size as its predecessor, it’s now far more detailed – see screen section below. The control layout on the rear remains the same with two small differences in function. The first is that the Direct print button still has a shared use, but instead of alternatively opening the White Balance menu, it now fires-up the Live View mode or starts recording video if the camera’s Command dial is set to the movie mode.
The second difference is White Balance has now been assigned to the upper of the four main cross-keys, which means its previous function of adjusting the metering mode has now been relegated to the main menu system. The remaining three cross-keys still offer direct-access to the Picture Style, AF and drive modes. A final point worth noting is Canon has kept the depth-of-field preview button which can be found just below the 500D / T1i’s lens release button.
Canon EOS 500D / Rebel T1i flash
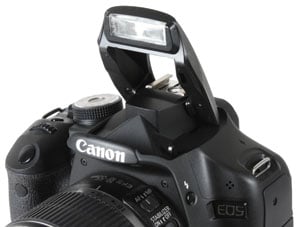
The EOS 500D / Rebel T1i is equipped with the same internal flash as its predecessor, which pops-up 55mm above the top of the lens mount and has a guide number of 13.
|
As before, there’s a hotshoe for mounting external Speedlite flashguns, although eagled-eyed Canon followers may notice a subtle plastic ridge around it which wasn’t present on its predecessor. This affords a little extra environmental protection when mated with the seals on the latest Speedlite flashguns, but with some metal still exposed, it doesn’t offer the weatherproofing of higher-end models like the EOS 40D and 50D.
 |
As you’d expect for its price point, there’s no PC sync port on the 500D / T1i for studio lighting – for that you’ll also need the EOS 40D or 50D. The fastest flash synch speed also remains the same as its predecessor: 1/200.
The 500D / T1i offers the same flash control options as the earlier 450D / XSi, although they’ve been promoted from the Setup section to the first menu page. As before, there’s a dedicated page of options for the internal flash which allow you to set the curtain sync, compensation and E-TTL II mode.
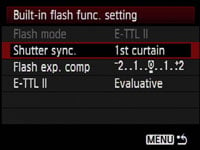 |
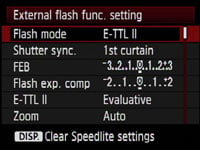 |
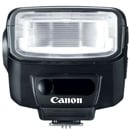
Like its predecessor these are also joined by a second page of options for controlling compatible Speedlite flashguns (including the 580EX II, 430EX II or the new 270EX), allowing you to adjust the compensation, bracketing, sync, zoom and wireless options without touching the flash; as before you can also adjust the external flash’s custom functions.
Canon EOS 500D / Rebel T1i viewfinder
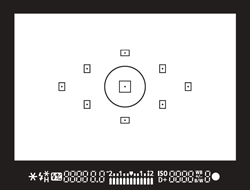 |
The EOS 500D / T1i is equipped with the same optical viewfinder as the 450D / XSi which employs a penta-mirror arrangement to deliver 95% coverage with 0.87x magnification. The coverage is the same as the Nikon D5000 and Olympus E-620, although all three models employ different magnifications (and sensor sizes), making their viewfinder experiences a little different.
Nikon’s D5000 has a relatively small viewfinder magnification of 0.78x, which in practice makes its viewfinder image appear smaller overall, although perhaps not by as much as the figures imply. The Olympus E-620 has an impressive-sounding magnification of 0.96x, although it’s coupled with a physically smaller sensor that also has a squarer 4:3 aspect ratio. As such, the E-620’s viewfinder approaches a similar height to the 500D / T1i, but isn’t as wide; it is however taller than the view through the D5000, although again not as wide. So compared to its major rivals, the EOS 500D / T1i boasts the largest viewfinder image, although again we’re talking subtle differences in practice.
In terms of markings, the 500D / T1i’s viewfinder shows the same nine focusing points as its predecessor, with the centre-point circled to indicate the spot-metering area. As you’d expect for a camera at this price point, you can’t swap the focusing screen, and unlike Nikon’s D5000, there are no on-demand LCD grid lines.
There is however detailed information running along the bottom of the image, and in very clear large characters. The details and layout are the same as the 450D / XSi, including the ISO value displayed at all times, with one small exception: the B&W icon has been shifted to the right to make room for a new ‘D+’ icon indicating if Highlight Tone Priority is enabled.
Canon EOS 500D / Rebel T1i Screen and Live View
 |
The EOS 500D / Rebel T1i’s screen measures the same 3in as the 450D / XSi, but becomes the latest Canon DSLR to feature VGA resolution. This gives it 920k pixels in total, or a resolution of 640×480 pixels instead of the 320×240 pixels of typical 230k monitors. This matches the specification of models like the Canon EOS 50D, Nikon D90 and Sony A700; indeed we understand it’s the same screen as that used on both the higher-end EOS 50D and 5D Mark II.
In use this allows the EOS 500D / T1i to display very fine details whether in Live View, image playback, or when navigating the menu system. With direct sunlight shining onto the screen though it can become hard to see, and should you attempt to, say, hold the camera above your head and frame in Live View, you’ll need to shade it with your left hand and squint.
So it’s a bitter-sweet experience compared to its two major rivals, as while the Canon screen has the advantage of size and resolution over the 2.7in / 230k monitors on the Nikon D5000 and Olympus E-620, both those models can twist and flip their screens to any angle. This in turn makes them much easier to view at high or low angles, and also allows you to better avoid direct sunlight by twisting the screen away.
Articulated screens simply provide greater flexibility when composing in Live View, but as soon as you playback images, the bigger size and especially the extra detail on the Canon screen looks so much better. This is very much a personal one to weigh up, although anyone who frequently composes in Live View will prefer an articulated screen. It should also be noted you can have your cake and eat it: the Panasonic Lumix G1 and GH1 both offer fully-articulated screens that are 3in and sport 460k pixels – not quite as detailed as Canon’s 920k screen, but still a significant improvement over 230k models.
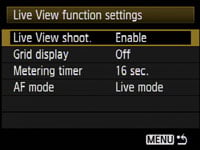 |  |
The EOS 500D / T1i’s Live View facilities are essentially the same as the EOS 50D, with a couple of minor but useful alterations. The first is Canon has finally enabled Live View as standard, unlike earlier models where you had to delve into a menu to activate the feature. So owners of the 500D / T1i can simply switch their camera on for the first time, press the Live View button on the back and start composing.
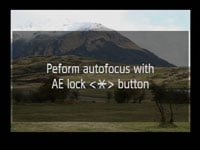
When first entering Live View, the 500D / T1i also now helpfully explains you’ll need to press the AE / AF lock * button in order to autofocus, again unlike earlier models which expected you to read the manual. We’d have ultimately preferred an intuitive half-press of the shutter release to perform the autofocus, like Nikon’s D5000 and the Olympus E-620 (the latter in its contrast-based AF mode only), but at least we’re getting there.
Interestingly, Canon has also switched the default AF mode in Live View to the contrast-based Live option (see below), which again brings it in line with the defaults of its main rivals. While this remains the slowest of the Live View AF modes, the lack of noise and interruption to the image – not to mention support for face detection – makes it the most sensible choice, at least in a lower-end model. So three small changes from Canon, but all greatly improve the initial Live View experience for first-timers; if Canon switches Live View AF to the shutter release on future models, we’ll be very happy.
Once you’re in Live View, the EOS 500D / T1i delivers 100% coverage and exploits the full VGA resolution of the screen, refreshed at a smooth 30fps. The effect of different apertures can be previewed by pressing the depth-of-field preview button below the lens release, and under most conditions the camera will temporarily brighten the screen to maintain a consistent image; if the subject’s already quite dark though, the screen will become darker during the preview, like the optical viewfinder.
 |
 |
 |
| ||||
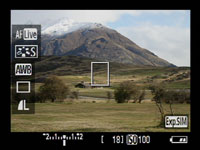
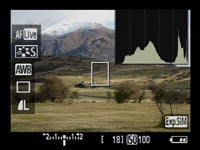
Pressing the Disp button cycles between four views: a clean image, one with basic shooting information beneath the frame, one which adds additional information over the image, and finally one which places a live histogram in the upper right corner. The option of a live histogram is a key advantage the Canon 500D / T1i and the Olympus E-620 have over Nikon D5000; strangely Nikon continues to reserve a live histogram for its top-end pro models only.
Canon also offers the choice of two alignment grids, although like the 50D you’ll need to enable them in the Live View menu; while this means you can see a grid and histogram at the same time, we’d prefer it simply appeared as an option when cycling through the Disp views.
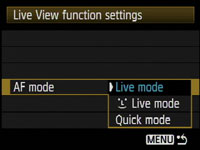 |
The EOS 500D / T1i inherits the same three Live View autofocus modes as the 50D, although has rearranged them with Live mode at the top, followed by Live mode with face detection and finally Quick mode at the bottom; as mentioned above, Live mode is the default option, and as before, to autofocus in any of the Live View modes you’ll need to press the AE / AF lock * button.
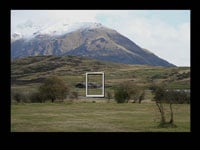
With the EOS 500D / T1i set to its default Live mode, a white rectangle is shown in the middle of the frame, which can be moved around using the cross-keys. Press the AE / AF lock button and the 500D / T1i will focus on whatever’s in the frame using a contrast-based system. Like other DSLRs, contrast-based autofocus in Live View is relatively slow, but operates very quietly without the sound or interruption of the mirror flipping.
Like earlier Canon models, Live mode adjusts the lens roughly at first before slowing down to fine-tune the focus. At best this could take around two seconds, but it’s not uncommon to find it taking as long as four. The major technical benefit though is that the focus reading is being taken directly from the sensor’s image, so Live mode doesn’t suffer from the potential AF inaccuracies of the traditional phase-change system.
The EOS 500D / T1i’s Live mode with face detection (indicated by a smiley icon) uses the same contrast-based system as normal Live Mode, but if it recognises a human face, it’ll frame it with a box and focus on that instead when you press the AF-ON button; if there’s more than one face in the scene, you can use left and right cross keys to select the one to focus on.
As you might expect, the 500D / T1i’s DIGIC 4 processor can certainly recognise faces and have the frame follow them round the screen as quickly as a compact, but the actual focusing process itself remains the same speed as normal Live mode – as such it can take several seconds. It can also be tricky to frame a portrait at longer focal lengths while pressing the AE / AF lock button to focus. If you’re lucky, the camera will lock on and confirm within a couple of seconds, but if it ends up being longer, it’s easier to exit Live View and frame a portrait shot through the viewfinder instead.
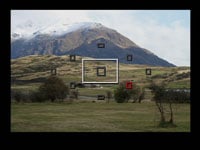 |
Finally, the EOS 500D T1i’s third AF option, Quick mode, employs the traditional 9-point phase-change AF system used when composing through the optical viewfinder. As such, the camera shows a graphical representation of the nine AF points on-screen in the same diamond configuration, with the active point(s) illuminating red. An adjustable white frame remains in the middle for magnified focusing assistance – see below.
Like other phase-change AF modes in Live View, the camera needs to flip its mirror down to take a reading before flipping it back up again to continue the live feed. There’s obviously some noise and an interruption to the image during this time, but it remains the quickest if the three AF modes in Live View – indeed, if the AF system locks onto the subject without a problem, the entire process can take less than a second.
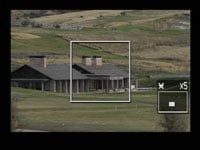
At any time during the Live or Quick AF modes, you can press the magnify button to show a 5x view, then a 10x view. The 500D / T1i will zoom-in on wherever the white frame is positioned on screen, which can be moved before or during using the cross-keys. At 10x, the EOS 500D / T1i shows an area that’s one tenth the width of the full image as you’d expect, but then scales this 475 pixel wide crop to fill the 640 pixel width of the monitor. So the 10x mode actually appears to be operating at greater than 1:1 magnification, or close to 133%.
 |
 |
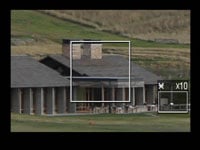 |
For purists it may be shame there’s no exact pixel-mapped 1:1 viewing mode, but at 10x there’s little evidence of scaling or fuzziness; indeed the image looks pin-sharp and allows you to confirm auto-focusing or make very precise manual focus adjustments. This view is also sharper than that of the Nikon models which become relatively fuzzy at their maximum magnification, including the D90 with its VGA screen. Canon’s magnified view also lets you better-preview the effect of a lens with Image Stabilisation facilities which you can see kick-in when you half-press the shutter release.
Finally, Live View on the EOS 500D / T1i is also available at a higher resolution when the camera’s connected to an HDTV using the HDMI port, or connected to a PC or Mac and using the supplied EOS Utility – see our Features page for more details on the latter. Note, the Live View Silent Shooting options of the higher-end 50D are not available. We have a full demonstration of the 500D / T1i’s Live View options in our video tour.
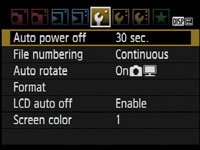
Canon EOS 500D / Rebel T1i shooting information and menus
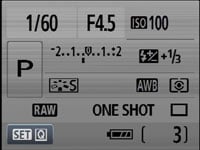 |  |
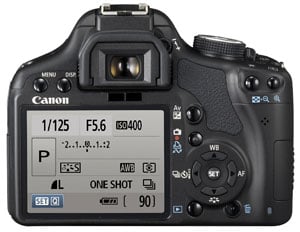
Like the 450D / XSi before it, the new 500D / T1i uses its main colour screen to display all shooting information, and while the screen size is the same, the extra detail of the 500D / T1i allows the fonts to look very smooth. The actual displayed information and styling is similar to the 450D / XSi, but Canon’s rearranged some of the items, while adding a D+ icon to indicate whether Highlight Tone Priority is enabled.
On the top row you’ll find the shutter speed, aperture, sensitivity and the icon for Highlight Tone Priority. On the second row there’s the shooting mode, exposure compensation scale, and flash compensation value. Next down on the third row are the Picture Style, White Balance mode, icons for White Balance compensation and bracketing, followed by the metering mode. On the fourth row are the image quality, AF and drive modes, leaving a four-segment battery indicator and the shots remaining at the bottom.
Also at the bottom, in the lower left corner is a highlighted box indicating that pressing SET will activate the camera’s Quick Control mode. Inherited from the 50D, this allows you to move a highlighter over many of the options listed above, before then turning the finger dial to directly adjust it, or pressing SET again to present a dedicated menu for that item.
It’s similar in practice to other on-screen adjustment systems like those pioneered on Olympus DSLRs, and a welcome addition to the 500D / T1i over the 450D / XSi. Like its predecessor though you can still change the colour scheme from a choice of four options – something that’s strangely absent from the 50D. Sadly the new Canon still won’t rotate its information to remain upright when you turn the camera though, unlike Nikon’s D5000 and the entire Sony Alpha range. Note: pressing the Disp button will switch the screen on and off, although proximity detectors will switch it off automatically as you compose through the optical viewfinder.
 |
 |
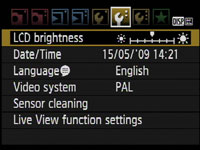 |
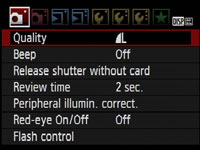
The menus look similar to the earlier 450D / XSi, but like the 50D, they now exploit the higher resolution monitor and the additional processing muscle of DIGIC 4: the fonts are smoother, the icons more colourful and there’s also fading transitions as you switch between pages; it’s a good-looking redesign. As before you can exclusively use the cross-keys for navigation, or use the finger dial to switch pages.
In terms of the actual sections, there’s two for recording, two for playback, two for setup, and one each for custom functions and My menu settings; there’s 13 Custom Functions in total and throughout the review we’ll highlight some of the options. Note that switching to the Movie mode adds a new page dedicated to this function, while temporarily losing the Custom Functions and My menu pages.
 |
 |
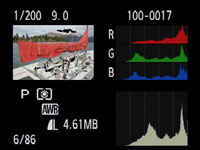 |
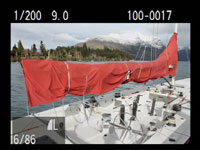
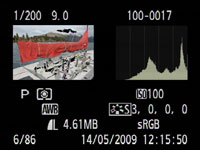
In playback mode, pressing the Disp button cycles between a clean image, one overlaid with basic information, followed by a thumbnail with extended shooting information and a brightness histogram, and finally a thumbnail with less shooting information, but both brightness and RGB histograms. You can also use the magnify buttons to zoom-in on an image or zoom out to display either four or nine thumbnail views.
If you’re directly connected to a PictBridge-compatible printer, the 500D / T1i also allows you to perform a number of manipulations including trimming and fine rotation, along with manual Levels adjustments.
Canon EOS 500D / Rebel T1i Battery and connectivity
The Canon EOS 500D / T1i is powered by the same light grey 1080mAh LP-E5 Lithium Ion battery pack as its predecessor the 450D / XSi. Canon quotes 400 shots under CIPA conditions compared to 500 on the 450D / XSI; this figure falls to around 170 shots when exclusively using Live View, and if you’re shooting lots of movies, expect it to fall even quicker. Canon reckons you’ll get just over an hour of video recording using a fully-charged battery.
While testing the 500D / T1i with lots of Live View framing and movie shooting, we found its battery could be consumed fairly quickly, so if you anticipate using these functions we’d definitely recommend carrying a spare.
Sadly there’s still only four levels on the battery life indicator, compared to the accurate percentage remaining shown by Sony’s Info Lithium models. If you require longer lifespan not to mention something more to hold onto, the optional BG-E5 battery grip can take two LP-E5 packs or six AA batteries, while providing portrait controls and grip. Alternatively if you prefer mains power, there’s an optional ACK-E5 adapter.
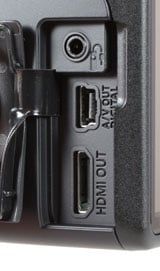 |
In terms of connectivity, a flap on the left side of the body opens to reveal a socket for the optional RS-60E3 remote switch, a combined USB / TV output and, new to the 500D / T1i over its predecessor, a mini HDMI port. Standard TV and USB cables are provided, and the latter can be used in conjunction with supplied software to remote trigger the camera, rendering the remote switch redundant – so long as you have a computer in close range of course. If you prefer wireless remote control, the optional RC-1 / RC-5 can trigger the shutter via infra-red.
An HDMI cable isn’t supplied, but any standard model with a mini-jack at one end will work. Note that while the 500D / T1i will deliver a great-looking high-resolution version of its Live View over HDMI, this will temporarily switch down to a lower resolution output while you’re recording a movie. So amateur film-makers hoping to take an HD feed to an external monitor while they’re shooting will be disappointed.
Like the 450D / XSi before it, the 500D / T1i unsurprisingly takes SD memory cards, and as always, you’ll need to supply your own. So if you’re upgrading from the 450D / XSi, you’ll be able to re-use a wide variety of accessories, including cards, batteries, the battery grip, remote control, and of course any lenses – which brings us to the end of this section. Click on the Features page to find out about lenses, anti-shake, focusing, anti-dust, the sensor, image processing, continuous shooting, PC-based remote control, and of course the new movie mode.