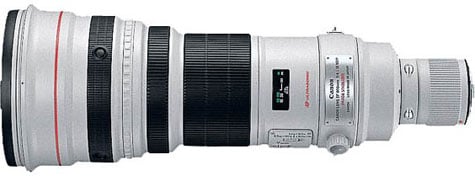
Canon’s EF 500mm f4L IS USM is a super-telephoto lens adored by wildlife and sports photographers alike. The 500mm focal length, equivalent to 800mm when mounted on a cropped-frame body, delivers decent-sized images of distant subjects, while the f4 maximum aperture allows you to isolate them with a very shallow depth-of-field. As one of Canon’s top-end professional lenses, the build and optical quality are excellent: the lens can handle tough conditions, while delivering well-corrected images even with the aperture wide-open on full-frame bodies.
The EF 500mm f4L IS USM is understandably large and heavy compared to mainstream lenses, but in super-telephoto terms is actually considered to be comparatively light and compact. Indeed it’s comfortably smaller and lighter than the next model up in the range, the EF 600mm f4L IS USM, and selected in preference by those who may need to hike with it for any distance or attempt an occasional handheld shot. Don’t get us wrong, you wouldn’t want to handhold or hike with a 3.87Kg lens for long, but it’s a world-apart from the 5.36Kg heft of the 600mm f4L in portability, not to mention being 69mm shorter and around 20% cheaper too.
In early 2011, Canon announced Mark II versions of both the 500mm f4L and 600mm f4L lenses with redesigned optics, improved stabilisation, and lighter weights; the two new versions weigh 3.19 and 3.92Kg respectively, the latter essentially matching the weight of the 500mm f4L Mark I. The new lenses aren’t however available until later in 2011 and carry comfortably higher prices: the 500mm f4L Mark II costs roughly 30% more than the Mark I (making it a little more expensive then the 600mm f4L Mark I), while the 600mm f4L Mark II weighs-in at around 25% more than the Mark I version.
Since the weight-saving on the new 500mm isn’t as significant as the Mark II 600mm, and there’s few who complained about the build or optical quality of the Mark I 500mm, it’s already looking like the ‘bargain’ of the Canon super-telephoto range; indeed as well-heeled professionals upgrade to the Mark II versions, there’s bound to be some good deals in the near future.
But despite the Mark I 500mm f4L comfortably being the cheapest Canon super-telephoto lens, its asking price of close to 7000 US dollars still renders it way out of reach for most photographers. Luckily there is an alternative: rent one. For less than $250 US dollars you could rent this epic model for a week, allowing you to cover a wildlife holiday or sporting event with one of the best lenses around. That’s exactly what I did for a trip to Florida during April 2011 when I may have failed in my primary goal of catching the final launch of Space Shuttle Endeavour, but ended up coming back with photos and video of everything else from surfers and beach babes to birds and classic sunsets.
|
Video: One week in Florida with a Canon EF 500mm f4L lens | |
|
|
I rented the Canon 500mm f4L from Borrow Lenses, a company based in California which will deliver to any address in the US, or a number of camera stores in the California area. I’d used their service once before in July 2010, renting a Canon EF 100-400mm zoom for a Bear photography trip to Brooks Falls, and was sufficiently impressed to become an affiliate partner. So if you’re ever renting camera equipment from them, please use our Borrow Lenses link to support Camera Labs. Please use the forum thread which accompanies this article to recommend alternative lens rental companies around the world.
Now back to the story: as a life-long fan of space flight, I’d always wanted to witness a rocket launch in person, with the Space Shuttle at the top of my list. As the Space Shuttle program gradually drew to a close though, there were literally only a couple of chances remaining. Discovery blasted-off in February 2011, leaving Endeavour and Atlantis to complete their final missions in April and June respectively. I took a gamble and decided to shoot for Endeavour, planning a trip which would hopefully let me shoot stills and video of the launch while also watching it in person.
I wanted to use DSLRs which could capture high resolution stills or shoot 1080p video at a variety of frame rates, which narrowed the choice down to Canon, and since high magnification was the order of the day, I’d be going for cropped-frame APS-C bodies. I selected an EOS 7D as my primary stills body for its fast continuous shooting, tough build and confident AF – see my Canon EOS 7D review for details. The 7D would be equipped with the EF 500mm f4L IS USM for the launch, delivering an equivalent focal length of 800mm. This combination would hang from a Manfrotto 393 head bracket, mounted on Manfrotto 055CXPRO3 legs, and be fired by cable release, hopefully allowing me to watch the launch with my eyes.
My primary video body would be an EOS 600D / Rebel T3i, chosen for its Digital Zoom facility which takes a 1920×1080 crop from the middle of the sensor, effectively multiplying the focal length by around 2.5 times with no loss of quality. Having already tested this facility with a 70-300mm lens in my Canon EOS 600D / Rebel T3i review, I knew it could deliver extremely high magnifications. I chose to fit this body with Canon’s latest EF 70-300mm f4-5.6L IS USM zoom, which with the sensor crop and digital zoom mode would deliver an equivalent focal length of around 1440mm for movies. For targeted audio, I planned on fitting a Rode Video Mic Pro. This combination would be mounted on a Gitzo 1541T tripod with a Markins Q3T ball head. I’d start recording video around a minute before launch, hopefully allowing it to record the lift-off unattended.
I also wanted wide-angle shots and video of the launch, so planned to use a second 600D / T3i body equipped with an EF-S 10-22mm zoom – see my Canon EF-S 10-22mm review for more details on this excellent lens. For high quality ambient sound capture, this camera would be fitted with a Rode Stereo Video Microphone. Finally, I planned to turn a fourth camera, a Canon PowerShot S95 compact, back at me and the crowd to film wide-angle reaction shots.
The vast majority of this equipment would be rented for the trip. I ended-up ordering the Canon EOS 7D (plus a spare battery), EOS 600D / T3i, EF 500mm f4L, EF 70-300mm f4-5.6L and EF-S 10-22mm from Borrow Lenses for one week and arranged to collect them from RayKo in San Francisco prior to my flight to Florida. The total cost of the rental (including insurance and delivery) was $741 US Dollars, which may be the cost of buying an upper entry-level DSLR kit, but got me a serious amount of high-end equipment with a total street value of over $12,000. The 500mm lens was the best value item, costing $298 with insurance for one week, compared to $6999 to buy.
The next question was how to carry it all. NASA doesn’t allow hard-sided or wheeled bags through security for launches and I wanted a fairly discreet-looking backback which could accommodate the 500mm lens, while also passing airport carry-on sizes.
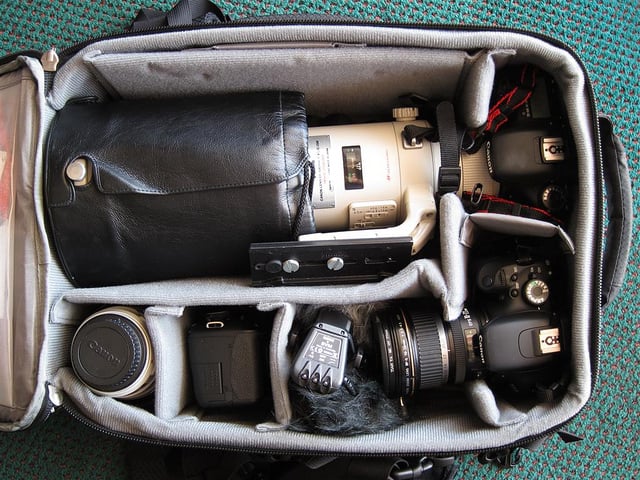
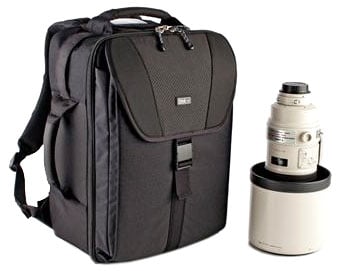
I narrowed it down to a Lowepro Pro Trekker 400 and a Think Tank Airport Acceleration v2. Either would have done the job, but the choice was made by the latter due to availability. It’s not too large, yet manages to squeeze in the 500mm f4L while mounted on a body, while accommodating another body and lens alongside.
|
Think Tank Airport Acceleration v2 packed for launch: taken with Canon PowerShot S95 |
 | |
Click image to access XGA version at Flickr |
|
The photo above shows the Think Tank Airport Acceleration v2 fully-loaded with all my equipment for the trip: a Canon EOS 7D and two EOS 600D / T3i bodies, along with the EF 500mm f4L, EF 70-300mm L and EF-S 10-22mm lenses. There’s also the two Rode microphones, a PowerShot S95 and a pair of small binoculars in there, along with a Samsung Netbook in the outer sleeve. The whole thing fully-loaded weighed over 20Kg, but felt surprisingly comfortable on my back. It’s also smaller than it looks, squeezing into overhead domestic airline baggage compartments as advertised, and always shocking passers-by when opened to reveal the monstrous 500mm within.
|
|
|
|
|
|
 |
|
|
|
|
I lugged it around for the entire week, never leaving my person, and even managed a short hike from the Golden Gate Bridge up to the Marin Headlands. On launch day, when accompanied by three tripods and an umbrella chair, I began to struggle, but by itself, the bag was again surprisingly easy to carry considering its contents. I’d highly recommend it for anyone needing to carry this amount of kit in a fairly discreet fashion. Stood-up, it also served as a handy platform to take some weight from the 500mm for handheld shots.
To find out more about the bag, see my Think Tank Airport Acceleration v2 backpack review.
That’s the equipment covered, so what about the results? Much to my surprise I ended up using the EF 500mm f4L for the vast majority of my shots during the week. Delays meant I sadly missed the actual Shuttle launch, but I made the most of having a super-telephoto in Florida by photographing folk playing on the beach and in the sea, along with a variety of birds and other wildlife in nearby wetlands. The topography around Cape Canaveral also presented numerous opportunities to photograph sunsets with the solar disc virtually touching the horizon. Amazingly it proved to be the ideal Florida vacation lens, at least for anyone not planning on visiting the theme parks.
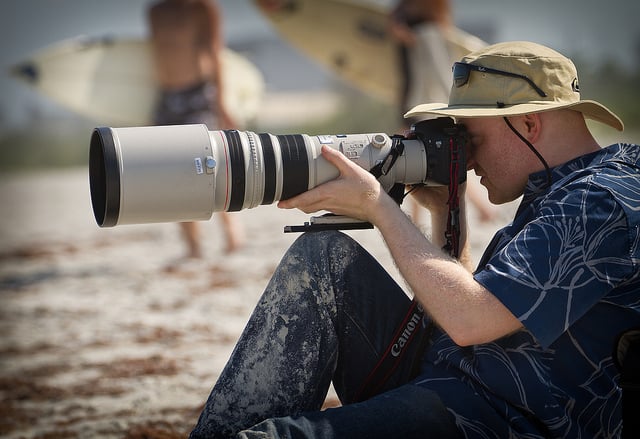
Here I am using it semi-handheld on Cocoa beach to photograph kite surfers. This photo was taken by Scott Kublin who runs HDR Photography Blog. Scott had grabbed my rented EF 70-300mm f4-5.6L lens on his EOS 7D, and snapped me snapping the kite surfers you’ll see further below…
|
Gordon with EF 500mm: Aperture Priority, 1/640, f5, 100 ISO, 70-300mm at 182mm (291mm equiv) |
 | |
Click image to access XGA version at Flickr |
|
What follows are a selection of photos taken during my trip. All were taken with the 500mm f4L and are presented here un-cropped and un-retouched to show the true quality and coverage of the lens; all but one were taken with the lens mounted on an EOS 7D body, with the exception being a single sunset taken with the 600D / T3i body just before using the Digital Zoom movie mode.
I’m equally surprised to report most of the shots below were also handheld, or taken with the lens casually resting on my knee, the top of the bag or out of my car window; only a handful were taken using my tripod, further reinforcing the 500mm f4L’s reputation as the ‘portable’ super-telephoto. I even managed some handheld video with it.
|
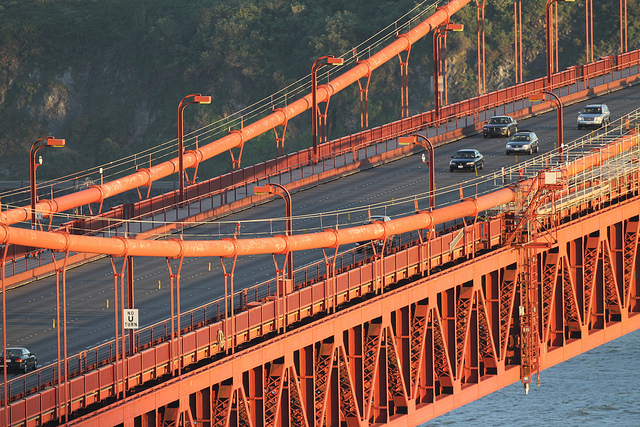
Golden Gate Bridge: Aperture Priority, 1/125, f5, 100 ISO, 500mm (800mm equiv) |
 | |
Click image to access original version at Flickr |
|
So without further ado, here’s my first shot above, taken in San Francisco the evening before heading off to Florida. The road to the Marin headlands for the classic Golden Gate Bridge at Sunset view was closed for repairs, so I had to hike to the nearest viewing area! Not normally a problem, but certainly tougher with 20Kgs of equipment! The Sun was setting as I parked my car, so it was a brisk walk up to the first viewing area and no time to set up the tripod, despite lugging it up too – so this shot was taken with the 500mm balancing on a post with IS enabled.
|
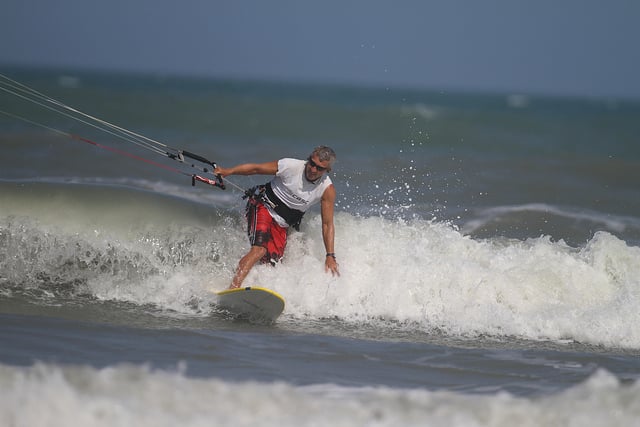
Kite Surfer: Aperture Priority, 1/3200, f4, 100 ISO, 500mm (800mm equiv) |
 | |
Click image to access original version at Flickr |
|
The shot above was what I was taking while sat on Cocoa Beach with the 500mm f4L lens resting on my knee – as seen earlier on this page. So please excuse the squint horizon, but it was handheld, and again I wanted to present un-retouched images for you here. The photo illustrates both the confidence of the EOS 7D’s AF system, along with the 500mm’s very shallow depth-of-field at f4, where only a short distance behind and in front of the kite-surfer is in sharp focus. While it’s easy to blur the background with the 500mm, I really like the effect seen here where the foreground in front of the subject is also blurred. You’ll see more of that later on this page.
|
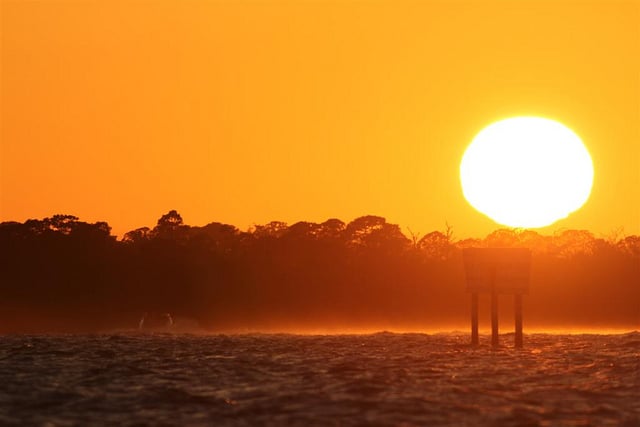
Cape Canaveral Sunset: Aperture Priority, 1/1000, f7.1, 100 ISO, 500mm (800mm equiv) |
 | |
Click image to access XGA version at Flickr |
|
I love high-power shots of the Sun, so given a 500mm lens on a cropped body and Florida’s low horizon lines, I found it hard to hold back. This photo was actually taken on the evening of the planned launch on April 29th a few hours after it was scrubbed. I joined Trey Ratcliff from Stuck in Customs and Scott Kublin from HDR Photography Blog on a mission to Disney to cheer ourselves up, and all of us had sunsets en-route in mind. The drive out of Cocoa Beach onto the main highway to Orlando crosses several bridges with views almost down to the horizon, so we parked-up at a promising spot, which coincidentally also had a clear view of the Space Shuttle on Pad 39a, along with the omnipresent cube of the NASA Vehicle Assembly Building, VAB, both about 13 miles away. While Trey and Scott shot relatively wide bracketed views for HDR, I set up my tripod for a tight 500mm image at an equivalent of 800mm. It was extremely windy and even with the legs at their shortest length and widest angle, my camera was being seriously buffeted; I shot some video, but it was too shaky for use. A shutter speed of 1/1000 eliminated any wobbles though for this shot just before the Sun dipped below the horizon.
|
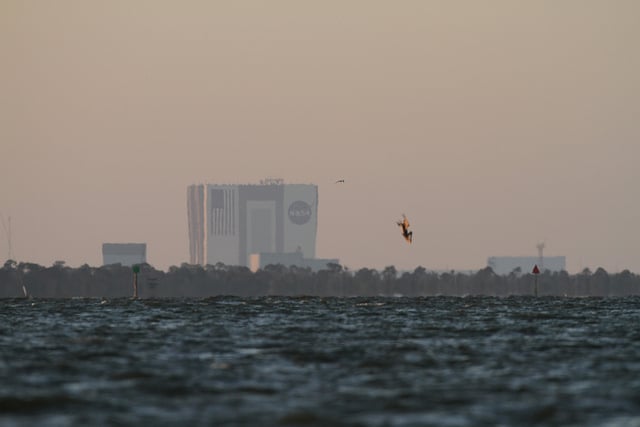
NASA VAB at sunset: Aperture Priority, 1/640, f5.6, 400 ISO, 500mm (800mm equiv) |
 | |
Click image to access original version at Flickr |
|
Moments before the Sunset shot, I turned the 500mm towards both the Space Shuttle and the NASA VAB. Both were about 13 miles distant and there were a lot of heat artefacts, especially around the Shuttle, perhaps due to defueling after the scrub; indeed my image of the latter is virtually unidentifiable, but there’s no mistaking the cube-shaped Vehicle Assembly Building where they literally bolt spaceships together before rolling them out to the launch pad. Remember this shot, like all the others on this page, is un-cropped, which gives an indication of the size of the thing: each star on the US flag painted on the side of the building is six feet wide and each red stripe is the width of a single lane road. Technically speaking this photo is horrible, but I like it because it reminds me of driving around the Cape Canaveral area, where the unmistakable cube of the VAB is almost always visible somewhere on the horizon. The photo also features the second omnipresent subject of the area: a diving pelican.
|
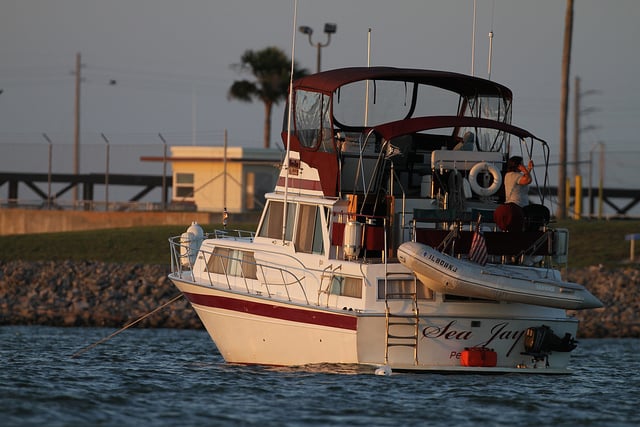
Boat at sunset: Aperture Priority, 1/200, f5, 100 ISO, 500mm (800mm equiv) |
 | |
Click image to access original version at Flickr |
|
As I panned the camera around I spotted a nearby boat which neatly filled the frame. I fired-off a shot and was immediately impressed by the degree of detail captured, along with the stylised flattened perspective of a super-telephoto lens. It was at this point, having taken the last three shots within moments of each other that I realised the 500mm could end up being my most used and flexible lens of the trip. I was already smitten and hadn’t even pointed it at any wildlife yet.
|
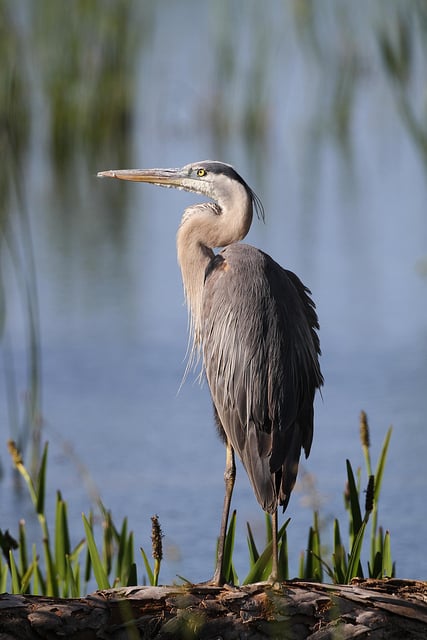
Heron: Ap Priority, 1/1000, f5.6, 100 ISO, 500mm (800mm equiv) |
 | |
Click image to access original version at Flickr |
|
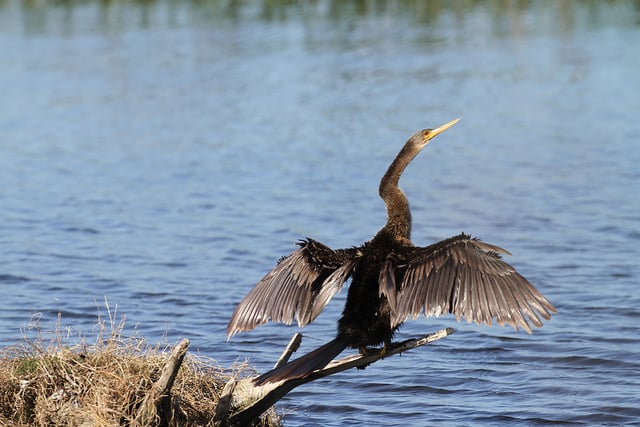
Florida is well-known for its wildlife, especially birds, and while many had already migrated by April, there was still plenty to point my camera at. I was advised by Trey to contact a Mr Vanelli who knew the best spots and subsequently recommended the Viera Wetlands, near to Brevard Zoo; it was about a 45 minute drive from Cocoa Beach past Patrick Air Force base and across the ‘rivers’. I’m no Twitcher (at least not yet anyway), but I loved my time at the wetlands, driving very slowly around and parking-up for regular photo opportunities. I’d grab a few shots out of the car window first, then if the bird seemed happy, I’d get out slowly and set up my tripod for steadier shots and video. The 500mm focal length on a cropped body was perfect for this location, and despite initial reservations, I never yearned for anything longer (or shorter), nor missed the opportunity to zoom. Here’s another shot from Viera Wetlands – again I’m no bird expert, so I’m relying on you all to tell me what they are in the forum thread which accompanies this article – thanks!
|
Stretching wings: Aperture Priority, 1/500, f6.3, 100 ISO, 500mm (800mm equiv) |
 | |
Click image to access original version at Flickr |
|
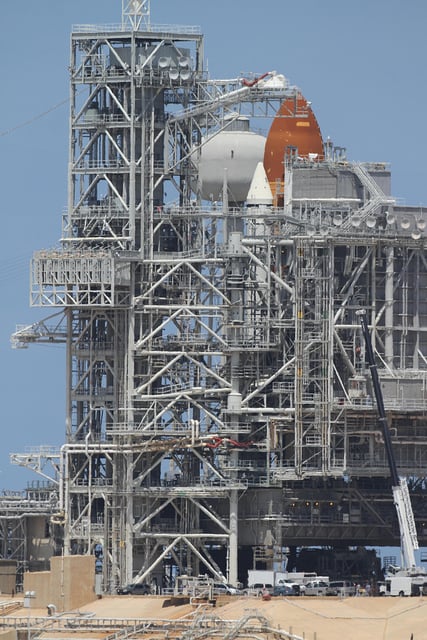
Okay, so I went all the way to Florida from New Zealand to take a photo of the Space Shuttle. Sadly I missed the launch of Endeavour STS 134, but I did at least get within 1.5 miles of Pad 39A from the Shuttle Viewing Gantry during a Kennedy Space Centre bus tour – that’s about four times closer than the ‘VIP’ NASA Causeway viewing area, and roughly eight or nine times closer than the nearest public road (such as the VAB shot earlier). Obviously you’d like to get as close as you can for a launch, but there’s minimum safe distances, and believe me, you would not want to be on the Gantry when that thing takes off. Anyway, I’d brought the 500mm to shoot the shuttle from the Causeway, so it was actually a bit too powerful from ‘just’ 1.5 miles away when mounted on a cropped-frame body. Unsurprisingly a lens like the 500mm gathers a lot of attention, and I was happy to let others take a shot with it, and one person did so with a full-frame 5D Mark II; the image was perfectly-framed with this combination and when he emails a copy, I’ll publish it here. Note there was a lot of heat rising between the gantry and pad, so if you view the image up-close you’ll see shimmering eliminating the ultimate detail.
|
Shuttle: Ap Priority, 1/1250, f5.6, 100 ISO, 500mm (800mm equiv) |
 | |
Click image to access original version at Flickr |
|
While I’m rambling, the obvious thing you’re thinking is ‘so where is the Space Shuttle then?’ The solid rocket boosters and external tank are clearly visible, but unfortunately Space Shuttle Endeavour itself is hidden by a load of scaffolding. Technically known as the Rotating Service Structure, this envelopes the Shuttle to provide maintenance access, along with helping to stabilise the stack. The ‘RSS’ was deployed in order to fix the problems which caused the April 29 launch scrub, so unfortunately prevented me from getting a good clear view. Ah well, I was destined not to see Endeavour in person!
|
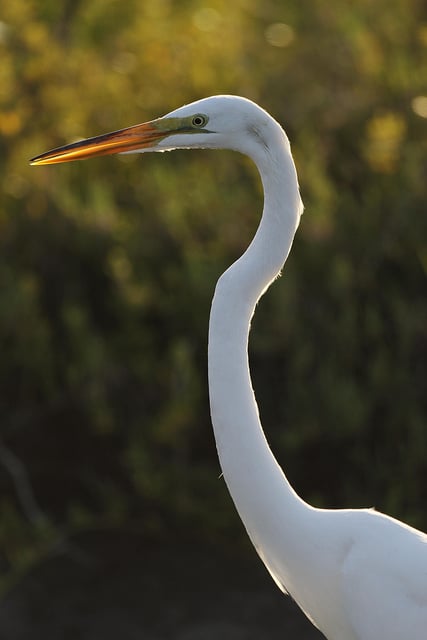
Backlit: Ap Priority, 1/640, f4, 100 ISO, 500mm (800mm equiv) |
 | |
Click image to access original version at Flickr |
|
Kennedy Space Centre isn’t just about launching rockets: NASA owns a massive block of land, most of which is actually turned over to wildlife. Merritt Island National Wildlife Refuge was established on the NASA grounds in 1963 and consists of 140,000 acres, complete with a wildlife drive, manatee observation deck and numerous opportunities to paddle – in a kayak that is, as there’s gators around. Late afternoon / early evening is an ideal time to view wildlife, so I headed over there the following day after browsing around Titusville.
|
Close-up birdie: Aperture Priority, 1/200, f4, 100 ISO, 500mm (800mm equiv) |
 | |
Click image to access original version at Flickr |
|
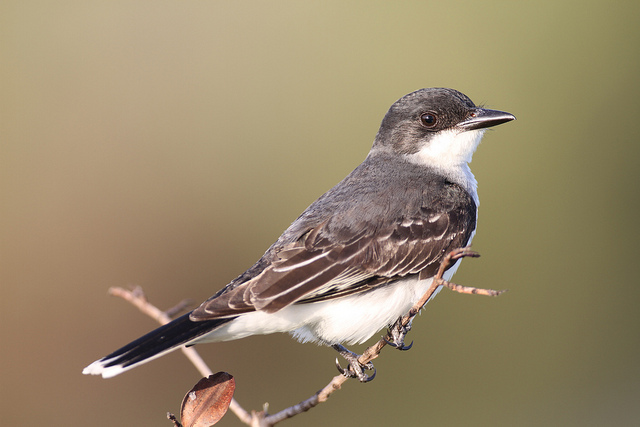
I had high hopes for Merritt Island, but the distances to the birds and other wildlife were much greater than at Viera Wetlands. Since there were also gators around, you’re also encouraged to stay in your car, so you’re limited to poking your lens out of your window. That said, I managed to grab some bird shots, including two of my favourites from the entire trip: the first (two pictures up), was nicely backlit by the setting sun, while the second one (immediately above) was literally only a few meters from my car at the lens’s minimum focusing distance, thereby filling the frame with a lovely out-of-focus background effect. I even managed to grab a few seconds of video of the same bird before it flew off. I also spotted a gator submerged by the side of the road, but I’m not going to show my photo here as it honestly just looks like a log. In fact maybe it was…
|
Portrait: Ap Priority, 1/1000, f4, 100 ISO, 500mm (800mm equiv) |
 | |
Click image to access original version at Flickr |
|
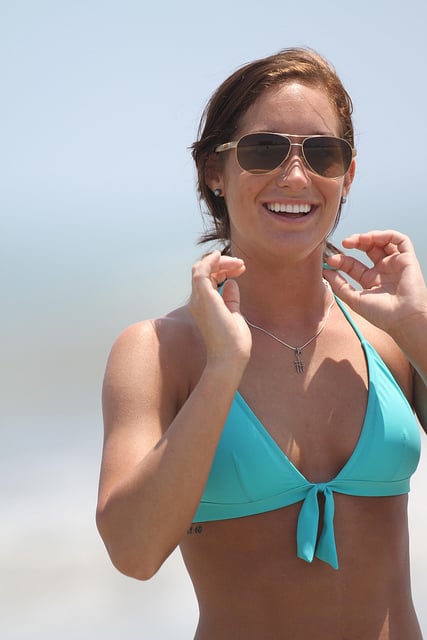
The day after visiting Merritt Island I decided to stick around Cocoa Beach, grabbing casual snaps of people enjoying the Sun, Sea and Sand. I wanted candid ‘street’ shots, but I equally didn’t want to take them surreptitiously. I think the last thing anyone wants on the beach is someone lurking in the background with a massive lens. So in this situation I positioned myself in the middle of the beach in plain view of everyone and happily announced my intentions to anyone who asked – and many who didn’t. Interestingly in these situations you actually find people coming to you, or deliberately positioning themselves in your field of view. I wouldn’t go as far as to say posing or being exhibitionists, but some people simply like being photographed. While scanning the horizon for surfers, two girls who’d been sunbathing behind me got up and started playing ball a few meters in front; literally right in front of me despite having miles of beach at their disposal. I politely asked if I could take some photos and they were perfectly happy. Like the Shuttle viewing gantry, the 500mm was actually a bit too long at this short distance, but I managed to grab a few portraits. None of these were posed and they were also moving pretty quickly, but here’s the sharpest, which almost looks setup, but was the briefest of glimpses.
|
Cyclist: Ap Priority, 1/1000, f4, 100 ISO, 500mm (800mm equiv) |
 | |
Click image to access original version at Flickr |
|
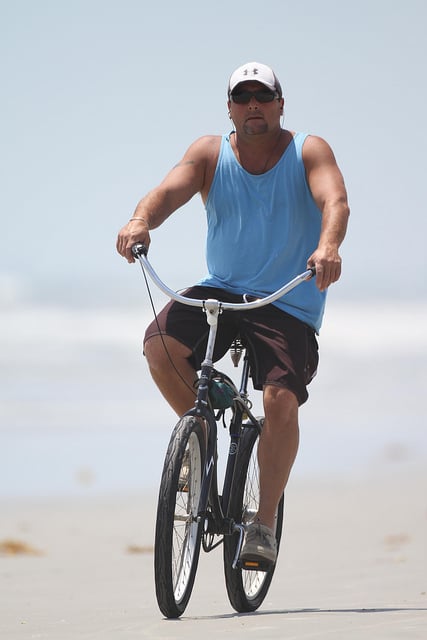
From the same position I had good views of people cycling up and down the beach. This was a fun test for the EOS 7D’s continuous AF capabilities, and I found the Zone AF mode most effective. I started photographing this guy when he filled about half the frame, so the sequence covers a few seconds of action; this was the last shot just before he became too big. Once again this was shot at f4, where the 500mm just renders the background into a silky smooth blur – it’s beautiful isolation.
|
Splash! Aperture Priority, 1/1000, f4, 100 ISO, 500mm (800mm equiv) |
 | |
Click image to access original version at Flickr |
|
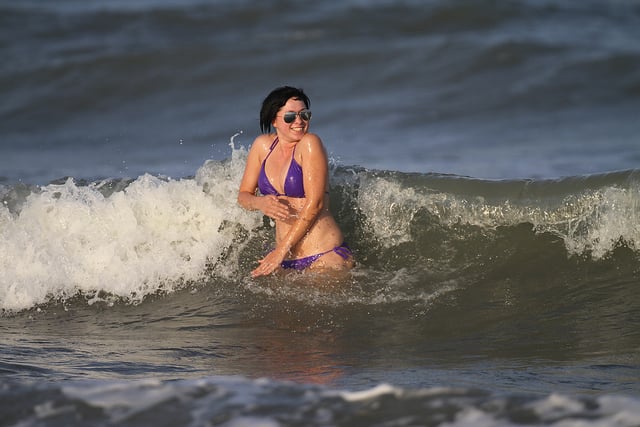
I grabbed lots of shots of people playing in the sea close to the shore, and my favourites were with the aperture wide-open at f4, where the water was quickly rendered into a blur behind and in front of the subject. I regularly switched between zone AF and Spot AF for these shots.
|
Beach bird: Aperture Priority, 1/800, f4, 100 ISO, 500mm (800mm equiv) |
 | |
Click image to access original version at Flickr |
|
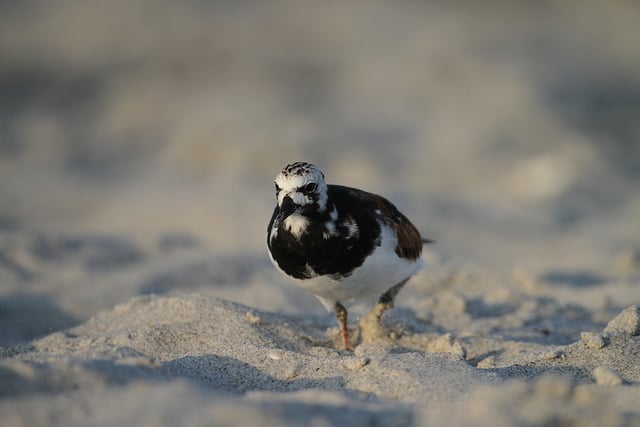
The razor thin depth-of-field of the 500mm f4 is perfectly illustrated in this shot of a bird on the beach, actually taken from the exact same spot as the last three photos. It was running around pretty quickly, but the 7D’s Zone AF managed to keep up for most of the shots. This was taken at a very close distance, indeed close to the lens’s minimum focusing distance, again maximising the shallow depth-of-field effect. Here not only is the background blurred, but also the foreground in front of the bird – there really is only a few inches where the image is sharp. Again I love the blurring both behind and in front of the subject.
|
Pelican (handheld): Aperture Priority, 1/1000, f8, 400 ISO, 500mm (800mm equiv) |
 | |
Click image to access original version at Flickr |
|
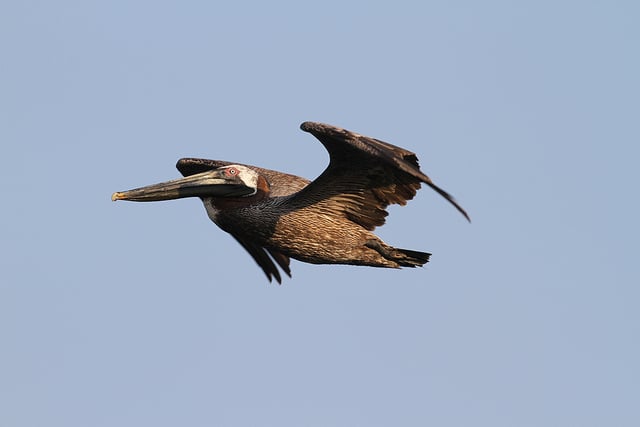
Pelicans were ever-present in the Cape Canaveral area, especially around the Manatee Observation Deck at Merritt Island, where I returned the following day. I grabbed hundreds of shots, all handheld, as they constantly flew past, again with the 7D set to Zone AF. The image above was one of my favourites, filling almost the entire frame with loads of detail. It was taken just before sunset at 400 ISO and 1/1000; I closed the aperture to f8 to be more forgiving on focusing. Swinging the 500mm f4L back and forth handheld required some effort, but it was not impossible – again another reason to go for this lens over the 600mm f4L, which would almost certainly have demanded a monopod. There were several occasions when a bird flew directly overhead, requiring me to swing the lens right up and over, which again would have been nigh-on impossible with the 600mm f4L, at least the heavier Mark I version anyway.
|
Kite surfer: Ap Priority, 1/1600, f4, 100 ISO, 500mm (800mm equiv) |
 | |
Click image to access original version at Flickr |
|
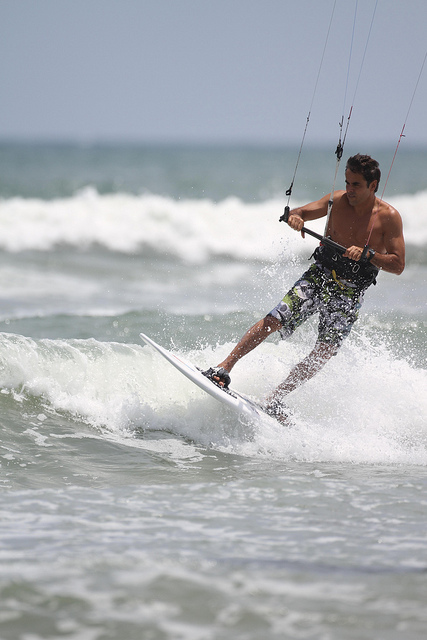
Okay, we’re coming to the end now with my last three shots: here’s my last from Cocoa Beach, taken from much the same location as those earlier, but two days later, of a kite surfer at reasonably close range. Zone AF was again the preferred choice on the 7D. Again I love the shallow depth-of-field.
|
Twisty: Ap Priority, 1/800, f6.3, 200 ISO, 500mm (800mm equiv) |
 | |
Click image to access original version at Flickr |
|
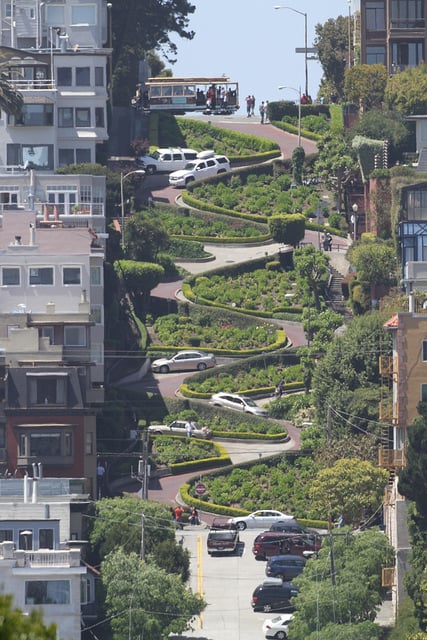
This was actually the last photo I took with the 500mm before returning it to Rayko in San Francisco. It’s a shot of the famously twisty section of Lombard Street in San Francisco, complete with a cable car at the top. It’s a famous photo, but I never knew where it was taken from. If you’re at the bottom of Lombard Street where it crosses Columbus Avenue, looking up at the twisty section, the view will be obscured by a maze of overhead power cables, and the road itself will also be at the wrong angle. The answer is to shoot it from approximately the same height at the opposite end of the road as it climbs towards Coit Tower. The only problem is that’s about 2km away, so you’ll need a big lens or significant cropping. Luckily the 500mm on a cropped body proved perfect once again. I also managed to grab some video of the same composition with the lens balanced on the Think Tank bag with my coat as padding. I’m pleased with the composition, although if you look at the original image at 100% you’ll see significant shimmering from heat rising; I’m not sure what the solution would be for this particular shot either as the light was just right at this time of day. The image could also have benefitted from using a polariser, although a tweak of the levels improves the contrast.
|
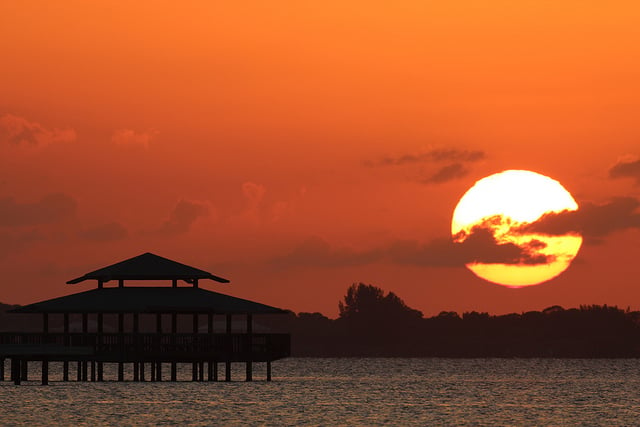
Sunset: Aperture Priority, 1/200, f7.1, 100 ISO, 500mm (800mm equiv) |
 | |
Click image to access XGA version at Flickr |
|
The Lombard Street shot may have chronologically been my last of the trip, but for the final image on this page, I’ve selected another Cocoa Beach sunset, taken from a parking lot where the West Cocoa Beach Causeway (520) meets the Banana River. This is the only shot on this page taken with the EOS 600D / T3i, which I switched to video moments later to capture a high magnification view using the Digital Zoom mode.
It should be clear by now that I had a great time with the EF 500mm f4L IS USM, and I had to keep reminding myself that I was paying around 28 times less than its RRP for a week’s rental – a bargain in my view. Which only leaves me to wrap things up in the Verdict.
Click here for my Canon EF 500mm f4L IS USM lens review verdict.
