Canon PowerShot G7X Mark II review
-
-
Written by Gordon Laing
In depth
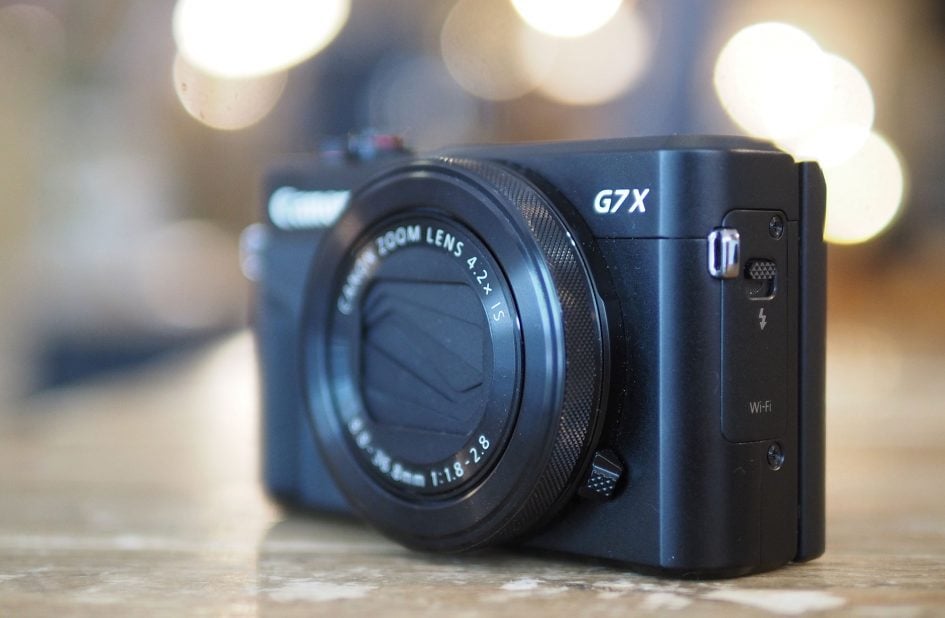
Canon’s PowerShot G7X Mark II is a compact aimed at enthusiasts based around a decent-sized 1in sensor and a 24-100mm f1.8-2.8 lens. Announced in February 2016 it comes about a year and a half after the original and best-selling G7X which was Canon’s first compact to employ Sony’s 20 Megapixel / 1in sensor; when coupled with a bright lens, the combination delivers a step-up in quality over a traditional point-and-shoot compact or smartphone while remaining pocketable.
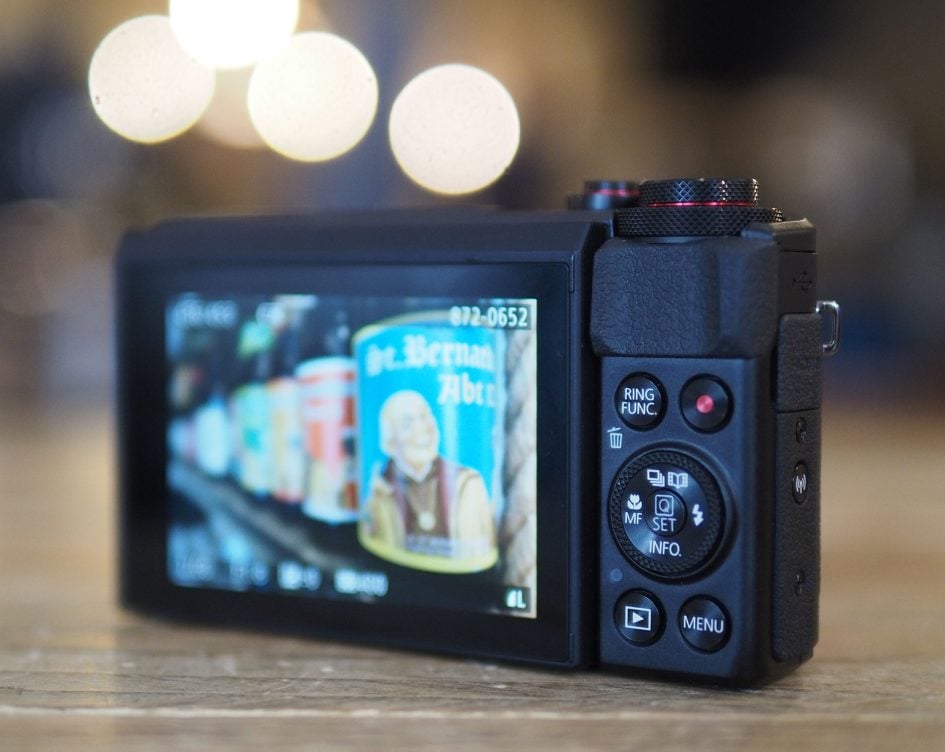
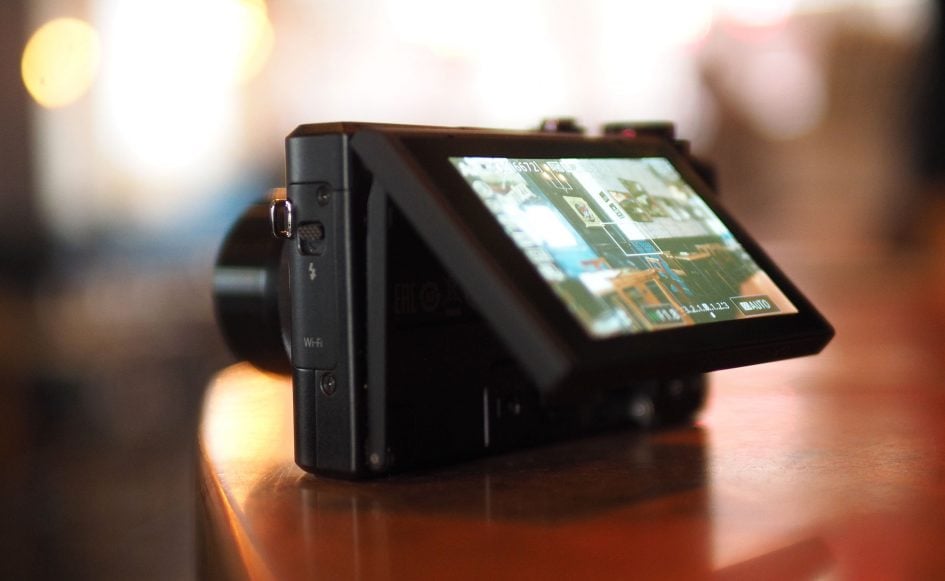
Physically the G7X Mark II is based on its predecessor with essentially the same design and control layout, but instead of a smooth front surface it now features a decent-sized grip and the ring around the lens can now be de-clicked for smooth step-free operation while filming. As before there’s a touch-screen which can flip up to face the subject, but now it can also angle down for easier framing at high angles. There’s still no viewfinder though – for that you’ll need the G5X.
The lens remains the same 4.2x / 24-100mm / f1.8-2.8 now shared on the G7X and G5X, but Canon claims feedback from both the lens and sensor allows it to achieve an extra stop of stabilisation. Behind the scenes is the same 20 Megapixel / 1in sensor but coupled with Canon’s latest DIGIC 7 processor which supports timelapse movies, in-camera RAW processing and improved tracking and subject detection. The market for compacts with 1in sensors is busier than ever so in my review I’ll help you make sense of the features and work out which model will be best for you!
Canon PowerShot G7X Mark II podcast / video review
In the video below, Doug Kaye and I discuss everything you need to know about the Canon PowerShot G7X Mark II! Prefer audio? Subscribe to the Cameralabs Podcast at iTunes.
Canon PowerShot G7X Mark II design and controls
The PowerShot G7X Mark II shares essentially the same body design and control layout as its predecessor, but now sports the very welcome addition of a chunky grip which makes it much easier to hold securely. Amazingly this makes it fairly exceptional in the World of pocket-sized compacts with 1in sensors. The original G7X, not to mention Sony’s current RX100 Mark III and IV, all have smooth front surfaces, relying on their thumb rests for any purchase. Panasonic’s TZ100 / ZS100 has a slight bulge which acts as a grip on the front, but the G7X Mark II becomes the first of its peer group to give you something more substantial to wrap your fingers around.
Measuring 106x61x42mm and weighing 319g with battery, the G7X Mark II is technically a couple of mm wider and a few grams heavier than its predecessor, but nothing that you’d notice even with them side-by-side. Meanwhile Sony’s RX100 Mark III and IV at 102x58x41mm and 290g are fractionally smaller, while Panasonic’s TZ100 / ZS100 at 110x64x44mm and 310g is fractionally larger, but in-person all are essentially in the same ballpark. As such they’re neither the slimmest nor lightest compacts around, but they will all just about squeeze into trouser pockets. Just before I continue, remember the Sony RX100 III / IV and Lumix TZ100 / ZS100 all feature built-in electronic viewfinders whereas the G7X Mark II does not.
If you’re after something smaller and lighter but still with a decent-sized 1in sensor, you should consider Canon’s PowerShot G9X which sacrifices some zoom range and aperture and the ability to tilt its screen to achieve an impressively compact size of 98x58x31mm and weight of just 209g. At this point it’s worth remembering Canon actually offers two more G-series compacts with the same 1in sensors: the G5X shares the same zoom as the G7X Mark II, but thanks to a chunkier body includes a slightly taller grip, a fully-articulated screen and a built-in electronic viewfinder, while the G3X is the super-zoom model with a larger body but a considerably longer 25x range. Like I said, there’s plenty of choice in the 1in market, but I’m going to concentrate on the differences between the G7X Mark II, Sony RX100 Mark III / IV and Lumix TZ100 / ZS100 as these are closest in size and target market.
In terms of controls, all three models feature mode dials on their top surfaces with plenty of options whether you want to shoot in full auto or with some degree of manual control. Like the original G7X, the Mark II features a two-tiered dial with a larger wheel dedicated to exposure compensation (in a generous +/-3EV range) under the main mode dial. This is unlike both Sony and Panasonic which force you to first push a button on the rear to fire-up their exposure compensation menus.
Canon’s approach provides quicker and more tactile access to exposure compensation, but it does raise the mode dial above the surface of the top panel, and the shutter release with zoom collar are also raised. In contrast the mode dial, shutter release and zoom collar are all recessed in the RX100 III / IV, leaving them flush with the top surface, while Panasonic opts for a halfway approach with raised controls but in a slightly recessed area. I point this out as I’ve found the zoom collars which sit atop of a body can become vulnerable to damage when the camera is regularly pulled in and out of tight pockets or bags. Now I didn’t have any issues with the G7X Mark I or II in this regard during my test period, but I have with other cameras, so it’s worth mentioning.
Another interesting difference regards their power controls: both Canon and Sony employ power buttons which means you can power straight into playback from off by simply pressing and holding their play buttons. In contrast, the Lumix TZ100 / ZS100 employs a power switch around the mode dial which means you need to first switch it on and wait for the lens to extend before then pressing playback if you want to review your photos and videos.
Staying with the top surface, all the cameras feature small popup flashes, the G7X Mark II’s housed at the opposite end to the mode dial and the RX100 III / IV and Lumix TZ100 / ZS100’s in the middle; all are raised manually by small switches and none have a hotshoe for anything stronger, although Canon does offer the optional HF-DC2 flash unit which is mounted on a bracket.
In terms of composition, the Canon G7X Mark II relies on its screen alone, whereas the RX100 III / IV and Lumix TZ100 / ZS100 offer the choice of screen or built-in electronic viewfinders. Sony’s electronic viewfinder is housed within the body on the left side and pops-up with a flick of a switch; you then need to pull out a housing by about 5mm to activate it. This process powers-up the camera independently of the main on/off button, and pushing it back in and down again will power-off the camera – although you can disable this on the Mark IV. When raised, eye detectors automatically switch between the viewfinder and the main screen. Meanwhile the Lumix TZ100 / ZS100 positions its viewfinder into the top left corner of the rear panel so it’s always available and ready for action, again with a small sensor to switch between it and the screen. This makes the Lumix body taller, but its viewfinder is more convenient than the Sony.
In terms of quality, the Sony RX100 III and IV employ OLED panels with 800×600 and 1024×768 pixel resolutions respectively, while the Lumix TZ100 / ZS100 comes in at a slightly lower resolution than either of the Sonys and with a slightly lower magnification too; I also found the Lumix viewfinder panel could exhibit some colour artefacts when glancing across it, especially with tired eyes. So I’d rank the viewfinders of the two Sonys ahead of the Lumix with the RX100 Mark IV being best of all, but the Lumix enjoys the greatest convenience.
While there are differences between each technology and implementation, the bottom line is the Lumix and both Sonys offer a viewfinder option, whereas the Canon G7X Mark II does not. Amazingly Sony and Panasonic have also managed to squeeze them in without compromising their body sizes. To be fair, Canon does offer a PowerShot G with a very good built-in viewfinder, the G5X, but the body is noticeably larger and less pocketable than the others mentioned here. You have to weigh-up – often literally – all of this when making your decision. For me the absence of a built-in viewfinder is the major weakness of the G7X Mark II, but equally it offers other things its rivals do not.
Round the back, the G7X II, Sony RX100 III / IV and Lumix TZ100 / ZS100 are all equipped with 3in screens sporting roughly similar resolutions and brightness levels. They’re slightly different shapes though, 3:2 on the G7X II and Lumix TZ100 / ZS100, and 4:3 on the Sony’s, so images shot in their native 3:2 aspect ratio will fill the screen on the Canon and Lumix but are displayed slightly smaller on the Sony models with a black bar underneath where the shooting information is shown.
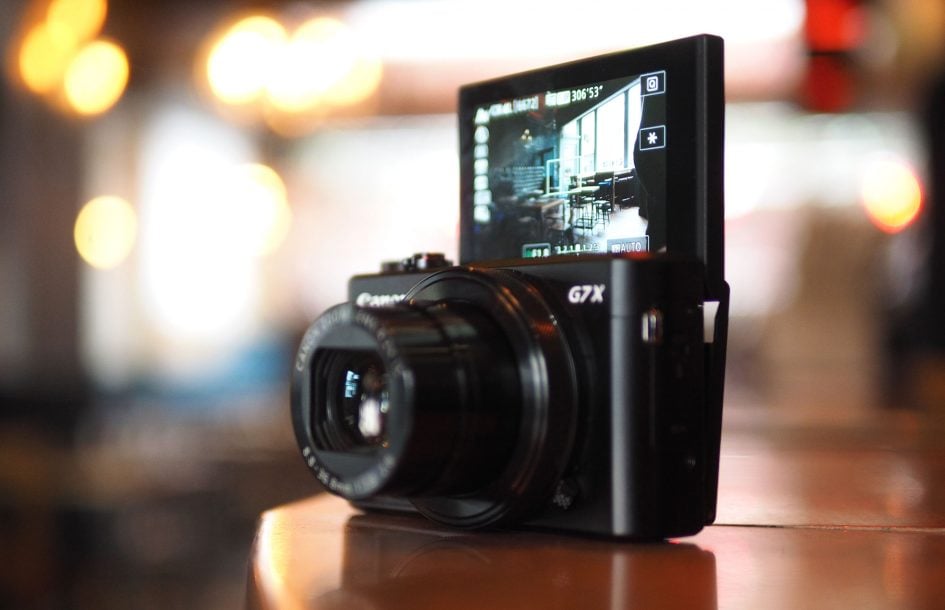
Previously the original G7X featured a screen that could flip up by 180 degrees to face the subject for selfies and vlogging, but unlike the Sony models it couldn’t tilt down for comfortable shooting at high angles. Now with the G7X Mark II, the screen can still angle up by 180 degrees, but adds the ability to tilt down by about 45 degrees. In this respect it matches the articulation on the Sony RX100 Mark III and IV. Screen articulation is an area where both Canon and Sony out-flex the Lumix TZ100 / ZS100 who’s screen is fixed firmly in place. In practice it really is much easier to shoot high and low with the Canon and Sony’s, and the ability to tilt the screen down is a welcome upgrade on the G7X Mark II.
Like its predecessor, the G7X Mark II’s screen is also touch-sensitive, allowing you to easily reposition a single AF area, tap through menus, tap to enter text and also use the familiar gestures during playback including swiping through images or pinching to zoom. Of all these, the simple repositioning of the AF area justifies the technology alone.
Panasonic has also equipped with the TZ100 / ZS100 with a touch-screen, a feature re-introduced to support the company’s innovative 4k Photo modes including Post Focus, but which again makes it a doddle to reposition an AF area. Meanwhile Sony resisted fitting the RX100 III or IV with a touchscreen and worse makes the process of manually repositioning a single AF area unnecessarily convoluted. If you frequently like to reposition the AF area manually, you should bear this in mind.
Canon also lets you pull-focus using the touch-screen while filming and I have an example in the video below. The Lumix TZ100 / ZS100 also lets you do this, but in contrast the Sony’s decide where and when to focus when filming which can prove infuriating at times.
Above: Download the original file (Registered members of Vimeo only)
In terms of the other controls on the rear, both the Canon and Sonys feature thumb-operated wheels on the rear, which provide clicked-feedback, while the Lumix TZ100 / ZS100 has a thumb dial on the top. All three offer a selection of customisable function buttons, two on the Canon G7X II, four physical keys (plus five soft keys) on the Lumix TZ100 / ZS100, while the Sony’s let you change the function of its cross keys; note most of the function keys are already doing something useful though, so adjust with care, for instance the G7X II’s two function buttons by default are the movie record and Ring Function buttons.
All these cameras also sport customisable control rings around their lens barrels, but while their operation is smooth on the Sony’s and Lumix models, you have the choice of smooth or clicked on the Canon. A small switch by the barrel lets you choose and this is one of the upgrades over the original G7X which offered click turning only. Smooth operation is preferred for making adjustments while filming video, but when shooting stills I find clicks easier to work with; so having the choice is a key advantage of the Canon G7X II over its rivals.
There’s one more button on the G7X II and that’s on the grip side, labelled with a Wifi icon. This speeds up the connection between the camera and a smartphone that’s been previously registered, although if you have NFC in your phone you can simply hold it against the base of the G7X II to initiate a connection.
The G7X II, Sony RX100 III / IV and the Lumix TZ100 / ZS100 all feature built-in Wifi, but while the Canon and Sony’s additionally sport NFC for touch-negotiation with compatible handsets, the Lumix does not. I’ll cover the Wifi features later in the review in detail.
In terms of wired connectivity the G7X II, Sony RX100 III / IV and Lumix TZ100 / ZS100 are all equipped with Type-D Micro HDMI and Micro-B USB ports, and all can be recharged in-camera over USB. I really like USB charging and am delighted Canon has finally begun to equip its latest compacts with the capability. It allows you to top-up by simply connecting to a USB port on a laptop, in a vehicle, a portable battery, or with any number of AC-USB adapters you may already have with you for other devices like your phone. Sure you tie up the camera while charging a battery internally, but it’s so easy to top it up with a portable battery in your bag or car while you move from location to location rather than having to find an AC outlet. That said, Canon unusually also supplies the G7X II with a traditional AC external battery charger, so considerately covers both options. Full marks, although it would be remiss of me not to mention that Sony’s RX100 IV is the only model in this group which can also be powered over USB, allowing you to keep shooting or filming on external power.
As for actual battery life, Canon quotes the G7X II as being good for 240 shots versus 320 for the RX100 III, 280 for the Mark IV or 300 for the Lumix TZ100 / ZS100. To be honest though, once you start filming video or using Wifi, each of their batteries deplete fairly rapidly and I’d rate them all as being in roughly the same ballpark. Luckily the convenience of USB charging though meant I was never caught out with a flat. Anecdotally, I found one charge allowed me to shoot just over 400 images and a couple of minutes of video on the G7X II across a weekend before I needed to recharge.
Finally, the PowerShot G7X II uses SD memory cards and has no specific requirements apart from needing readily available Class 6 or faster to support the best quality movie modes. In contrast, to support XAVC S movies on the RX100 III or IV, you’ll need an SDXC card, which in most situations means one measuring 64GB or larger.
Canon PowerShot G7X Mark II lens
Canon has equipped the PowerShot G7X Mark II with exactly the same lens as its predecessor. So the G7X II inherits a 4.2x optical zoom equivalent to 24-100mm with an aperture of f1.8-2.8 and a closest focusing distance of 5cm at 24mm and 40cm at 100mm. It’s a good solid specification that delivers a useful general-purpose range with decent macro capabilities and the chance to deliver a shallow depth of field under the right conditions. Here’s shots taken from the same position comparing its widest and longest focal lengths.
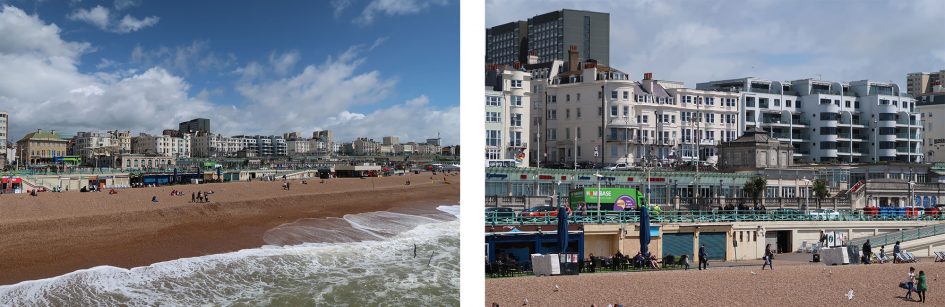
Above: Canon PowerShot G7X Mark II coverage, 24mm equiv (left), 100mm equiv (right)
Looking at the competition, Sony equips its RX100 III and IV with a 2.9x optical zoom delivering an equivalent range of 24-70mm with a bright focal ratio of f1.8-2.8. When the lens is set wide at 24mm, the closest focusing distance is the same 5cm as the Canon, although at the 70mm end the Sony can focus at 30cm compared to 40cm for the G7X II, albeit the Canon doing so at 100mm. So the Canon and Sony RX100 III share the same 24mm wide-angle coverage, but the Canon zooms-in almost 50% further for more useful telephoto coverage.
If you want longer telephoto reach though, the Lumix TZ100 / ZS100 becomes the leader in the pocketable 1in market with a 10x / 25-250mm equivalent range, f2.8-5.9 focal ratio, and a closest focusing distance of 5cm when wide and 70cm at the long-end. So while the G7X II, Sony’s RX100 III / IV and Lumix TZ100 / ZS100 all start at roughly the same wide coverage, the Lumix zooms two and a half times further than the G7X II and over four times longer than the Sony’s at the long-end, giving it considerably greater reach. The compromise is the focal ratio, with the G7X II and Sony’s being over a stop brighter at the wide-end, and advantage that continues throughout their ranges. This allows the Canon and Sony’s to deploy sensitivities one stop lower or shutter speeds twice as fast under the same conditions, and also achieve slightly shallower depth of field effects – although it’s important to remember that if you’re able to exploit the long-end on the Lumix, you’ll achieve greater blurring in the background than either the Canon or Sony.
So what sort of blurring can you expect in practice? To find out, here’s a comparison I made between the earlier G7X and RX100 III, both of which sport exactly the same lenses as their most recent versions. I photographed a portrait at the maximum focal length and aperture for both models, adjusting my position to maintain approximately the same subject framing; the Lumix TZ100 / ZS100 wasn’t available at the time of this comparison, but in separate tests I’ve found it’s not possible to achieve much of a shallow depth-of-field on that model unless either shooting at the longest telephoto end or at its closest macro. Certainly at typical portrait focal lengths, the Lumix won’t give you much separation between foreground and background.
Above left: Canon G7X at 100mm f2.8, above right: Sony RX100 III at 70mm f2.8
The longer focal length of the G7X has made the background elements bigger on the frame, including of course the defocused ones. So the blurring effect looks greater on the G7X above left, than the RX100 III.
To really maximize the shallow depth of field effect you should get as close as possible to your subject, so I made a second comparison, again at their longest focal lengths and maximum apertures, but this time also including the older Sony RX100 II. The RX100 II shares the same 100mm maximum focal length as the G7X, but with a much slower f4.9 aperture.

Above left: Sony RX100 II at 100mm f4.9, middle: Sony RX100 III at 70mm f2.8, right: Canon G7X at 100mm f2.8
As you can clearly see above, the Canon G7X is delivering the greatest blurring of the three, followed by the Sony RX100 III and then the RX100 II, confirming that what you really want to maximize this effect is both a longer focal length and a brighter aperture.
While shooting this composition though, I was very aware of each camera’s minimum focusing distance when zoomed to telephoto. As mentioned earlier, the G7X can focus to 40cm at 100mm and the RX100 III can get as close as 30cm at 70mm. But the older RX100 II can only focus down to 55cm at 100mm. This forced me to shoot the composition above from 55cm, showing a best-case scenario for the RX100 II, but the G7X, RX100 III / IV and Lumix TZ100 / ZS100 can all focus closer, delivering greater blurring effects. Here’s two shots from the G7X Mark II at or close to its minimum focusing distance when zoomed-out to 24mm and in-to 100mm. Both were taken with the camera’s maximum aperture of f1.8 and f2.8. respectively.

Above: Canon PowerShot G7X II Macro at 24mm f1.8

Above: Canon PowerShot G7X II Macro at 100mm f2.8
It’s also worth looking at whereabouts in the focal range the aperture changes, as some lenses slow down faster than others. The Canon G7X starts at f1.8 at 24mm then slows to f2 at 28mm, f2.2 at 35mm, f2.5 at 39mm, then reaches its minimum aperture of f2.8 at 55mm and stays with it all the way up to 100mm.
On the Sony RX100 III, the f1.8 aperture is only available at 24mm, slowing to f2 at 25mm and f2.5 at 28mm. Then at 32mm the lens slows to f2.8 and stays there for the rest of the range up to 70mm. The older RX100 II starts at f1.8 at 28mm, hits f2 at 30mm, then f2.8 at 35mm, f4 at 66mm and the minimum f4.9 between 97mm and 100mm.
Meanwhile, the Lumix TZ100 / ZS100 starts off with a smaller maximum aperture of f2.8 when zoomed out to 25mm, passing f4 by 50mm, f5 by 90mm, and hitting f5.9 from 160 to 250mm.
So the Canon G7X II and all the Sony’s mentioned are all over a stop faster than the Lumix TZ100 / ZS100 at their respective widest-angles, and roughly a stop faster at 50mm too. At 100mm, the G7X II extends this to around two stops faster than the Lumix. The Canon also stays slightly brighter than the Sony RX100 III and IV until they’re mid-way through their ranges. For example at 28mm or 35mm, the G7X II enjoys two thirds of a stop advantage over the RX100 III / IV, in turn allowing it to deploy lower ISOs under the same conditions. It’s revealing to note the Mark III / IV actually slows down by one whole stop by the time it reaches 28mm, whereas the G7X II doesn’t lose a whole stop until it’s at 39mm.
Like its predecessor, Canon has usefully equipped the G7X II with a built-in Neutral Density (ND) filter which reduces the amount of light by three stops. This is particularly useful for using larger apertures in bright conditions or for deploying longer exposures in dim conditions to better blur the motion of water or clouds. In a nice upgrade over the original G7X, the ND filter can now be set to enable automatically which means you never need to worry about bumping-up against the fastest shutter speeds in bright conditions; previously on the G7X you needed to set the ND filter manually, although this option is also still available on the G7X II; note the Auto ND option is only available for stills, not movies where you still have to manually choose on or off.
To see what’s possible with the ND filter enabled, I took this shot of The London Eye with the earlier G5X which has the same optics. With the aperture closed to f11 and the sensitivity set to the lowest 125 ISO, the ND filter forced a two minute exposure. I used Bulb mode for the long exposure, triggering the process over Wifi using the Camera Connect app on my Galaxy S6, although I did have to keep the virtual shutter release button pressed throughout. Enabling the ND filter allowed me to extend the exposure from 15 seconds to 120 seconds, which even with the slow rotation of the wheel provided the desired trailing of the pod lights and some blurring on the River Thames below.

Above: Canon PowerShot G5X long exposure with ND filter: 120 seconds
Finally, the G7X II lens offers optical stabilisation which Canon reckons is good for three stops. To put it to the test I took a series of shots at the longest 100mm focal length using steadily decreasing shutter speeds, first without stabilisation enabled, then with it active.

Above: Canon G7X Mark II at 100mm and 1/6. Left: stabilisation OFF, right, stabilisation ON
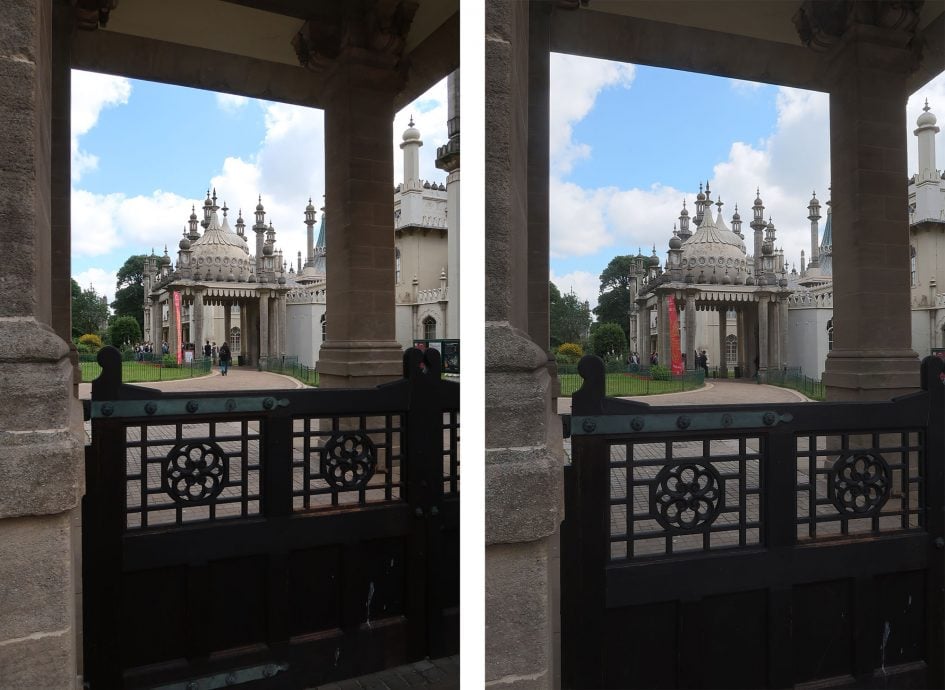
On the conditions of the day, I needed a shutter speed of just over 1/100 to handhold a shot at 100mm without stabilisation. With stabilisation enabled, I achieved the same result at 1/6, corresponding to four stops of compensation. This is a big improvement over the typical two stops of stabilisation I achieved with the G5X and G7X. Canon promised improvements in IS on the G7X Mark II and they certainly did it.
The stabilisation is also very effective when filming handheld video, even when walking around with the camera. Here’s a video I filmed around Brighton’s Lanes with Dynamic IS set to High and with Auto Level enabled to ensure the footage is steady and straight.
Above: Download the original file (Registered members of Vimeo only)
Canon PowerShot G7X II focus and continuous shooting
The G7X II, like most compacts, relies on a contrast-based AF system which hunts back and forth before confirming focus. In terms of focus areas, the PowerShot G7X II offers the usual two options for a Canon compact: 1-point and Face + Tracking. The former, as its name suggests, uses a single AF area which can be repositioned anywhere on the screen with a simple tap on the desired part. This is, for me, a major advantage over Sony’s RX100 series which don’t have touch-screens. You can also change the size of the single AF frame.
Switch to Face / Tracking and the G7X II will attempt to recognize a human face in the composition. If it can’t, it falls immediately back to a multi-area system. The Face ID option also allows you to register up to 12 different people by storing images of their faces, after which the camera will name and prioritise them if they’re spotted on the frame.
You can also choose between One Shot for single autofocus or Servo for continuous autofocus, although perhaps counter-intuitively if you want to keep focusing during a burst, Canon recommends coupling Servo with 1-Point AF rather than the tracking option. There’s also a Continuous AF option in the menus, but this refers to pre-focusing where the G7X II makes adjustments as you compose, before you’ve even pressed the shutter release to accelerate the final process.
In One Shot mode, the G5X snaps-into focus fairly swiftly, certainly as fast as the higher-end Sony RX100 IV. If you have Continuous AF enabled for pre-focusing, the G7X II normally locks-onto the subject regardless of focal length in less than a second with minimal hunting.
As I mentioned earlier, the joy of the touch-screen is being able to reposition a single AF area with a simple tap – something that’s still lacking even on the latest RX100 IV. If you prefer the automatic life though, the Face / Tracking option works well.
It’s also possible to switch the G7X II into manual focus and use the up and down buttons, touch-screen controls or lens ring to adjust the distance using an on-screen scale and optional focus peaking; you can also magnify the image by 5x or 10x and still keep peaking running to be really precise. Unlike the G7X before it, you can also now adjust the focus manually while filming video, again using the same control system, and again with peaking if desired even while recording. I’ll discuss movie autofocus in the movie section later in the review.
In terms of continuous shooting, the G7X Mark II is quoted as being able to fire bursts with single AF at 8fps for up to 30 JPEG or 19 RAW files, or at 5.4fps with Servo (Continuous) AF for up to 46 JPEGs. To put it to the test I fitted a freshly-formatted UHS card, set the sensitivity to 400 ISO and the shutter speed to 1/500 and timed a series of bursts. With the quality set to Large Fine JPEG, I fired-off 33 frames in 3.98 seconds for a speed of 8.3fps, after which it continued shooting, albeit at a slower page of about 5fps
Switching to RAW, I managed to shoot 22 frames in 2.61 seconds for a speed of 8.4fps. After this burst, the camera kept shooting, but much more slowly at a speed of around 1.3fps. And finally with the camera set back to Large Fine JPEG, but with Servo AF, I managed 51 frames in 9.42 seconds for a speed of 5.4fps, after which it slowed only slightly to a little below 5fps.
These figures represent an improvement in speed and depth over the original G7X and recent G5X which in my tests shot bursts at a little over 6fps for JPEGs with Single AF and 4.5fps with Servo AF. The big improvement though is for RAW which on the older models which shot at an effective useless rate of 1.3fps. Now this is significantly increased to the same 8fps as JPEGs, at least until the buffer is filled. This means the G7X II is only a tad slower than the Sony RX100 III’s 10fps for JPEGs and actually faster than its 7fps for RAW. It’s great to see Canon finally catch up in burst speeds on these models. The later Sony RX100 IV may be faster still for JPEGs, but its price is noticeably more expensive.
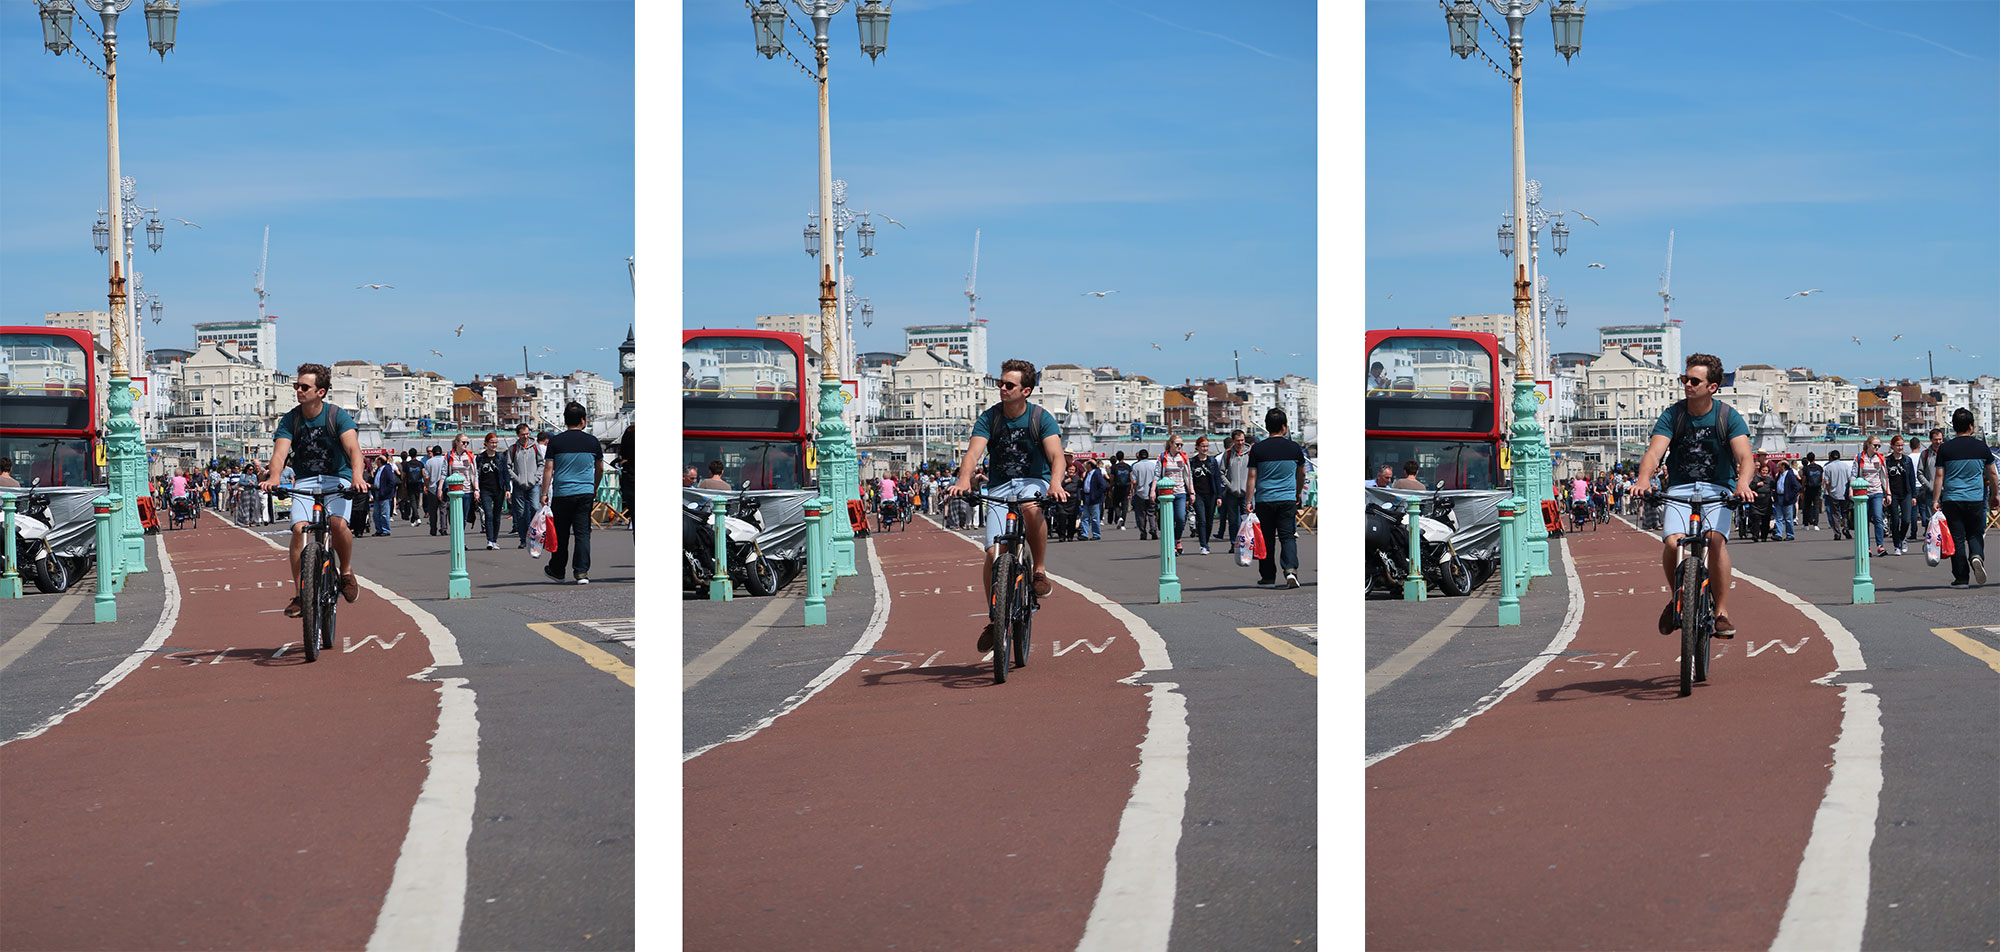
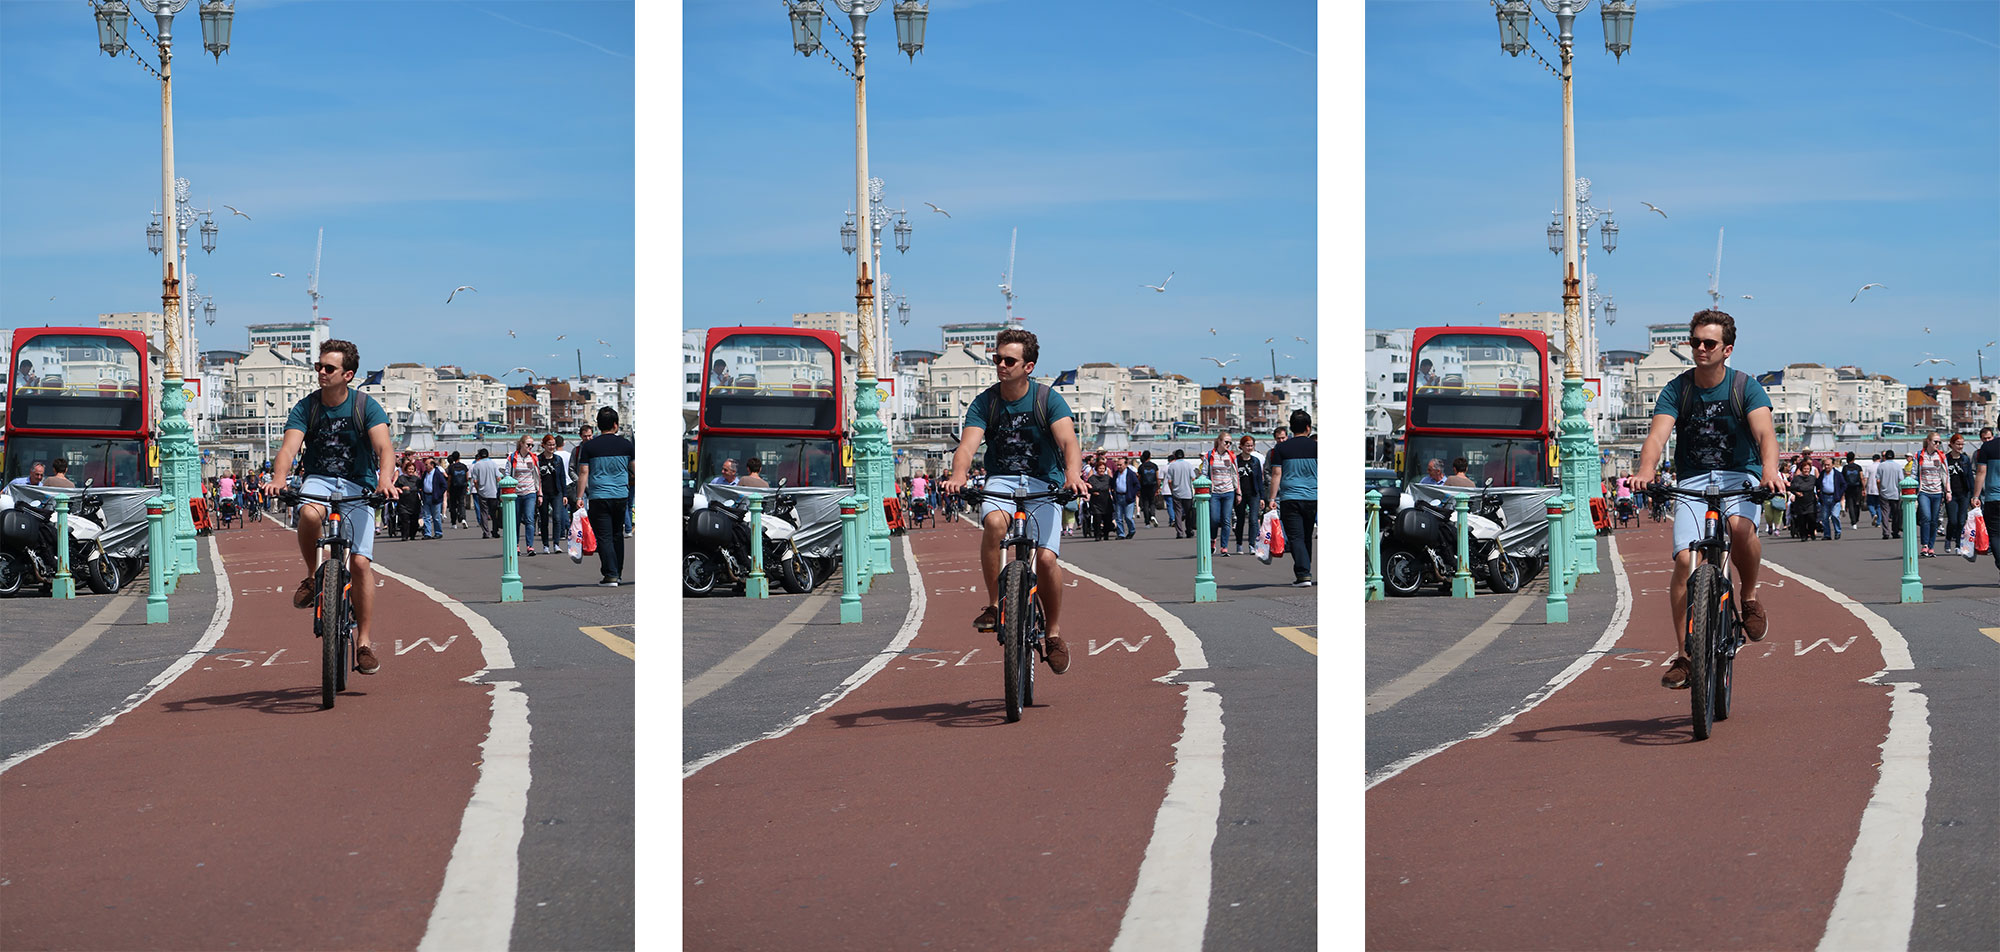
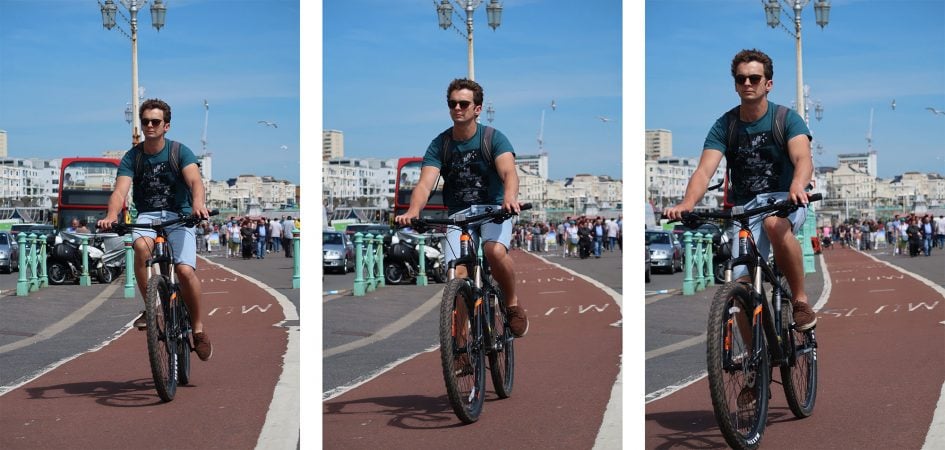
I tried the G7X II’s Servo AF on a variety of subjects including approaching cyclists and vehicles, and found so long as the subject was large enough for the camera to lock-onto, it did a pretty good job at tracking it and keeping it in focus – albeit at the reduced speed of around 5.4fps. Here’s a sequence of a cyclist I shot using Servo AF and a single AF area.


Canon PowerShot G7X Mark II shooting modes
The PowerShot G7X II’s mode dial offers full AUTO, Canon’s Hybrid AUTO, SCN (which also accesses effects), a dedicated Movie position, a Custom bank, along with Program, Aperture and Shutter Priority and full Manual.
Shutter Priority and Manual offer access to the full exposure range of 1/2000 to 30 seconds, to which Manual adds a Bulb option that supports exposures up to four minutes and 16 seconds while the shutter is held; if the Touch Shutter is enabled, you can also start and end a Bulb exposure with taps on the touch-screen, but obviously you’ll need to be gentle to avoid wobbling it. Alternatively you can trigger a Bulb exposure via the smartphone app. Auto exposure bracketing is available for three stops in a range up to +/-2EV.
Set the G7X II to AUTO and it’ll work out everything for you using scene detection which even accommodates and adjusts for subjects which are close, in motion, backlit, in shadow, smiling or even sleeping, including additional scenes for smiling or sleeping babies. It’s fun to point the camera at different subjects and see the scene icon adjust itself
Set the camera to Hybrid AUTO and it’ll exploit Canon’s Movie Digest feature to capture two to four seconds of video prior to you taking each photo. These are then compiled as the day goes on into a single movie which can give a fun behind-the-scenes. The idea is you normally spend at least a couple of seconds setting up a composition before taking photos and this is when people in portraits can often be most relaxed before their stock pose. When it works well, the compiled movies can certainly be fun, but at other times you may grab uncomfortable or messy footage, plus there’s the constant buffering taking place which will drain your battery sooner rather than later.
Next on the mode dial is SCN which now combines a selection of scene presets along with Canon’s creative effects which on previous models often enjoyed its own position on the dial. This makes the SCN position quite busy now, with on-screen selection of the following options: Self-Portrait, Portrait, Panning, Star (Star Portrait, Star Nightscape, Star Trails, Star Portrait, Star Time-Lapse Movie), Handheld Night Scene, High Dynamic Range, Fisheye effect, Art Bold effect, Water Painting effect, Miniature effect, Toy Camera effect, Background defocus effect, Soft Focus effect, Grainy Black and White effect, Underwater and Fireworks.
Canon often juggles its presets and effects with the introduction of a new image processor, sometimes combining or separating, sometimes adding or removing. The G7X Mark II is one of the first models to deploy the company’s latest DIGIC 7 processor and along with the combining of the scene presets and creative effects under one section, Canon-philes will also notice the removal of Creative Shot which on earlier models analysed the scene and took six shots with different crops and effects. I actually found it quite fun, as it would often suggest an approach you’d not previously considered, but it’s not available on the G7X II.
Turning the lens ring lets you adjust the intensity for most of them or settings for others. For example, in Grainy Black and White mode the ring lets you adjust the contrast, while in HDR mode you can choose the severity (or tastefulness) of the processing. Meanwhile the Miniature mode exploits the lens ring, touchscreen and Info buttons to adjust the position and thickness of the plane of focus along with the speed of playback if you end up choosing to film a movie.
Like earlier Canon compacts, the Miniature effect only works with two aspect ratios, 4:3 and 16:9, which means it’s the only effect which can’t be applied to the native 3:2 sensor shape. And again like earlier models, the shape you choose also defines the quality of the miniature movie should you decide to start filming: leave the photo shape to the default 4:3 for this mode and the G7X II will record a miniature movie in standard definition VGA. If you want a nice high definition widescreen movie, you’ll need to first set the photo aspect ratio to 16:9 which isn’t particularly intuitive since other effects are simply applied to the current movie quality setting. Annoyingly miniature movies are also still only possible at a maximum quality of 720p, lacking the 1080p options of most rivals. Every time a new image processor arrives from Canon I hope they’ve resolved this oddity, but it still remains here for another generation.
Here’s an example of a miniature movie below, followed by several examples of the other Creative Filters in action on still photos.
Above: Download the original file (Registered members of Vimeo only). Sample movie filmed with the Canon PowerShot G7X II in its Miniature mode. As is often the case with Canon cameras, I had to set the photo shape to 16:9 in order to capture the Miniature effect in HD.

Above left: Art Bold effect, above right: Water Painting effect

Above left: Toy Camera effect, above right: Grainy Black and White effect
The HDR mode takes three exposures and combines them into one to extend the tonal dynamic range of the composition, generally revealing details otherwise lost in dark shadows or bright highlights. You can’t choose the ISO sensitivity, the bracketing depth or the exposure increment between the frames, but you can choose from five different processing effects: Natural, Art Standard, Art Vivid, Art Bold and Art Embossed. The natural option is fairly sympathetic, generally boosting detail in dark shadow and mid shadow tones. The other options deliver a far more stylised effect that may be right up your street, or may alternatively drive you onto another street entirely. Here’s an example showing Program mode below left and Natural HDR on the right.

Above left: HDR OFF, above right: HDR mode (Natural)
The G7X II also inherits four Star modes for easy astrophotography. First is Star Portrait, which composites three images taken in succession: the first fires the flash to capture the foreground person, while the second and third deploy longer exposures and high ISOs without the flash in an attempt to record the background. Once the process is complete the self-timer lamp blinks three times. The second option, Star Nightscape, is for capturing wide star fields and typically shoots a 15 second exposure at 800 ISO f1.8, which should be sufficient for basic Milky-Way type compositions.
The third mode, Star Trails, takes a series of images over a period of ten minutes to two hours before then assembling them into one image – this allows you to record the effect of star trails without the battery drain of a very long single exposure. Here’s an example I shot from my backyard in Brighton with the earlier G5X using a recording period of about 100 minutes. It’s a lot more forgiving on light pollution than the second mode and unless you have very dark skies, this is the option I’d go for when shooting stars with any of the supporting PowerShots.
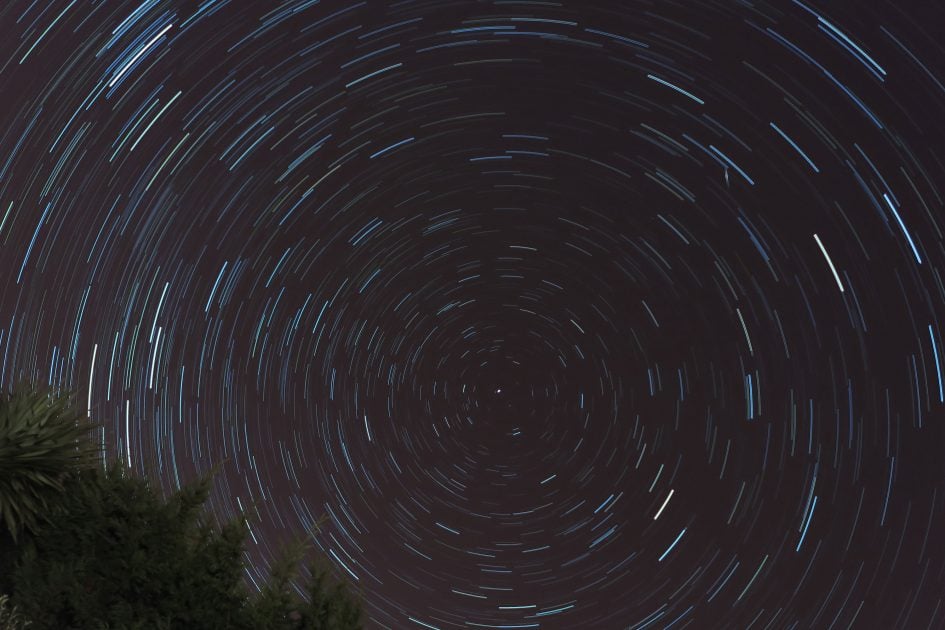
Above: Canon PowerShot G5X Star Trail mode
Finally the fourth option lets you record Star time-lapse movies, taking photos at intervals before assembling them in-camera into an accelerated video clip. Canon lets you choose 15, 30 or 60 second intervals, and a subsequent playback frame rate of 15 or 30fps. Here’s an example I filmed with the G7X II, set to record for one hour with a 15 second interval and medium tail effect with the final movie being encoded at 25fps.
Above: Download the original file (Registered members of Vimeo only). Sample movie filmed with the Canon PowerShot G7X II in its Star Timelapse mode. I set the camera to record for one hour with a 15 second interval and medium tail effect with the final movie being encoded at 25fps.
Astro-photography can be very technical, but these modes make it very easy to capture good results and are well worth trying if you find yourself under clear (and ideally dark) skies.
What you still won’t find on the PowerShot G7X II though is a panorama mode which automatically stitches images taken in a simple sweep of the camera. Why this continues to elude Canon is beyond me, and it’s disappointing not to have it on any of their cameras. Auto panoramas are now standard on Sony and Panasonic cameras, not to mention most phones and other camera brands. They’re a sore absence on the G7X II, not to mention every other Canon camera at the time of writing, and I think most owners would prefer to have this in place before indulging in the more specialist star modes.
While I hoped DIGIC 7 would finally bring in-camera panoramas to Canon compacts, I am pleased to report it does now include an in-camera timelapse movie mode. To be fair, this was kind of already present in the Star Timelapse mode – and indeed some owners of previous models have used it for daytime timelapse movies – but now there’s an official option. You’ll find it in the movie mode menu which I’ll cover later in the review.
DIGIC 7 also brings in-camera RAW processing to the G7X II, allowing you to create new JPEGs from RAW files during playback. The camera lets you adjust the brightness, white balance, Picture Style, Auto Lighting Optimiser, High ISO Noise reduction and image quality. Sadly you can’t apply any of the creative effects though, like Miniature or Toy Camera.
Above is a normal image I shot in RAW and below is a somewhat extreme version I re-processed into a high contrast black and white image using the in-camera facilities.
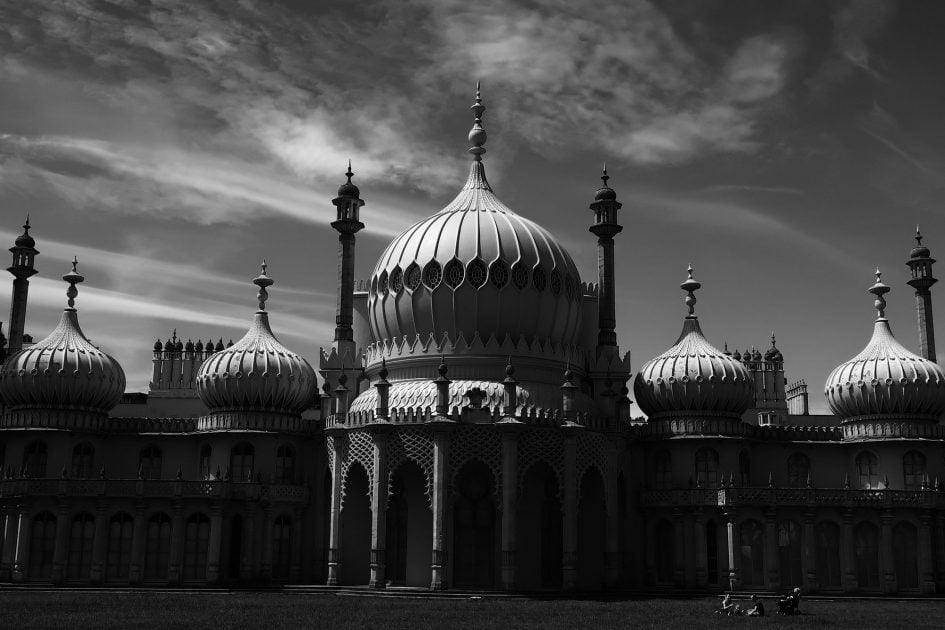
For the second image above, I set the Picture Style to monochrome with a digital red filter, increased the contrast to the maximum, and changed the white balance to Tungsten, before saving the result as a new file. I really appreciate the chance to re-process RAW files in-camera as it lets you explore various styles or correct white balance without having to use a computer.
Canon PowerShot G7X Mark II Wifi
The Canon PowerShot G7X II is equipped with Wifi and NFC for wireless transfer of images between devices, GPS tagging, uploading to services and smartphone remote control. The implementation is similar to the most recent models like the G5X.
Canon now offers just one smartphone app for all its cameras: Camera Connect is available for iOS and Android devices, and I tested it on my Samsung Galaxy S7. The first thing you’ll need to do is download the app and if – like me – you have an NFC-equipped handset, you need only hold the camera and phone together for a couple of seconds to trigger the process.
In an upgrade over the original model, the G7X II is now equipped with Dynamic NFC which means you don’t even need the camera to be powered-on for it to initiate communications with an NFC phone – all you do is hold them together to trigger the download of the app and, once installed, bringing the two devices together will automatically start and connect their Wifi networks then fire-up the app – all ready for action without further interaction. If you’re in playback on the camera, you can touch the devices and again they’ll connect automatically before then asking you to select images on the camera for immediate transfer to your phone. These processes are much simpler than before where you had to manually start Wifi then connect the devices before the app would offer any control or transfer. While Sony’s NFC implementation is arguably even more direct with zero button-presses to send a photo on-screen, I have no complaints with Canon’s latest approach. And as before if your phone doesn’t have NFC, you can initiate the process using the smartphone button on the side of the camera.
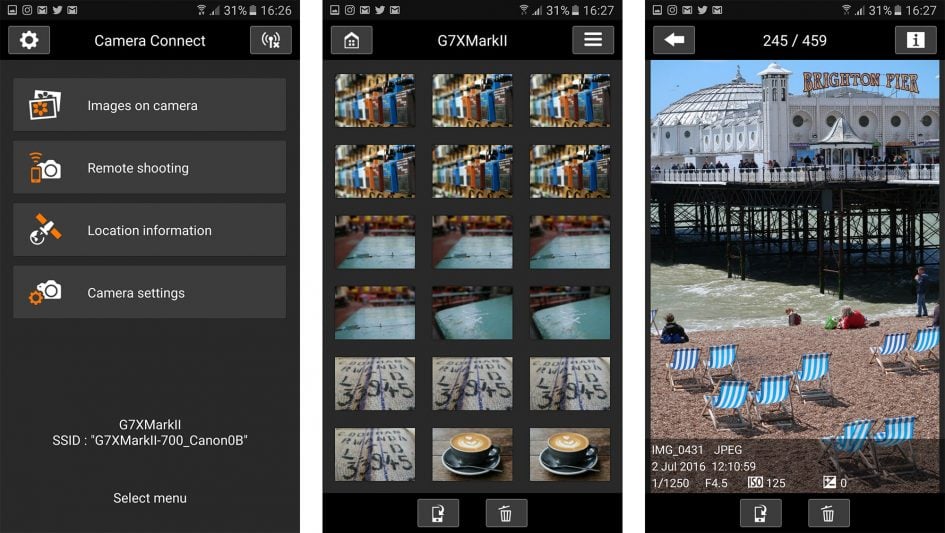
Once connected, the Camera Connect app offers four main options: Images on Camera, Remote Shooting, Location Information and Camera Settings. Clicking Images on Camera presents a page of thumbnails to scroll through or select for further information and subsequent transfer to your phone; when transferring images you can choose to resize it to 3 Megapixels or go for the original 20 Megapixel file. RAW files aren’t visible for transfer, but movies are, although the app will first convert 1080p footage to 720p whether you like it or not. At least you can get video from the camera onto your phone though, unlike many apps.
Choosing Remote Shooting fires-up a live view from the camera with the chance to tap to refocus anywhere on the composition. There’s also a slider to operate the optical zoom remotely if desired.
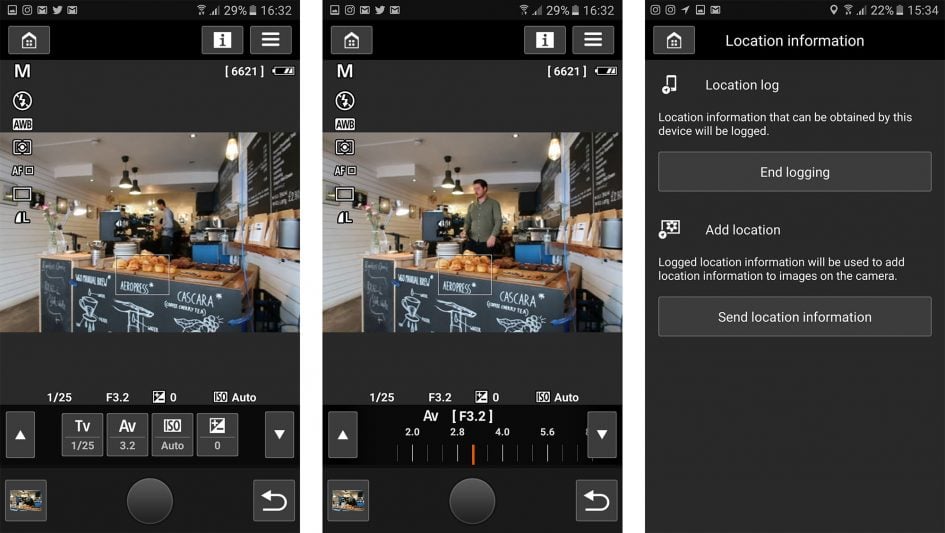
On the previous Camera Window app on the G7X, that’s as far as remote control went, with no chance to adjust the exposure. In contrast, the newer Camera Connect app offers manual control over the aperture, shutter, sensitivity and compensation, depending on the position of the exposure mode dial on the camera. For the maximum control, turn the dial to Manual, although even in the auto and semi-auto modes you’ll still have remote control over the ISO and exposure compensation. Annoyingly you still can’t trigger a movie recording from the app, nor change the camera’s exposure mode remotely, but it’s quick enough to exit Remote Shooting, turn the dial and enter Remote Shooting again without having to disconnect or leave the app.
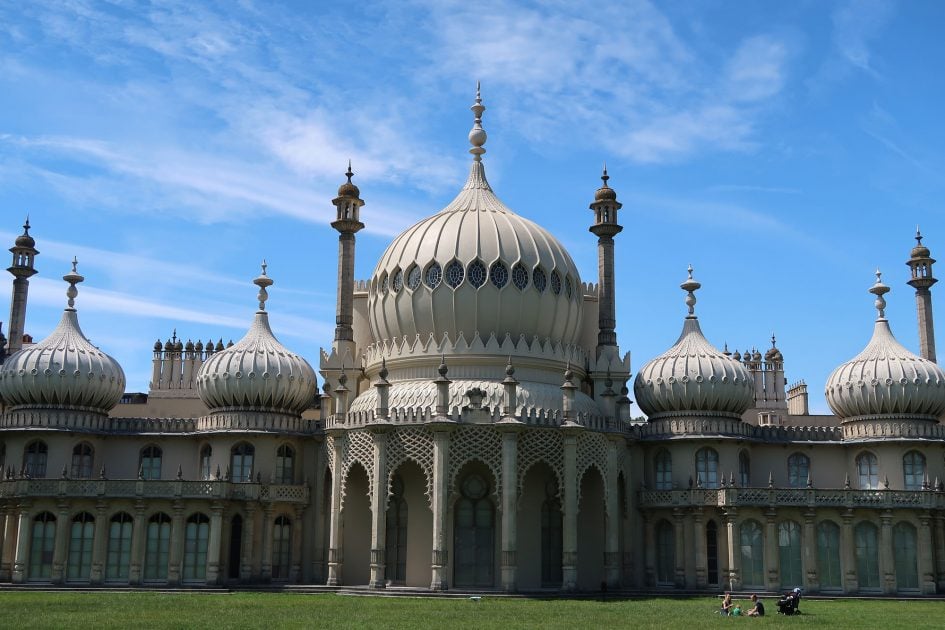
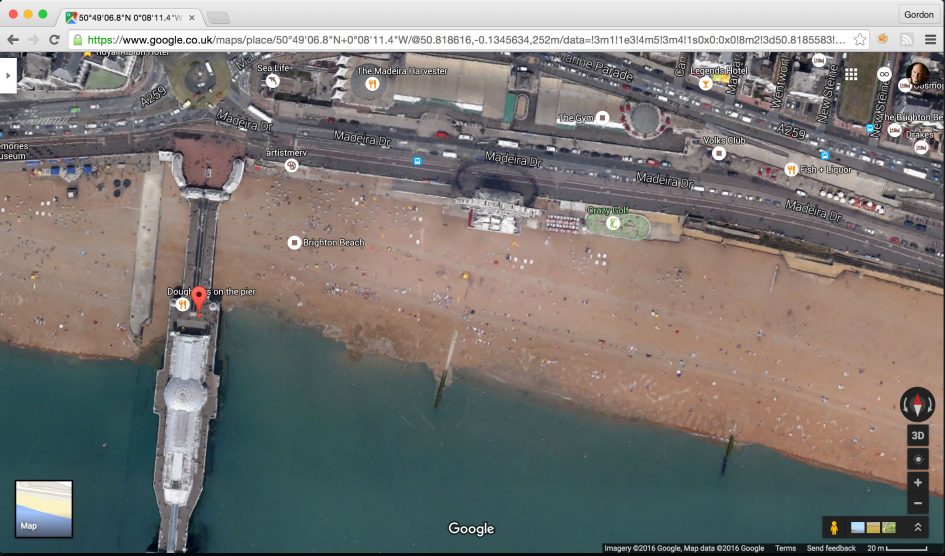
The third option is Location Information which simply lets you start recording a log using your smartphone’s built-in GPS, then send location information to the camera over Wifi to tag relevant images. Here’s one I took of the Brighton Pavilion where the location is accurate – or at least as accurate as the phone supplies.
So by improving its NFC implementation, Canon’s made the connection process much quicker and easier than the original G7X, while the latest Camera Connect app now offers full manual control over exposure. There’s minor annoyances like not being able to initiate a movie recording nor change the shooting mode remotely, but otherwise the Canon Wifi experience is now up there with the best of its rivals.
Canon also supports the wireless transfer of images to Mac or Windows systems if the camera and computers are connected to a mutual wireless network. You can alternatively connect to wireless printers or even send images direct from the camera to sharing services albeit via Canon’s Image Gateway service. Personally I find the online sharing and captioning process much easier on a phone, so I mostly copy images between the camera and phone before letting the latter manage the final upload and sharing.
One quick aside: the Camera Connect app may be unified across PowerShot and EOS cameras, but that’s not to say the feature-set is identical. Strangely, while remote movie recording wasn’t possible on the G7X Mark II, it is possible on compatible EOS DSLRs. Conversely, while you can record a location log on the PowerShots, the option frustratingly disappears when you connect an EOS DSLR, presumably to encourage sales of the GPS receiver accessory.
Canon PowerShot G7X II movie mode
The PowerShot G7X II can record Full HD video with stereo sound captured by the built-in microphones, and you can optically zoom the lens while filming. You can start recording in any mode by simply pushing the red record button on the rear, but by first turning the mode dial to Movie, the camera unlocks advanced options and reformats the screen in the appropriate aspect ratio (16:9 for HD video).
The Movie mode extends the range of possible frame rates over the original G7X to include 1080 at 24p, 25p, 30p, 50p and 60p, although there’s nothing faster for slow motion, nor any 4k; for that you’ll need Panasonic’s Lumix TZ100 / ZS100 or Sony’s RX100 IV. If you are into slow motion on the G7X II, you could film at 60p and slow it by 2.5 times on a 24p timeline; here’s an example of how that looks.
Above: Download the original file (Registered members of Vimeo only). Sample movie filmed with the Canon PowerShot G7X Mark II in 1080 / 60p then interpreted to 24p.
The maximum recording time is limited to a second shy of half an hour or when the file reaches 4GB in size, whichever comes first. If you’re filming in 1080 / 60p or 1080 / 30p, expect to hit the 4GB file limit first after about 16 and 24 minutes respectively. In terms of battery life, you should get around 60 to 75 minutes worth per charge.
In terms of focusing it’s possible to set the camera to auto or manual, and if the latter you can adjust the focusing distance using the touch-screen interface while filming; during this process you’re guided by an on-screen distance bar, and if you like you can also enable focus peaking to highlight the edges of areas in focus. The ability to adjust manual focus distance wasn’t available on the earlier G7X and a nice enhancement here.
When set to AF you can use the touchscreen to pull-focus to different subjects, a useful feature that’s not available on cameras like Sony’s RX100 series to date which of course lack touch-screens. Here’s an example with the lens zoomed-wide; I have another with the lens zoomed long earlier on the page.
Above: Download the original file (Registered members of Vimeo only)
You can also use the touchscreen to tap on a subject and have the camera track it as it moves towards or away from you. You can see this demonstrated in the following video where I tapped on the dark T-shirt of the man carrying the camera as the video started. From this point on, the camera attempted to follow him.
Above: Download the original file (Registered members of Vimeo only)
Set the G7X II mode dial to Movie and you can choose between five options: Standard (auto filming), Short Clip, Manual, Time-lapse and iFrame. Manual mode provides full control over the shutter speed, aperture and ISO, and impressively the latter can be set to Auto, allowing you to fix the shutter and aperture and let the camera adjust the sensitivity for the light levels. You can also deploy the built-in ND filter for movies, although there’s no Auto option for movies – it’s either on or off. You can also use the touchscreen to make silent adjustments to the aperture, shutter and ISO while you’re filming, or assign one of their functions to the lens ring and exploit the de-clicked option to adjust in silence too. The de-clicked lens ring is ideal for movie use and a key upgrade over the earlier models – in the following video, I used it to adjust the aperture from the minimum to maximum as I went from outside to inside and back again, although I could equally have achieved a balanced exposure using Auto ISO instead.
Above: Download the original file (Registered members of Vimeo only). Sample movie filmed with the Canon PowerShot G7X Mark II in 1080 / 25p. In the video I use the de-clicked lens ring to smoothly adjust from f11 outdoors to f1.8 indoors and back again.
Time-lapse movies are also new to the G7X Mark II, and selecting this mode presents three presets: Scene 1 (for moving subjects like people), Scene 2 (for slowly changing subjects like clouds) and Scene 3 (for slowly changing scenes). Each Scene configures the interval between shots, number of shots and whether the exposure should be locked to the first image or automatically adjusted for each shot; the camera lets you use the Scenes as a starting point, before fine-tuning the settings as desired. For my first example, I chose Scene 1 and filmed people walking along the Brighton seafront.
Above: Download the original file (Registered members of Vimeo only). Sample movie filmed with the Canon PowerShot G7X Mark II in 1080 / 25p using its timelapse scene 1 mode.
For my second example of a Sunset, I started with Scene 2, but changed the interval to five seconds and the total to 600 shots for a 50 minute capture period and 24 second playback time. I also set auto exposure for each frame.
Above: Download the original file (Registered members of Vimeo only). Sample movie filmed with the Canon PowerShot G7X Mark II in 1080 / 25p using its timelapse mode; I shot 600 frames every five seconds over a 50 minute period which the camera then assembled into a movie using the current settings.
Now let’s check out some more sample movies!
Above: Download the original file (Registered members of Vimeo only)
Above: Download the original file (Registered members of Vimeo only)
Above: Download the original file (Registered members of Vimeo only)
Above: Download the original file (Registered members of Vimeo only). Sample movie filmed with the Canon PowerShot G7X Mark II in 1080 / 24p at 1600 ISO. See other versions: Canon G7X II at 3200 ISO and Canon G7X II at 6400 ISO.
Right, that’s enough talk, now it’s time to check out my results and comparisons. Check out my Canon G7X II quality results, Canon G7X II sample images or tab back to my verdict!