Best vegetarian meals
-
-
Written by Gordon Laing
I love cooking and wanted to increase the number of vegetarian dishes for everyday family meals. So here are my new favourites: quick, easy and very tasty, whether you’re a confirmed vegetarian or a curious carnivore!
Black Bean Burger and Buffalo Cauliflower Wings
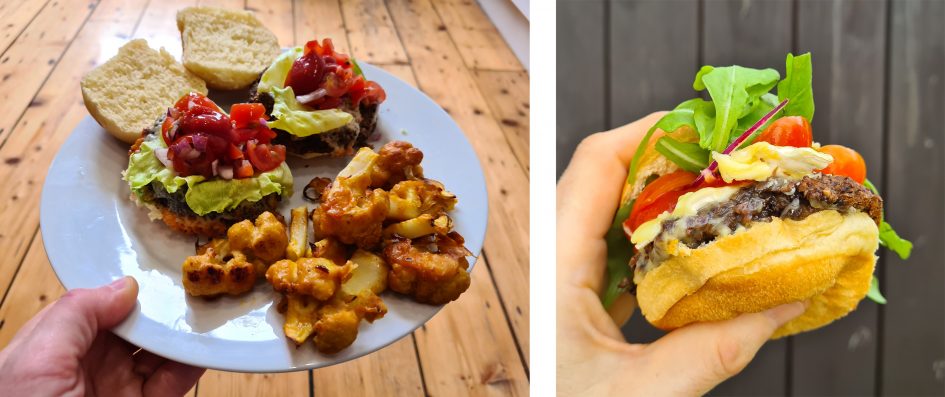
Saturday night is Burger and wings night at the Laing residence, with regular experiments in recipes and combinations. My favourite vegetarian burger recipe so far is Jamie Oliver’s Roasted Black Bean burger, here adapted to the ingredients I can find and very quick to rustle-up. Forget fries though, the best accompaniment in my view are buffalo cauliflower wings, adapted from the Tasty website recipe. Cauliflower continues to be a revelation to me in texture and flavour – don’t forget to include the main stalk too, chopped into sticks; I always keep this part when cooking other recipes and add it to the mix when it’s wings night!
Prep: 15 minutes, cooking time 30 to 45 minutes. Pre-heat oven to 200 C.
Ingredients
200g wild mushrooms (such as Oyster and Shitake)
100g rye bread – I use Aldi’s
1 red onion, roughly chopped
1 tin / 400g black beans (already cooked if not tinned)
2tbps freshly ground coriander
1 Cauliflower, broken into large florets and with stalk cut into strips
Half a cup of self-raising flour
Half a cup of milk
1tbsp garlic powder
1tbsp ground turmeric
1tbsp paprika
Brioche rolls and garnishes to serve
Method
Brush any dirt from the mushrooms, then pop them, the rye bread, onion and half the coriander into a food processor and blend for a few seconds. It’s possible to use a pack of brown mushrooms in place of wild mushrooms, but beware the additional liquid in them can result in a slightly soggy burger. Next drain and wash the black beans, taking care to shake away as much liquid as possible, then add to the processor and blend to a thick paste – try to leave some texture in there. Then shape into eight burgers about 8cm in diameter and 15mm thick, place on an oiled baking tray, sprinkle over the remaining coriander and a splash of olive oil, then bake / roast for 30-40mins. Five minutes before serving, you can pop on some slices of cheese.
For the wings, simply whisk the flour, milk and flavourings into a batter in a large bowl, then add all the cauliflower pieces including the leaves with the centre stems sliced out and the stalk chopped into sticks (plus any extra chopped cauliflower stalks or even broccoli stalks you’ve been saving), then spread out onto an oiled baking tray and roast for 30-40mins, turning once halfway. During the final 10 minutes, brush with a mix of olive oil and either hot or barbeque sauce with a spoon of runny honey for extra colour and flavour.
Courgette Pie

Adapted from the fantastic Veg: River Cottage Everyday cookery book, the courgette pie has quickly become a family favourite. This Greek-influenced dish is reminiscent of the classic spinach and feta pie, but with a twist where the spinach is replaced by grated courgette, and the excess liquid from the veg used to cook the rice within the pie. It’s incredibly quick and easy. Since the oven’s already on, I normally throw in some potatoes and carrots on another tray to have with it.
Prep: 10 minutes, cooking time 45 minutes. Pre-heat oven to 200 C.
Ingredients
750g courgettes, grated
130g rice (I use Basmati)
130g grated cheese (I use Cheddar)
3 eggs, whisked
1 red onion, finely chopped
1 pack puff pastry, I use shop-bought
Method
You’re making a large pastry roll here, so drape the puff pastry over a medium baking dish, with the spare pastry hanging over the edges. Then simply mix the rest of the ingredients thoroughly in a large bowl, add some salt and pepper, then spoon onto the pastry before folding over the ends. If you’re using a roll of bought puff pastry, it’ll be a tight fit, but the ends should just meet with enough to pinch them together. Then bake in a pre-heated oven at 200 C for about 40-45 minutes or until the pastry is golden brown. I cut the entire pie in half for two meals, with each half giving you four good portions when served with vegetables.
Paneer Curry
Everyone needs a decent curry recipe in their repertoire and by far the best I’ve found is courtesy once again of The River Cottage, albeit with a number of tweaks. Mine is based on their baked chicken curry recipe, but with the chicken switched for paneer cheese, the baking swapped for the hob, and the overall quantity-doubled to stretch into three meals for four as it tastes better the next day and even better the day after that. Paneer is an Indian cheese that’s available in ethnic stores or larger supermarkets and is a brilliant substitute for the chicken in the original recipe – in fact I much prefer it. Regardless of your preferences though, the key, as with all currys, is to freshly grind whole spices as you need them for the maximum flavour. This recipe creates a mild curry, like a Tikka, and you can add chillis for heat as desired.
Prep time: 20 minutes, cooking time: one to three hours on a gentle heat.
Ingredients
3 medium onions, peeled and roughly chopped
6 garlic cloves, or an entire small bulb, peeled
1 large thumb of ginger, peeled and finely grated
2 teaspoons of whole fennel seeds
4 teaspoons of whole cumin seeds
4 teaspoons of whole coriander seeds
4 teaspoons of whole fenugreek seeds
4 teaspoons of ground turmeric
2 tins of chopped tomatoes
2 tins of coconut milk
Method
Put all the whole spices into a small pan without any oil and dry-fry them until they take on some colour, but be very careful not to burn them. Then pour them into a grinder and grind them into a powder.
Place all the onion, garlic and ginger into a food processor and blitz into a smooth paste.
Take a casserole or a large pan (I use my vintage Le Creuset Casserole) and start heating several tablespoons of ground nut / peanut oil or sunflower oil – a mix is also ok, but don’t use olive oil in this dish.
When the oil is hot, briefly fry the ground spices, adding the turmeric into the mix too. They will soak up a lot of the oil, so if necessary, add some more as you’ll be frying the onion mix with it soon. Again be careful not to burn the spice mixture.
After a minute or so, add the onion mix (but don’t clean the food processor yet). Fry the onion mix at a medium to high heat for a few minutes, stirring often – remember you’re trying to fry this mix for flavour, not to boil it.
Add the chopped tomatoes to the food processor and blitz until smooth, then add them to the pan. Then do the same for the tinned coconut milk, blitzing into a smooth liquid in the food processor before adding to the pan. Add a generous amount of salt and pepper to the mixture, give it a good stir, and bring it to a gentle simmer with the lid half-off. You now need to gently cook it for at least an hour to reduce the liquid and allow the flavours to develop; I aim for about two hours to reduce by at least one third, but the hard work is done. Be sure to give the mixture a good stir every 15mins or so, and adjust the lid to minimise curry eruptions.
Towards the end of the cooking process you can prepare and add the paneer cheese. I buy mine in blocks and roughly cut it into small square tiles around 15x15x5mm in size, but you could go for larger shapes if desired, and some paneer is already sold in cubes. Fry these in a separate pan in batches until all sides are browned, then add to the curry mix – the cheese is pretty robust and will survive several reheatings.
I serve the curry on basmati rice with poppadoms on the side (try the packs you fry yourself rather than the pre-fried ones to save on packaging and money). I also cook some veg, such as broccoli, fried aubergines or simple frozen peas and corn -indeed on the last day of the curry, I just add peas and corn directly to the mixture and warm them up together.
Kale Pasta
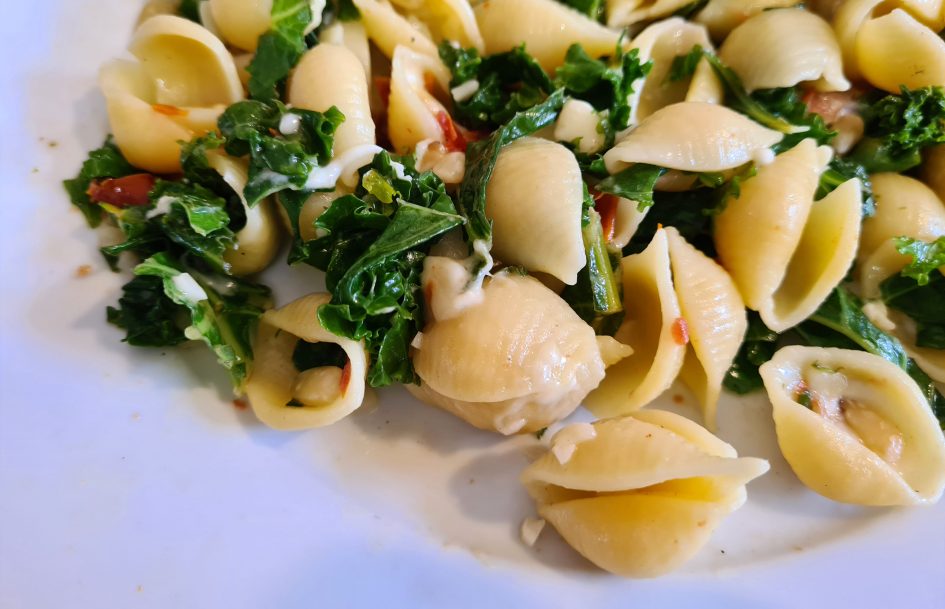
A quick and healthy favourite that gets a bunch of dark green veg into you! Like most of my meals, it started as an official recipe – in this case Farfalle with Savoy Cabbage by Jamie Oliver from his second Naked Chef book – but over the years I’ve made a lot of substitutions. The core concept remains the same – steam some dark green veg and mix with pasta shapes – but while I’ve kept the pine nuts for crunch and mozzarella for stretch, I’ve switched the pancetta for sun-dried tomatoes, the Farfalle for Penne, and the savoy cabbage for curly kale or cavalo nero.
Prep: about ten minutes. Cooking time, about 20 minutes
Ingredients
2 bags of Kale or Cavalo Nero, thickest stems removed
400g pasta shapes – I use penne, but farfalle or others work well
1 bag mozzarella chopped roughly into large cubes
1 large thumb’s worth of hard cheese, chopped finely
Handful of pine nuts
Half a jar of sun dried tomatoes, roughly chopped
2 large cloves of garlic, finely chopped
Method
Boil your pasta in a large pan, while cleaning the kale or cavolo nero and removing any tough stalks; if you prefer savoy cabbage, just clean, then shred it, leaving the main stalk. When the pasta is ready, drain it and re-use the warm pan on a medium heat to warm-up some olive oil.
Gently fry the garlic, pine nuts and sundried tomatoes for a minute or so, then add the kale or cavalo nero, give it a good stir, then add a couple of knobs of butter and a splash of water before fitting a tight lid to steam the green veg. Check after a minute or two and give it another stir, adding a little more water if it’s become dry.
Once the veg is cooked to your preference – I’d only give it a couple of minutes – mix in the cooked pasta, mozzarella and parmesan, along with a generous amount of salt and pepper. Stir thoroughly, replace the lid and turn off the heat. The warmth of the veg and pasta will melt the cheese and after a minute or two, it will be ready to serve.
Pesto

Who doesn’t love pesto? Whether it’s stirred into pasta (pictured above topped with grilled Halloumi cheese) or used as a spread on toast or in wraps, it’s extremely flexible, universally popular, and a doddle to make yourself. So forget the ready-made jars and whizz-up your own in just a couple of minutes. Traditional Pesto Genovese uses basil leaves and pine nuts, pounded in a pestle and mortar with grated Parmesan and or Pecorino cheese, and mixed with olive oil. Delicious, but Basil doesn’t grow that easily where I live and pine nuts are prohibitively expensive, so many thanks again to The River Cottage for some more affordable and equally tasty substitutions! Instead of Basil, try a bunch of flat leaf or curly parsley, stalks and all, swap pine nuts for a pack of walnuts (or toasted sunflower seeds), and switch parmesan for a cheaper hard cheese like Grana Padano. For added zing, I also include a clove of garlic and half a freshly-squeezed lemon.
Prep time – 5 minutes. ‘Cooking’ time 5 minutes
Ingredients
Bunch of parsley – flat leaf or curly – including stalks
Pack of shelled walnuts or toasted sunflower seeds
Good handful of grated hard cheese like Parmesan or Grana Padano
One clove of garlic
Half a freshly squeezed lemon
Olive oil – start with around 100ml, but be ready to add more
Method
Place all the ingredients into a food processor and blitz into the consistency you like. While shop-bought pesto is very smooth, you have the opportunity to leave yours a little chunkier if preferred, so after each pulse on the processor, try it for consistency. You will also invariably need to add more oil as you blitz and while it may at first seem like a lot, believe me it will still represent less of the total than the shop-bought pestos. The fresh pesto will keep in the fridge for several days, although I generally stir most of it into freshly cooked pasta shapes for a main meal, leaving a small quantity to jazz-up wraps for lunches later in the week. When adding to pasta, I also like to include broccoli and top-off with slices of fried Halloumi cheese.
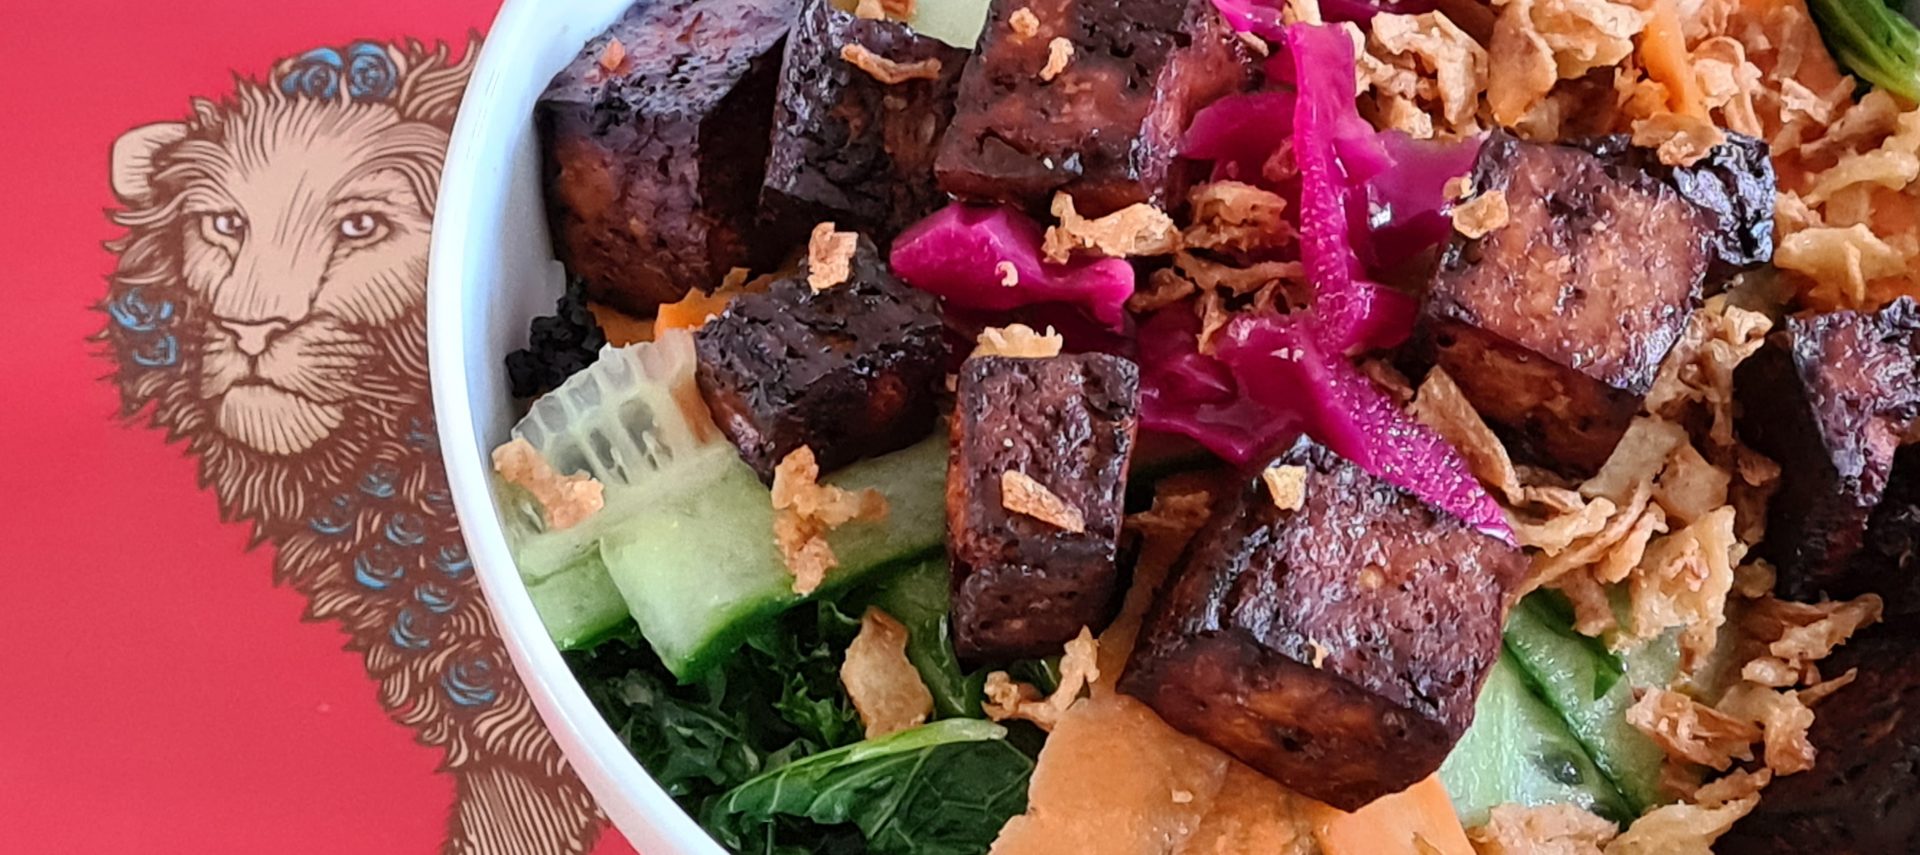
Bibimbap
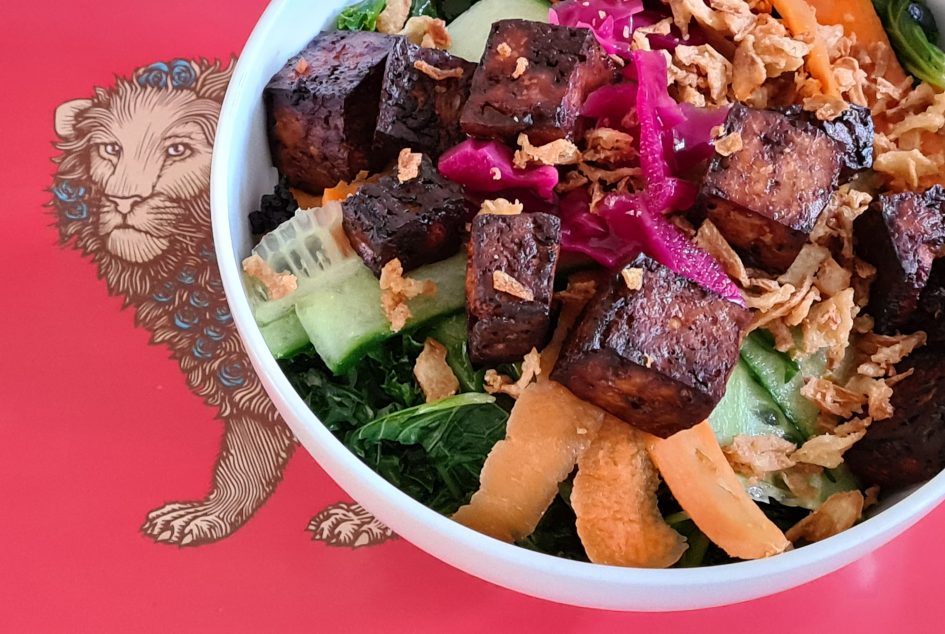
Bibimbap is a Korean dish that literally means mixed rice. It typically consists of a bowl of white rice, topped with a variety of cooked or raw veg, pickles, Kimchi and proteins like strips of meat, marinated tofu or a fried egg. I generally use whatever’s left in the fridge to quickly assemble a delicious lunch, and even though it’s not as traditional, sometimes swap the rice base for noodles. If you’re using tofu, first drain the water from the pack, wrap the block in a tea towel and place a heavy weight on top – like a cast iron saucepan – to press-out excess liquid. After an hour or so, slice the tofu into square chunks and place it in a bowl with the marinade – I use a mix of oil, tamari / soy sauce, paprika and balsamic vinegar. After an hour or so of marinating, you can bake / roast the tofu pieces in a 200 C oven for 30 minutes and you’ll end up with delicious savoury chunks to sprinkle on your bibimbap. Apologies to any locals or purists for the fusion nature of my recipe.
Prep: A few minutes to longer if you’re marinating tofu. Cooking: 20 minutes
Ingredients
As much boiled or steamed white rice as you need
Some dark green veg like spinach, kale, cauliflower leaves
1 carrot
Half a cucumber
Method
While I cook the rice, I stir fry whatever green veg I have in the fridge, including old cauliflower leaves with the stalks removed. I then assemble the dish by first putting the rice – or noodles – in a large bowl, the cooked veg on top, followed by a mix of raw carrot and cucumber, sliced into ribbons using a grater. Atop this place your choice of protein, pickles and condiments – I’m fond of pickled red cabbage and a sprinkling of crispy onions from a packet, along with either cubes of marinated tofu or a simple fried egg. I also enjoy a splash of soy sauce / tamari and some chilli jam to finish it off.
Ramen

Ramen is a Japanese soup consisting of wheat-based noodles in a broth with various toppings. If you’re being authentic, there are very particular noodles – not to mention other ingredients – you should use. My take on Ramen may not be particularly faithful to what you find in japanese restaurants, but it’s still a very tasty dish that’s easy to whip-up and a hit with everyone who’s tried it.
Ingredients to serve 4-6
Noodles of your choice. I use four 150g packs to feed four to six.
Two liters of stock. I use three stock cubes.
Two to three tablespoons of Miso paste, red or white.
Crushed garlic and grated ginger. Use as much as you like!
Three leeks washed and sliced lengthways into strips.
Spring onions, one bunch, washed and finely chopped.
Frozen corn and or edamame beans.
Firm Tofu, pre-pressed to remove liquid.
Soft boiled egg for those who want one!
Soy sauce or Tamari
Method
I start by cooking the noodles if necessary, then reserving them in a bowl of cold water, then soft-boil the eggs for those who want them, and again reserve. Next make the broth. Boil two liters of water in a pan before adding the stock cubes and miso paste, stirring until dissolved. Then add the crushed garlic, grated ginger and two tablespoons of soy sauce or Tamari. Simmer gently for a few minutes, then strain into another pan before adding the chopped leeks and spring onions. Simmer for a few minutes until the vegetables are tender, then add the frozen corn or beans. Finally prepare your toppings. I cube the pressed Tofu, dust in corn starch, then fry until crispy. To serve, add a scoop of noodles and some broth to a bowl, then top with crispy tofu, torn seaweed and the boiled egg. If you like, let people assemble their own Ramen bowl. For added flavour, pour a little sesame oil on top, and or some Siracha hot sauce.