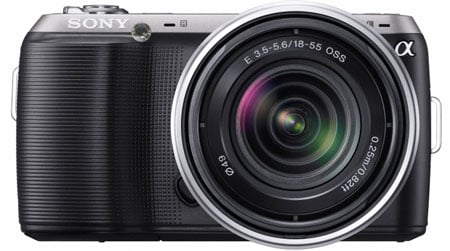
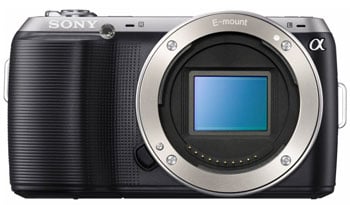
Sony Alpha NEX-C3
-
-
Written by Gordon Laing
Intro
The Sony Alpha NEX-C3 marks the second generation of what Sony calls its ‘compact system camera’ range and the rest of us are beginning to refer as ‘mirrorless interchangeable lens cameras’, or ILCs. The unique attraction of the NEX range is that it is based on the APS-C sensor format commonly used in DSLRs and can therefore offer comparable image quality and noise performance.
Sony’s first generation NEX models featured minimal physical controls and a user interface designed for novices; its target market was point-and-shoot upgraders. They later accommodated the desires of more advanced photographers with firmware upgrades to improve usability, increase customisation options and add new features. With the launch of the entry-level NEX-C3 in June 2011 followed by the more advanced NEX-5N and NEX-7 Sony, like Olympus and Panasonic, now has a range that addresses both markets
The NEX-C3’s newly designed sensor adds an extra 2 Megapixels to the 14.2 Megapixel sensors of the original NEX-3 and NEX-5 models. The body has been redesigned and is smaller than both the NEX-3 and NEX-5. The NEX-C3’s best quality video mode is 720p at 30 frames per second. Beyond that, the differences between this and first generation NEX models are fairly small, particularly in light of the ver.04 firmware update for the earlier models which added Picture Effects and the Peaking focus assist function.
It may have the biggest sensor, but the NEX-C3 isn’t the only mirrorless ILC out there and faces tough competition from models like the Panasonic Lumix GF3 and Olympus Pen E-PL3, both of which we’ve compared it with here. Is a big sensor, legendary low-light performance and a proliferation of ‘gadget’ features from sweep panorama to new Picture Effects enough to trump the competition? Read our full review to find out.
 |
Sony Alpha NEX-C3 Design and controls
Given the APS-C sensor concealed within, the NEX-C3 really is a miracle of modern miniaturisation. Measuring 110 x 60 x 33mm and weighing 225 grams with battery and card (but no lens) it’s smaller even than the NEX-5. It measures up well against the Lumix GF3 and, the curviness of the latter apart, with the kit lens attached they are similarly dimensioned. While the Olympus E-PL3 has a slightly thicker body thanks to its built-in stabilisation, the smaller kit lens makes it the least bulky of the three overall.
 |
|
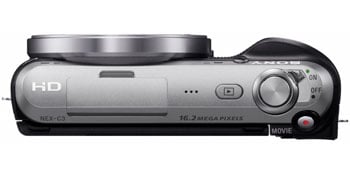
The C3’s plastic body feels solidly constructed and the newly designed top panel with bevelled rear edge looks good, feels comfortable and places the video record button where it can be operated by either your thumb or index finger. The right hand side of the body has separate covered panels for the USB and mini HDMI ports while the SD card slot has been separated from the battery compartment and located centrally on the bottom panel next to the tripod bush. This arrangement means you can change the battery with the camera mounted on a tripod, but not the card.
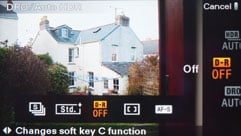
The shutter release and power switch are now combined, with the latter forming a collar surrounding the large shutter button. The playback button remains on the top panel leaving the rear to the control wheel and two soft keys. The NEX-C3 provides good opportunities for customisation, the bottom soft key and the left, right, and centre control wheel buttons can all be assigned to custom functions. For this reason none of these buttons is labelled. The lower softkey and the centre control wheel button are annotated with the assigned custom function on the screen, but you have to remember what you did with the left and right control wheel buttons, which takes a little getting used to.
The central button of the control wheel can be assigned to a custom menu to which you can add your choice of functions from a list that includes Drive mode, AF/MF, AF mode, AF area, ISO, White balance, Metering mode and Flash mode. The disadvantage of assigning the centre button to the Custom menu is that it no longer fulfils its default function of selecting the shooting mode. To do that you’d subsequently need to select the shooting mode menu via the main menu.
There is an alternative, you can assign the shooting mode to one of the other soft keys or customisable control wheel buttons, but then, of course, you’ll have to sacrifice whatever custom function you might have otherwise wanted to use it for, so it’s a bit like custom button musical chairs. The other drawback is that in non-PASM modes the shooting mode menu reverts to the centre button. There’s a clue in that the centre button on-screen label switches from Custom to Shoot Mode, but it highlights a more general weakness in the NEX approach – there just aren’t enough buttons to allow for customisation in a consistent fashion.
 |
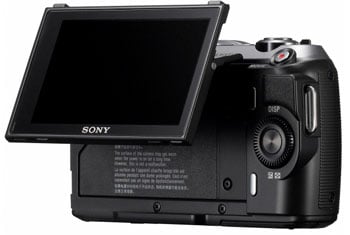
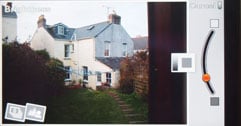
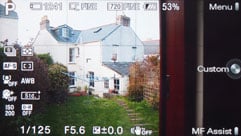
Like the Olympus E-PL3, and earlier NEX models, the NEX-C3 has a 16:9 flip up LCD screen and with 921 thousand pixels provides a detailed, though not particularly bright or contrasty view. Pressing the display button at the top of the control wheel toggles three overlays that not only vary the amount of information displayed, but the way it’s shown. The basic info display provides graphical sliders for aperture and shutter speed in PASM modes, alternatively you can simply display the numerical readouts. Unlike the Pen E-PL3 which has an optional electronic viewfinder, the NEX currently only offers an optical viewfinder for the 16mm pancake lens.
The NEX-C3 is supplied with a small add-on flash unit which, rather awkwardly, screws into the accessory port on the top panel directly above the lens mount. The supplied unit has a guide number of 10 at 200 ISO which gives it a maximum range of 2.85 metres with the 18-55mm kit lens at its wide angle setting and maximum aperture. That’s an improvement on the Lumix GF-3’s built-in unit and the same output as the Pen E-PL3’s included accessory flash. Sony produces a more powerful external flash for NEX models with a guide number of 20, however, you can use any external flash in the E-PL3’s standard hotshoe, whereas the Sony port is – as usual – proprietary. The bundled Sony flash flips up to activate and has Auto, Fill, Slow-Sync, Rear-Sync and Off modes, the last being a little superfluous as all you need do is flip it back down. As with the Lumix GF3 the voluminous dimensions of the 18-55mm kit lens can cause a shadow when photographing close objects.
Like earlier NEX models, the accessory port can alternatively be used to mount the ECM-SST1 mini shotgun microphone for recording better quality sound in movies. You can’t connect a third party microphone.
Sony Alpha NEX-C3 lens and stabilisation
The range of available lenses is clearly a hugely important factor for anyone considering an interchangeable lens system camera like the NEX-C3. Sony has recently added three new E-mount lenses to its range, the Carl-Zeiss Sonnar T E24mm F1.8, E50mm F1.8 OSS, and E55-210mm F4.5-6.3 OSS. We tested the NEX-C3 with the supplied E 3.5-5.6 18-55 OSS kit zoom. It’s also available with the 16mm f2.8 pancake lens or with both.
Sony Alpha NEX-C3 coverage wide |
Sony Alpha NEX-C3 coverage tele | |
 |  | |
| 18 – 55 mm at 18mm (27mm equivalent) | 18 – 55mm at 55mm (82mm equivalent) |
Like all E mount lenses the 18-55mm kit lens has a crop factor of 1.5 giving it a 35mm equivalent range of 27-83mm. To show the coverage I’ve taken two shots at the wide angle and full tele positions.
Though the stabilisation is built into the lens and not the body you can turn it on and off from the NEX-C3’s setup menu, though, disappointingly, you can’t assign it to a custom menu. To test the stabilisation performance of the 18-55 kit zoom with the NEX-C3 we zoomed it to its maximum 55mm (83mm equivalent) telephoto position and took a series of hand-held shots at a range of shutter speeds with OSS enabled and turned off.
Sony 18-55mm f3.5-5.6 OSS Off/On | ||||
 |  | |||
100% crop, 18 – 55mm at 55mm, 200 ISO 1/8th, OSS off. |
100% crop, 18 – 55mm at 55mm, 200 ISO 1/8th, OSS on. | |||
To test the stabilisation on the 18-55mm kit lens I took a series of shots with the lens set to its maximum zoom setting of 55mm. I set the NEX-C3 to shutter priority mode and took a series of exposures at progressively slower shutter speeds with OSS turned off and on. As you can see from the crops above, OSS can produce blur-free shots down to 1/8th of a second, a little more than three stops better than conventional wisdom dictates is advisable without stabilisation.
Sony Alpha NEX-C3 shooting modes
Well known for feature modes on its compact range, Sony has endowed the NEX-C3 with a huge range of shooting features in addition to PASM exposure modes. There are of course the 2D and 3D panoramic shooting modes, the former with a maximum image size of 8192 x 1856. Intelligent Auto mode features compact-style scene recognition for enhanced auto exposure and auto focussing, and has been augmented by results-based Photo Creativity modes including a new Background Defocus mode, Brightness, Colour, Vividness and Soft Skin Effect. You can also access the Picture Effects from this menu, though, unlike the Photo Creativity modes Picture Effects can be used in any shooting mode, not just iAuto, including movies.
|
 |
Picture Effects include Pop-Color, Retro Photo, Posterization, Toy Camera, High-Key and several partial colour modes which desaturate the image leaving only a single colour. People haven’t been slow to point out that, like Panasonic, Sony is following in the footsteps of Olympus with this, but at least they’ve put their own spin on it with a range of effects that unusually doesn’t include a faux tilt-shift or ‘miniature’ option.
The Photo Creativity modes are accessed from the centre button on the control wheel, even if you have it assigned to the custom menu which isn’t available in iAuto mode. It’s very accessible and extremely easy to use. With Background Defocus set as the default, two clicks of the centre button and you can rotate the wheel to open or close the aperture with a on-screen graphic (as well as the view) to guide you.
Due to its large sensor, the NEX-C3 already has an advantage in low light conditions and this is augmented by its composite exposure modes. Anti Motion blur gets its own position on the NEX-C3’s virtual shooting mode dial, but Hand-held Twilight mode is tucked away in the Scene modes. You can see examples of both in the High ISO Noise results page.
The NEX-C3’s Auto HDR mode combines three bracketed exposures to produce a composite image with improved highlight and shadow detail. If you’re familiar with HDR post processing from bracketed shots you’ll be impressed with what the NEX-C3 can do in-camera. The only drawback with Auto HDR is the potential for ghosting with moving subjects. In those situations the DRO (Dynamic Range Optimiser) modes might provide a solution. Available on Sony Compacts and SLRs for a number of years now, DRO applies a series of tone curves to a single shot to improve shadow and highlight detail.
Sony Alpha NEX-C3 movie modes
Like the NEX-3 before it, the NEX-C3’s best quality video mode is 720p at 30 frames per second. Movie files are encoded at an average bit rate of around 9Mbps and saved as Mpeg-4 files. Sony’s attempts to maintain feature differences between NEX models is perhaps understandable, the only models in the range to support 1080p AVCHD shooting modes are the NEX-5N and NEX-7, with the NEX-3 and NEX-C3 restricted to 720p Mpeg-4 modes; the earlier NEX-5 offered 1080i. Having said that, both the Panasonic Lumix GF3 and Olympus Pen E-PL3 offer 1080i AVCHD recording modes, so the C3 is looking a little dated in this respect compared to its closest rivals.
In auto exposure modes the NEX-C3 automatically adjusts exposure while recording. You can choose the aperture in Aperture Priority mode, but you can’t alter it once you’ve pressed the record button. Background defocus and the Picture effects can all be used for movie shooting and you can disable SteadyShot stabilisation for shooting movies, though if you’re shooting hand-held I wouldn’t recommend it. The large knurled zoom ring of the Sony 18-55mm kit lens makes it one of the smoother barrel zooms to operate during movie recording, but it’s still a hard trick to pull off and, as can be seen from the first clip, some practice is required to avoid slightly tilting the camera body in opposition to the direction of the zoom ring.
The NEX-C3’s stereo mics are positioned well apart at the tip of the front panel on either side of the lens mount. Like most built-in mics, they are susceptible to wind noise, but unlike the Lumix GF3 there’s no wind noise filter, you can turn off audio recording altogether though.
| |
|---|---|
|
Though the NEX-C3 lacks a 1080 HD mode, the quality of it’s MP4 encoded 720p video is good. Its big lens with smooth zoom action makes video zooming a little steadier than with some models, but it’s still no match for a motorised zoom.
| |
|---|---|
|
In this tripod-mounted panning shot the highlights on the water don’t trouble the NEX-C3’s CMOS sensor. Focus holds up well during the zoom but the stereo mics are a little susceptible to wind noise
| |
|---|---|
|
The NEX-C3’s mics are pretty sensitive as you can hear on this interior panning shot. The auto exposure isn’t as responsive as it might be though.
Sony Alpha NEX-C3
handling
From flicking the on/off switch the NEX-3 is ready to take a shot in less then a second and a half. If you’re in a hurry you can hold the shutter button down as soon as you’ve turned it on and it will focus and fire as soon as it’s ready, so you get your shot at the earliest opportunity.
Out of the box, the NEX-C3 is a camera that in iAuto mode has everything compact upgraders are likely to want plus a little more in terms of opportunities to experiment. While Picture Effects might be seen as little more than a diversion, Photo Creativity successfully achieves its goal of providing advanced creative control for beginners. Background Defocus works and is a practical alternative, even for the more experienced, to Aperture priority mode.
 |
 |
 |
In more experienced hands, the NEX-C3 has the features to make it a genuine SLR alternative, but I suspect its lack of physical controls will be the biggest hurdle for many. The potential for customisation goes a long way to overcoming that. If you’re thinking the lack of a quick menu puts the NEX-C3 at a disadvantage compared with the Panasonic Lumix GF3 and Olympus Pen E-PL3, it doesn’t, as the Custom menu is effectively the same thing.
With the custom menu on the central button of the control wheel, flanked by two frequently used controls, say ISO sensitivity and drive mode, and a third option on the bottom soft button, the NEX-3 becomes a very quick, versatile and intuitive camera to handle. All the same, it would be nice not to have to sacrifice direct access to exposure mode selection for the privilege. I’d also prefer it (and I doubt that I’m alone in this) if Sony took a more consistent approach to its low-light modes. Why is Anti Motion Blur on the Shoot mode dial, but not Hand-held Twilight mode?
Moving on, the new Focus Peaking function works very well. This provides visual feedback on the screen for manual focussing and works with any lens. It highlights in-focus high-contrast areas by colouring the edge pixels (you can choose the colour and sensitivity in the setup menu) so that objects in focus are surrounded by a colour halo. It’s available on new NEX models and in the v.04 firmware update for the NEX-3/5 and it works really well. For very accurate manual focussing you can set the sensitivity to low, while medium works well for general purpose daylight shooting and the high sensitivity setting is ideal for low light work where manual focussing would otherwise be a near impossible task, especially if your vision isn’t 20/20. For anyone thinking about buying an ILC to use with their DSLR or legacy lenses, focus peaking is a big plus and, for now at least, it’s exclusive to the Alpha NEX range.
The NEX-C3 has two continuous shooting modes, plus auto bracketing and self-timer modes. Continuous Adv has a quoted frame rate of 2.5fps which our review model matched exactly in tests. In Speed Priority Cont mode the focus and exposure is locked on the first frame. The quoted rate of 5.5fps is a little slower than that of the 14.2 Megapixel NEX-3/5 but in our tests the NEX-C3 sustained a rate of 5.9fps for a burst of 12 frames in the best quality JPEG mode, before slowing appreciably. Setting stabilisation on and DRO Auto makes little if any difference, but shooting RAW+JPEG reduces the high speed burst (though not the rate) to 6 frames.
The NEX-C3’s 16.2 Megapixel APS-C sized sensor produces 3:2 images with a maximum size of 4912 x 3264. Images can be saved as RAW data files or as JPEGs at one of two compression settings Best quality JPEGs have a file size of between 4 and 8MB. The ISO sensitivity ranges from 200 to 12800 ISO and the shutter speed range is from 30 seconds to 1/4000 plus Bulb.
To see how the quality of the Sony Alpha NEX-C3 measures-up in practice, take a look at our real-life resolution and high ISO noise results pages, browse the sample images gallery, or skip to the chase and head straight for our verdict.


