Sony Alpha NEX 3 / 5 (firmware v2)
-
-
Written by Gordon Laing
In depth
Sony Alpha NEX-3 / NEX-5 design
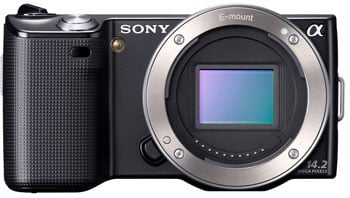
Sony’s NEX-3 and NEX-5 share a very distinctive design with a thin body sporting a large lens mount pushed up to one side – so with anything other than a pancake lens attached, they resemble a letter L when viewed from above. While the grips on both the NEX-3 and NEX-5 are generous for their body size, you can’t help but rest the lens barrel in your left hand. The resulting two-handed operation works very well with the camera and lens held comfortably and securely; it harks back to Sony’s classic F-series compacts, although this time the body doesn’t tilt – the screen does.
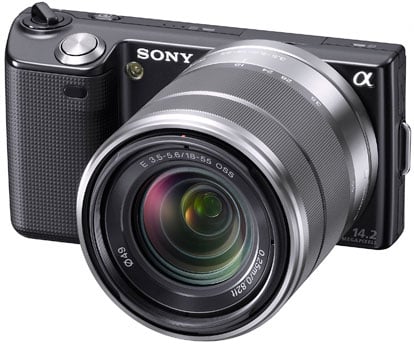 |
The two NEX cameras employ different body materials and slightly different styling. The more affordable NEX-3 (pictured below in silver) employs a plastic body measuring 117x63x33mm and weighing 297g including battery and card (but no lens). The pricier NEX-5 (pictured above in black) employs a magnesium alloy body measuring 111x59x38mm and weighing 287g, again including battery and card but no lens. The build quality on both is excellent, although the NEX-5 has the edge.
You’ll also notice while the NEX-5 is thicker (thanks to a deeper grip), it is slightly smaller and fractionally lighter overall. Compare the two models side-by-side and it feels like Sony’s literally filed-down the NEX-3’s body where possible to come up with the NEX-5 shape – the upper surface is lower, making the lens mount actually poke over the top a little, while sections have been removed from either side of the tripod mount at the bottom. This all has the effect of making the camera look even smaller, although the savings at the bottom have resulted in a relatively small flat area around the tripod thread.
What you don’t realise from looking at photos of the NEX bodies though is just how small they are in the flesh. Place either NEX alongside the Olympus E-P2 or Panasonic Lumix GF1 for example, and the Sony’s are noticeably smaller. The two rival models measure 121x70x35mm and 119x71x36mm respectively, and weigh 385g and 341g respectively, again with battery and card but no lens. As such their main bodies are taller, wider, thicker and heavier.
To be fair, the Olympus Micro Four Thirds models all feature built-in stabilisation, and both these and the GF1 also boast proper flash hotshoes, but that doesn’t detract from the fact the NEX cameras are smaller in every dimension and lighter while boasting flip-out screens and larger sensors. Sony’s design is very impressive indeed and throws down the gauntlet to rivals in terms of size without compromising comfort and stability. Indeed it’s amazing to look back at Sony’s first non-DSLR to feature a large sensor – 2005’s Cyber-shot R1 – and how much smaller the NEX models are without sacrificing practicality. With a lens attached – especially a zoom – you’ll still need a large pocket or a bag to carry either NEX, but their compact dimensions remain very impressive.
 |
 |
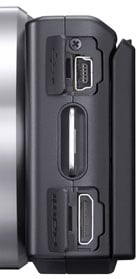
We can also breathe a sigh of relief that Sony has (mostly) avoided the usual proprietary cable connections of its compacts, instead fitting the NEX bodies with standard mini USB and mini HDMI ports behind flaps on the left side. Like the latest Alphas, there’s no AV output to standard definition TVs, so it’s HD-only in Sony’s world, and unfortunately there’s no standard microphone input either, but there is at least an external microphone accessory, more of which later. We’re also pleased to report the NEX cameras feature card slots which can take either Memory Stick PRO Duo or SD media, including the latest SDXC versions and wireless Eye-Fi cards; ironically the dual-format nature of the slot means inserting Sony’s own slightly smaller Memory Stick PRO Duo cards can be fiddly, but we’re just happy to be able to use SD too.
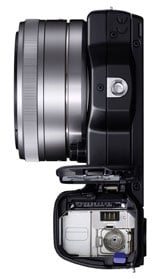
The card slot is located in the battery compartment, with both the NEX-3 and NEX-5 using an NP-FW50 Info Lithium pack which reports the remaining battery life on-screen as an accurate percentage alongside the usual bar icons. Sony claims the battery is good for 330 images under CIPA conditions, although as always you may burn through it quicker depending on use. We got close to the target with just under 300 still images from a fresh charge (albeit none with the flash), including several minutes of video and plenty of playback on-screen.
Sony Alpha NEX-3 / NEX-5 controls
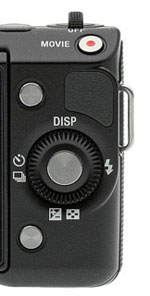 |
While Sony’s NEX bodies are a triumph of miniaturisation and industrial design, their control systems may leave some owners scratching their heads. To keep things really simple for its target audience, there’s no mode dial and only the bare minimum of buttons. On the top right surface you’ll find the shutter release, power switch (approximately one second to startup), playback and movie record buttons, while on the back are a control wheel and two unlabelled buttons. That’s it, although at least the absence of a mode dial means there’s no chance of accidentally turning it during transportation.
With the camera powered-off, you’ll understandably wonder where the menu button is, but switch it on and you’ll see the two unlabelled buttons on the rear acting as soft-keys, with their current function – along with that of the control wheel and its centre button – indicated on-screen. This has the potential for great flexibility, not to mention customisation, but again Sony’s opted to keep things simple. Indeed for the vast majority of the time when shooting, the top button is configured to access the menu (or go back a step), while the bottom one is dedicated to context-sensitive tips. Indeed it can be quite a shock when you notice one of them actually change to offer something else.
The control dial tilts to double-up as a joypad: pushing up switches the display mode, pushing right sets the flash options, pushing down sets the exposure compensation when shooting or enters an index view during playback, while pushing left sets the drive mode. What you won’t find though is any means to directly setting the sensitivity, white balance, AF mode or any number of other options considered common to enthusiasts. To access these, you’ll need to enter the menu system, which we’ll cover in detail lower in the review.
Sony Alpha NEX-3 / NEX-5 flash and accessory port
 |
|---|
Like the Olympus E-P1 and E-P2, Sony has saved space by not trying to squeeze a flash into either NEX body. Unlike all the Micro Four Thirds models to date though, neither NEX body has a standard flash hotshoe. Instead each features a small proprietary accessory port under a hinged door on the top surface, and is supplied with a small flash unit which slots in and is secured in place with a slightly fiddly thumb-screw.
The flash unit is hinged at the base, allowing it to work a little like a popup model on a DSLR. Flip it up and it’ll clear the lens mount by about 30mm, allowing it to minimise red-eye compared to flashes built-into bodies. Flip it down and it sits flat and fairly discreetly on top of the lens barrel, adding little to the overall size. In order to clear the larger barrel of the 18-200mm lens though, an optional extension adapter should be fitted to further raise the height of the flash.
 | |
|---|---|
The standard flash unit is quite a nice implementation, but with a guide number of 7 can’t hope to match the power of external flashguns mounted onto a proper hotshoe. For casual snaps and fill-ins, it’s fine, but those requiring more power and reach will need to look elsewhere. It’ll be interesting to see if Sony releases a larger flash unit for the NEX cameras, but the small port and mounting area will certainly limit the potential size. Note: Sony previewed a larger mockup flash unit for the NEX cameras at Photokina in September 2010.
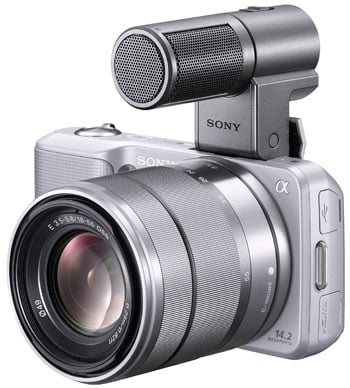
The NEX port can also be used to mount other optional – and equally proprietary – accessories, including an external microphone (see movie mode page) and optical viewfinder matched to the 16mm pancake lens. It’s a shame the NEX-3 and 5 weren’t equipped with standard microphone jacks, but many Sony camcorders aren’t either, and to be fair, there’s nowhere to mount a standard shotgun mic. Hopefully there’ll be a lapel microphone accessory in the future, or better still, an adapter with a standard jack, but we’re not holding our breath.
Sony Alpha NEX-3 / NEX-5 screen
 |
Sony has equipped the NEX-3 and NEX-5 with screens which stand out from the competition: they’re large, very detailed, and perhaps most impressively of all given the tiny size of the bodies, can vertically tilt for easier composition at high or low angles.
The panels measure 3in and sport 920k pixels, delivering a very detailed image and fine edges to fonts in the menu system. The picture is crisp and looks great indoors, although can quickly become hard to view under direct sunlight.
This is where the screens on the Olympus models come into their own, as while they’re neither as detailed nor vibrant as the Sony, they are more easily visible in direct sunlight. Those shooting in bright conditions (or who want the additional stability of holding a camera to their eyes) may be interested in the optional optical viewfinder, although this only matches the coverage of the 16mm pancake; there was no electronic viewfinder accessory at the time of writing.
Sony Alpha NEX shooting in 3:2 mode | |
|---|---|
 | |
| Default view when shooting in 3:2 aspect ratio | |
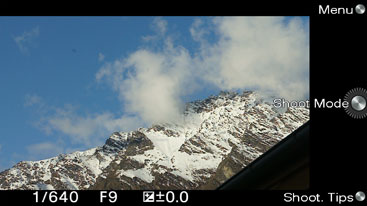
Following a trend on many compacts, the actual shape of the NEX screen is 16:9, despite the sensor delivering a narrower image at its native aspect ratio. So when you’re shooting in the best quality mode, the actual 3:2 shaped image measures 2.6in on the diagonal; it’s shifted up against the left side of the screen, leaving a black strip measuring about 1cm wide on the right side.
This space is used to label the functions of the control wheel and soft keys, although this text often runs over the edge of the image; the main shooting information is superimposed along the top, left and bottom sides of the image.
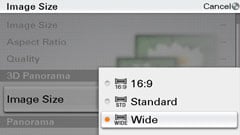
The benefit of using a 16:9 screen on most compacts is the ability to fill it when shooting HD video – or of course when switching to a 16:9 mode for stills. But bizarrely Sony does neither by default and instead crops the existing 3:2 image area to deliver a 16:9 shape with thin black bars above and below it (see below left). So instead of filling the screen, the live 16:9 image is actually smaller than when shooting in 3:2. Thankfully, delving into the main Setup menu reveals a Wide Image option which can be set to Full Screen, after which 16:9 images will occupy the entire area during composition and playback (see below right). This really ought to be the default option for 16:9 compositions.
Sony Alpha NEX shooting in 16:9 modes: default view / Full Screen option | ||
 | 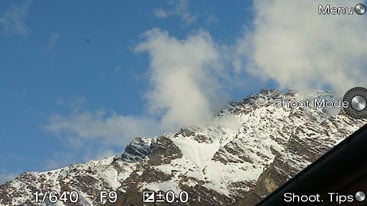 | |
| Default view when shooting in 16:9 aspect ratio | Full Screen view when shooting in 16:9 aspect ratio | |
Moving onto the tilting screen, this gives the NEX cameras a genuine advantage over those with fixed panels. They can tilt upwards by just shy of 90 degrees, allowing comfortable shooting at low angles or at waist height; it’s also great for discreet shooting. In the other direction, the tilt is closer to 45 degrees, but this still allows you to compose fairly easily with the camera held high overhead. It’s a shame the screen can’t twist out to the sides or back on itself for protection, but these would have almost certainly have added to the size of the camera. Tilting the screen can also reduce the problem of visibility in harsh light.
Issues with visibility aside, the NEX screens are a delight to use. The combination of a detailed image during composition or playback with the flexibility of the tilting mount makes them preferred over screens on rival models.
Sony Alpha NEX-3 / NEX-5 menus and user interface
 |
|---|
 |
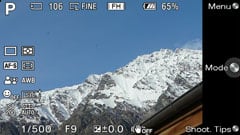 |
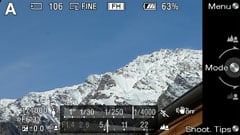
The upper side of the control wheel is labelled DISP, and pressing it cycles through a series of display options. When shooting, the default screen shows a clean image superimposed only with the shooting mode in the top left corner and the exposure at the bottom (with exposure compensation in the PASM modes). Press DISP and additional details including the shots remaining, photo and video quality and battery life are shown running along the top. If you’re in the PASM modes, the shutter speed and aperture are now complemented with a graphical scale, illustrating their relationship.
Press DISP again and more details are added running down the left side, including the drive and AF modes, along with the face and smile detection modes. In PASM modes, sensitivity is tagged on the bottom and a second column added alongside indicating the metering, AF area, white balance, Creative style and DRO mode. Since that adds up to a fair number of icons, the previous graphical representation of the aperture and shutter is sensibly replaced by their simple values at the bottom. Press the wheel upwards and you’re returned to the cleanest of the three views.
 |
|---|
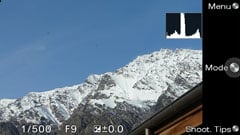 |
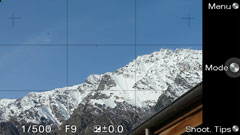
No amount of pressing the DISP button will reveal an alignment grid or live histogram though. For those you’ll need to delve into the Setup menu to enable them.
The grid splits the image into the usual three by three pattern, with additional cross-hairs near the corners indicating the coverage of the movie mode should you start filming. Without the grid enabled, you’ll need to start filming in order to frame your clip.
The live histogram is positioned in the upper right corner and responds very quickly, although in another daft decision, it disappears while you adjust the exposure compensation – ironic since that’s exactly when you need it.
This is however a minor annoyance compared to the process of adjusting any of the shooting settings. Most cameras these days, including Sony’s own Cyber-shots, offer a superimposed function menu system which delivers quick access to things like the image quality, sensitivity and white balance. Indeed the NEX user interface tantalisingly looks like it’s going to do the same on the view which reveals all the icons on the left side. You’d be forgiven for thinking a button would let you highlight the desired icon before turning the control wheel to adjust its settings. Surely that would make sense, right?
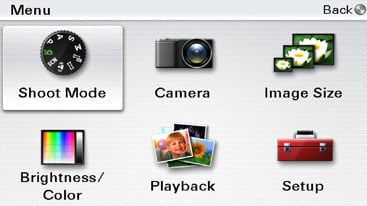 | |
Sadly not. There’s no such menu system on the NEX, at least not on the model we tested running firmware version 2. Sure, the control wheel rocks to deliver direct access to the drive mode, flash mode and exposure compensation setting, but for everything else, you’ll need to enter the menu system. But even then things aren’t as simple as they could be. Rather than having a single menu for shooting settings, they’re spread over five sub categories: Shoot Mode, Camera, Image Size, Brightness / Colour and Setup.
Shoot Mode is self-explanatory: it’s the electronic version of the missing mode dial, although you may not immediately find everything you’re looking for. For instance while the Panorama and Anti Motion Blur modes are directly available on the virtual dial, the equally useful Handheld Twilight mode is hidden in one of the scene presets. Worse, the clever HDR mode isn’t here at all, instead residing as one of the DRO options in the Brightness / Colour section.
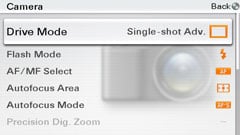 |  |
Let’s go through the other sections in turn. The Camera menu is where you’ll find the drive mode, flash mode, AF / MF switch, AF area, AF mode, Smile and Face detection options.
This is also where you’ll find the panorama shooting directions and a couple of display options.
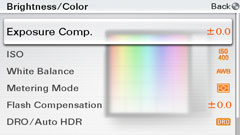
Image Size is naturally where you’ll set the quality for stills, movies and panoramas. Brightness / Colour is home to exposure compensation, ISO, White Balance, Metering, Flash compensation, DRO mode and Creative Style. Setup contains things like the histogram and grid options, along with noise reduction and Steadyshot modes, in addition to the usual formatting, date, and firmware version. A sixth menu covers playback options.
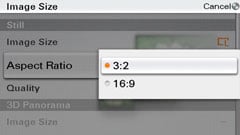 |  |
If splitting these settings across various menus and forcing you to press lots of buttons to access them wasn’t bad enough, there are also inconsistencies in adjusting them. Some settings popup a sub-menu of options as you’d expect (see quality options far left), but others throw you back to the main shooting view with the options now selected with a graphical wheel (see ISO, left).
This looks pleasant enough, but means if you want to adjust anything subsequently, you’ll need to delve back into the menu system. A simple operation like changing the ISO followed by the white balance could involve a lot of clicks, during which time you can’t help but wonder why Sony’s forcing you to do this when almost every other camera it sells is so much quicker and easier.
Equally confusing are the number of items which are mysteriously greyed-out in the menus. We all understand a greyed-out option is unavailable for some reason, but that reason is not always obvious with the NEX menus. One of the worst examples is when you find the HDR mode greyed-out, which only after trial and error do you discover is because the image quality is set to RAW. Surely it would be more helpful for the HDR option to explain it only works with the camera set to JPEG, or even make the change for you. Since you have to jump through many hoops to adjust settings, you’d also be forgiven for wanting to save time and perhaps configure both the still and panorama settings while you’re in the Image Size section. Well sadly not because the panorama settings are greyed-out unless you’re currently in the panorama mode, at which point the still image settings become unavailable. You can’t even adjust the normal and 3D panorama settings at the same time.
 | |
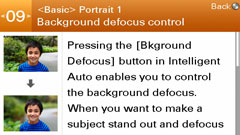
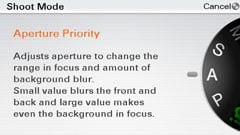
Now to be fair, the user interface isn’t all bad. Sony helpfully presents an easy way to adjust the depth of field in Intelligent Auto mode without you having to understand apertures and f-numbers. In Intelligent Auto, the control wheel is labelled ‘Bkground Defocus’, and pressing the central button presents a curve with ‘defocus’ at the bottom and ‘crisp’ at the top.
Turning the wheel then lets you choose the amount that will be in focus, while the actual exposure values are discreetly updated towards the lower left corner. Crisp may not be the best word to describe the minimum aperture, as it’ll result in softening due to diffraction, not to mention run the risk of camera shake at slower exposures. But it’s no worse than any other beginner-friendly version of Aperture Priority, and should a novice stumble into the Priority modes, the actual values are still complemented by graphical representations of their impact or application.
 |
 |
 |
 |
 |
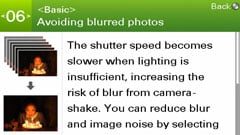
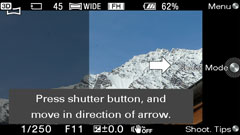
Best of all though are no fewer than 85 pages of context-sensitive tips, several of which are shown running down the left side of this page. Press the lower soft-key labelled Shooting Tips and the NEX will helpfully show a selection of tips relevant to your current shooting situation. What’s really clever is how it’s dynamically linked to the conditions recognised in the Intelligent Auto mode. Position the camera close to a subject and the Intelligent Auto mode switches to macro, and cleverly, many of the tips subsequently describe shooting close-ups. Likewise, point the camera at people, landscapes or twilight scenes and as the Auto mode reconfigures itself, so do the tips. They’re decent tips too, well-written and illustrated with before and after shots, and if you’d like to read them all in turn, you can access the entire list in one of the menus.
The NEX user interface is certainly a roller-coaster ride. When it’s good, such as the context-sensitive tips, it’s a leader in its class, but when it’s bad, such as trying to adjust a number of settings quickly, it can become incredibly frustrating. The important thing though is to put it in perspective. Camera reviews are generally written by camera reviewers who typically run through a huge variety of settings when evaluating a new model. In order to reveal the difference between various settings, such as the ISO sensitivity or Creative Styles, we may have to run through the entire range in a matter of minutes or even seconds. A camera which makes this process difficult will quickly frustrate us. As such, it’s not surprising to find many reviews of the NEX concentrating on the negative aspects of the user interface as it often feels designed to infuriate camera reviewers.
The important question is whether you’ll have a similar experience as a typical photographer. If you’re the kind of person who frequently changes settings between shots like the sensitivity and white balance, then you will find the current NEX user interface slow and potentially frustrating; indeed it could become a deal-breaker.
But if you don’t change your settings that often, it’s not that big an issue. Indeed during normal use, we tended to leave the camera either set to Intelligent Auto or Aperture Priority. In the former, the camera did pretty much everything by itself, and in the latter, the f-number was always easily adjustable. We of course understand different photographers have different needs, but in general use, how often would you adjust the sensitivity, white balance and AF modes? Many photographers may set the camera up, then leave the settings untouched for general use, in which case the laborious user interface becomes a minor issue.
It should also be said even if you do change your settings frequently and find the interface infuriating, you may still be willing to accept it for the camera’s plus sides; indeed despite cursing every time we needed to perform rapid sensitivity comparisons, we remained won over by the NEX overall. That said, Sony – or a cunning hacker – will make many friends if they develop an alternative user interface for the NEX which makes it easier to change common settings. A super-imposed function menu, such as those on Sony’s own Cyber-shot compacts, would improve the NEX by leaps and bounds and open up the market to enthusiasts who may have been put off.
Being able to customise the lower soft key to offer direct access to your most used setting would also be a significant improvement; after all most of the time it just sits there offering the shooting tips which more experienced owners will quickly outgrow. Even just a little more consistency would be good – for example with the AF set to Flexible Spot, the lower soft key always lets you make readjustments. It would be a big improvement if the same applied when adjusting other settings, like the ISO and White Balance, because as it stands you need to re-enter the menu system to tweak or correct either. Note Sony has promised customisable controls with a firmware update expected in mid-October 2010.
 | 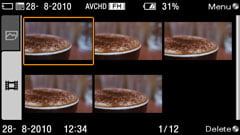 |
Just when you hoped things might get back to normal, the NEX user interface has one more surprise: during playback you’ll be able to click through your still photos as expected, but no amount of scrolling left or right will reveal your movies. This is because still photos and movie clips are exclusively organised on different tabs, and to see these tabs, you’ll need to push the control wheel down for the thumbnail view. This presents the usual nine thumbnails, but on the far left side are the tabs allowing you to view either photos or video. Once the video tab is selected, you’ll see your movies, but not the still photos.
An option in the Playback menu allows you to choose whether play button defaults to the photo or video view, but you’ll still need to subsequently fire-up the thumbnail view to switch between them. While there’s an argument for keeping photos and video separate, it can be annoying when you want to view all your material sequentially without starting a slideshow. Having to change tabs to see your video is also hardly intuitive if you’re coming to the NEX without having fully read the manual.
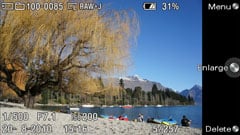 | 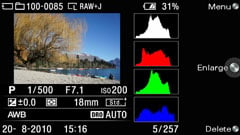 |
When viewing photos, the DISP button cycles between three views: one that’s clean, one with basic shooting information, and one with a thumbnail (with flashing highlights) alongside RGB and brightness histograms. Pressing the button in the centre of the control wheel enters the enlarge mode, after which you can spin the wheel to zoom in and out. If Wide Image is set to Full Screen, 16:9 stills will fill the screen, although 16:9 movies will do so during playback regardless of this setting.
Panoramic images are initially displayed during playback in their entirety as thin strips, but pressing the centre button on the control wheel magnifies them to fill the height of the screen (or width for vertical pans) before scrolling to reveal the full image.
Now let’s check out the Sony Alpha NEX Features, including their lenses, focusing and shooting modes and sensor. If you’re only interested in their video capabilities at this point, you can skip straight to our Sony Alpha NEX Movie Mode page.
Sony Alpha NEX-3 / NEX-5 lenses, focus, sensor and drive
Click here to find out about the Sony Alpha NEX-3 / NEX-5 Movie Modes
The Alpha NEX-3 and NEX-5 employ Sony’s brand new E-mount for interchangeable lenses. It’s a 100% electronic system and since the NEX cameras feature relatively large APS-C sized sensors, the E-mount also has an appropriately large diameter; indeed the outer edge of bayonet mount touches the top and bottom of the NEX-3 and actually protrudes a little above and below the smaller NEX-5 body. It really brings home both the compact size of the bodies and the large sensors housed within.
 |
Like Micro Four Thirds before it, the E-mount enjoys a relatively short lens to sensor distance thanks to the absence of the traditional DSLR mirror and optical viewfinder. Despite featuring a larger sensor and wider diameter mount though, the NEX lens to sensor distance is actually a fraction shorter than Micro Four Thirds. This coupled with a protruding lens mount rather than one which is flush to the front surface contributes to the thinner proportions of the NEX bodies compared to rivals. It’s an impressive achievement.
 |
|---|
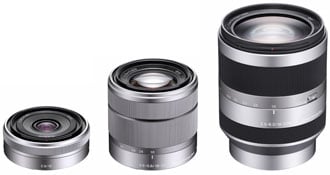
Any new system lives or dies by its selection of lenses and at the time of writing, Sony offered three for its new E-mount: an 18-55mm f3.5-5.6 kit zoom, a 16mm f2.8 pancake prime, and an 18-200mm f3.5-5.6 super-zoom. Since the NEX cameras share the same sized sensor as the Alpha DSLRs, they also inherit the same 1.5x field-reduction factor, so the three lenses deliver equivalent focal lengths of 27-83mm, 24mm and 27-300mm respectively. Sony also offers a pair of wide angle converters which attach to the 16mm pancake: once converts it into a 12mm (18mm equivalent) and the other converts it into an ultra-wide fisheye.
Unlike the Alpha DSLRs though, there’s no room for sensor-shift stabilisation in the tiny NEX bodies. Instead Sony’s opted for optical stabilisation, included on both the 18-55mm and 18-200mm zooms, but not the 16mm pancake. This is no different to the Panasonic Lumix G series, which also relies on optically stabilised lenses, but is a key downside compared to the Olympus models which boast built-in stabilisation which works with any lens you attach. We’ll test the stabilisation of the Sony NEX 18-55mm kit lens in just a moment.
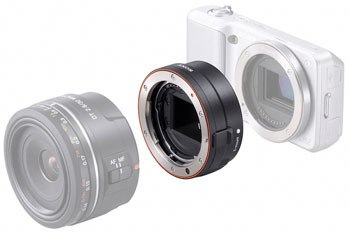 |
While three lenses is obviously a minimal selection, Sony has plans for more and in the meantime, adapters are available for mounting alternatives. As Micro Four Thirds owners already know, the benefit of a short lens to sensor distance is the ability to adapt the mount to handle virtually any lens system. For starters, Sony offers its LA-EA1 adapter which allows you to fit full-sized Alpha lenses on the NEX, although the 100% electronic E-mounting means there’s no autofocus. Sony has however promised support for AF on SAM and SSM lenses with a firmware update in mid-October 2010. Note the adapter features its own tripod mount, eliminating fears over the small mating area on the NEX-5.
Beyond Sony’s systems, Rayqual offers adapters which allow the NEX cameras to use Nikon F, Canon FD, Leica M, Contax / Yashica and Pentax K mount lenses. Cosina also offers a Voigtlander VM adapter. You’re looking at around $100-$200 USD for an adapter, and again you’ll be manually focusing, but the opportunity to use some of the best quality lenses around is a big advantage, especially as native E-mount options are currently limited.
As for the initial triplet of E-mount lenses, Sony’s unusually avoided plastic construction and instead opted for much classier metal bodies. The three E-mount lenses really do look and feel the business. Impressively they also autofocus in virtual silence, which coupled with the decent build quality give them a real edge over most noisy, plastic-bodied DSLR kit lenses. Polariser fans will also be pleased to learn the filter mount doesn’t rotate while focusing.
As for Sony’s choice of focal lengths for its first three E-mount lenses, the two zoom ranges aren’t surprising, but some may question the decision to produce a wide prime before any other. Olympus and Panasonic opted for arguably more sensible 17 and 20mm focal lengths for their initial pancake primes, equivalent to 34 and 40mm respectively. These can be used as general-purpose lenses, whereas the 24mm equivalent focal length of the Sony 16mm is best-suited to landscape and architectural work.
Of course lens focal lengths are very personal choices. While a 24mm equivalent is way too wide for traditional portrait work or achieving shallow depth-of-field effects, it may be right up your street for other types of photography. Indeed rather than seeing it as a mistake by Sony, it could be a key reason to go for the NEX system over rivals; it’s certainly one of our favourite focal lengths for general travel photography. But before you choose the NEX for its 16mm alone though, be aware the Olympus lens roadmap states a wide prime between 20 and 30mm equivalent (not to mention new fisheye and macro) will be available for Micro Four Thirds in Spring 2011 – and of course when mounted on an Olympus Micro Four Thirds body, they’ll become stabilised too.
But back to the E-mount and the 18-55mm kit zoom which we used for our test shots. As stated above, this delivers an equivalent range of 27-83mm and to illustrate the coverage in practice we took shots with it fully zoomed-in and out from a tripod at our standard outdoor test location. You can see the coverage below, and can check out the performance of the lens at different apertures in our results pages – it’s better than you’d think for a kit lens.
Sony SEL1855 18-55mm kit lens coverage when zoomed out and in | ||
 |  | |
| 18-55mm at 18mm (27mm equivalent) | 18-55mm at 55mm (83mm equivalent) | |
As explained above, the 18-55mm and 18-200mm E-mount zooms employ optical stabilisation, which is enabled or disabled using a menu option rather than a physical switch. To put its effectiveness to the test we took a series of photos with it zoomed-into an equivalent of 83mm, where traditional photographic advice would recommend a shutter speed of at least 1/83 to eliminate camera shake.
Our sequence started at 1/80 and reduced by one stop each time until 1/10. We performed this sequence twice, first without OSS enabled, and secondly with OSS enabled. Below are 100% crops taken from the non-OSS and OSS images at a shutter speed of 1/10.
Sony SEL1855 18-55mm kit lens OSS stabilisation at 55mm | ||
 |  | |
| 100% crop, 1/10, 18-55mm at 55mm (83mm equivalent), OSS off | 100% crop, 1/10, 18-55mm at 55mm (83mm equivalent), OSS on | |
As you can see, the version with OSS is much clearer than that without, and delivering a steady image at 1/10 corresponds to around three stops over conventional wisdom.
Sony Alpha NEX-3 / NEX-5 focusing, face and smile detection
 |  |
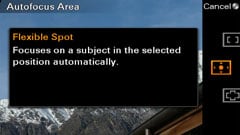 |  |
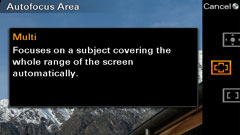
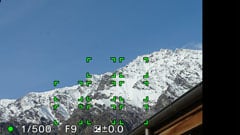
As mirror-less cameras, the Alpha NEX-3 and NEX-5 rely on contrast-based autofocusing, just like Micro Four Thirds and conventional compacts. The NEX-3 and NEX-5 offer three different AF modes: 25-area Multi, Centre and Flexible Spot; the latter allows you to position a small AF area almost anywhere on the frame, and considerately dedicates the lower soft key to readjustments if required.
In addition you can choose between Single Shot AF (AF-S) and Continuous AF (AF-C) modes. You can also opt for DMF which lets you make manual adjustments after autofocusing, or complete Manual focus control. All focusing options are in the Camera menu, although Setup offers an additional MF Assist option which enlarges the view by seven or 14 times when manually focusing for easier confirmation.
In use with the 18-55mm kit lens, the autofocus system felt fairly snappy – not lightning fast, but certainly able to lock onto most subjects in less than a second. Side-by-side with the Olympus E-P2 (running its latest firmware), both cameras felt similar in AF speed. Where the Sony NEX system really scores though – at least with the kit lens anyway – is the AF noise. The Micro Four Thirds models were already fairly quiet, but the NEX kit lens operates in virtual silence; it’s certainly in considerable contrast to typical DSLR kit lenses which can audibly grind away while autofocusing. The NEX cameras also support continuous AF while filming video, and we’ll discuss that more in our Movie Mode page.
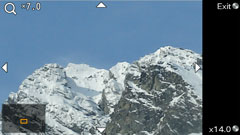 | 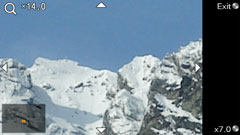 |
Like Micro Four Thirds, manual focusing is motor-assisted. This can feel a little detached if you’re used to a mechanical system, but becomes familiar over time. The magnified focusing assistance views coupled with the high resolution screen makes it easy to manually focus very precisely.
The NEX cameras also feature face detection, and like Sony’s latest Cyber-shots you can actually choose whether to prioritise Adult or Child faces, and amazingly it works too. If face detection is enabled, but no faces are detected, the camera reverts to the 25-area Multi-AF mode.
In use the face detection on the NEX cameras proved less reliable than the company’s compacts though. There were many occasions when it failed to lock onto either adult or infant faces, instead reverting to the 25-area AF system. We believe this may be down to the face detection operating more confidently with subjects that are already in fairly sharp focus, and that the comparatively shallow depth of field of the NEX compared to a compact was tripping it up. Either way when using traditional compacts alongside the NEX, the latter definitely felt less confident and consistent at face detection which might be an issue for some point-and-shoot upgraders.
The NEX also features Sony’s Smile Shutter technology, enabled in the Camera menu. This actually measures the size of your subject’s smile, indicating their apparent cheeriness on a scale on the left. It’s surprisingly effective at doing it too, and fun to watch as the bar rises and falls as their expression changes. Then when the user-selectable trigger point is reached, the camera automatically takes a photo. There’s three trigger options, with the mildest firing the shot with little more than a demure raise of the lips, while the strongest requires full-on toothy grins. So long as the face detection system has already locked-onto the subject, the Smile Shutter works very effectively.
Sony Alpha NEX-3 / NEX-5 shooting modes
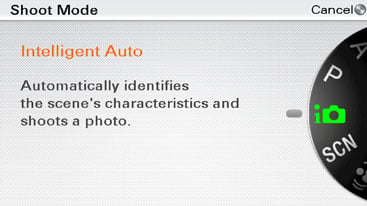
Sony may primarily target the NEX-3 and NEX-5 at beginners, but both cameras offer a wealth of shooting modes to choose from. In the absence of a physical dial, the most common modes (according to Sony) are selected on-screen from the Shoot Mode menu. The options are: Intelligent Auto, SCN, Anti Motion Blur, Sweep Panorama, 3D Sweep Panorama (on version 2 firmware onwards), Manual, Shutter Priority, Aperture Priority and Program.
The Shoot Menu is the first option in the main menu system, which you can access most times by pressing the upper soft key. Alternatively with the NEX set to anything other than Intelligent Auto, you can directly adjust the shooting mode by pressing the button in the centre of the control wheel and turning it to the desired setting.
 | 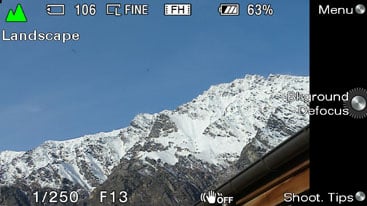 | |
| Choosing Intelligent Auto from the virtual mode dial | Intelligent Auto recognising a landscape view |
Intelligent Auto mode employs scene detection which attempts to figure out what you’re photographing and adjust the settings accordingly. Depending on the subject, the camera can automatically switch between Night View, Tripod Night View, Night Portrait, Backlight, Backlight Portrait, Portrait, Landscape and Macro. If none are recognised the camera defaults to a standard automatic mode.
Like its latest Cyber-shot compacts, the NEX’s Intelligent Auto mode works very well in practice. Point it at a distant subject under reasonable lighting and the NEX is likely to select the Landscape preset. Point it at a person or a very close subject and it’ll switch to Portrait or Macro respectively. Take a shot under dim conditions and Night View will be activated, and cleverly if the camera doesn’t detect any wobbling, it’ll assume you’ve got it mounted somewhere steady and choose Tripod Night View. As mentioned earlier, the optional Shooting Tips are dynamically related to the current scene mode, so if the NEX thinks you’re shooting close-ups and selects its macro mode, then the tips also become focused to taking close-ups – clever stuff.
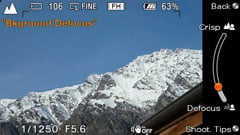 | |
Intelligent Auto also presents a beginner-friendly means by which to adjust the depth-of-field, using a ‘Bkground Defocus’ scale on the right side of the screen; simply turn the control wheel to choose between Defocus at one end of the scale and Crisp at the other. As you turn the wheel towards Crisp, the aperture closes, increasing the depth-of-field and vice versa. It’s a nice idea and works fairly well, although anyone unfamiliar with the other impacts of selecting small aperture settings – such as f-numbers in double figures – should beware as they can produce a softer image due to diffraction, not to mention run the risk of camera shake due to subsequently longer exposures.
 | 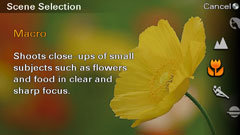 |
If you like the automatic life, but prefer to point the camera in the right direction, the SCN position offers eight presets including Portrait, Landscape, Macro, Sports / Action, Sunset, Night Portrait, Night View and Handheld Twilight; each is accompanied by a page which describes the mode with a sample image of how it might be used. The most interesting of the Scene presets is Handheld Twilight mode, which really ought to have its own position on the virtual dial alongside Anti Motion Blur. Both of these modes share an innovative approach to the problems of shooting in low light so we’ll describe them together.
Sony Alpha NEX-3 / NEX-5 Handheld Twilight and Anti Motion Blur
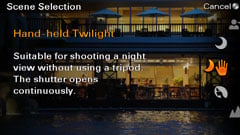 |  |
First seen on Sony’s top-end Cyber-shots like the HX5 and TX7, the Handheld Twilight (HHT) and Anti Motion Blur (AMB) modes both fire-off six frames in less than a second before combining them into a single image. HHT is designed for static subjects in low light and combines its frames to reduce visible noise. AMB is designed to combat blur due to movement in low light and combines its frames in an attempt to generate a sharp result. The sound of the shutter firing six times in quick succession before resetting itself is far from discreet and guarantees some head turning from anyone within ear-shot, but the results can be excellent.
We believe the HHT and AMB modes are so important we’ve dedicated detailed results pages to each. Along with comparing them side-by-side with the normal NEX modes, we’ve included several comparisons with rival cameras, where the low light advantage of the NEX cameras becomes clear.
Indeed the HHT and AMB modes are so effective, our only complaint is they’re not implemented as standard in the Intelligent Auto mode. Sure, you’d need to warn the photographer the shutter will noisily fire multiple times (and allow them to choose a normal mode for discretion if preferred), but at anything above 400 ISO, the HHT mode really makes a difference to noise levels, while the AMB mode is ideal for subjects in slight motion under low light without a flash. Both modes are key advantages of the Sony NEX cameras over the competition. See our Sony NEX Handheld Twilight results and Sony NEX Anti Motion Blur results.
Sony Alpha NEX-3 / NEX-5 Sweep Panorama
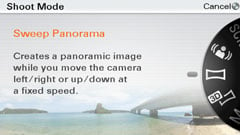 |  |
Next up on the virtual mode dial comes Sony’s Sweep Panorama, again first seen on selected Cyber-shot compacts. This again exploits the quick continuous shooting capabilities to fire-off a burst as you pan the camera across a scene. The camera then automatically stitches the frames into a single panoramic photo within mere seconds.
As before you can choose the panning direction from left to right, right to left, or vertically from down to up or up to down. You can also select between standard or extra wide image sizes, although this time, the resolution is slightly higher than the Cyber-shots. Instead of a 1080 pixel height for horizontal panoramas, the NEX cameras shoot at 1856 pixels tall by 8192 or 12416 pixels wide, depending on the size selected; the wider of the two represents a 201 degree sweep with the kit zoom at 18mm. Vertical panoramas measure now 2160 pixels wide by either 3872 or 5536 pixels tall, again depending on the size selected. The vertical panorama mode can also be used for a horizontal sweep with the camera turned to the portrait orientation if preferred.
Sony Alpha NEX-5 Sweep Panorama samples |

 |
| Both images taken with 18-55mm at 18mm (27mm equivalent) |
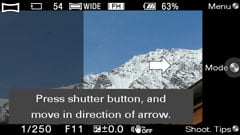
In use the Sweep Panorama is certainly impressive. As you shoot, a frame on the screen guides you through the pan and asks you to repeat if you’re moving too fast. If you stop moving before the maximum image width, the camera simply records a grey area you can crop-out later. At first glance the results look great, although like most panoramic stitching there can be errors depending on the subject, distance and focal length. If the subject moves during the pan, such as a boat bobbing or tree swaying, there’ll almost certainly be some ghosting, while anything at close range may suffer from parallax effects. But zoom-out, keep your distance and the results can look wonderful.
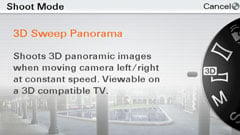
Sony Alpha NEX-3 / NEX-5 3D Panorama
 |
|---|
 |
 |
 |
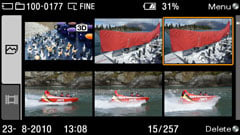
Update the NEX cameras to firmware version 2 and they’ll additionally offer a 3D Sweep Panorama mode. This exploits the panning motion to generate depth information which can be interpreted by a compatible 3D TV over HDMI to deliver a 3D image. You also get a 16:9 image option along with the standard and wide sizes, although this time the maximum height of all three is 1080 pixels. In 3D Panorama mode, the NEX cameras record two files: a standard 2D JPEG which can be viewed and used as normal, and an accompanying MPO file which contains the depth information; the MPO files typically measure between 1 and 3MB each.
It sounds like an amazing feature, especially considering there’s only one lens, but the conditions are stricter than the normal Sweep Panorama mode. First it’s only available for horizontal pans. Secondly you’ll need to get the panning speed just right or the NEX will abort and ask you to try again.
To put the 3D capabilities to the test we updated our NEX-5 to firmware version 2 and photographed a variety of scenes with depth in mind. We then connected the NEX-5 to two different 3D TV sets using an HDMI cable: the Samsung UA55C7000, a 55in LED set, and the Panasonic TH-P50VT20, a 50in Plasma set. Many thanks to the Noel Leeming store in Remarkables Park, Queenstown for letting us try out both sets.
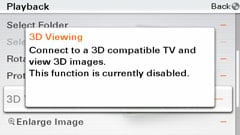
By default, the NEX cameras output their 3D images in 2D, allowing you to view them as normal. To view them in 3D, you’ll need to enable ‘3D Viewing’ in the Playback menu, which is only available when connected to a compatible 3D TV over HDMI. Once connected and enabled, the NEX cameras display an additional menu which lets you push a button to confirm 3D playback, after which you’re in business.
We were initially sceptical about how well it would work, but were impressed to see clear depth effects from the 3D Panorama images during playback on both sets (using their respective 3D goggles). As with 2D playback, wide or standard panoramas could be viewed in their entirety, or enlarged to fill the screen and scrolled smoothly. Images shot in the 16:9 3D Panorama mode simply filled the screen and remained still.
In our test shots, the 3D effect always appeared behind the screen, not in front of it. The effect was also variable depending on the subject matter. Unsurprisingly our shots which included mostly distant landscapes had the least impact. Those which included very close subjects may have revealed the greatest depth effect, but often suffered from stitching errors. The most effective 3D Panoramas were those with subjects no closer than about one meter, but which also included a distant background. Sony recommends keeping subjects no closer than 3m.
We’ve pictured examples two below – albeit presented in 2D from the JPEG files: the first was our most effective 3D capture, while the second proved problematic due to very close subjects and stitching errors – although to be fair, the subjects were much closer than Sony recommends for this mode.
Sony Alpha NEX-5 3D Panorama samples (using the 2D JPEG file) |

 |
| Both images taken with 18-55mm at 18mm (27mm equivalent) |
Since the 3D mode creates a normal 2D JPEG image in addition to its dedicated MPO depth file, you might wonder why you wouldn’t shoot all your panoramas in 3D mode for ‘future-proofing’. Well you could, but the 3D mode shoots at a lower resolution than the normal Sweep Panorama and is limited to the horizontal direction, not to mention demanding a stricter panning motion. But if you’re happy with a 1080 pixel height and carefully shooting all your panoramas horizontally, then you may as well opt for the 3D mode and enjoy their extra depth when connected to a 3D set.
Ultimately while the 3D effect is nowhere near as good as that of a decent 3D animated movie, it remains a fun and impressive capability, given there’s only one lens on the camera. When the subject matter is right, the effect can look good, and adds yet another unique string to the NEX bow.
Sony Alpha NEX-3 / NEX-5 PASM modes and bracketing
 |  |
Following the innovative automatic, stacking and stitching modes, the traditional Program, Aperture Priority, Shutter Priority and Manual modes may lack glamour, but they do let you take control over the NEX exposures. The NEX-3 and NEX-5 offer shutter speeds of 1/4000 to 30 seconds in 1/3EV steps and a Bulb option in Manual for longer exposures. Bulb is more practical on the NEX-5 as the camera supports the optional RMT-DSLR1 IR remote control to trigger the shutter, whereas the NEX-3 forces you to press the shutter release button; we’re confirming with Sony on the maximum length of Bulb exposures and whether you’ll need to keep your finger on the remote for the duration. The maximum flash sync speed is 1/160.
Adjusting the aperture and shutter speed in their respective Priority modes is as simple as turning the control wheel, although we were a little disappointed not to find Shift in Program mode. Exposure compensation is available in a +/-2EV range with 1/3EV increments; note compensation is not available in Intelligent Auto.
Bracketing is available from the Drive menu with three frames taken in the choice of either 1/3 or 2/3EV increments. This may seem a little restrictive until you discover the NEX’s built-in High Dynamic Range (HDR) option. The HDR mode, available from the DRO / Auto HDR section in the Brightness / Colour menu, fires-off three frames at a choice of exposure increments, then automatically combines them into a single image with increased dynamic range – great for protecting detail in highlights and shadows, and like the camera’s other cunning modes can be used handheld.
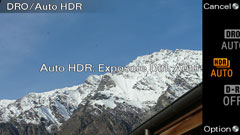 | 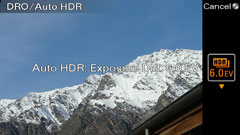 |
By default, the NEX chooses the exposure increment for you in Auto HDR mode, but pressing the lower soft key allows you to manually select exposure increments of 1 to 6EV in single EV steps; that’s a huge range and while HDR aficionados may have preferred an additional option to shoot more than three frames (or have broader bracketing options for HDR assembly on their computers), it remains a very powerful feature to find in-camera. It’s also worth noting Sony’s Alpha A550 only combined two exposures up to 3EV apart in its HDR mode, so having three here with a 6EV range is a significant step-up.
To put the Auto HDR mode to the test we photographed our standard low light scene with DRO disabled, then with HDR Auto enabled; we let the NEX decide on the exposure increment. The results, along with their respective histograms are shown below.
| ||||||||||||||||


You don’t need to analyse the histograms to see the impact of Auto HDR on this particular composition: dark shadow areas have been lifted and saturated highlights brought down to deliver an image with a much higher tonal dynamic range than before. It’s also clear from the histograms how mid tones have been boosted and shadow areas softened. Whether you like the result or not is personal, although with the chance to manually intervene and choose your own exposure increments, the NEX cameras deliver the most powerful in-camera HDR feature we’ve tested to date. Note when testing the Cyber-shot HX5 we needed to meter for highlight areas to get the most from its HDR mode, but that wasn’t as necessary when shooting with the NEX cameras. You really can point and shoot in this mode and enjoy excellent results.
Once again our biggest complaint about the HDR mode on the NEX cameras is that it’s hidden away in a Brightness / Colour sub-menu. We’d argue that HDR, along with the Handheld Twilight modes deserve top-billing alongside Anti Motion Blur and Sweep Panorama on the main mode dial. These are not novelty modes: they’re truly useful tools which give the NEX cameras a key advantage over the competition. It’s certainly interesting to see how Sony’s designed the NEX cameras as its own Cyber-shot HX5 compact not only sported a physical mode dial, but one which proudly featured its HDR and Handheld Twilight modes alongside Anti Motion Blur and Sweep Panorama. Is Sony really trying to tell us the NEX cameras are aimed at a lower-end customer than the HX5?
Sony Alpha NEX-3 / NEX-5 sensor
|
|
The Alpha NEX-3 and NEX-5 are equipped with a brand new 14.2 Megapixel CMOS sensor, measuring 23.4×15.6mm and delivering 3:2 aspect ratio images with a maximum resolution of 4592×3056 pixels. This is exactly the same size as the APS-C sensors employed by the vast majority of cropped-frame DSLRs and a major advantage the NEX system has over arch rival Micro Four Thirds. Considering Micro Four Thirds (and full-size Four Thirds) employ sensors measuring 17.3x13mm, the NEX sensors boast a surface area that’s over 50% larger.
|
Like Micro Four Thirds cameras, the NEX sensor is visible when you remove the lens. When taking a shot, the shutter curtain actually has to close first before opening and closing to make the exposure, before finally opening again to the default position. It may alarm some to find the sensor exposed and vulnerable without a lens attached, but like Micro Four Thirds, the low pass filter protects the surface and is considerably tougher than a delicate shutter curtain. Understandably there’s some concern over dust settling on the sensor, but we only noticed the tell-tale marks on a handful of images taken at small apertures, and a quick blast from a Giotto’s Rocket blower sent them all packing.
 |
|---|
|
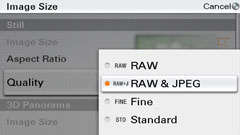 |
The NEX-3 and NEX-5 offer two lower resolutions at 7.4 and 3.5 Megapixels respectively, along with a cropped 16:9 mode with three resolutions at 12, 6.3 and 2.9 Megapixels. Images can be saved with Standard or Fine JPEG compression, or recorded as a RAW file either by itself or accompanied with a JPEG.
Best quality Large Fine JPEGs typically measure between 4 and 6MB each, while RAW files typically measure just shy of 15MB each. As discussed above, you’ll need to enter the Image Size menu to adjust the settings, and remember if RAW or RAW plus JPEG are selected, the HDR mode will be unavailable.
Like the Alpha A550, the sensitivity runs between 200 and 12,800 ISO in 1EV increments, with High ISO noise reduction applied with the choice of Auto or Weak levels (there’s no Off option). Long exposure noise reduction is enabled by default, applying to exposures of one second or longer, although this can be disabled if preferred. There’s no expansion to the ISO range, so 200 is both the base and lowest setting, while the top value of 12,800 ISO is as far as the camera will go. This highest ISO is double that of the Olympus E-P1 / E-P2 and four times the maximum sensitivity of the Panasonic Lumix GF1; you can see how the NEX performs across its sensitivity range in our High ISO Noise results.
We believe the Auto ISO setting (used by Intelligent Auto and available as an option in the PASM modes) uses a range between 200 and 1600 ISO, although can confirm both the Handheld Twilight and Anti Motion Blur modes can access sensitivities up to 6400 ISO. While manual control over sensitivity can only be made in 1EV steps, the Auto modes have access to smaller increments – indeed in our tests the HHT and AMB modes regularly selected in-between values which prevented direct comparisons with the normal settings in our results pages.
Like most Sony cameras, the NEX-3 and NEX-5 apply contrast, saturation and sharpness using a series of Creative Styles. The NEX cameras offer a choice of Standard, Vivid, Portrait, Landscape, Sunset and Black and White, with all but the latter offering optional tweaking of contrast, saturation and sharpness in +/-3 steps; the Black and White Creative Style of course loses the saturation control, although sadly doesn’t replace it with a choice of colour filters.
We used the Standard Creative Style for our tests and found it delivered pleasingly natural-looking images which were neither over-cooked nor lacking in vibrancy.
Alongside Auto White Balance are Daylight, Shade, Cloudy, Incandescent, Fluorescent and Flash presets, each of which can be tweaked in value. The NEX cameras additionally offer a Custom White Balance option and direct entry of colour temperature in a range of 2500 to 9900K with 19-step Magenta and Green compensation.
Like other Alphas, the NEX cameras are equipped with Sony’s D-Range Optimiser (DRO) feature which can adjust the tonal range as you record the image; you can access this through the Brightness / Colour menu. DRO can be set to Auto (the default) or manually from a scale of one to five. We used the default Auto setting for our gallery shots, but disabled it for our High ISO results as it can artificially increase noise levels.
| ||||||||||||||||


To put DRO to the test we photographed our standard low-light High ISO scene with DRO disabled then set to Auto. You can see the full images above, with their respective brightness histograms below. In this particular example, the effect is subtle, and you may need to consult the histograms to see the Auto DRO option has a slight boost in mid-tones.
DRO does a fair job at adjusting the contrast in tricky scenes, but much of the glory is snatched by the HDR option available from the same menu; we’ve covered that in detail in the shooting modes section above.
Sony Alpha NEX-3 / NEX-5 drive modes
|

 |
|---|
 |
Following a very welcome trend with a number of Sony cameras, the NEX-3 and NEX-5 offer above average continuous shooting abilities. Each camera offers two continuous shooting modes: one which fires at 2.6fps and a ‘Speed Priority’ option which locks the focus and exposure on the first frame, but accelerates the rate to an impressive 7fps. It’s this speed which allows the NEX cameras to support Sony’s innovative stacking and stitching modes.
With the NEX equipped with a 2GB Memory Stick PRO Duo card, the shutter speed set to 1/500, the sensitivity at 200 ISO and DRO on Auto, we fired-off 50 Large Fine JPEG frames in a fraction under 21 seconds, corresponding to a rate of 2.4fps. Switching to RAW allowed us to fire-off seven frames in just under three seconds before the camera paused briefly for breath; again this corresponded to around 2.4fps.
Moving onto Speed Priority mode we fired-off 20 Large Fine JPEGs in 3.2 seconds before the camera began to vary its rate – albeit remaining fairly quick. This initial burst corresponded to a rate of 6.25fps. Switching to RAW again allowed the same seven frames to be captured as before, but at the faster rate. So slightly slower than the quoted specification, but still pretty swift.
In the normal continuous shooting mode, the NEX cameras deliver roughly the same speed as the Olympus E-P1 / E-P2 and Panasonic Lumix GF1, but where Sony scores over its rivals is the Speed priority mode. With the exposure and focus locked from the first frame, it needs to be used with care, but under the right conditions it again gives the NEX cameras a key advantage.
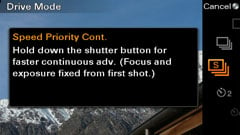
Sony Alpha NEX Speed Priority Continuous shooting | ||||||||
 |
 |
 |
 |
 | ||||
 |
 |
 |
 |
 | ||||
To put this to the test we headed to the World-famous Shotover Jet in Queenstown where the boats travel at up to 85kph and perform 360 degree spins. We had to be careful when to start our sequence so not to get caught out by changes in distance or brightness, not to mention avoiding the point where the buffer briefly stalled after around 20 shots. Like most Live View cameras, there’s no live update to the subject’s position once you start shooting, although the recorded images flash-up sufficiently quickly to give the impression of live feedback, allowing you to track even fast subjects effectively. Once mastered the Speed Priority mode captured impressed results. You can see a sequence of ten images above and have 100% crops from another in our Sample Images Gallery.
The Drive menu also offers the choice of 10 and 2 second self-timers, along with a Continuous self-timer option which captures three or five images after a ten second countdown. The latter is handy for maximising your chance of a successful self-timed shot, but it’s a shame not to find the face-timers of recent Cyber-shots which actually wait until someone’s recognised in the frame before starting the countdown, thereby saving undignified dashes back to the camera.
Now let’s check out the Alpha NEX movie modes.
Sony Alpha NEX-3 / NEX-5 Movie Mode
Click here to find out about the Sony Alpha NEX-3 / NEX-5’s Lens, AF, sensor and drive modes
The Sony Alpha NEX-3 and NEX-5 both offer a selection of movie modes. Each camera will film in High Definition, although the cheaper NEX-3 is limited to 720p, whereas the pricier NEX-5 boasts 1080i; this is one of the few differences between the two models.
You can start recording at any time by simply pressing the dedicated Movie button on the back of each camera; regardless of quality selected, the maximum recording time is around 29 minutes per clip. You should successfully record video using any Memory Stick PRO Duo card, although if you’re using SD memory, you’ll need a card rated as Class 4 or quicker; we successfully used the best quality 1080i AVCHD mode on the NEX-5 with a SanDisk Ultra II Class 4 SD card.
In stark contrast to the movie modes on current DSLRs, both NEX cameras will autofocus while recording and the E-mount lenses are designed to do so very quietly. Sadly the exposures are fully automatic though, so there’s no opportunity to adjust the aperture and control the depth of field. You can however apply exposure compensation and choose to manually focus if desired, and as you’ll see below, you can achieve a shallow depth-of-field with selective focusing under certain conditions. Both cameras also sport stereo microphones and the option to mount a proprietary external microphone, although there’s no standard microphone jack.
 |
The more affordable NEX-3 offers the choice of filming at 640×480 pixels at 3Mbit/s or 1280×720 at either 6 or 9Mbit/s. All three video options on the NEX-3 are encoded using MPEG-4 in a progressive format at 30 or 25fps depending on your region with AAC audio and wrapped-into an MP4 file.
The pricier NEX-5 offers the choice of encoding formats. When set to MP4, you can choose between 640×480 pixels, again at 3Mbit/s, or 1440×1080 at 12Mbit/s; the latter is stretched to a 16:9 frame during playback, just like the HDV camcorder format. Like the NEX-3, they’re encoded using MPEG-4 in a progressive format at 30 or 25fps depending on your region with AAC audio and wrapped-into an MP4 file.
The NEX-5 additionally offers Full HD recording at 1920×1080 pixels at 17Mbit/s in the AVCHD format. We believe the sensor outputs 30 / 25 progressive, but the NEX-5 generates an interlaced version of its Full HD video at 60i / 50i depending on your region. This AVCHD-encoded video is accompanied by Dolby Digital audio wrapped-into an MTS file; our sample came from a PAL region, so our clips were filmed at 50i.
Given the choice between shooting in MP4 or AVCHD on the NEX-5, Sony recommends the former for editing and playback on your computer and the latter for playback on HDTVs or authoring onto Blu Ray discs. Of course given the right software, you can author MP4s onto Blu Ray and edit AVCHD if desired; we successfully edited AVCHD files from the NEX-5 using Adobe Premiere Pro CS4.
A 2GB card should get you approximately 27 minutes of 720p video on the NEX-3. The same card in a NEX-5 should get you around 20 minutes at the 1440×1080 MP4 setting or 14 minutes in the Full HD AVCHD setting. Once again, the maximum length of a single clip in any mode is around 29 minutes.
In the absence of manual exposure controls, the movie mode on the NEX camera is certainly easy to use. Just point and press the big red record button the back. If you were previously shooting stills in the best-quality 3:2 format without guidelines enabled, you’ll have to wait until recording commences before seeing exactly what you’re going to capture in any of the video modes. Enable the grid option though and you’ll notice four faint crosshairs near the corners of the image, indicating the coverage of the 16:9 frame should you start shooting video in that mode. The position of the crosshairs just in from the corners of the still image frame indicates a slight reduction in the field of view when recording video. If Wide Image is set to Full Screen in the Setup menu, the HD video frame will fill the screen when recording.
Unlike many cameras which degrade their output over HDMI once recording starts, the NEX-5 impressively outputs a Full HD image while recording. The screens below – like all those in this review – were captured over HDMI, and examining the image at 100% revealed very fine detail. This means you could potentially use the NEX cameras with an external HD monitor for framing, although annoyingly there’s no display view that’s completely clean; once you start recording, you’ll see the image below right as a bare minimum.
 |  | |
| Recording video in the default view. Note 3:2 guides | Recording video with Full Screen enabled. Note 3:2 guides |
We tested the video capabilities of the Alpha NEX-5 and 18-55mm kit lens, using its best quality AVCHD ‘FH’ setting. Registered members of Vimeo can download the original files by clicking the links below each window; these take you to the Vimeo page where the video is hosted and the link to download the actual file can be found under the ‘About this video’ section in the lower right. We used VLC Player to watch the MTS clips under Windows.
| |
|---|---|
|
Our first video clip above shows how the NEX performs when handheld like a typical camcorder. The initial gentle panning looks fine, but there’s definitely more visible shake than you’d expect from a camcorder. Towards the end of the clip we zoomed the kit lens all the way in and back out again, and like most DSLR video modes, the results ain’t pretty. Again like all cameras with manual zooms, it’s impossible to make adjustments to the focal length when handheld without twisting the entire camera. The resulting wobbles reveal the infamous jello effect with a number of undesirable artefacts. If you like zooming the lens while filming, there’s still no substitute for the motorised zoom of a camcorder.
On the plus side, the CMOS sensor ensured there was no vertical streaking on the sunlight reflected in the rippling water. Windiness aside, the audio quality from the built-in mics was pretty good and there was no audible evidence of the lens’s various mechanics in motion. The AF system wasn’t particularly challenged during this clip, but there were no issues to report.
| |
|---|---|
|
For our second clip we mounted the NEX-5 on a tripod and smoothly panned it from left to right, while avoiding any zooms. With all shakes, wobbles and twists eliminated, the results understandably look much better.
Mild wind has however had an impact on the audio track, and you’ll also notice on all the clips how even slight brushing on the camera’s body is recorded clearly. The external microphone promises much better results.
| |
|---|---|
|
In our third video clip we moved indoors for a low-light test, with a handheld pan. Annoyingly the NEX cameras don’t relinquish any control over the sensitivity when recording movies, so not only can you not control the exposure, you can’t fix the ISO either. Instead the camera adjusts its own gain for video, resulting in noisier clips than you might have hoped for. That said, the clip is still much cleaner than those recorded using cameras with smaller sensors. It’s just a shame you can’t get your hands dirty with the NEX video modes and fix the exposure settings as desired. In that respect, it falls below what’s possible with many DSLRs, although in its favour, the NEX can adjust its focus quickly and quietly while filming.
| |
|---|---|
|
Sony correctly states in its NEX marketing that a camera with a large sensor (and correspondingly longer focal length lenses) allows much shallower depth-of-field effects than a typical compact. But frustratingly for videophiles, the NEX-3 and NEX-5 use automatic exposures for their video modes, with no manual control over the aperture. This would suggest there’s no control over the depth-of-field, but under the right conditions you can still pull focus from one subject to another.
|

In our fourth clip we zoomed the kit lens to 55mm and positioned it close to a coffee cup in a moderately lit cafe – apologies for the knocking noises in the background. The relatively low light forced the NEX to open its aperture, which coupled with the long focal length and close subject distance has delivered a shallow depth-of-field. Prior to filming we set the NEX-5 to manual focus and focused on the edge of the cup, then with the video recording we adjusted the manual focusing ring to focus back to glasses a few inches behind, then back again.
Even with a high resolution screen it was hard to confirm exactly when the glasses in the distance were in sharp focus, while the absence of distance markings on the lens along with motor-assisted manual focusing made it tough to mark preset points. But as you can see from the clip, it was still possible to pull focus from one subject to another with a shallow depth-of-field effect. The NEX-3 and NEX-5 may not be the ideal tools for this effect with their current control systems, but it’s still an improvement over what’s possible with typical camcorders.
In other clips we filmed people with lots of camera motion and found the NEX did a fair job of refocusing. It sometimes disagreed with us on what should be the primary subject, often snapping onto other people or objects, but it’s still much better than the complete absence of autofocusing in most DSLR movie modes.
Ultimately we still found dedicated camcorders preferable for handheld filming. Their stabilisation and AF systems proved more effective than the NEX in our tests, and motorised zooms remain the only way to smoothly adjust the focal length while filming. The major advantage of the NEX – its big sensor with potentially superior low light capabilities and shallow depth-of-field effects – is also hobbled in the almost 100% automatic movie mode. If you can’t manually adjust the ISO or aperture, you’re limited in what you can achieve. Don’t get us wrong, the low light performance can be good, but equally the automatic gain can hike-up the sensitivity more than you’d like. We wouldn’t expect the degree of control to change with a firmware update either, given it would encroach on the video-oriented NEX-VG10.
But as movie modes on still cameras go, especially still cameras with big sensors, the NEX does a very good job. The AF may not be perfect, but at least it can autofocus while filming and the kit lenses do so very quietly. The audio from the built-in mics isn’t bad and there’s the option to upgrade with an external unit, albeit a proprietary one. The video quality looks pretty good, so long as you don’t incur the jello monster’s wrath by twisting or wobbling too much, and the handling of the small body with the tilting screen works well. While we were unable to try it in person, you may also be able to enjoy manual control over the aperture by fitting an older lens via an adapter, just like the early days with the Canon EOS 5D Mark II before its firmware update brought manual exposure control.
Update: Sony has promised a firmware update in mid-October 2010 which adds the ability to adjust the aperture on movies. We hope to retest the NEX cameras with this update in the future.
Now let’s return to the photo quality with our Sony NEX real-life resolution results.


