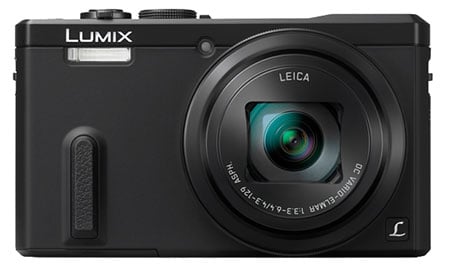
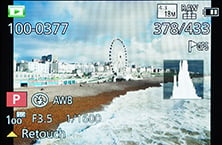
 The Lumix TZ60 / ZS40 is Panasonic's flagship pocket super-zoom camera. Replacing the best-selling TZ40 / ZS30, the new TZ60 / ZS40 sports a 30x range equivalent to 24-720mm, and becomes the first pocket super-zoom with a built-in electronic viewfinder and support for RAW files. The TZ60 / ZS40 also packs 18 Megapixel resolution, 1080p video, built-in Wifi with NFC, and GPS with a database of landmarks.
Panasonic Lumix TZ60 / ZS40 review
-
-
Written by Gordon Laing
Intro
The Panasonic Lumix TZ60, or ZS40 as it’s known in North America, is the latest version of the company’s hugely popular travel zoom camera. Announced in January 2014, it once again comes exactly one year after its predecessor, the best-selling TZ40 / ZS30, and like that model the TZ60 / ZS40 was the first of the 2014 pocket super-zooms, laying down the specification to compete with.
The most important specification of any super-zoom camera is its range and after two generations employing the same 20x / 24-480mm equivalent lens, it’s not surprising to find this is the first specification to receive an upgrade on the TZ60 / ZS40. So the new model now sports a 30x range equivalent to 24-720mm, allowing it to zoom 50% closer than its predecessor and crucially compete with Sony’s HX50V which in 2013 out-gunned its rivals; note the HX50V’s successor, the HX60V sticks with the same 30x range, and Canon has also now adopted it for its latest SX700 HS. The TZ60 / ZS40’s resolution has mercifully stuck at 18 Megapixels with a 1/2.3in sensor, and there’s still 1080p video, built-in Wifi with NFC, and GPS with GLONASS support.
There is however one other headline feature beyond the extended zoom range and that’s a built-in electronic viewfinder. It’s the same tiny 0.2in / 200k dot panel as the earlier Lumix LF1, squeezed into a corner (albeit with improved lenses), but it does give the flagship TZ / ZS a key feature that’s absent from the competition – an important difference from its 30x zoom rivals, the Sony HX60V and Canon PowerShot SX700 HS. The TZ60 / ZS40 is also more sophisticated than its predecessor with a customizable control ring around the lens, focus peaking and support for RAW. Find out how it all comes together, and how it compares to the Sony and Canon in my Lumix TZ60 / ZS40 review!
Panasonic Lumix TZ60 / ZS40 design
The Lumix TZ60 / ZS40 is easily identifiable as a Panasonic compact but noticeably larger than its predecessor to accommodate the longer zoom range and electronic viewfinder. The TZ60 / ZS40 now measures 111x64x34.4mm and weighs 240g with battery, compared to the TZ40 / ZS30 at 108x59x27.7mm and 198g.
 |
In your hands the new model looks and feels larger, but to be fair we should now be comparing it against other 30x zooms. Sony’s Cyber-shot HX60V measures 108x64x38.3mm and 272g including battery, while Canon’s PowerShot SX700 HS measures 113x66x34.8mm and weighs 269g including battery. This makes all three 30x travel zoom rivals very similar in size and weight, although both the Panasonic and the Canon are thinner than the Sony.
Strangely despite boosting the zoom range by 50%, Panasonic’s designers chose to downgrade the grip to little more than a thin raised strip on the front surface. It’s actually the smallest grip of the three 30x pocket cameras on test here and to me, unsurprisingly the one I found hardest to hold steady. To be fair you can get reasonably purchase on from the front strip, leaving your thumb to push against a small ridge on the rear, but once you’re zoomed-into 720mm you really need all the help you can get. For me it’s definitely two-handed operation for the best results. That said, as the only one of its peer group to sport a built-in viewfinder, you can of course compose with the camera held to your eye where the third point of contact (your face) allows you to hold it steadier – I’d definitely recommend it when shooting at longer focal lengths.
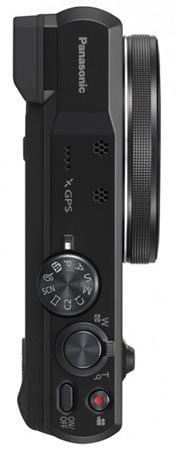
On the top surface the TZ60 / ZS40 has a small bulge to accommodate the viewfinder housing alongside stereo microphones, a raised but fairly stiff mode dial, generously sized shutter release with zoom collar, and two buttons, one lozenge shaped for power and the other a red record button to start filming video in any mode. Unlike the Sony HX60V and Canon SX700 HS which both have popup flashes, the Lumix TZ60 / ZS40 has its flash built-into the front surface making it available without an additional press. The Sony HX60V is the only one of the three to feature a hotshoe.
The TZ60 / ZS40 enjoys a significant upgrade in controls over its predecessor, sporting two customizable dials compared to none on the TZ40 / ZS30. Yep, unbelievable as it seems now, if you wanted to change, say, the aperture or shutter on the old version, you wouldn’t be turning any wheels – instead you’d need to first press the Exposure / Map button on the back of the camera before then using the cross keys to adjust the setting. Why did we ever put up with that?
In its place on the TZ60 / ZS40 are two new control dials, one around the lens barrel which turns smoothly, and one on the rear, a thumb-operated wheel which clicks when turned; this rear wheel also tilts in four directions to deliver the traditional cross-key navigation, more of which in a moment.
You can customize the functions of either control wheel, or have the camera assign them as it sees fit. You may want to customize them though as with the default settings, both wheels often perform exactly the same function, for example, both adjusting the aperture or shutter in their respective priority modes. This seems a bit daft when one should really adjust, say, the exposure compensation instead by default. You can easily reconfigure one to adjust exposure compensation, but then when you enter manual mode, that dial effectively becomes redundant, when what you’d really want to happen is the default option where one operates the shutter and the other adjusts the aperture as you’d expect. I couldn’t find a way to enjoy both scenarios without reconfiguring the dials back and forth.
This is a little frustrating and feels like a missed opportunity, although I’m not ruling out the possibility I’ve not figured out the magic combination of settings yet. But again let’s not be too churlish, as remember the TZ40 / ZS30 had no control dials at all. So a thankful nod to Panasonic none-the-less. A quick note on the rear wheel – it’s not as stiff to push down as the Sony wheels, but I still avoided pushing it down by mistake when turning it.
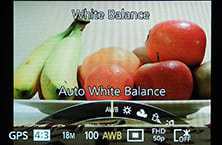
Like earlier Panasonic cameras, there’s also the on-screen Q-menu which offers quick access to a variety of settings. Rather than the drop-down menus of previous models though, the TZ60 / ZS40’s Q-menu now employs a row of settings along the bottom of the screen which popout their options onto a curved section of a circle – it’s a similar interface to that on the earlier LF1. You use the left and right cross keys to select the desired setting (in Program mode consisting of the GPS mode, aspect ratio, resolution, ISO, white balance, AF area, video quality and screen brightness), then use either dial to adjust it. Yep, once again both dials doing the same thing when one could have scrolled through the settings and the other make the actual adjustments.
 |  | 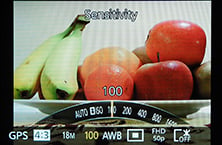 |
In addition, pushing up, down, left and right on the rocker dial gives you immediate access to exposure compensation, drive mode, AF mode and flash mode. There’s also a single customizable Function key to give quick access to another setting, such as image compression, metering, and various on-screen guides, although sadly not ISO. To change the sensitivity you either have to go through the Q.Menu, the main menu or assign the function to one of the two dials.
What you won’t be doing on the TZ60 / ZS40 though is touching the screen to make any adjustments. Panasonic has decided to dump the touchscreen of previous flagship models and instead go in-line with its non-touchy rivals, Canon and Sony. I think this is a shame as it was a key differentiator with those models and allowed you to quickly and easily set a focusing area by just tapping it. Alas not possible now on the TZ60 / ZS40, although to be fair equally not possible on the HX60V or SX700 HS either. I believe it was not implemented by Panasonic to keep the cost down.
The TZ60 / ZS40 is powered by a 1250mAh Lithium ion battery pack, the DMW-BCM13E, quoted as being good for 300 shots per charge, compared to 380 on the Sony HX60V and 250 on the Canon S700 HS. These figures may be under CIPA conditions, but none take into account any built-in GPS or Wifi activity, nor movie recording, so I’d take them with a pinch of salt. Certainly I found it easy to run the TZ60 / ZS40 down during a day of fairly active photography, so you should keep an eye on the battery life.
On the upside, the TZ60 / ZS40, like its predecessor and the Sony HX60V, recharges its battery in-camera over USB. I realize people are divided over in-camera USB charging versus mains charging in a separate unit, but I’m definitely a supporter of the former, especially for a point-and-shoot camera. This is not a higher-end DSLR or mirrorless camera where many people carry a spare and prefer to keep their camera operational while a battery is charging. On a point-and-shoot camera, most people only ever have one battery and simply want to top-it-up as easily as possible. With a mains charger you need to remember to take the unit with you on trips and find a mains outlet to plug it into. With in-camera USB charging, all you need is the cable then you can simply connect it to a laptop, a portable battery, an in-car adapter, or any USB mains adapter you probably already have with you for another device, such as a phone or tablet. I love being able to topup the charge while I’m driving between locations without needing any special kit, and have also recharged on buses, planes or other vehicles equipped with USB ports. I’m also a big fan of portable USB batteries which can top-up a USB-powered device like the TZ60 / ZS40 wherever you may be; I use an Anker Astro Mini battery which is also perfect for topping-up a phone or tablet that’s flagging. Ultimately I believe USB charging is definitely the preferred solution for a camera that’s designed for travel.
Staying on the subject of ports, the other wired connector on the TZ60 / ZS40 is micro HDMI. The camera additionally features built-in Wifi with NFC to aid negotiation on compatible devices, and also a GPS receiver which supports GLONASS. I’ll talk more about Wifi and GPS later in the review, but for now mention that the Sony HX60V has both Wifi and GPS built-in, but the Canon SX700 HS only has Wifi, instead relying on a separate handset to make a GPS log for subsequent syncing.
Panasonic Lumix TZ60 / ZS40 screen and viewfinder
The Lumix TZ60 / ZS40 is equipped with a 3in screen with 920k dot resolution and 3:2 shape. As noted earlier, it’s no longer touch-sensitive, a decision I believe made to hit a lower price point. Certainly the absence of a touch-screen hasn’t hurt sales of Sony’s or Canon’s pocket travel zoom cameras, so maybe Panasonic wonders why it should fit an expensive component when no-one else does. But that’s exactly the reason it should continue in my view. Not only is a touch-screen an invaluable aid for selecting AF areas or entering text, but it was a key differentiator for the flagship Lumix travel zoom. I know some people aren’t bothered about them, but I personally miss it on the TZ60 / ZS40.
 |
So in terms of screen composition, the TZ60 / ZS40 is very similar to its two main rivals, with the same size display and resolution. But there is a very important difference between them when it comes to an alternative means of composition. The Lumix TZ60 / ZS40 is the only one to squeeze in an electronic viewfinder, impressively without resulting in a body that’s noticeably bigger.
The viewfinder is housed in the top left corner of the body when viewed from the rear. There’s no automatic eye detection, so you need to manually switch between it and the screen using an LVF button to the side of it.
We’ve actually seen the viewfinder unit before on the Lumix LF1: it employs a 0.2in 200k dot panel with 0.46x magnification equivalent on a 35mm system, although Panasonic has improved the optics to reduce aberrations. What does all that mean? The image is pretty small and fairly coarse too, a world apart from the large and detailed viewfinders we’re seeing on the latest mirrorless system cameras, or even Sony’s RX100 III. It’s certainly not something you look through and exclaim ‘wow’, nor something you’d use regularly in preference to the screen. But small and coarse as it is, it remains a very useful addition, not only when shooting under direct sunlight which renders most screens unusable, but also to hold the camera steadier when shooting at very long focal lengths; holding a camera to your eye provides a third point of contact and greatly reduces potential shake.
In the absence of a touch-screen, it’s also the new key differentiator between the TZ60 / ZS40 and its rivals, and one that even I’d admit is preferable. Neither the HX60V nor SX700 HS have built-in viewfinders, and while the Sony can accommodate a considerably nicer one as an optional accessory using its hotshoe, it is a large and expensive option which I suspect most owners won’t bother with. The key benefit of the viewfinder on the TZ60 / ZS40 is it’s built-in, always with you, and doesn’t compromise the size of the camera compared to rivals. It’s small, basic, but very useful.
 |  |  |
A few notes on the display views. The TZ60 / ZS40 offers a variety of views with varying amounts of information and guides. There’s a dual-axis leveling gauge, and if enabled in the menus, a live histogram or choice of guidelines; although unlike its predecessor, no chance of dragging them around the screen with your finger.
 |  |  |
Annoyingly the TZ60 / ZS40 still won’t rotate portrait shaped images in playback to fill the screen when the camera is turned on its side either. This is a daft decision which continues to be replicated on Lumix cameras. Please Panasonic, follow everyone else and rotate your images to fill the screen during playback!
Panasonic Lumix TZ60 / ZS40 lens
The lens range is the most important specification on a super-zoom camera, and after two generations using the same 20x zoom, it’s no surprise to find Panasonic updating it for the TZ60 / ZS40. Besides the company had little choice as Sony’s HX50V raised the bar a year earlier by squeezing a 30x zoom into a body not much larger than the Lumix TZ40 / ZS30.
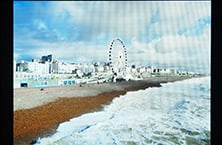
So the Lumix TZ60 / ZS40 now sports a new 30x zoom, equivalent to 24-720mm in 35mm terms, and allowing it to zoom 50% closer than its predecessor. This range matches the Sony HX50V and HX60V, and is essentially the same as the 25-750mm range delivered by the Canon SX700 HS. The focal ratios are similar too, with the Panasonic, Sony and Canon starting off at f3.3, f3.5 and f3.2 at the wide-end respectively, and ending at f6.4, f6.3 and f6.9 respectively at the long end. The closest focusing distances with the lenses set to wide are 3cm, 5cm and 1cm respectively, allowing all to capture good macro images, although giving the Canon the overall edge.
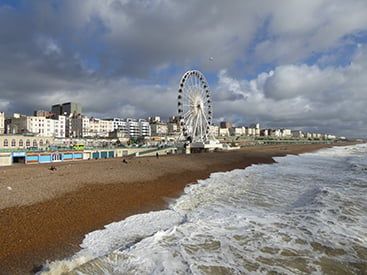
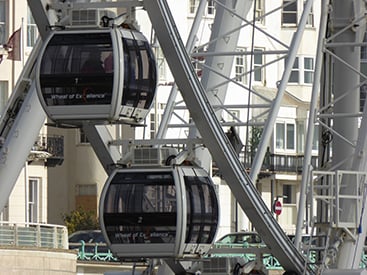
So what does a range of 24-720mm let you capture? Below are two photos taken from the same position with the TZ60 / ZS40 using each ends of the zoom, illustrating the range at your disposal – at one moment capturing a wide field before getting very close to distant details the next. It’s extremely flexible, and while you need to take care for camera shake at the long end, especially with the much reduced aperture, the stabilisation is excellent and again there’s the option to use the viewfinder for even greater stability.
Panasonic Lumix TZ60 / ZS40 coverage wide | Panasonic Lumix TZ60 / ZS40 coverage tele | |
 |  | |
| 4.3-129mm at 4.3mm (24mm equivalent) | 4.3-129mm at 129mm (720mm equivalent) | |
Maybe 720mm isn’t enough for you though, in which case the TZ60 / ZS40 offers Intelligent Zoom, which takes a crop and interpolates it up to the full resolution, thereby effectively doubling the maximum reach to 60x / 1440mm. Here’s a shot taken from the same position with the maximum zoom, first without iZOOM enabled, and secondly with it enabled.
Panasonic Lumix TZ60 / ZS40 Maximum zoom with IR disabled | Panasonic Lumix TZ60 / ZS40 Maximum zoom with IR and i.ZOOM enabled | |
 |  | |
| Uncropped image, 30x, 720mm equivalent | Uncropped image, 60x, 1440mm equivalent. | |
When viewed at the reduced size above, the latter certainly delivers a large boost to the effective magnification, but how does it look at 100%? To find out I took three sets of crops with and without iZOOM, and one also showing the difference the additional iRESOLUTION has compared to images without. As with previous models, Intelligent Resolution delivers a version with greater sharpening and contrast for a punchier result which you may or may not prefer, but Intelligent Zoom continues to produce images with fuzzy edges when viewed at 100%. You can’t beat an optical zoom, and thankfully the TZ60 / ZS40 has sufficient range and reach to keep most people happy without resorting to digital extensions.
TZ60 / ZS40 normal shooting | TZ60 / ZS40 with Intelligent Resolution (IR) | TZ60 / ZS40 with IR and max i.ZOOM | ||
 |  |  | ||
 |  |  | ||
 |  |  | ||
 |  |  | ||
100% crop, 4.3-129mm at 129mm, 100 ISO | 100% crop, 4.3-129mm at 129mm, 100 ISO | 100% crop, 4.3-129mm at 129mm, 100 ISO |
With a maximum optical focal length of 720mm on a body with little to grip, it’s very important to have effective image stabilisation. To put the OIS system to the test on the TZ60 / ZS40, I zoomed it into its maximum focal length and took a series of photos at progressively slower shutter speeds first without stabilisation, then with, to see what it was capable of ironing-out.
Panasonic Lumix TZ60 / ZS40 Image Stabilisation off / on | ||
 |  | |
100% crop, 4.3-129mm at 129mm, 1/100, 200 ISO, IS off | 100% crop, 4.3-129mm at 129mm, 1/100, 200 ISO, IS on | |
On the conditions of the day I required a shutter speed of 1/800 or 1/400 at a push to reliably handhold a shake-free image at 720mm, but with stabilisation enabled, I managed the same result at 1/100, or at a push 1/50, corresponding to about three stops of compensation in practice.
While three stops sounds fairly average for an image stabilisation system, it doesn’t illustrate how useful it is when composing with the TZ60 / ZS40 at maximum zoom. With stabilisation disabled, I may have been able to handhold a sharp shot at around 1/400, but the image was dancing around the screen and almost impossible to line-up. Switch stabilisation on though and the composition became rock-steady, making it easy to line-it up exactly as desired. It’s an invaluable tool when packing such long focal lengths into such small bodies. I should also add that this test was performed when composing with the screen and as discussed earlier, you can enjoy steadier results when composing with the viewfinder held to your face – so it’s worth switching to the EVF when you’re shooting at the longest focal lengths or in low light.
| |
|---|---|
| |
| |
I was also curious to see how effective the stabilisation was for video, so in the handheld sequence above, I zoomed through the focal range before panning around the scene at the maximum focal length. I found the TZ60 / ZS40 did a remarkably good job at ironing out any wobbles at the maximum zoom for handheld video so long as you kept the camera moving a little bit. Once I paused, the wobbles appeared a little, but they weren’t too bad. Of course your mileage may vary, but again so long as I kept some motion in the clip, the TZ60 / ZS40 allowed me to film smooth video handheld even at 720mm. Bottom line, the stabilisation makes the TZ60 / ZS40’s big zoom range usable for both stills and video.
Panasonic Lumix TZ60 / ZS40 shooting modes
The Lumix TZ60 / ZS40, like its predecessor and rivals, is fitted with a mode dial giving access to a wealth of manual, semi and fully automatic shooting modes. Along with the usual PASM modes and Intelligent Auto, you’ll find Creative Control (with 15 filter effects), SCN (with 18 presets), two custom modes and a panorama option. There’s no movie mode on the dial as you can simply start recording in most modes by pressing the dedicated red record button.
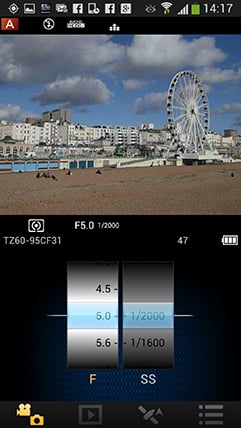
In Shutter Priority and Manual mode you have access to exposures between four seconds and 1/2000, and in Aperture Priority you can choose from nine settings at wide angle from f3.3 to f8. These give you full control over the exposure way beyond what’s possible with exposure compensation, but I’m always keen to point out that control over the aperture doesn’t translate into the ability to deliver very shallow depth of field effects. To find out what’s possible with the TZ60 / ZS40 in terms of depth of field – and control over it – I took a macro composition where the effect would be most pronounced and took images with the maximum and minimum apertures at close range. Here’s how they look.
Panasonic TZ60 / ZS40: Depth-of-field in Aperture Priority | ||
 |  | |
| Aperture Priority: f3.3, 4.3-129mm at 4.3mm (24mm equivalent) | Aperture Priority: f8, 4.3-129mm at 4.3mm (24mm equivalent) | |
As you can see in the examples above, there’s definitely some control over the depth of field available with the TZ60 / ZS40, but it’s not significant, and neither is the potential for blurring even when shooting macro compositions. I did however wonder if it was possible to capture a shallower depth of field by zooming the lens all the way into the maximum equivalent of 720mm, and again shooting fairly close to the minimum focusing distance. Below is my best effort, and as you can see, it is possible to blur the background a bit, but to do so, you’ll be shooting at (or close to) the maximum focal length and still positioning the subject as close as the camera will focus on it.
| |||

Moving on, the TZ60 / ZS40 offers the usual basic three frame auto exposure bracketing, but in a mild maximum range of 1EV apart. HDR fans should however note there is a dedicated HDR scene preset which combines three frames in-camera and I’ll show you an example of that in just a moment. Note there’s no interval timer or multiple exposure facilities on the TZ60 / ZS40.
Intelligent Auto on the Lumix TZ60 / ZS40 combines Panasonic’s latest technologies to deliver a pretty foolproof experience. Like earlier models, these include Intelligent ISO and Scene Detection which both do a good job of figuring out what you’re trying to take and whether the subject’s in motion. In practice this works very well, with the camera automatically recognising and switching between portraits, landscapes, close-ups, night scenes (with or without people) and sunsets. If Face Recognition is enabled and spots a previously registered under-three year old, it’ll switch to Baby mode, and if a night scene is recognised without a tripod, the camera can opt for the Handheld Night Shot mode. The camera’s also good at detecting motion and increasing the sensitivity if necessary to maintain a quick shutter to avoid blurring – great when photographing unpredictable children, although obviously the quality reduces quickly at higher ISOs.
 | 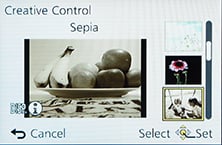 | 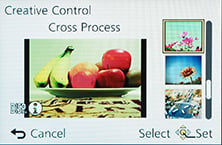 |
Like other Lumix compacts, the TZ60 / ZS40 collects a selection of special effects into the Creative Control position on the dial, indicated by a painter’s palette. You have the choice of 15: Expressive, Retro, Old Days, High Key, Low Key, Sepia, Dynamic Mono, Impressive Art, High Dynamic, Cross process, Toy Effect, Miniature, Soft Focus, Star Filter and One Point colour. Here’s a selection showing some of the Creative Controls in practice.
Panasonic Lumix TZ60 / ZS40 Old Days Creative Control | Panasonic Lumix TZ60 / ZS40 Impressive Art Creative Control | |
 | 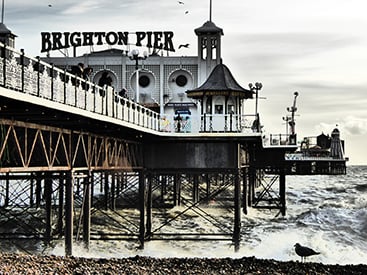 | |
Panasonic Lumix TZ60 / ZS40 Toy Creative Control | Panasonic Lumix TZ60 / ZS40 Dynamic Mono Creative Control | |
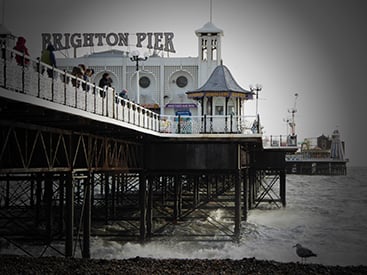 | 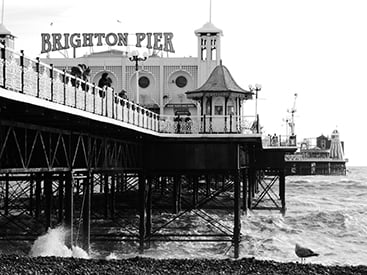 | |
You can also apply Creative Control effects to movies by simply pressing the red record button. This includes the Miniature effect, although as with other cameras, processing overheads mean you’ll only capture a few frames per second. This does however have the visual benefit of accelerating motion when played-back at normal frame rates. Here’s an example below I filmed with the TZ60 / ZS40 where the action is effectively reduced by eight times.
| |
|---|---|
| |
| |
Turning the dial to SCN lets you choose from 18 Scene Presets which include 3D, High Speed Video, Handheld Night Shot and HDR; note the Panorama mode enjoys its own position on the main dial.
Unlike the High Dynamic mode in the Creative Control section (see earlier), the TZ60 / ZS40’s HDR mode actually takes three different exposures and combines them into one. You can see an example below, where it’s clear the version with HDR has boosted mid-tones albeit with a boost in sensitivity to support handholdable shutter speeds under these conditions.
Panasonic Lumix TZ60 / ZS40 Program at 100 ISO | Panasonic Lumix TZ60 / ZS40 HDR Scene Preset at 1600 ISO | |
 |  | |
 |  | |
0.5 secs, f3.3, 100 ISO | 1/25, f3.3, 1600 ISO | |
Finally, the TZ60 / ZS40 offers a panorama mode accessed direct from the mode dial. This works similarly to the sweep panorama option on Sony’s Cyber-shot cameras, capturing a series of images in a burst as you pan the camera across the scene in an arc, after which the camera automatically stitches them together for you.
Again like Sony you can choose from panning with the camera held horizontally or vertically, but unlike Sony the TZ60 / ZS40 seems happy to capture a full 360 degree panorama if you’re able to keep turning it during the four second capture process – during which time it has to be said everybody around you will be staring.
The maximum image size is 8000×1080 pixels in landscape mode or 1440×8000 in portrait mode, so the total resolutions of around 8 and 11.5 Megapixels aren’t going to win any detail contests. Depending on how much you wobble, the camera may need to crop some of that down to an even smaller image. For example in my tests I typically captured images measuring 6000×864 in landscape and 1104×4440 in portrait. So you won’t even come close to matching the same resolution as a single frame shot in one of the normal modes, but the Panorama preset will give you massive coverage which may be preferred depending on the subject. Like other recent Lumix compacts, it’s possible to preview and apply some, but not all, Creative Filter effects to panoramas. Here’s a couple of examples.
| ||||||


Panasonic Lumix TZ60 / ZS40 focusing
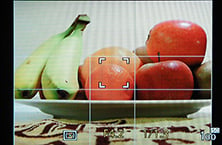
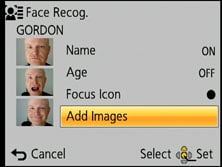
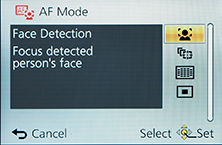
The Lumix TZ60 / ZS40 is equipped with the same five main AF modes as its predecessor which can be manually selected in the PASM modes, or left to the camera to choose from in auto. First is Face Detection, which can detect and track human faces. This works alongside Face Recognition, which can memorise up to six people (using one to three poses) along with their names and birthdays if desired. Once registered, these faces can have focusing priority over ‘strangers’, and it’s also fun to see their name popup under the tracking frame. If the subject’s age is less than three years old, the camera will also automatically switch to its Baby scene preset in auto modes.
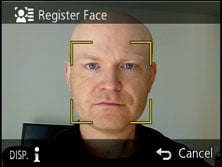 |  | 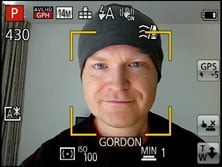 |
In practice it really works too, and is fairly tolerant of accessories like hats, although sunglasses will almost always fool the system. The second AF mode is AF Tracking, which is essentially like face detection for non-human subjects. This allows you to place a target over a subject, after which the TZ60 / ZS40 will track it across the frame and adjust its focus as required.
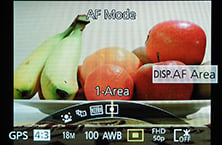
Next up comes the standard 23-area AF system, which the TZ60 / ZS40 defaults to in the absence of recognisable faces in the auto modes. The fourth AF mode is single-area, which as its name suggests, just uses one area for quicker response. The fifth option is spot focusing, which works the same way as single-area, but unsurprisingly with a much smaller square
On the earlier TZ40 / ZS30 the touch-screen really came into its own for AF positioning. If you were in the single area mode you could tap where you’d like the camera to focus, and in face detection mode you could tap to select the primary subject in compositions with more than one person in them. Sadly none of this is possible with the TZ60 / ZS40 as Panasonic has removed the touch-screen to meet a lower price point. It’s something I really miss on the camera, although I should add that at least there’s now no longer any risk of accidentally touching the side of the screen while handling the camera and inadvertently moving the AF area. As it stands if you want to move the single AF area, you first need to press DISP while in the AF menu, then use the cross keys to reposition the square and the dial to change its size if also required.
 | |  |
With manual focus enabled on the TZ60 / ZS40 you can use the front control ring to adjust the focusing distance, which is also indicated by a curved graphical scale on-screen. Meanwhile the rear thumb wheel can adjust the magnified view between five and ten times, and if focus peaking is enabled the areas in focus will be surrounded by a highlight. Peaking is a welcome new feature on the TZ60 / ZS40 over its predecessor, but for me worked best when viewing the entire image rather than a magnified view.
As for manually focusing on the TZ60 / ZS40, it’s certainly possible, but I found I had to turn and turn the control ring to adjust the focusing distance through the entire range which didn’t feel very responsive. I should also add that while manual focusing – with peaking if enabled – is also possible while filming movies, it too is quite an unresponsive experience. But then it is nice to at least be able to lock the focus when filming and know it’s not going to drift regardless of where you point the camera.
Panasonic Lumix TZ60 / ZS40 Wifi
Wifi and NFC first came to the TZ / ZS series with last year’s TZ40 / ZS30, and the new model essentially inherits the same capabilities.
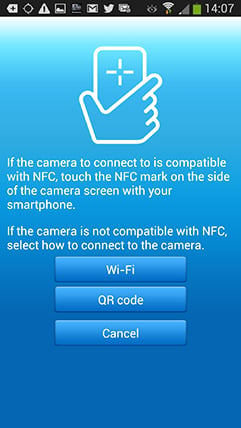 |
Wifi allows you to wirelessly browse the TZ60 / ZS40’s images on the larger and more detailed screen of a smartphone, tablet or laptop, copy them onto these devices, upload them to online storage or social media services (either directly or via a smartphone), or become remote-controlled by a free app for iOS or Android devices. These are flexible and powerful features to have at your disposal, and if your phone or tablet is additionally equipped with NFC you can simply hold it against the TZ60 / ZS40 for a second and they’ll sort out the Wifi network selection and password entry for you, making the whole process much quicker and easier.
At the time of writing, an increasing number of handsets were suppprting NFC, most famously including the latest Samsung Galaxies and Google NEXUS devices, but sadly still no iOS models. If you don’t have an NFC device yet or are an Apple owner though, don’t worry. You can achieve the same end result by manually choosing a Wifi network and entering any security by hand, or use the QR code shortcut, it’s just that NFC will do that part for you with a simple tap or two. I tested the capabilities using my Samsung Galaxy S4.
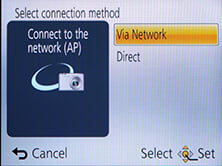
Okay so let’s start with establishing a connection between the camera and a smartphone or tablet. NFC or not, the first thing you’ll need to do is install the free Lumix Image app, available for iOS or Android devices. Next you’ll need to enable Wifi on your phone or tablet and if you’re intending to use NFC, you’ll also need to enable this on your phone / tablet.
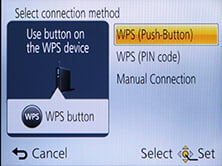
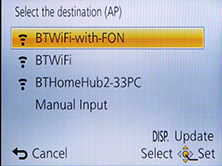
If your phone / tablet doesn’t have NFC you’ll now need to press the Wifi button on the back of the camera and either create a new connection, or load one you’ve previously configured. If you’re creating a new connection you can choose from ‘remote shooting and view’, ‘playback on TV’, ‘send images while recording’ or ‘send images stored in the camera’. For a smartphone / tablet connection, you should choose the first option for remote shooting and view. This then sets up the TZ60 / ZS40 as a wireless access point, displaying the SSID name and password. You’ll then need to start the Lumix Image app, select Wifi as your means of connection, select the TZ60 / ZS40’s network and enter the password.
If your phone or tablet has NFC you should start the Lumix Image app then briefly hold the two devices next to each other for about one second. For security, NFC has a very short range, so you’ll need to ensure the NFC chips on both devices are literally right next to each other for the initial negotiation. The location of the NFC chip is clearly marked on the left side of the TZ60 / ZS40, but it may not be as obvious on your handset. On the NEXUS 7 it’s actually hidden behind the large NEXUS logo on the back, but on the Galaxy S3 and S4 it’s hidden on the rear to one side, but all you need to do is brush the camera’s NFC sensor over the other device and when it finds it, it’ll let you know. A message will appear on both the camera and phone or tablet asking you to tap again to confirm the connection, and that’s it. I found it worked most times, but at others it required a couple of attempts, or a restart of the Image app.
If the connection was unsuccessful for some reason you’ll hear an error sound from your phone or tablet, but if it works, you’ll hear a triumphant ‘ta-da’ sound instead. When it works you’ll feel like whooping too, at least the first couple of times, but clearly the Lumix engineers feel excited every time as the app plays the confirmation literally at full blast. The problem is some handsets, such as the GS3 and GS4, can be pretty loud at full volume and there doesn’t appear to be any way to change this sound or turn it down. It even plays at full blast when your phone is muted. This caused me some embarrassment on more than a couple of occasions including one time when literally every customer in a small bar turned round to see what was going on – quite alarming.
The NFC negotiation process takes about 15 to 20 seconds to complete, but the devices only need to be in close contact for the initial handshake which takes less than a second. You may be twiddling your thumbs during the negotiation, but it’s still quicker and much easier than manually searching for and selecting the right Wifi network and entering any security.
Once your phone or tablet becomes connected to the TZ60 / ZS40, you can remote control it, browse the images direct from the memory card, copy them onto the handset and if desired send them onto various storage or sharing services.
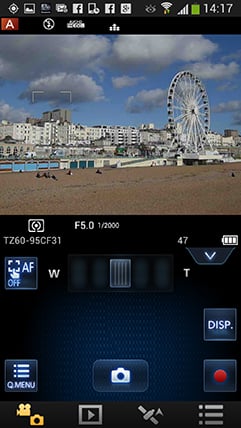 |  |  |
The remote control feature is really neat, showing a live image on your phone or tablet’s screen and allowing you to take a photo or start or stop a video. You can drag a slider to zoom the motorised lens and even tap anywhere on the live image to set the focus to that area or directly take the shot – giving the TZ60 / ZS40 the touch-screen capabilities it always deserved. If the camera’s mode dial is set to Aperture or Shutter Priority, you can remotely adjust the aperture or shutter speed respectively, and in Manual you can change both.
You can also adjust the drive mode, exposure compensation or focus area, although strangely the ISO and White Balance buttons were always greyed-out when I used the remote control; maybe you need to use a different shooting mode to enable them. There’s also a Q.Menu button which presents a list of additional options you can remotely change including the flash mode, aspect ratio, resolution, compression, focus mode, metering mode, colour mode or movie quality.
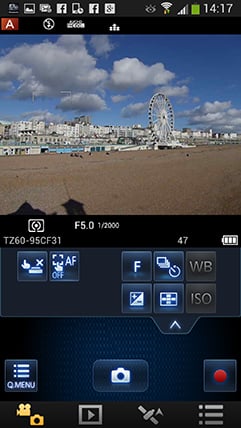
Moving on, you can also use a connected phone or tablet to quickly browse the images in your camera on their bigger screens without having to copy them over first. This is more useful than it sounds. I found myself really enjoying scanning through a day’s shoot on my phone without having to remove the card, physically connect the camera or copy any unnecessary files.
 |  |  |
To maintain a responsive experience which feels like the images are stored locally on your phone or tablet, the camera sends a lower resolution version. So you can pinch to zoom-in a little, but not as much as if you were viewing the original. But when you see an image you like, just press and hold it on-screen for a second and the Lumix Image app will let you save the original to your device or start uploading it to one of the social, sharing or storage services installed on your device. You can configure the app to provide shortcuts to two or three of your most used services which could include Dropbox and Instagram in addition to the more usual suspects. Or of course once the image is copied into your device, you could just exit the Panasonic app and handle it direct from whichever sharing or storage app you like via your phone’s gallery.
You can also choose whether to copy images in their original resolution, or in one of two smaller versions. It typically took about 20 seconds to copy an original JPEG from the camera to my Galaxy S4 from a distance of about 1m; it’s not possible to copy RAW files though. On some Wifi cameras we’ve noticed the JPEGs sent over Wifi can be modified (typically shrunk) even if ‘original’ is selected, but I checked the JPEG files wirelessly transferred from the TZ60 / ZS40 against the genuine originals and they were identical, meaning you really can use the Wifi to make transfers or backups.
Alternatively if you’re browsing your images on the camera and you see one you’d like to share, just tap the camera against your NFC phone or tablet and it will automatically establish a temporary network and copy the original over; the entire process again takes about 20 seconds. This is a brilliant feature and makes it easy to share or store your images.
It’s so much fun interacting with the camera using a smartphone or tablet that it’s easy to forget the Lumix TZ60 / ZS40 can also upload images directly to the internet by itself via a suitable Wifi connection. These can be shared to services like Facebook and Twitter, but go via Panasonic’s own Lumix Club; indeed images uploaded from the camera wait in a private Lumixclub album to be shared with a description. Since this requires you to have access to a computer, tablet or phone, it makes more sense to just use NFC / Wifi to copy the image from the camera to that device first and upload from there.
 |  |  |
As mentioned earlier, you can also configure the Lumix TZ60 / ZS40 to automatically send images after they’re taken to a smartphone, tablet, or a computer, although as far as I understand it, you can only send images to a computer via a separate access point, such as a home or office network; I certainly couldn’t configure a direct peer-to-peer link between the Lumix TZ60 / ZS40 and my MacBook Air, although direct connections are of course possible to smartphones and tablets as discussed earlier. Either way, it’s nice to have images automatically sent to devices which can subsequently upload them to cloud storage and backup if desired. Sure it’s heavy on bandwidth, not to mention battery power, but if neither are significant issues for you, it’s a compelling proposition. Or of course you could simply have a client viewing images on a tablet as you’re taking them, inside or out.
Like the Lumix TZ40 / ZS30, LF1 and G6 before it, I was very fond of the Wifi capabilities of the Lumix TZ60 / ZS40. I enjoyed browsing through a day’s shoot on the larger screen of a tablet and once connected it was a doddle to select original images to copy over for closer examination or sharing. The remote control facility was also fun and genuinely useful, although the range could vary significantly depending on surroundings and interference.
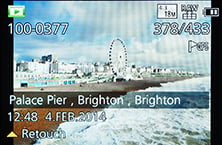
Panasonic Lumix TZ60 / ZS40 GPS
The Lumix TZ60 / ZS40 inherits the built-in GPS receiver of its predecessor, which allows it to record location and time details for each image and store them in the standard EXIF header. These can then be cross-referenced by a built-in database of landmarks to display location information; you can of course also use the location details to plot your position on mapping software on your computer later.
The TZ60 / ZS40 also inherits the GPS-logging capabilities of its predecessor, along with support for the Russian GLONASS (Global Navigation Satellite System). GLONASS works in a similar way to the GPS system, but having support for both GPS and GLONASS increases your chance of ‘seeing’ enough satellites for an accurate position. This won’t make much difference in wide open spaces, but definitely helps when there’s obstructions to the sky such as buildings in a city. I used the TZ60 / ZS40 in various cities in the UK and can confirm it definitely acquired a position in situations where the older models like the TZ30 / ZS20 (without GLONASS) could struggle. Before you think it may out-perform your smartphone though, note that many ‘GPS’ chipsets in phones these days also support GLONASS.
Once the Lumix TZ60 / ZS40 has locked onto the GPS signal, it can cross-reference the co-ordinates against its internal location database to display the name of the Country, State and City on-screen. The camera’s database also features over one million landmarks spread across 73 countries, including museums, churches, stations, airports, temples, sports grounds and tourist locations, which are also displayed if desired. You can choose how much or little area information is displayed from the database, although purists may be disappointed they’ll still have to delve into the GPS menus to actually view raw co-ordinates and satellite details.
 | |  |
The TZ60 / ZS40 inherits the GPS modes of its predecessors which attempt to reduce acquisition times by actually running most of the time, even when the camera is switched off. When the camera’s switched on, it’ll actually perform positioning every five minutes. But when you switch the camera off, it’ll continue to check its position every 15 minutes; you know when this is happening because a small light on the top surface illuminates when the GPS is actively searching. This approach means the camera stands a good chance of knowing where it is when you switch it on to take a photo, and in practice I found it generally took between five and 20 seconds to confirm its new position after powering-up.
Of course this ‘always-on’ approach raises concerns over battery consumption, but the TZ60 / ZS40 is intelligent enough to stop the search under a number of conditions. If positioning has not been successful for two hours after power-off, it’ll give up. Likewise if the camera’s not been switched on for three hours, it’ll stop the search. And if the battery indicator falls to one bar, it’ll automatically stop searching to prevent itself from running down.
If you’d prefer the camera only searched for its position when it was switched on (to save power or avoid interference in planes), you can enable Airplane mode in a separate menu. The plus-side is knowing exactly when the GPS is operating, but the downside is taking anything up to a few minutes to re-acquire your position from cold. Meanwhile the GPS OFF option really does turn it off altogether.
For quicker searching you can also download GPS Assist data via a utility on your computer which contains updated positions of the satellites. For best results, you’ll need to update this process every month.
Despite initial concerns over the default GPS option, it once again became my preferred choice when using the TZ60 / ZS40. If you’re regularly taking photos throughout the day, the TZ60 / ZS40 will typically find and display its location in no more than ten seconds (or 20 at a push), even if the camera’s been in a pocket or car. If you’ve not moved much at all, the signal could re-acquire in less than five seconds.
Continuing to search while the main camera is switched-off is just one of the aspects which makes Panasonic’s GPS implementation different from some of its rivals. Another is the cross-referencing of co-ordinates against an internal database to display a place name. This region and landmark information may sound like a novelty, but it’s great fun to see places named on-screen, not to mention being useful. Even in familiar places the camera can teach you a thing or two about local landmarks, such as the official names of churches or a sports club you weren’t aware of – and while Panasonic hasn’t provided any specifics on the depth of landmarks beyond the previous model, I certainly noticed some new names coming-up while photographing around the same areas as before.
Of course a system which displays landmark names by location can be tripped-up by overlap or simply covering a large area. As such, you may need to move around a park, zoo or golf course before its name is revealed, while anything close to a known landmark will often display its name instead.
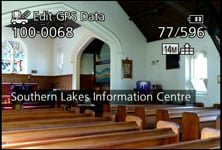
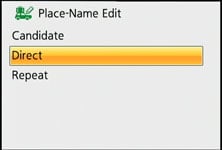
For example when testing the earlier models, before revealing the name of a local golf course I had to drive through the greens to the actual clubhouse, while photos taken in a bar near to a church displayed the church’s name. In another example, a church I confirmed was in the database from earlier photos was later mis-identified as an information centre. The TZ60 / ZS40 does however offer several options to edit the landmark information in playback. You can choose from a list of possible ‘candidate’ landmarks suggested from a list.
 |  | 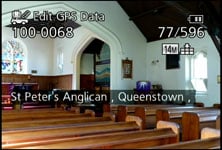 |
In other cases where the landmark doesn’t exist in the database at all, you can create a new name for it using manual text entry. I did this for the church which was mistakenly displaying the name of a nearby tourist information centre instead – see below. This process is the same as the TZ40 / ZS30 before it.
|  |  |
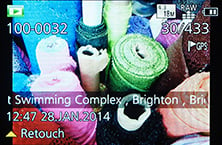
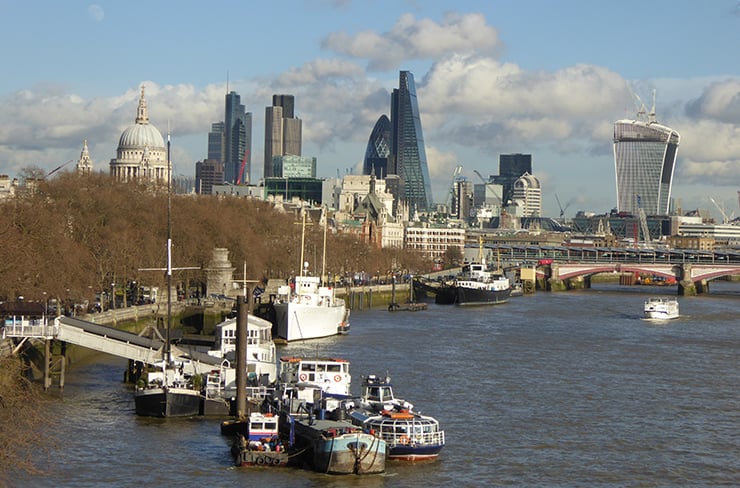
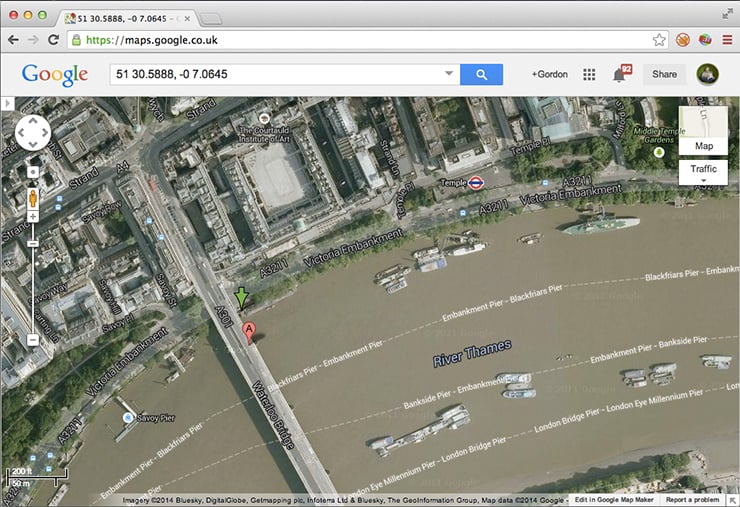
Ultimately it’s important not to worry too much about the displayed place names though as they’re not actually recorded in the image files. The TZ60 / ZS40 is simply matching the reported GPS co-ordinates with a database of names during capture or playback, and while the result may not always match-up or show what you were expecting, you still have the raw GPS time and location details to work with later. To illustrate the typical accuracy of the built-in GPS, here’s a photo I took from Waterloo Bridge in London, with the embedded GPS co-ordinates entered into Google maps below it.
 |
 |
So far, so similar to the TZ40 / ZS30, but the new TZ60 / ZS40 does have a notable difference when it comes to its GPS implementation. The on-screen mapping, first introduced on the TZ40 / ZS30, is no longer present on the new model. It’s strange to see Panasonic removing features on the new version, but to be honest it’s a sensible decision if it allows the camera to reach a lower price point.
On the old model, you could display your position (and those of your photos) on a crude-looking on-screen map, but it was a far less rich experience and presentation than using online maps on your phone, plus you had to pre-load maps for your region from the supplied DVD onto the camera. It was fun, but pretty redundant and I didn’t miss it on the TZ60 / ZS40. Remember you can still easily make a GPS log with the camera, set the recording interval and the total duration, then export it as a KML file for use on mapping software – or of course simply read the GPS co-ordinates embedded in the images.
Panasonic Lumix TZ60 / ZS40 movie mode
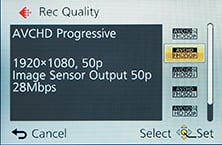
The Lumix TZ60 / ZS40 inherits most of the movie modes of its predecessor, allowing it to capture 1080p at 50p or 60p depending on region, and at a high rate of 28Mbit/s too.
 |
 |
 |
While you can start recording in, say, Aperture Priority or Manual, don’t get too excited as exposures are fully automatic once you start filming. The only exception is when filming in the Intelligent Auto mode, where the TZ60 / ZS40 can choose from one of four scenes: portrait, landscape, macro and low light. Like earlier models, stabilisation is always active, even if you’ve disabled it for still photos. On the upside the optical stabilisation brings genuine benefits to the TZ60 / ZS40’s movie shooting as you’ll see in the clips below.While you can start recording in, say, Aperture Priority or Manual, don’t get too excited as exposures are fully automatic once you start filming. The only exception is when filming in the Intelligent Auto mode, where the TZ60 / ZS40 can choose from one of four scenes: portrait, landscape, macro and low light. Like earlier models, stabilisation is always active, even if you’ve disabled it for still photos. On the upside the optical stabilisation brings genuine benefits to the TZ60 / ZS40’s movie shooting as you’ll see in the clips below.Like the TZ40 / ZS30 before it, audio is recorded in stereo from built-in microphones, and you can also zoom the lens while filming. As before you can start filming in any mode by simply pressing the red record button and you can also capture still photos while filming, albeit only in the 16:9 aspect ratio but at a usable resolution of 13.5 Megapixels – but watch out as there’s only a limited number you can take during a clip (indicated on-screen) and if you’re moving the camera at the time, they’ll almost certainly suffer from motion blur due to the slower shutter speeds typically implemented during video recording.
Panasonic continues to offer the choice of two encoding formats, AVCHD or MP4, with Panasonic recommending the former for the best quality results or playback on HDTVs, and the latter for extensive editing or uploading.
The AVCHD mode can record video in either 1080p at 28Mbit/s, or 1080i or 720p, both at a rate of 17Mbit/s. 1080p footage is recorded at 50p or 60p depending on region, while 1080i footage is recorded at 50i or 60i depending on region. 720p footage is recorded at 50p or 60p depending on region. You can choose to tag AVCHD movies with GPS location data, although it may cause incompatibilities with some devices. Using the best quality 1080p AVCHD mode, you’re looking at about 200Mbytes per minute of footage, considerably more than the 1080i and 720p AVCHD modes which consume closer to 120 Mbytes per minute of footage.
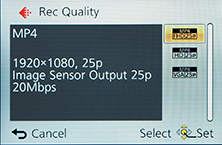
The MP4 mode can record video in Full HD 1080p, 720p or standard definition VGA, at rates of 20, 10 and 4 Mbit/s respectively. All three modes are encoded using progressive video at 25p or 30p depending on region.
Panasonic quotes both the AVCHD and MP4 modes as being restricted to clips with a maximum length of 29 minutes and 59 seconds. Finally, Panasonic recommends using an SD card rated at Class 4 or faster for recording movies.
If the camera was set to manual focus for stills, then it also applies to movies, as does the presence of focus peaking if enabled. In theory this should let you manually pull focus while filming while using peaking as a guide, but you need to turn the lens control ring round and round to make any significant adjustments so it’s not very practical. But on the upside, switching to manual focus at least means there’s no chance of the camera refocusing at an inopportune moment. Now let’s check out a bunch of clips to show you what the camera is capable of.
| |
|---|---|
| |
| |
| |
|---|---|
| |
| |
| |
|---|---|
| |
| |
| |
|---|---|
| |
| |
| |
|---|---|
| |
| |
| |
|---|---|
| |
| |
The TZ60 / ZS40 also inherits the slow motion capabilities of its predecessor, filming at 200fps in VGA (640×480) or 100fps in 720p HD (1280×720). These clips are then played back at 25fps, thereby slowing down the action by eight or four times respectively. Like other slow motion modes, there’s no audio captured, and stabilisation is also disabled.
| |
|---|---|
| |
| |
| |
|---|---|
| |
| |
Panasonic Lumix TZ60 / ZS40 continuous shooting
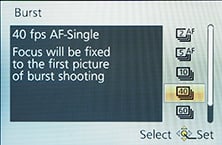
Like earlier models, the Lumix TZ60 / ZS40 is blessed with a wide variety of continuous shooting modes: 2fps or 5fps with autofocus, or 10fps with focus locked on the first frame, all at the maximum 18 Megapixel resolution. If you’re happy to sacrifice resolution for speed, you can alternatively shoot at 40fps in 5 Megapixels, or at 60fps in 2.5 Megapixels, both again with the focus fixed. Panasonic quotes a maximum of six frames at the 10fps speed.
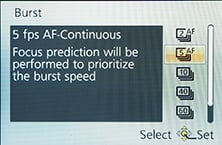 | 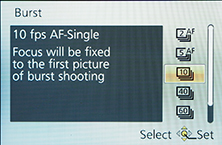 |  |
To put the capabilities to the test I fitted the TZ60 / ZS40 with a freshly formatted SanDisk 16GB UHS-1 SD card and timed various bursts. Starting with the 5fps mode and the quality set to 18 Megapixel Fine JPEG, I fired-off six frames in 1.37 seconds, corresponding to a speed of 4.4fps; after this initial burst the camera slowed to about 2.5fps. Moving up to the 10fps mode, again with 18 Megapixel Fine JPEG quality, I fired-off six shots in 0.44 seconds, corresponding to a speed of 13.6fps; after this burst the camera stopped recording until the buffer cleared.
Switching to the 40fps mode saw the resolution drop to 5 Megapixels, and allowed me to capture exactly 30 frames in 0.73 seconds, corresponding to 41fps. The 60fps mode dropped the quality again to 2.5 Megapixels, but captured exactly 60 frames in 0.97 seconds, delivering 62fps.
So the TZ60 / ZS40 performed almost identically to its predecessor in continuous shooting, delivering the quoted burst sizes, often at slightly faster speeds. What’s different this time round is support for RAW, so I retested the 5 and 10fps modes with this quality setting. At 10fps, I grabbed four RAW frames in 0.31 seconds, corresponding to a speed of 12.9fps, while at 5fps I grabbed four frames again, this time in 0.72 seconds, corresponding to a speed of 5.6fps. So again the speeds slightly exceeded the specifications, but in each case shooting in RAW meant capturing four rather than six frames.
Overall there’s a decent selection of speeds at your disposal, but it’s a shame you need to drop the resolution to 5 or 2.5 Megapixels in order to grab more than six frames at a time. It would have been great to be able to capture say, 10 frames at 10fps, giving you a second’s worth of action coverage, but as it stands, when shooting at 10fps, you can only shoot for just under half a second which doesn’t give you much breathing space to grab the perfect moment.
Panasonic Lumix TZ60 / ZS40 sensor
Panasonic has equipped the Lumix TZ60 / ZS40 with what seems to be the same 18 Megapixel sensor introduced on last year’s TZ40 / ZS30. Back then Panasonic had increased the resolution by four Megapixels to keep up with Sony, a numbers-driven strategy I felt was risky when we’re talking about making the most of tiny 1/2.3in sensors. Anyway Sony still managed to trump Panasonic on resolution when it later released the 20 Megapixel HX50V.
Fast-forward to 2014 and both Panasonic and Sony have mercifully stood still for their latest resolutions, the Lumix TZ60 / ZS40 and HX60V sporting 18 and 20 Megapixels respectively. Sadly though Canon’s previously brave move of employing a modest 12 Megapixels on last year’s SX280 HS has now been beaten down by the marketeers in favour of a new 16 Megapixel sensor on the SX700. You can see how all three compare in my results pages.
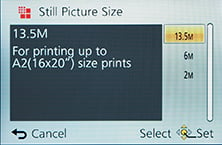
Just before the results though, here’s a few brief specifications for you. The TZ60 / ZS40’s sensor delivers 4:3 shaped images with a maximum of 4896×3672 pixels – that’s enough to make photo quality (300dpi) prints at 16.3×12.2in. Since most people rarely print above 10x8in, you’ve got sufficient resolution to make a good-looking print or even crop-in a little without losing quality, at least at low sensitivities anyway.
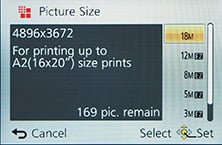 |  | 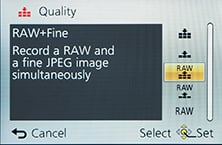 |
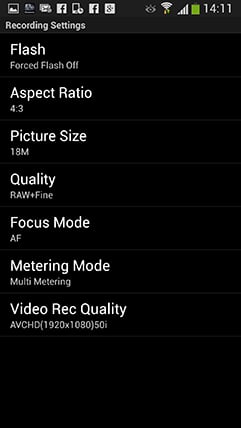
As before, there’s a wealth of alternative image resolutions and sizes. You can shoot in the full 18 Megapixels, or at 12, 8, 5, 3 or 0.3 Megapixels in the 4:3 aspect ratio, or switch to 3:2, 16:9 or 1:1 cropped shapes instead, each with reduced resolutions. Again as before there’s also the choice of two JPEG compression levels, Fine or Standard, but new to the TZ60 / ZS40 is the chance to record RAW files, with or without a JPEG at either compression level. This is a major move for the Lumix travel zoom, and gives it with another valuable edge over the competition, at least in theory – you can see it in action in my RAW quality results.
I always take my shots in the best quality mode, which on the TZ60 / ZS40 was with it set to 18 Megapixels / 4:3 / RAW+Fine compression, and most of the JPEGs worked out around 7Mb and the RAW files about 21MB.
To see how the quality of the measures-up in practice, take a look at my TZ60 / ZS40 quality and TZ60 / ZS40 noise results pages, browse my TZ60 / ZS40 sample images, or skip to the chase and head straight for my verdict.


