Panasonic Lumix DMC-GF2
-
-
Written by Gordon Laing
Intro
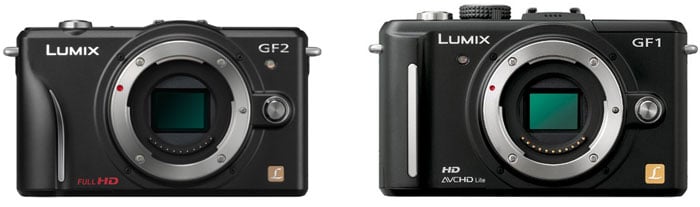
The Lumix DMC-GF2 is Panasonic’s second ‘pocketable’ compact to employ the Micro Four Thirds standard it co-developed with Olympus. Announced in November 2010, it’s the successor to the popular Lumix GF1, and like that model packs a large sensor into a small body with a removable lens mount.
The most obvious difference between the Lumix GF2 and its predecessor is size: the new model is 19% smaller and 7% lighter, making it the smallest camera with interchangeable lenses and a built-in flash; note the Sony NEX-3 and 5 employ tiny external flashguns.
While the GF2’s styling may look similar to its predecessor, you can see from the photo below how the lens mount (and lens barrel) protrudes above the top of the main body in a similar way to the Sony NEX-5. Eagle-eyed Panasonic followers will also note how the redesigned grip on the GF2 looks inspired by that on the Lumix LX5.
Other key changes include the addition of a touch-screen which replaces many of the GF1’s physical controls, 1080i video recording and a newly designed flash which pops-up higher to minimise red-eye and potential shadows from larger lenses. The GF2 is also available in black, silver, white, red and pink. In our full review of the Lumix GF2 we’ll see how it compares against its two main rivals: Sony’s NEX-3 and the Olympus E-PL2. Read on to find out which is the large-sensor compact for you!
 |
Viewed from above, the Lumix GF2 reveals several key changes from its predecessor. Despite a reduction in size, Panasonic’s thankfully retained the hotshoe and accessory port for the optional EVF, but the mode dial and drive lever which surrounded it have gone. In their place are new stereo microphones, albeit both located to the right of the hotshoe and lens axis.
There’s still a dedicated button to start recording video in any mode, but this is now joined by a new button for entering the GF2’s Intelligent Auto iA mode. The GF2 does of course offer alternative modes, but these are now accessed using the new touch-sensitive screen on the rear.
 |
|---|
 |
The GF2 body plus battery and card weighs 310g, which shaves 31g from the original GF1. Add the new lightweight 14mm f2.5 pancake prime lens and the total weight of the operational GF2 becomes 365g. The GF2 measures 113x68x33mm compared to the 119x71x36mm of the GF1, so is 6mm narrower, 3mm shorter and 3mm thinner; these all add up to a body which is noticeably smaller.
Side-by-side with its main rival, the Olympus E-PL2, the GF2 body is more compact, and 51g lighter. The GF2 looks a lot slimmer than the E-PL2, primarily because of the latter’s bulging hand grip. But the difference in body size is somewhat evened up when both cameras are fitted with their 14-42mm kit lens – the Panasonic Lumix G Vario 14-42mm f3.5-5.6 stabilized lens being considerably bulkier than the Olympus M.Zuiko 14-42mm f3.5-5.6. With their 14-42mm kit zooms attached, at 475g the GF2 is actually 2 grams heavier then the E-PL2 kit.
The rear-panel controls have likewise been simplified. The thumbwheel control is retained but the AF/AE lock, AF/MF preview and Display buttons have gone, all but the last, which is moved to the touch-screen, can be assigned via the custom menu to the Q.menu/Fn button.
 |
The Lumix GF2’s connection ports have been moved to the right side of the camera. Under the plastic flap is a mini Type-C HDMI port, and a combined USB and TV output. The HDMI port can be used to deliver high definition slideshows or movie playback on an HDTV and can be configured to output 1080i, 720p or 576p / 480p, the latter modes depending on whether it’s set to PAL or NTSC. There’s also a Viera Link option which allows the GF2 to be controlled by compatible Panasonic TVs over an HDMI link. There’s no remote terminal for the optional DMW-RSL1 cable release though; note the Olympus E-PL2 supports a cable release accessory.
On the bottom of the camera the tripod bush is centrally located directly beneath the lens mount and the card and battery compartment is on the right. The GF2 takes SD cards and is compatible with HC and XC versions; you’ll need Class 4 or faster for AVCHD movies or Class 6 for Motion JPEG.
Like its predecessor, the Lumix GF2 has a built-in pop-up flash unit which is mechanically activated by a button just behind it in the left top corner of the rear panel. The extension arm has been redesigned though so the flash now extends further upwards and forwards, reducing the potential for vignetting and red-eye. With a guide number of 6 meters at 100 ISO, the flash output is the same as before. Marginally less powerful than that on the Olympus E-PL2, with a maximum range of less than two metres it won’t light up a large room. Increase the ISO to 200 and that becomes a more useful (nearly) two and a half metres. If that’s not sufficient, you can of course mount an external unit in the hotshoe.
With the flash raised, you can choose from Auto, Auto with red-eye reduction, Forced-on, Forced-on with red-eye reduction, Slow-sync, Slow-sync with red-eye reduction. There’s no forced off option as you can achieve that by simply pushing the flash back into the body as it won’t raise on its own accord. The red-eye reduction fires a pre-flash, but if red-eye removal is enabled in the menus, digital correction is also applied before saving.
The Lumix GF2 Lithium-Ion battery provides sufficient power to shoot about 300 pictures with the 14-42mm kit zoom attached, using the CIPA standard. Swap that for the 14mm f2.5 pancake prime and you’ll get an additional 20 shots before the battery runs dry. If you’re exclusively shooting video that equates to 150 and 160 minutes of total recording time.
The Lumix DMC-GF2 is equipped with a standard Micro Four Thirds lens mount and, like full-sized Four Thirds bodies, its sensor results in a field-reduction of two times – so the 14mm and 14-42mm kit lenses offer equivalent coverage of 28mm and 28-84mm respectively. The GF2 can use any Micro Four Thirds lens, and thanks to the short sensor to mount distance, various adapters allow it to accommodate a number of other lenses. Most obviously there’s an adapter for full-sized Four Thirds lenses, but additional third party adapters allow you to mount Nikon F, Canon FD, Pentax K, OM system, Voigtlander and Leica M lenses. Note there may be restrictions regarding autofocus, particularly during movies, with certain Micro Four Thirds lenses – see Panasonic’s Lumix GF2 lens compatibility page for full details.
Lumix GF2 with 14-42mm f3.5-5.6 coverage wide |
Lumix GF2 with 14-42mm f3.5-5.6 coverage tele | |
 |  | |
| 14-42mm at 14mm (28mm equivalent) | 14-42mm at 42mm (84mm equivalent) |
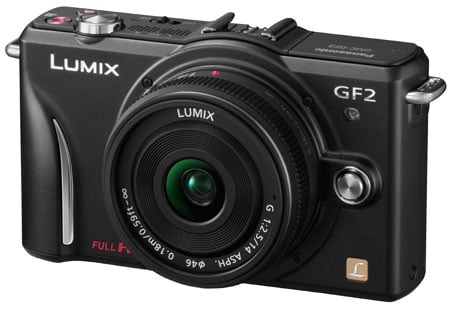
The Lumix GF2 is available as a body only, or in a kit with either the 14-42mm kit zoom (H-FS014042E), or the 14mm f2.5 pancake prime (H-H014) (which doesn’t have optical stabilisation), or with both. We tested the GF2 with both lenses, using the kit zoom for our main results and gallery pages, and the 14mm for a special report on this new lens – see our results pages.
With the 14-42mm zoom attached, you can immediately see why all of Panasonic’s publicity shots show the camera with the diminutive 14mm pancake prime attached instead. The kit zoom adds significantly to the camera’s size and weight but, while the 14-42mm is undoubtedly on the large side, it’s comfortable in use, providing a solid purchase for your left hand. Unlike the zoom on the Olympus E-PL2, the ridged zoom ring on the Panasonic lens is located well forward of the camera body which means you can hold it in the conventional manner with your hand supporting it from below. The zoom action of the Panasonic lens, however, is not as smooth as on the Olympus or Sony lenses and we found it very difficult to get good results while shooting video.
Among the 14-42mm kit lens’ advantages are it’s excellent quality and it’s fast and silent auto focussing. The latter is a particular advantage for shooting video and combined with the GF2’s touch screen focussing makes for some very slick manual focus pulling.
At its maximum 42mm focal length the front section of the lens extends to give a total length of 88mm. Like the Olympus and Sony lenses, it doesn’t rotate, so you can use a circular polariser in the 52mm thread. It’s also supplied with a bayonet lens hood which can be reverse-mounted for compactness when not in use. Note unlike the Olympus 14-42mm, neither the Panasonic nor Sony kit zooms can be retracted for transportation.
Lumix G Vario 14-42mm f3.5-5.6 MEGA O.I.S off/on | ||||
 |  | |||
100% crop, 14-42mm at 42mm, 1/10, 100 ISO, Shutter priority mode, MEGA O.I.S off. |
100% crop, 14-42mm at 42mm, 1/10, 100 ISO, Shutter priority mode, MEGA O.I.S on. | |||
The Lumix GF2 body has no in-built stabilisation, but the 14-42mm kit lens is stabilised using the same MEGA O.I.S lens-shift system available on the Lumix compact range. Both sensor and lens-based stabilisation systems have their proponents; fans of the lens-based approach will tell you that unstabilised bodies are more compact and therefore you don’t have carry stabilisation with you when you don’t want or need it. The fact that both the Lumix GF2 and Sony NEX-3/5 bodies are significantly smaller than the Olympus E-PL2 bears this out. The obvious downside is if you do want stabilisation, you’ll need to choose a lens which features it, whereas the built-in stabilisation of the Olympus bodies works with any lens you attach, including primes and wide-angles. There are other optically stabilised lenses in the Panasonic Micro Four Thirds range, but it tends to be reserved for telephoto zooms. Neither the 14mm f2.5 nor 20mm f1.8 pancake primes are stabilised – unless of course you mount them on an Olympus body.
So, at the risk of stating the obvious, it’s the 14-42mm kit lens lens were testing here, rather than the camera, and we did so by zooming it to its maximum telephoto range of 42mm (84mm equivalent) and taking a series of handheld shots at a range of shutter speeds both with the stabilisation turned off and with it turned on in Mode 1 (continuous).
The crops above are from shots taken with the GF2 in Shutter Priority mode with an exposure of 1/10th of a second. The one on the left was shot with MEGA O.I.S turned off and the one on the right with it set to mode 1 (continuous). Ordinarily with an 84mm (equivalent) lens you’d expect to be using a shutter speed of around an 80th of a second to avoid camera shake. So the 14-42mm’s MEGA O.I.S. stabilisation is providing a full three stops.
We actually managed to get sharp results at 1/25th of a second with the stabilisation turned off, so the difference is a less impressive. Having said that, the GF2 manages a little better than the Olympus E-PL2 with the M.Zuiko 14-42mm, which just about managed to eliminate camera shake at 1/15th of a second.
 |
Like all micro Four Thirds cameras, the Lumix GF2 relies on a contrast-based AF system in Live View. Though initially sluggish, speeds have improved dramatically and are now as good and, in some cases even better than the phase-change systems on most budget DSLRs.
The DMC-GF2 has four AF modes which can be directly selected by pressing the left button on the control pad. Face detection is the default AF mode in iAuto shooting mode, but can be selected for other modes as well. Alongside that there’s 23-area AF, single area AF and tracking AF. The GF2’s 23 areas provide greater coverage in smaller sectors than the Olympus E-PL2’s 11-area AF system, but in practice both were very swift, the GF2 beating the E-PL2 by a fraction of a second on most occasions.
Being able to access the AF options from a single click of the control pad is great, but it would have been even better if manual focus was on this menu as well. As it is it’s on the Focus mode menu, along with AF single and AF continuous options which determine whether autofocus operates continuously, or only with first press of the shutter release. You can, of course, add Focus modes to the Quick menu, or even assign it to the Quick menu/Fn button.
The GF2’s focussing is quick and decisive in all modes. The ability to quickly switch AF modes is useful, but it’s the touch-screen that gives the GF2 a unique advantage over its competitors. Tapping the screen in single area mode identifies the precise part of the screen you want the AF to select and the single area in that position is used. You can also do this in 23-Area AF mode, in which case the camera selects a group of AF regions around the touched location. In tracking mode you can touch to select the object to be tracked.
The focus ring on the lens is used for manual focussing. With MF Assist activated the screen automatically zooms to 5x magnification to give you a better view and in practice this makes focussing very quick and easy. Touching the screen in manual focus mode also activates the magnified MF Assist view which is useful if you just want to make a final check.
It’s also worth mentioning the GF2 features the same Panasonic face recognition feature as some of its compacts. Once registered, focus and exposure can be prioritised on up to six faces. Names also appear on screen when registered faces are recognised and when in iA mode the Baby scene mode is automatically selected for anyone aged under three.
Available focussing modes on the GF2 are dependent on the lens. The GF2 worked in AF Continuous mode with both the Lumix 14mm pancake prime and the 14-42mm kit zoom as well as the Olympus M.Zuiko 14-42mm kit lens. But lenses from other manufacturers, and even some Panasonic Micro Four Thirds lenses may have limitations including inability to function in AFC and even AFS focus modes. Similarly, most Four thirds lenses used with an adapter won’t work in AFC mode. You can find full compatibility details for most Panasonic and Olympus lenses on Panasonic’s Micro Four Thirds lens compatibility web page.
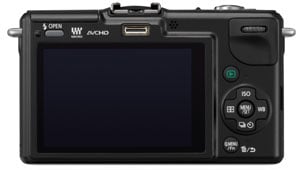
The Lumix GF2 retains the 3in / 460k screen specification as its predecessor, but it now becomes touch-sensitive. As we’ve already mentioned, you can tap to focus on a specific area and even trigger the shutter via the screen if desired, although there is of course still a traditional shutter release button on the top. Like earlier Panasonic cameras, the super-imposed Q-menu allows you to adjust a wide variety of settings, and this too can be controlled by touch if desired, along with being customisable to only show the options you regularly need access to.
 |
 |
 |
The touch-screen is very responsive, but it takes a while to get used to using it in preference to the physical controls where they exist. Out of habit we found ourselves frequently using the Q.menu button and then using the control pad to navigate it, rather than touching the screen icons.
 |
 |
 |
But the GF2 is a very customisable camera and by assigning the Q.menu/Fn button to another function you can quickly overcome that problem. We wouldn’t be at all surprised to see the physical button count decrease in future models as the touch screen is every bit as good for making menu selections.
Although it shares the same 460k pixel resolution as the Olympus E-PL2, the Lumix GF2 screen displays a punchier, more contrasty image, that’s a little easier to see in bright sunlight. Like the E-PL2, you can attach an optional electronic viewfinder to the GF2’s hotshoe which mates with the accessory port just behind and below it. The Olympus VF-2 and Panasonic LVF1 may both be electronic viewfinders which can vertically tilt and replicate what you see on the screen with 100% coverage, but both are worlds apart in quality. After the superb ‘Live View Finders’ of the larger Lumix G1 and GHx models, Panasonic decided to keep costs down on the LVF1 by equipping it with an average 202k pixel resolution. Olympus has gone the other way with its VF-2. This larger unit boasts 1440k dot resolution for a much more detailed image, albeit with a smaller quoted magnification of 1.15x to the Panasonic’s 1.4x. The Olympus finder is correspondingly more expensive, but neither can exactly be described as cheap. If you really want an EVF, it may be worth considering the larger Lumix G models which have them built-in.
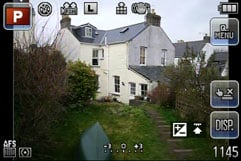
Another thing the GF2 has in common with the E-PL2 is the 3:2 aspect ratio of the screen. This means that for stills shooting in the native 4:3 aspect ratio, there are narrow vertical black bars down the sides, but the touch-icons extend into this area. The exposure mode is displayed in the top left corner of the screen and touching the icon displays an overlay with a choice of all modes, maybe not as instant as a physical mode dial, but easily good enough, given that you can quickly switch from your preferred exposure mode to iA mode and back with the iA button.
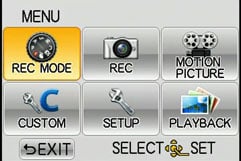
Another way to get to the shooting mode screen is to press the menu button at the centre of the control pad. The top-level menu is a six button screen providing access to Rec mode, Rec (shooting), Motion picture, Custom, Setup and Playback settings. Once again, you can navigate and select using the control pad, but it’s far quicker and easier just to touch them. Once you get to the second-tier menu, however, none of the menus is touch-sensitive, so you’ve got to use the pad. It would be so much better if you were able to drag to scroll and touch to select here; having introduced a touch-screen it looks like Panasonic has more work to do to fully integrate it.
| ||

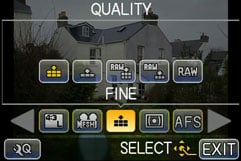
Despite that, the menus are fairly easy to navigate and well organised, if lengthy in places. With the exception of Rec mode, the top level options are tabbed on the second-tier screen so, having selected one, you can easily switch between them. The Rec mode menu has 22 items arranged on five pages, including picture size and quality, Face recognition, Focus mode, Flash, Burst rate and Stabilisation. The setup menu is also a five-page affair and the custom menu runs to six pages. But that’s not such a bad thing. Having all these options makes it more likely you’ll be able to get the GF2 working in a way that suits you and it’s not as if you need to access many of these settings on a regular basis, particularly with a customisable Q.menu to rely on.
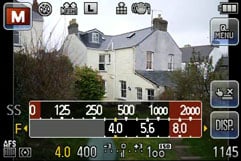
A display touch icon toggles the information overlay which can itself be configured to accommodate a variety of data including shooting mode, image size and quality, exposure and ISO, flash mode, stabilisation and focus and metering modes. The screen can also be overlayed with a grid and a live histogram which you can drag to position anywhere convenient. In playback mode the display icon toggles between a basic information overlay, detailed information display, a histogram display with separate red, green, blue and luminance displays, a highlight clipping display and no overlay.
The Panasonic Lumix DMC-GF2 offers the same three metering options as the GF1: Multiple, Centre-weighted and Spot. We used the default Multiple metering during our tests and found very few occasions when compensation was required; you can see various samples in our results and gallery pages. Shutter speeds from 1/4000 to 60 seconds are directly available in Shutter Priority or Manual, but the GF1’s Bulb option in Manual, which offered longer exposures to a maximum of four minutes is no more; the fastest flash sync speed is 1/160.
The GF2 employs a single thumb dial with a push function, which allows you to easily adjust either the shutter or aperture in Manual mode. In Shutter and Aperture Priority, pushing the dial inwards allows you to adjust the exposure compensation. It’s a neat system which eliminates the need for twin dials and work a little more intuitively than the system on the Olympus E-PL2, which uses the control dial and OK button. Like most things, you can assign aperture and shutter speed controls to the Q.menu and adjust then use the touch screen, but the thumbwheel works so well we doubt most people will bother.
In addition to the traditional PASM modes, the SCN touch icon on the Rec mode menu allows you to choose between 17 presets. The My Colours Mode alternatively allows you to shoot in Auto but applies a choice of coloured effects – note these are in addition to the various Film Modes available in other modes. The GF2 offers three Custom modes, one more than the GF1, which access previously registered settings.
The contrast-based AF system of the Lumix GF2 additionally allows Panasonic to implement its full Intelligent Auto (iA) mode as seen on its latest compacts. This exploits a number of technologies including Scene detection, face detection, digital red-eye removal, Intelligent ISO, Intelligent exposure, Long shutter noise reduction, Quick AF, focus priority and backlight compensation to deliver a seamless automatic experience that has an uncanny ability of figuring out what you’re trying to take.
We found the GF2 seamlessly switched between Landscape mode when pointed at a distant scenery, Macro when moved toward a close subject, and Portrait with Face Detection when turned towards people. You can even drag an on-screen slider with your finger to choose the degree of background bluriness, thereby working like a beginner-friendly version of aperture priority. Overall iA continues to be one of the cleverest fully automatic modes we’ve tested, exploiting the camera’s full range of technologies, and fulfils Micro Four Thirds’ brief to be easier to use than a traditional DSLR by complete beginners. We’d certainly be happy leaving it set to Intelligent Auto for general day-to-day shots or trusting it for capturing spontaneous moments.
In terms of exposure bracketing, Panasonic has taken a small step backwards offering a maximum 5-frames with one third or two thirds of a stop between them. HDR fans will be disappointed to see the seven frame option of the GF1 dropped, and the GF2 is bettered in this respect by the Olympus E-PL2 which offers 3, 5 and 7 frame bracketing.
Panasonic Lumix DMC-GF2 Movie Mode
The GF2’s sensor and image processor support 1080i video – a big upgrade over the 720p mode of its predecessor. The Lumix GF2 offers 1080i at 60 or 50Hz for NTSC or PAL regions, or 720p at 60p or 50p, again for the same regions. In NTSC regions 1080i HD movies are output from the sensor at 30fps and encoded at 60i, and in PAL regions are output from the sensor at 25fps and encoded at 50i. 720p AVCHD movies are output from the sensor at 30fps and encoded at 60p, in PAL regions they’re output at 25fps and encoded at 50p.
These modes are encoded using AVCHD, but like most Panasonic cameras, there’s an alternative mode which can record 720p or lower resolutions with the more editing-friendly Motion JPEG codec. Motion JPEG movies are always encoded at 30fps regardless of region. Continuous shooting times with the motion JPEG settings are quite restrictive, the 2GB file size limit being reached in around 8 minutes at the 720p resolution. The only limit on AVCHD recording is your card or battery capacity. That is, unless you live in Europe, where VAT regulations make it necessary for manufacturers to limit continuous recording times; in the case of the GF2 to a second short of thirty minutes. While frustrating, that’s still a lot longer than the effective 8 minute limit of the Motion JPEG mode though. Note AVCHD movies on the GF2 require Class 4 memory cards or quicker, while Motion JPEG movies require Class 6 cards.
As mentioned above, there’s now built-in stereo microphones with adjustable levels, although unfortunately unlike the Olympus E-PL2 (via an additional accessory anyway) no way to connect an external microphone. Like the Lumix LX5, Intelligent Auto is also available for movies, and the GF2’s touch-screen also allows you to adjust focus by tapping the desired area as you film.
The biggest practical problem we encountered while shooting video with the Lumix GF2 fitted with the 14-42mm kit lens, was the near impossibility of smooth zooming. The mechanical linkages on both the Olympus 14-42mm and Sony 18-55mm kit lenses were smoother, but the truth is none of these manual zooms provide anything like the result you get from a motorised compact zoom. As you can see from the clips below, with continuous AF enabled, the GF2 does a fairly good job of maintaining focus while zooming, it loses it a little every now and then, but is quick to recover. And like the Olympus E-PL2 its autofocus motor is silent. In Focussing terms the touch screen provides a feature that the competition can’t match though and that’s the ability to re-focus on different subjects by simply touching the screen. If you manage to do this without wobbling the camera, it’s a great way to produce slick-looking manual focus in your movies.
| |
|---|---|
|
The Zoom on the Vario 14-42mm f3.5-5.6 kit lens is impossibly difficult to operate smothly. Although the focus wanders a little during zooming, it’s quickly recovered. You can see an alternative example from our Queenstown location below.
| |
|---|---|
|
Now let’s mount the GF2 on a tripod for a smoother panning motion…
| |
|---|---|
|
In this tripod-mounted panning shot above, the GF2 makes a fairly good job of difficult lighting conditions, but has problems holding the focus during the zoom. Like the mono mic on the E-PL2 the GF2’s stereo mics are prone to picking up wind noise.
| |
|---|---|
|
Good exposure and white balance on this interior hand-held panning shot, but this time the GF2 has a real problem with AFC wandering during the pan.
Panasonic Lumix DMC-GF2 Continuous shooting and sensor
The Lumix GF2 offers three continuous shooting speeds; Low, Medium and High with frame rates of 2, 2.5 and 3.2fps respectively. On the High setting Live view is disabled.
We tested the GF2’s burst modes using a freshly formatted Lexar Professional 133x 8GB SDHC card with the camera set to produce large fine JPEGs. Our test results for the L, M and H modes came out slightly slower than Panasonic’s quoted figures at 1.8, 2.4 and 2.85fps respectively. The GF2 can’t maintain these speeds for very long either. At the slowest L setting we managed a burst of 20 frames before the camera stalled, while at the M and H settings the camera stalled after 12 frames; long enough to get a decent sequence, but not continuous in the generally accepted meaning of the term, which presumably is why Panasonic call it a ‘Burst’ mode. The good news is these figures don’t get much worse when shooting RAW. You can shoot a burst of 5 RAW frames at the H speed.
At the heart of the Lumix GF2 is a 12.1 Megapixel (effective) Live MOS sensor which we believe is the same as that in the Lumix G2. The resolution may be the same as the earlier GF1, but the new model features Panasonic’s latest Venus FHD processor which offers a number of tricks including Intelligent Resolution which applies selective sharpening to enhance images and Intelligent dynamic range control. The sensitivity range runs from 100 to 6400 ISO and shutter speeds manual modes can be set from 60 seconds to 1/4000th though, as we’ve mentioned earlier there’s no bulb setting.
To see how the quality of the Lumix GF2 measures-up in practice, take a look at our real-life resolution and high ISO noise results pages (where you’ll also find a report on the new 14mm pancake prime lens), browse the sample images gallery, or skip to the chase and head straight for our verdict.


