Panasonic Lumix DMC-GF1
-
-
Written by Gordon Laing
Panasonic Lumix DMC-GF1 vs Olympus E-P1 vs Canon PowerShot G11 real-life detail
Panasonic Lumix DMC-GF1 results : Real-life resolution / High ISO Noise / G VARIO 20mm lens sharpness
Panasonic Lumix DMC-GF1 with Lumix G 20mm f1.7 |
Olympus E-P1 with Lumix G 20mm f1.7 |
Canon PowerShot G11 with built-in lens | ||
 |
 |  | ||
f4, 100 ISO |
f4, 100 ISO |
f4, 80 ISO | ||
 |  |  | ||
f4, 100 ISO |
f4, 100 ISO |
f4, 80 ISO | ||
 |  |  | ||
f4, 100 ISO |
f4, 100 ISO |
f4, 80 ISO | ||
 |  |  | ||
f4, 100 ISO |
f4, 100 ISO |
f4, 80 ISO |
Panasonic Lumix DMC-GF1: JPEG versus RAW
|
We photographed the scene pictured above using the GF1’s RAW plus Large Fine JPEG mode, allowing us to directly compare images created from exactly the same data. Below are 100% crops taken from the original JPEG file alongside the RAW version, processed with the supplied Silkypix Developer Studio 3.0 SE; by default, the Unsharp Mask is set to zero in SilkyPIX, which unsurprisingly delivers a very soft result, so here we’ve increased the amount to 100 in order to accentuate fine details. As you might expect, the result is pretty similar to earlier G-series models. At first glance, the sharpened RAW file appears to solve the softening seen above – it’s cut through the ‘haze’ to deliver a punchier result with crisp details. But look a little closer and it’s also revealed some posterisation effects, especially on the tree foliage and some of the building walls and roofs. Many would find this undesirable when examined at 100%, but it does prove shooting in RAW has the potential to deliver better-looking results than the in-camera JPEGs using the camera’s default settings. As always, it’s a case of experimenting with different settings (not to mention actual RAW converters) until you achieve the desired effect. Now let’s look at how the camera performs across its sensitivity range in our Panasonic Lumix DMC GF1 High ISO Noise results. |
Panasonic Lumix DMC-GF1: JPEG |
Panasonic Lumix DMC-GF1: RAW | |
 |  | |
f4, 100 ISO |
f4, 100 ISO |
Panasonic Lumix DMC-GF1 results : Real-life resolution / High ISO Noise / G VARIO 20mm lens sharpness
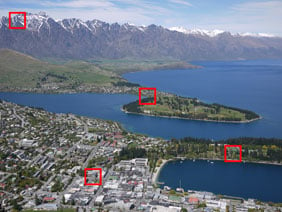
The image above was taken with the Panasonic Lumix DMC-GF1 in Aperture Priority at 20mm f4 with a sensitivity of 100 ISO; the original JPEG measured 6.73MB. The crops are taken from the areas marked with the red squares and presented below at 100%. Each camera was using its default settings for noise reduction and image processing, but all contrast-enhancements were disabled to avoid artificially increasing the noise. We’ve compared the Canon PowerShot G11 against the Olympus E-P1 and Panasonic Lumix GF1 in our results pages here because all three are powerful compacts aimed at enthusiasts who want a high degree of control. The E-P1 and GF1 may cost 50% more than the G11 thanks to their physically larger sensors, but we believe all three are targeting the same audience, many of whom are willing to adjust their budget for a compact which delivers the quality and control they desire. Looking at the crops below, it’s important to remind yourself the PowerShot G11 has a considerably smaller sensor than the other two models here, and also two fewer Megapixels. We also fitted the two Micro Four Thirds models with a prime lens set to its optimum aperture, whereas the G11 was using its built-in lens with an aperture automatically selected in Program mode. As such, it’s impressive just how similar the degree of real-life detail is between the three models at their lowest sensitivities. Indeed most of the differences you’re seeing here are down to their respective image processing strategies using the default settings. The Olympus E-P1 is clearly applying the greatest sharpening of the three cameras here, with the punchiest image as a result. In contrast, the Panasonic GF1 is taking a more laid-back approach with its default in-camera JPEGs, and Canon has also struck a good balance between applying sufficient sharpening to reveal detail without suffering from undesirable artefacts. The mountain ridge may be lacking contrast and suffering from a little softness on the G11 sample here, but in terms of the other cropped areas, we’d say Canon’s latest compact performs very well and some may even prefer its default output here compared to the pricier cameras alongside. Of course the larger sensors of the E-P1 and GF1 give them an advantage under lower light, but under bright conditions at the lowest sensitivity (and using their default settings), the PowerShot G11 can certainly give them a run for their money. Now scroll down to see whether shooting in RAW brings any benefits to the GF1, or if you can’t wait any longer, check out how it performs across its sensitivity range in our Panasonic Lumix GF1 Noise results. |