Panasonic Lumix DMC-GF1
-
-
Written by Gordon Laing
Panasonic Lumix DMC-GF1 lenses
The Lumix DMC-GF1 is equipped with a standard Micro Four Thirds lens mount and like full-sized Four Thirds bodies, its sensor results in a field-reduction of two times – so the 20mm and 14-45mm kit lenses offer equivalent coverage of 40mm and 28-90mm respectively. The GF1 can use any Micro Four Thirds lens, and thanks to the short sensor to mount distance, various adapters allow it to accommodate a number of other lenses. Most obviously there’s an adapter for full-sized Four Thirds lenses, but additional third party adapters allow you to mount Nikon F, Canon FD, Pentax K, OM system, Voigtlander and Leica M lenses.
 |
This gives Micro Four Thirds bodies an enormous choice of optics, including some very tempting high-end primes, but there are unsurprisingly restrictions in their use. Autofocus is only possible with Micro Four Thirds lenses or a handful full-sized Four Thirds models, and Continuous AF becomes even more restrictive, only working with Panasonic’s own Micro Four Thirds lenses, excluding the 20mm f1.7 prime. Pretty much anything else you mount becomes manual focus only.
There’s more details in the focusing section below, but regardless of the lens you attach to the GF1, you’re still looking at a field-reduction of two-times, and remember the mount itself wasn’t designed with hefty third party lenses in mind, so beware of damage. Caveats aside though, these adapters still give the Micro Four Thirds standard a unique advantage in the market.
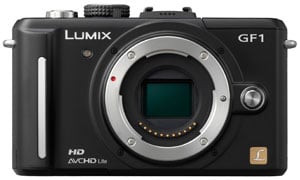
One glance at the photo of the GF1 body above reveals another fairly unique aspect about the Micro Four Thirds standard: with no reflex mirror and a shutter that’s open by default, the sensor (or at least its protective filter) is exposed to the elements by default. This is a little disconcerting at first, although potentially greater damage could be done to the delicate shutter curtain if it were closed.
 |
The GF1’s sensor is protected from foreign particles by an anti-dust system which operates every time the camera is powered-up, or when manually selected from the sensor cleaning custom menu. In our standard anti-dust tests where the body is left open inside and outside for ten minutes each, the GF1 impressively managed to avoid any visible dust marks. Even at f16 (the minimum aperture for the G VARIO 20mm f1.7 lens) and with Auto Levels applied, we couldn’t see a single mark.
Like other (Micro) Four Thirds models, it’s not so much that the dust isn’t necessarily there, but it’s so far out of the focal plane to rarely come into sharp focus even at tiny apertures. The bottom line is dust was never an issue during our tests with the GF1.
 |
Panasonic typically offers the GF1 in a choice of two kits with either the G VARIO 14-45mm f3.5-5.6 zoom or the G VARIO 20mm f1.7. The former is the very same zoom sold in the earlier Lumix G1 kit, but while the quality is fine, it’s relatively large when mounted on the GF1. Unlike the M.Zuiko Digital 14-42mm kit lens of the Olympus E-P1, the Panasonic zoom doesn’t offer a collapsible option for transportation. While we found this collapsing mechanism occasionally frustrating in spontaneous moments, there’s no denying its physical benefits: the Panasonic kit zoom measures 60mm in length, whereas the Olympus model collapses to 44mm, making it much more portable.
The G VARIO 20mm prime is a much better physical match for the GF1, so it’s no surprise to find it used in most of the promotional images. Indeed Panasonic only supplied this lens for our tests with the GF1, although we also tried it with the E-P1’s kit zoom. You can see coverage examples below shot with the GF1 at 14mm, 20mm and 42mm; the 20mm image was taken with the prime, while the others were taken with the Olympus kit zoom and are roughly similar to what you’d get with the Panasonic kit zoom.
Panasonic Lumix DMC-GF1 with M.ZD 14-42mm at 14mm |
Panasonic Lumix DMC-GF1 with Lumix G 20mm f1.7 |
Panasonic Lumix DMC-GF1 with M.ZD 14-42mm at 42mm | ||
 |
 |  | ||
28mm equivalent |
40mm equivalent |
84mm equivalent |
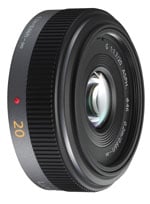
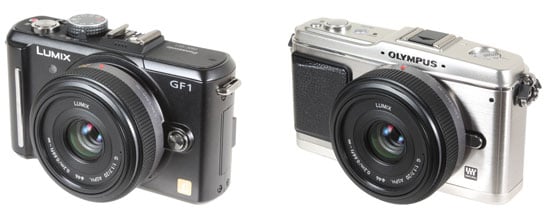
Our results and gallery pages for the GF1 were exclusively shot with the G VARIO 20mm and it’s a very seductive lens in use. Like other pancake primes, it’s physically small and light, and makes the GF1 (or E-P1) very portable. You still won’t be squeezing it into most trouser pockets, but it’ll slip into larger coat pockets or cargo pants without too much trouble. And in the spirit of fairness, we’ve pictured it mounted on both the GF1 and E-P1 below so you can see how it looks on each body.
The f1.7 aperture is an absolute joy if you’ve been used to the f3.5-5.6 focal ratio of typical kit zooms. Wide-open at f1.7, it’ll gather four times more light than a kit zoom at f3.5, or a whopping ten times more than f5.6. So a shutter speed of 1/6 at f5.6 or 1/15 at f3.5 becomes 1/60 at f1.7. This gives the lens a massive advantage in low light, while also allowing you to achieve a much shallower depth-of-field than most zooms.
|
|
|
Obviously the one thing a prime lens can’t do is zoom, but with an equivalent focal length of 40mm, the G VARIO 20mm is actually a great general-purpose option. This will of course come as no surprise to anyone who shot with nothing more than a film SLR and 50mm lens in the past, and the experience with the GF1 and 20mm is satisfyingly similar. Modern digital photographers have become used to shooting with zooms, and it’s not necessarily a good thing. Shooting with a prime forces you to move around and explore the composition, with inevitably better results than standing rooted to the spot and zooming. We rarely found a time when we wished for a zoom instead.
Sadly the G VARIO 20mm does not have optical stabilisation, which means when mounted on the GF1 you’ll simply need to ensure you’re using a sufficiently quick shutter speed to avoid camera shake. So in that respect it really is like going back in time to the Seventies or Eighties with a 35mm SLR and 50mm lens. Luckily the bright aperture and very slightly wider than ‘standard’ coverage help you to avoid shake in most situations, but when filming handheld video, wobbles are almost inevitable.
In terms of other features, the G VARIO 20mm has a decent manual focusing ring, and while its motor-assistance suffers from the same slightly detached feeling as most (Micro) Four Thirds lenses, it’s easy to make precise and accurate adjustments. Finally, there’s a filter thread measuring 46mm, but no lens hood supplied.
Overall it’s hard for a camera enthusiast not to become smitten with the GF1 when mounted with the G VARIO 20mm, although as a standard Micro Four Thirds lens, it’s an equally compelling option for the Olympus E-P1. Indeed more so, because the built-in stabilisation of the E-P1 provides anti-shake capabilities with this lens which are absent when mounted on the GF1.
As you’ll discover in more detail below, the G VARIO 20mm is also the only Panasonic Micro Four Thirds lens to date which doesn’t support Continuous AF on the Panasonic bodies. But even without Continuous AF or optical stabilisation, it remains a highly recommended lens for the GF1 and especially the E-P1 which not only stabilises it, but also allows it to focus continuously.
Panasonic Lumix DMC-GF1 focusing
|
By eliminating the mirror and phase-change AF system of a traditional DSLR, all Micro Four Thirds cameras exclusively rely on a contrast-based AF system in Live View. Contrast-based AF systems may operate quietly and without interruption to the image, but their performance on DSLRs to date has been fairly slow. Thankfully Panasonic solved the problem with its initial Lumix G1, which boasted AF performance as good as, or even better than the phase-change system on most budget DSLRs. This AF system was then inherited by the GH1 and now the GF1. The GF1’s implementation is essentially identical, although Panasonic notes the speed is a little slower.
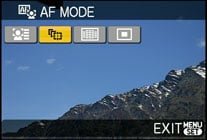 |  |
As such, the Lumix GF1 is equipped with a 23-area AF system, with additional options of single (adjustable) area AF, face-detection and AF tracking selectable from the on-screen Q.Menu. Pressing the AF / MF button switches it between Single (AFS), Continuous (AFC, where available, see below) and Manual focusing (MF) modes.
The 23-area mode allows the GF1 to automatically choose from a wide area of targets. The region covered is larger and denser than the 11-area system of the Olympus E-P1. The AF tracking system allows you to place a cross-hair over a subject, which is then tracked following a half-press of the shutter. The system will adjust the focus and exposure for the subject in the same way as Face Detection, and works well for subjects which don’t move too quickly toward or away from you. Face Detection works in the same way as Panasonic’s compacts, quickly acquiring subjects and tracking them as they move. In use the GF1’s face detection was much faster and more consistently reliable than the E-P1.
The Lumix GF1 additionally features Panasonic’s Face Recognition. First seen on the Lumix TZ7 / ZS3 and not to be confused with plain old Face Detection, this can actually identify specific faces which have previously been registered with the camera.
The faces of up to six people can be memorised by the GF1, along with their names and birthdays if desired. Up to three images per person can be stored to help identification, and if Auto Registration is enabled, the camera will even suggest memorising a face it’s seen several times before.
 | 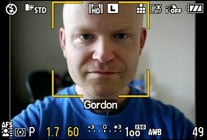 |
Once registered, these faces have focusing priority over ‘strangers’, and it’s also fun to see their name popup under the usual square tracking frame. If the subject’s age is less than three years old, the camera will also automatically switch to its Baby scene preset when set to iA. In practice it really works too, and is fairly tolerant of accessories like hats, although sunglasses can fool the system.
If you want to photograph subjects moving toward or away from you at faster speeds, such as vehicles, the Continuous AF (AFC) mode would seem the most appropriate, but this may not be compatible with the lens you’re using. Unfortunately we were unable to test it on the GF1 since the option was greyed-out and unavailable on both of the Micro Four Thirds lenses we had on test: Panasonic’s own 20mm f1.7 or the Olympus 14-42mm kit zoom. Note this is a limitation of the body because both lenses happily worked in Continuous AF mode on the Olympus E-P1. Interestingly the GF1 was able to offer Continuous AF while recording movies, just not when taking stills with these lenses.
All is revealed on Panasonic’s Micro Four Thirds lens compatibility web page, which states the 20mm f1.7 will only support AFS and Manual focusing when taking still photos on any of its bodies to date. The same applies for the Olympus 14-42mm and 17mm Micro Four Thirds lenses when mounted on a Panasonic body. As for full-sized Four Thirds lenses, only a handful will even support AFS mode on the Panasonic bodies, with the bulk of the Olympus range and all of the Sigma models becoming manual focus only.
Luckily all of Panasonic’s other Micro Four Thirds lenses to date, including the 14-45mm kit zoom, will support AFC for still photos on the GF1, GH1 and G1. These variations in AF compatibility are one of the downsides of the format and we’d advise anyone interested in it should check Panasonic’s web page closely.
Returning to single AF mode though, the performance from the GF1 is at least pretty quick. A half-press of the shutter release in any of the four AF modes will see the subject acquired and focused in less than a second when using either the 20mm f1.7 or Olympus 14-42mm kit zoom; and if the lens focus doesn’t have far to travel, it can feel almost instant. Revealingly when either lens was fitted to the Olympus E-P1 (running firmware 1.1), it was noticeably slower – maybe not as bad as some reports have suggested, but at least 50% slower in our tests. This is a key advantage the GF1 has over the E-P1, as it simply feels snappier in general use. If you shoot mostly still subjects in a considered manner, it won’t matter, but if you want something which responds as quickly as possible, then you’ll prefer the GF1.
 |  |
Manual focusing also works well on the GF1. With MF selected using the AF / MF button on the rear, the GF1 will display a magnified view as soon as you start turning the focusing ring; turning the thumb dial lets you adjust the magnification between five or ten-times, the latter corresponding to just over 1:1. Alternatively by pushing the left cross-key the GF1 will display a small frame which can be moved to almost anywhere on the frame for a closer-look. Pressing SET will magnify that area, and again turning the thumb wheel allows you to choose between five and ten-times magnification.
With the maximum 10x magnification and fine resolution of the screen, precise manual focusing is quite possible with the GF1 – and since you’re always monitoring a feed from the actual sensor, there’s no concern over focusing errors which face traditional phase-change systems.
So despite a number of compatibility issues which prevent some lenses from supporting Continuous AF, the autofocus performance of the GF1 remains impressive. It’s accurate, quicker than its rival the E-P1, while the magnified views make manual focusing a breeze.
Panasonic Lumix DMC-GF1 metering, exposures and bracketing
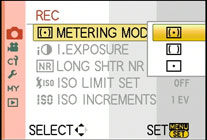 |
The Panasonic Lumix DMC-GF1 offers the same three metering options as the G1 and GH1: Multiple, Centre-weighted and Spot. We used the default Multiple metering during our tests and found very few occasions when compensation was required; you can see various samples in our results and gallery pages.
We would however note the Program line for the 20mm f1.7 lens favours very large apertures even under bright conditions. This ties-in with our tests which found this lens delivers its sharpest results between f2 and f4, while also minimising the potential for camera-shake (as there’s no stabilisation in this lens). But of course a large aperture also means a shallow depth-of-field, so ensure the camera’s focused on the exact area you want – or use Program Shift to select a slightly smaller aperture to give you more margin for error or when you want a larger depth-of-field. Without intervention, you may find most of your photos taken in Program mode with this lens were at an aperture of f2.0 or brighter, which may not deliver the effect you were hoping for.
 | 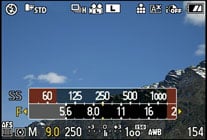 |
Shutter speeds from 1/4000 to 60 seconds are directly available in Shutter Priority or Manual, with a Bulb option in Manual offering longer exposures to a maximum of four minutes while the shutter release is held; the fastest flash sync speed is 1/160. As described on the Design page, the GF1 employs a single thumb dial with a push function, which easily allows you to easily adjust either the shutter or aperture in Manual mode. In Shutter and Aperture Priority, pushing the dial inwards allows you to adjust the exposure compensation. It’s a neat system which eliminates the need for twin dials; indeed we found it ergonomically preferable to the two dials of the Olympus E-P1, but that’s simply down to personal choice.
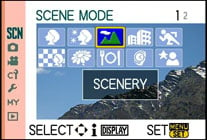 |  |
In addition to the traditional PASM modes, the SCN position on the dial allows you to choose between 17 presets on-screen. The My Colours Mode on the dial alternatively allows you to shoot in Auto but applies a choice of coloured effects – note these are in addition to the various Film Modes available in other modes which we’ll discuss below. The GF1 also offers two Custom modes which access previously registered settings.
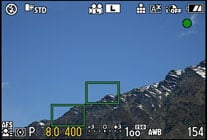
The contrast-based AF system of the Lumix GF1 additionally allows Panasonic to implement its full Intelligent Auto (iA) mode as seen on its latest compacts. This exploits a number of technologies including Scene detection, face detection, digital red-eye removal, Intelligent ISO, Intelligent exposure, Long shutter noise reduction, Quick AF, focus priority and backlight compensation to deliver a seamless automatic experience that has an uncanny ability of figuring out what you’re trying to take.
We repeated a test used on previous Lumix models and found the GF1 seamlessly switched between Landscape mode when pointed at a distant mountain, Macro when moved toward a close subject, and Portrait with Face Detection when turned towards people. It continues to be one of the cleverest fully automatic modes we’ve tested, exploiting the camera’s full range of technologies, and fulfils Micro Four Thirds’ brief to be easier to use than a traditional DSLR by complete beginners. We’d certainly be happy leaving it set to Intelligent Auto for general day-to-day shots or trusting it for capturing spontaneous moments.
In terms of exposure bracketing, it would have been easy for Panasonic to offer the bog-standard three-frame option of most budget DSLRs.
But instead it’s reached for the mid-range and semi-pro categories by offering the same three, five and even seven-frame options as the G1 / GH1 with either one third or two third stops between them. HDR fans will be very satisfied – nice work, and a small trump over the E-P1 which only offers three-frame bracketing.
Panasonic Lumix DMC-GF1 sensor and processing
The Panasonic Lumix DMC-GF1 is equipped with the same 12.1 Megapixel Live MOS sensor as the Lumix G1, which at 17.3x13mm conforms to both the Micro and original Four Third specifications. Note this is a different sensor to the slightly larger model in the GH1, which allows that model to offer multiple aspect ratios without cropping.
 |
 |
 |
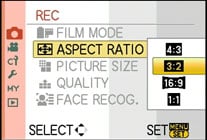
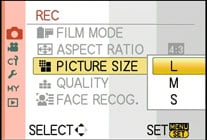
The GF1’s sensor delivers 4:3 images at a maximum resolution of 4000×3000 pixels. Wider 3:2 and 16:9 aspect ratios, along with a square 1:1 option are also available, but like the G1, simply crop pixels from the top and bottom of the frame (or the sides for 1:1) – again only the GH1 offers multiple aspect ratios without cropping.
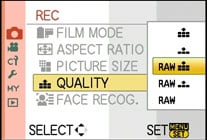
Each aspect ratio on the GF1 is available in two lower resolutions, and the choice of Fine or Standard JPEG compression. The G1 can also record images in RAW, either by themselves, or accompanied by a Fine or Standard JPEG. Best quality Fine JPEGs at the highest 12.1 Megapixel resolution typically measure between 5.5 and 7MB each, while RAW files weigh-in at 14MB each, apparently regardless of content.
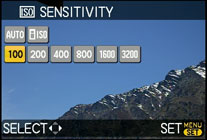 |
Sensitivity runs between 100 and 3200 ISO all at the sensor’s full resolution and you can see examples of each in our High ISO Results page. Auto and Intelligent ISO modes work between 100 ISO and either 400 or 800 ISO respectively. Intelligent ISO takes motion into account and adjusts the sensitivity to allow a sufficiently quick shutter speed to avoid camera-shake.
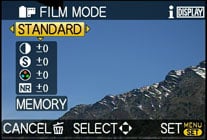
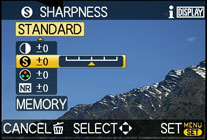
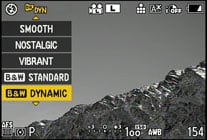
Contrast, Sharpness, Saturation and Noise Reduction are applied using the GF1’s various Film Modes, each adjustable by two steps up or down and accessed via the Q.Menu or main menu system. The GF1 offers nine Film Mode presets (six in colour and three in black and white, although sadly saturation isn’t replaced by any filters in the latter), along with two Custom modes and a Multi Film option which brackets by using your choice of three Film Modes.
We used the default Standard Film Mode throughout our tests and found it delivered a natural-looking, if slightly restrained style to its JPEGs; interestingly the default JPEG output from the Olympus E-P1 applies noticeably greater sharpening and contrast. If you want punchier output from the GF1, choose one of the other Film Modes, or boost the settings as desired.
 |
 |
 |
The GF1 also offers an Intelligent Exposure mode which adjusts the contrast to balance scenes with extremes of brightness. It’s applied automatically in Intelligent Auto, or manually adjusted between four settings in the other modes: Off (the default), Low, Standard or High. When testing the earlier Lumix G1, we found this setting made little effect, but we repeated the test on the GF1 with our standard indoor Church shot which contains dark shadowy ceilings and brightly backlit windows.
|

Panasonic Lumix DMC-GF1 i-Exposure (Off / High) | ||
 | ||
 |  | |
i-Exposure Off: 100 ISO, f5.6, 0.77 sec |
i-Exposure High: 100 ISO, f5.6, 0.77 sec | |
Above you can see samples complete with Histograms showing the same composition taken with Intelligent Exposure Off, then set to its maximum High option – and as you can see, the two images look essentially identical. Certainly there was no brightening of the dark areas or greater protection for those which had become saturated. Of course you may enjoy greater mileage with different subjects.
Finally, the GF1 also applies a number of in-camera optical corrections, including the reduction of coloured fringing on JPEGs.
Panasonic Lumix DMC-GF1 Movie Mode
Despite employing the G1’s sensor, the GF1 offers HD video recording capabilities. It may not boast the Full HD 1920×1080 capabilities of the GH1, but you can record at 1280×720 pixels – just like the Olympus E-P1. Audio is recorded using the built-in mono microphone – sadly there’s no external microphone input.
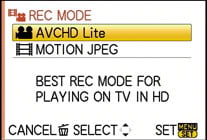 | 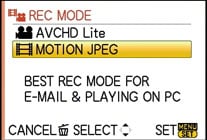 |
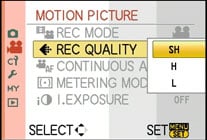
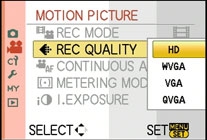
Like recent Panasonic models, the GF1 offers the choice of encoding formats: Motion JPEG for ease of editing, or AVCHD for greater efficiency and longer recording times.
With the camera set to Motion JPEG, you have the four quality choices: HD (1280×720 / 16:9), WVGA (848×480 / 16:9), VGA (640×480 / 4:3) and QVGA (320×240 / 4:3), all recorded at 30fps. Switch to AVCHD Lite mode and the resolution is fixed at 720p (1280×720 / 16:9), but with the choice of three compression settings: SH (17Mbit/s), H (13Mbit/s) or L (9Mbit/s). If you have a ‘PAL’ model (Europe / Aus / NZ), the sensor outputs 25fps and the AVCHD files are recorded at 50p. If you have an ‘NTSC’ model (North America), the sensor outputs 30fps and the AVCHD files are recorded at 60p.
 |  |
The Motion JPEG mode is limited to 2GB per file, which in HD mode will get you just over eight minutes worth of footage. Switching to the more efficient AVCHD mode, the same 2GB file will squeeze in double the recording time, even at the best quality 17Mbit/s setting. AVCHD also has the major benefit of recording until you run out of memory, in theory allowing you to record hours of uninterrupted footage given a big enough card. This is a key advantage the GF1 has over the E-P1, which only offers Motion JPEG with the same 2GB file limit.
Of course the GF1’s battery may run out before your memory does, and there’s the usual sting that European models are limited to individual file lengths of 29 minutes and 59 seconds to comply with tax regulations. But a second shy of half an hour still gives you much more flexibility than eight minutes of Motion JPEG, so why would you bother with the old format?
In a word, compatibility. Motion JPEG can be easily played and edited on almost any system, whereas AVCHD remains a bit of a challenge even for the latest computers. So if you intend to edit your footage, Motion JPEG is preferred, but if you’re just going to play the footage with the camera (either on its screen or a connected HDTV), or of course need more than eight minutes per clip, then use AVCHD.
Another difference worth noting between the two formats is their location on the memory card itself. Motion JPEG ‘MOV’ files may be found alongside your still photos in the DCIM folder, but the AVCHD ‘MTS’ files are buried away in various nested folders which start with one unhelpfully labelled PRIVATE on your card. This is to ensure compatibility with Panasonic’s TVs, and to play them on your computer, simply point your software at this folder and it’ll work out the rest; we had no issues playing back in Cyberlink’s PowerDVD 8 which ‘saw’ them as a Blu-Ray disc, or opening them directly into VLC Player. Either way, just remember to copy the MTS files out of this folder before reformatting your card.
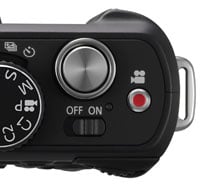 |
The GF1 offers two ways to start recording: you can either press the handy red button on top of the camera at any time, or turn the main dial to Motion Picture P mode. The latter may seem redundant when there’s a button which can start and stop recording in any mode, but it has a number of advantages.
First is the GF1 will adjust its screen to show the filming aspect ratio and remaining time, so you know what you’re going to capture and for how long. To be fair, the GF1 also lets you display the movie aspect ratio and remaining time when shooting stills if preferred, but most will have the screen showing the photo aspect ratio and remaining shots instead.
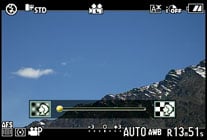 |
The second advantage to using the Motion Picture P mode is having control over the depth-of-field. By default, the GF1 will adjust the exposure compensation if you turn the thumb dial, but push the dial-in, and the GF1 will switch into its ‘peripheral defocus’ option. This displays a graphical scale which goes from blurred on the left to sharp on the right, so while there’s no specific mention of f-numbers, it’s effectively operating like a beginner-friendly version of Aperture Priority. And as you’ll see in our GF1 HD video compilation, it’s certainly possible to achieve a very small depth-of-field if desired, especially with the G VARIO 20mm f1.7 lens.
The downside to filming with this lens on the GF1 though is lack of stabilisation, which resulted in a few wobbles during our tests, especially so under the very windy conditions of the sample clip shown below. We did however film this sequence twice, allowing you to compare the quality, file size and ease of editing of both the AVCHD and Motion JPEG formats. Registered members of Vimeo can download the AVCHD clip and Motion JPEG clip in their original formats. As always, we recommend using VLC for playback under Windows.
Continuous autofocus while filming is possible, but like the GH1 before it, there’s a wealth of caveats depending on the lens in question. For the quickest and quietest results, you’ll need a G VARIO HD lens, although at the time of writing that limited you to the 14-140 zoom sold with the GH1. Other Micro Four Thirds lenses will allow Continuous AF while filming – even the G VARIO 20mm f1.7, despite it not supporting AFC for stills – but the process is slow and audible. As such unless you have access to an ‘HD’ lens, we’d recommend disabling Continuous AF in the movie menus and either fixing the focus before filming or adjusting it manually during.
As for the actual video quality itself, it’s really very good. 720p footage filmed in either Motion JPEG or AVCHD Lite looked detailed and punchy. In terms of recorded detail, both formats were roughly the same, although interestingly the Motion JPEG footage had more sharpening and contrast applied for a punchier result. As such the AVCHD footage looked more natural, although the choice between them again mostly lies between compatibility and file lengths.
We noticed very few undesirable artefacts such as the dreaded jello effect which plagues most video-equipped DSLRs, although again the lack of stabilisation on the G VARIO 20mm f1.7 can spoil a lot of handheld clips filmed with this lens. All-in-all though, a great movie mode in DSLR terms so long as you understand the caveats and don’t expect it to replace your camcorder for casual footage. Once again you can see some more samples in our HD compilation.
Panasonic Lumix DMC-GF1 drive modes
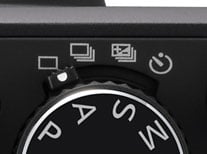 |
The GF1’s various drive modes are selected using the switch around the main mode dial. With Continuous, Bracketing or Self-timer selected, the options change in the super-imposed Q.Menu.
The GF1 offers the same two continuous shooting speeds as the G1 before it: Low speed shoots at 2fps, while High speed shoots at the maximum rate of 3fps. According to Panasonic, you can keep firing off JEPGs at either rate until you run out of memory, or for up to seven RAW frames.
To put this to the test we fitted the GF1 with a freshly formatted Lexar Professional 133x 8GB SDHC card and fired-off 50 Fine JPEGs in 20 seconds, which corresponds to a slightly slower rate of 2.5fps. Switching to RAW and the GF1 fired-off seven frames in 3.5 seconds, corresponding to around 2fps, after which the camera stalled between frames.
So in terms of continuous shooting speed, the GF1 may perform slightly slower than quoted, but roughly matches the speed we measured from the Olympus E-P1. It’s worth noting most new DSLRs costing roughly the same money will deliver slightly faster continuous shooting speeds, with the leader in this price-bracket being the Nikon D5000 with 4fps.
Like other Micro Four Thirds bodies, the GF1 may not have a mirror, but that doesn’t result in silent operation. They all still feature physical shutters, so the sound you hear when shooting photos is real and not a recording. It is a little quieter than the sound of a traditional DSLR taking photos, but not by a great deal. Both the Gf1 and E-P1 share similar volume in this regard.
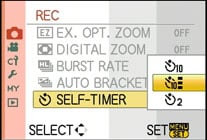 |
The GF1’s self-timer offers standard 10 and two second options, along with a ten second option which takes three frames at around two second intervals. There’s no mirror lockup option because there’s no mirror.
Note: there’s no PC-based remote control option, but Panasonic does offer an optional DMW-RSL1 wired remote control with a simple shutter release button and lock for Bulb exposures.
Now let’s see how the Lumix GF1’s quality compares against the Olympus E-P1 and Canon PowerShot G11 in our Real-life results pages.


