Panasonic Lumix DMC-G3
-
-
Written by Gordon Laing
Intro
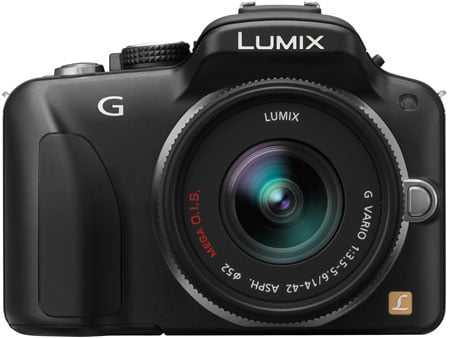
Panasonic’s Lumix DMC-G3 is a compact interchangeable lens camera with a DSLR-sized sensor and HD video capabilities. Successor to the Lumix G2, it’s the first of Panasonic’s third generation of ‘EVIL’ cameras, and like its predecessors, it’s based on the Micro Four Thirds standard.
Like the Lumix G2 before it, the G3 employs the same high resolution electronic viewfinder and fully articulated touch-sensitive screen, although this time the body’s even smaller than before; indeed Panasonic claims the G3 is the smallest and lightest camera with interchangeable lenses and a built-in viewfinder. Surprisingly despite featuring an electronic viewfinder, the body is only fractionally larger than screen-only models like the Lumix GF2 and Olympus E-PL2. Suffice it to say it’s considerably smaller and lighter than traditional DSLRs with articulated screens, such as Canon’s EOS 600D / Rebel T3i or Nikon’s D500.
The Lumix G3 isn’t just about further miniaturisation though: it offers the choice of filming 720p or 1080i video complete with audio recorded by a stereo microphone on the viewfinder head; it inherits the neat touch-screen interface of the GF2, including the ability to tap on the subject you’d like the camera to refocus on while filming video; and there’s a neat picture-in-picture option which gives you a small magnified window when manually focusing, while still showing the complete picture for composition. Perhaps most importantly of all though, the Lumix G3 debuts a brand new 16 Megapixel sensor, finally upgrading the 12 Megapixel sensor employed across all but the high-end GH series to date.
|  |
The Lumix G3 is a particularly exciting camera because not only does it improve upon earlier models, but it also offers much of the higher-end GH2’s capabilities in a smaller, lighter, cheaper and simplified package. In my review I’ll be taking an in-depth look at the Lumix G3, testing the claims and new features, while comparing it to other mirror-less cameras along with traditional DSLR rivals like Canon’s EOS 600D / T3i and Nikon’s D5100. On paper, the Lumix G3 looks like being one of the most appealing Micro Four Thirds cameras to date, so let’s find out if it can deliver the goods in practice.
Panasonic Lumix DMC-G3
Design and Controls
At first glance the Lumix G3 looks similar to its predecessor, the G2, with both resembling shrunken DSLRs with a defined viewfinder head and grip. But place the G3 next to the G2 and you’ll immediately notice a number of important differences: the afore-mentioned grip is now curvier and significantly reduced in depth, in turn relocating the shutter release to the main top surface, while the space to the right of the lens mount has been brought-in.
 | |
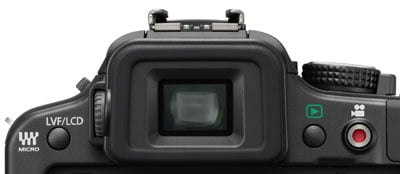
Meanwhile a thinner body has seen the main mode dial shrink in diameter and lose the rotary drive mode switch of the G2, while the second AF mode / area dial of its predecessor has been lost entirely. While the controls have been reduced and simplified from the earlier G2, with greater reliance on the (improved) touch-screen interface, the G3 does at least now feature stereo microphones built into the head, like the GH2.
The most dramatic thing about the G3 is its size and weight, measuring 115x84x47mm and weighing 382g with battery. Compare that to the 124x90x76mm and 444g of the Lumix GH2 body plus battery. This also makes the G3 comfortably smaller and lighter than the fairly compact Sony Alpha SLT-A55, which measures 124x92x85mm and weighs 500g with battery. Next to a traditional DSLR the difference becomes even greater: Nikon’s D5100 and Canon’s EOS T3i / 600D measure 128x97x79mm and 133x100x80mm respectively, and weigh 558g and 570g including their batteries.
|
Canon’s EOS T3i / 600D may be relatively small for a DSLR, but looks positively over-sized next to the G3 – it’s 18mm wider, 13mm taller and 33mm thicker (so long as you don’t count the G3’s viewfinder which pokes out by about 15mm). The G3 is also considerably lighter: there’s a 188g difference between their body plus battery weights, and impressively even if you fit the G3 with its 14-42mm kit lens the total weight still comes in a few grams lighter than the Canon body alone.
Now it’s important to put this into perspective: thanks to its traditional DSLR shape, the G3 when equipped with anything other than a pancake lens is still not going to squeeze into most pockets, but it will occupy considerably less space in a bag than the Canons and Nikons of this world, while also being noticeably lighter. Indeed once you’ve got the G3 in a bag, you’ll hardly know it’s there, and I found myself very happy to take it out everywhere I went.
I’m also pleased to report there’s no cause for concern over the shrunken grip. Sure, you can’t wrap your fingers around it like a traditional DSLR, or indeed the Lumix G2 / GH2, but instead your fingers simply bend down to hold it more like a compact camera, and in use it feels absolutely fine. The build quality, like the G2 before it, also feels very good, but while the body has a satisfying solidity to it, the exterior finish has the bare minimum of rubberised surfaces. As such the plasticky finish feels closer to models like Canon’s budget EOS T3 / 1100D than the higher-end EOS T3i / 600D and Nikon D5100 which it’s arguably pitched directly against. It’s not a deal-breaker by any means, but it does lend the G3 a less classier feel compared to these models.
Returning to the controls, Panasonic may have removed the AF dial and drive switch of the earlier G2, but there’s still plenty of buttons offering direct-access to common items without being forced to go via the touch-screen interface.
Round the back, the navigation cross-keys double-up to offer direct access to the ISO, White Balance, Drive mode and AF area menus, while the DISP and Q.MENU buttons can both be reprogrammed to offer direct access to one of 17 different settings each. It’s an impressive degree of direct access and customisation for a camera of its class, and arguably puts it ahead of the Canon T3i / 600D, not to mention the Nikon D5100.
Panasonic has also fitted the G3 with one of its push-dials on the rear, where a press can change the function of the dial itself. In Aperture and Shutter Priority, the dial naturally defaults to adjust the f-number and shutter speed respectively, but push it in and it’ll subsequently adjust the exposure compensation. Push it in again and it reverts to adjusting the f-number or shutter speed. Pushing the dial in full Manual switches between adjusting the shutter speed and aperture. In Program it can be used to shift the exposure, or again adjust the exposure compensation with a push. Like previous Panasonic models to implement the same dial, it works really well, although I found the wheel itself could have done with protruding a little further to provide better grip; as it stands, I sometimes found myself accidentally pushing it in when I wanted to turn it instead.
|

Completing the controls are a dedicated Movie button which lets you start recording video in any mode, another which enters or exits Intelligent Auto (handy if you’re in another mode with obscure settings but spot a spontaneous photo opportunity), a button to switch between the screen and viewfinder (necessary since the G2’s eye detectors are no longer present on the G3), and Panasonic’s usual manual switch for popping-up the flash, thereby preventing it from opening on its own. The Movie and iA buttons are particularly thoughtful as they let you start filming video or enter the fully automatic mode with a single press without having to worry about turning a dial or entering a specific mode. It makes the G3 quicker, easier and more intuitive to use than its traditional DSLR rivals.
In isolation, the G3’s physical controls are already more than sufficient to deliver quick access to pretty much anything you desire – and indeed beat many rivals in this regard, but remember these are in addition to a very capable touch-screen interface which I’ll come to in the next section.
As mentioned above, the Lumix G3 features a popup flash, which you need to manually open by flicking a switch on the side of the head; with the flash closed, it won’t popup on its own accord, which prevents any nasty surprises. The popup flash has a guide number of 10.5 at the base sensitivity of 160 ISO, which is weaker than the Nikon D5100 and Canon T3i / 600D which sport guide numbers of 12 and 13 respectively at their lower base sensitivities of 100 ISO.
The G3 is also equipped with a hotshoe which can accommodate the optional FL220 / FL360 / FL500 with TTL auto metering; note unlike the Canon T3i / 600D, there’s no built-in wireless flash control.
Moving onto the ports, a flap on the right side of the body opens to reveal remote control, mini HDMI and combined AV / USB jacks, but sadly no external microphone input; this is clearly to differentiate it from the higher-end Lumix GH2, although dangerously for movie fans it does place the G3 behind the Canon T3i / 600D and Nikon D5100 in this regard; annoyingly it was also something you’d find on the earlier G2. On the upside though, Panasonic has equipped the G3 with fairly respectable stereo microphones in the head with four level adjustments and a digital wind filter. I should also mention I couldn’t persuade the G3 to output an HDMI signal while composing or filming, which again puts it behind the GH2 for film-makers wanting to connect an external monitor; not surprising for this model, but worth noting none-the-less.
Finally in a compartment under the body you’ll find the battery and memory card slot. The G3’s smaller grip means it inherits the DMW-BLD10E Lithium Ion battery from the Lumix GF2, with Panasonic quoting around 270 shots taken with either the screen or viewfinder. This figure is about 100 shots fewer than the earlier G2 managed with its bigger battery, although comparable to its DSLR rivals when composing in Live View, but of course a traditional DSLR has the advantage of an optical viewfinder which can roughly double the number of shots taken per charge.
In terms of memory, the G3 is compatible with SD, SDHC and SDXC cards; Panasonic recommends using cards rated at Class 4 or higher when recording AVCHD movies, or Class 6 or higher when recording Motion JPEG movies.
Panasonic Lumix DMC-G3 screen
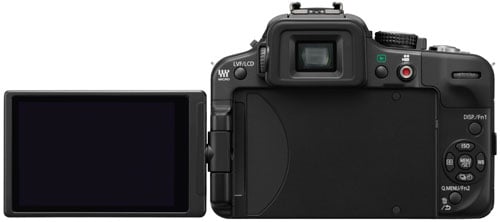
Like its predecessor, the Lumix G3 is equipped with a fully articulated screen which can twist and flip to any direction, including facing forward for crafty self-portraits or back on itself for protection. The screen is hinged at the side, which allows for easy adjustments and viewing even when mounted on a tripod. Canon’s EOS T3i / 600D and Nikon’s D5100 also feature fully articulated screens which are hinged at the side; indeed now it’s only Sony which insists on hinging its screens at the bottom, and as a consequence sometimes finds themselves in an awkward position, especially when mounted on a tripod.
 |
The size, shape and resolution of the G3’s screen are also the same as its predecessor and the GH2 at 3in, 3:2 and 460k dots. When shooting photos in the native 4:3 aspect ratio, the G3 shows thin black bars down either side of the image, with the active area measuring 2.7in on the diagonal. When shooting 16:9 content, such as HD movies, the G3 shows thin black bars above and below the image, resulting in a 2.8in diagonal. Switch to cropped 3:2 shaped images on the G3 and they’ll fill the full 3in diagonal of its screen.
The Canon EOS T3i / 600D and Nikon D5100 also sport 3in screens, although at higher resolutions of 921k and 1040k dots respectively. To put this into perspective, the actual panel resolution of the G3’s screen is 480×320 pixels, while those on the Nikon and Canon are 640×480 and 720×480 pixels respectively. The Nikon D5100’s screen is 4:3 in shape, which means its native 3:2 shaped images only fill 2.8in of it, while 16:9 footage measure 2.7in. The Canon T3i / 600D’s screen is 3:2 in shape, which means its native 3:2 shaped images fill the panel, while 16:9 footage measures 2.85in (yes, 0.05in bigger than the G3).
That’s a lot of numbers to digest, but ultimately the Canon screen looks best to me in terms of fine detail thanks to its higher resolution and the fact images taken at the native shape of its sensor fill the available area. This won’t make any difference to the quality of your shots, but it’s certainly nice to have. I should also note the Panasonic screen was harder to see with bright sunlight shining directly onto it.
But the G3’s screen, like the G2 and GH2 before it, has one major benefit over those on the Canon and Nikon bodies: it’s touch-sensitive. Panasonic has arguably embraced touch-screens more than any other camera manufacturer and is deploying them on a wide range of products. The idea of tapping the screen to confirm settings, dragging icons to customise menus, dragging sliders or swiping through images during playback is something you’ll either enjoy or fail to see the point of; some may even find it less usable than traditional controls. Thankfully Panasonic has retained a full complement of buttons and dials on the G3, so if you prefer, you can operate it entirely without touching the screen.
But novelty aside, there are a few genuine benefits to a touch-screen on a camera. The most useful is without a doubt being able to tap on the subject you’d like the camera to focus on. Panasonic extends this with the G3 so in group shots you can choose which face has priority, while in action sequences, the continuous tracking can by activated by simply tapping on the desired subject even as it moves towards or away from you.
Impressively this can also be exploited when filming video, where the camera can track, say, a person simply by tapping their face. For me though, the neatest application for touch-focusing on the G3 is the ability to refocus between different subjects during the same clip by tapping them. Imagine filming a conversation between two people with a shallow depth-of-field and a fixed camera position. Normally in a movie or TV show, the focus would be adjusted during the sequence so that the person talking was sharp – it’s an almost subliminal effect which helps us know who to watch and listen to. Traditionally this would involve a focus-puller carefully measuring the distance between the camera and the two subjects before then manually adjusting the focus on the lens back and forth while filming. Now with the G3, like the GH2 before it, you simply tap the person you’d like the camera to refocus on.
| |
|---|---|
|
To show it in action, I zoomed the kit lens into its maximum 42mm focal length and filmed a stack of snowboards at R&R Sports in Queenstown; the store lighting was quite low at the time, so even though you have no official control over the aperture while filming on the G3, I suspect it was wide open at f3.5. I then tried to tap on the labels of each board starting with the one closest in the lower left corner. The labels were pretty small and not always easy to accurately tap, but you can see the idea as the camera refocuses on boards going further back in the composition. I then repeated the process, also including the ski boots at the back of the store before returning to the nearest board.
There’s some searching as the focusing locks-on, but generally it’s a great performance, and again something that would be very difficult to achieve with a traditional DSLR, or indeed any camera without a touch-screen. I’ve also tried it with the Leica DG Summilux 25mm f1.4, and while the shallower depth of field makes it harder for the contrast-based AF to get its teeth into, you can still enjoy some great results; see the Movie Mode section lower on this page for an example illustrating this. Ultimately the quick and quiet continuous movie AF along with a touch-screen were powerful allies on the earlier GH2, so it’s great to have them here on the G3 at a lower price. It’s a unique, useful and fun capability which takes the G3 way beyond the video focusing on traditional DSLRs.
Panasonic Lumix DMC-G3 viewfinder
Again like its predecessor and the GH2, the Lumix G3 is equipped with an electronic viewfinder as an alternative means of composition; Panasonic calls this a ‘Live View Finder’ or LVF for short. The G3 inherits the same 1440k dot / 800×600 pixel / 4:3 shaped LVF as the G2 and GH1 before it, rather than the 1530k dot / 852×600 pixel / 3:2 shaped panel in the GH2.
 | |
This means photos taken in the G3’s native 4:3 aspect ratio fill the viewfinder image, while anything wider, such as 3:2 or 16:9 content gradually occupies a smaller area with increasingly thick black bars above and below. That said, the image size is large compared to the optical viewfinders on DSLRs costing a similar amount. Even when set to record 3:2 shaped images (which occupy a smaller cropped area in the LVF), the viewfinder image on the G3 is about 50% wider and taller than that on the Canon EOS T3i / 600D, which in turn is a bit larger than that on the Nikon D5100. Switch the G3 to 4:3 whereupon the entire finder panel is used and the image looks enormous.
This is one of several advantages to the G3’s LVF over the optical viewfinder in a traditional DSLR. Other benefits include 100% coverage and the ability to show Live View and movie composition, not to mention playback, all of which can only be achieved on the screen of a DSLR. Anything you see on the G3’s screen can be replicated in the LVF, including a live histogram, various alignment grids, colour graphics and magnified focusing assistance.
There are however downsides. First, the Field Sequential technology used to generate the image can sometimes ‘tear’ with a rainbow effect during fast pans or when glancing across the image. This seems to affect some people more than others, and unfortunately I personally fall into the ‘affected’ camp. For static shots it’s rarely if ever a problem, but when panning across fine lines, such as fences, the image can break-up in a manner I find quite distracting. But slow down or stop moving and it corrects itself immediately. It’s one of those things you really have to try out for yourself.
The other major downside is the fact you’re looking at an electronic image, rather than one which is simply passing reflected light straight through an optical system. As such in dimmer conditions when optical viewfinders remain quite usable, an electronic one can become noisier and suffer from reduced frame rates. It can also become a deal-breaker for action photographers, since the image between frames when shooting continuously at high speeds is not live but replayed. As such you’re watching where the action was a moment ago as opposed to where it is right now, which can make following fast-moving subjects tricky. Not impossible with practice, but certainly harder than the speed-of-light immediate feedback you get from an optical viewfinder.
Die-hard fans of optical viewfinders will remain unconvinced. When using the G3, you’re never in any doubt it’s an electronic image you’re looking at. It may deliver a large, high resolution image, but it has an electronic appearance, and a finite amount of detail, not to mention limited dynamic range; it’s easy to find bright areas saturating into pure white which contained visible tonal detail through an optical viewfinder. Then there’s the tearing artefacts, battery drain and absence of live feedback when following action at top speeds which we’ll discuss in the continuous shooting section below.
But the counter-arguments are a much bigger apparent image than the often tiny optical viewfinders on budget DSLRs, 100% coverage and the benefit of super-imposed graphics and information. There’ll always be pros and cons to both technologies, but the bottom line is the Lumix G3 Live View Finder is one of the best on the market. For my money though the GH2’s finder still enjoys an edge for wider content thanks to its wider 3:2 shaped panel.
Panasonic Lumix DMC-G3 auto-focusing
The Micro Four Thirds standard exclusively employs Live View for composition, and as a mirror-less system, there’s no opportunity to divert any light to a phase-change autofocus sensor. As such, focusing entirely relies on contrast-based systems, which in the past haven’t always been the quickest solutions around. Panasonic has however been working hard to resolve this, and models like the flagship Lumix GH2 proved contrast-based AF could not only keep up with the speed of phase-change, but actually beat it.
As such I’m really pleased to find the Lumix G3 essentially inherits the GH2’s AF system, which is so good I’ll continue to forgive the cheesy ‘World’s fastest level of light speed’ description. In short it’s the quickest contrast-based AF system I’ve used, snapping confidently onto subjects in a split second. Even when coupled with the basic 14-42mm kit lens, the G3 snaps onto subjects faster than the phase-change AF system and kit lenses of rival DSLRs; switch those DSLRs into Live View and the difference becomes almost embarrassing. In use alongside the Canon EOS T3i / 600D and Nikon D5100 kits, the Lumix G3, like the GH2 before it, simply felt much snappier, not to mention quieter too.
The G3’s AF performance certainly lays to rest any concerns that quick focusing isn’t possible with contrast-based systems, along with the old tradition that phase-change was always faster. It’s also important to remember a contrast-based system works with data from the same sensor you’ll use to the capture the image. This allows contrast-based systems to avoid the front and rear focusing errors which can plague phase-change AF systems, including those on the Sony’s SLT models. So with the G3, you’ve got the best of both worlds: the accuracy and face tracking of a contrast-based system, with the speed of the best phase-change systems.
It’s really worth reiterating the face tracking too, as while phase-change die-hards may remain sceptical, a decent face detection system can be invaluable when photographing people. When using the G3 alongside a traditional DSLR, I found the former’s quick contrast AF and face detection allowed it to lock onto subjects more quickly and accurately than the phase change on the latter – and while most DSLRs now offer face detection in their own Live View modes, their contrast-based AF which ultimately drives the lens is too slow to be practical. I really put this to the test by fitting the G3 with the Leica DG Summilux 25mm f1.4 and photographing close portraits at a three-year-old’s birthday party with the aperture set to f2 or wider. This combination delivered a very high success rate despite the cake-fuelled subjects rarely keeping still for long.
The G3 is also packed with a broad selection of AF modes and options: you can choose from the new Pinpoint mode along with Single area, 23-area, AF Tracking and Face Detection, and like the GH2, these integrate beautifully with the touch-screen. Simply tap the area you’d like the camera to focus on, or the face which should have priority, or touch the subject you’d like to track.
The new Pinpoint mode is a highlight, temporarily magnifying the image by 5 times for a really close conformation, while also letting you swipe the enlarged target area around with your finger until you settle on the desired part of the subject. You can also opt for Manual focusing assistance with either a small window in the middle showing an enlarged view at 4x, or a full-screen view at 5x or 10x. The variety of AF modes, coupled with their touch-controls work really well, and give the G3 a big advantage in flexibility and ease of adjustment over traditional DSLRs.
Panasonic Lumix DMC-G3 sensor and processing
The Lumix G3 marks the debut for a brand new 16 Megapixel sensor which, as you’ll discover in the results pages, is a welcome upgrade over the 12 Megapixel chip previously employed in all Panasonic’s Lumix G models to date apart from the flagship GH range. Indeed by sharing the same effective resolution as the GH2, the G3 becomes the joint-highest resolution Micro Four Thirds camera to date.
Normally packing more pixels into the same surface area would be cause for concern, especially considering the earlier 12 Megapixel sensor was out-performed at high sensitivities by larger APS-C chips, but again as you’ll see in my results pages, Panasonic has done a great job.
The G3 may share the same effective resolution as the GH2, but lacks its clever trick where spare pixels around the edges of a slightly larger sensor are used to maintain the angle of view when shooting in different aspect ratios. The GH2 does this by actually having an 18 Megapixel sensor with a fractionally larger surface area behind the scenes. This means the GH2 can not only maintain its angle of view as the aspect ratio is changed, but also minimise any loss of resolution. In contrast, the G3, like most cameras, will crop its images when shooting at anything wider than its native aspect ratio – which in this case is 4:3 – and those crops will also gradually reduce the angle of view.
 |
 |
 |
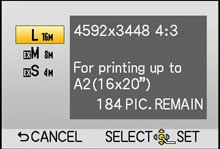
So set the G3 to its maximum 16 Megapixel resolution and it’ll deliver images with 4592×3448 pixels, while 3:2 and 16:9 images measure 4576×3056 (14 Megapixels) and 4576×2576 (11.5 Megapixels) respectively, each becoming increasingly cropped and slightly reducing the field of view. In contrast, the GH2 when set to 4:3 delivers images with 4608×3456 pixels. Switch it to the 3:2 aspect ratio and you’ll capture 15 Megapixel images with 4752×3168 pixels, while in 16:9 records 14 Megapixel images with 4976×2800 pixels. So it’s clear the GH2 not only maintains its angle of view at wider aspect ratios, but also captures more of the view widthways with a higher number of pixels in that dimension too as quoted above. To be fair to the G3, its cropping at wider aspect ratios is again no different to most cameras, it’s just that the flagship GH series are cleverer in this regard.
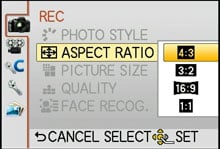
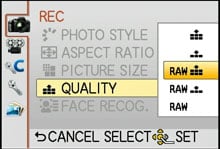
Each aspect ratio on the G3 is available in the choice of three resolutions and with either Standard or Fine JPEG compression; you can also record RAW data at the maximum resolution of each aspect ratio either by itself or accompanied by a Standard or Fine JPEG.
The base sensitivity of the G3 starts at 160 ISO and tops-out at 6400 ISO. This is below the 12800 and 25600 ISO maximums of the Canon EOS T3i / 600D and Nikon D5100 respectively, but again when you look at the noise results for all three, you won’t feel you’re missing out.
The Lumix G3 also sports the same Intelligent Resolution options as the GH2. It’s applied automatically in iA mode, but disabled by default in the PASM modes, where you can manually choose between Off, Low, Standard, High and Extended. To see it in action, I shot my standard test scene again with each of the settings and have presented 100% crops from the same area below for comparison.
Panasonic Lumix DMC-G3 Intelligent Resolution disabled |
Panasonic Lumix DMC-G3 Intelligent Resolution Extended | |
 |  | |
100% crop, 1/800, f5.6, 160 ISO |
100% crop, 1/800, f5.6, 160 ISO | |
In the example above, Intelligent Resolution has done a good job of applying fairly significant sharpening while minimising the usual artefacts. It’s certainly delivered a punchier result than the somewhat laid-back style of the default JPEG processing, although you may prefer the result from RAW files, as seen in the results section.
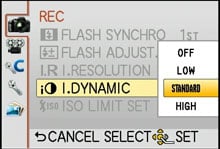 |
Like most new Panasonic cameras, the G3 also features I.Dynamic, or Intelligent Dynamic Range control, which automatically adjusts the contrast when there’s a big difference between light and dark areas on the image. Again it’s applied automatically in iA, but off by default in the PASM modes, where you can choose between Off, Low, Standard and High.
To put it to the test I photographed my standard low-light test scene with each of the settings; this composition features both dark shadows in the roofing, along with brightly backlit windows. I’ve pictured two samples with histograms below with I.Dynamic disabled on the left and set to High on the right. Like the GH2 before it though, this particular scene didn’t benefit from I.Dynamic.
Panasonic Lumix DMC-G3 I.Dynamic disabled |
Panasonic Lumix DMC-G3 I.Dynamic High | |
 |  | |
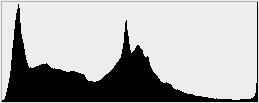 | 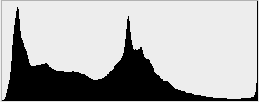 | |
1/2.5 secs, f5.6, 160 ISO |
1/2.5 secs, f5.6, 160 ISO | |
The Lumix G3 also offers a choice of five special effects which can be applied to pictures as you take them in the ‘Creative Control Mode’. It’s pretty simple, just turn the mode dial to the icon of the artist’s palette, then choose from Expressive for a pop-style saturated effect, Retro for a faded effect, High Key to expose for highlights, Sepia to apply a sepia tone, and High Dynamic to adjust bright and dark areas. Before you get too excited, the latter only takes a single frame, so there’s no clever compositing of multiple images; the result is no different to tweaking the levels or curves later. To illustrate four of the five effects in practice, I applied them while shooting my standard low-light scene, below.
Panasonic Lumix DMC-G3 Expressive Creative Control Mode |
Panasonic Lumix DMC-G3 Retro Creative Control Mode | |
 |
 | |
Panasonic Lumix DMC-G3 Sepia Creative Control Mode |
Panasonic Lumix DMC-G3 High Dynamic Creative Control Mode | |
 |  |
The Lumix G3 additionally supports Panasonic’s recent H-FT012E 3D lens which employs two separate lenses to generate a 3D image on compatible cameras. When fitted with the lens, the G3 can record 2D JPEGs with an accompanying MPO file containing depth information which can be interpreted by most 3D TVs to display a 3D image. The maximum resolution supported is 1824×1368 pixels in the ‘4:3’ aspect ratio. Note, the G3 can only record still 3D photos with this lens, not 3D movies.
A quick note on exposures: the G3 offers shutter speeds from 1/4000 to 60 seconds, but while long exposure fans will welcome the ability to select 60 seconds in Manual without the need for a cable release to keep the shutter open, the G3’s Bulb mode only extends this by about two times to a maximum of around 120 seconds. If you want longer exposures, you’ll be better-off with a traditional DSLR.
On the upside, the exposure compensation is available in a broad range of +/-5EV, and the exposure bracketing can be set to three, five or a generous seven frames at up to 1EV apart; so while deep-sky astro-photographers will be disappointed by the two-minute bulb, HDR fans will love the seven-frame bracketing. In these respects it’s the same as the flagship GH2, and in terms of bracketing, a step-up from rival DSLRs at similar price points as these tend to just offer three frames.
Panasonic Lumix DMC-G3 movie mode
Like the GH2 before it, the G3 can capture Full HD video with continuous autofocus and stereo audio recorded from built-in mics (complete with level meters and level adjustment if you like), although Panasonic has been careful to limit the feature-set on the new model so not to tread on the toes of the flagship.
 |
 |
 |
 |
 |
|
As such the G3 is lacking the external microphone input of the GH2, along with the ability to output a clean – or indeed any – signal over its HDMI port while filming, preventing the use of external monitors. There’s also no formal manual control over movie exposures on the G3, nor the choice of adjustable frame rates, and while the G3 does offer the tele-converter crop function of the GH2, it only does so at 720p, not 1080. In addition, the sensor outputs 25p or 30p depending on region, which is then converted into 50p / 50i or 60p / 60i for 720 and 1080 options, whereas the GH2’s sensor actually output 50 or 60p, giving it an encoding and AF advantage over the G3.
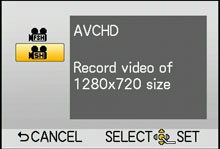
Like earlier Panasonic cameras, you still have the choice of AVCHD or Motion JPEG encoding for movies. Set the G3 to AVCHD and you can choose from FSH (1080i encoded at 50i or 60i (from 25 or 30fps sensor output) depending on region, or SH (720p encoded at 50p or 60p (again from 25 or 30fps sensor output). Both modes consume around 17Mbit/s. Panasonic recommends a Class 4 card or faster for AVCHD recording in either mode.
Switch the G3 to Motion JPEG mode and you can choose from QVGA (320×240) , VGA (640×480) and HD (1280×720) options, all encoded as progressive files at 30fps regardless of region; Panasonic recommends a Class 6 card for Motion JPEG modes.
You can start recording video in any shooting mode by simply pressing the dedicated record button next to the right of the viewfinder, and the G3 can also capture still photos while recording without interrupting the video, albeit only at the video resolution – for example, 2 Megapixel 1920×1080 images when filming in the AVCHD (1080i) mode. You can alternatively set the camera to capture full resolution stills while filming, but doing so will briefly interrupt the footage.
As with previous Panasonic cameras offering the choice of AVCHD and Motion JPEG encoding, the latter is easier to edit, but limited to file sizes of 2GB – which in turn limits you to around seven and a half minutes of recording time per clip in the 720p HD mode. In contrast, AVCHD may be tougher to edit, but creates smaller files and can keep recording until you run out of memory. The same 2GB file would actually get you 13 minutes in AVCHD. Fit an 8GB card, and you could record for an hour, uninterrupted.
The only caveat for maximum recording times as always concerns cameras destined for the European market, which for tax regulations are limited to 29 minutes and 59 seconds. This is annoying if you’re recording anything which lasts longer than half an hour, but it’s still four times longer than the maximum length in Motion JPEG, and you can of course just start recording a new clip when the first one ends.
Unlike the GH2’s Creative Movie mode which lets you choose from Program, Aperture Priority, Shutter Priority or full Manual, the G3’s movie exposures are automatic. The camera chooses the ISO and shutter speed automatically, and also the aperture when the mode dial is set to Program or if iA is enabled. I did however find the G3 appeared to inherit the f-number in Aperture Priority mode when you started to film, which gives some control over depth of field. It’s not a formal control and I’m not sure of any limitations, but it’s a start for those who like to fix the aperture setting. Of course an alternative is to use an older third-party lens with a manual aperture ring via an adapter, such as a Nikkor model.
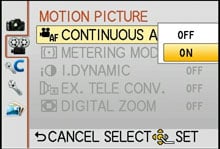
The typical buyer of the G3 will however be much more interested in its continuous autofocusing capabilities, which like the GH2 before it, are very impressive. To date, most traditional DSLRs either perform painfully slow and obvious focusing searches while filming, or don’t bother at all and force you to manually focus. Sony’s Alpha SLT models sport a far superior experience thanks to their translucent mirrors allowing phase-change AF sensors to remain active during filming, but focusing can still be audible with common lenses.
In contrast, the Lumix G3 manages to deliver continuous AF while filming both quietly and fairly quickly. Don’t get me wrong, it’s not perfect: the G3’s contrast-based AF can’t help but search back and forth in order to confirm focus, whereas the Sony SLT’s phase-change AF tends to avoid it. But on the whole the Lumix G3 locks-on fairly quickly, quietly and without fuss. The slower sensor output means it’s not as quick as the GH2, but it remains an impressive performance none-the-less and far superior to that from traditional DSLRs like the Canon EO ST3i / 600D or Nikon D5100.
As described and demonstrated in the AF section above, the G3 also inherits a neat option from modern camcorders where you can use the touch-screen to tap on the subject you’d like the camera to refocus on, while you’re filming. This is great for pulling-focus between subjects without recomposing the shot. Again as seen in the sample video earlier on this page, there can still be a little visible searching, but it remains a useful and enjoyable feature for those who don’t want to manually pull-focus; here’s another sample showing it in action.
Here are a selection of sample videos filmed with the Panasonic Lumix DMC-G3 using its G VARIO 14-42mm kit lens and best-quality 1080 / 60i AVCHD movie mode. Registered members of Vimeo can download the original files by clicking the links below each window; these take you to the Vimeo page where the video is hosted and the link to download the actual file can be found under the ‘About this video’ section in the lower right.
| |
|---|---|
|
In my first clip above the first thing to notice is the lack of vertical streaking around the sunlight reflections on the water – this is a benefit of a camera with a MOS sensor. As I panned the camera around, the kit lens did a fairly good job of reducing the wobbles. You may also notice the continuous autofocusing in action here, searching from time to time. With this subject matter, it would have been best to disable continuous AF, as the occasional searching is a little distracting, but the impressive aspect is the virtual silence in which it operates – with ambient sounds, you simply cannot hear the AF system, or indeed the optical stabilisation, operating. This is a major improvement over models like the Nikon D5100 which grind away quite audibly while focusing.
| |
|---|---|
|
In my second clip above, I locked the G3 to a tripod, disabled stabilisation and AF on the kit lens and smoothly panned from left to right. As you’d expect, the result is clean and detailed without any distracting searching from the AF system.
| |
|---|---|
|
Moving on, my third clip above was filmed handheld in a relatively dim bar with both stabilisation and continuous AF enabled. Under these conditions the G3 was quite happy to lock onto the subject, but the constant panning in this clip meant it sometimes lost focus and searched a little. The good news is the AF system remains essentially silent, although again for a clip like this without a moving subject, you’d still be better just disabling continuous AF.
| |
|---|---|
|
My fourth clip, above, deliberately put the continuous AF system to the test. First I locked the AF area to the middle of the frame, then simply moved the camera around, pointing it at various subjects near and far at Vudu Cafe in Queenstown to see how the continuous autofocus coped. Give the G3 some defined edges for its contrast-based AF system to lock-onto and it can do a great job, refocusing fairly quickly and again silently. There’s a little searching back and forth and occasional pauses which made the G3 feel less confident and responsive than the high-end GH2, but I’m still impressed by the result; it’s certainly a lot better than any traditional DSLR. Nice coffee too…
| |
|---|---|
|
In my fifth clip, above, I’ve given the G3 a more predictable subject to follow with its continuous AF and subject tracking. I zoomed the kit lens to 42mm, set the subject tracking by tapping the screen, then followed the Skyline logo on the cable car as it steadily approached. To be fair the G3 kit doesn’t have the smallest depth-of-field even when zoomed-in, but to its credit, the camera does a good job at keeping the subject in sharp focus with minimal searching – and again with no audible noise. Again a great result for the G3 and something a traditional DSLR would struggle with.
| |
|---|---|
|
In this final video above, I fitted the Leica DG Summilux 25mm f1.4 lens and used the Lumix G3’s touch-screen to ‘pull-focus’ between the salt shaker and the menu on the table in the background. There’s no official control over the aperture when filming video with the Lumix G3, although judging from still photos taken from the same position moments before, I’d be confident in saying this was filmed with the Leica 25mm’s aperture wide-open at f1.4. Since the salt shaker was positioned close to the minimum focusing distance, the depth of field is very shallow, rendering even the table alongside into a satisfying blur. Unfortunately this also means there’s little for the G3’s contrast-based AF to get its teeth into and it struggles a little here; indeed I struggled a little too to find the menu and salt shaker to tap on when they were out of focus. As such it’s not surprising to see the contrast AF search a little, but at least the focusing is quiet, smooth and fairly swift. Unlike comparable DSLRs, this is an effect that’s a doddle to achieve with the G3’s touch-screen system.
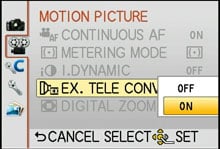 |
Finally, like the GH2 before it, the G3 offers a teleconverter option which crops an HD frame from the middle of the sensor, thereby delivering a magnified view without any loss of quality. The GH2 allowed you to do this for either 1080 or 720 video, delivering effective magnifications of 2.6 or 3.9x.
Sadly the G3 doesn’t offer the teleconverter for 1080 video, but it’s there for 720 if you’re interested, again delivering roughly 3.9x magnification with an area cropped from the middle of the frame. While it’s a shame the 1080 option is no longer present, it remains a useful facility. I should however note the Canon EOS T3i / 600D offers a similar movie crop feature for Full HD 1080 video.
Panasonic Lumix DMC-GH2 using 14-140mm at 140mm 720p footage with Extra Tele Converter disabled |
Panasonic Lumix DMC-GH2 using 14-140mm at 140mm 720p footage with Extra Tele Converter enabled | |
Download the original file (Registered members of Vimeo only) |
Download the original file (Registered members of Vimeo only) | |
Above are two examples illustrating the earlier GH2’s teleconverter for movies, filmed from the same position and focal length, one without the teleconverter on the left and one with on the right. The G3 delivers exactly the same result; I’ll add new samples for this soon.
Panasonic Lumix DMC-G3 continuous shooting
The Panasonic Lumix G3 offers four continuous shooting speeds: Low speed shoots at 2fps, Middle speed at 3fps and High speed at 4fps, all at the full 16 Megapixel resolution, while the Super High speed mode drops the resolution to 4 Megapixels, allowing it to fire-off bursts at 20fps. The Nikon D5100 claims 4fps and the Canon EOS T3i / 600D 3.7fps at their full resolutions respectively.
As always I tested all the continuous shooting modes under real-life action conditions, photographing Queenstown’s famous Shotover Jet boats zooming past and performing 360 degree spins. You can see a sequence below taken at the 20fps Super High Speed mode.
 |
 |
 |
 |
 | ||||
 |
 |
 |
 |
 |
Before discussing speeds in detail, it’s important to mention the difference between composing with a 100% live view system like the G3 for action shots compared to a traditional DSLR: between frames, the image displayed by the screen or viewfinder is not actually live, but the previous photo played-back. So while you have the shutter release held, you’re effectively shooting blind.
This causes a problem when the action requires panning, as you have no feedback as to where to point the camera other than the previous photo you took – by which time the subject will of course have moved-on. As such, panning on live view systems involves a certain degree of blind anticipation and adjusting the camera further than the image you’re viewing might suggest. It’s something you do get used to, but it’s nowhere as intuitive or easy as the optical viewfinder in a traditional DSLR which thanks to the speed of light gives a brief glimpse at what’s happening between frames, allowing you to recompose as required.
If the G3 is set to High or Super High Speed, the image between frames is the previous one played back, but reduce the shooting speed to the 3 or 2fps modes and the camera has sufficient processing muscle to display a live image between frames.
Another important difference regards continuous autofocusing while shooting. The G3 can do it, but taking a reading from the contrast-based system is much slower than the combination of phase-change and predictive AF on a traditional DSLR. So switch the G3 to continuous AF and you’ll see the shooting speed dramatically reduce, whereas on the Canon and Nikon it remains essentially unchanged. Indeed if you’re shooting with Continuous AF on the G3, you may as well select the 3fps mode for live feedback as the AF system will effectively slow it down beyond this rate anyway.
Okay, now for the speeds. Set to Large JPEG and High Speed mode, the G3 fired-off nine frames in 2.3 seconds before slowing to around 2.2fps, corresponding to an initial burst speed of 3.9fps. Set to RAW, the G3 fired-off seven frames in 1.8 seconds, again corresponding to 3.9fps. Finally, wehn set to Super High speed mode, the G3 grabbed a 40-frame burst in 2.2 seconds, corresponding to a rate of 18fps.
So in practice, the G3 essentially delivers its quoted speeds, coming-in a fraction faster than the Nikon D5100 at 3.8fps and the Canon EOS T3i / 600D at 3.6fps. The difference in speeds is almost imperceptible though and importantly, the G3 began to slow beyond its initial burst much sooner, after ten or fewer frames, compared to around 20 for the DSLRs. Considering the G3 fights back with a higher speed option at a lower resolution, there’s pros and cons to all the models, but the bottom line is the absence of live feedback when shooting above 3fps will rule-out the G3 for anyone really serious about action photography. To be fair, its rivals which share 100% live view systems are currently no better, so this remains an area where a traditional DSLR with an optical viewfinder is preferred.
Now check out my Panasonic Lumix G3 image quality results.


