Panasonic Lumix DMC-TZ3
-
-
Written by Gordon Laing
Panasonic Lumix DMC-TZ3 screen
Panasonic Lumix TZ3 features continued…
Lenses and OIS / Screen and menus / Sensor and processing
One of the major upgrades enjoyed by the Lumix TZ3 over its predecessor is a bigger screen: 3in compared to 2.5in, and it now dominates the camera’s rear surface. The TZ3’s screen is also more detailed with 230,000 pixels and looks bright and detailed in practice – fortunately too considering there’s no room for an electronic or optical viewfinder to use as an alternative.
 |
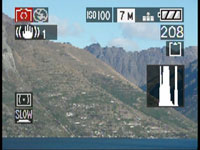
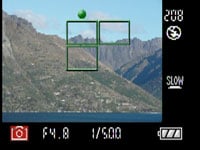
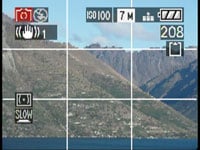
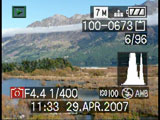
A dedicated Display / LCD mode button on the back of the TZ3 cycles between five display modes: the first just shows the composition, the second overlays exposure and shooting details, the third additionally presents a live brightness histogram, the fourth shrinks the frame to allow exposure details around the side like a DSLR viewfinder, while the fifth overlays a three-by-three grid to aid composition and lining up. An option in the Setup menus allows you to switch the grid for an alternative pattern and also display a live histogram in addition to the grid if desired.
 |
 |
 |
Holding the Display / LCD Mode button for a second presents two options for brightening the screen. The second option, called High Angle, is designed for use with the camera held high above your head. Viewed face-on, it simply appears to increase the screen brightness, but with the camera held high above you as intended, it certainly makes viewing the screen much easier; not as easy as a flip-out screen, but it’s still surprisingly effective.
 |
Panasonic Lumix DMC-TZ3 menus
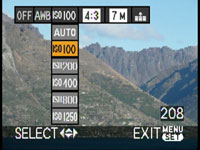 |
The Lumix TZ3 inherits one of the most useful features of Panasonic’s higher-end LX and FZ series cameras: a super-imposed drop-down menu which appears at a touch of the ‘Func’ button to offer immediate access to a variety of settings.
With the TZ3 set to Normal record mode, this menu offers instant access to the drive mode, White Balance, sensitivity, aspect ratio, resolution and compression. It’s a wonderful implementation in practice and a most welcome enhancement over the TZ1.
Beyond this though the TZ3 is operated pretty much the same way as its predecessor with only a handful of menu alterations. Pressing the middle ‘Menu / Set’ button on the back of the camera presents the relevant menu options for the mode you’re currently using. These are all attractive and well designed with smooth fonts and clear icons.
In Normal recording mode, the menus are divided into Recording and Setup sections, selected using tabs on the left side; these sections have three and four pages of options respectively.
The first Recording menu page allows you to choose the White Balance, ISO sensitivity, Image Aspect Ratio, Picture resolution and Compression quality – see our next Features page for further details on these options.
 |
 |
The second Recording page allows you to enable Audio recording, change the metering and AF options, and set the burst mode – the latter was previously accessed using a button on the back of the TZ1, but the TZ3 uses this button as its Func control.
The third recording page includes options to adjust the colour mode and limit the slowest shutter speed from 1/8 to 1 second. The TZ1’s option to create a stop-motion animation using up to 100 still images is sadly no longer present on the TZ3.
 |
 |
Options across the four Setup menu pages include switching the aspect ratio of your TV from 4:3 to widescreen 16:9 – this generates a squashed anamorphic output, ready to be stretched horizontally to fit a widescreen TV, just like a DVD movie. You can also record images in 4:3, 3:2 or 16:9 formats; see the following Features page for more details.
The Setup menus also feature a world clock function which allows you to choose between home and destination time zones to store the local time on images. You can even set the start and end date of a holiday to automatically switch time zones – neat.
 |
 |
Switching the TZ1 to Simple mode (indicated by a heart on the mode dial) limits the menu to just four basic options, allowing you to choose overall image quality by size, whether to enable auto review or audio beeps, and to set the clock.
In playback mode you can press the Display button to show a histogram if desired, and you can of course also zoom-out to show increasing numbers of thumbnails.
Another feature of recent Panasonic compacts now offered by the TZ3 is the ability to display two images simultaneously during playback for easy comparison. In theory this is really no different from a thumbnail mode which only shows two pictures, but Panasonic cleverly flips them on their side so you use the screen in a portrait orientation to maximise their reproduction.
This ‘Dual Display’ option is quite useful in practice, especially on a detailed 3in screen and as you can also choose which two images to show alongside each other – rather than just two consecutive files.
For a demonstration of the Panasonic TZ3’s menu system, check out our video tour.


