Panasonic Lumix DMC-L1
-
-
Written by Gordon Laing
Panasonic Lumix DMC-L1 sensor and files
Panasonic Lumix L1 features continued…
Lenses and viewfinder / Screen and menus / Sensor and processing / Anti dust
 |
The Lumix L1 is equipped with a 7.5 Megapixel Live MOS sensor developed by Panasonic and also employed by the Olympus E-330. Measuring 17.3x13mm, this sensor delivers 4:3 aspect ratio images with a maximum resolution of 3136×2352 pixels. At 300 dpi, this allows reproduction at around 10.5x8in.
 |
 | ||
While 7.5 Megapixels is sufficient for most requirements, the Lumix L1 does of course enter a market currently dominated by 10 Megapixel DSLRs. It’s important to remember though most of these 10 Megapixel models deliver wider 3:2 aspect ratio images with 3872×2592 pixels; since there’s only an advantage of 250 pixels or so vertically, most of the additional ‘Megapixels’ are devoted to the sides of the wider image.
Panasonic also claims there’s no technical limitation to the resolution of its Live MOS sensor, and that 7.5 Megapixels was chosen for the best balance between detail and noise performance. Check our results pages to see how the L1 measures up in these respects against rival models.
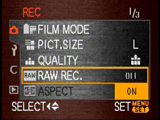 |
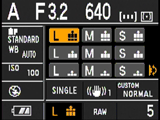
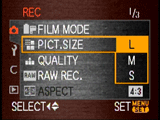
The L1’s images can be recorded at three different resolutions in its native 4:3 aspect ratio, each with the choice of three different JPEG compression levels; best quality SuperFine JPEGs typically measure between 3.5 and 6MB, with most working out around 4.5MB each. Cropped 3:2 and 16:9 aspect ratios are also offered when shooting in Live View mode. You can additionally set the L1 to record in a RAW format, although this is always in addition to a JPEG. The L1’s RAW files measure just under 15MB each.
Panasonic supplies its PhotoFun StudioViewer for basic RAW conversions and SilkyPix Developer Studio 2.0 SE for more sophisticated adjustments. The L1’s RAW files are also supported by Adobe Camera RAW version 3.5 onwards, and that’s what we’ve used for our RAW versus JPEG examples on our results pages.
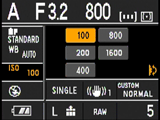 |
Sensitivity is offered from 100 to 1600 ISO in relatively coarse 1 EV increments. Noise reduction is applied using the L1’s Film Modes – see below – and available in five steps from -2 to +2. Interestingly the default Standard Film Mode applies the noise reduction at its minimum -2 setting.
Colour and white balance
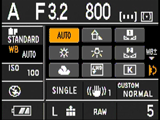
The L1 offers Auto, daylight, cloudy, shade, halogen and flash presets along with two custom white balance settings and manual entry of the colour temperature from 2500 to 10000K – the latter complete with a live preview and a scale showing icons for the preset positions.
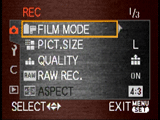 |
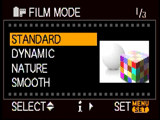
Contrast, sharpness, saturation and noise reduction are applied using a choice of nine Film Modes, including three black and white options and two custom modes. In the colour Film Modes, all four settings can be adjusted on a scale of -2 to +2.
 |
 | ||
We used the default Standard Film Mode for our Gallery and test shots which has contrast, sharpness and saturation set to their middle zero positions and noise reduction as the minimum -2 setting. This delivered natural-looking images with a pleasing, almost subdued quality compared to many consumer cameras, although if you prefer punchier results, just switch to the Dynamic Film Mode.
Image processing and handling
Panasonic quotes a continuous shooting rate of 3fps, for a maximum of six shots in RAW, or as many as you have memory available for in JPEG. To put this to the test we fitted our L1 with a SanDisk Ultra II 1GB SD card and set the shutter speed to 1/1000.
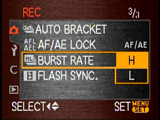 |
With the quality set to SuperFine JPEG mode we fired-off 17 shots in six seconds before the L1 paused ever so slightly and continued. The shooting rate varied from this point on, although continued firing while there was memory remaining; the initial burst corresponds to Panasonic’s 3fps rate.
We then set the L1 to record a RAW image, which as explained above, is always in addition to a JPEG. This time the L1 performed exactly as quoted, firing off six frames in two seconds, again corresponding to 3fps. Once the six frames had been grabbed though, the L1 paused to clear its buffer – we had to wait three seconds after this burst before being able to take another shot.
In terms of general handling, the L1 is pretty good. It can go from cold power-off to firing off its first shot in 1.3 seconds, which as we’ll explain on the next page includes the compulsory sensor-cleaning process. That’s quite impressive, and while admittedly not as quick as the best digital SLRs, you certainly don’t feel like you’re being kept waiting.
The autofocus was accurate and the Leica zoom fast and quiet in operation. The L1 is only equipped with a basic three-point AF system though, so it’s not an ideal camera for tracking complex action away from the middle of the frame.