 The PEN E-PL5 looks the part, but it can also deliver when it comes to other things that photographers value. Its image quality is excellent (certainly not beaten by many APS-C models), it handles very well, and it's a capable video camera too. It provides lots of physical controls, plenty of options for customisation and you can plug in an accessory viewfinder - all things that will appeal to enthusiasts. At the same time it has a touch-screen, easy-to use auto modes and lots of fun features, so it's also very well suited to compact upgraders and other novices. This-all round versatility is something that's not easy to achieve but Olympus has pulled it of with great style and panache, a feat which earns the E-PL5 our Highly Recommended award.
Olympus PEN E-PL5 review
-
-
Written by Ken McMahon
Intro
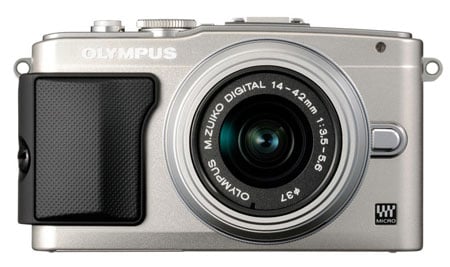
The Olympus PEN E-PL5 is a mid-range mirror-less compact system camera (CSC) with a 16 Megapixel sensor and a 3in articulated touch screen. Like all Olympus CSCs, the PEN E-PL5 employs the Micro Four Thirds standard and this model sits in the middle of the retro-styled PEN range between the entry-level PEN Mini E-PM2 and the flagship PEN E-P3; it also supercedes the earlier PEN E-PL3 which, for now, remains in the line-up.
The E-PL5’s new sensor is the same as that used in the SLR-style OM-D E-M5, so it’s slightly smaller than the APS-C sensor in the Canon EOS M and Sony NEX models and produces squarer 4:3 proportioned images. Unsurprisingly the E-PL5 shares the same video modes as the E-M5 with a best quality 1080p30 mode and can shoot continuously at 8fps. It’s supplied as a kit with the M.Zuiko 14-42mm f3.5-5.6 lens which, with a 2x field reduction factor, has a 35mm equivalent range of 28-84mm. Like all PEN models the E-PL5 has built-in sensor-shift image stabilisation which works with any lens you attach, a unique advantage over all other CSCs.
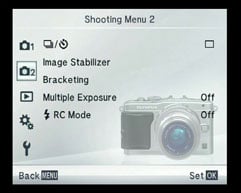
The E-PL5 gets a new 3in touch-screen that flips up-and-over for self-shooting and it’s also compatible with a choice of optional electronic viewfinders. The touch screen works to augment, rather than replace physical controls, though, and the E-PL5 sports a conventional mode dial, a rear control wheel and a programmable function button. It provides an excellent range of auto bracketing options and is highly customisable.
There’s lots of competition in the mirror-less CSC market for the PEN E-PL5, and now that Canon has finally released a compact system camera, there’ll be a lot more. I’ve compared the PEN E-PL5 to the EOS M, Canon’s entry into this highly popular and rapidly expanding market sector. Read on to find out if the newcomer has what it takes to compete with the latest additon to the establised and highly regarded PEN range.
 |
Olympus E-PL5 design and controls
Measuring 111 x 64 x 38mm and weighting 325 grams with card and battery, but without the lens, the PEN E-PL5 is 1mm thicker than its predecessor and a tiny bit (7g) heavier. So they’re more or less the same size and weight, but the body shape has changed in a number of subtle details. The front panel has a slightly convex shape now and the lens mount doesn’t protrude as much, the slope at the top of the rear panel is gentler, the screen looks a little more robust and the thumb grip is bigger. Like the E-P3, the E-PL5 now has a detachable screw front grip which is supplied with the camera. Along with the other body modifications it makes the E-PL5 a much more comfortable camera to hold and one which feels a lot more secure in your hand. I screwed the grip on immediately on removing the E-PL5 from the box and that’s where it stayed. It not only provides a more secure grip but, in my view, actually improves the looks of the E-PL5.
 |
The Canon EOS M measures 109x67x33mm and weighs 298g with battery but no lens, so it’s a little narrower and 5mm thinner than the E-PL5 and weighs a little less, but a camera without a lens isn’t much use and when you attach the respective kit lenses, it’s the PEN that wins the compactness contest. The PEN E-PL5’s 14-42mm kit lens weighs 113g compared with 210g for the EF-M 18-55mm. So with their respective kit lenses attached the EOS M weighs 508g and the E-PL5 weighs 438g. Plus, the E-PL5’s lens retracts when not in use and is more compact than the EOS M’s. Of course you don’t have to fit the kit lens and the EOS M is more compact, even pocketable with the 22mm f1.8 pancake prime fitted, but so is the E-PL5 with the 17mm f2.8. And there are many more native lens options for the E-PL5, like, for example the new 15mm f8 body cap lens, or Panasonic’s 14-42mm collapsing Power Zoom.
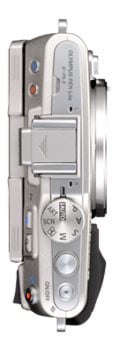
The PEN E-PL5 control layout is exactly the same as that of the earlier E-PL3. It has a mode dial on the top panel with positions for the PASM modes, Intelligent auto, Art filters, Scene modes and finally movie shooting. The top rear panel slopes gently backwards so it’s now much easier to see the controls here when looking down from above. These include playback and delete buttons on the left of the accessory port and Fn and magnify buttons to the right of it. The accessory port itself is centrally located to the rear of the hotshoe – accessories like the included flash and optional electronic viewfinder slide into the hotshoe and connect via the port. Finally on the far right there’s a dedicated movie record button.
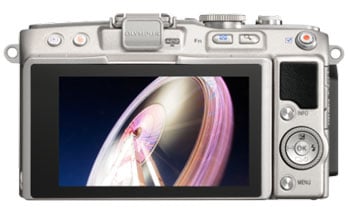
Moving down to the back panel, this is dominated by the 3in articulated screen , which I’ll talk about in more detail shortly. To the right of it below the enlarged thumb rest you’ll find a four way control dial flanked top and bottom by info and menu buttons.
On the right side of the body there is a plastic hinged flap covering the combined USB / A/V out and mini HDMI ports. On the base the combined battery and card compartment takes the same BLS-5 battery as other PEN models which provides enough power for a respectable 360 shots.
 |
As with the other models in the PEN range, the E-PL5 doesn’t have a built-in flash, but is supplied with a tiny accessory flash unit that fits into the standard hotshoe and also couples with the AP2 accessory port. The flash has a Guide number of 10 at 200 ISO which gives it a range of nearly 3 metres at f3.5, exactly the same as the Sony NEX-C3’s supplied external flash. The flash accessory suplied in some regions with the EOS M is more powerful but has the same range at the EOS M’s base 100 ISO setting as the E-PL5’s flash does at 200 ISO.
The E-PL5 has no fewer than 8 positions on the flash mode menu – Auto, Redeye, Fill in, Flash off, Red-eye slow, Slow, Slow 2, and Full. The fastest sync speed is 1/160. To use the flash you manually pop it up into the raised position, at which point if you’re in Auto flash mode it will immediately start charging. This takes about two to three seconds with a fully charged battery – unlike the EOS M’s accessory flash, which is powered by AAA batteries, the PEN E-PL5′ flash draws its power from the camera battery. The CIPA rating of 360 shots on a full charge includes use of the flash. If you need more power than the accessory flash can provide, the E-PL3 is also compatible with Olympus’ FL36R, FL50R, FL300R and FL600R wireless flash units.
Olympus E-PL5 screen and viewfinder
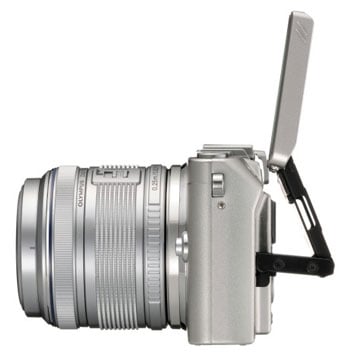
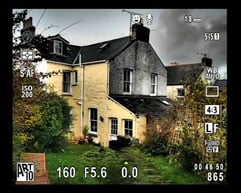
The PEN E-PL3 retains the 3in 460 dot LCD screen of its predecessor, but it’s now touch-sensitive and the hinge has been redesigned making it possible to flip the screen up and over the top of the camera body so that it faces front. Flipping the screen out so that it points 90 degrees up for waist-level shooting is great and the screen can also be angled down by around 75 degrees which is ideal for overhead shooting. The screen is attached to the camera body via two hinged panels and by extending both of these, the first out by 90 degrees and the second up and back in you can position the screen facing front. In fact it tilts backwards by a few degrees, but you can see it perfectly well. A sensor in the panel detects when it’s fully extended like this and flips the image vertically so it appears the right way up.
 |
This is clearly a more versatile arrangement than the previous one and is similar to the NEX 5R. Is it better than a screen hinged at the side like on the Lumix G5? Both have their fans, but I prefer having the screen directly in line with the camera body rather than off to one side. About the only drawback with the E-PL5 way of doing things is you can’t use the flash with the screen in the forward-facing orientation – well, you can, but you just can’t see a great deal.
The other thing the E-PL5 screen has in common with the NEX models is its 16:9 proportions. Personally I think this is the wrong shape for a screen on a stills camera, particularly one with a Four Thirds sensor that has 4:3 proportions as, for stills shooting you’re effectively only using the central portion of the screen with wide black bars down either side. While the E-PL5’s screen measures 3in diagonally the 4:3 imaging area is only 2 and 3/8ths of an inch, so it’s smaller than you’d see on a 2.5in screen.
In HD movie modes it’s a different story though, here the movie image fills the screen with information overlayed. If you spend more time shooting 16:9 movies than stills it’s an ideal set up, but for stills shooting the E-PL5’s screen is effectively much smaller than the 3in 3:2 screen on the Canon EOS M which matches the shape of its stills.
Like the EOS M and NEX 5R, the PEN E-PL5’s screen is touch sensitive and can be used to focus and shoot, select settings from the Super Control Panel and control playback, but it’s not nearly as well integrated as the EOS M’s touch screen with far more reliance placed on the physical controls. I’ll talk a bit more about that in the handling section below.
One major advantage the E-PL5 has over the EOS M though is that it’s AP2 accessory port is compatible with the Olympus VF2 electronic viewfinder, which slides into the hotshoe. The VF2 has a resolution of 1.44 million dots. It can be used conventionally or flipped upwards at a 90 degree angle so you look down into it and, though not cheap is a must-have accessory for anyone used to composing with an SLR viewfinder and spectacle wearers.
Olympus E-PL5 Lens and stabilisation
The PEN E-PL5 has a Micro Four Thirds lens mount and can use any of the mature and growing catalogue of lenses avalable in that format, including those by Olympus in addition to Panasonic and other third parties. This is a big advantage both Olympus and Panasonic CSCs have over younger rivals which currently have much fewer native lens options.
You can buy the PEN E-PL5 as a body only or in a kit with the 14-42mm f3.5-5.6 II R MSC zoom lens. That’s a lot of letters, but its the same lens that ships with the earlier E-PL3. The MSC stands for ‘Movie and Still Compatible, which basically means it’s fast for stills shooting, and quiet for movie AF, a feat that Olympus achieves using a design that moves fewer of the lens elements in order to focus.
Another big advantage to the 14-42mm zoom is that it’s retractable when not in use. There’s clearly a demand for smaller lenses to keep the overall size and weight of compact system cameras to a minimum and Olympus was well ahead of the game with its retractable zoom. Panasonic has also pioneered small, lightweight zooms with its 14-42mm Power Zoom lens which sports a motorized zoom and a collapsing design which sees it fold down to just 27mm thick.
Because of the larger APS-C sensor and the fact that their camera bodies lack built-in stabilisation, Canon and Sony have a bigger challenge on their hands in producing smaller lighter lenses. But that doesn’t mean they won’t try and The Sony NEX 6 is paired with a stabilised 16-50mm f3.5-5.6 retractable power zoom that ‘s just 30mm long and weighs 116g.
As I’ve mentioned previously, like all PEN bodies, the E-PL5 has built-in sensor shift image stabilisation which works with any lens you attach. As it shares the OM-D E-M5’s sensor and Truepic VI processor, for a brief moment I though the E-PL5 might also include the five-axis stabilisation system introduced on the OM-D. Alas, it’s the same two-axis system from the earlier E-PL3, presumably the mechanical components for the five-axis system are either to large to fit the smaller E-PL5 body, or too expensive, or both.
Olympus PEN E-PL5 with M.Zuiko 14-42mm f3.5-5.6 coverage wide |
Olympus PEN E-PL5 with M.Zuiko 14-42mm f3.5-5.6 coverage tele | |
 |  | |
| 14-42mm at 14mm (28mm equiv) | 14-42mm at 42mm (84mm equiv) |
As it is, the 2-axis system counteracts vertical and horizontal camera motion enabling hand-held exposures at slower shutter speeds than would be possible without it. The stabilisation has four modes, Off, S-IS 1 (Auto), S-IS 2 (vertical only) and S-IS (Horizontal only). Stabilisation for movie shooting is set separately and I’ll talk about that in the movie section below.
To test the PEN E-PL5’s stabilisation with the 14-42mm kit lens I zoomed the lens to its maximum 42mm (84mm equivalent) focal length and took a series of hand-held shots in Shutter priority mode at progressively slower speeds with the stabilisation enabled and disabled. You can see the results in the 100 percent crops below. The PEN E-PL5 just about managed a sharp shot at 1/15th of a second – around two and a half stops slower than you’d expect to be able to without stabilisation. That’s a fairly lacklustre performance compared with the four stops plus you can get with the Canon EOS M’s EF-M 18-55mm, but again remember the Olympus will stabilise any lens you attach, whereas the EOS M requires optically-stabilised lenses, and already of the two native EF-M models available, only one has it.
Olympus PEN E-PL5 with M.Zuiko 14-42mm f3.5-5.6 Image Stabilisation Off/On | ||||
 |  | |||
100% crop, 14-42mm at 42mm 100 ISO 1/15th S-IS Off. | 100% crop, 14-42mm at 42mm 100 ISO 1/15th S-IS 1. | |||
Olympus PEN E-PL5 shooting modes
In PASM modes the E-PL5 provides good access to exposure settings which are activated by pressing the up position on the control wheel. In Program auto mode you can then shift the aperture/shutter speed combination either by up/down pushes on the control wheel or by rotating it, with exposure compensation achieved by pushing the left/right positions. This quickly becomes second nature and the only thing that gets in the way, literally, is the control wheel’s proximity to the protruding right edge of the flip-up screen. With similar setups for the semi automatic and manual exposure modes, while it lacks the E-P3’s thumbwheel, you always feel in full control of exposure.
There’s automatic exposure bracketing up to 7 frames in 1/3, 2/3 and 1EV increments. I’ll say that again: seven frames compared to the paltry three on most CSCs. You can also bracket white balance, ISO sensitivity settings, and flash exposure. The E-PL5 also adds a new HDR bracket option which provides a subset of the exposure bracketing options – 3, 5, or 7 frames at 2EV intervals with the 3 and 5 frame option also available at 3EV intervals. It doesn’t actually merge the frames into a final HDR result in-camera like the EOS M, though, which makes you wonder why Olympus bothered. That said, HDR bracketing does lock the white balance and focus on the first frame and I suppose the wider two and three frame intervals would be useful in some situations.
In addition to PASM modes the E-PL5 has point and Shoot iAuto mode with scene detection. Olympus pioneered results-based controls and so it’s no surprise to see Live Guide controls appear when you press the centre button on the control wheel. These provide uncomplicated slider-based controls for jargon-free image adjustment including colour saturation, brightness, blur background and Express motion (slow shutter speed).
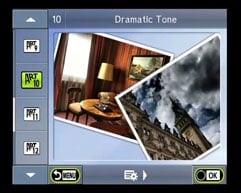
The E-PL5 also has another Olympus innovation that’s been adopted in one form or another by just about every compact manufacturer, Art filters. The collection of six filters available on the E-PL3 has been expanded to twelve with the addition of Pale and Light Colour, Light Tone, Cross Process, Gentle Sepia, Key line and Watercolour to the original line up of Pop Art, Soft Focus, Grainy Film, Pin Hole, Diorama, and Dramatic Tone. As before, there are ample customisation options with a wide choice of filter effects and framing.
The E-PL5’s extensive auto bracketing options even extend to art filters with the final position on the menu automatically applying any or all of the filters to your shot. It’s very useful for me, as I can show you every one of the twelve filters in the table below with only a single shot. I’m not sure it’ll find wide appeal beyond that as, if you shoot RAW you can always apply these effects in post processing using the Olympus RAW Viewer application.
 |
 |
 |
 |
 |
 |
 |
 |
 |
 |
 |
 |
Olympus PEN E-PL5 movie modes
The Pen E-PL5 builds on the movie capabilities of its predecessor with modes matching those available on the OM-D E-M5 including a best quality 1080p30 video mode. Rather than a variety of frame rates, as offered by the Canon EOS M, the E-PL5 provides different quality modes at the same resolution and frame rate, so the 1080p mode has two options, Fine at 20Mbps and Normal at 17Mbps. Likewise there are two 720p30 modes at 13Mbps and 10Mbps respectively.
In a move away from the AVCHD encoding of earlier PENs, movies are encoded using H.264 and saved as QuickTime files with a MOV extension in the same folder as still images. There are also two modes, 1280×720 and 640 x 480, both at 30fps, that are encoded using the older, less efficient, but more editing-friendly Motion JPEG codec and saved as AVI files.
The PEN E-PL5 mode dial has a movie position which provides a full screen 16:9 view so you can frame up your shot properly. You can argue the pros and cons of a 16:9 screen, but being able to use the full screen area to frame shots prior to shooting at least makes the most of it. Movie recording can be started in any shooting mode, though, by pressing the dedicated movie record button on the top panel, when recording is started in this way the exposure and ISO sensitivity are set automatically. Switch to the Movie position on the mode dial and you have access to PASM exposure modes for movie shooting, but whilst you can set the aperture and shutter speed before pressing the record button, during recording the exposure is fixed. For all of these modes the ISO sensitivity is selectable, but like the other exposure settings is fixed once recording has started.
The PEN E-PL5 is the first touch-screen Olympus camera that allows you to touch focus during movie recording, neither the PEN E-P3 nor the OM-D E-M5 will allow you to do this, so it’s a very welcome addition and one which brings the E-PL5 into the same bracket as the EOS M and Panasonic CSCs . You can see an example of the E-PL5’s touch-focus in action in the movie section below.
In Movie Mode the PEN E-PL5’s Live control menu allows you to change a range of settings independently of the same settings in stills shooting modes. These include the movie mode and quality settings, exposure and AF modes (including Face priority modes), processing options (Picture mode) ISO sensitivity, and audio recording. You can also set the movie stabilisation here, with three options, Off, M-IS1, which provides additional stabilisation to counteract walking motion, and M-IS2, the same 2-axis stabilisation as the the S-IS 1 stills stabilisation.
The E-PL5’s art filters are no longer available from the Live view menu in Movie mode, but you can still use them for movies by selecting the Art position on the mode dial and pressing the movie record button. The effect processing can slow down the frame rate considerably. In some cases the slow, jerky playback that results can actually add to the effect, but in the faux tilt-shift Diorama mode the sound is turned off and playback maintained at 30fps to speed up the action. You can’t control the playback in the way that the EOS M allows, and neither can you select the in-focus area or adapt it for portrait orientated shooting, instead the E-PL5 uses the the AF area to select the in-focus image area around which blurring is applied.
The PEN E-PL5 inherits two movie effects introduced on the OM-D E-M5. Multi shot echo and One shot echo are really two variations on the same effect which freezes a single frame and holds it at reduced opacity while the action continues. Think of all those movies you’ve seen where someone has a drug slipped into their drink and you see their point of view as they stumble into the furniture and lose consciousness and you’ll get the idea. It has limited applications (unless you make a lot of those kinds of movies) but it can be disabled if you don’t want to be bothered with it. Also included is the feature which allows you to view the developments of long exposures at fixed intervals on the LCD screen.
It doesn’t end there. There’s an art fade movie effect which transitions from one picture mode to another or into any of the Art filters (see the example below) and a One-push tele-converter movie crop feature. While you might think this is gimmickry that’s better handled in post processing, that’s what many people said about the Art filters when they were introduced and they’ve proved hugely popular. So it could be that Olympus is once again pushing the boundaries of in-camera processing and that, as before, others will follow where it leads.
You can take photos while recording video, though images are limited to the 16:9 aspect ratio and the video clip is split before and after the shot. The E-PL5 has built-in stereo mics and although there’s no external mic socket you can attach an Olympus or other external mic with the optional SEMA-1 microphone adapter connected to the accessory port. You can also adjust recording levels to one of three positions and there’s a 3-position wind-cut filter. Though you have to delve into the menu system for these settings which is a bit of a pain.
| |
|---|---|
|
This and all the other clips here were shot in the E-PL5’s best quality 1080p30 Fine movie mode. The Quality is good and E-PL5 handles the changing light well. The focus wanders quite a bit during the zoom but eventually finds its mark. There’s also something a bit odd going on with the railings at the front of the ferry towards the end of the clip, which might be a stabilisation artifact.
| |
|---|---|
|
For this tripod mounted panning shot the stabilisation was disabled.
| |
|---|---|
|
Once again, the E-PL5’s AF has a few wobbly moments during this indoor low-light hand-held paning shot, but it quickly sorts itself out. The quality here is again good and not too noisy at the higher sensitivity selected in Auto ISO mode. Exposure and white balance is pretty solid too.
| |
|---|---|
|
For this example demonstrating the PEN E-PL5’s touch AF, I zoomed the lens in a little and set the widest available aperture in Aperture priority exposure mode. I rested the camera on the table and focused on the coffee cup before pressing the record button, then alternately tapped the optics behind the bar and the cup to shift the focus back and forth. The E-PL5’s touch AF can be a bit fussy. The first time I tapped the cup, the focus resolutely refused to move, even though I selected the high contrast area with the Lavazza branding. Only after I tapped several times, eventually ending up in the region of the handle, did the focus motor oblige. Once I knew where to tap, it responded very quickly though.
| |
|---|---|
|
This final movie clip shows the PEN E-PL3’s Art Fade movie effect in action. To set this up you fist have to turn it on in the menu system. Then, pressing the Fn button during recording brings up a menu overlay allowing you to choose between any of the Picture syles or Art filters and applies a fade transition in between.
Olympus PEN E-PL5
handling
The introduction of the touch screen to the PEN E-PL5 alters it’s handling in several key respects. Most obviously it adds touch shooting and touch focussing, two of the most useful things you can do with a touch screen. And, for the first time on a PEN, you can use the touch screen to change the focus while shooting a movie.
Aside from that, the touch screen isn’t particularly central to the E-PL5’s handling. You can use it to select the AF area after first pressing the left button on the rear dial and you can use to select settings on the Live control and Super control panels, but not to change the settings once they’re selected. For that you need to use the rear dial and OK button.
While you can scroll through images in playback mode, you can’t use gestures to zoom in and out (though you can pan around by dragging with your finger) like on the EOS M, instead a slider control appears on the right. And the PEN E-PL5’s menu system is a touch-screen dead zone, relying solely on the rear dial to navigate and select menu options. Interestingly the touch screen plays a much bigger role when using the novice-targetted Live Guide adjustments.
It’s a different approach to that of the EOS M, where the lack of physical controls places more emphasis on the screen, but not necessarily a worse one. It would be fair to characterize the E-PL5’s screen as a back up to the physical controls – you can even turn it off if you don’t want it.
 |
 |
 |
 |
 |
 |
 |
 |
 |
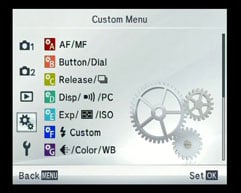
But it’s in the physical controls that the power and versatility of the E-PL5 really lies and that’s demonstrated by the huge degree of customisation on offer. As well as the ability to customise the functions of specific buttons, the E-PL5’s Custom menu provides ten options for altering the way everything from the direction of the focus ring to which menus are displayed in each of the shooting modes.
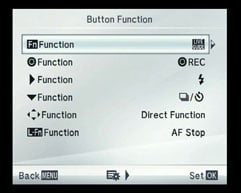
As for the buttons, you can assign custom functions to the Fn, movie record, two positions on the rear dial and the L-Fn button on lenses that have one. You can choose whether rotating the rear dial in Program mode controls Program shift or exposure compensation and configure it separately for A, S and M modes. You can even choose which way to turn the dial to up or down the menu options, which may be an option too far, but it gives you a feel for the scope of the customisation options on the E-PL5. It’s a far cry from the two programmable buttons with minimal options on the EOS M.
Olympus PEN E-PL5 Autofocus
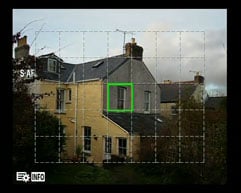
The PEN range has a reputation for fast contrast detect AF and the E-PL5 maintains it. It’s difficult to say if it’s any faster than its predecessor – both focus within an instant of half-pressing the shutter release, even when the lighting conditions are less than optimal. The default AF area mode has 35 areas in a 7×5 grid covering all but the edges of the frame. You can quickly select an individual area either by using the four-way controller or by tapping the screen.
The screen can also be used to meter, focus and shoot in a single tap – a process that happens virtually instantaneously even when the camera has to refocus from close to distant objects. With face detection enabled the camera will lock onto multiple faces in the frame and you can also set one of three eye priority AF modes – left, right and auto which selects the eye closest to the camera. All very useful and it works, though for the eye priority mode to work effectively the subject does need to be reasonably close and well lit.
Set to continuous AF mode, the E-PL5 will adjust its focus as the subject approaches or moves further away. Like other cameras with contrast-based AF systems this can prove a bigger challenge than those with phase-detect AF systems. A contrast-based system can’t help but search back and forth a little when confirming focus, which means it may struggle to keep up with a subject in constant motion. The E-PL5 is one of the better contrast-based cameras in this regard, but it’s still not as confident or consistent as a phase-detect AF system when it comes to tracking.
As well As S-AF and C-AF modes there’s a C-AF TR tracking mode which locks onto a subject and follows it around the frame. There’s also S-AF MF which allows you manually fine tune once the AF has locked and finally Manual focus. With MF assist activated, or by assigning the magnify function to one of the Fn buttons, manual focusing is surprisingly easy, though in low light it isn’t so straightforward and you’re left wishing for something akin to the focus peaking of Sony’s NEX models.
Olympus PEN E-PL5 Continuous shooting
Though it shares the same sensor and processor as the OM-D E-M5, the E-PL5 doesn’t quite match its 9fps top continuous shooting speed, but it does improve significantly on its predecessor’s 5.5fps. With the stabilisation turned off the PEN E-PL5’s fastest continuous shooting speed is a respectable 8fps, and there’s also a slower 3.6fps speed. The maximum number of frames is quoted at 27 for RAW files and 19 for Large Normal JPEGs. Both settings provide continual adjustment of focus and exposure if the camera is in Continuous AF mode.
To test the PEN E-PL5’s continuous shooting performance I fitted it with a freshly formatted Sandisk Extreme Pro UHS-1 SD card, turned the stabilisation off, set it to continuous AF and selected 1/500 in Manual exposure mode. In the fastest Sequential H mode it fired off 16 Large Fine JPEGs at a rate of 8.8fps before slowing to a slightly erratic 2fps or so. Switching to RAW shooting, it managed 15 frames at just over 9fps before slowing to around 1fps. Once the buffer is full it takes around 9 seconds to write Large Fine JPEGs to the card or 13 seconds for RAW files.
Olympus PEN E-PL5 Sensor
The PEN E-PL5 shares the same 16.1 Megapixel MOS sensor introduced on the OM-D E-M5. The sensor is the same size as used in other Micro Four Thirds compact system cameras and Four Thirds system SLRs. As such it’s smaller than the APS-C sensors common in DSLRs and used in the Canon EOS M and Sony NEX and results in a 2x reduction in the field of view compared with a full frame 35mm sensor.
The new sensor increases the E-PL5’s sensitivity range over its predecessor starting at the same 200 base ISO setting and extending to 25600 ISO. The shutter speed range is 1/4000 to 60s plus Bulb to 30 minutes. Files are saved as JPEGs at one of two compression settings, Fine and Normal. At the best quality fine setting image files are around 4 to 8MB in size. The PEN E-PL5 can, of course, also save RAW files.
To see how the quality of the Olympus PEN E-PL5 measures-up in practice, take a look at my Olympus E-PL5 quality and Olympus E-PL5 noise results pages, browse my Olympus E-PL5 sample images, or skip to the chase and head straight for my verdict.


