Nikon D800 review
-
-
Written by Gordon Laing
Quality
Nikon D800 vs Canon EOS 5D Mark III JPEG
|
Canon EOS 5D Mark III (JPEG using in-camera defaults) Using EF 24-105mm f4L IS USM |
Nikon D800 (36MP JPEG using in-camera defaults) Using Nikkor AF-S 24-70mm f2.8G ED | |
 |  | |
f8, 100 ISO |
f8, 100 ISO | |
 |  | |
f8, 100 ISO |
f8, 100 ISO | |
 |  | |
f8, 100 ISO |
f8, 100 ISO | |
 |  | |
f8, 100 ISO |
f8, 100 ISO |
Nikon D800 vs Canon EOS 5D Mark III JPEG quality, with D800 set to Medium 20 Megapixels |
|
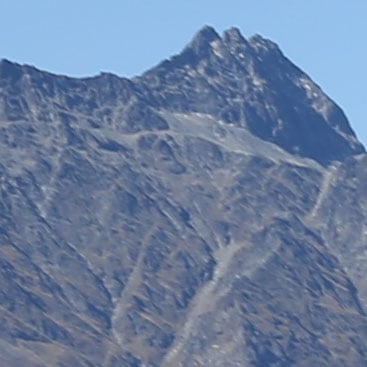
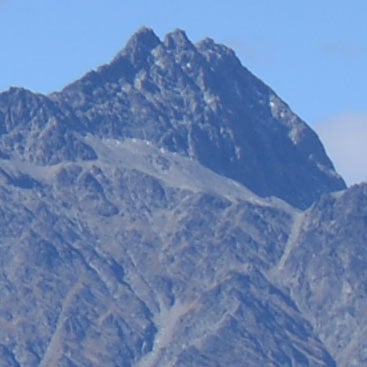
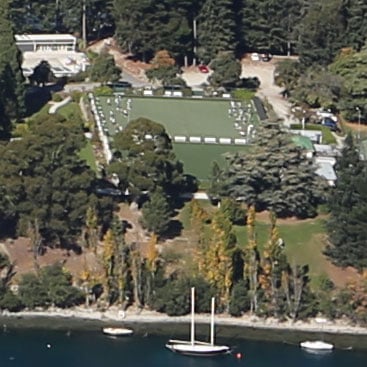
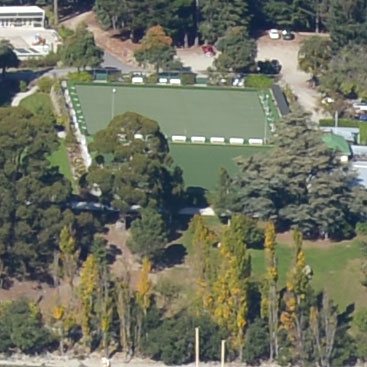
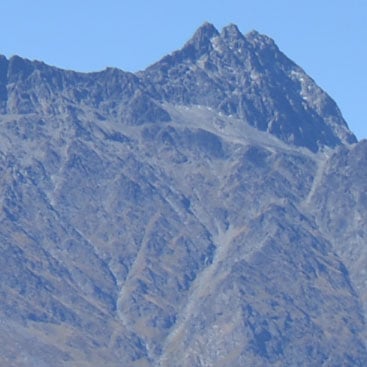
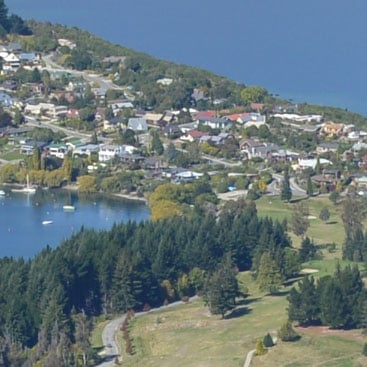
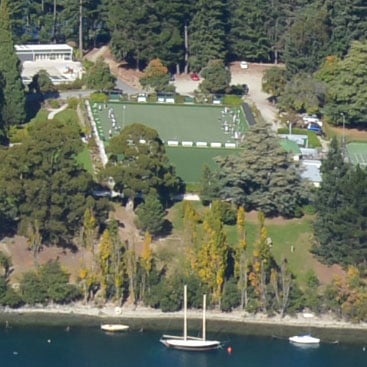
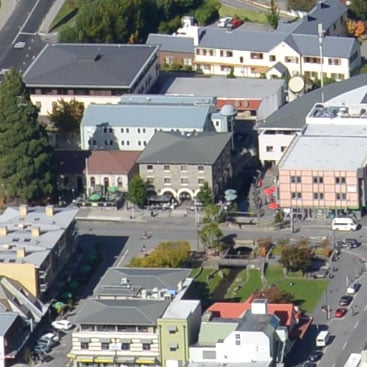
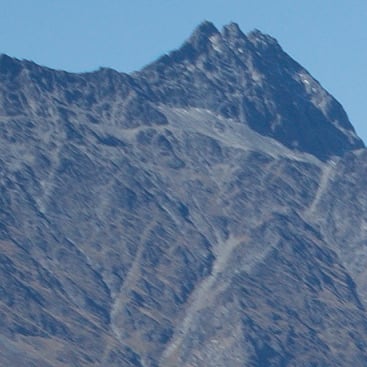
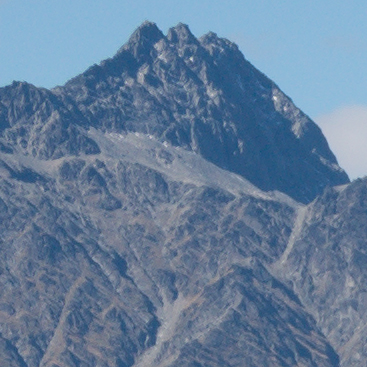
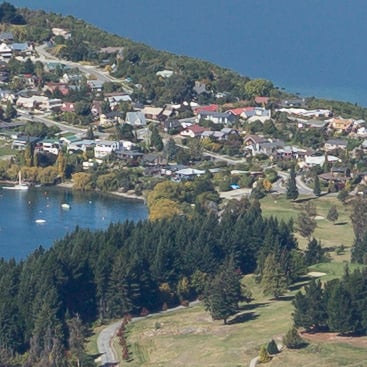
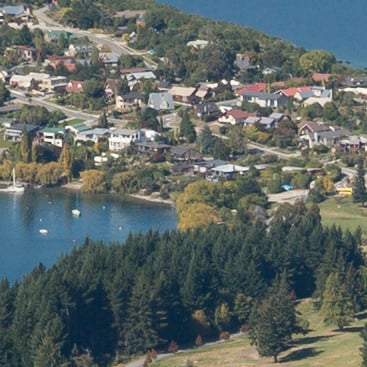
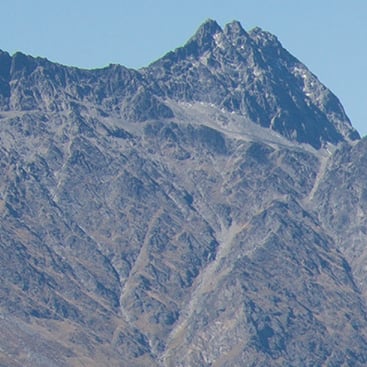
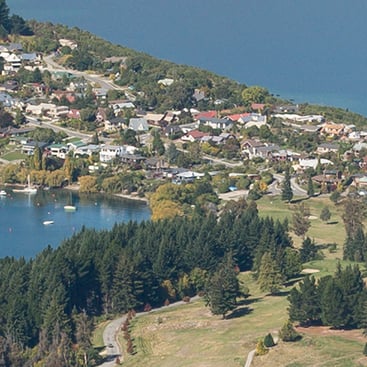
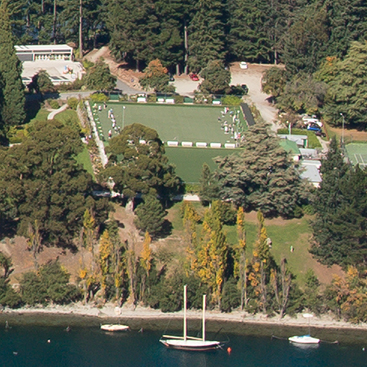
Below you’ll see crops from the EOS 5D Mark III at its maximum resolution compared to the D800 at its medium resolution. Yes, the D800 has so many pixels to start with that even when set to its medium quality mode, it’s comparable to the Mark III. So we have the 22.3 Megapixels of the Mark III versus the 20 Megapixels of the D800’s medium mode. Starting with real-life resolving power, they’re inevitably very similar, and again the biggest difference boils down to processing style with their default settings. Once again it’s down to personal preferences, but I prefer the more natural look of the D800 here compared to the arguably slightly over-cooked Mark III style with its higher contrast and sharpening. The striking thing for me is how the D800 is still delivering what looks like a better overall image even when set to its medium quality. As mentioned above though, this is just an out-of-camera JPEG comparison at 100 ISO using the defaults. I shot this scene in RAW+JPEG and you can see the RAW results on my Nikon D800 vs Canon 5D3 RAW quality page; there’s also a full list of results pages at the top of this page if you’d like to skip straight to any other section. |
Canon EOS 5D Mark III (JPEG using in-camera defaults) Using EF 24-105mm f4L IS USM |
Nikon D800 (20MP JPEG using in-camera defaults) Using Nikkor AF-S 24-70mm f2.8G ED | |
|  | |
f8, 100 ISO |
f8, 100 ISO | |
|  | |
f8, 100 ISO |
f8, 100 ISO | |
|  | |
f8, 100 ISO |
f8, 100 ISO | |
|  | |
f8, 100 ISO |
f8, 100 ISO |
Nikon D800 results : Quality / RAW quality / Noise / Noise Downsampled / RAW Noise / Vs Medium format
Nikon D800 vs Canon EOS 5D Mark III RAW quality
|
Canon EOS 5D Mark III (RAW using Adobe Camera RAW) Using EF 24-105mm f4L IS USM |
Nikon D800 (36MP RAW using Adobe Camera RAW) Using Nikkor AF-S 24-70mm f2.8G ED | |
 |  | |
f8, 100 ISO |
f8, 100 ISO | |
 |  | |
f8, 100 ISO |
f8, 100 ISO | |
 |  | |
f8, 100 ISO |
f8, 100 ISO | |
 |  | |
f8, 100 ISO |
f8, 100 ISO |
Nikon D800 vs Canon EOS 5D Mark III RAW quality, (D800 down-sampled to 20 Megapixels) |
|
Below you’ll see crops from the EOS 5D Mark III at its maximum resolution compared to the D800’s image down-sampled to 20 Megapixels to match the camera’s medium resolution setting. I down-sampled the image in Photoshop as the RAW+JPEG option for the Medium resolution records the RAW file in the full 36 Megapixels. So on the previous page you can see a 20 Megapixel JPEG generated in-camera, while on this page it’s a 36 Megapixel RAW image down-sampled to 20 Megapixels in Photoshop. The down-sampling process has applied a little extra sharpening, so the Nikon crops look crisper than those from the Canon. I’d say they look a little better too, although are arguably on the edge of the sharpening becoming a little too high. What this extra set of results show though is the D800 can essentially equal the 5D3’s performance with its medium resolution mode, thereby generating smaller files than the full 36 Megapixel mode if desired. Now it’s time to examine their high ISO performance with the first of my Nikon D800 noise pages, starting with a JPEG comparison with the Canon. I’ll also include RAW and down-sampled versions later on and if you’d prefer to jump straight to these, just scroll up to the results contents box. |
Canon EOS 5D Mark III (RAW using Adobe Camera RAW) Using EF 24-105mm f4L IS USM |
Nikon D800 (20MP RAW using Adobe Camera RAW) Using Nikkor AF-S 24-70mm f2.8G ED | |
|  | |
f8, 100 ISO |
f8, 100 ISO | |
|  | |
f8, 100 ISO |
f8, 100 ISO | |
|  | |
f8, 100 ISO |
f8, 100 ISO | |
|  | |
f8, 100 ISO |
f8, 100 ISO |
Nikon D800 results : Quality / RAW quality / Noise / Noise Downsampled / RAW Noise / Vs Medium format
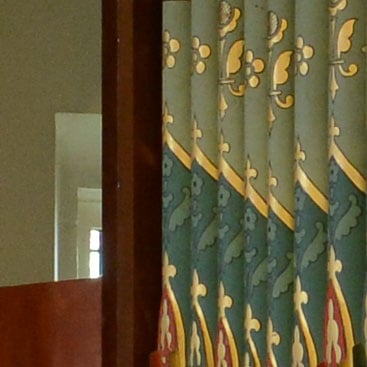
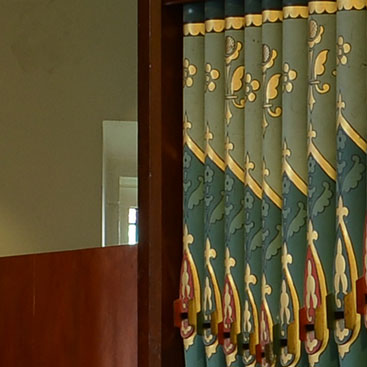
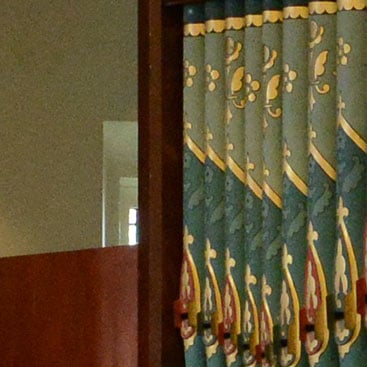
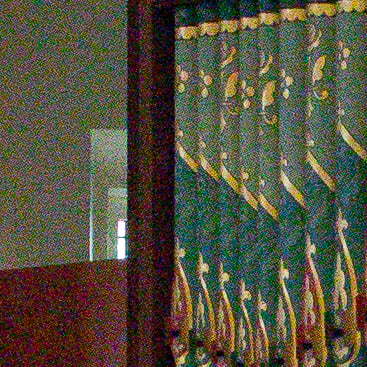
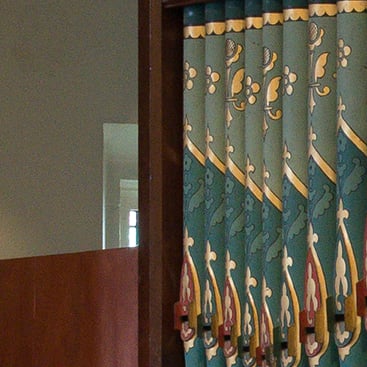
Nikon D800 JPEG vs Canon EOS 5D Mark III noise
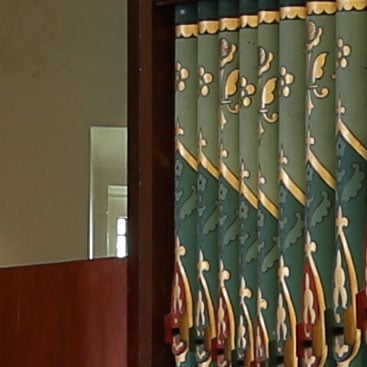
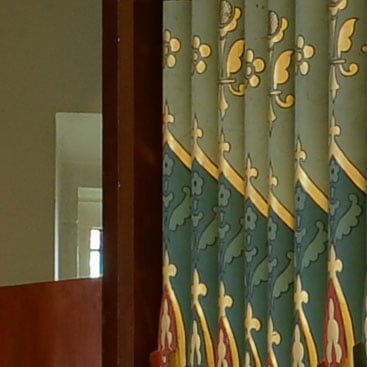
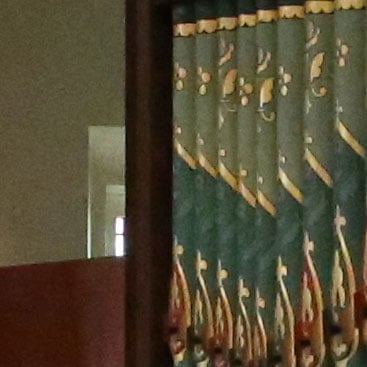
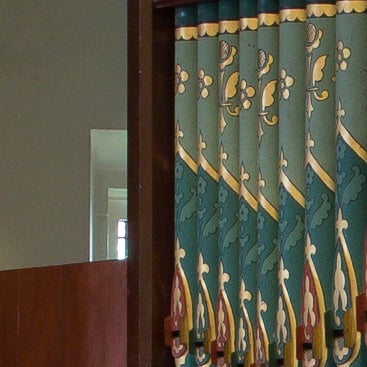
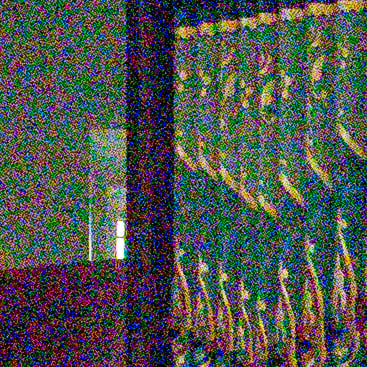
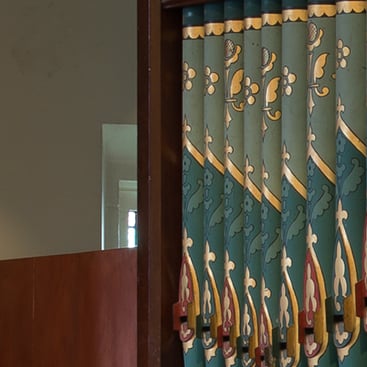
The image above was taken with the Nikon D800 with the Nikkor AF-S 24-70mm f2.8G ED lens set to 40mm and the aperture set to f8 in Aperture Priority mode. At its expanded Low sensitivity of 50 ISO, the D800 metered an exposure of 5 seconds for this composition. The Canon 5D Mark III metered an identical exposure, so you’re comparing like-with-like below. It’s time for Clash of the Titans part 2! We’ve already seen the Nikon D800 out-resolve the Mark III at low sensitivities, but what happens as you increase the ISO? The larger pixel-pitch of the Canon should technically enjoy an advantage at high sensitivities, so let’s see what happens in practice. This page covers the results with in-camera JPEGs using the default settings, while the next page compares their RAW output. A quick glance at the default processing styles below once again reveals the Mark III applying greater sharpening and contrast for a punchier-looking result, but on this shot, the difference is less obvious than on my outdoor resolution test. What is quite obvious though is the extra resolution of the D800, delivering a much tighter crop when viewed at 1:1, and clearly capturing more detail too. Just look at the markings at the top of the organ pipes and you’ll see finer details in the egg-shaped cross-hatching which just isn’t being resolved on the Mark III. So as you’d expect following my real-life outdoor resolution tests, the D800 enjoys the advantage at 50 and 100 ISO. Now let’s crank up the ISO and see what happens. At 200 ISO, the Mark III remains 100% clean, but pixel-peepers may notice minor noise textures creeping into the D800’s background. Nothing to be concerned about, but there is a visibly difference if you’re looking. At 400 ISO though, those noise textures on the D800 have become a little more obvious, and while a minor patchiness is also now appearing on the Mark III, the Canon is definitely cleaner at this point. That said, the D800 is still out-resolving it on fine detail. With the sensitivity doubled to 800 ISO, the D800’s noise textures are becoming increasingly apparent, while the Mark III is managing to keep them under control. Now to be fair, Nikon has always been less noise-averse than Canon and in the past has been happy to let some fine textures appear in preference to smearing out fine detail – and the same approach is clearly being applied here. And on the upside, unlike the patchy colour noise artefacts of some cameras, Nikon’s noise always looks finer and more grain-like. In terms of ultimate detail though, the D800 is beginning to lose it, and I’d rank it similarly to the Mark III at this point, ignoring noise. At 1600 ISO, the noise has become more obvious on the D800 and for the first time in this sequence I’d say the Mark III has begun to take a lead – albeit extremely small at this point – in resolution. The Canon crop is also considerably cleaner. At 3200 ISO, noise textures start to become obvious on the Mark III, but remain much lower than those on the D800. Edges on the Canon are also much better defined than the Nikon at this point. At 6400 ISO the gap widens as the D800 becomes very noisy viewed at 1:1, with edges becoming quite poorly defined. The Mark III certainly isn’t noise-free at this point, but remains much cleaner and better-defined. The story continues at 12800 and 25600 ISO, the maximum for the D800. I’d say at these higher sensitivities the Mark III enjoys around a two stop advantage over the D800 when both are shooting at their maximum resolutions and viewed at 1:1. Certainly the 12800 sample of the Mark III is quite usable at smaller sizes, whereas the D800 is looking pretty ropey at this point. The Mark III then goes on to bravely offer 51200 and 102400 ISO options, but both suffer from considerable noise and lack of both detail and saturation. They’re nothing to be excited about unless you’re in an emergency situation. So this test panned-out as expected: the D800 wins on detail at low sensitivities, while the 5D Mark III wins on noise levels and cleaner output at higher sensitivities. The important question is where that cross-over point is? Judging from the crops below, I’d say it’s at 800 ISO. At 50-400 ISO the D800 remains sufficiently clean for most people and manages to out-resolve the Mark III. At 800 ISO and above though, the D800 becomes noticeably noisier than the Mark III for in-camera JPEGs using the default settings. I’d say the Mark III is very usable at 1600-6400 ISO with impressively clean results, whereas the D800 has become very noisy in comparison. So the decision between them on image quality should be influenced by the range of ISOs you typically shoot at. If you shoot mostly below 400 ISO and can use a tripod for most of your work, then you will enjoy a visible resolution benefit with the D800. But if you regularly shoot above 800 ISO and in particular in the 1600-6400 ISO range, then you’ll prefer the cleaner output of the Mark III. Once again this is the story for in-camera JPEGs using the default settings, and as you’ll see on the next page, the story can be quite different in RAW. You can head straight to my Nikon D800 RAW noise results page if you can’t wait, but if you can hold back for a moment, check out what happens when you down-sample the D800’s JPEG images to 20 Megapixels in my Nikon D800 noise down-sampled page – and yes, I’ll be repeating that test in RAW too later in the review!
|


Nikon D800 results : Quality / RAW quality / Noise / Noise Downsampled / RAW Noise / Vs Medium format
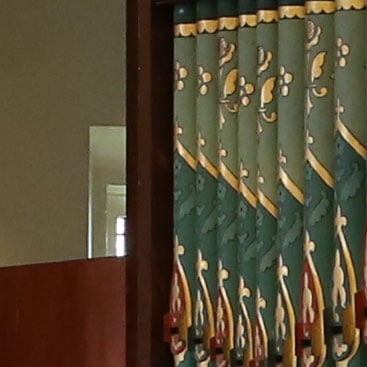
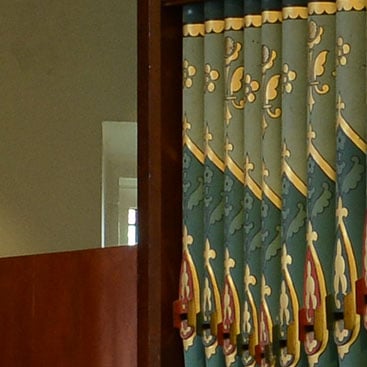
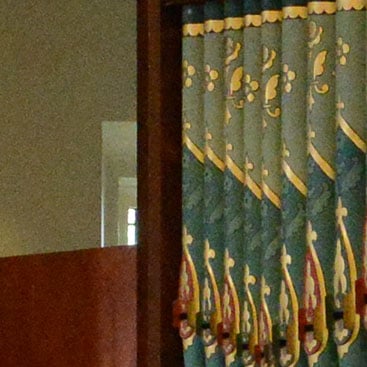
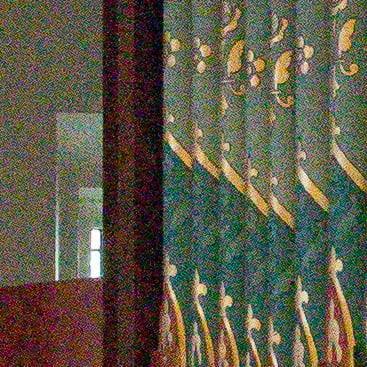
Nikon D800 (down-sampled) vs Canon EOS 5D Mark III JPEG noise
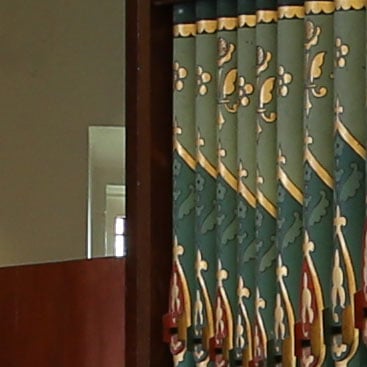
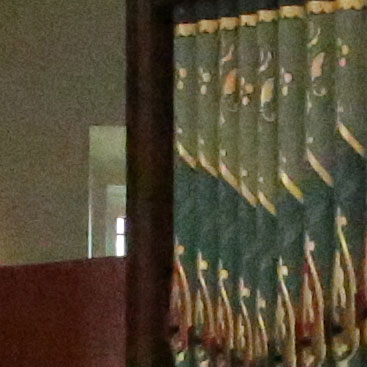
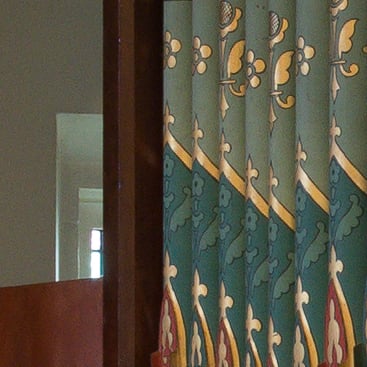
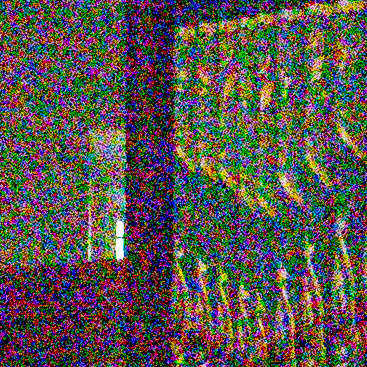
The image above was taken with the Nikon D800 with the Nikkor AF-S 24-70mm f2.8G ED lens set to 40mm and the aperture set to f8 in Aperture Priority mode. At its expanded Low sensitivity of 50 ISO, the D800 metered an exposure of 5 seconds for this composition. The Canon 5D Mark III metered an identical exposure, so you’re comparing like-with-like below. A common criticism of camera tests online is the presentation of results at 100% or 1:1. This involves taking crops at fixed pixel dimensions, such as 367×367 pixels as seen on my results pages here. Crops from higher resolution images therefore show a smaller portion of the total frame. The counter-argument is images should be compared at the same physical size – that is to say the crops should show the same portion of the frame, which means the higher resolution image will have a higher pixel density per inch. It also means any artefacts, such as noise, will appear smaller. This is the argument you’ll hear for presenting fair results from the D800 against lower resolution bodies like the Canon EOS 5D Mark III. When the images are viewed at 1:1 without scaling, the D800 inevitably looks noisier due to its higher pixel density, but if images from both models were reproduced at the same size, then the D800’s noise would appear more discreet and could in fact place them on a more level playing field. There’s pros and cons to each approach. If you’re comparing printed images, then scaling is definitely the right approach. If the print is sufficiently large, or the process sufficiently fine, then the higher resolution image should benefit from finer details and smaller noise artefacts. But if you’re presenting images online as I do, then scaling suffers from a number of issues. First is the fixed pixel density of monitors which means if I were to scale D800 images to the same physical size as 5D Mark III images, you wouldn’t see any detail advantage of the former – and surely that’s unfair. Secondly if you are down-sampling images, what resolution should you down-sample to? If I were to scale D800 images down to the same resolution of the 5D Mark III, it would involve an uneven number with scaling artefacts as a result. You would in effect be measuring the quality of the down-sampling process. I could of course print the results, but then how could I share them online? If I scanned them, we’d have all manner of additional artefacts to deal with. This is why I, like most camera review sites, prefer the pure approach of presenting images at 100% or 1:1. It may penalise very high resolution bodies on the presented size of artefacts, but it will equally reveal the finer details captured, and is a pure approach which doesn’t involve scaling, printing or scanning. And while many may argue against pixel-peeping, who doesn’t zoom-into 100% for a good look at their images from time to time? The crops I present are simply a small window of that 100% view, untouched for appraisal. I realise this isn’t to everyone’s tastes which is why I also always provide original images to download in my sample images gallery. This means you can download and print or rescale as desired. That said, the D800 is a somewhat exceptional case as it offers a Medium size that delivers 20 Megapixel images which coincidentally are very close to the maximum size of the Canon 5D Mark III’s photos. So in the spirit of fairness – and by popular demand – I’ve presented my D800 noise results again below, this time down-sampled to the 20 Megapixel ‘Medium’ size. I used Photoshop to down-sample the images using the Bicubic Sharper (Best for reduction) option. First things first: by down-sampling the D800 images to 20 Megapixels, you’re throwing away a lot of data and any resolution benefit over the 5D Mark III. You’d only do this to minimise noise in a 1:1 comparison. Looking closely at the crops, there’s now little if any difference in actual resolution and detail captured, but the D800’s in-camera JPEGs are certainly responding well to the down-sampling process in terms of sharpness. Between 50 and 400 ISO, the down-sampled D800 crops below are very crisp and visibly sharper than those from the Mark III – although you can achieve a similar effect from the Mark III by tweaking the sharpness on RAW files. Despite the down-sampling though, noise still becomes visible at the same points as before. It’s creeping-in on the D800 crop at 400 ISO and more obvious by 800 and 1600 ISO. Is it any cleaner than the unscaled images on the previous page? Not to my eyes. The noise artefacts are proportionately smaller, which makes them less obtrusive, but they’re still visible to the same extent. Meanwhile the Mark III at the same sensitivities looks cleaner. Now there’s other factors at play here. Looking at the Mark III crops, you can see some patchiness in the background which implies stronger noise reduction using the default settings. We’ve seen this before: Canon errs on cleanliness with higher noise reduction, whereas Nikon errs on detail with lower noise reduction. Overall I don’t think down-sampling has changed my opinion from the previous page. It’s been beneficial for the D800 at the low ISOs, delivering very crisp and pleasing images, but at higher ISOs I wouldn’t say the noise is significantly reduced or improved. Of course the next test is to process RAW files without noise reduction to see what’s really happening behind the scenes and you can see that in my Nikon D800 RAW noise results page!
|


Nikon D800 results : Quality / RAW quality / Noise / Noise Downsampled / RAW Noise / Vs Medium format
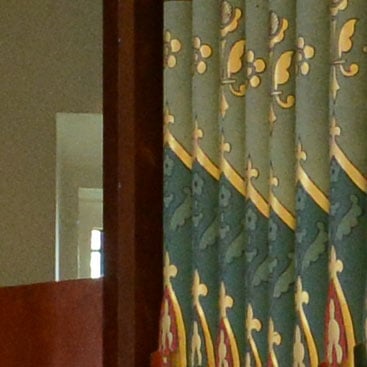
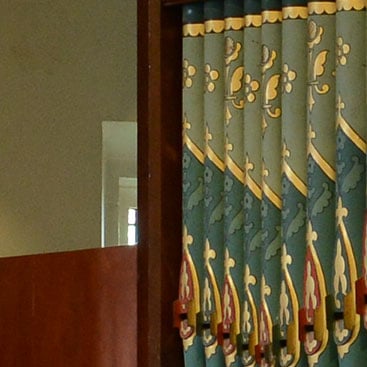
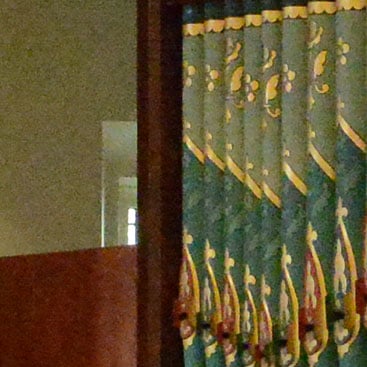
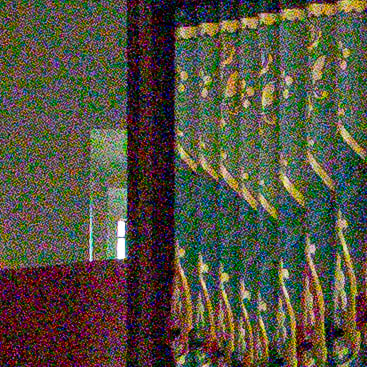
Nikon D800 vs Canon EOS 5D Mark III JPEG RAW noise
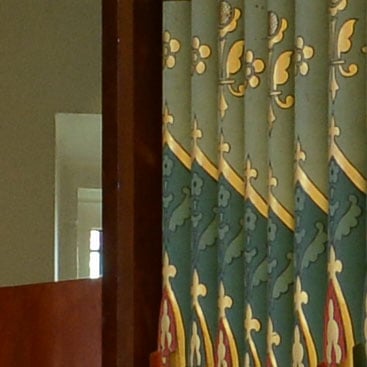
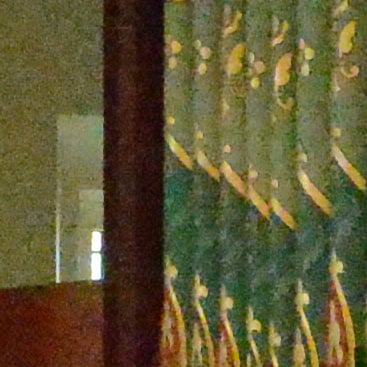
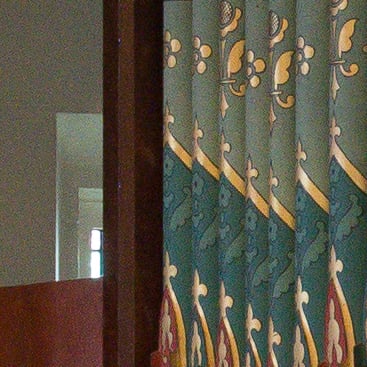
The image above was taken with the Nikon D800 with the Nikkor AF-S 24-70mm f2.8G ED lens set to 40mm and the aperture set to f8 in Aperture Priority mode. At its expanded Low sensitivity of 50 ISO, the D800 metered an exposure of 5 seconds for this composition. The Canon 5D Mark III metered an identical exposure, so you’re comparing like-with-like below. I processed both sets of files in Adobe Camera RAW using identical settings: Sharpening at 70 / 0.5 / 36 / 10, Luminance and Colour Noise Reduction both set to zero, and the Process to 2012 with the Adobe Standard profile. These settings were chosen to reveal the differences in sensor quality and isolate them from in-camera processing. The high degree of sharpening with a small radius enhances the finest details without causing undesirable artefacts, while the zero noise reduction unveils what’s really going on behind the scenes – as such the visible noise levels at higher ISOs will be much greater than you’re used to seeing in many of my comparisons, but again it’s an approach that’s designed to show the actual detail that’s being recorded before you start work on processing and cleaning it up if desired. If you’re viewing this page in isolation I’d urge you to have a copy of my Nikon D800 JPEG noise results open at the same time – and just to be extra helpful, you can click this link to open them in a new window. Image processing can be a very personal thing, but like my outdoor test results I’d say both the D800 and 5D Mark III benefit from the RAW workflow described above. Both are displaying very crisp fine details without any undesirable haloing artefacts. Again like my outdoor tests, the Mark III benefits the most, with the RAW conversion eliminating the contrast-heavy approach of in-camera JPEGs using the default settings. It’s really brought out the finest details, and now the 5D Mark III is showing the cross-hatched pattern in the egg shapes at the top of some of the organ pipes; sure it’s not as clearly defined as in the D800 crops alongside, but it’s a darned sight clearer than the JPEG comparison. With noise reduction completely turned off, it’s not surprising to find a smattering of grainy textures appearing at low sensitivities: indeed pixel-peepers will just about spot it at 200 ISO, and more noticeably at 400 ISO. At 200 and 400 ISO this graininess is ever so slightly higher on the D800 than the Mark III, but it’s so close it’s hardly worth mentioning. What’s much more important now though is scrolling down throughout the sensitivity range and noticing how both cameras appear to share very similar noise characteristics at each ISO value when viewed at 100%. Indeed all the way up to 25600 ISO the noise levels appear pretty much the same. This is a very revealing result. On the previous pages we saw how the Nikon D800 enjoyed a detail advantage at low ISOs, but lost out to the Mark III on noise levels at higher ISOs. What this page reveals is both cameras are actually starting with roughly similar degrees of noise when viewed at 1:1 and the Canon is simply applying greater (or more effective) noise reduction on its in-camera JPEGs than Nikon. Turn that noise reduction off though and both cameras are essentially delivering the same amount of speckles. Crucially though, the higher resolution of the D800 is still managing to capture slightly finer details than its big rival. This is a great result for the D800 which amazingly manages to pack 50% more pixels onto its sensor than the Mark III without any apparent compromise in noise levels. It also illustrates the importance of performing comparisons of RAW files with noise reduction disabled to see what’s really happening behind the scenes. So a draw in noise but a lead in detail makes it a win overall for the D800 on this page. It also begs the question of what happens if you then take these files from the D800 and down-sample them to the same resolution as the Mark III – and that’s exactly what I’ve done on the next page in my Nikon D800 RAW noise down-sampled results!
|


Nikon D800 results : Quality / RAW quality / Noise / Noise Downsampled / RAW Noise / Vs Medium format
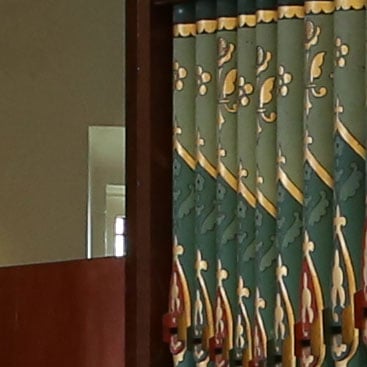
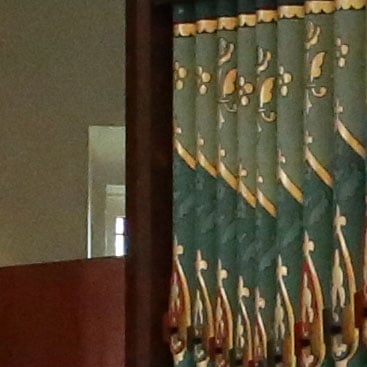
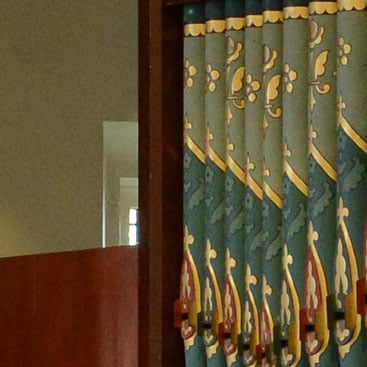
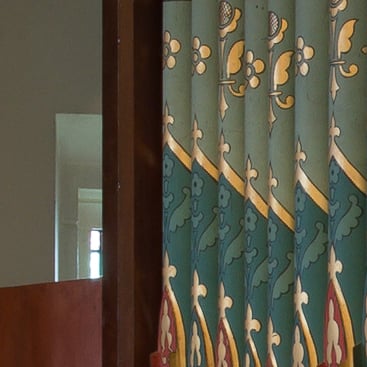
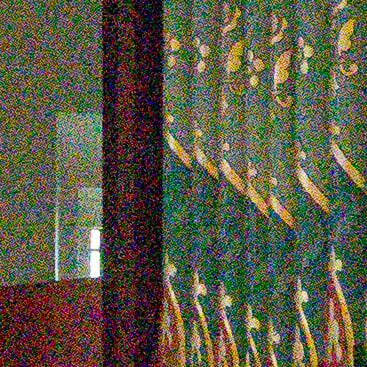
Nikon D800 (down-sampled) vs Canon EOS 5D Mark III RAW noise
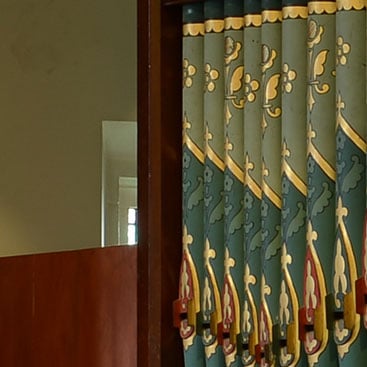
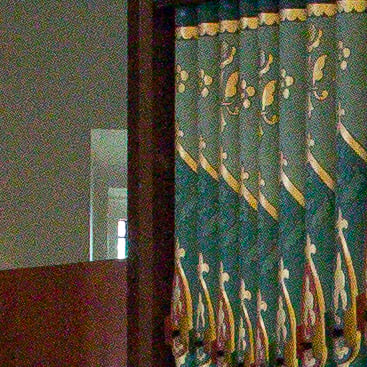
The image above was taken with the Nikon D800 with the Nikkor AF-S 24-70mm f2.8G ED lens set to 40mm and the aperture set to f8 in Aperture Priority mode. At its expanded Low sensitivity of 50 ISO, the D800 metered an exposure of 5 seconds for this composition. The Canon 5D Mark III metered an identical exposure, so you’re comparing like-with-like below. I processed both sets of files in Adobe Camera RAW using identical settings: Sharpening at 70 / 0.5 / 36 / 10, Luminance and Colour Noise Reduction both set to zero, and the Process to 2012 with the Adobe Standard profile. These settings were chosen to reveal the differences in sensor quality and isolate them from in-camera processing. The high degree of sharpening with a small radius enhances the finest details without causing undesirable artefacts, while the zero noise reduction unveils what’s really going on behind the scenes – as such the visible noise levels at higher ISOs will be much greater than you’re used to seeing in many of my comparisons, but again it’s an approach that’s designed to show the actual detail that’s being recorded before you start work on processing and cleaning it up if desired. The difference between this page and the previous one is I have downsized the D800’s processed RAW files from 36 to 20 Megapixels to better match the resolution of the 5D Mark III. I’ve discussed the pros and cons of presenting scaled versus unscaled image crops on my Nikon D800 noise down-sampled results page (for JPEGs) so I won’t go over it all again here. Just suffice it to say some people like to see one type of result and some people like the other, so in the spirit if fairness and completeness, I’m presenting both in this review! So on this page it’s the turn of the down-sampled RAW files, and as before I used Photoshop to perform the process using the Bicubic Sharper (Best for reduction) option. On the previous page with 100% unscaled crops you saw how the D800 and 5D Mark III actually share very similar noise characteristics. Indeed when viewed at 1:1 with noise reduction completely turned off, the noise patterns looked almost identical. The big question here then is whether down-sampling the D800’s RAW images can actually deliver a result with less noise than the Canon 5D Mark III? Pixel peepers could stare at the images below all day and maybe persuade themselves there’s a minor advantage to the Nikon, but to be honest I can hardly see any difference myself. To all intents and purposes, downsampling the RAW files without noise reduction hasn’t given the D800 any perceptible advantage over the Mark III. Of course this is with noise reduction completely turned off. If you applied the same amount of noise reduction to both original images and then downsampled the D800 image to the same resolution as the Mark III, then you may enjoy the benefit of smaller and less noticeable noise artefacts. Feel free to try it yourself with the crops from the previous page and tell me what you think in the Cameralabs forums or my social media channels, but this after six pages of results comparing the D800 against the 5D Mark III, this is as far as I’m going to go myself. The bottom line is when shooting in JPEG with the default settings, the D800 enjoys a detail advantage at the lower ISOs, while the Mark III enjoys less visible noise artefacts at higher sensitivities – a draw if you like. But switch to RAW and turn off the noise reduction for a level playing field and both cameras deliver essentially the same amount of noise at 100%. Since the D800 does so while also capturing more detail, it’s the winner at any ISO in RAW. So overall I’d say the D800 has the potential to deliver superior image quality at any ISO value, so long as you’re shooting in RAW, but in JPEG there’s a definite point where one model does better than the other. Ultimately this means the D800 enjoys the edge over the 5D Mark III in terms of still photo quality. For video and speed the Canon may be better, but for still photos, the Nikon wins. That said, I hope these results pages show that both cameras are capable of delivering superb image quality, especially when shooting in RAW. For me it also reconfirms the excellent output from the latest version of Adobe Camera RAW, using the recipe described. Try it for yourself on your own RAW files: Sharpening at 70 / 0.5 / 36 / 10, Luminance and Colour Noise Reduction both set to zero, and the Process to 2012 with the Adobe Standard profile, or if you prefer, Camera Standard. Let me know what you think. In the meantime, that’s the end of my Nikon D800 vs Canon EOS 5D Mark III tests, but this section isn’t quite finished yet. The D800 so impresses in terms of resolution, it begins to tread on the toes of medium format cameras, but how close are they really in practice? To find out, I got hold of a 60 Megapixel Phase One IQ160 and compared them head-to-head – see my Nikon D800 vs medium format quality page! Alternatively if you’ve already seen enough, head on over to my Nikon D800 sample images, or skip straight to my Nikon D800 verdict.
|


Nikon D800 results : Quality / RAW quality / Noise / Noise Downsampled / RAW Noise / Vs Medium format
Nikon D800 vs Phase One IQ160 Medium Format RAW quality
|
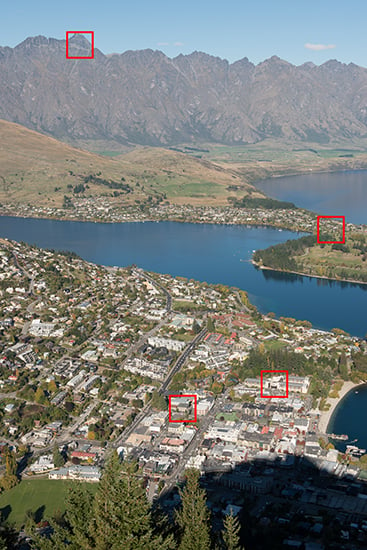
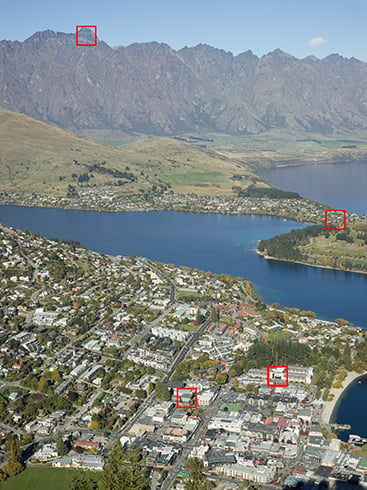
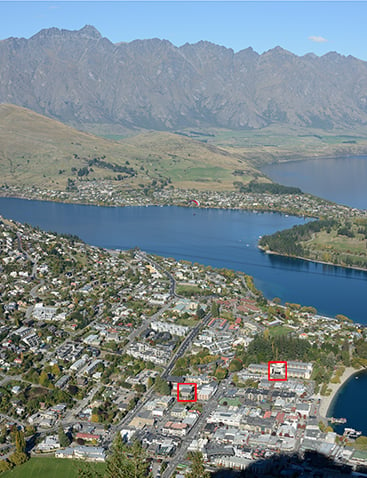
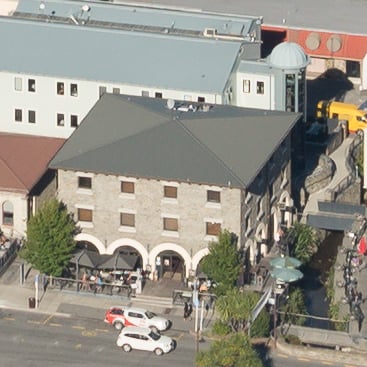
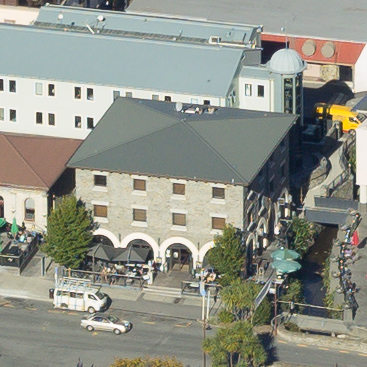
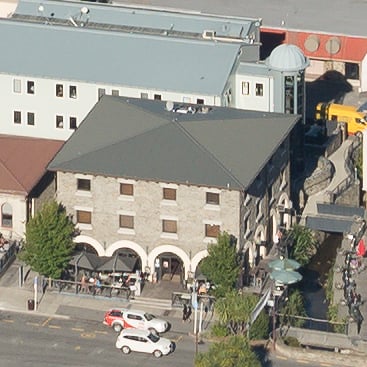
Nikon D800 vs Phase One IQ160 RAW quality, (D800 with two frames stitched together) | |||||||||||||||
|
While examining the sensor specifications of the Nikon D800, it occurred to me that two images stitched on top of each other would in fact be roughly similar to a single frame from the Phase One IQ160 medium format back. The IQ160 sensor measures 53.9×40.4mm and sports 60.5 Megapixels, which delivers images with 8984×6732 pixels. Stitching two D800 images together with no overlap effectively generates a 72 Megapixel image with 9824×7360 pixels from a virtual sensor measuring 48x36mm. Okay, it’s not a perfect match, but it again it’s interesting to see how close the D800 can get to medium format quality. So below are the two images I shot. The one on the right is the same single frame from the Phase One IQ160, while on the left are two landscape images from the D800 stitched together. For this comparison I found the Nikkor 24-70mm f2.8 wasn’t quite long enough to match the coverage of the Phase One combination, so switched to a Nikkor 70-200mm f2.8 and nudged it in a little. The EXIF reports 70mm, but it was a slightly tighter view than the 24-70mm at 70mm and required to match the Schneider 80mm on the IQ160. | |||||||||||||||
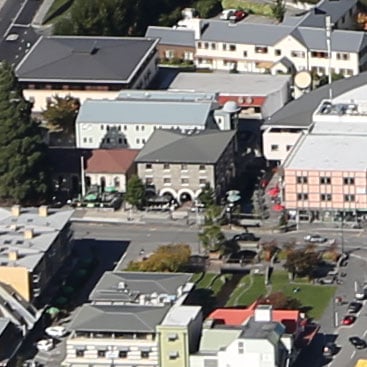
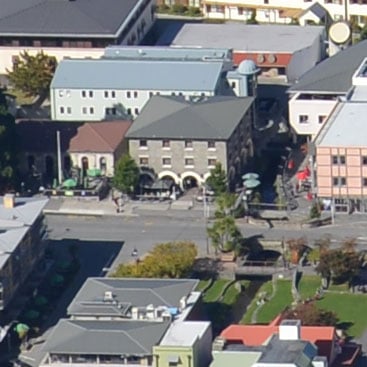
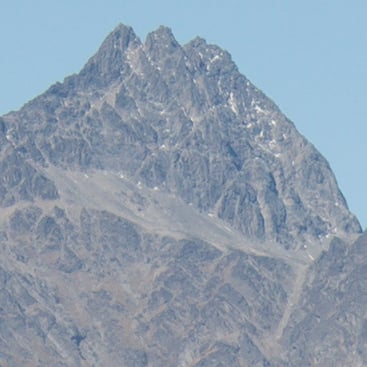
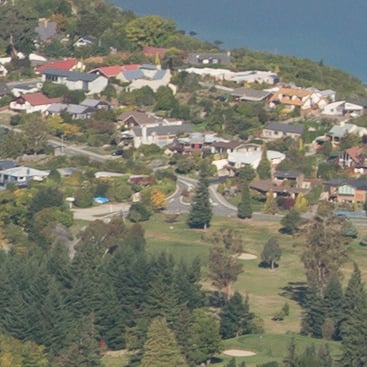
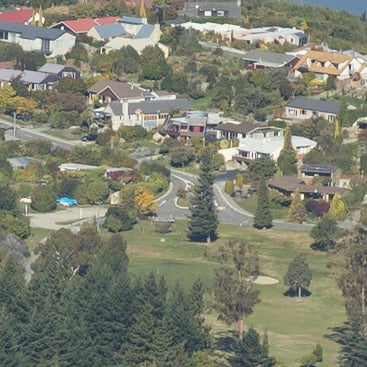
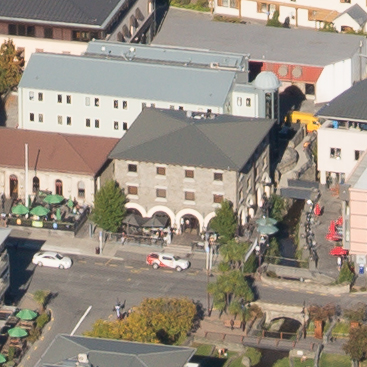
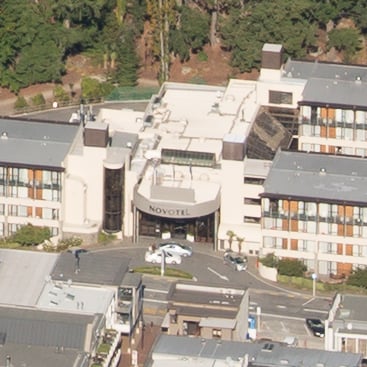
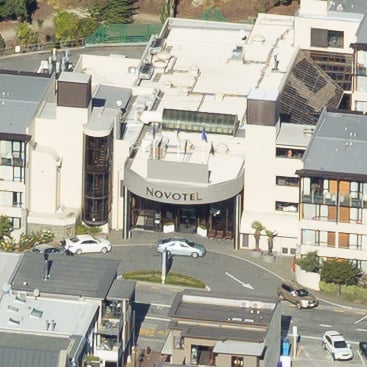
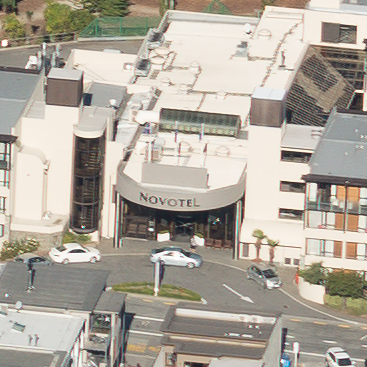
This time I’ve taken two crops from the images above and reproduced them here at 100% without any scaling. The cropped areas are marked with red squares. Ignore the third square to the right of centre on the IQ160 image above as it wasn’t used again in this comparison. In the crops below we’re comparing 72 Megapixels against 60 which is why the Nikon crops show a slightly smaller area, but as you can see the coverage is roughly the same. At best the degree of real life detail is similar too, although the IQ160 crops still enjoy a crispness that’s lacking on the D800 samples. In particular, look at the second row of crops of the Novotel hotel, where the fine detail is much sharper. As above, much of the difference in sharpness is down to using a better quality lens with the IQ160, coupled with its lack of anti-aliasing filter, but it’s impressive to see two of the D800 frames coming close in resolution. If you’re anything like me though, you may be wondering if any digital enhancement might help out the Nikon crops in this example, so to find out, I applied an extra Unsharp Mask to the D800 sample and repeated the crops. Scroll down to see! | |||||||||||||||
Nikon D800 (72MP RAW using two stitched frames) Using Nikkor AF-S 70-200mm f2.8 at 70mm |
Phase One IQ160 (60MP RAW using Adobe Camera RAW) Using Schneider LS 80mm f2.8 | |
 |  | |
f8, 100 ISO |
f8, 50 ISO | |
 |  | |
f8, 100 ISO |
f8, 50 ISO | |
|
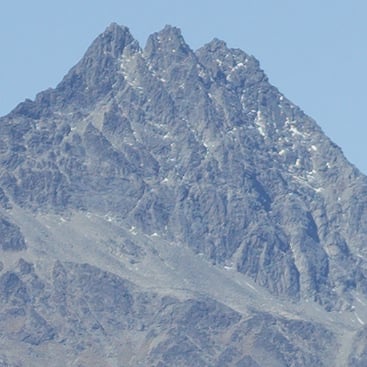
Below you’ll find the D800 crops with extra sharpening applied, just to see if we can get a little closer to the crispness of the IQ160. As you can see, the fine detail on the D800 crops is now more apparent, although it’s still lacking the ultimate crispness of the medium format shot. But what this page of casual tests and processing does reveal is when two D800 images are stitched together, you’re close to matching the resolution of a top-end medium format camera. Fit a decent prime lens and consider using the D800E version and you may even match the ultimate crispness and sharpness too. This is something I hope to do in the future and I will of course update this review. I hope you enjoyed this experiment. It concludes my tests with the D800, which only leaves me to share my Nikon D800 sample images and my final verdict page! | ||
Nikon D800 (72MP RAW using two frames and extra sharpening) Using Nikkor AF-S 70-200mm f2.8 at 70mm |
Phase One IQ160 (60MP RAW using Adobe Camera RAW) Using Schneider LS 80mm f2.8 | |
 | | |
f8, 100 ISO |
f8, 50 ISO | |
 | | |
f8, 100 ISO |
f8, 50 ISO | |
Nikon D800 results : Quality / RAW quality / Noise / Noise Downsampled / RAW Noise / Vs Medium format


