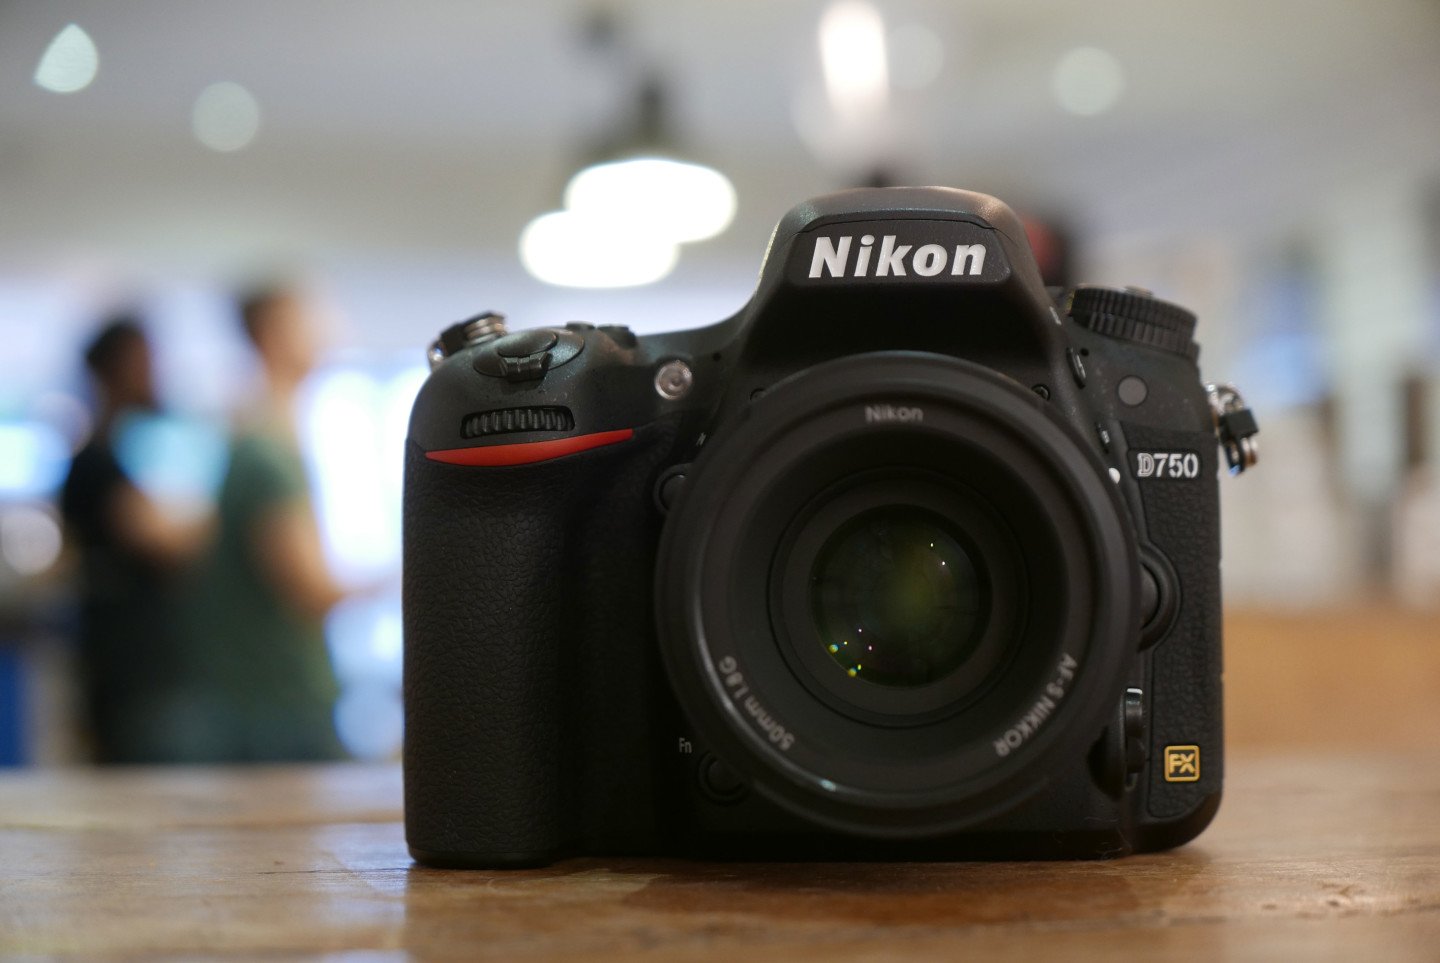
 The Nikon D750 is a very capable high-end DSLR that successfully positions itself between the existing D610 and D810 - a slot which may, at first, seem unnecessary, but which has ended up delivering one of the most compelling models in the range. Nikon's been very careful with the feature-set, picking aspects of both models on either side of it, while adding others that make it unique and arguably the company's most forward-thinking full-frame DSLR to date. So the D750 gives you a 24 Megapixel full-frame sensor in a tough body that's weather-sealed to the same extent as the D810, a 51-point AF system that works in lower light than the models on either side of it, 6.5fps continuous shooting, 1080 video at 60p, 9-frame AEB, and becomes the first full-frame Nikon DSLR to feature an articulated screen and built-in Wifi. It lacks the ultimate resolving power of the D810, not to mention its 1/8000 shutter and PC Sync port, but costs around $1000 USD less while also including Wifi and the tilting screen. It's become my favourite DSLR in the current Nikon line-up.
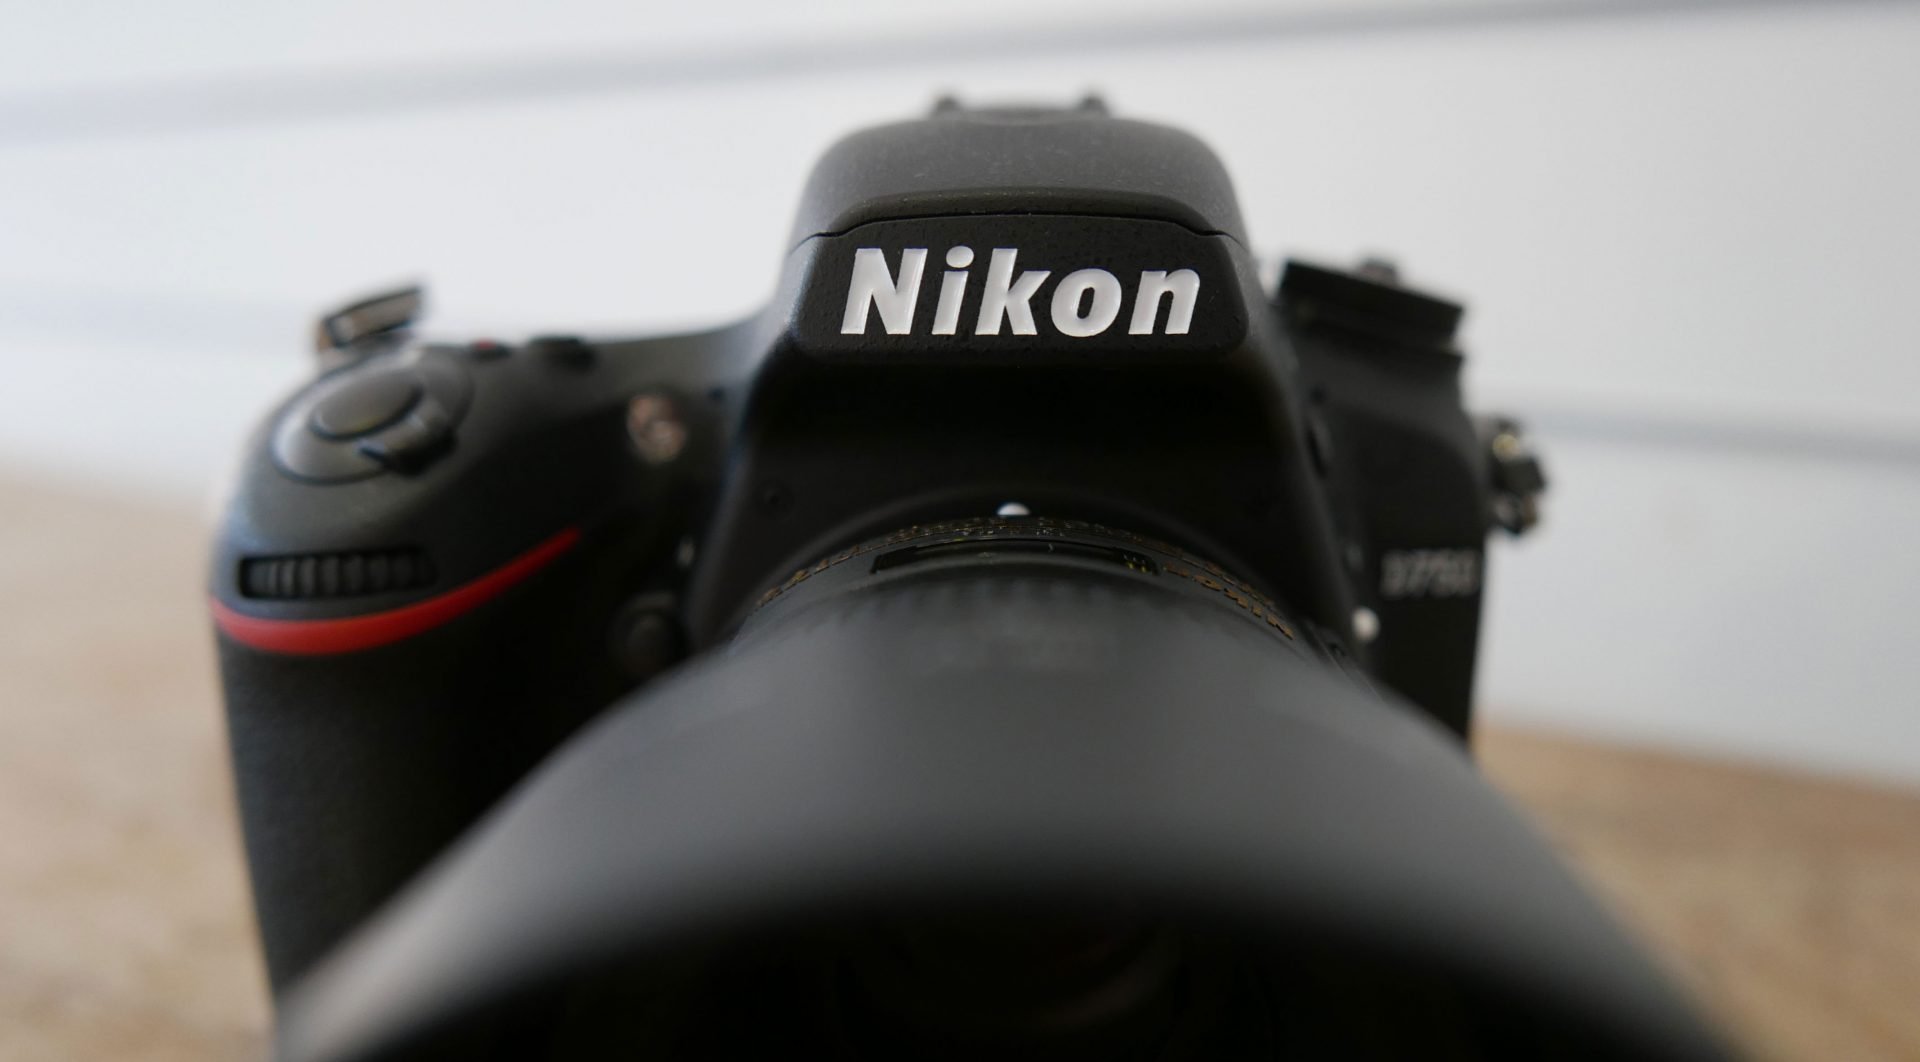
Nikon D750 review
-
-
Written by Gordon Laing
Intro
The Nikon D750 is a full-frame DSLR aimed at enthusiast photographers. Announced in September 2014, it’s positioned between the D610 and the D810 as a new model, and not officially as a replacement for the D700 – although some owners of that model will undoubtedly be weighing-up their upgrade options.
Nikon’s equipped the D750 with what it describes as a new 24.3 Megapixel FX-format sensor, sharing the same resolution as the D610, but with a higher maximum sensitivity of 12800 ISO (51200 extended) and support for 1080 video at 50p and 60p. Continuous shooting is also a tad faster than the D610 and D810 at 6.5fps, and the D750 inherits the D810’s 9-frame AEB and 91k dot RGB metering sensor, albeit with the D610’s 1/4000 maximum shutter. The viewfinder on all three models shares the same 0.7x magnification and 100% coverage.
The rugged body employs a monocoque structure that’s dust and moisture resistant to the same degree as the D810. Inside there’s dual SD memory card slots, a new 51-point AF system that works at lower light levels than the D810, zebra patterns (but no focus peaking), power aperture and Auto ISO in Manual for movies, and the chance to record video to a card and to an external HDMI device simultaneously. So far, so good, but the icing on the cake is the D750 becomes Nikon’s first FX-format DSLR with built-in Wifi and a vertically-tilting screen – at last! I’ve spent several weeks with the D750, testing it alongside the D810 for one of my most-thorough reviews to date. Read on to find out if this is the full-frame camera for you!
Nikon D750 design and controls
The D750 is immediately recognizable as a Nikon DSLR: smart, confident and familiar. As you’ll discover throughout the review, the D750 ends up as a mix of both the D610 and D810, coupled with some unique features of its own, but in terms of looks and controls, it’s closest to the D610.
Measuring 141x113x78mm and weighing 840g with battery, it’s officially the smallest and lightest full-frame DSLR in the current Nikon range. But it’s important to put this in perspective: the D750 is essentially the same width and height as the D610 and just 4mm thinner, and as for weight, it’s actually only 10g lighter, so in terms of size and weight you’d be hard pushed to tell much difference between it and the D610. This places both cameras firmly on the side of a semi-pro body and a World apart from even high-end mirrorless cameras that can weigh almost half as much – Sony’s A7r for instance (with the same full-frame 36 Megapixel sensor as the D810) weighs just 465g with battery.
To be fair though we’re talking about a full-frame DSLR here, and the D750 (along with the similarly-sized D610) is still comfortably smaller than the D810 which measures 146x123x82mm and weighs 980g with battery. Indeed place the D750 alongside the D810 and the mid-range model looks surprisingly compact – see my photo below.
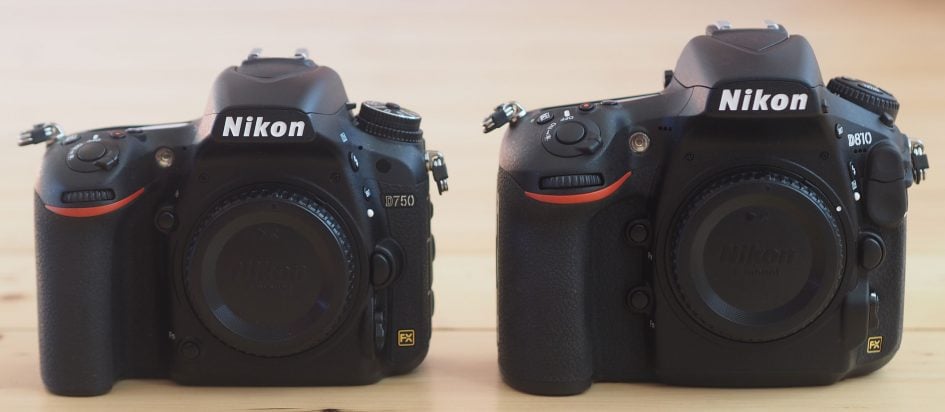
To really get a feel for the differences between the D750 and the D810, I tested both side-by-side and more emerged than I expected beyond the obvious specifications. You’ll notice the first as soon as you pick them up: the grips on both models are both traditional ‘Nikon’ which means a hooked inner area for your fingertips and a nice tall ridge on the rear for your thumb to press up against, but the D750’s grip feels deeper and to me more comfortable. Some of the difference is due to the D810 having a larger side area for the palm of your hand to wrap around, but again I personally preferred the feel of the D750’s grip. I should however say that if you have large hands, you’ll probably prefer the D810.
In terms of build quality, the D750 uses magnesium alloy at the top and rear, and Nikon describes the body as being weather-sealed to the same degree as the D810, although uniquely says the D750 is its first with a ‘monocoque’ structure. I can’t say if one is genuinely tougher than the other as while I have used both in light rain, I’ve not bashed them about – they both feel pretty robust to me, and we’ll have to wait for more owner reports to see how they’re performing in the field. Note the D610 is also weather-sealed, albeit presumably to a lesser extent – certainly its construction doesn’t feel as solid and confident as the D750 in your hands. Indeed I’d say Nikon’s got the balance just right here – the same solidity and confidence of the D810, but in a lighter, more compact and – for many – easier to hold body.
The D750’s control and layout philosophy is closer to the D610 than the D810: as such the D750 features a Mode dial which, in addition to the traditional PASM options, offers Auto, Flash Off, SCENE, EFFECTS and two user presets. Contrast that with the D810 and higher-end models that employ a Mode button which, in conjunction with a simple turn of a dial, cycles through the PASM modes and nothing else. The use of a mode dial (let alone one offering effects) firmly places the D750 as a mid-range model in Nikon’s world, and interestingly is a key difference with the long-departed but still much-loved D700 which has a Mode button.
The D750’s Mode dial has a button in the middle that must be held down before it can be turned, thereby avoiding any accidental changes. Like the D610, the Mode dial also sits atop a wider dial which selects the Drive mode: the D750 offering Single, Continuous Low, Continuous High, Quiet, Quiet Continuous, Self Timer and Mirror Lockup.
On the right side of the viewfinder hump you’ll find the shutter release button with a collar that powers the camera on and off, dedicated buttons for metering, video recording and exposure compensation, and the upper LCD information screen. Interestingly the upper screen is narrower and less detailed than the D810 and the D610. There’s still room for the basics like shutter speed, aperture, ISO, shots remaining and exposure compensation, along with a sprinkling of icons to indicate things like the metering mode, card slot in use, Wifi, bracketing and battery life. But what you won’t find on the D750’s upper screen are icons for the White Balance, Quality or AF mode settings, all of which are available on the D810, D610, and D700’s upper screens; instead these are displayed on the D750’s rear colour screen in larger and more detailed fonts, and lest we forget this screen can also be angled up (or down). I hear the sound of teeth gnashing from the Nikon faithful, but I don’t find the reduction in the upper LCD panel a problem myself – indeed I quickly found myself adapting to consulting the rear screen when changing settings.
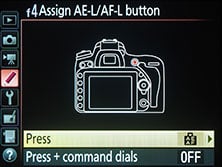
Like the D610 and D810, there’s twin dials for your finger and thumb on the front and rear of the grip, and a lockable rocker control pad on the rear panel. All work in essentially the same way, but it’s interesting to note their actual design and style. The D810’s (and D700’s) dials and rocker pad are chunkier than the ones on the D610 and D750, which may sound like a minor difference, but it’s one that actually lends the D810 and D700 a higher-end feel in operation. Another control difference is the absence of an AF-ON button next to the AE / AF lock button to the side of the thumb dial. It’s there on the D810 and D700, but not on the D610 or D750. Now it is possible to assign AF-ON to the AE / AF lock button or either of the two function buttons on the front of the camera, but the lack of a dedicated AF-ON button again confirms the D750’s position against current and past models.
Above the top left side of the screen are buttons for playback and delete, and running down the left side of the screen are the Menu, Lock, Magnify, Zoom-out and i buttons, the latter presenting a page of common settings to change when composing with the viewfinder, or a smaller super-imposed strip of options during Live View. The Lock, Magnify and Zoom-out buttons also double-up to adjust the White Balance, Quality and ISO settings when held down as you turn one or both of the dials. For example with the Quality button held down, the thumb dial adjusts the compression while the finger dial adjusts the resolution, and again the actual value is shown on the screen at the back.
Like other Nikon DSLRs, the rocker pad on the rear is used to position the AF area while shooting, navigate menus or scroll-around images, either in playback or live view – and like other models there’s a switch to lock its operation if preferred. Inside the rocker is the OK button which can be customized to offer different functions in shooting or playback. While shooting I like the default option which resets the AF area to the center, while in playback I prefer to reconfigure it to jump immediately to a 1:1 (or 200%) view, saving you from multiple taps on the magnify button – a useful feature that’s also possible on the D810 but not the D610. Above the rocker is the Info button which displays a large array of shooting information on the rear screen.
Below the pad is the control for entering Live View or movie modes which has become standard on recent Nikon DSLRs. A collar switches between Live View or Movies, while the Lv button in the middle enters or exits either mode. Nice and easy, and as I’ll note later in the review, the process of entering or leaving Live View is getting steadily quicker with each generation, so on the D750 and D810 it’s ready for action noticeably sooner than earlier models – at last, one-up on the ageing D700!
Turning to the front of the D750, there’s two buttons to the left side of the lens mount as you face the camera labeled Pv (Preview) and Fn (Function). Both are customizable with the same choice of 19 functions, although by default the Pv button activates a depth-of-field preview for the viewfinder and Fn fires-up the virtual horizon in the viewfinder. Note the AE / AF Lock button on the rear can also be customized, albeit from a smaller selection of six options.
 |  |  |
To the right side of the lens mount as you face the camera are four buttons: at the top is a button to popup the built-in flash, and holding this button while you turn the two control dials lets you set the flash mode and flash compensation; note the D810 actually employs two buttons for this, one to release the flash and the other to set the modes. Next down on the D750 is a dedicated button for bracketing which interestingly on the D810 is actually positioned higher, between the two flash buttons. Beneath this is the lens release button and tucked-in at the bottom is the familiar Nikon lever for switching between AF and Manual Focus. As with many other models, this has a button in the middle which again used in conjunction with the control dials lets you adjust the AF mode and AF area.
Returning to the built-in flash on the D750, it’s rated at 12m / 39 foot at 100 ISO, the same as the D810 and D610, and like those models you can use it for wireless flash control. There’s also a hotshoe for mounting external Speedlights and the camera of course supports Nikon’s Creative Lighting System, CLS.
On the left side of the body as you hold the camera are three large rubber flaps: the lower flap hides the USB and HDMI ports and anyone who uses external recorders will be delighted to hear the D750’s HDMI port, like the D810, is a decent-sized Type-C connector and outputs a clean signal. Behind the middle flap are a pair of 3.5mm jacks, one for an external microphone and the other for connecting headphones. Finally behind the top flap is a port for the optional MC-DC2 remote cord, although it is also possible to remote control the camera for free with your smartphone over Wifi. The D610 matches the D750’s side-ports by function, although its USB port is a more common type; note the D810 remains fairly unique in the camera World by sporting a proper USB 3 port. Like the D700 before it, the D810 also has two front-mounted ports: PC Sync for external lighting, and an accessory terminal for use with optional GPS units. And there’s another reason for some D700 owners not to cross-grade to the D750: no PC Sync port.
On the grip side of the D750’s body is a tall plastic door that opens to reveal two SD memory card slots. It’s fair to say Nikon has embraced twin memory card slots like no other camera company and offers them on a number of models including the D610, D750 and D810, although the latter swaps one of the SD slots for a CF slot. Personally speaking I think dual card slots are a great idea especially the ability to shoot duplicate images onto two cards for backup or the immediate handing-over of one to a client. Like other twin-slot bodies, you can also record RAW to one and JPEG to the other, or use the second card as an overflow when the first one fills.
And finally, the D750 is powered by the same EN-EL15 Lithium Ion battery pack as the D610 and D810, although their respective forecasts on lifespan varies. The D610 squeezed around 900 shots per charge under CIPA conditions, but Nikon claims new efficiencies allow both the D750 and D810 to extend this to a little over 1200 images. These figures are when composing with the optical viewfinder, as switching to Live View or movies will see the life greatly decrease, as will the use of Wifi on the D750. If you’d like longer life, there’s the new MB-D16 battery grip which offers portrait controls and can power the camera with an EN-EL15 or six AA batteries. Note unlike the D700, the battery grip for the D750 will not accelerate its fastest continuous shooting speed – it stays at 6.5fps maximum.
Nikon D750 viewfinder
The Nikon D750 is equipped with a pentaprism optical viewfinder with 100% coverage and 0.7x magnification; so in terms of size and coverage, it’s no different from the D610 and D810 on either side of it in the range, and like those models you’ll enjoy a large and bright view of the scene. Like other higher-end Nikon DSLRs, there’s also a variety of on-demand LCD graphics in the viewfinder which disappear completely when not in use, thereby avoiding the view getting clogged-up with inactive etchings.
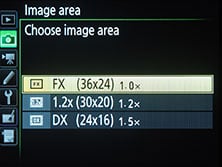
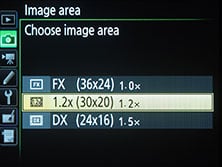
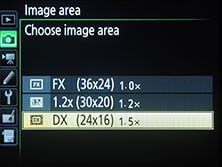
The LCD technology allows the viewfinder to indicate which of its 51 AF-points are currently active along with optional guides for alignment and a handful of icons indicating things like low battery, no memory card, whether any effects are being applied and which sensor format you’re shooting in. As I’ll mention later in the review, the D750 can shoot in the FX (full-frame), 1.2x crop and DX (1.5x crop) formats, with the frames of the smaller pair being indicated in the viewfinder by a thick black outline.
The viewfinder also offers LCD scales along the bottom and right sides that can be used as a virtual horizon indicator if assigned to the Function button. Strangely though, Nikon has hobbled this on the D750 to only allow one scale to work at a time: the bottom one when shooting in the landscape orientation, and the side one when shooting in the portrait orientation. So the D750 only actually offers a single-axis virtual horizon in the viewfinder, indicating horizontal tilt only. This seems purely to differentiate it from the D810’s viewfinder, which allows both scales to be active simultaneously for a dual-axis horizon. To be fair though, the D750 does offer a dual-axis horizon on the screen which I’ll describe in the next section.
As always, a line of shooting information is displayed beneath the main image: from left to right, depending on the mode and situation, you’ll see a focus indicator, metering icon, AE and FV lock indicators, Program shift, Shutter speed, Aperture, exposure compensation scale, indicators for HDR, Active D-Lighting, flash compensation, Bracketing and Auto ISO, the ISO value, shots remaining, and flash ready icon. The Shutter speed, Aperture, ISO value and shots remaining can also switch to show the AF mode, aperture stops available, or white balance, depending on the operation.
Nikon-philes will notice the viewfinder is similar but not identical to the D810. For starters there’s the fact only one scale is used at a time to deliver a single axis virtual horizon, but look closely and something looks different with the AF point array. Both cameras have a 51-point AF system with the same arrangement of points, but on the D750 they’re vertically squashed a little and don’t share the same height as the D810. Nikon has explained it’s because there’s less room in the D750’s smaller viewfinder housing. In practice this means slightly less vertical coverage from the AF module, but I’ve noted it here more out of interest than as an actual downside. The real anoraks out there (and I salute you!) will also note the D750’s focusing screen is described as a Type B BriteView Clear Matte Mark III compared to the Type B BriteView Clear Matte Mark VIII on the D810. Told you they were different.
Oh yes, one final point: the D810, like earlier high-end Nikon DSLRs including the D700, features a circular viewfinder surround with a tiny lever which closes a built-in blind to prevent stray light from entering, whereas to black-out the D750’s viewfinder, you’ll need to remove the rubber surround and clip on the supplied cover.
Nikon D750 screen and display views
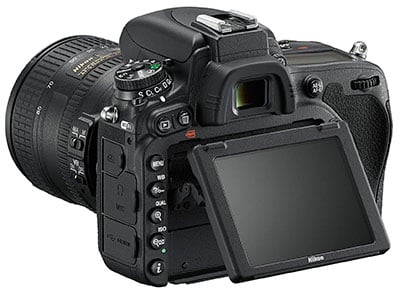
The D750 becomes Nikon’s first FX-format DSLR to sport an articulated screen. It may not be fully-articulated like the side-hinged screen on the D5300, but it will tilt vertically up by 90 degrees for waist-level shooting as well as down by exactly the same amount, making it much easier to compose with the camera overhead. Remember most other screens with vertical articulation, only tilt down by about 45 degrees, giving the D750 greater flexibility when shooting movies or in Live View.
 |
I appreciate that articulated screens are met with strongly opposing views with some photographers loving them and others hating them. I know many traditional photographers don’t see the point and fear they compromise the integrity of a body, but I find them invaluable for composing at high or low angles in Live View and for movies. I’m also impressed Nikon has gone the extra mile by deploying a mechanism that’s considerably chunkier and more robust than any other articulated screen I’ve seen. Of course that’s unlikely to be any consolation if your camera is struck by a basketball or a marauding bear while the screen is folded out, but in more normal use I’ve never seen an average articulated screen break and once again the D750’s mechanism is considerably more robust. Also remember the D750 is more of a landscape, architectural or portrait camera, not a sports or wildlife camera, so ultimate ruggedness is not its number-one priority.
The screen itself employs the same 3.2in / 4:3 aspect ratio / 1229k dot RGBW panel as the D810. This shares the same size, shape and 640×480 resolution as the screens on the D800 and D610, but with a RGBW filter array that delivers greater brightness than the RGB / 921k dot panel. Note none of the Nikon DSLRs has a touch-screen, a feature I hope is adopted sooner rather than later. You can however adjust the brightness and the colour balance of the screen if desired.
The 4:3 aspect ratio of the D750’s screen means images viewed or composed in the native 3:2 aspect ratio are shifted to the top of the screen, leaving a black bar along the bottom for shooting information. On the one hand it’s nice to have this separation of information, but it’s worth noting Canon has been employing wider 3:2 shaped screens on its DSLRs for some time which match the native shape of their images. This means images fill the Canon screens and maximise all the available 1040k pixel resolution, while 16:9 movies will appear larger and more detailed too.
In practice, images on the D750 screen measure 3in on their diagonal as oppose to 3.2in on the Canon models with 3:2 shaped / 3.2in screens, and also measure 640×426 pixels as oppose to 720×480 pixels. These numbers may seem minor, but when both cameras are placed side by side, the displayed images from the Canon models are a little larger and more detailed, and certainly allow you to confirm live view focus more easily with or without magnification.
Entering Live View is very simple on the D750: just turn the switch on the rear of the body to the camera icon then press the LV button in the middle. It’s a lot quicker than earlier models too, with the live image appearing only a split second after you press the LV button, making it much more practical to jump in and out of it. Indeed I found myself regularly switching in and out of Live View while composing with the D750 – the speed makes it feel a lot more like an integrated part of the camera’s operation rather than an add-on. Note the D810 is equally fast, although of course lacks the articulated screen.
With Live View active you can focus by either half-pressing the shutter release or assigning AF-ON to one of the customizable buttons. Like earlier Nikon DSLRs there’s two Live View focusing modes, AF-S Single AF or AF-F Full-time servo AF, selected by pushing the button in the AF switch by the lens mount and turning the thumb wheel. The AF-F mode attempts to focus continuously on the selected AF area, but like AF-F in the movie mode you may find it spends more time searching than actually tracking; indeed if you’re anything like me you’ll turn it off straightaway.
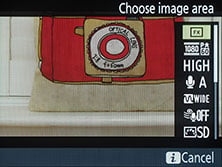
Pressing the i button superimposes a short menu of options: image area, image quality, image size, picture control, Active D-Lighting, remote control mode, and Exposure Preview. If you select the cropped image areas of 1.2x or 1.5x, their impact is immediately reflected in the coverage on-screen during Live View: the image still fills the monitor, but shows a tighter view.
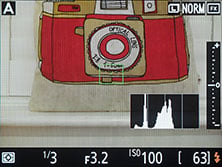
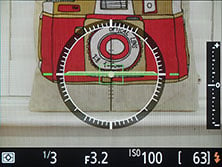
Pressing the Info button during Live View composition cycles through four pages of information and guides: the first superimposes a very nicely designed dual-axis leveling gauge, the second displays the maximum amount of shooting information, the third opts for a clean view with no overlays, the fourth superimposes framing guide lines. If Exposure Preview is enabled via the i button menu in Live View, then a fifth page is added showing a live histogram.
 |  |  |
Pressing the magnify button gradually zooms-into the image by up to 200%. I’m pleased to report the D750 and D810 keep showing more detail with every magnification step up to 100%, unlike earlier models which simply enlarged a lower resolution image and gradually became fuzzier. In this respect Nikon has finally caught up with Canon’s Live View magnification, and it’ll be welcomed by any photographer who likes to confirm focus in Live View at 1:1. It’s certainly resolved one of the biggest bugbears I had with Nikon DSLRs, although annoyingly there’s still no focus peaking available which will infuriate videographers.
 |  |  |
During playback you can zoom-in for more detail or out to three progressively smaller thumbnail views with four, nine or 72 images shown at a time, followed by a calendar view. As I mentioned earlier, it’s also possible to configure the OK button to zoom straight into 50, 100 or 200% which saves loads of button-pushes if you regularly like to check focus in playback – and who doesn’t?
 |  |  |
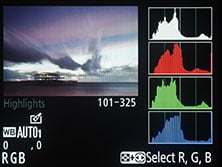
Like other Nikon DSLRs, there’s a wealth of shooting information available for each image in playback by pushing the rear pad up or down. Doing so cycles through the following pages: image with AF area indicated and basic file details at the bottom, image alone, thumbnail with shooting information and a brightness histogram, three pages of further shooting details, thumbnail with RGBW histograms, and finally highlights (including RGB channels if desired) before returning to the image with file information. You can cycle back and forth through these as desired, or customise the playback pages from the Playback Display Options menu.
 |  |  |
The dedicated Retouch menu lets you apply D-Lighting, Red-eye correction, crops, effects, adjust the colour balance, correct distortion or rotation, or composite multiple exposures. There’s also in-camera processing of RAW NEF files, letting you choose the image quality, image size, white balance, exposure compensation, picture control, High ISO NR, colour space, vignette control and D-Lighting. Once you’re happy with the adjustments, a new JPEG file is generated.
Nikon D750 Original JPEG image | Nikon D750 JPEG from RAW file processed in-camera |
 |  |
| 4 minute long exposure | 4 minute long exposure |
To demonstrate the in-camera RAW processing in action, compare the two images above: the first on the left is a JPEG straight out of camera from a long exposure. Unfortunately the exposure wasn’t quite long enough and the image is a bit dark. The colours are also a little muted due to the standard picture control. So I selected the RAW file from the Retouch menu, applied 0.5 EV of exposure compensation to slightly brighten the image, changed the Picture Control to Vivid to boost the colours, and set D-Lighting to High to lift shadow details; the result is above right and matches what I could achieve externally in Capture NX.
Finally, the screen isn’t just used for Live View and playback. When composing with the optical viewfinder you can press the Info button to display a page of detailed shooting information on the screen, much more than is shown on the upper LCD screen. I used this often to check most settings at a glance, especially when shooting on a tripod with the screen angled-up. This display also considerately changes its colour scheme based on the conditions, preventing you from being blinded when it’s dark.
 |  |  |
From the menus you can also fire-up the same dual-axis virtual horizon that’s available in Live View, only this time without the live image. Again it’s particularly handy when the D750 is mounted on a tripod.
Nikon D750 shooting modes
The D750 is equipped with a mode dial which offers the usual PASM options along with Auto, Flash Off, SCENE, EFFECTS and two user presets. The decision to fit a mode dial along with offering auto, scene and effects options firmly places the D750 as a mid-range model in Nikon’s world, as the higher-end D8x0 and single-digit D series employ a mode button which simply cycles through PASM and nothing else. It’s also revealing that the older (but still very much loved) D700 and D300(s) employ the mode button and PASM options of the higher-end models, leading owners of those to not regard the D750 as an upgrade, at least in terms of controls.
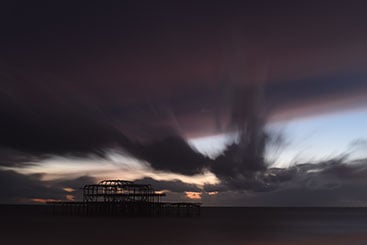
The positioning of the D750 is further confirmed by its shutter speed range of 30 seconds to 1/4000, thereby matching the D610 and lacking the 1/8000 of not just the D8x0 series, but also the older D700 and D300(s). Like other recent Nikon DSLRs, there’s two long exposure options: Bulb and Time, the latter conveniently opening the shutter with a single press and keeping it open until you press the shutter release again. This means you may not need a cable release for exposures longer than 30 seconds, and if you want to stay completely hands-free you can use the smartphone app to start and stop the exposure over Wifi. Here’s a four minute exposure I took using the Time option and with long exposure noise reduction disabled.
|

The maximum flash sync speed is 1/200, the same as the D610, but slower than the 1/250 of the D8x0 and D700; note all Nikon cameras can support a sync speed one third of an EV faster (so 1/250 on the D750 and 1/320 on the D8x0 and D700), but with a reduction in flash range. As noted in the ports section near the start of the review, the D750 also lacks the PC Sync port of the D8x0 and D700, again making it a less serious camera for those who are into strobes.
Metering duties are carried out by the same 91k dot RGB sensor as the D810, which can actually perform face detection even when you’re composing through the optical viewfinder. If the metering sensor recognizes a human face, it should expose for it and also work with the AF system to try and focus on it too. In practice when shooting through the viewfinder, I certainly found the D750 exposed correctly when faces were in the frame, but of course it could only focus on them if they fell within the AF area. Switching to Live View allowed the D750 to focus on a face anywhere in the image, along with surrounding them with a frame, but the contrast-based AF system slowed focusing down to one to two seconds which isn’t very practical for portraits.
I also found the Matrix metering system generally over-exposed for my liking, requiring around -0.3EV compensation for most subjects but as much as -1EV when faced with bright sunny landscapes like my outdoor test scenes. I’ve experienced this with almost every Nikon DSLR and I think it’s driven by a desire to capture the optimal tonal range for subsequent work, rather than trying to generate a good-looking JPEG out-of-camera. So any adjustment to the exposure really depends on how you want to use your images: if you’re shooting with the intention to work on them later, then the default metering should give you a good range of tones to work with, but if you want a great-looking JPEG without any work then you may want to dial-in a bit of negative compensation or apply the very effective Active D-Lighting options which adjust the levels for a punchier output.
Or of course you could choose one of the alternative metering options. In addition to Matrix metering which deploys the full technology of the sensor to figure out what’s in the scene, you can choose more traditional Center-weighted (with a choice of circle sizes), Spot (4mm circle which can also be linked to a single AF area), or the new Highlight-weighted option inherited from the D810 which places greater importance to the highlights in the scene and is ideal when shooting brightly-lit subjects against a dark background like stage performers.
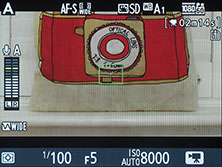
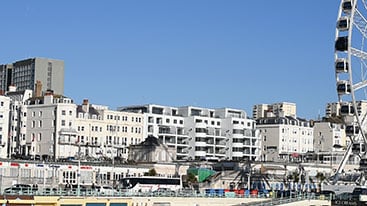
The D750’s metering and AF technology really came together for this photo I took at the annual Lewes Bonfire celebrations where various societies march through the medieval town in period costume, bearing torches. The light levels are low and very unpredictable on the faces of the people taking part, and they’re in pretty much constant motion too. I was shooting with the 50mm f1.8G at f2 and tracking the subjects with a single AF point in Continuous AF mode. I had the sensitivity bumped up to 6400 ISO to ensure a fast shutter speed (1/500 here) to freeze the action and prevent bumps from the jostling crowd. The D750’s done a fantastic job here, keeping the subject in focus and exposing perfectly for the face under the selected AF point. Challenging conditions, but again the AF and metering technology came together for this image.
|

Exposure compensation is offered in a broad +/-5EV range, and I’m relieved to report exposure bracketing is inherited from the higher-end models with the choice of two to nine frames at increments up to 1EV, or two to five frames at bigger gaps up to 3EV apart. This is a key differentiator with the lower-end D610 which only offers basic two to three frame bracketing, albeit with a decent gap between them up to 3EV.
So HDR fanatics will love the D750’s AEB, while those who want to experiment with the technique in an easier environment can deploy the camera’s built-in HDR mode which takes two exposures and combines them into a single JPEG with a choice of tone mapping strengths from Low to Extra High; note the HDR mode is not available when RAW or RAW+JPEG is selected in the image quality. If you’re into more surreal multiple exposures, the D750 can alternatively combine two or three different exposures into one image with automatic gain if desired. Below is a comparison of a normal JPEG against the HDR mode set to Extra High.
Nikon D750 Single frame | Nikon D750 HDR mode at Extra High |
 |  |
 |  |
1/60, f8, 400 ISO | 1/50, f8, 400 ISO |
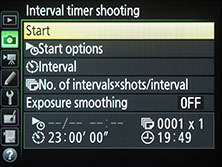
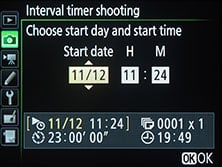
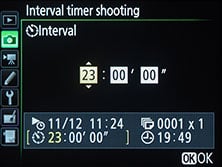
A highlight of many Nikon cameras are their built-in intervalometers. The Interval Timer Shooting menu lets you choose a start time from one minute to one week in advance, interval times of one second to 24 hours, and numbers of intervals from one to 9999; there’s even the chance to record one to nine frame at each interval. So there’s loads of options to cover timelapse shooting, and the D750 considerately lets you know when the process will complete, adjusting its forecast as you make changes to the settings.
 |  |  |
If your goal is simply to produce a timelapse movie, you could alternatively choose the Timelapse Photography option in the Movie menu. This has more basic interval options, but conveniently encodes the images as they’re captured into a video with the current movie quality. You can set the intervals between one second and ten minutes, and the shooting time to a minute shy of eight hours. The actual still photos aren’t kept in this mode, but instead are appended to a steadily growing video that you can terminate at any point in the process and still end up with a playable file. There’s also an exposure smoothing option which seems to eliminate distracting steps between shutter speeds, thereby avoiding flickering. At the end of the process, or if you interrupt it by pressing the OK button, a video is automatically encoded at the current quality settings, so be sure to have these set to the desired quality before you start.
To try it out I filmed for 40 minutes at three second intervals for the sunset timelapse below, using Aperture Priority, fixed ISO, fixed focus and fixed white balance; I let the camera work out the shutter speed as the conditions became steadily darker, and the exposure smoothing option has avoided any flickering.
| |
|---|---|
| |
|
As mentioned earlier, the D750 has a dedicated EFFECTS position on the mode dial which lets you choose from seven different digital effects from an on-screen interface. You can choose from Night Vision, Colour Sketch, Miniature, Selective Colour, Silhouette, High Key and Low Key. The first four are only available when shooting JPEG, while the last three can be recorded in RAW+JPEG. Colour Sketch and Miniature are also available when filming video. Here’s a selection of the effects on my standard test scene, followed by a miniature movie filmed from the same position.
Nikon D750 Colour Sketch | Nikon D750 Miniature |
 |  |
Nikon D750 Selective Colour | Nikon D750 High Key |
 |  |
| |
|---|---|
| |
|
Night Vision deploys high sensitivities and a monochrome conversion for easy shooting in very low light, Colour Sketch performs an outline filter, Miniature delivers the popular tilt shift effect with an adjustable band of focus (up / down, left / right, and thickness), Selective Colour lets you pick a colour while everything else is turned to black and white, Silhouette does what it says on the tin and is idea for dark shapes in front of sunsets, while High Key and Low Key bias the exposure to the right and left respectively. There’s no in-camera panoramas, but then that’s par for the course for DSLRs right now even in Live View.
Nikon D750 autofocus
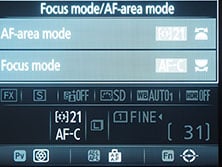
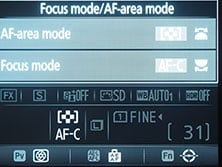
The D750 features a new autofocus module, the Advanced Multi-CAM 3500 II, which employs 51 focus points, 15 of which are cross-type, and 11 of which work at f8. So far this shares the same specification as the Advanced Multi-CAM 3500FX module in the D810, and indeed the D800 before it, but what’s new on the D750 is the ability to autofocus in lower light: -3EV compared to -2EV on the D810 / D800. Hence the different module name.
The arrangement of the 51 AF points is the same as the D810 / D800, but as you’ll know from the viewfinder section earlier, the array is slightly squashed vertically due to the size of the pentaprism head section. Meanwhile for comparison, the D610’s Multi-CAM 4800 has 39 AF points, 9 of which are cross-type, and seven which work at f8. Importantly the D610’s AF system is the least-capable of the three FX bodies in low light, focusing down to -1EV. So the D750 enjoys an edge in its AF specification over not just the lower-end D610, but the higher-end D810 / D800 as well.
The D750 has a small lever by the lens mount that switches it between AF and Manual focus, and if set to AF you can choose from AF-S (single), AF-C (continuous) or AF-A (which chooses single or continuous based on the subject). You can activate the focus with a half-press of the shutter release, or by assigning AF-ON to one of the three customizable buttons, most likely the AE / AF lock button; the absence of a dedicated AF-ON button is another difference between the D750 and the higher-end D810.
There’s five options for configuring the 51 AF areas: Single Point, Dynamic Area, 3D Tracking, Group Area AF and Auto Area AF. In Single and Dynamic Area, you can manually adjust the focusing point using the rocker control on the rear, with Dynamic Area also considering 9, 21 or 51 surrounding focus points if the subject moves (you can choose how many it should consider). In Auto Area, the D750 chooses the focus point automatically, while in Group Area the camera automatically chooses from a reduced area of points. If the D750’s metering system detects a face in the composition, it’ll work with the AF system to place the AF points over the subject – so long as they’re within the area covered by the AF system of course.
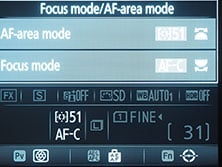 | 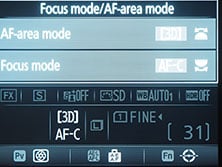 |  |
With 3D Tracking, you manually select a focusing point and place it over the desired subject. With the shutter-release half-pressed, the D750 will then attempt to keep this subject in focus even if you recompose the shot. 3D Tracking also exploits colour information to help track a subject, although obviously if it’s the same colour as the background, the system will become confused. Nikon recommends 3D Tracking for quickly composing shots where subjects are moving erratically, such as tennis players. Meanwhile 9-point Dynamic is best for predictable motion, like runners or racecars, 21-point Dynamic is more suited to unpredictable motion like football players, while the 51-point Dynamic option is best for subjects which are moving quickly and can’t easily be framed, like birds in flight.
As with all cameras which offer a variety of AF options, it’s a case of experimenting to see which works best for your particular application. It also pays to be flexible in your choice as the one Nikon thinks is best for a certain activity might not quite fit the one you’re trying to shoot. In use I found the Auto area worked well for general use and spontaneous portraits, again so long as the subject of course fell within the area covered by the AF system. The 9-area Dynamic mode was great for tracking steadily approaching action, like bikes, although when shooting marches, I found a single area was more reliable as I could keep it positioned over someone’s face. Meanwhile when I was trying to capture birds taking-off at close range the 51-point Dynamic mode worked best. The 3D mode did a good job when there was sufficient contrast between the subject and background, like a brightly coloured skier or snowboarder against a white backdrop, or a boat or surfer against a mostly flat-coloured ocean.
In terms of low light performance I tried the D750 out at the annual Lewes Bonfire celebrations where various societies in costume march along the streets at night. Most of the attendees may be carrying flaming torches, but the light levels are still very low and challenging for an AF system. When shooting with the AF-S 50mm f1.8G wide-open I found the D750 managed to track approaching subjects fairly confidently using single AF areas. Compared side-by-side with the D810 I’d say the D750 enjoys an edge in very low light, and this could certainly be a factor if you shoot under these conditions regularly, such as portraits at events. I’ve not compared the D750 side-by-side with the D610, but I’d expect the gap to be more noticeable between their AF in low light.
|

Of course so far I’ve only discussed the AF using the viewfinder. The D750 also offers autofocus during Live View with the choice of AF-S for single and AF-F for full-time continuous. In Live View – and for movies – the D750 continues to use a 100% contrast-based AF system that’s certainly very accurate, but still quite leisurely in execution. In AF-S mode you’re looking at one to two seconds for the camera to lock-on under fairly good conditions and longer when the light levels fall. The AF-F mode bravely tries to make adjustments continuously, but while it’s just about adequate for adjusting the focus as you pan around a room, it’s not up to the task of tracking an approaching or receding subject in constant motion.
Returning to the Lewes Bonfire parade, I tried shooting with the camera held overhead, exploiting the articulated screen in Live View, but found the AF was essentially unusable in low light with a moving subject. It was fine in manual focus, and I appreciated the ability to compose at high angles, but Live View AF on the D750 remains nowhere near the experience you’ll enjoy shooting with the best mirrorless cameras. If you mostly shoot with the screen in Live View, a mirrorless camera remains the best choice – I’d recommend the Olympus OMD EM1 if you shoot mostly static subjects or the Sony A6000 if you regularly shoot subjects in motion.
So while the articulated screen encourages you to shoot more spontaneously with the D750 in Live View, I find the slow AF in Live View means it’s best reserved for confirming focus on static compositions like landscapes and buildings.
Nikon D750 movies
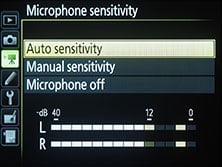
The D750 shares essentially the same movie capabilities of the higher-end D810 which means it offers 1080p up to 60p, manual control over exposures, headphone and microphone jacks, manual audio levels, zebra patterns (but no focus peaking), clean HDMI output, full-time continuous autofocusing and Auto ISO options.
 |  |  |
To enter the movie mode you’ll need to first turn the collar on the rear of the camera from Live View to Video, then press the button inside to fire-up the live image (cropped to the selected movie format); after this just press the dedicated record button near the shutter release to start and stop recording.
In Program and Shutter Priority modes you can adjust the exposure compensation, and in Aperture Priority you can adjust the Aperture as well. For full manual control over exposure you’ll need to turn the D750’s mode dial to Manual, after which you can set the shutter speed (between 1/25 and 1/4000), aperture and sensitivity.
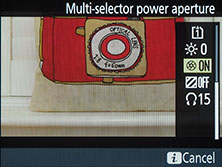
Two neat exposure options inherited from the D810 are Auto ISO and Power Aperture. Auto ISO works for movies as it does for stills, letting you define a maximum sensitivity and automatically compensating for varying light while you film with a fixed shutter and aperture. Power Aperture provides smoother and slightly quieter adjustments of the aperture while filming (and it works for movies recorded internally onto the memory card). Normally when you adjust the aperture the camera opens or closes the lens iris as quickly as possible which is great for stills, but results in sudden and visible brightness steps during video – plus turning the actual finger dial results in a loud click and a possible wobble. If you enable Power Aperture on the D750 though you can use the quieter rear pad to adjust the aperture values, but crucially the mechanism which opens or closes the iris is slowed down. The result is a smooth transition between f-numbers while also avoiding the clicking controls; the process is still audible, but it’s much quieter than turning the finger dial, and again visually much more discreet. Here’s a video I filmed to demonstrate the feature.
| |
|---|---|
| |
|
Contrast-based autofocus is available in single or continuous (AF-F) options. The latter works similarly to previous Nikon DSLRs where the camera attempts to refocus regularly with variable results. When moving the camera from one subject to another, the refocusing process can actually be quite effective at times, with a smooth rack, but at other times you get the impression the camera is less confident, attempting to refocus even when there’s no need. During this time the lens focusing is also quite audible, especially when the camera’s performing lots of little adjustments. The problem is Nikon doesn’t yet have a lens that focuses quietly for video, so it’s fallen behind options from Canon, not to mention the almost universally quieter mirrorless crowd. But equally I appreciate there’s probably few people who’ll use the full-time continuous AF mode on the D750 as it’s aimed at higher-end film makers. Conversely though, if we are to manually focus with the D750 while filming we could really do with focus peaking, a feature that’s sorely missing on Nikon DSLRs.
There may not be focus peaking, but there is at least a zebra pattern option to indicate areas of over-exposure, although it’s less sophisticated than many rivals by not offering a choice of thresholds.
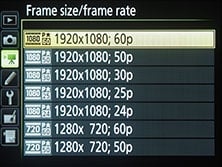
In terms of quality you can choose 1080p at 60p, 50p, 30p, 25p or 24p, or 720p at 60p or 50p; the 60p, 30p and 24p options have actual frame rates of 59.94, 29.97, and 23.976fps respectively. Videos are encoded in H.264 and stored as MOV files in the same folder as still photos. Nikon doesn’t quote bit rates, but I measured most of my clips at 22Mbit/s, although one jumped to the late thirties. Note there’s no higher frame rates than 60p available, so unless you’re making a project at a sub-60fps frame rate, there’s no chance to slow the footage down smoothly.
 |  |  |
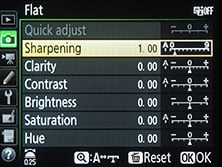
Saturation, sharpening, contrast and other image parameters are applied – as with stills – using a selection of adjustable Picture Controls; and like the D810 there’s now a Flat option which turns the sharpening almost all the way down (set to 1 on a scale of 0-9), and sets all other parameters to zero for grading purposes; I have two Flat clips available for download: Nikon D750 flat clip and Nikon D750 flat clip.
So far the D710’s movie capabilities sound the same as the D810, but there are differences to note. First, the D750 houses its movie options under a separate tab, whereas on the D810, they’re accessed from a page off the main recording section. But more important is the impact of their respective sensors, and crucially the crop and subsequent scaling applied to reduce 24 or 36 Megapixels down to Full HD.
Below are videograbs of 1080p video filmed with the D750 and D810 using the same 50mm lens from the same position. The D750’s video actually has exactly the same horizontal field of view as its still photos, and only involves a vertical crop to deliver the 16:9 shape, before then down-scaling to 1920×1080. It’s clear from the grabs below though that the D810 makes a small crop first before scaling-down to 1920×1080. As such the D810 captures a slightly narrower field of view than the D750 when filming video in the FX mode.
Nikon D750 Coverage in FX format with 50mm f1.8G | Nikon D810 Coverage in FX format with 50mm f1.8G |
 |  |
| Full image resized to fit table | Full image resized to fit table |
But other than showing a slightly tighter area, what impact does this have on their video quality? In the table below you’ll see 100% crops made from the center of the videograb frame, and you’ll notice the D810 is recording finer and crisper details. Some of this is undoubtedly due to the slightly higher effective magnification due to the initial tighter crop, but even with that taken into account, the D750 is visibly softer.
Nikon D750 100% crop from 1080 / 24p video in FX mode | Nikon D810 100% crop from 1080 / 24p video in FX mode |
 |  |
| 100% crop taken from video grab | 100% crop taken from video grab |
Both cameras also offer a DX crop mode which applies a 1.5x field reduction factor, and below I’ve again taken videograbs from each body. Interestingly this time though, both are showing exactly the same coverage.
Nikon D750 Coverage in DX format with 50mm f1.8G | Nikon D810 Coverage in DX format with 50mm f1.8G |
 |  |
| Full image resized to fit table | Full image resized to fit table |
This gives us a great opportunity to compare the quality when both are recording the same field of view, so once again I’ve presented 100% crops from the middle of each videograb below. And once again, despite now sharing the same coverage, the D810 still looks crisper with finer details than the D750. Now of course with fewer pixels to start with, the scaling factor is still different for the D750 than the D810, and this is certainly playing a part in the overall quality, but so is the absence of an anti-aliasing filter on the D810. We could both spend an age performing further analysis, but the bottom line is under good light and at low ISOs, the D810 is capable of delivering crisper and finer details than the D750, albeit with a small reduction in the field of view when filming in the FX format.
Nikon D750 100% crop from 1080 / 24p video in DX mode | Nikon D810 100% crop from 1080 / 24p video in DX mode |
 |  |
| 100% crop taken from video grab | 100% crop taken from video grab |
But what happens when you increase the sensitivity? Does the D750 enjoy an advantage? Remember both cameras still have plenty of pixels to spare when generating a 1080p frame, so both need to scale or throw away data. In the table below I’ve compared 100% crops from footage filmed in low light at 1600 to 51200 ISO for both bodies. I filmed in the FX format, so once again the D810 has reduced the field of view slightly.
Nikon D750 100% crop from 1080 / 30p video | Nikon D810 100% crop from 1080 / 30p video |
 |  |
| 100% crop taken from video grab at 1600 ISO | 100% crop taken from video grab at 1600 ISO |
 |  |
| 100% crop taken from video grab at 3200 ISO | 100% crop taken from video grab at 3200 ISO |
 |  |
| 100% crop taken from video grab at 6400 ISO | 100% crop taken from video grab at 6400 ISO |
 |  |
| 100% crop taken from video grab at 12800 ISO | 100% crop taken from video grab at 12800 ISO |
 |  |
| 100% crop taken from video grab at 25600 ISO | 100% crop taken from video grab at 25600 ISO |
 |  |
| 100% crop taken from video grab at 51200 ISO | 100% crop taken from video grab at 51200 ISO |
Judging from the crops above I’d say both models share similar noise levels at 1600 and 3200 ISO, although the D810 enjoys an edge in detail as seen before on my outdoor samples. Interestingly beyond 3200 ISO though, the D810 suffers from more visible noise with image quality that deteriorates faster than the D750; indeed at the upper end of the scale I’d say the D750 enjoys a one to two stop advantage in noise levels over the D810. It’s interesting because both have to downsample a high resolution full-frame image into a 1920×1080 frame and there’s plenty of opportunities for pixel-binning, but the end result is the D810 out-resolves the D750 at low sensitivities and the D750 delivers a cleaner image than the D810 at very high sensitivities.
With all that said, here’s a selection of sample movies filmed with the D750 and as always, registered members of Vimeo can download the original clips for evaluation.
| |
|---|---|
| |
|
| |
|---|---|
| |
|
| |
|---|---|
| |
|
| |
|---|---|
| |
|
| |
|---|---|
| |
|
| |
|---|---|
| |
|
| |
|---|---|
| |
|
Nikon D750 Wifi
The D750 becomes Nikon’s first full-frame DSLR with built-in Wifi; indeed it’s only the second DSLR in the entire range with Wifi, the other being the D5300. As most of you know I’m a big fan of Wifi and believe it should be fitted in every camera as standard nowadays, rather than being deployed as a special feature on select models. But it is an important step for Nikon to include it here, so a respectful nod to the D750 and whoever voted for its inclusion.
The Wifi implementation on the D750 is essentially the same as the D5300 before it, which in turn matches the experience of the optional Wifi module for earlier models such as the D3300. As such you get basic remote control and wireless transfer of images to an iOS or Android smartphone running the free Wireless Mobile Utility, or WMU for short. There’s also basic GPS tagging available.
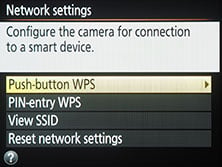
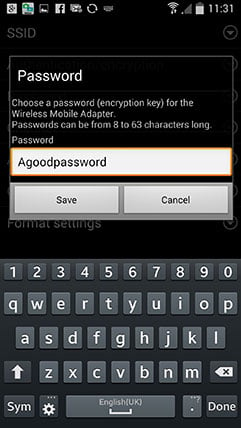
The first step is to go to the Wifi section in the Setup menu and enable the Network connection. This sets the D750 up as a wireless access point with an SSID which you can view in the Network Settings section. Next start the WMU app and connect to the camera’s Wifi network by selecting it in the Wifi list; there’s no NFC in the D750 so you’ll need to select the network by hand. Once you’re connected you can start using the app to access images or control the camera, but I’m going to pause for a moment because networking enthusiasts may have noticed something a bit odd: no security.
 |  |  |
By default the D750 broadcasts a public SSID without a password required to connect to it, and the network name is obvious too. This means anyone scanning Wifi networks within range will be able to see it and connect to the camera, and potentially access your images. If you’ve tagged images during playback for transfer to a smart device, then these will also be sent automatically to the next device that connects to the camera, which in a worse-case scenario may not be your handset.
Now despite some alarmist reports about this, I don’t think it’s a huge risk myself. First of all most people will only enable Wifi on the camera when they want to transfer images or remote control it; they’ll normally turn it off afterwards and even if they don’t, the Wifi switches off after five minutes of inactivity. So a wireless hacker would need to be within range of the camera during the (probably) brief time the Wifi was enabled. Secondly without a computer application that exploits the Wifi in the camera, the only way you can currently access images or remote control it is with the WMU app for iOS or Android devices. So a hacker would also need to have the app installed on their phone. And third, the camera only supports one connection at a time, so if you’re already connected to the camera with your phone, no-one else can sneak in there. So while it is possible in the default configuration for someone else’s smartphone to connect to the D750 and access images, I think the conditions for it to happen are extremely unlikely. Note it’s also not possible for someone to place images or Trojans in your camera, at least not with the WMU app.
If you are concerned though, there are a variety of security options that can be enabled on the D750. First for Android owners is WPS, either with or without a PIN code. To enable this, enable Wifi on the D750 then choose Push Button or PIN Entry WPS in the Network Settings menu. If you chose the former, then you can instruct your Android device to virtually ‘push’ the WPS button from its Wifi menu, after which it and the camera make a secure connection that remains secure for subsequent connections until you reset the Wifi options on the camera. If you choose the PIN option on the camera, you can instruct your handset to generate a WPS PIN and enter it on the D750; again it creates a secure connection from that point on between the camera and your device. I couldn’t get the PIN option to work with my Samsung Galaxy S4, but the WPS Push Button option worked fine and secured the two devices from that point on.
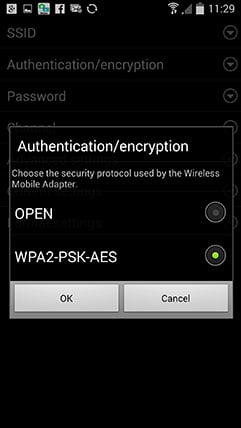
A more conventional approach that also works on iOS devices is to add a password to the network, and you do that via the WMU app. Once again enable Wifi in the camera and connect to the unsecured network with your handset. Next in the WMU choose settings, then Wireless Mobile Adapter settings. Within here you can change the SSID to something more discreet, and importantly enable WPA2-PSK-AES authentication and encryption, before entering a password of your choice; you can even manually set the broadcast channel from 1-11 if desired. Once configured, you’ll need to enter the correct password to connect to the camera, and as before you can reset back to the default using the camera’s own menus. Phew!
 |  |  |
So it is possible to enable a variety of effective security measures on the D750’s Wifi, although again I can’t envision many scenarios where your images would genuinely be at risk in the default open configuration. It does however illustrate how much easier this process can be with manufacturers who’ve thoroughly thought-through the process – for instance the best Wifi connectivity I’ve experienced to date is with Sony cameras which with a single tap against NFC-enabled phones will enable their Wifi, search for the correct SSID, enter the password, perform the desired process such as sending an image, then disconnect back into your initial configuration, all without a single button press. Nikon’s engineers need to look at the competition’s implementations to see how much better the process can work in practice.
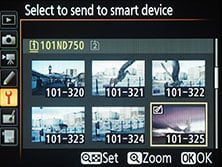
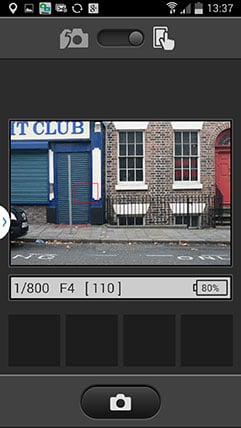
Once you’re successfully connected to the D750’s Wifi, the WMU app presents two main options: Take Photos or View Photos. Tapping Take Photos fires-up a live image from the camera. You can view the current exposure, tap to reposition the active AF area, and press a button to take a photo. Unfortunately though you cannot adjust the exposure settings from the app; instead you need to slide an on-screen switch in the app to return control to the camera, make the adjustments there, then slide the app switch back to handset control. You can’t trigger a movie recording remotely either.
 |  |  |
The lack of remote exposure control greatly limits the usefulness of the app, but in some good news I can report the app can be used as a wireless release for long exposures: simply set the D750 to Manual mode, choose Time for the shutter speed (one click beyond Bulb), connect to the camera using Wifi, then from the app press the shutter button once to start the exposure and once more to stop it again. There’s no need to keep the ‘button’ depressed during the exposure, just once to start and once again to stop, although the WMU app will need to remain at the top, as if you try and access another app, such as a timer, the camera’s shutter will close. This is a little annoying as you can’t use the WMU app or any other timer in your handset to tell you how long the exposure is, so you’ll need to use the main system clock or an external timer. That said, I successfully made several long exposures this way lasting well over a minute in length, and it saved me from buying an optional Nikon cable release accessory.
Moving onto the second main option, View Photos, lets you browse images on the camera or in the phone. Choose the former and the app will download thumbnails from the camera, which can take some time if you have a lot of images on the card; annoyingly the app doesn’t cache the thumbnails, so anytime you want to copy over even just one image you’ll need to wait for the thumbnails to be transferred again.
 | 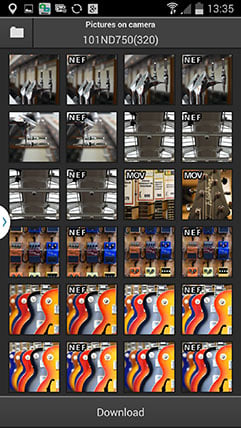 | 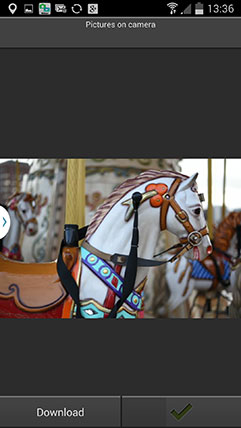 |
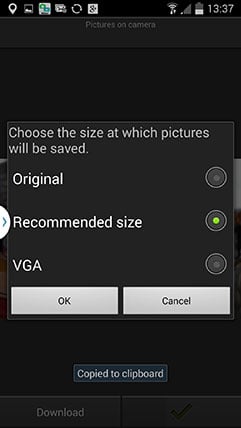
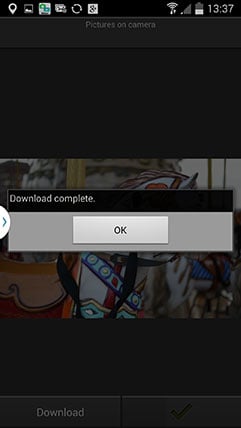
Once complete you can copy over JPEG or NEF RAW files onto your handset, the former in a choice of sizes: Original, Recommended Size or VGA. The recommended size is a preset optimized for the device in question, which on my Galaxy S4 resized to 1620×1080, matching the vertical height of my display, but obviously giving no extra detail to zoom-in. Meanwhile NEF files can be copied over in their full size – roughly 30MB each – but my handset could only display them in a low resolution; that said it opens up interesting possibilities to backup or transfer original RAW images, something that’s rarely possible on other camera Wifi apps.
 | 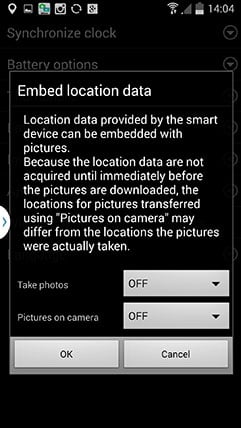 |  |
Just before transferring the image, the app also asks if you’d like to embed your current position on the file using the GPS information from your handset. This works fine, but unfortunately is only applied to the image that’s being copied onto your phone and not to the original file that’s stored in the camera. Additionally it’ll only take the position at the time you make the transfer to your handset, so if you download photos later using Wifi and opt to embed the position, they’ll have your current (and incorrect) position embedded in them rather than actually where they were took. This greatly limits the usefulness of the feature as if you want all your images tagged with their position, you’ll need to connect to the camera using Wifi immediately after taking every photo, then copy the original file, otherwise you may end up with the wrong position and or a lower resolution image. Why Nikon can’t just implement a GPS logging feature is beyond me, but of course there are third party apps that can do it for you if you want to tag many, or all, images during a shoot.
 |
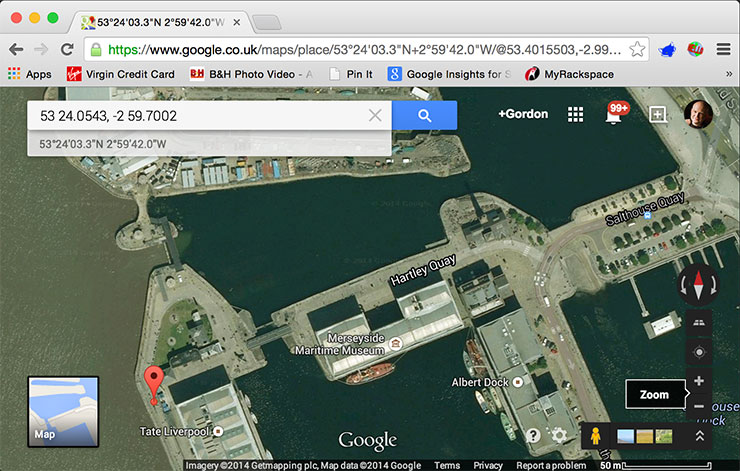 |
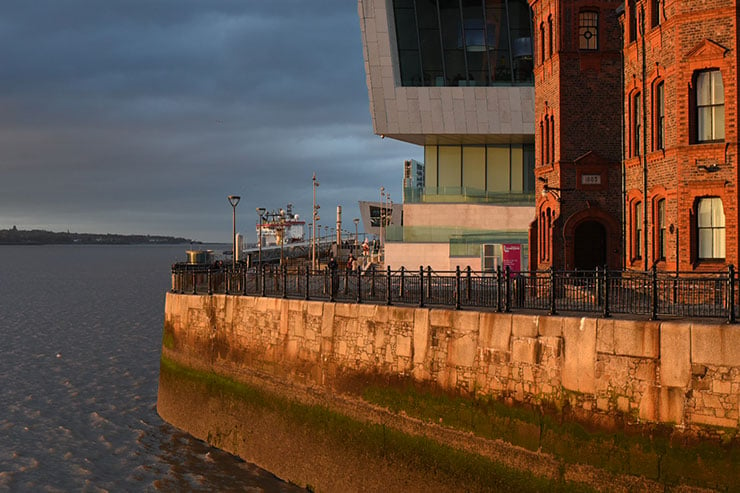
Above is an example of the GPS tagging in action. I took a photo on a bridge in Liverpool’s Albert Dock, before sitting down on a nearby bench to transfer it to my phone. It was of course from the bench that the app took my location, so that’s what’s been embedded in the file. When the co-ordinates were fed into Google Maps, you’ll see the marked location is that of the bench, not the actual position of the photo which was about 50m further up in the image on the small oval island. It’s not a disaster for this shot as it’s close enough as a reminder, but it’s easy to imagine a situation where you tagged the images at a later point where you were nowhere near the original shooting location.
Nikon D750 Continuous Shooting
The D750’s drive modes are accessed from a dedicated dial under the main mode dial on the upper left side of the body. The dial offers S (Single), CL (Continuous Low), CH (Continuous High), Q (Quiet), QC (Quiet Continuous), Self Timer and Mirror Lockup. The top speed in Continuous High is 6.5fps, compared to 6fps on the D610, 5fps on the D810, or 5fps for the older D700.
In this respect the D750 would appear to be the fastest full-frame Nikon of the bunch (at least until you get to the single digit pro bodies), but there are a number of situations when some of the other bodies can become faster. For example, reduce the resolution to the 1.2x or DX crops on the D810 and you can boost the speed to 6 or 7fps respectively. Fit the optional battery grip to the old D700 and fill it with AA batteries and you could boost its speed from 5 to an impressive 8fps. Interestingly there’s no boostable options on the D750 whether you reduce the resolution or fit the battery grip: it sticks with a maximum of 6.5fps, which will frustrate owners of the D700 (with grip) who were hoping for a new high-end sports option without the expense of the D4.
Anyway, these are just the numbers. To find out how the D750 performs in practice I fitted it with a freshly-formatted 32GB UHS-1 SD card, set the sensitivity to 400 ISO, the shutter to 1/500, and fired-off a number of bursts under different conditions. All were with full frame 24 Megapixel images.
Starting with Large Fine JPEGs, optimized for quality, I fired-off 37 shots in 5.69 seconds for a rate of exactly 6.5fps. After 37 frames though, the buffer filled and the rate fell to around 3fps. Switching down to Normal compression, but still for Large resolution, allowed me to capture 100 images in 15.31 seconds for a rate of 6.53fps.
Moving onto RAW (14 bit losslessly compressed), I managed 13 frames in 1.83 seconds for a rate of 7.1fps, after which the buffer filled and the rate fell to around 2.5fps.
These measurements pretty much correspond to Nikon’s own quotes, although the buffer for Large Fine JPEGs and 14 bit lossless-compressed RAWs is described in the manual as 87 and 15 frames respectively, so my own experience fell short of that; Nikon’s test memory card may have been faster though, allowing the buffer to fill more slowly. Here’s a burst of six frames taken at the highest speed with continuous AF.
| Nikon D750 Continuous AF with Continuous High Drive mode using 50mm f1.8G | ||||||
 |  |  |  | |||
 |  |  |  | |||
Out of interest I thought I’d make some comparisons with the D810. With a 1000x UDMA 7 Compact Flash card and the quality set to FX / 36 Megapixels, I managed 100 Large Fine JPEGs in 19.83 seconds for a rate of 5.04fps. Switching to 14 bit losslessly-compressed RAW allowed me to capture 26 frames in 4.99 seconds for a rate of 5.21fps. These also confirm Nikon’s quotes for the higher-end model, and in my earlier tests the D610 delivered its quoted 6fps for JPEGs and RAWs. So the D750 becomes the fastest of the three current non-pro FX bodies, but only by a small margin over the D610, and as noted earlier while it beats the D700 body-alone, it doesn’t take the crown when this older model is boosted with its optional grip and AA batteries.
The D750 also offers two Quiet modes, for single and continuous shooting. Like earlier Nikon models, the Quiet Single option takes the photo in two parts: as you press the shutter the photo is taken, but the noise of the system re-cocking is delayed until you let go of the button. In practice on the D750 it’s barely quieter than shooting normally, but allows you to draw-out the process, a bit like half-opening a bag of crisps in a cinema, feeling embarrassed as everyone turns around, then opening the rest of the bag a couple of seconds later. Meanwhile the Quiet Continuous mode reduces the shooting speed and makes a little more of a lolloping sound than normal, but again the volume reduction is minimal.
On the D810 the Quiet modes are more effective, although the shutter sound is duller and less piercing to start with. The Quiet Single mode again delays the second half of the shooting operation, but is noticeably quieter than the normal mode. The Quiet Continuous mode again lollops along at a slower speed, but like the single mode does so noticeably quieter. So in terms of the quiet shooting options, the D750 and D810 may seem to share the same modes, but they’re more effective on the D810; perhaps its extra heft helps dampen the sound.
But don’t get me wrong, quiet is far from being silent, and this is an area where mirrorless cameras sporting optional electronic shutters are taking the lead, allowing them to shoot in complete silence. If you’re shooting a ceremony or even street in quiet conditions, having an electronic shutter is an absolute boon, especially coupled with a tilting screen or remote control. Unfortunately DSLRs are far from quiet when flipping their mirrors up and down, and sadly even in Live View the Nikons can’t deploy a 100% electronic shutter for silent operation.
Nikon D750 sensor and processing
The D750 is equipped with a 24 Megapixel full-frame ‘FX-format’ sensor. As always, Nikon describes the sensor as being new but doesn’t actually say in what way. I can tell you it measures 35.9x24mm, uses CMOS technology, contains 24.93 million pixels and uses an anti-aliasing filter to minimize moire. The total pixel count is a fraction higher than the 24.7 million quoted for the D610, but the other specifications appear to be the same including the same number of effective pixels (24.3 million), the same maximum image resolution of 6016×4016 pixels and again the presence of the AA filter. I think the main difference is the ability to film 1080 video at 60p and shoot slightly faster at 6.5fps.
Contrast it with the higher-end D810 that has the same sensor dimensions, but 36.3 million effective pixels for a maximum image size of 7360×4912 pixels, along with the absence of an anti-aliasing filter. If you’re reproducing your images at 300dpi, the D750 – and D610 – can deliver prints measuring 20×13.4in, compared to 24.5×16.4in. Meanwhile the older D700 with its 12.1 Megapixel sensor delivered images with 4256×2832 pixels and a maximum print size of 14.2×9.4in at 300dpi. So in terms of resolving power, the D750 and D610 are a comfortable step-up over the older model, and equally a step below the ultimate resolution of the D810. I’ve made detailed comparisons between the D750 and D810 for resolution and noise in my quality pages, but before launching in on them I’ll wrap-up the rest of the quality options.
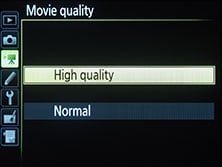
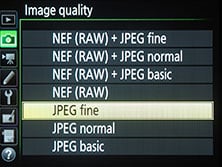
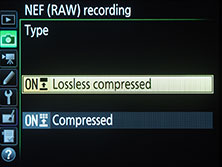
The D750 lets you record JPEG or RAW files or both with a selection of compression options. JPEG files can be recorded with Fine, Normal or Basic compression and with the additional choice of ‘Optimal quality’ or ‘Size priority’, the latter attempting to keep file sizes consistent. You can additionally set the JPEG resolution between Large, Medium and Small. RAW files can be recorded with 12 bit or 14 bit tonal range, and with the choice of lossy or lossless compression. Unlike the D810, there’s no option to choose uncompressed or lower resolution RAW files, nor the option to record in 8-bit TIFF. I shot mostly in RAW+JPEG with RAW set to 14 bit lossless and JPEG set to Large Fine with Optimal Quality; my JPEGs typically measured between 12 and 18MB each while RAW NEF files measured 28-35MB each.
 | 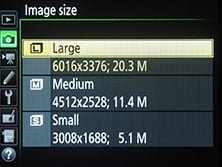 |  |
It’s also possible to shoot in the choice of two cropped formats with a field reduction factor of 1.2x or 1.5x, and a corresponding reduction in maximum resolution of 16.7 or 10.3 Megapixels. As noted earlier in my review, a thick black frame indicates the cropped area in the optical viewfinder, while the actual image scales to fit the screen in Live View. Some Nikon bodies offer quicker continuous shooting speeds in these cropped modes, but not the D750. If you’re shooting with a DX lens, it’s also possible to capture the full FX frame if you’d like to perform your own crop later – so I don’t think there’s a hugely compelling reason to shoot in the cropped formats, unless you have a DX lens with a strict imaging circle and a desire to save memory.
 |  |  |
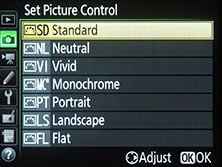
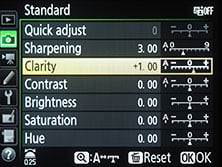
In PASM modes, a number of imaging parameters can be applied with the Picture Controls. You can adjust sharpening, clarity, contrast, brightness, saturation and hue, along with filter effects and toning for monochrome images, or go for an overall adjustment with the Quick Adjust slider. The D750 offers seven presets including the Flat profile from the D810 which sets all sliders to 0 and sharpening to 1 (on a scale of 0 to 9). You can customise any of the Picture Controls in-camera or via an application and save them in 9 custom positions. The D750 also has Active D-Lighting and in-camera HDR options I covered in the exposure section.
 |  |  |
The sensitivity runs from 100 to 12800 ISO as standard, extendable down to 50 ISO (Lo1) and up to 51200 ISO (Hi2). You can apply High ISO Noise reduction with High, Normal, Low or Off settings, and there’s also an Auto ISO option with a customisable upper limit.
Now check out how the D750 and D810 compare in my Nikon D750 quality results, Nikon D750 noise results, Nikon D750 sample images and onto my final verdict page!


