 The Coolpix P7700 is a compact camera that has 'enthusiast' written all over it. Nikon has got the fundamentals right and there are many nice touches, from the versatile auto bracketing to the indicator on the exposure compensation dial. Were it not for the lack of a viewfinder, slow buffer writing and poorly designed menu system it might have been Highly recommended. As it is, it's a worthy recipient of a Cameralabs Recommended award.
Nikon COOLPIX P7700 review
-
-
Written by Ken McMahon
Intro
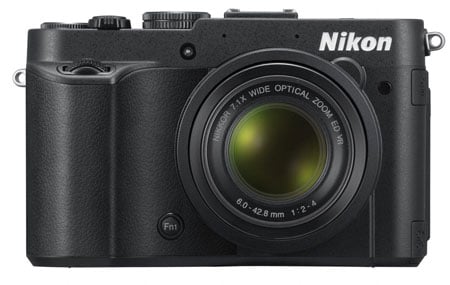
The Nikon Coolpix P7700 is a high end compact aimed at enthusiast photographers. Launched in August 2012 it replaces the P7100, maintaining much of the older model’s styling and extensive controls, but introducing a new 12 Megapixel CMOS sensor and upgrading many other features. The new sensor provides not only larger images, but brings with it a 1080p30 best quality video mode as well as faster 8fps continuous shooting. The lens retains its 28-200mm equivalent range, but now has a brighter f2-4 maximum aperture. And the earlier model’s tilting 3in 921k dot screen has been replaced with one of the same size and resolution that’s now hinged at the side and can face forwards.
The Coolpix P7700 is a little smaller and lighter than its predecessor, and that’s due, in part at least, to the absence of an optical viewfinder. Though the P7100’s optical viewfinder was small and only provided an 80 percent view, removing it from the P7700 and not offering any optional accessories means the screen is now the only means of composing images, which won’t appeal to everyone.
It’s also one of the key differences between the Coolpix P7700 and the Canon PowerShot G15, a model it otherwise shares a great deal in common and with which it’s designed to compete head-to-head. Read my full review to discover what other differences set these two advanced compacts apart and which offers the best all round experience for those looking for DSLR-style features and handling in a smaller format.
 |
Nikon Coolpix P7700 design and controls
The Nikon Coolpix P7700 isn’t what you’d call a pocketable compact. Measuring 119 x 73 x 50mm and weighing 392 grams with card and battery, if you want to pocket it, you’ll need to wearing your coat. It’s appreciably larger than the 107 x 75 x 40mm Canon PowerShot G15, and and a little heavier, but these are both big chunky models that place more of a priority on features and performance than compactness.
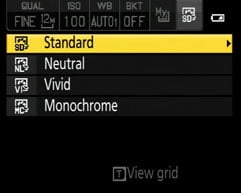
The absence of the optical viewfinder is probably the most significant feature that distinguishes the Coolpix P7700 from its predecessor as well as from the Canon PowerShot G15. With no viewfinder to accommodate, the top panel is flat, but the control layout is very similar to the P7100’s with the quick menu dial on the right directly behind the tiny pop-up flash providing a shortcut to settings for quality, ISO, white balance, bracketing, My menu presets and Picture Control.
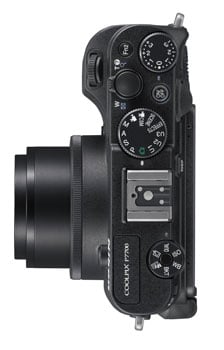 |
On the other side of the hotshoe are the mode dial and, to the left of it, on the rear of the top panel the on/off button. To the left of that, protruding over the rear edge making it easy to operate with your thumb is the exposure compensation dial and in front of it on the corner of the top panel is one of two function buttons labelled Fn2. The Fn1 button is located at the bottom left of the front panel. Finally, to the right of Fn2 is the shutter release button with a zoom collar.
The Coolpix P7700 has two command dials located on the front and rear panels where they can be operated with the index finger and thumb of your right hand. The rear one is designated the main command dial and the front one the sub-command dial. The main command dial is used for Program shift and shutter speed control with the sub-command dial controlling the aperture in PASM modes.
Round the back, above the LCD screen is a small switch on the left corner to pop-up the flash and just behind and to the the right of the hotshoe a lozenge shaped button to toggle display overlays. To the right of the screen there’s a slightly raised panel with AE-L/AF-L, playback and menu buttons. Below the contoured thumb rest and inset into the previously mentioned panel is a four-way control wheel or, as Nikon likes to call it rotary multi-selector with option for flash, AF area mode, focus mode and self-timer option at the four compass points.
The Coolpix P7700 feels comfortable, solid and rugged in your hand. The rubberised front panel offers a very secure grip and the profusion of physical controls is well laid out. Nikon has clearly put a lot of thought into the ergonomics of the P7700 and though it has probably more knobs and buttons than any other advanced compact I can think of, it doesn’t feel cramped, unwieldy or confusing, quite the opposite in fact.
 |
A small hinged door on the left panel opens to reveal a combined USB / A/V port as well as a mini HDMI connector. On the other side of the body are two smaller doors top and bottom for the external mic socket and accessory port which is compatible with Nikon’s GP-1 GPS receiver.
The base of the Coolpix P7700 has a centrally located standard quarter inch tripod thread and you’ll also find the combined battery and card compartment here. The Coolpix P7700 uses the same EN-EL14 battery as its predecessor with a slightly reduced 330 shots available on a full charge. Remaining battery life is shown on screen at all times with a three-segment graphic. The Coolpix P7700 has 86MB of internal memory – enough for a handful of full resolution shots or a 25-second full HD movie clip should you forget to insert an SD card and is compatible with SD, SDHC and SDXC cards.
The Coolpix P7700 has a built-in pop-up flash unit with a guide number of 7 in metres at 100 ISO. Full marks to Nikon for publishing the guide number which makes it much easier to assess the flash power and make comparisons with other models with a published guide number. Dividing the P7700’s guide number by it’s maximum f2 aperture gives it a range at 100 ISO of 3.5 meters. Canon doesn’t publish a guide number for the PowerShot G15, instead preferring to specify a maximum distance at the wide angle focal length (i.e the maximum f1.8 aperture) of 7 meters at an unspecified ISO sensitivity. This doesn’t of course mean the G15’s flash is more powerful than the P7700’s, most likely the Canon figure is obtained at a higher ISO sensitivity. At any rate, neither of these small built-in units will light up a stadium, but they are useful for close portraits and fill-in. In practice I’d say the Coolpix P7700’s provided slightly brighter more even coverage than the PowerShot G15.
The flash supports Auto, Auto with red-eye reduction, Fill flash, Manual, Slow sync, Rear-curtain sync and Commander modes. The latter is used for wireless control of off-camera flash units. You can also attach an external flash to the Coolpix P7700’s standard hotshoe which is compatible with Nikon’s Speedlight models SB910, SB900, SB800, SB700, SB600, SB400 and the SB-R200 with the AS-20 stand.
Nikon Coolpix P7700 screen and Viewfinder
Given Canon’s decision to drop the articulated screen on the G15, but retain the optical viewfinder, Nikon’s move in the opposite direction is all the more interesting. With the Coolpix P7700, Nikon has dropped the earlier P7100’s optical viewfinder, but extended the screen’s flexibility by replacing the single hinge flip-up arrangement with a side-hinged one that allows you to position the screen facing forwards for self-shooting. This arrangement means that the screen can be folded inwards for protection when you’re not using the camera. When it’s in this position the camera can’t be turned on preventing accidental operation when in a bag or pocket.
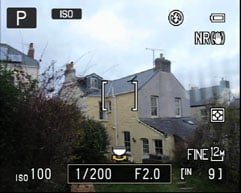
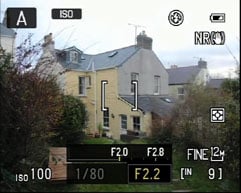
Other than the change in articulation, this is essentially the same 3 inch 920k dot screen that’s on the P7100. It has 4:3 proportions which means the image fills the frame when you’re shooting at the best 12 Megapixel stills resolution with information overlayed. Pressing the display button toggles a single info overlay screen on or off. Additionally you can elect to add a single-axis electronic level, live histogram and grid individually to either the on or ‘off’ displays.
Nikon Coolpix P7700 lens and stabilisation
The Coolpix P7700 is fitted with a 7.1x 6-42.8mm f2-4 zoom lens which gives it a 35mm equivalent range of 28-200mm. That’s the same range as the earlier Coolpix P7100 but the maximum aperture is a stop brighter across the range. A bright lens isn’t something any manufacturer of an advanced compact can any longer be complacent about. Good low-light performance is a key feature enthusiasts look for and there’s no shortage of models that now offer it including the Panasonic Lumix LX7 (f1.4-2.3), the Sony RX100 (f1.8-4.9), the Olympus XZ-2 iHS (f1.8-2.5) and of course Canon’s G15 (f18-2.8), S110 (f2-5.9) and G1 X (f2.8-5.8).
Cast your eye along that list and you’ll notice that most of the competition in fact goes brighter than the Coolpix P7700’s f2-4 lens, but none of them has anything like the 7.1x range and, in fact ,the PowerShot G15 (and the S110) with next longest 5x range still falls well short. So if a slightly longer zoom is something you’re happy to sacrifice a little brightness for, the Coolpix P7700 fits the bill.
Nikon Coolpix P7700 coverage wide |
Nikon Coolpix P7700 coverage tele | |
 |  | |
| 6-42.8mm at 6mm (28mm equiv) | 6-42.8mm at 42.8mm (200mm equiv) |
For all its greater zoom range though, the Coolpix P7700’s 28mm wide angle isn’t that impressively wide, though, again, all the models mentioned above, with one exception share the 28mm maximum wide angle focal length. The Lumix LX7 boasts an impressively wide 24mm super-wide angle, so if landscapes and interiors are you thing, that’s well worth a look.
To compare the depth of field performance of the Coolpix P7700 and PowerShot G15, I set them both to their maximum telephoto focal lengths, 140mm on the G15 and 200mm on the P7700, and got as close to the subject, the leaf in the images below, as possible while still being able to focus. Both of these cameras allow you to get quite close to subjects even when zoomed in, but you can get closer with the G15 at its 140mm equivalent maximum zoom than you can with the 200mm of the Nikon P7700. The G15 also has a brighter f2.8 maximum aperture when zoomed in than the f4 of the P7700. Both cameras produce quite shallow depth of field in the images below and there’s not much to choose between them, but with its brighter lens I say the G15 has a slight edge here.
Nikon P7700 and Canon PowerShot G15 macro depth of field | ||||
.jpg) |  | |||
Coolpix P7700 6-42.8mm at 42.8mm (200mm equiv.) 100 ISO F4 | PowerShot G15 6.1-30.5mm at 30.5mm (140mm equiv.) 80 ISO f2.8 | |||
For my second test I shot these two portraits at a more typical portrait distance for a head and shoulders shot. This time I set both cameras to roughly equivalent focal lengths – the maximum 140mm equivalent on the G15 and chose the widest available aperture in Aperture Priority mode – f2.8 on the G15 and f3.5 on the P7700. Both cameras have thrown the background out of focus, though not by nearly as much as you’d be able to on a DSLR or CSC with a bigger sensor and an equivalent lens aperture. Again, the PowerShot G15 edges it with a slightly more blurred background than the Coolpix P7700.
Nikon P7700 and Canon PowerShot G15 portrait depth of field | ||||
 |  | |||
Coolpix P7700 6-42.8mm at 28.4mm (135mm equiv.) 200 ISO F3.5 | PowerShot G15 6.1-30.5mm at 30.5mm (140mm equiv.) 200 ISO f2.8 | |||
Like other high end Coolpix compacts, the P7700 has Nikon’s Vibration Reduction lens-shift optical image stabilization. Nikon claims Vibration Reduction allows hand-held shooting at shutter speeds four stops slower than would ordinarily be possible. To put it to the test I zoomed the Coolpix P7700 to its maximum 200mm telephoto focal length, set it to Shutter priority mode and took a series of shots at progressively slower shutter speeds with Vibration reduction turned on and off. I used the Coolpix P7700’s built-in ND filter to allow sufficiently slow shutter speeds in these bright conditions.
As you can see from the crops below, Vibration reduction on the Coolpix P7700 is pretty effective and allows hand-held shots to be take at shutter speeds of 1/13th, and, as claimed, around four stops slower than conventional wisdom suggests is safe.
Nikon Coolpix P7700 Vibration reduction Off/On | ||||
 |  | |||
100% crop, 6-42.8mm at 42.8mm 100 ISO 1/13th VR Off. | 100% crop, 6-42.8mm at 42.8mm 100 ISO 1/13th VR On. | |||
Nikon Coolpix P7700 shooting modes
The Coolpix P7700 can be used as a point and shoot in Auto mode. This is an old school auto mode with no scene detection to detect backlit or moving subjects to help choose an appropriate scene mode or set the aperture and shutter speed accordingly. For that you need Scene Auto selector mode, which uses Scene detection to pick the right scene mode for the subject. The seven scene modes that Scene auto selector works with are: Portrait Landscape, Night Portrait, Night Landscape, Close up and backlighting. It’s not as sophisticated as the Scene detection on the Canon PowerShot G15, for example it can’t detect moving subjects and select a faster shutter speed to freeze the action, nor if there are strong facial shadows requiring fill-in flash. Neither can it tell when the camera is mounted on a tripod and disable the image stabilisation.
But auto modes aren’t really what the P7700 is about. Switch to the PASM modes and you have a range of semi auto and fully manual modes that, with the P7700’s extensive array of controls at your fingertips, provide all the control you’re likely to need or want.
I mentioned earlier that in the PASM modes the two command dials are used for aperture and shutter speed control, with the Quick menu dial set to ISO sensitivity you have control of the three exposure determinants at your fingertips. If you want things set up differently there are numerous customisation options which I’ll go into in detail in the handling section later. There are also three user positions on the mode dial for instant recall of saved configurations.
The Coolpix P7700 has nineteen scene modes including all the usual suspects from Portrait to Party via Landscape, Sports, Beach, Fireworks, Backlighting and Sunset. There are two panorama modes for shooting 180 and 360 views. Both work along the same lines as Sweep Panorama on Sony compacts and its numerous clones – you press the shutter once and pan the camera as smoothly a you can. You can pan with the camera in portrait or landscape orientation – the P7700 works out which, you don’t need to tell it beforehand. More often than not that’s all you need to do; the camera stops shooting when you complete the sweep and stitches the images into a single 180 or 360 view. Portrait mode produces the largest images which are 3200 x 1024 pixels for 180 panoramas and the 360 ones measure 6400 x 1024. So not high resolution enough for a massive print – you’d just about get something 5 x 16 inches from a 180 degree shot, but big enough for a small framed shot and for Web display.
If your panning technique leaves something to be desired, or there are objects close to the camera, there’s a lack of detail for it to match up, or for some other unknowable reason it occasionally doesn’t make the full sweep, in which case it saves the partial view for you providing you got more than half way round.
There’s also a 3D mode which combines two horizontally offset shots to produce a 3D image in the MPO file format with a 16:9 aspect ration and a size of 1920×1080.
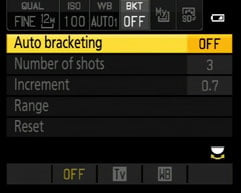
The Coolpix P7700 has good auto bracketing features with the choice of three or five frame exposure bracketing at 1/3, 2/3 and 1EV intervals. You can also bracket the white balance (one shot is taken and the white balance setting is applied to the data to produce several versions) and ISO sensitivity. Compared with the G15, which offers 3 frame bracketing up to plus or minus 2 stops in 1/3 EV increments, the Coolpix P7700 is more versatile, though it lacks the G15’s novel focus bracketing feature. Like the G15, the Coolpix P7700 provides a dedicated exposure compensation dial with 1/3 stop increments up to plus of minus 3EV.
Finally, the effects position on the mode dial provides a range of filters which you can apply in-camera to reproduce traditional darkroom techniques. A selection of these is shown below. You either love or hate this stuff, but whatever your view, it’s becoming increasingly popular on cameras aimed at all levels. The only criticism I have of the P7700’s filters is that, when shooting in RAW plus JPEG mode a RAW file wasn’t saved for every effect, only the Defocus during exposure effect saved a JPEG with the effect added, plus the original RAW data. That would be enough to put me off ever using them and I’d expect most enthusiast photographers would feel the same way.
 |
 |
 |
| Creative monochrome | Painting | Soft |
 |
 |
 |
| Cross process | Nostalgic sepia | Low key |
Nikon Coolpix P7700 movie modes
The new 12 Megapixel CMOS sensor provides the Coolpix P7700 with 1080p30 HD video, a step up from the 720p best quality mode of its predecessor that keeps it in step with the PowerShot G series. There are two quality options at this setting that encode at average bit rates of 18.8Mbps and 12.6Mbps. Movies are encoded using the efficient H.264 codec and are saved in a QuickTime wrapper with a .MOV file extension in the same folder as stills.
Other modes are 720p30 and 640 x 480, also at 30fps. Like the G15 the P7700 also includes slow motion modes that record at faster frame rates to slow down the action. HS 120 shoots VGA (640 x 480) resolution footage at 120fps which when played back at 30fps slows the action down to one quarter speed, HS 60 provides half speed playback at 1280 x 720. The Coolpix P7700 has one further trick up its sleeve with an HS 15 option that speeds up the action by a factor of 2 and records at full 1920 x 1080 HD resolution.
The Coolpix P7700 lacks a dedicated movie record button, so to shoot movies you must first turn the mode dial to one of the two movie positions. In the basic Movie position everything is set automatically, but you do have a couple of menu selectable options – you can choose between single and full-time AF and activate the Wind noise reduction filter.
Switch the mode dial to the Custom movie position and you have control over exposure modes with the option to choose either Aperture priority or fully manual exposure. You can also choose the AF mode, change the Picture control settings (for example to shoot monochrome or with a custom Picture control setting), use the built-in ND filter or activate the Wind noise reduction filter. Once you’ve started recording the exposure and other settings can’t be changed. You can use the optical zoom during recording and if Vibration reduction is turned on it’s used for movie recording. However, when shooting in Aperture Priority or Manual exposure modes, the optical zoom is disabled, which is pretty disappointing.
As with the PowerShot G15 you can apply some of the Coolpix P7700’s effects to movies. The ones you can use are Painting, Cross process, Soft, Nostalgic sepia, High key, Low key and Selective colour, all options that can be comfortably processed while maintaining the native frame rate.
| |
|---|---|
| |
| |
| |
|---|---|
| |
| |
| |
|---|---|
| |
| |
| |
|---|---|
| |
| |
Nikon Coolpix P7700
handling
The Coolpix P7700’s abundance of physical controls makes it an easy camera to get on with (though novices might be a little intimidated by the profusion of dials and buttons). With so many physical controls there’s potential for confusion and error, but Nikon’s attention to detail has paid off and the P7700 is a real delight to use. With handling, it’s the things that don’t work, or work poorly that tend to get your attention, but there’s little to fault and much to commend in the P7700’s design.
Just to highlight one example. Physical exposure compensation dials are all to easy to nudge when taking the camera out of a bag, or just holding it while walking along. The P7700 beeps when the exposure compensation dial is moved and there’s also a green LED that lights up when the dial is anywhere other than the 0EV position. The Mode dial, another candidate for accidental nudging also beeps when moved.
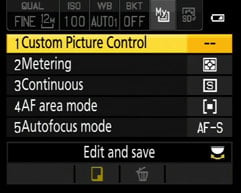
The Quick menu dial provides fast access to a range of settings that it helps to get to immediately without having to search a menu for them. Turning the dial immediately brings up the appropriate menu, if it’s already in position you just press the little button in the centre.
 |
 |
 |
 |
 |
 |
 |
 |
 |
The Coolpix P7700’s menu system is functional, but it lacks the accessibility and readability of the PowerShot G15, in other words it’s just not as well designed. In many cases the information is there, it’s simply not presented in the best way which means you have to take a little more time to interpret it. The main menu system is divided over two tabs labelled Shooting and Setup that can be navigated using either the multi-selector or the command dials. The problem with both of these menus is that they are long lists you need to scroll through to find what you’re looking for. While the Quick menu dial makes some settings accessible, equally there are things buried in the menu that aren’t so easy to get to. Continuous shooting, the built-in ND filter, metering options and external mic recording levels are just some examples of settings that can’t easily be accessed, though you can assign them to one of the Fn buttons.
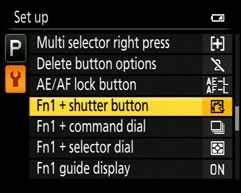
Nikon has taken every opportunity to provide customisation options on the Coolpix P7700 which has two dedicated programmable function buttons and also allows limited customisation of the two command dials and AE/AF lock button. The Fn1 button is used in combination with a half-press on the shutter release, the main (rear) command dial or the rear multi-selector dial to access a range of functions including RAW shooting, ISO sensitivity, White balance, Picture control, Metering, Continuous shooting, Flash exposure compensation and Active D-lighting. The Fn 2 button is more limited in scope and is used on its own to activate one of the viewing options from a choice of the electronic level, live histogram and framing grid, alternatively it can be used to activate the built-in ND filter.
Nikon Coolpix P7700 Autofocus
In general use the Coolpix P7700’s contrast detect AF is swift, though not lightning fast. In good lighting conditions it’ll lock on to a subject quickly, with a short, but perceptible delay between half-pressing the shutter release and the beep sounding to indicate the focus has locked.
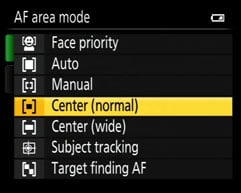
The Coolpix P7700 has no fewer than seven AF area modes – Face priority, Auto, Manual, Centre (normal) Centre (wide) Subject tracking and Target finding AF. The P7700’s face detection works reasonably well when people are within a few metres of the camera in good light. But it quickly loses faces when they turn to profile and seemed to have quite a lot of trouble recognising spectacle wearers. If there are no faces in the frame it defaults to the nine-area AF system which it uses to focus on the subject closest to the camera. Alternatively you can manually select the focus area from one of 99 positions using the multi-selector to move the frame around a 9×11 grid.
The Coolpix P7700 also includes the target finding AF feature introduced on the Coolpix S8200 in 2011. This identifies both human and non-human subjects in the frame when the camera is pointed at a scene. It’s quite interesting to watch the P7700 at work while it’s doing this – potential subjects are identified and tracked with green rectangles. If you’re shooting people, face recognition is probably a better choice of AF modes, but target finding does seem to have an uncanny knack for picking the main subject in a scene which for some situations is a real improvement on the nine-area AF mode.
Nikon Coolpix P7700 Continuous shooting
The Coolpix P7700 has a multitude of continuous shooting options starting with an 8fps full resolution mode, Continuous H, that can fire a burst of 6 images. Next is Continuous M, which again fires a 6-frame burst, this time at 4fps, followed by Continuous L which fires a burst of around 30 frames at 1fps. There are also two very high speed modes, both of which fire a burst of 60 frames at 120 and 60fps respectively at 1280 x 960 resolution.
To test the Coolpix P7700’s continuous shooting I fitted it with a freshly formatted SanDisk Extreme Pro UHS-1 card, set the image quality to large fine JPEG and set the shutter speed to 1/500 in Shutter priority exposure mode. Set to Continuous H mode, using its electronic shutter the P7700 fired a burst of exactly six frames in 0.6 seconds – 10fps exactly. Changing the quality to RAW, then RAW+fine JPEG didn’t slow the P7700 down, in both modes it maintained the 10fps rate for a 6-frame burst.
The P7700 is quite slow to write images from its buffer to the card, taking fractionally under 5 seconds to write the burst of 6 large fine JPEGs to the card, and for RAW files that increases to just short of 14 seconds. From a general handling standpoint shooting RAW with the P7700 can be a slightly frustrating experience as, even when in single shot mode, there’s a significant delay in writing RAW files to the Card, even a UHS-1 speed card. Swapping the UHS-1 card for a SanDisk Extreme speed class 10 card resulted in no drop in continuous shooting speeds, or write times. So though the P7700 is compatible with the faster UHS-1 cards, there’s no speed advantage to be gained from them.
While the P7700 outperformed Nikon’s own quoted specification for continuous shooting, the half-a-second or so 6-frame burst is just too short to capture an action sequence of worthwhile length, while, at one frame per second the longer 30 frame option is too slow. It’s a little disappointing that Nikon couldn’t extend the burst length of the middle 4fps mode so that a longer sequence was possible. Though there’s a wider range of options, the Coolpix P7700’s continuous shooting is in practice little better than the PowerShot G15, which can also shoot a 10fps burst of a longer 10-frame (i.e. one second) duration.
In addition to the conventional continuous shooting options the P7700 also offers Nikon’s Best Shot selector and Multi-shot 16 modes which respectively shoot multiple images and choose the best one and create a 4×4 grid from a continuous sequence. Additionally there’s a simple interval timer option with 30 second (max 600 shots), 1 minute (300 shots), 5 minute (60 shots), and 10 minute (30 shots) options.
Nikon Coolpix P7700 Sensor
The Coolpix P7700 has a 1/1.7in CMOS sensor which has a resolution of 12 Megapixels. Interestingly Nikon has made exactly the same move with the P7700 as Canon did with the PowerShot G15, replacing the 10 Megapixel CCD sensor in the earlier P7100 with a CMOS sensor of increased resolution, but the same physical size.
The Coolpix P7700’s ISO sensitivity ranges from 80 to 6,400 ISO and its shutter speed range is 60 seconds to 1/4000. It saves files in JPEG format at a choice of two compression settings and can also shoot RAW. The best quality Fine JPEGs are between 4 and 5MB in size.
To see how the quality of the Coolpix P7700 measures-up in practice, take a look at my Nikon P7700 quality and Nikon P7700 noise results pages, browse my Nikon P7700 sample images, or skip to the chase and head straight for my verdict.


