Fujifilm XM1 review
-
-
Written by Ken McMahon
Quality
Fujifilm XM1 vs Olympus EP5 vs Panasonic Lumix GF6 JPEG quality
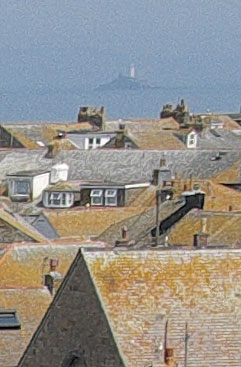
To compare real-life performance I shot this scene with the Fujifilm X-M1, the Olympus PEN E-P5, and the Panasonic Lumix GF6 within a few moments of each other using their best quality JPEG settings; RAW results will follow on the next page.
The X-M1 was fitted with the new Fujinon 16-50mm f3.5-5.6 OIS kit lens. To eliminate quality differences due to lens factors I used the Panasonic Lumix G Vario 14-42mm f3.5-5.6 II on both the PEN E-P5 and the Lumix GF6.
For the PEN E-P5 and Lumix GF6 the lens was set to its 14mm (28mm equivalent) wide angle setting. At its wide angle setting, the 16-50mm Fujinon lens has an equivalent focal length of 24mm and the X-M1 sensor has a 3:2 aspect ratio compared with 4:3 on the Micro Four Thirds models. I zoomed in marginally with the X-M1 to produce an equivalent vertical field of view.
All three cameras were set to Aperture Priority exposure mode with the senstivity set manually to the base ISO sensitivity setting.
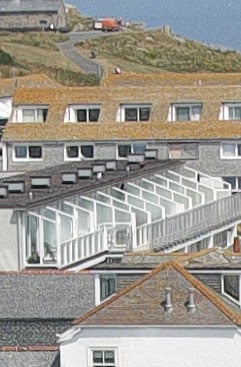
The image above was taken with the Fujifilm X-M1. The X-M1 was mounted on a tripod and the stabilisation was turned off. Aperture priority mode was selected with the aperture set to f5.6 With the sensitivity set to 200 ISO the X-M1 metered an exposure of 1/900. Also at 200 ISO, the PEN E-P5 selected 1/1250 and, at its base 160 ISO setting, the Panasonic Lumix GF6 selected 1/1000 at f5.6.
The cameras were left on their default settings for this test. On the Fujifilm X-M1, Film Simulation was set to Standard, White balance was set to Auto, Dynamic Range was set to Auto, Noise reduction, Highlight tone, Shadow tone, Colour, and Sharpness were all set to 0. The PEN E-P5’s Picture mode was set to Standard, White balance was set to Automatic, Keep Warm Colour was turned on and Gradation was set to Normal. On the GF6, the Photo Style was set to Standard, White balance was set to Auto and i.Dynamic and i.Resolution were turned off. The X-M1 JPEG file measured 6.62Mb and, as usual, the crops are taken from the areas marked by the red rectangles.
The first crop from the Fujifilm X-M1 looks a little soft compared with those from the PEN E-P5 and the Lumix GF6. You can make out more detail in the grassy foreground in both the PEN E-P5 and Lumix GF6 crops. The second crop also looks to have slightly softer edges, but I think the APS-C sensor in the X-M1 is recording as much detail as the Micro Four Thirds models, possibly these differences are more a consequence of slightly less punchy processing of the X-M1 JPEGs.
The XC16-50mm lens produces consistently good quality across the frame and the detail in the third crop from the edge of the frame is almost as sharp as in the centre with no distortion or fringing. The final crop from close to the centre of the frame shows nice clean edges with a high level of detail, but it still looks just a tad softer than the crops from the PEN E-P5 and Lumix GF6. I wouldn’t be too concerned about this though. You still can’t see more detail in the crops from the Micro Four Thirds models and the difference, particularly on the PEN E-P5 crops looks like processing rather than the sensor.
The only sensible conclusion to be drawn form this comparison is that there’s very little little to choose between these three sensors in terms of image quality at lower sensitivities. If you prefer a slighter punchier look, the PEN E-P5 will give it to you, but you could probably achieve something quite similar by increasing the sharpness on the X-M1. Alternatively, shooting RAW will give you even more control.
To see how the results from RAW given the same processing shape up take a look at my Fujifilm XM1 RAW quality results on the next page. Alternatively you can see how these models compare at higher sensitivities in my Fujifilm XM1 Noise results.
Fujifilm X-M1 | Olympus PEN E-P5 | Panasonic Lumix GF6 | ||
 |  |  | ||
f5.6, 200 ISO | f5.6, 200 ISO | f5.6, 160 ISO | ||
 |  |  | ||
f5.6, 200 ISO | f5.6, 200 ISO | f5.6, 160 ISO | ||
 |  |  | ||
f5.6, 200 ISO | f5.6, 200 ISO | f5.6, 160 ISO | ||
 |  |  | ||
f5.6, 200 ISO | f5.6, 200 ISO | f5.6, 160 ISO |
Fujifilm XM1 vs Olympus EP5 vs Panasonic Lumix GF6 quality RAW
To compare real-life RAW performance I shot this scene with the Fujifilm X-M1, the Olympus PEN E-P5, and the Panasonic Lumix GF6 within a few moments of each other using their RAW modes.
The X-M1 was fitted with the new Fujinon 16-50mm f3.5-5.6 OIS kit lens. To eliminate quality differences due to lens factors I used the Panasonic Lumix G Vario 14-42mm f3.5-5.6 II on both the PEN E-P5 and the Lumix GF6.
For the PEN E-P5 and Lumix GF6 the lens was set to its 14mm (28mm equivalent) wide angle setting. At its wide angle setting, the 16-50mm Fujinon lens has an equivalent focal length of 24mm and the X-M1 sensor has a 3:2 aspect ratio compared with 4:3 on the Micro four thirds models. I zoomed in marginally with the X-M1 to produce an equivalent vertical field of view.
All three cameras were set to Aperture Priority exposure mode with the senstivity set manually to the base ISO sensitivity setting.
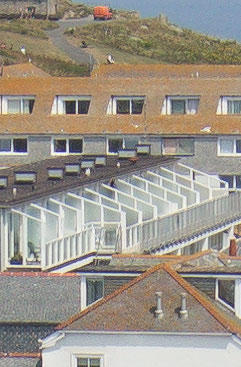
The image above was taken with the Fujifilm X-M1. The X-M1 was mounted on a tripod and the stabilisation was turned off. Aperture priority mode was selected with the aperture set to f5.6 With the sensitivity set to 200 ISO the X-M1 metered an exposure of 1/900. Also at 200 ISO, the PEN E-P5 selected 1/1250 and, at its base 160 ISO setting, the Panasonic Lumix GF6 selected 1/1000 at f5.6
The cameras were left on their default settings for this test. The X-M1 RAW file measured 26.2Mb and, as usual, the crops are taken from the areas marked by the red rectangles.
I processed the files from the PEN E-P5 and Lumix GF6 in Adobe Camera RAW using identical settings: Sharpening at 70 / 0.5 / 36 / 10, Luminance and Colour Noise Reduction both set to zero, and the Process to 2012 with the Adobe Standard profile. To further reduce any distracting visual differences between the crops I also set custom white balance to 5500K. These settings were chosen to reveal the differences in sensor quality and isolate them from in-camera processing. The high degree of sharpening with a small radius enhances the finest details without causing undesirable artefacts, while the zero noise reduction unveils what’s really going on behind the scenes
At the time of testing the Fujifilm X-M1 RAW format wasn’t supported by Adobe Photoshop Camera RAW 8.1.0.43, so I processed the X-M1’s RAF raw file in the supplied Raw File Converter application. I tried as far as possible to produce similar results to the Camera RAW processed files, setting sharpness to exagerrated, turning off all noise reduction, setting the white balance to 5500K and developing the result to a .tif file. While the resulting crops provide a useful idea of what the X-M1 RAW file can produce, it’s not intended for comparison with the Camera RAW processed files, so I’ll confine my comments to the X-M1 RAW files compared with the JPEGs on the previous page. I’ll update the X-M1 crops when Camera RAW support is becomes available in Adobe Photoshop Camera RAW..
So what about the crops? As I suspected these processed RAW files from the Fujifilm X-M1 show a greater level of detail the in-camera JPEGS. At this high level of sharpening and in the absence of noise processing they also look very grainy but, despite that, you can see a lot of the finer detail in the stonework, roof tiles and brickwork than was visible in the JPEGs. So at the very least, these files confirm that with a little effort there’s every chance of squezzing even better results from the X-M1 RAW files.
You can see how these models compare at higher sensitivities in my Fujifilm XM1 Noise results.
Fujifilm X-M1 | Olympus PEN E-P5 | Panasonic Lumix GF6 | ||
 |  |  | ||
f5.6, 200 ISO | f5.6, 200 ISO | f5.6, 160 ISO | ||
 |  |  | ||
f5.6, 200 ISO | f5.6, 200 ISO | f5.6, 160 ISO | ||
 |  |  | ||
f5.6, 200 ISO | f5.6, 200 ISO | f5.6, 160 ISO | ||
 |  |  | ||
f5.6, 200 ISO | f5.6, 200 ISO | f5.6, 160 ISO |
Fujifilm XM1 vs Olympus EP5 vs Panasonic Lumix GF6 Noise RAW

To compare RAW noise levels under real life conditions, I shot this scene with the Fujifilm X-M1, the Olympus PEN E-P5, and the Panasonic Lumix GF6 within a few moments of each other using their RAW settings at each of their ISO sensitivity settings.
The X-M1 was fitted with the new Fujinon 16-50mm f3.5-5.6 OIS kit lens. To eliminate quality differences due to lens factors I used the Panasonic Lumix G Vario 14-42mm f3.5-5.6 II on both the PEN E-P5 and the Lumix GF6.
For the PEN E-P5 and Lumix GF6 the lens was set to its 14mm (28mm equivalent) wide angle setting. At its wide angle setting, the 16-50mm Fujinon lens has an equivalent focal length of 24mm and the X-M1 sensor has a 3:2 aspect ratio compared with 4:3 on the Micro four thirds models. I zoomed in marginally with the X-M1 to produce an equivalent vertical field of view.
The cameras were set to Aperture Priority exposure mode with the ISO senstivity set manually.
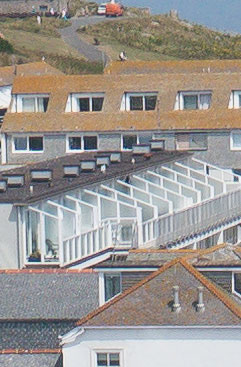
The above shot was taken with the Fujifilm X-M1in Aperture priority mode. The X-M1 RAW file measured 26Mb and, as usual, the crops are taken from the areas marked by the red rectangle. At its 200 ISO base sensitivity the PEN E-P5 metered an exposure of 1/6 at f5.6. At 160 ISO Panasonic Lumix GF6 selected 1/5 at f5.6 and the I applied -.67EV to the Fujifilm X-M1 to produce an equivalent exposure of 1/6 at f5.6 at 200 ISO. Note the Sun begain to creep into the frame when I was shooting my final shots with the X-M1, hence the illuminated portion to the left side, but it’s still possible to look beyond that to other areas of the frame for a fair comparison with the other models. If I get the chance to try all three models at the same time again in the future, I’ll reshoot this test.
I processed the files from the PEN E-P5 and Lumix GF6 in Adobe Camera RAW using identical settings: Sharpening at 70 / 0.5 / 36 / 10, Luminance and Colour Noise Reduction both set to zero, and the Process to 2012 with the Adobe Standard profile. To further reduce any distracting visual differences between the crops I also set custom white balance to 4300K. These settings were chosen to reveal the differences in sensor quality and isolate them from in-camera processing. The high degree of sharpening with a small radius enhances the finest details without causing undesirable artefacts, while the zero noise reduction unveils what’s really going on behind the scenes – as such the visible noise levels at higher ISOs will be much greater than you’re used to seeing in many of my comparisons, but again it’s an approach that’s designed to show the actual detail that’s being recorded before you start work on processing and cleaning it up if desired.
At the time of testing the Fujifilm X-M1 RAW format wasn’t supported by Adobe Photoshop Camera RAW 8.1.0.43, so I processed the M-M1’s RAF RAW file in the supplied Raw File Converter application. I tried as far as possible to produce similar results to the Camera RAW processed files, setting sharpness to exagerrated, turning off all noise reduction, setting the white balance to 4300K and developing the results to a .tif file. While the resulting crops provide a useful idea of what the X-M1 RAW file can produce, it’s not intended for comparison with the Camera RAW processed files, so I’ll confine my comments to the differences between these X-M1 RAW crops and the JPEG’s. I’ll update the X-M1 crops when Camera RAW support becomes available in Adobe Photoshop Camera RAW.
The first thing to note about the crops is that there’s no 100, 6400 and 25600 ISO crops as the extended ISO range is only available in JPEG modes, suggesting the extended settings are pulled from RAW data at the closest ISO settings within the standard range – 200 ISO for the 100 ISO setting and 6400 for 12800 and 25600 ISO. Two things strike me about the X-M1 RAW crops. The first is the absence of colour noise, though it’s difficult to be sure the RAW converter isn’t responsible despite the zero noise reduction settings. The second is the irregular pattern of the noise, presumably due to the less regular structure of the X-M1’s X-trans sensor. Then of course there’s the fact that, as we saw with the JPEGs, the increase in noise is very small at each step up the ISO range (ok, three things). It’s clear that it’s the sensor, rather than extraordinarily efficient noise processing that’s at the heart of the X-M1’s superior high ISO noise performance.
Now head over to my Fujifilm XM1 sample images to see some more real-life shots in a variety of conditions.
|


Fujifilm XM1 vs Olympus EP5 vs Panasonic Lumix GF6 Noise JPEG
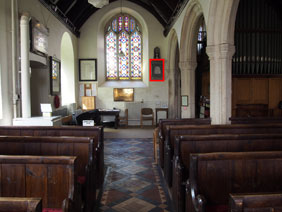
To compare noise levels under real life conditions, I shot this scene with the Fujifilm X-M1, the Olympus PEN E-P5, and the Panasonic Lumix GF6 within a few moments of each other using their best quality JPEG settings at each of their ISO sensitivity settings; RAW results will follow on the next page.
The X-M1 was fitted with the new Fujinon 16-50mm f3.5-5.6 OIS kit lens. To eliminate quality differences due to lens factors I used the Panasonic Lumix G Vario 14-42mm f3.5-5.6 II on both the PEN E-P5 and the Lumix GF6.
For the PEN E-P5 and Lumix GF6 the lens was set to its 14mm (28mm equivalent) wide angle setting. At its wide angle setting, the 16-50mm Fujinon lens has an equivalent focal length of 24mm and the X-M1 sensor has a 3:2 aspect ratio compared with 4:3 on the Micro Four Thirds models. I zoomed in marginally with the X-M1 to produce an equivalent vertical field of view.
The cameras were set to Aperture Priority exposure mode with the ISO senstivity set manually.
The above shot was taken with the Fujifilm X-M1in Aperture priority mode. The camera was mounted on a tripod and tonal enhancement features were left on their default settings; Dynamic Range was set to Auto, Noise reduction, Highlight tone, Shadow tone, Colour, and Sharpness were all set to 0 and Long exposure noise reduction was on. On the PEN E-P5 Gradation and Noise reduction were set to Auto and Noise filter was set to standard. On the GF6, i.Dynamic and i. Resolution were turned off and Long Shutter noise reduction was on. The X-M1 JPEG file measured 4.2Mb and, as usual, the crops are taken from the areas marked by the red rectangle.
At its 200 ISO base sensitivity the PEN E-P5 metered an exposure of 1/6 at f5.6. At 160 ISO Panasonic Lumix GF6 selected 1/5 at f5.6 and the I applied -.67EV to the Fujifilm X-M1 to produce an equivalent exposure of 1/6 at f5.6 at 200 ISO. Note the Sun begain to creep into the frame when I was shooting my final shots with the X-M1, hence the illuminated portion to the left side, but it’s still possible to look beyond that to other areas of the frame for a fair comparison with the other models. If I get the chance to try all three models at the same time again in the future, I’ll reshoot this test.
The Fujifilm X-M1’s standard ISO range is 200-6400 ISO with 100, 12800 and 25600 available as part of an extended range when recording in JPEG. The base ISO setting is therefore 200 ISO which is the same as the Olympus E-P5. For comparison purposes you should therefore be looking at the 200 ISO crops from the Fujifilm X-M1 and PEN E-P5 alongside the base 160 ISO crop from the Lumix GF6.
As in the outdoor test, the Fujifilm X-M1 crops here look a tiny bit soft by comparison with those from the PEN E-P5 and the Lumix GF6, but in terms of noise at the base 200 ISO sensitivity setting there’s not much to set them apart. All three crops show a good level of detail with no visible noise to speak of. Even pixel-peeping the 100 percent crop, it’s actually very difficult to see much of a difference between the 200 and 400 ISO crops from the X-M1. The 800 ISO crop is a little noisier again and this time you can spot the difference without looking too hard but the increases at each 1EV step up the ISO range are very, very marginal and the 1600 ISO crop looks very good indeed. Already I’d say there’s a stop diffenence between the Fujifilm X-M1 and the PEN E-P5 and Lumix GF6.
Where 1600 ISO might be considered the limit for good quality reproduction at 100 percent viewing size on the two Micro Four Thirds models, 3200 ISO on the X-M1 is still looking relatively clean. And in the upper reaches of the sensitivity range, often considered nothing more than a numbers game for marketing purposes, the X-M1 continues to produce, frankly quite astonishingly low levels of noise. You can even just about still read the text in the Fujifilm X-M1’s 25600 crop, which is pretty remarkable.
You can put this down to the larger surface are of the Fujifilm X-M1’s sensor, or its novel construction, most likely both are partially responsible. Regardless of the technicalities the X-M1’s sensor comes out of this comparison a winner by a clear margin.
To find out how much of a role processing plays in keeping noise at bay in these crops take a look at my Fujifilm XM1 RAW noise results page to see just how much noise is present behind the scenes. Or head over to my Fujifilm XM1 sample images to see some more real-life shots in a variety of conditions.
|