Canon EOS 7D
-
-
Written by Gordon Laing
Canon EOS 7D lenses, focusing, sensor and drive
Click here to find out about the EOS 7D’s Movie Mode
The Canon EOS 7D employs an EF lens mount and is fully compatible with both Canon EF and EF-S lenses. Thanks to its APS-C sensor size, all lenses effectively have their field of view reduced by 1.6 times.
 |
The EOS 7D is available as a body alone or in a choice of kits with various stabilised zoom lenses. Depending on your geographic region, there’ll be three main EOS 7D kits, bundled with either the ageing EF 28-135mm IS, or the new EF-S 15-85mm IS or new EF-S 18-135mm IS.
 |
The two new lenses weren’t available at the time of testing our EOS 7D body, so we used it with the EF 24-105mm f4.0L IS, a high quality zoom for both cropped and full-frame bodies.
With an equivalent focal length of 38-168mm on a cropped body like the EOS 7D, it may be lacking decent wide-angle coverage, but remains a quality general-purpose option especially when coupled with an ultra-wide lens like the excellent EF-S 10-22mm.
Check back in the future for reviews of the new EF-S zooms. The EF-S 15-85mm IS in particular looks set to be a great walk-around lens for the EOS 7D (along with any cropped Canon model), delivering slightly wider coverage than the EF-S 17-85mm IS it replaces.
The important thing to remember though is the EOS 7D has the highest pixel density of any Canon DSLR to date, so to make the most of those 18 Megapixels, you’ll need to couple it with decent optics.
Canon EOS 7D focusing
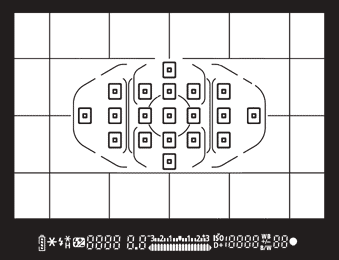 | |
The Canon EOS 7D employs a brand new 19-point AF system which features a wealth of options and customisation. It’s a significant step-up in sophistication over previous 9-point Canon AF systems, and the company’s answer to Nikon’s 51-point AF system. Sure it may still not have as many individual AF points, but more than compensates with the way it uses them.
All 19 points are cross-types, sensitive to both horizontal and vertical lines when used with lenses of f5.6 or brighter. The central point also features a separate diagonal pair of line sensors which are automatically used with lenses sporting an aperture of f2.8 or faster.
The 7D’s 19 AF points are arranged in a diamond pattern which occupies the same area on the frame as those on the earlier 50D, although with ten more AF points, the density is noticeably higher. For example rather than having just three vertically and three horizontally at the broadest axes of the 50D, the 7D has five and seven respectively. This higher density has allowed Canon to offer some innovative AF area options which we’ll discuss in a moment.
Each AF point is represented by a black square in the viewfinder, although thanks to the 7D’s new transmissive LCD, any inactive points effectively become invisible, ensuring a clutter-free view. A custom option allows the points to be illuminated in red for greater visibility in low light.
The AF system may be brand new, but the three main AF modes remain the same as previous Canon DSLRs: One Shot AF for still subjects, AI Servo AF for moving subjects, and AI Focus AF which automatically switches from One Shot to Servo when it detects a subject starting to move.
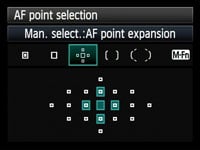
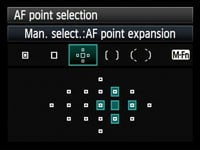
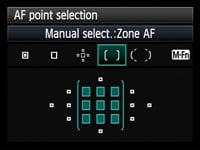
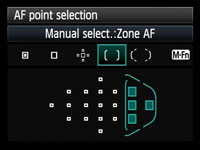
Things get interesting when you choose the AF area. As usual, you start by pressing the AF area button in the upper right corner of the 7D’s body, but then you use the new M.Fn button to the side of the shutter release to cycle between up to five different options. If all five AF area modes have been enabled in a custom menu, you’ll have the choice of Spot AF, Manual AF, AF Point Expansion, Zone AF and Auto Selection.
 |  |
 |  |
Manual AF and Auto Selection are self-explanatory: the former lets you manually choose one of the 19 AF points, while the latter automatically uses any combination of the 19 AF points. The other three modes are however brand new and show Canon really thinking about the often challenging conditions photographers find themselves in.
The first of the new AF options, Spot AF, works just like Manual AF selection in that it allows you to manually choose one of the 19 AF points, but the difference here is the 7D actually reduces the effective size of each point. This is useful if you need absolute precision when focusing on an exact portion of your subject, such as the eye in a portrait with a small depth of field.
The second new AF option for the 7D is AF Point Expansion, inherited from the 45-point AF systems of the professional 1D series. This again works like Manual AF selection, allowing you to manually choose one of the 19 AF points, but the difference this time is the 7D now additionally considers four adjacent AF points, above, below and to the right and left of the selected one (edges permitting). This means if the primary point loses the subject for whatever reason, it can fall back on one of the surrounding points to reacquire the target – handy for sports photography.
The third AF option, Zone AF, makes its debut here on the EOS 7D. This splits the 19 AF points into five groups or zones: centre, upper centre, lower centre, left and right. With a preferred zone selected, the EOS 7D will then attempt to focus on the closest subject in that group. So it works just like the normal Automatic selection, but concentrates on a smaller portion of the frame. This is clearly useful when you still want the camera to automatically choose an AF point, but this time from a specific region rather than the entire array. Again useful for sports or wildlife action where you can concentrate the camera’s attention on one region.
Beyond the three AF modes and five AF area options, the EOS 7D additionally offers a broad array of customisation. You can adjust the AI Servo tracking sensitivity, change the Priority balance between drive speed and tracking accuracy, and even the tracking method to better avoid temporary obstacles fooling the system into losing the primary subject. You can even choose separate AF points or zones depending on the orientation of the camera, allowing you to ensure the focus remains, say, at the top of the frame whether composing in landscape or portrait orientation. Wedding photographers or anyone in situations where the camera’s orientation is regularly changed will love this capability.
To put the EOS 7D’s new AF system to the test we photographed the World-famous Shotover Jet boats using the EF 70-200m f2.8L lens. These boats race along the Shotover river in Queenstown New Zealand, approaching at high speed before suddenly executing 360 degree spins. As such they represent a challenge to any AF system. In this particular circumstance we found the normal Auto Selection with AI Servo tracked the boats very effectively and you can see a series of shots in our sample images gallery and video tour.
Under more sedate conditions, we found the Spot AF option was very useful when shooting macro subjects with a very small depth of field, while the Zone AF was handy when sports action was concentrated in one portion of the frame.
In short, we never found a situation where the EOS 7D’s auto-focus struggled, although to be fair, we found the 51-point AF system in the Nikon D300s equally effective under the same conditions. We’re not professional sports photographers, so can’t categorically rate one system more highly than the other, but found both equally impressive in use. If you had to choose between them, the higher density of the Nikon system could be more useful when tracking highly erratic subjects, but equally you may find the zoning and other area options of the Canon system more appropriate to your style of photography.
Either way the EOS 7D boasts the most impressive AF system from any non-Pro Canon body to date, and is the first model in the EOS range to offer AF zoning (not even the 1D Mark IV has it). It all adds up to a significant upgrade over the earlier 9-point AF systems and finally gives Nikon’s 51-point AF system a run for its money.
Finally, the EOS 7D also inherits the AF Micro-adjustment from the EOS 50D and 5D Mark II which allows you to adjust the point of focus forward or back in +/- 20 fine increments.
You can apply adjustments globally to all lenses, or register individual settings for up to 20 different models of your choice.
When you attach that particular lens, the 7D recognises it and applies whatever settings you’ve stored. Should you try and register more than 20 lenses, the 7D will ask which ones you want to overwrite.
Canon EOS 7D metering, exposures and bracketing
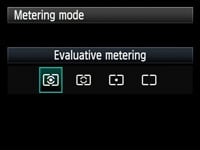
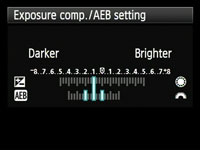
The Canon EOS 7D offers the same four metering modes as recent models: multi-zone TTL Evaluative, Partial (9.4% of v/f area), Spot (2.3% of v/f area) and Center-weighted; when spot-metering is selected, the viewfinder LCD system displays a circle indicating the area.
 |
Before you think there’s no major changes other than the spot circle though, the EOS 7D actually employs a brand new iFCL metering system with 63 zones. FCL stands for focus, colour and luminance, all of which are now considered by the metering system. The sensor also has dual layers, one sensitive to red and green light and the other sensitive to blue and green light.
As always, we used Evaluative metering for all out results and gallery shots and didn’t find any occasions (beyond shooting test charts) where we needed to apply any compensation. During our tests it proved more consistently reliable than the earlier Canon metering system (although to be fair we never found it that bad), and again brings yet another aspect of the 7D closer to Nikon’s technology – after all its arch rival has long employed both distance and colour information on its effective metering system.
 |
In terms of exposures, the EOS 7D is no different from the EOS 50D: there’s the usual shutter speed range from 1/8000 to 30 seconds plus a Bulb option, while the fastest flash sync speed is 1/250. The EOS 7D’s shutter block is however rated 50% longer than the EOS 50D: it’s rated for 150,000 shots, which is the same as the Nikon D300s.
Sadly despite all the innovation and enhancements, Canon’s failed to significantly improve the basic bracketing options of the EOS 7D from earlier models. As such you just get the bog-standard three frames, albeit now at up to 3EV apart in 0.3EV increments, which will undoubtedly be disappointing to HDR fans. In stark contrast, the Nikon D300s boasts exposure bracketing with up to nine frames at increments of 0.3, 0.5 or 1EV apart. It’s clearly one part of the Nikon system Canon wasn’t inspired by.
Canon EOS 7D anti-dust
As far as we understand, the EOS 7D offers the same three techniques to combat dust as the EOS 50D and 5D Mark II: anti-static coatings to reduce it sticking in the first place, a vibrating filter which tries to shake-free the more stubborn particles, and a software-based solution which maps the position of any pesky marks and appends them to images for automatic removal later using the supplied Digital Photo Professional software.
Following our usual DSLR torture-test we left our 7D face-up without a lens, inside and outside for ten minutes each; we can’t know how much dust entered the body during this time, nor even how much was present to start with, but we know such a process would result in dust being a problem for most models. We then updated the 7D’s Dust Delete Data and powered the camera on and off twice to vibrate the filter.
We then took a series of photos at every aperture setting of a plain white surface at close range with the EF 24-105mm IS lens zoomed-into 50mm and manually focused to infinity. Dust marks normally become most apparent at the smallest apertures (eg f16 and f22), but it’s also important to test at more common apertures.
Canon EOS 7D dust example at f22 / f22 with Auto Levels | ||
 |  | |
100% crop, 24-105mm at 50mm, f22 |
100% crop, 24-105mm at 50mm, f22 (Auto Levels) | |
With the 7D set to f22 we spotted a couple of very faint marks, although with the most obvious cropped above left, most would agree it’s hardly obtrusive – indeed we’ve had to apply Auto Levels to reveal its location more clearly in the image above right. As the aperture was opened, these marks quickly grew diffuse and essentially disappeared at f16 or larger.
The supplied Digital Photo Professional software identified that Dust Delete Data was present on both JPEG and RAW files, and used it to eliminate several marks, although interestingly not the one pictured above. So even though the 7D’s anti-dust system (like most DSLRs) wasn’t 100% infallible, dust could hardly be described as an issue during our tests – a good result for the 7D.
Canon EOS 7D sensor and processing
|

The Canon EOS 7D is equipped with a brand new 18 Megapixel CMOS sensor which generates 3:2 aspect ratio images with a maximum size of 5184×3456 pixels; at 300 dpi, these can be reproduced at up to 17.3×11.5in, compared to 15.8×10.5in on the 50D or 13×8.6in with the 40D. Indeed at the time of writing, only the EOS 5D Mark II (and the older EOS 1Ds Mark III) offered a higher resolution in Canon’s range with 21.1 Megapixel sensors delivering 5616×3744 pixel images which can be reproduced up to 18.7×12.5in at 300 dpi.
The major difference between the sensors in the EOS 7D and the EOS 5D Mark II though are their physical sizes: the EOS 5D Mark II employs a full-frame sensor measuring 36x24mm, while the EOS 7D uses a smaller APS-C sensor measuring 22.3×14.9mm. As such the individual photo-sites on the EOS 7D are physically smaller – indeed it features the highest pixel density of any Canon DSLR to date.
This understandably leads to concerns over increased noise and reduced dynamic range. Canon provides some reassurance by using improved gapless micro-lenses which it claims are more efficient than those on the EOS 50D, and you can see how they compare, along with the EOS 5D Mark II and Nikon D300s in our High ISO Noise results pages.
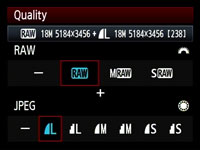 |
The 7D’s JPEGs can be recorded at two lower resolutions (8 and 4.5 Megapixels) and with the choice of Fine or Normal compression. RAW files are of course offered, although unusually again in the choice of three resolutions: either the full 18 Megapixels in RAW, 10.1 Megapixels in MRAW or 4.5 Megapixels in the SRAW; note these lower resolution RAW files were described as SRAW1 and SRAW2 on earlier models.
Cleverly the RAW and JPEG options can be set separately, allowing you to choose any combination. So if recording both JPEG and RAW, you could have RAW, MRAW or SRAW, accompanied by a JPEG at any of the three resolutions or two compression settings. The new RAW / JPEG button on the upper left corner of the body also allows you to quickly switch between recording one or two accompanying files. Best quality Large Fine JPEGS typically measure 6.6MB each, while full-size RAW files measure around 18MB each.
Like most Canon DSLRs, the EOS 7D employs 14-bit analogue to digital conversions, and this 14-bit tonal detail is also recorded in the RAW images. See our Results pages for examples comparing the 7D’s JPEG and RAW output.
Like the EOS 50D, copyright data can now be added to images, but you can now edit this in-camera, rather than having to rely on the EOS Utility software.
The sensitivity runs between 100 and 6400 ISO, or to an equivalent of 12800 ISO (H) if ISO expansion is enabled in the Custom settings. This is one stop higher than the Nikon D300s and matches the total range of the EOS 50D, although this older model referred to both 6400 and 12800 ISO as extended settings. The EOS 5D Mark II offers a higher 25600 ISO expanded setting, and you can see how all four models compare across their entire sensitivity ranges in our High ISO Noise results. Note: if Highlight Tone Protection is enabled, the 7D’s sensitivity range is reduced to 200-6400 ISO.
On previous Canon DSLRs, the sensitivity would stick at 400 ISO when the ISO was set to Auto in Manual or Bulb; this remains the case for Bulb or flash exposures on the EOS 7D, although sensibly Manual mode now works with Auto ISO in the same way as Program and the other exposure modes.
Like the EOS 50D, two noise reduction modes are available in the Custom Functions: Long Exposure Noise Reduction is applied to exposures longer than one second and can be set to Auto, On or Off, while High ISO Noise Reduction is applied throughout the range, but more so at higher sensitivities. High ISO Noise Reduction is available with four settings: Standard (the default), Low, Strong or Disable. Note Strong NR will reduce the maximum burst during continuous shooting.
Pressing the White Balance button allows you to choose from Auto, Daylight, Shade, Cloudy, Tungsten, White Fluorescent, Flash and Custom, followed by the option to manually enter a colour temperature from 2500 to 10000 Kelvin. White Balance correction and bracketing is also available.
Sharpness, Contrast, Saturation and Colour Tone are applied using a number of Picture Styles: for colour photography, you have the choice of Standard, Portrait, Landscape, Neutral and Faithful, while a further Monochrome option offers four filter and four toning effects. Contrast, Saturation and Colour Tone can be adjusted in a new wider range of +/-4, while Sharpness is offered from 0 to 7. While it’s possible to tweak these presets or configure your own with the three custom modes in-camera, software supplied with EOS 7D lets you create and edit precision Picture Styles to your absolute requirements.
We used the default Standard Picture Style for all our sample images, and found it delivered fairly lively-looking JPEGs similar in style to the EOS 5D Mark II, although not quite as crisp. They’re much punchier than the earlier EOS 50D though which could appear quite muted and restrained at times.
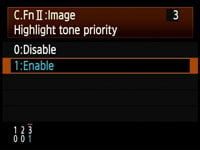 |
Leveraging the EOS 7D’s 14-bit A-D conversion is the Highlight Tone Priority (HTP) option, inherited from recent models and still buried away in one of the custom function menus; it’s disabled by default. According to Canon, this improves the highlight detail by expanding the dynamic range from the standard 18% grey to bright highlights. This option is only available between 200 and 6400 ISO and Canon warns noise could be increased in shadow areas. ‘D+’ icons indicate Highlight Tone Priority in the viewfinder and on both the upper and rear screens, so you should be in no doubt when it’s enabled.
Below you can see crops taken from our main results image, taken with and without Highlight Tone Priority, HTP. If you have a fairly good monitor, you should be able to see some subtle tonal details in the HTP version of the snowy mountain ridge which are burnt-out on the version without HTP. It’s fairly subtle in this example, but could still be beneficial if you’re shooting subjects with bright highlights, such as snowy scenes, or wedding dresses.
Canon EOS 7D JPEG Highlight Tone Priority Disabled (default) |
Canon EOS 7D JPEG Highlight Tone Priority Enabled | |
 |  | |
1/640, f8, 200 ISO |
1/640, f8, 200 ISO |
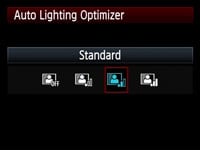 |
The EOS 7D additionally inherits the Auto Lighting Optimizer from recent models, which adjusts the brightness and contrast of images with dark areas (such as backlit portraits). The 7D offers the same four settings as the EOS 50D and 5D Mark II: Standard, Low, Strong and Disable. The Standard setting is always applied when the 7D is set to Auto or the Scene presets, and is also applied by default in PASM modes, although you can adjust it to one of the other three settings if preferred.
The settings and implementation may be the same, but Auto Lighting Optimizer on the 7D has now been promoted from the depths of the Custom section to its own prominent position on the second menu page.
Canon EOS 7D Auto Lighting Optimiser: Off / Strong | ||
 |
 | |
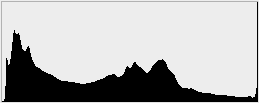 | 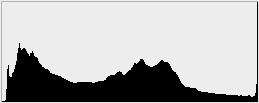 | |
Auto Lighting Optimiser Off: 100 ISO, f8, 1.3 secs |
Auto Lighting Optimiser Strong: 100 ISO, f8, 1.3 secs | |
Above you can see two examples of the same composition taken with the Auto Lighting Optimizer disabled (above left) and with its Strong setting (above right). In this particular example which includes dark shadow areas and blown highlights, we can see very little evidence of the Auto Lighting Optimiser in action. The shadows remain dark and the bright window highlights remain saturated. Lest you think it’s the same image, we’ve included histograms of each which reveal a very slight reduction in the shadow peak on the version with Strong Auto Lighting Optimization, but little difference overall.
 |
Following our policy of using default settings when testing cameras, most of the same images you’ll see in this review were taken with Highlight Tone Priority off and the Active Lighting Optimizer set to Standard. Since both can result in artificially higher noise levels though, we ensured both were disabled for our High ISO Results page.
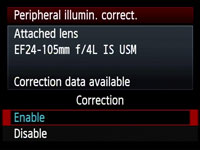
The EOS 7D also inherits the Peripheral Illumination Correction of the EOS 50D and 5D Mark II. This is optionally applied to JPEG images to reduce the effect of vignetting where the image darkens towards the corners. The EOS 7D contains a database of 26 Canon lenses and allows you to enter a further 14 models or swap existing ones for other models if preferred. If the lens model is recognised, the correction will be applied by default to JPEG images, although you can switch the option off if preferred. Canon describes the resulting effect as similar to that offered on RAW images in recent versions of its Digital Photo Professional (DPP) software, although DPP itself can offer additional corrections.
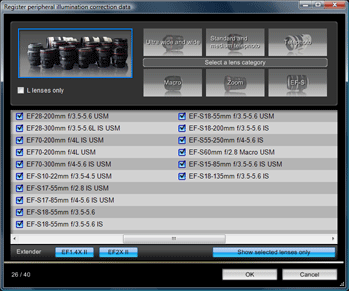 |
Any lens for which DPP offers corrections can be entered into the 7D’s internal database using the supplied EOS Utility. The latest version includes correction data for the new EF-S 15-85mm and EF-S 18-135mm IS zooms. DPP also offers data for each lens fitted with a 1.4x or 2x Extender, although these will count as additional entries in the 7D’s 40-model internal database.
Since Peripheral Illumination Correction is enabled by default, you’ll see the effect of it on our JPEG sample images throughout this review taken with the EF 24-105mm f4.0L IS lens.
In our tests, it proved very effective at reducing the effect of vignetting, although in extreme cases with certain lenses there can still some darkening in the extreme corners.
It remains a improvement over the versions without though, but remember any digital brightening will result in potentially greater visible noise in the applied areas – especially if the ISO was already high on the original.
Note unlike the Nikon D300s, the EOS 7D does not automatically correct coloured fringing in-camera. Instead you’ll need to use the supplied DPP software.
Canon EOS 7D drive modes and remote control
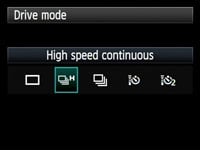 |
The Canon EOS 7D offers two continuous shooting modes: Low which shoots at 3fps and High which shoots at 8fps. The latter is 1.7fps faster than the EOS 50D and over twice as quick as the 5D Mark II; indeed it approaches the 10fps top speed of Canon’s pro sports DSLR, the EOS 1D Mark IV. It also finally gives the Canon an edge over its rival from Nikon. The D300s offers 7fps as standard, although this is boostable to 8fps with the optional battery grip (when fitted with the right batteries). The EOS 7D’s speed isn’t accelerated by its battery grip, but by boasting 8fps with no optional accessories, it numerically has the advantage.
Of course these quoted figures are all theoretical, so to see how the EOS 7D actually performs in practice we fitted it with a formatted Lexar Professional UDMA 16GB 300x Compact Flash card and set the camera to Continuous High. In Large Fine JPEG mode, the 7D rattled-off no fewer than 157 JPEGs in 20 seconds and seemed happy to continue while space remained; this corresponded to a rate of 7.85fps.
Set to RAW mode, the 7D managed 20 frames in three seconds before slowing, corresponding to a rate of 6.6fps. Writing to the card was very fast, with the process completed after only a few seconds.
The RAW shooting rate we measured may have been a little slower than the quoted top speed, but the JPEG rate was only a fraction below 8fps in practice. In comparison, we measured the D300s shooting JPEGs at 6.3fps and RAW files at just under 6fps. It’s important to note this RAW speed on the D300s was with 12-bit data, and switching it to 14-bit dropped the speed to just 2.35fps. In contrast, the 7D only records its RAW files in 14-bit.
So when comparing JPEGs or 14-bit RAW data, the EOS 7D comfortably out-paced the D300s, and this is even more impressive when you consider it’s shifting 50% more data with every frame.
To be fair, the 6.3fps JPEG rate we measured from the D300s is still very fast and should be more than sufficient for most applications, but the EOS 7D is quicker still and becomes the best option for anyone demanding absolute top frame rates without investing in a pro sports body.
Note during our tests, Canon released a service advisory warning the EOS 7D could suffer from ghosting during continuous shooting. We didn’t notice this on any of our continuous sample images and you can see several examples in our Gallery and HD Video tour – although they were taken under bright lighting conditions at relatively low ISOs. Canon has however since released a firmware update which it claims fixes the issue (version 1.1.0 released during early November 2009).
In terms of the self-timer, the EOS 7D gives you the choice of 10 or 2 second countdowns, although it doesn’t share the additional custom timers of recent consumer EOS DSLRs which can take multiple shots as insurance. A mirror lockup option is however available in the custom menu, which applies to either normal or self-timed shots. Unlike the Nikon D300s, there’s no built-in Intervalometer, but in its favour, the 7D can achieve this and much more when connected to a computer with supplied software.
In a feature which first made its debut on the EOS 40D, the 7D can be remote-controlled by a PC or Mac using the supplied EOS Utility. Images can be recorded to your computer’s hard disk, the internal memory card or both, and there’s Intervalometer facilities for programmed shoots. The camera can be connected to your computer either directly with the supplied USB cable, or via the optional WFT-E5(A) wireless transmitter; the latter allows wired or wireless Ethernet connections, along with control via a web-based interface for remote control which could potentially be on the other side of the world.
Up to ten EOS 7D’s equipped with WFT-E5(A)s can also be triggered by the same computer. To find out more about the wireless transmitter capabilities, see our WFT-E3(A) review; this model may be designed for the earlier EOS 40D and 50D bodies, but is physically and functionally very similar to the WFT-E5(A).
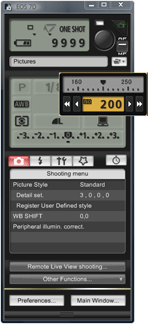 |
The EOS Utility lets you remote control and adjust pretty much any setting that doesn’t involve the physical turn of a dial or flick of a switch. So you can’t change the exposure mode from, say, Aperture to Shutter Priority using the software, but you can adjust the aperture or shutter value, the image quality, white balance, metering or sensitivity for example. Impressively the software also lets you see the Live View on your computer monitor and even lets you manually or autofocus the lens with a magnified view for assistance. We have a demonstration of this in our EOS 7D video tour.
New to version 2.7.0.2 which comes supplied with the EOS 7D is the option to adjust the flash settings and automatically popup the internal flash if desired, although you’ll need to push it back down again yourself. You’ll also see a Peripheral Illumination Correction section which lets you choose which 40 lenses from the entire Canon EF catalogue should populate the 7D’s internal database.
Software-based remote control is a wonderful feature to have and if you have a laptop handy, it could even eliminate the need for certain photographers to invest in a cable release. In fact the only downside we could find was the inability for the USB port to power the camera itself, thereby making an AC adapter mandatory for serious unattended photography.
Note: remote control with the EOS Utility is now supported by and supplied with every single DSLR in the current EOS range, including the entry-level EOS 1000D / XS. So while Canon can be tight about not supplying lens hoods with its non-L models, it certainly doesn’t skimp on the bundled software. Similar remote control software – often without the Live View capabilities – is an optional extra from other manufacturers, and Canon also bundles decent RAW processing software with its Digital Photo Professional program.
Now let’s find out about the new video recording capabilities in our EOS 7D Movie Mode section!


