Canon EOS 5D Mark II
-
-
Written by Gordon Laing
In depth
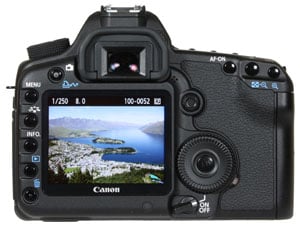
EOS 5D Mark II design, controls, screen and live view
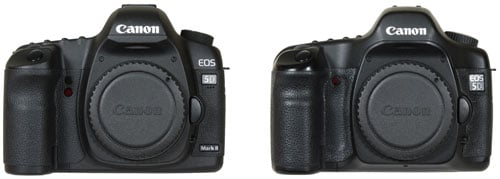
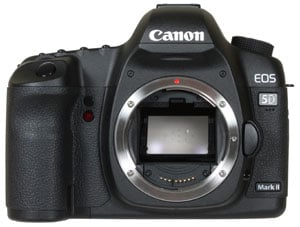
Canon’s EOS 5D Mark II is based on the same body as the original EOS 5D, and shares the same dimensions, although a newly-styled upper section and surround to the lens mounting gives it a noticeably different appearance. We’ve pictured the new EOS 5D Mark II alongside the EOS 5D below. Viewed face-on, the new EOS 5D Mark II has a more angular head section, compared to the rounded shape of its predecessor, along with a defined line under the Canon logo – although this doesn’t hide a popup flash as some hoped. You’ll also notice a separate self-timer lamp and IR remote control sensor between the grip and lens mount, along with three tiny holes below the 5D logo to accommodate the built-in microphone.
 |
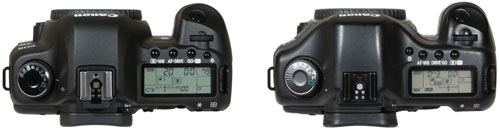
Viewed from above, the grip and main control positions are clearly unchanged, but the cosmetic differences in styling become more obvious. There’s quite defined lines along the top of the head of the 5D Mark II, which are missing from the original, along with a newly-styled Command dial and a silver flash hotshoe with a plastic surround to provide a weatherproofed seal with models like the Speedlite 580EX II.
The most important difference when viewed from above though is the larger status screen, along with a rearrangement of the upper right buttons and new protruding surrounds which makes it easier to find them with your eye up to the viewfinder. We’ll detail the screen and controls in a moment. So while the 5D Mark II shares essentially the same body as its predecessor, the cosmetic changes give it a different look.
 |
Both bodies do however feel pretty much identical in your hands though. The body weight is identical at 810g, and despite a new battery on the Mark II, there’s only a few grams difference with them fitted. The grip remains the same size and shape, delivering a good fit for larger hands with the textured rubber coating providing a secure hold, although the hooked inner areas of Nikon’s grips still feel ergonomically superior.
 |
The build quality is essentially the same as its predecessor, although Canon has upgraded the environmental sealing with strips and ridges around the various doors, flaps and compartments, along with the plastic surround on the hotshoe. There’s no specific mention of the degree of weatherproofing, but these seals are certainly a step-up from the original EOS 5D.
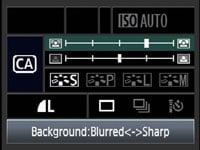 |
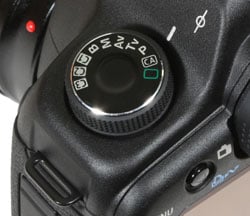
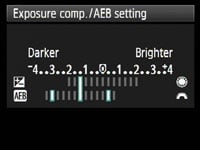
As mentioned above, the EOS 5D Mark II’s controls are virtually identical to its predecessor, which will allow owners of the previous model to get up and running without delay, although there are a handful of differences worth noting. First, the restyled Command dial adds two more Custom positions along with a new CA mode squeezed between Program and green square auto that was first seen on the EOS 50D. CA stands for Creative Auto and is essentially a beginner-friendly version of Aperture Priority. So instead of dialling-in an f-number, the CA mode presents an on-screen slider to adjust the background sharpness. A second slider is used to adjust the exposure compensation. It’s a friendly approach to controlling depth-of-field, but arguably better-suited to entry-level models than the 5D Mark II.
Joining the CA, green square Auto and three Custom modes are the usual PASM modes, although like the 5D before it, you won’t find any scene presets. This is Canon’s way of saying the 5D Mark II is a more serious camera, although again the presence of the new Creative Auto mode is a slight contradiction.
Like its predecessor, the upper right surface is dominated by an LCD information screen, although it’s now larger and more detailed, including a new four-segment battery indicator, an icon to indicate Highlight Tone Priority, and the ISO value displayed at all times, in addition to all the details previously shown. The actual characters indicating the aperture and shutter speed are also larger than before and much easier to read. It’s an unexpected and decent upgrade over its predecessor.
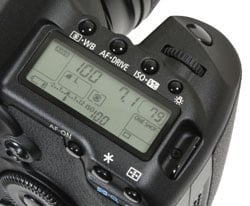 |
As before, three dual-function buttons run along the top side of the screen, which are now easier to find without looking thanks to protruding surrounds. While the six total functions offered by these buttons are the same as the 5D, Canon’s rearranged them to match the EOS 50D – so there may be a little confusion for 5D owners upgrading.
The first button on the left adjusts the metering and white balance modes, the second adjusts the AF and drive modes, while the third adjusts the sensitivity and flash compensation. While each button can be pressed and held like a shift key as you turn either the finger dial or thumb wheel, it’s also possible to adjust the settings by pressing the button once, then moving your finger or thumb to the appropriate dial within a few seconds. This allows you to easily make the required adjustments without removing your right hand from the main grip.
Turning to the rear of the camera you’ll find Canon’s large thumb wheel, a standard fixture on all but its entry-level DSLRs. In Program, Shutter and Aperture priority, the wheel is used to adjust the exposure compensation, while in full Manual it controls the Aperture value. As mentioned above, it also adjusts the White Balance, Drive mode and Flash compensation when these respective buttons are pressed first. In the 5D Mark II’s menus, it’s used to scroll up and down options on a page, and in playback it’ll scroll between images.
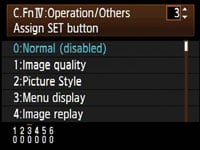
It’s a very tactile control that allows quick adjustments, with a satisfyingly large SET button in the middle to confirm options; the SET button can also be configured to directly enter the Image Quality or Picture Style menus, start Image Replay, view the Quick Control screen, start recording Movies, or present the main menu system.
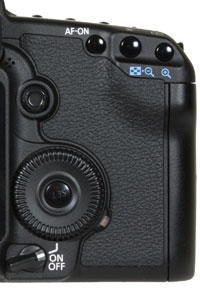 |
Above the thumb wheel is an eight-way joystick which can be used for operating the new Quick Control menu first seen on the EOS 50D (see screen section below), scrolling round magnified images during playback or as an alternative to the thumb and finger dials when navigating menus and other options. Like earlier EOS DSLRs though, it requires a little practice to avoid pressing it, say, upwards, when you meant to push it in to confirm a setting. You’ll also notice four tiny dots to the upper left of the joystick for the loudspeaker.
Concentrated above the ridge for the thumb rest are three buttons: the usual focus point selection and AE lock buttons which double-up for zooming in or out on images, alongside a new AF-ON button which is used to autofocus during Live View, or simply start the AF process independently of the shutter release.
Like the earlier 5D, a number of buttons can be found on the left side of the screen, although there’s been a few changes. Menu, Info and Play are still present, but Jump has been removed and in its place are new buttons to directly access the Picture Styles menu or delete files.
 |
In the top left corner to the side of the viewfinder, you’ll find the Direct print button, although this now doubles-up for entering Live View – so the 5D Mark II skips the SET button to activate Live View on the 40D and goes straight for the more sensible approach of the 50D, although as we’ll explain below, you’ll still have to enable the facility in a menu.
You’ll also notice while the 5D Mark II sports buttons for direct access to almost every major shooting setting, it still doesn’t have a button dedicated to adjusting the image quality. The new Quick Control system on the 5D Mark II does however provide an alternative to entering the main menu system, and you can also configure the SET button to take you directly to the Image Quality menu if desired.
Canon EOS 5D Mark II flash
Like its predecessor, the EOS 5D Mark II does not feature a built-in flash, so anyone hoping the newly designed head section was hiding something will be disappointed. Actually it is a disappointment, because while a popup flash will potentially compromise the build and integrity of a DSLR head and may not be taken seriously by pros, they do provide useful fill-in capabilities along with wireless control of external flashguns. As it stands though, owners of the 5D Mark II, like the original 5D will need to lug an external flashgun around. In this respect, it’s the same as the Sony Alpha A900, although Nikon’s D700 is fairly unique in offering a popup flash.
|

On the upside, the 5D Mark II inherits the raised plastic surround to its hotshoe from recent EOS models which mates with higher-end Speedlites like the 580EX II to provide environmental sealing. Behind one of the side flaps there’s also a PC Sync port for connecting to studio lighting – see port section at the bottom of this page.
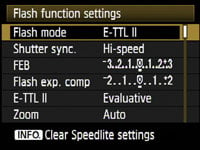 | 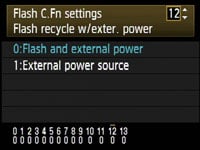 |
Like recent Canon DSLRs, the EOS 5D Mark II also offers options to configure compatible external flashguns. These are now split over two menu pages (see above), one adjusting flash function settings like flash compensation, curtain sync, and E-TTL II mode, while the second page is dedicated to custom flash options. External Speedlites which support camera-control include the 580EX II, 430EX II, and the compact 270EX; the latter is an ideal option for anyone who wants a portable flash option for the Mark II.
Canon EOS 5D Mark II viewfinder
 |
The Canon EOS 5D Mark II offers a penta-prism viewfinder with 98% coverage and 0.71x magnification. The magnification remains the same as its predecessor, but Canon’s squeezed 2% extra coverage from it. As you might expect, both viewfinders appear very similar in size in practice, although the focusing screen on the new 5D Mark II looked brighter and more neutral in colour compared to slightly warm, yellowy appearance of the 5D – although of course ageing could be a factor here. This brighter, more neutral appearance made the new 5D Mark II more preferable in use.
Compared to its ‘affordable’ full-frame rivals, the Nikon D700 features a viewfinder with 95% coverage and 0.72x magnification, while Sony’s Alpha A900 boasts nothing less than 100% coverage with 0.74x magnification. Compare the Sony directly against the others and its viewfinder does indeed appear larger, so it wins this particular battle, although again there’s nothing wrong with the 5D Mark II’s viewfinder, and anyone upgrading from an APS-C model will revel in its large view.
Look through the 5D Mark II’s viewfinder and you’ll see the same nine AF points as its predecessor, arranged in a diamond pattern, with a circle in the middle indicating the spot-metering area. As before, the AF points are indicated by rectangular outlines which illuminate red when active.
 |
Below the frame you’ll find the shutter speed, aperture, an exposure compensation scale, the ISO value and shots remaining, along with various icons to indicate AE lock, flash ready, high-speed flash sync, flash bracketing, flash compensation, white balance correction, black and white mode, focus conformation and whether Highlight Tone Priority is enabled or not. The 5D Mark II also features a new battery icon on the far left side. So existing 5D owners will be pleased to find indication of not only their battery life, but also the current ISO value at all times, along with a number of new icons.
The EOS 5D Mark II also supports three new interchangeable focusing screens: along with the standard Eg-A Precision Matte, you have the choice of fitting the optional Eg-D Matte with an alignment grid (pictured) or the Eg-S Super-Precision Matte for easier manual focusing with lenses sporting apertures faster than f2.8. Note these are different models than the screens for the 5D. It’s also a shame Canon continues to not implement the LCD on-demand grid lines seen on all but the cheapest Nikon DSLRs, but at least there’s the option to swap focusing screens if desired.
Canon EOS 5D Mark II Screen and Live View
 |
The EOS 5D Mark II is equipped with the same 3in 920k VGA screen as the EOS 50D. This is a major upgrade over the 2.5in 230k QVGA screen of the earlier EOS 5D, and brings the Mark II in line with its major rivals from Sony and Nikon.
Like other VGA screens, the 5D Mark II’s monitor looks incredibly detailed, whether you’re playing images, composing in Live View or simply navigating the newly designed menu system. It’s not just larger and more detailed than its predecessor’s screen though, it’s also brighter and easier to view. Admittedly, like the 50D, the Mark II’s screen can become harder to view with bright Sunlight shining directly on it, but take out the 5D under the same conditions and you’ll notice a big improvement with the new model.
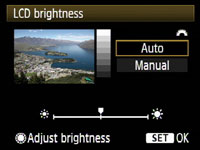 |
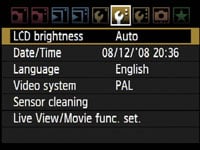
The Mark II also boasts a new feature over the 50D: a sensor to the lower right corner of the screen which can detect the ambient surroundings and adjust the screen brightness to match. In use this certainly helps in bright conditions, while equally dimming the screen when it’s dark so not to blind you.
Beware though as it can sometimes give a skewed representation over the brightness of the image you’ve just captured, especially under very Sunny conditions when it’s at its maximum brightness, or when the conditions are changing quickly. We’d recommend anyone shooting with this auto brightness setting check their histograms in playback for a more accurate representation, or switch the screen brightness to manual so there’s fewer surprises.
In another upgrade over the original 5D, the Mark II features Live View facilities – which are a joy to use with the new, improved screen. The implementation is similar to the EOS 50D, although with some new features to support the Mark II’s unique video recording capabilities.
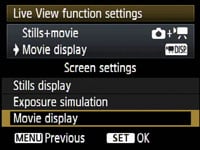
Despite Live View now being a mainstream feature which many buyers seek out, Canon continues to disable it as standard on the EOS 5D Mark II. So like the EOS models before it which feature Live View, you’ll first need to enable it in the dedicated Live View / Movie Function menu.
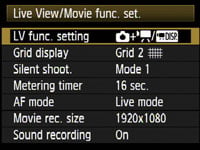 | 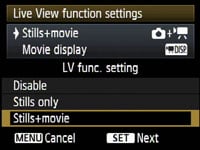 | 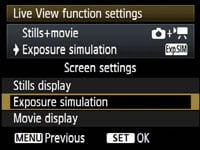 |
Unlike previous EOS models though, you’ll find two different Live View function settings for Stills alone, or Stills and Movie recording. After selecting the desired option, you’ll then be presented with the choice of three viewing modes for Stills display, Exposure Simulation and a new Movie display option. Like earlier EOS DSLRs with Live View, Exposure simulation simply adds the option to view a Live Histogram. The new Movie display viewing mode previews the exposure settings that will specifically be used for video recording (plus still recording while filming), along with a transparent mask indicating the 16:9 area if you’re shooting in the Mark II’s HD mode. For full details of the Movie mode, see the Feature section; for now we’ll concentrate on using Live View for recording still images.
With Live View set to Stills or Stills and Movie, you can start the system by pressing the Direct Print / Live View button to the left of the viewfinder; you’ll hear the mirror flip open and about two seconds later the live image will appear on the screen. To stop Live View, press this button again; note the mirror won’t flip down if you’re in Live View and decide to enter the menu system.
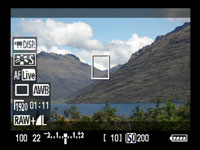
Live View on the EOS 5D Mark II offers 100% coverage and exploits the full VGA resolution of the screen, refreshed at a smooth 30fps. In the stills viewing modes, the effect of different apertures can be previewed by pressing the depth-of-field preview button below the lens release. The camera will temporarily increase the screen brightness to maintain a consistent image; this may result in greater on-screen noise, but it won’t appear in the final image.
 | 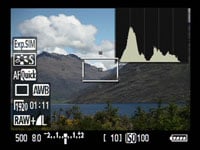 |  |
Pressing the Info button cycles between a clean view, one with shooting information running beneath the frame and a third view which superimposes additional information over the image. If Exposure simulation is enabled in the Live View menu, a fourth view adds a Live Histogram to the frame, which looks very detailed thanks to the VGA resolution. The Live View menu page also offers a choice of two superimposed alignment grids, which goes some way to making up for the separate viewfinder screen accessories. Note: Live Histograms are not available on any Nikon DSLR other than the flagship D3(x), although the D700 does inherit its neat Virtual Horizon feature.
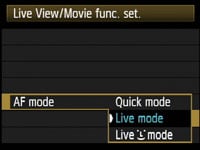
Like the EOS 50D before it, the 5D Mark II ofers the choice of three AF modes in Live View: the default Quick mode flips the mirror down to take a reading from the traditional 9-point phase-change AF system, Live Mode employs a slower, but silent contrast-based system with an adjustable focusing area, while Live Mode with Face Detection will track and focus on human subjects like a compact. To autofocus using any of the three Live View modes on the 5D Mark II, you’ll need to press the AF-ON button.
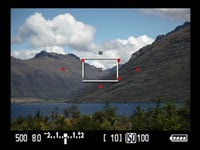
In Quick mode you’ll see a graphical representation of the nine AF points on-screen. Press the AF-ON button and the mirror briefly flips down to take a reading, indicates the active AF points in red with a double beep if sounds are enabled, then flips back up again to continue the view. There’s obviously some noise and an interruption to the image, but it remains the quickest of the three AF modes in Live View – indeed, if the AF system locks onto the subject without a problem, the entire process can take less than a second.
 |  |  |
|

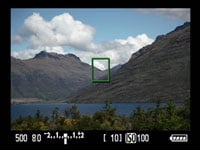
With the EOS 5D Mark II set to Live mode, the nine small AF squares are replaced by a single larger white frame which can be moved around the screen using the joystick. Press the AF-ON button and the Mark II will focus on whatever’s in the frame. At best this will take just under two seconds before the frame turns green with a double-beep to confirm, but with trickier subjects the process can take closer to four seconds. There isn’t any interruption to the display though, nor the sound of the mirror flipping.
The Live mode with face detection (indicated by a smiley icon) uses the same contrast-based system as normal Live Mode, but if it recognises a human face, it’ll frame it with a box and focus on that when you press the AF-ON button; if there’s more than one face in the scene, you can use the joystick to select the one to focus on. As you might expect, the 5D Mark II’s DIGIC 4 processor can certainly track faces around the frame with ease, but the actual focusing process itself can still be slow, and if the face isn’t already sufficiently sharp to start with, the system won’t even recognise it. It can also be tricky to frame a portrait at longer focal lengths and press the AF-ON button to focus. If you’re lucky, the camera will lock on and confirm within a couple of seconds, but if it ends up being longer, it’s easier to exit Live View and frame through the viewfinder instead.
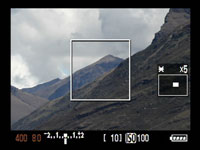 |  |
At any time during the Quick or Live AF modes, you can press the magnify button to show a 5x view, then a 10x view. The 5D Mark II will zoom-in on wherever the white frame is positioned on screen, which can be moved before or during using the joystick. At 10x, the Mark II shows an area that’s one tenth the width of the full image as you’d expect, but then scales this 561 pixel wide crop to fill the 640 pixel width of the monitor. So the 10x mode actually appears to be operating at slightly greater than 1:1 magnification.
Purists may have preferred an exact pixel-mapped 1:1 viewing mode, but at 10x there’s little evidence of scaling or fuzziness; indeed the image looks pin-sharp and allows you to make very precise focus adjustments. The 30fps frame rate is also smoother for motion than the 15fps of the Nikon D700’s Live View.
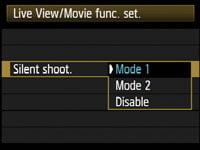 |
The EOS 5D Mark II also inherits the silent shooting options of the 50D. Mode 1, the default, is quieter than normal shooting and also supports continuous shooting at around 3fps. Mode 2 is quieter still by employing an electronic first curtain shutter to actually take the picture, but delaying the noisier re-cocking of the physical shutter so long as you keep the shutter release held.
The idea is to press the shutter release button to take the photo (with a very faint click), but keep it held until you’re out of ear shot, after which you can let go, allowing the Mark II to audibly re-cock the physical shutter. You may only be able to take one photo with this technique, but it could be useful in certain situations. Note there’s also an option to disable Silent Shooting altogether, which sounds like the camera’s taken two shots; Canon only recommends using this to avoid exposure issues with extension tubes or Tilt and Shift lenses. You can hear an example of Mode 1 and Mode 2 Silent Shooting in our EOS 40D Silent Shoot video.
Finally, Live View on the EOS 5D Mark II is also available at a higher resolution when the camera’s connected to an HDTV using the HDMI port, or connected to a PC or Mac and using the supplied EOS Utility – see our Features page for more details on the latter. Note, the image seen on the live HDMI output will however shrink if you start filming video in the HD mode, although this won’t affect the quality of the recording; this will however be annoying for videophiles wanting to use HDMI to drive an HD display while filming.
Canon EOS 5D Mark II shooting information and menus
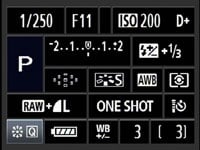 |  |
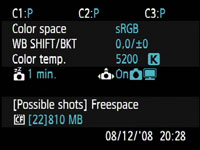
Half-press the shutter release button and the main shooting settings are shown on both the rear monitor and upper screen. The 5D Mark II formats the details on the rear screen in the same way as the 50D, and offers the same means to adjust them.
So the fonts and layout are still quite chunky, but the Mark II shows the shutter speed and aperture, sensitivity, whether Highlight Tone Priority is active, the shooting mode, an exposure compensation scale, flash compensation expressed numerically, the selected AF point, Picture Style, White Balance and Metering mode, the image quality, AF mode and drive mode. The battery life, white balance correction, maximum burst and shots remaining are also shown.
 |
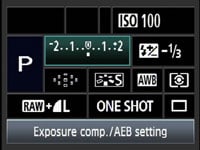
In the bottom left corner of the screen you’ll see a letter Q next to an icon surrounded by arrows. This represents the 5D Mark II’s Quick Control option, inherited from the 50D and activated by pushing the joystick in. You can then move a blue highlighter over the desired setting using the joystick and then either turn the thumb or finger dials to directly adjust it, or press the SET button to view a dedicated menu for that item. It’s similar in practice to other on-screen adjustment systems like those pioneered on Olympus DSLRs, and a welcome addition to the Mark II over its predecessor. Like the 50D though, there’s no opportunity to change the colour scheme, nor for the characters to rotate and remain upright when shooting in the portrait orientation like Sony’s DSLRs.
Pressing the Info button switches to a page with details of further settings (albeit not adjustable with the joystick). Press the Info button again and the screen can be forced off – unlike the budget Canon DSLRs which feature proximity sensors to switch the screen off when you bring your eye to the viewfinder.
The EOS 5D Mark II also inherits the 50D’s redesigned menu style which exploits the VGA monitor and the additional processing muscle of the DIGIC 4. So unlike the single long scrolling list of options on the original 5D, you’ll find nine tabbed pages with no more than seven items on each, and like the 50D, the fonts are smoother, the icons more colourful and there’s also fading transitions as you switch between pages; it’s a good-looking redesign over the original 5D and easier to navigate too. Like the 50D, you can exclusively use the joystick for navigation, or use the finger dial to switch pages and the thumb wheel to scroll through the options on each.
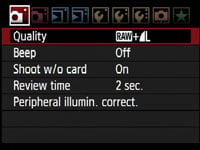 |  | 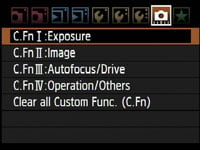 |
In terms of the actual sections, there’s two for recording, two for playback, three for setup, and one each for custom functions and My menu settings. The Custom Function section is split into four sub-sections for Exposure, Image, Autofocus / Drive and Operation / Others; there’s 25 Custom Functions in total and throughout the review we’ll highlight some of the options.
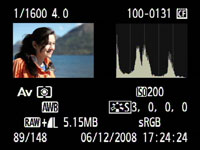
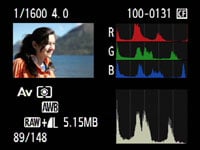
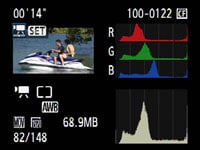
In playback mode, pressing the Info button cycles between a clean image, one overlaid with a little shooting information, then a thumbnail with extended shooting information and a brightness histogram, and finally a thumbnail with less shooting information, but both brightness and RGB histograms. The page with just the brightness histogram and extended shooting information can be switched to display RGB histograms instead if preferred.
 |  |  |
You can also use the magnify buttons to zoom-in on an image or zoom out to display either four or nine thumbnail views. If you’re directly connected to a PictBridge-compatible printer, the 5D Mark II also allows you to perform a number of manipulations including trimming and fine rotation, along with manual Levels adjustments.
Canon EOS 5D Mark II Battery and connectivity
 |
After using the BP-511A across a number of EOS DSLRs, including the original 5D and the recent 50D, Canon’s developed a new battery pack for the 5D Mark II: the LP-E6 is the same width, thickness and only a fraction longer, but packs in 1800mAh to its predecessor’s 1390mAh. Canon claims this is good for around 860 still shots under CIPA conditions, compared to 800 for the original 5D, or up to 90 minutes of video recording alone. Clearly the new camera is hungrier than the old one, only managing a few extra shots despite a significant boost in battery power.
We first tried firing a series of continuous sequences using the viewfinder, a non-stabilised lens and with minimal reviewing; under these conditions the battery expired after around 800 shots. Of course the situation changes when you’re using Live View, recording movies or shooting with Image Stabilised lenses. Under more typical general use, we found each charge was good for closer to 250 stills and seven or eight minutes worth of HD movie recording all with an IS lens, along with fairly generous use of Live View and playback on the beautiful screen.
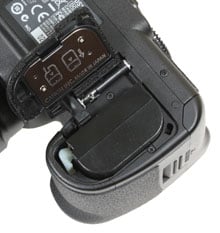
The battery is also Canon’s first to offer accurate feedback on the exact charge remaining. Like Nikon, it inexplicably hides the percentage figure in a menu, but at least it’s there and the main icons indicating battery life on the main screen, upper panel and in the viewfinder feature more segments than before.
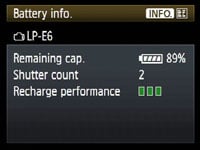 |  |
The new Battery Info menu page shows the exact percentage of charge remaining, along with the number of shots fired during this charge so far, and an indication of the recharge performance using three squares. With all three lit green, the battery recharging performance is in good condition. Two lit squares indicate the recharging performance is reduced, while a single red square means it’s time to buy a new battery. The Mark II can also remember the condition of any spares and list them all on a registration page.
|
If you’d like extended battery life, you can fit the optional BG-E6 Battery grip which takes two LP-E6 while additionally providing a portrait grip and controls. Sadly the grip for the existing 5D is not compatible due to the new battery type. Canon also offers a new WFT-E4(A) wireless transmitter which equips the Mark II with Wifi, wired networking, GPS connectivity and the option to connect external USB storage devices, along with a portrait grip and controls. This shares essentially the same feature-set as the WFT-E3(A) for the 40D and 50D, so check out our Canon WFT-E3(A) review for an idea of what’s possible.
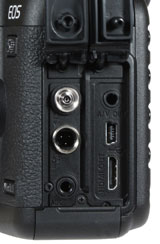 |
Like its predecessor, the Mark II has two large rubber flaps on its left side covering the ports. It shares the same PC Sync for external lighting, N3-type remote and USB ports as its predecessor, but the TV output now includes stereo sound and is joined by a mini HDMI port and a stereo microphone input for the movie mode.
Interestingly unlike Nikon’s DSLRs with HDMI, there’s no option to force different resolutions over HDMI; instead Canon says the 5D Mark II will display images at the TVs optimum resolution. Note the Mark II can output its Live View over HDMI in 1920×1080 pixel resolution, but if you’re recording a movie, the HDMI output will temporarily reduce in quality.
In terms of memory, the EOS 5D Mark II unsurprisingly sticks with Compact Flash, and can accommodate Type I or Type II cards. The Mark II can exploit the extra speed of UDMA cards (indeed it’s advisable for the movie mode) and its interface also supports future Class 6 UDMA cards which we understand should allow larger bursts in continuous shooting. So existing 5D owners can reuse their memory and cabled remotes, but not any spare batteries or battery grip.
Now let’s check out the Features section which includes details on the sensor, autofocus, drive modes, image processing and of course the Mark II’s new Movie mode.
Canon EOS 5D Mk II lenses, focusing, sensor and drive
The Canon EOS 5D Mark II employs an EF lens mount and thanks to its full-frame sensor, there’s no field-reduction factor to take into consideration. So mount a 24-105mm zoom, and you’ll really get 24-105mm coverage in practice.
 |
Like the 5D before it though, not to mention Canon’s other full-frame bodies, the Mark II is not compatible with EF-S lenses. This is in contrast to Sony and Nikon’s full-frame bodies which will allow DT and DX lenses respectively, albeit either in a cropped mode, or in full-frame with the acceptance there’ll be significant vignetting and softness outside their corrected area.
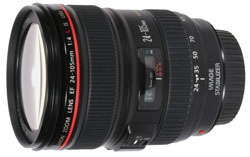 |
The EOS 5D Mark II will be available body alone, or in a kit which in most regions will include the Canon EF 24-105mm f4.0L IS.
This is one of Canon’s best general-purpose lenses, offering a flexible 4.4x optical range, a constant f4.0 aperture, quick and quiet USM focusing, Image Stabilisation, and L build quality which includes a smooth zoom ring, full-time manual focusing, environmental sealing on the mount and a lens hood.
We used this lens throughout our tests with the EOS 5D Mark II and found it an ideal partner; you can see samples taken with it in our results and gallery pages. We also thoroughly reviewed this lens using the earlier EOS 5D, and you can find out more in our Canon EF 24-105mm review.
Canon EOS 5D Mark II focusing
The Canon EOS 5D Mark II employs the same 9-point AF system (with 1 cross-type and 6 invisible assist points) as its predecessor, the EOS 5D, although the AF algorithm has been improved. Like the 5D, the AF points are arranged in a diamond pattern and represented by small rectangular outlines which illuminate red when active; you can switch the red lights off if preferred in a custom menu.
 |
Press the focus area button and you can use the joystick, finger dial or thumb wheel to manually select a single focus point using the screen or viewfinder. For AF assistance in low light though, you’ll need to be using an external flashgun.
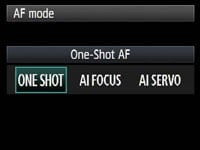
Like all Canon DSLRs there’s three auto-focusing modes: One Shot AF for still subjects, AI Servo AF for moving subjects, and AI Focus AF which automatically switches from One Shot to Servo when it detects a subject starting to move.
 |
Sticking with a three year old AF system, albeit with the latest algorithm, has been a disappointment for many who compare specifications. Sony’s A900 may be similar with a 9-point system (with 10 assist points), but Nikon’s 51-point AF system on its D700 sounds much more impressive. It is however important to not trust numbers alone and to actually compare them in real-life tracking environments.
Fitted with the EF 24-105mm f4.0L lens fully zoomed-in, we found the EOS 5D Mark II was perfectly capable of tracking subjects in fast motion. It easily passed our test of maintaining sharp focus on vehicles approaching face-on at speeds of 50kph over a 100m stretch. So long as the subject was covered by an AF point, we were fine.
This is where Nikon’s D700 has an advantage with many AF points, spread over a larger area, but with smaller gaps between them. This gives it the edge when a subject changes distance unpredictably between focusing points or moves over a wider area, but again if you can keep the action around the Mark II’s diamond capture area, you’ll be fine in most situations.
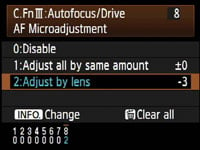 | 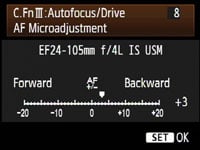 |
New to the EOS 5D Mark II over the 5D is support for AF Micro-adjustment. Inherited from the professional 1D series and the recent 50D, this allows you to adjust the point of focus forward or back in +/- 20 very fine increments. You can apply adjustments globally to all lenses, or register individual settings for up to 20 different models of your choice.
When you attach that particular lens, the 5D Mark II recognises it and applies whatever settings you’ve stored. Should you try and register more than 20 lenses, the Mark II will ask which ones you want to overwrite. We’re pleased to find this facility on the 5D Mark II (not to mention the 50D) as it addresses a serious issue that affects many photographers.
Canon EOS 5D Mark II metering, exposures and bracketing
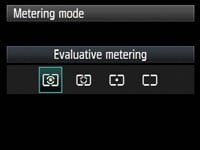 |
The Canon EOS 5D Mark II offers the same four metering modes as the 5D: 35-zone TTL Evaluative, Partial (8% of v/f area), Spot (3.5% of v/f area) and Center-weighted; the viewfinder also indicates the spot metering area with a circle. As before, we used Evaluative metering for all our sample images and found very few occasions when we’d want to apply any compensation.
 |
The EOS 5D Mark II offers shutter speeds from 1/8000 to 30 seconds plus a Bulb option; the fastest flash sync speed is 1/200 and the shutter block is now rated for 150,000 cycles (same as the Nikon D700, but more than the 100,000 of the Sony A900). The shutter sound is a little different from its predecessor, but not as motorised as the 40D / 50D – check out our Canon EOS 5D Mark II video tour to hear it for yourself.
Exposure bracketing is available with three frames up to 2EV apart in 0.3EV increments, which puts it in line with most budget or mid-range DSLRs; Sony’s A900 offers up to five frames (albeit only offering the full +/- 2EV range for three frames), while Nikon’s D700 takes the lead with a far more useful nine-frame option which will be preferred by HDR enthusiasts. White balance bracketing is also available on the 5D Mark II, again with three frames, and at +/-3 levels in one level increments. If both exposure and white balance bracketing are active, the Mark II will take nine frames.
Canon EOS 5D Mark II anti-dust
The EOS 5D Mark II finally brings anti-dust facilities to the series – the original 5D was one of the last models to not offer it, and dust could certainly be a problem with that camera. Like other Canon DSLRs, the 5D Mark II offers three techniques to combat dust: anti-static coatings and materials to reduce it sticking in the first place, a vibrating filter which tries to shake-free the more stubborn particles, and a software-based solution which maps the position of any pesky marks and appends them to images for automatic removal later using the supplied Digital Photo Professional software. The anti-static coating on the 5D Mark II’s low pass filter now employs fluorine which Canon claims better repels dust.
 |  |
Following our usual DSLR torture-test we left our 5D Mark II face-up without a lens, inside and outside for ten minutes each; we can’t know how much dust entered the body during this time, nor even how much was present to start with, but we know such a process would result in dust being a problem for most models. We then updated the Mark II’s Dust Delete Data and powered the camera on and off twice to vibrate the filter.
We then took a series of photos at every aperture setting of a plain white surface at close range with the EF 24-105mm IS lens zoomed-into 70mm and manually focused to infinity. Dust marks normally become most apparent at the smallest apertures (eg f16 and f22), but it’s also important to test at more common apertures.
|
Canon EOS 5D Mark II dust example at f22 / f8 | ||
 |  | |
100% crop, 24-105mm at 70mm, f22 | 100% crop, 24-105mm at 70mm, f8 | |
With the 5D Mark II set to f22 we spotted just one mark on the image, a small hair on the far left hand side. Upon closer examination at 100%, there was a second tiny mark nearby, but barely visible. Applying Auto Levels to the whole image revealed a number of fainter marks, but these weren’t visible under normal conditions even at f22.
As the aperture was opened, the mark became more diffused and trickier to see. We’ve pictured the exact same area above right from the sample taken at f8 where the mark has become almost invisible. The supplied Digital Photo Professional software identified that Dust Delete Data was present on both JPEG and RAW files, but failed to remove the hair. We have seen DPP remove more conventional dust marks before though, so assume it’s looking out for circular targets.
Reviewing our images and video footage taken before this anti-dust test revealed this tiny hair had in fact been present throughout, although effectively invisible at all but the smallest apertures. Interestingly it was easiest to spot in video footage, because as discussed on the next page, the 5D Mark II often selects f16 or f22 under bright conditions in its movie mode.
But this small hair aside, we were very impressed by the anti-dust performance of the 5D Mark II. The body was left open without a lens inside and out for 20 minutes, and yet it didn’t show any more visible dust marks than prior to the test. This is a huge improvement over the original 5D which could attract a wealth of dust even during the few short seconds of a lens change, so anyone upgrading should be very satisfied. As for the hair, we eliminated it with a burst of air from a Giotto Rocket.
Canon EOS 5D Mark II sensor and processing
The headline feature of the Canon EOS 5D Mark II is its 21.1 Megapixel full-frame sensor, measuring 36x24mm. It generates 3:2 aspect ratio images with a maximum resolution of 5616×3744 pixels, which gives it 1248 more pixels horizontally and 832 pixels vertically than its predecessor the EOS 5D; at 300 dpi, this allows the 5D Mark II’s images to be printed at 18.7×12.5in to the 5D’s 14.5×9.7in, which is quite a boost. Behind the scenes is Canon’s latest DIGIC 4 image processor – only the second time it’s been used in a Canon DSLR.
It’s obviously not gone unnoticed the 5D Mark II’s sensor shares the same resolution and dimensions as that in the flagship 1Ds Mark III, but Canon describes it as a new sensor which employs an improved output amplifier, more advanced colour filter with superior light transmission, and other enhancements also seen in the recently announced EOS 50D. Canon claims the result is the highest quality seen from any EOS DSLR to date, and you can see for yourself in our results and gallery pages.
 |
The 5D Mark II’s JPEGs can be recorded at two lower resolutions (11.1 and 5.2 Megapixels) and with the choice of Fine or Normal compression. RAW files are of course offered, and like the 50D, there’s additionally the choice of two lower resolution RAW modes labelled SRAW1 and SRAW2.
Like the 50D, the RAW and JPEG options can be set separately, allowing you to choose any combination. So if recording both JPEG and RAW, you could have RAW, SRAW1 or SRAW2, accompanied by a JPEG at any of the three resolutions or two compression settings. Best quality Large Fine JPEGs typically measure between 6 and 9MB each, while full-size RAW files measure between 25 and 35MB each.
Like other recent EOS DSLRs, the 5D Mark II employs 14-bit analogue to digital conversions, and this 14-bit tonal detail is also recorded in the RAW images. See our Results pages for examples comparing its JPEG and RAW output. Copyright data can now also be added to images, but unlike the Nikon D700 this can’t be edited in-camera; instead you’ll need to use the supplied EOS Utility.
The sensitivity runs between 100 and 6400 ISO, with the option of L, H1 and H2 settings offering an equivalent of 50, 12800 and 25600 ISO respectively; note L, H1 and H2 will only be available if you enable ISO Expansion in the Custom settings. This gives the 5D Mark II the broadest range of sensitivities of any Canon DSLR to date, and an impressive three stops more than its predecessor (with their respective expanded ranges). To see how they compare in terms of detail and noise levels, see our High ISO Results page. If Highlight Tone Protection is enabled, the 5D Mark II’s sensitivity range is reduced to 200-6400 ISO.
 |
Like recent Canon DSLRs, the sensitivity sticks at 400 ISO when the ISO is set to Auto in Manual or Bulb, so if you want lower sensitivities in these modes, ensure you also manually set the sensitivity; the 5D Mark II will at least tell you on its screens and in the viewfinder what ISO value it’s going to use when set to Auto though, so there shouldn’t be any nasty surprises.
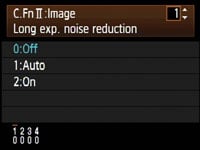 |  |
Like the EOS 40D and 50D, two noise reduction modes are available in the Custom Functions: Long Exposure Noise Reduction is applied to exposures longer than one second and can be set to Auto, On or Off, while High ISO Noise Reduction is applied throughout the range, but more so at higher sensitivities. High ISO Noise Reduction is now available with four settings: Standard (the default), Low, Strong or Disable, and we have examples of each in our High ISO Noise Reduction results page. Note Strong NR will reduce the maximum burst during continuous shooting.
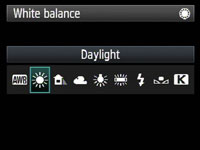 | 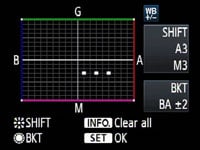 |
White Balance settings offer Auto, Daylight, Shade, Cloudy, Tungsten, White Fluorescent, Flash and Custom, followed by the option to manually enter a colour temperature from 2500 to 10000 Kelvin. White Balance correction and bracketing is also available.
Sharpness, Contrast, Saturation and Colour Tone are applied using a number of Picture Styles: for colour photography, you have the choice of Standard, Portrait, Landscape, Neutral and Faithful, while a further Monochrome option offers four filter and four toning effects. Contrast, Saturation and Colour Tone can be adjusted in a new wider range of +/-4, while Sharpness is offered from 0 to 7. While it’s possible to tweak these presets or configure your own with the three custom modes in-camera, software supplied with EOS 5D Mark II lets you create and edit precision Picture Styles to your absolute requirements – just like the EOS 50D, 40D and 450D / XSi before it.
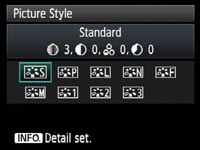 | 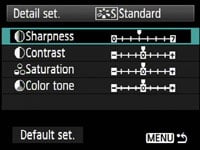 |
We used the default Standard Picture Style for all our sample images, and found it delivered a natural-looking balance which was neither overly punchy, nor too restrained. Like most of Canon’s recent DSLRs, the output is very smooth and can handle additional sharpening if you prefer crisper results.
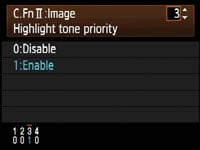 |
Leveraging the EOS 5D Mark II’s 14-bit A-D conversion is the Highlight Tone Priority (HTP) option, inherited from the EOS 50D, 40D and 450D / XSi, and buried away in one of the custom function menus; it’s disabled by default. According to Canon, this improves the highlight detail by expanding the dynamic range from the standard 18% grey to bright highlights. This option is only available between 200 and 6400 ISO and Canon warns noise could be increased in shadow areas. Like the 50D before it, ‘D+’ icons to indicate Highlight Tone Priority in the viewfinder and on both the upper and rear screens, so you should be in no doubt when it’s enabled.
 |
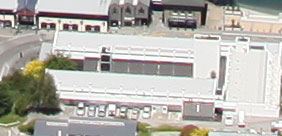
To put this to the test we shot our standard outdoor resolution composition using the EOS 5D Mark II and EF 24-105mm IS with and without Highlight Tone Priority enabled. Bright Sunlight reflected from white roofs in the town often blow highlights, so are a good test for Highlight Tone Priority.
Below you can see crops taken from the lower middle area with and without Highlight Tone Priority, and on a good quality monitor, you’ll see the version with the feature enabled has better retained highlight details which have become blown-out on the normal image. Checking the histograms reveals a slight compression to the tonal range which has then been shifted to the left to avoid saturation of the highlights. We didn’t notice any increase in noise in darker areas of this particular image, although it was taken under bright daylight.
Highlight Tone Priority will undoubtedly be a popular option for wedding photographers along with anyone shooting in bright wintery conditions, but we wouldn’t recommend it for all situations. As always, check the result with examples of your own to see if its having a benefit. Note: the effect is also applied to RAW files and non-removable if enabled, so use with caution.
|
Canon EOS 5D Mark II JPEG Highlight Tone Priority Disabled (default) | Canon EOS 5D Mark II JPEG Highlight Tone Priority Enabled | |
 |  | |
1/250, f8, 100 ISO | 1/500, f8, 200 ISO |
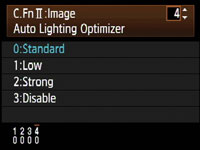 |
The EOS 5D Mark II additionally inherits the Auto Lighting Optimizer from the 50D, 450D / XSi and 40D (the latter only applying it in Auto and Scene presets). Auto Lighting Optimizer adjusts the brightness and contrast of images with dark areas (such as backlit portraits), and the implementation is the same as the 50D.
Like the 50D, the 5D Mark II offers the choice of four different Auto Lighting Optimizer settings: Standard, Low, Strong and Disable. The Standard setting is always applied when the 5D Mark II is set to Auto or CA, and is also applied by default in PASM modes, although you can adjust it in the custom menu to one of the other three settings.
Canon EOS 5D Mark II Auto Lighting Optimiser: Off / Strong | ||
 |  | |
 |  | |
Auto Lighting Optimiser Off: 100 ISO, f8, 0.5 sec | Auto Lighting Optimiser Strong: 100 ISO, f8, 0.6 sec | |
Above you can see two examples of the same composition taken with the Auto Lighting Optimizer disabled (above left) and with its Strong setting (above right). In this particular example which includes dark shadow areas and blown highlights, we can see very little evidence of the Auto Lighting Optimiser in action. The shadows remain dark and the bright window highlights remain saturated. Lest you think it’s the same image, we’ve included histograms of each which reveal minor differences in the range, but like the 50D before it, little difference overall in this particular composition; certainly nowhere near the dramatic changes seen with Sony’s Dynamic Range Optimizer on the same scene.
 |
Following our policy of using default settings when testing cameras, most of the sample images you’ll see in this review were taken with Highlight Tone Priority off and the Active Lighting Optimizer set to Standard. Since both can result in artificially higher noise levels though, we ensured both were disabled for our High ISO Noise and Noise Reduction Results pages.
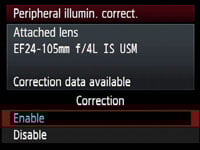
The EOS 5D Mark II inherits the Peripheral Illumination Correction first seen on the EOS 50D. This is optionally applied to JPEG images to reduce the effect of vignetting where the image darkens towards the corners. Like the 50D, data for up to 40 lenses can be loaded (or removed) via the supplied EOS Utility, and Canon’s pre-loaded a selection of popular models to get you started. If the lens model is recognised, the correction will be applied by default to JPEG images, although you can switch the option off if preferred. Canon describes the resulting effect as similar to that offered on RAW images in recent versions of its Digital Photo Professional (DPP) software, although DPP itself can offer additional optical corrections.
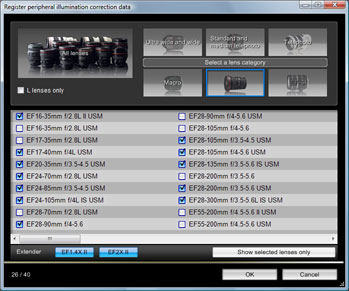 |
Any lens for which DPP offers corrections can be entered into the 5D Mark II’s internal database using the EOS Utility – see right. At the time of writing, the latest version of DPP offered correction data from a choice of 82 Canon lenses, although when connected to the 5D Mark II, the EOS Utility sensibly greys-out the EF-S section. DPP also offers data for each lens fitted with a 1.4x or 2x Extender, although these will count as additional entries in the Mark II’s 40-model database.
Since Peripheral Illumination Correction is enabled by default, you’ll see the effect of it on our JPEG sample images throughout this review taken with the EF 24-105mm IS. To test its effectiveness, we took examples with and without correction enabled using this lens zoomed-out to 24mm and with its aperture open to f4, at which point it normally suffers from quite noticeable vignetting. As a popular EF zoom, this lens was already loaded in the 5D Mark II’s internal database. The tests were taken of an evenly-lit white surface using a diffused filter and the lens focused to infinity.
|
Canon EOS 5D Mark II with EF 24-105mm IS Peripheral Illumination Correction: On (default) / Off | ||
 |  | |
EF 24-105mm at 24mm f4 Peripheral Illumination Correction Enabled | EF 24-105mm at 24mm f4 Peripheral Illumination Correction Disabled | |
As you can clearly see above, the 5D Mark II’s in-camera Peripheral Illumination Correction has greatly reduced the effect of vignetting on our sample, although there’s still some darkening in the extreme corners. It remains a big improvement over the version without though, but remember any digital brightening will result in potentially greater visible noise in the applied areas. Indeed Canon warns the effect will be reduced at higher sensitivities.
Canon EOS 5D Mark II drive modes and remote control
 |
|
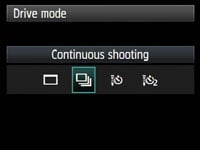
The Canon EOS 5D Mark II offers one continuous shooting mode which operates at 3.9fps – this is approximately one third faster than the 3fps on its predecessor, although slower than its rivals. Sony’s Alpha A900 and Nikon’s D700 both shoot at 5fps, which the latter can boost to 8fps with a battery grip.
Like the 50D, the 5D Mark II now supports quick UDMA Compact Flash cards which allow it to capture impressive bursts and clear its buffer quickly. Canon quotes up to 14 RAW images or an unlimited number of JPEGs in a continuous sequence. Support for even faster Class 6 UDMA cards in the future may see the RAW buffer size increase.
To put these figures to the test we fitted the EOS 5D Mark II with a formatted Lexar Professional UDMA 4GB 300x Compact Flash card and set the camera to Continuous. In Large Fine JPEG mode, the 5D Mark II certainly appeared happy to keep shooting while we held the shutter down. We got bored at 60 seconds after which the camera had fired-off 232 shots, corresponding to a rate of 3.86fps. Set to RAW mode, the 5D Mark II squeezed out 15 RAW frames before stalling, in four seconds, corresponding to a rate of 3.75fps. Writing to the UDMA card was very fast, with the buffer clearing the 15 RAW frames in just three seconds.
We retimed the continuous JPEG rate in 20-shot bursts at higher sensitivities and found the 5D Mark II maintained its speed throughout its ISO range, including 6400, 12800 and even 25600 ISO. While it’s still disappointing not to have 5fps on the 5D Mark II, the boost from 3 to 3.9fps actually makes a big difference in practice, and allows the new Canon to capture action sequences which were over too quickly for its predecessor.
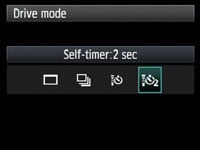 | 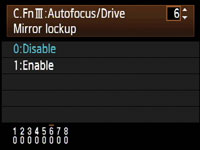 |
In terms of the self-timer, the EOS 5D Mark II gives you the choice of 10 or 2 second countdowns, although it doesn’t share the additional custom timer of the 450D / XSi which can take multiple shots as insurance. A mirror lockup option is available in the custom menu, which applies to either normal or self-timed shots. Unlike the Nikon D300, there’s no built-in Intervalometer, but in its favour, the 5D Mark II can achieve this and more when connected to a computer with supplied software.
In a feature which first made its debut on the EOS 40D, the EOS 5D Mark II can be connected to a PC or Mac with a USB cable and remote controlled using the supplied EOS Utility. Still images can be recorded to your computer’s hard disk, the internal memory card or both, and there’s Intervalometer facilities for programmed shoots. The EOS Utility also allows you to start recording a movie from its live preview screen, although sadly this isn’t stored on your computer’s hard disk – it’ll be written to the internal memory card only, regardless of your settings.
 |
The EOS Utility lets you remote control and adjust pretty much any setting that doesn’t involve a physical dial or switch. So you can’t change the exposure mode from, say, Aperture to Shutter Priority using the software, but you can adjust the aperture or shutter value, the image quality, white balance, metering or sensitivity for example. Impressively the software also lets you see the Live View on your computer monitor and even lets you manually focus the lens with a magnified view for assistance. We have a demonstration of this in our EOS 5D Mark II video tour.
Version 2.5 which comes supplied with the EOS 5D Mark II (and the 50D) also lets you switch the camera between autofocus and manual focus. If the former is selected, the camera will autofocus if you pass the mouse over the graphical shutter release ‘button’ on-screen – thereby acting as a virtual half-press. You’ll also see a Peripheral Illumination Correction section which lets you choose which 40 lenses from the entire Canon EF catalogue should populate the 5D Mark II’s internal database.
Software-based remote control is a wonderful feature to have and if you have a laptop handy, it could even eliminate the need for certain photographers to invest in a cable release. If you have the optional WFT-E4(A) wireless transmitter connected, you can also dispense with the short USB cable and either use a considerably longer CAT-5 Ethernet cable or exploit the wireless freedom of a Wifi connection – check out our Canon WFT-E3(A) review for a report on the essentially identical version for the EOS 40D / 50D along with a video demonstration.
Note: remote control with the EOS Utility is also supported on the EOS 50D, EOS 40D, EOS 450D / XSi and even the entry-level EOS 1000D / XS. So while Canon can be tight about not supplying lens hoods with its non-L models, it certainly doesn’t skimp on the bundled software. Similar remote control software – often without the Live View capabilities – is an optional extra from other manufacturers, and Canon also bundles decent RAW processing software with its Digital Photo Professional.
Now let’s move onto our second features page, dedicated to the EOS 5D Mark II’s movie mode.
Canon EOS 5D Mark II Movie Mode
NEW: Updated with firmware 1.1.0 manual control.
The EOS 5D Mark II becomes Canon’s first DSLR to offer movie recording facilities – and the second ever DSLR from any manufacturer to do so, after Nikon’s D90. Both models capture High Definition video in a progressive format, and can exploit their large sensors and a wide variety of lenses to deliver results which are hard or impossible to achieve with consumer camcorders. There are however significant differences in their quality and implementations.
Nikon’s D90 captures 720p video (1280×720 pixels) at 24fps, while Canon’s EOS 5D Mark II captures 1080p video (1920×1080 pixels) at 30fps; both also offer standard definition modes, the D90 offering 320×216 and 640×424 modes again at 24fps, and the 5D Mark II a 640×480 mode, at 30fps. Both cameras exploit their full sensor width when recording video, although the 5D Mark II has the advantage with its larger full-frame sensor to the D90’s cropped-frame DX format sensor.
 | 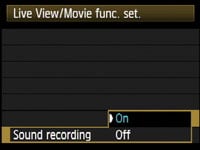 |
Both models feature built-in microphones for recording mono sound, but the EOS 5D Mark II additionally offers a stereo microphone input. Nikon encodes its movies using the ageing Motion JPEG format in an AVI wrapper at a bit rate of around 20Mbit/s for the HD mode, or around 2.5Mbyte/s.
Canon encodes its movies using the newer H.264 format (a variant of MPEG-4) with a Quicktime MOV wrapper at a bit rate of around 40Mbit/s for its HD mode, or around 5Mbyte/s. This rate is within the writing capabilities of most decent CF cards, but UDMA models are recommended for the best results.
The D90’s maximum file size for movies is 2GB, although additional restrictions limit the HD mode to clips of five minutes. The 5D Mark II’s maximum file size for movies is 4GB or 29 minutes and 59 seconds, whichever happens first. If you’re shooting HD, then file size will be the limiting factor, with a formatted 4GB card squeezing in just over 12 minutes worth of HD footage in our tests. Recording a 12 minute HD clip also consumed approximately 20% of a fully charged battery, giving you roughly an hour’s worth of recording from a full charge – so long as you also had 20GB worth of storage.
|  |  |
|


Both models capture video as an extension of their Live View modes, and use transparent masks on-screen to indicate the 16:9 frame where necessary. On the 5D Mark II, you’ll first need to enter the Live View Function settings page and choose Stills and Movie. After this you get to choose the screen settings, with the Movie Display option showing the transparent mask for HD recording, an indication of how much time is available, and following a half-press of the shutter, the exposure details that will be used for video – along with stills should you take any during the recording. Note these exposure settings will almost certainly be different to those if you were shooting in the Stills-only mode, as you can see in the screengrab above right – we’ll explain more in a moment. With the functions and screen options selected, simply press the Live View button to enter Live View, then press the large SET button on the rear to start and stop recording.
One of the major restrictions of the Nikon D90 (for non-pros anyway) was an inability to autofocus once you’d started recording a movie. The EOS 5D Mark II does offer contrast-based AF options while filming if Live Mode or Face Detect are selected in the Live View AF settings, but they’re essentially useless as they work no differently to when taking stills. As such you’ll need to hold down the AF-ON button and wait for a few seconds as the focus point leisurely shifts back and forth before locking-on – all while you’re recording. It’ll certainly refocus the lens, but unlike a camcorder it’s neither a quick nor continuous process. So while the 5D Mark II technically can autofocus while filming, most people will be setting it before recording or adjusting it manually like the D90.
 |
One of the great benefits of using a DSLR to capture video is the possibility of achieving a very small depth of field, thanks to their large sensors and lenses with bright focal ratios. When the 5D Mark II was first released though, this proved tricky because exposures in its movie mode were fully automatic, and annoyingly it also tended to select very small apertures such as f22 in bright daylight. In June 2009 though, Canon released firmware version 1.1.0 which equipped the Mark II with manual exposure control for video – and we re-tested it.
Updated Mark IIs now have the choice of shooting in fully automatic or fully manual exposure modes for video. To shoot in the new manual mode, you’ll need to turn the Command dial, naturally enough, to Manual, although you’ll also need to have the Screen Settings set to Movie display, as described above. If the Command dial is in any other position, or the Screen Setting not in Movie Display, the movie mode will become fully automatic. We’ll describe this original auto mode first.
In its fully automatic movie mode, the Mark II automatically sets the shutter, aperture and ISO sensitivity itself. There’s also no control over the metering or colour space, nor is there any noise reduction applied, but the movie mode does adopt the current White Balance and Picture Style, along with applying Peripheral Illumination Correction, Highlight Tone Priority and Auto Lighting Optimizer if enabled. In this Auto mode, the Mark II will however let you apply exposure compensation (which tends to adjust the ISO value), along with locking the exposure, both of which provide a certain degree of creative control.
 |
Since adjusting the aperture results in audible clicks and visible jumps in brightness, the 5D Mark II will avoid changing it in auto mode while filming unless it really has no other choice. For the minimum disruption it first adjusts the sensitivity (with the complete range of 100 to 6400 ISO at its disposal). It’ll then adjust the shutter speed, with Canon quoting a range between 1/30 and 1/125, although we found it sometimes reporting slightly slower or faster speeds. Then if all else fails, it’ll change the aperture, normally in big jumps, such as from f5.6 to f16.
You can see what values it’s chosen for the aperture, shutter and ISO by half-pressing the shutter release during Live View, so long as you’ve previously configured the Live View function to Stills and Movie, and the screen to Movie Display as mentioned above. You may however be surprised by the Mark II’s selections at times.
With a top shutter speed of just 1/125 (or thereabouts), the camera frequently chooses a very small aperture under bright conditions. Without intervention, we found the camera regularly filming video at f16 or even f22 on Sunny days (see menu grab above). This of course throws any initial thoughts of a small depth of field out the window. While the 2 Megapixel resolution of 1080p means diffraction is less of an issue at such small apertures, there are additional concerns over sensor dust becoming more visible – indeed the tiny hair seen in the anti-dust section of the previous page became an annoying fixture in the corner of most of our outdoor footage, when automatically shot at f22. If you download the clip we’ve provided at Vimeo (see later), you’ll see it in the top left corner.
 |
Take the Mark II indoors where you’d hope its fast lenses and large sensor would have a big advantage, and you’ll often find it increasing the sensitivity to as much as 3200 ISO rather than slowing the shutter or opening the aperture. So with your first filming attempts in auto mode, you’ll probably end up with a huge depth of field outdoors and disappointingly noisy results indoors. But as anyone who’s watched numerous professional clips taken with the 5D Mark II knows, there’s obviously some ways around it.
Prior to the June 2009 firmware update, video enthusiasts discovered a number of tricks to force the Mark II into using their desired aperture settings. The brute-force technique involved mounting an older lens with an actual physical aperture ring, with older Nikkor models proving particularly popular with the aid of an adapter. Now this is no longer necessary, as firmware 1.1.0 supports direct manual control over the aperture, shutter speed and ISO sensitivity.
In practice, this is very simple to operate. First set the Command dial to Manual (M), and secondly, ensure the Live View Screen Settings are set to Movie Display. That’s all there is to it: you can now simply turn the finger dial to set the shutter speed or the thumb wheel to adjust the aperture. Shutter speeds between 1/30 and 1/4000 are available, along with any aperture setting offered by the lens. Pressing the ISO button presents a menu of sensitivities between 100 and 6400 ISO, or you can go for Auto and have the camera adjust them itself.
Below we have four videos filmed with the 5D Mark II’s manual movie mode, all using the Canon EF 50mm f1.2L lens with its aperture wide-open at f1.2 for the minimum depth-of-field. The shutter speed was set to the minimum 1/30 setting and the ISO adjusted for the ambient light. The first three clips were taken in a dim bar with the sensitivity at 400 ISO, while the final clip (under 50Hz fluorescent lighting, hence the flicker) was taken in a newsagents at 100 ISO. The exposures were not adjusted while filming, and all were handheld, so we apologise for any wobbling in advance. In three out of the four clips, the focusing was manually adjusted to demonstrate the ability to selectively focus from one subject to another – something that’s now easy to achieve with the 5D Mark II and the right lens. You can see a version in higher resolution at Vimeo, where Vimeo members can also download the original edited 1080p file (exported from Adobe Premiere Pro CS4 in H.264).
With the ISO set to a fixed value, it’s important to realise you are now in fully manual mode, and the camera won’t do anything to compensate for an over or under-exposure – you are in complete control. It is however relatively easy to judge exposures on-screen, so long as you’ve switched-off the auto screen brightness option. Generously, the Mark II will also let you manually adjust the aperture, shutter or ISO while you’re filming if desired, again by turning the required dial; in the case of ISO, just press the ISO button and again turn the finger dial. As with the automatic mode though, adjusting the aperture will result in audible clicks, so you’ll want to adjust the shutter or ISO first. And while the fastest shutter speed of 1/4000 should allow you to select large apertures under bright conditions, you may still want to invest in some neutral density filters for greater flexibility.
This firmware update has transformed the EOS 5D Mark II into the highly creative and controllable video camera everyone wanted from the start, and takes it beyond the level of manual control offered by any other DSLR with video capabilities to date. Note Panasonic’s Lumix GH1 also offers full manual control over exposure in its movie mode, but technically speaking, it’s not a DSLR.
So controls aside, is the quality any good? In a word, very. Without intervention, the 5D Mark II is capable of capturing clips containing an enormous amount of detail to rival the best HD camcorders. The results are pretty clean at relatively high sensitivities, although 3200 ISO can look noisy and is frequently selected by the Mark II under dim conditions when set to auto – it’s certainly revealing much of the gorgeous Vincent Laforet night footage appears to have been shot at a maximum of 1600 ISO (judging from the exposure data of stills taken at the same time). But with the manual mode described above, you can now reign the camera back under control and enjoy very clean results.
Perhaps unsurprisingly for a camera with a CMOS sensor and rolling shutter, the 5D Mark II can suffer from the ‘jello’ effect which also plagues the Nikon D90 at times. Like the D90, this tends to crop up on jerky handheld shots and quick pans, although the Canon seemed to suffer less than the Nikon when we were testing them.
Now for another example clip, this time in the fully automatic mode. We’ve all seen what the 5D Mark II is capable of in the hands of professional film-makers with specialist lenses, but while the results are spectacular, for most of us it’s a little like buying the same camera as Ansel Adams and expecting to achieve the same landscape shots.
The reality is of course quite different, especially if you try and use the Mark II like a normal camcorder – that is to say, handheld with pans, zooms and auto exposures. In the clip here you’ll see several artefacts, some due to the rolling shutter on handheld footage, others due to panning with IS enabled, and some thanks to the zoom not being operated particularly smoothly (both at the beginning and end of the clip). The audio was recorded using the built-in microphone. You can see a version in higher resolution at Vimeo, where Vimeo members can also download the original 1080p MOV file.
|
Once again, the filming technique may be sloppy, but is fairly typical for many camcorder owners and illustrates how a dedicated camcorder remains the best choice for this kind of casual shooting – although even here it’s great to enjoy 24mm coverage when most camcorders don’t come close. To really see the Mark II’s movie mode shine though, you’ll need to abandon casual filming technique and start working like a pro. Note the video above has of course been scaled down and recompressed by Vimeo for viewing online.
Now the 5D Mark II has manual exposure control, most of the downsides to its movie mode are physical. DSLRs and their lenses were never designed for video, and they’re not the most comfortable devices to hold out in front of you for extended periods of time. It’s also hard to manually adjust focus and zoom rings smoothly while filming, and the built-in microphone will also hear the process, along with picking up the sound of stabilising optics if enabled. To be fair though, the 5D Mark II generously offers a stereo microphone input (albeit with auto levels only) which allows you to avoid the mechanical sounds, while third parties offer a variety of grips and mounts for comfortable shooting – and focusing.
 |  |
It’s also important to discuss the files. H.264 is a complex compressor, and at the high bit rates employed by the Mark II, presents a significant challenge to play and edit. Indeed you’re lulled into a false sense of security when playing clips using the camera itself, whether viewed on its screen or connected to a TV, because it’s a smooth and effortless process for the DIGIC 4 processor. They also look fantastic with the camera connected to an HDTV using an optional HDMI cable.
Copy the movie files onto your computer though and you could be in for a shock. Unless you already have the processing power and graphics acceleration to smoothly decode tough Blu Ray movies, chances are you’ll be faced with choppy playback. Editing becomes even harder, and unless you’re willing to transcode into an intermediary format, you’ll again almost certainly have a choppy experience.
Ultimately though, once you’ve mastered its foibles, the 5D Mark II’s movie mode is a revelation. Images packed with detail, selective focusing with very small depths of field, and low noise in dim conditions, not to mention the entire EF lens catalogue at your disposal plus others with adapters, make it an ideal tool for keen videographers.
Don’t get us wrong, it’s no replacement for a camcorder, and you should eliminate any ideas of using it exclusively for filming family events and holidays straightaway. The ergonomics, controls and focusing make it unsuitable for starters, while the typical handheld usage of many video amateurs will only accentuate the undesirable ‘jello’ effect and other artefacts as seen in the clip above. But it is perfect for capturing clips or sequences which a consumer camcorder would otherwise find difficult or impossible. These could then be inserted into a project to spice it up.
It’s independent film makers who’ll really love the 5D Mark II’s movie mode though. They’ll already be used to manually pulling focus and familiar with the accessories and techniques required to get the best from the camera and avoid the artefacts. They’ll take one look at the Mark II and exclaim “1080p on a 36x24mm frame with decent interchangeable lenses for only $2699?!” It’s a sheer bargain in professional film making terms and many units will be sold with little or no intention to ever shoot stills.


