Canon EOS 550D / Rebel T2i
-
-
Written by Gordon Laing
Canon EOS 550D / T2i Movie Mode
Click here to find out about the EOS 550D / T2i’s Lens, AF, sensor and drive modes
The EOS 550D / Rebel T2i becomes Canon’s latest DSLR to offer HD video recording, and after the slightly hobbled capabilities of the earlier 500D / T1i, the company has gone all-out to impress with the new model.
Indeed the EOS 550D / T2i features nothing less than the same video capabilities of the high-end EOS 7D. So it’s out with the disappointing 20fps 1080p mode of its predecessor and in with 1080p in the choice of 24, 25 or 30fps, along with 720p and standard definition options, manual exposure control, an external microphone input, and a brand new feature you won’t even find on the EOS 7D.
Considering the video capabilities of the EOS 7D were already impressive for a semi-pro model, it’s wonderful to find them in a body costing half the price. Canon’s clearly identified video as a key selling point for DSLRs, and doesn’t want to compromise even an upper entry-level model.
 |  |
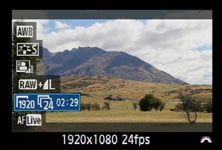
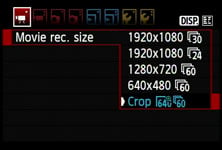
So like EOS 7D before it, the 550D / T2i allows you to film at either 1920×1080, 1280×720 or 640×480 pixels. The Full HD 1920×1080 mode can be set to record at either 30fps (29.97 actual) or 24fps when the Video System is set to NTSC, and 25 or 24fps when set to PAL. The 1280×720 and 640×480 modes record at a higher frame rate of either 60fps (59.94 actual) when set to NTSC or 50fps when set to PAL. The screen-grabs here show the quality page when the video system is set to NTSC or PAL.
The inclusion of a 24fps option at 1920×1080 pixels will delight independent film makers who were frustrated with the fixed 30fps speed of earlier models. Anyone wanting to integrate footage into PAL projects will also be pleased to find a 25fps option which matches their video standards. And remember while a firmware update allows the top-end EOS 5D Mark II to shoot 1080p at 24 and 25fps along with the original 30fps setting, there’s still no 720p options.
Here’s a sample clip filmed with the EOS 550D / T2i under bright conditions in its Auto mode at 1080 / 30fps. We used the EF-S 18-105mm IS lens with IS disabled and the camera mounted on a tripod.
Immediately following this clip we filmed the same sequence using the 25 and 24fps modes, along with the 720 options at both 60 and 50 fps for comparison.
Registered members of Vimeo can download the original files for evaluation. Click each link to download 1080p at 30fps / 1080p at 25fps / 1080p at 24fps / 720p at 60fps / 720p at 50fps.
Note if you’re downloading the files from Vimeo using Internet Explorer 8, you may find the file extension is MP4 rather than the original MOV. Don’t worry, the file is otherwise identical, and you can rename the extension to MOV if necessary. As with other Canon cameras employing the same encoding system, the playback may be jerky under QuickTime for Windows; we recommend playing the files under Windows using VLC Player, but even then you’ll also need relatively quick hardware for smooth results.
|
Like the EOS 5D Mark II and EOS 7D, there’s a built-in mono microphone and, impressively for a camera of its class, a 3.5mm stereo mini jack to connect an external microphone. The use of an external microphone, like the Rode stereo model, can transform the audio quality and is highly recommended over the internal microphone. As before, video is encoded using H.264 with uncompressed PCM audio, stored in a QuickTime MOV wrapper – and as before, while the mild video compression ensures great quality, the encoding format remains a challenge to edit (or even play) smoothly on many computers. You’ll also need a Class 6 (or higher) SD card to support the maximum recording times, such as any of the SanDisk Ultra III or Extreme models.
The maximum time per file remains 29 minutes and 59 seconds or 4GB, whichever happens first. You’re looking at about 330MB per minute in any of the HD movie modes, with the 720 option consuming the same as the 1080 due to its higher frame rates. So that 4GB file limit will actually be reached after approximately 12 minutes, regardless of the HD quality setting.
This is a bitter-sweet result as on the one hand it’s nice to have a 720 file at 60 / 50fps for capturing fast action or grabbing still frames from the footage, but on the other hand anyone who’s struggled to edit hefty 1080p files would have welcomed a lighter 720 option. So it seems churlish to complain after Canon’s gone from two to five different HD modes between the 500D / T1i and the 550D / T2i, but it’d be wonderful if we could also either have a 720 mode at 30 / 25 / 24fps or some higher compression options for more manageable output.
At this point it’s worth comparing the facilities of the Nikon D5000 and D90. They only offer a single HD movie mode at 1280×720 pixels and 24fps, with audio captured by a built-in microphone only – you’d need the D300s for an external microphone input. Nikon’s video files are encoded using the Motion JPEG format and stored in an AVI wrapper. The maximum file size is 2GB, although additional restrictions limit the HD mode to five minutes. So the Canon EOS 550D / T2i not only offers higher resolution 1080p video, but the choice of frame rates, longer maximum recording times per file and an external microphone input. The only thing in the Nikon’s favour at this point is the Motion JPEG format, which may seem old fashioned compared to the H.264 of Canon, but it’s considerably easier to work with on your computer.
Moving back to the EOS 550D / T2i, Canon may have adopted the higher-end 7D’s video modes, but the movie mode itself is activated in a similar way to the 500D / T1i. So rather than flicking the 7D’s dedicated Live View / Movie switch, you’ll need to turn the 550D / T2i’s mode dial to the movie camera icon. Doing so flips open the mirror and shutter to deliver a live feed to the screen, after which you simply press the dedicated Live View button (with a red dot next to it) to start and stop recording.
 |
 |
 |
With the movie mode running, you’ll see the image framed with transparent borders at the top and bottom for the 16:9 HD modes or at the sides for the 4:3 SD modes. The borders when shooting in HD are thinner than on previous models thanks to the wider 3:2 aspect ratio of the screen, although this also explains the vertical bars for narrower 4:3 footage. The entire 3:2 frame is visible behind the borders to reveal what would be captured if you pressed the shutter release button all the way down to take a photo. Yes, taking still photos is possible while filming – and at the full 18 megapixel resolution if desired – but doing so will interrupt your video for about one second.
 |
 |
 |
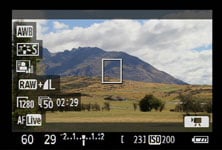
Pressing the Display button cycles between a clean view, one with basic shooting details superimposed along the bottom of the frame, and a third which overlays six further settings running down the left side. Like normal Live View, you can directly adjust any of these settings by first pressing the Q button, before using the cross keys to highlight the desired setting then turning the finger wheel to change it. Here you have the ability to adjust the White Balance, Picture Style, Auto Lighting Optimizer, still photo quality, video quality and the AF mode.
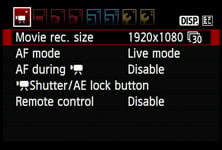 |  |
The same options and more besides are available by pressing the Menu button. This presents two new menu pages dedicated to movie options which aren’t visible with the camera set to any other mode. So while it can be initially confusing not to find any movie options when casually browsing the menus in other modes, it does at least avoid potential conflicts.
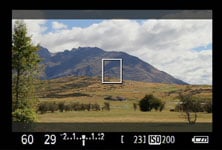
The second movie menu page is where you’ll find the option to display one of two alignment grids, along with switching the exposure mode from Auto to full Manual. In Auto, the movie mode will automatically adjust the aperture, shutter and sensitivity, and like previous Canon DSLRs, it has a preference for selecting unusually small apertures and high ISOs even under bright light, perhaps in an attempt to maximise the depth-of-field – see screen grabs above, where in Auto, the camera’s selected 1/60 at f29. Thankfully the relatively small frame sizes of video even in HD (1080p actually only being roughly 2 Megapixels) means diffraction rarely becomes an issue at these small apertures, but any chance of a shallow depth-of-field is out of the window, and you also run the risk of dust marks becoming more visible.
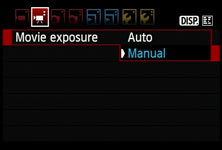 | 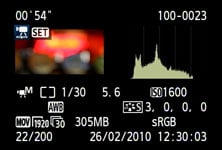 |
Thankfully the Manual exposure option allows you to take control and deliberately select large apertures to minimise the depth-of-field, or lower ISOs to maximise the quality. Just like Manual for still photos, the shutter speed is directly adjusted with the finger dial, while the aperture is set by first pressing and holding the exposure compensation button like a shift key. Shutter speeds from 1/4000 to 1/60 (in all the VGA and 720 modes) or 1/30 (in all the 1080 modes) are available, as are sensitivities from 100-6400 ISO, while any aperture offered by the lens can be selected. The exposure values are recorded and shown in playback for clips shot in Manual, but not Auto – you can see an example here for the clip below.
It’s wonderful to have manual control over exposures from day-one, as the automatic mode often chooses very small apertures and thereby eliminates any chance of enjoying a nice shallow depth-of-field – one of the major benefits of using a DSLR for video in the first place.
The clip opposite demonstrates the kind of effect that’s possible with the EOS 550D / T2i when fitted with the standard EF-S 18-135mm IS kit lens. We filmed it with the lens zoomed-in and near to its closest focusing distance with the aperture wide-open to maximise the shallow depth-of-field effect. We then simply turned the manual focusing ring to selectively focus between the foreground and background and back again.
If this effect appeals, you can achieve much greater blurring with lenses like the EF 50mm f1.4. As before, registered members of Vimeo can download the clip here.
 |
 |
Like the EOS 7D, the 550D / T2i offers auto-focusing while filming, but before you get too excited, it’s fairly useless. First of all, it doesn’t operate continuously like a camcorder (or the Panasonic GH1). Instead it only refocuses when you half-press the shutter release and worse, takes several seconds to do so using the contrast-based Live mode. So while you can refocus while filming, you’ll just end up recording the leisurely adjustment process. To be fair, it’s occasionally handy for ensuring the subject is in focus without manually adjusting the lens or exiting to make an automatic reading, but it’s a process you’ll definitely want to edit out later. You can disable autofocus while filming if desired.
You can also take a photo while filming by pressing the shutter release button all the way down, but while the camera continues filming afterwards, you effectively lose approximately one second’s worth of footage. Should you want to proceed anyway, the photo will be captured at the quality setting in the main menu, so you can enjoy the full 18 Megapixels if desired. Canon’s supplied software can also grab frames from movie footage.
So far, the 550D / T2i’s movie mode reads like the EOS 7D, but as mentioned at the start, it boasts a brand new feature you won’t find on the higher-end model: a Movie Crop mode. This shoots standard definition VGA video, but rather than take (or combine) pixels from the entire height of the sensor, only the central 640×480 pixels are used. Since these occupy a small cropped area in the middle of the frame, the captured view is effectively magnified over the normal shooting modes. In fact, the Movie Crop mode effectively multiplies the focal length by 7.2x, allowing you to get much closer to distant detail.
Since there’s no pixel-binning taking place, the image can become noisy under anything other than bright conditions, and unsurprisingly the focusing becomes absolutely critical. It’s like using the magnified focus assistance in Live View, but then actually recording what you see filling the screen rather than withdrawing to a normal magnification once confirmed. But for the right subjects, the result can be impressive.
Here’s a clip filmed with the EOS 550D / T2i in its standard definition movie mode with the EF-S 18-135mm IS kit lens fully zoomed-in and pointed at the Moon. As you’d expect from an effective focal length of just 216mm, the lunar image is tiny, but by switching the mode to the Movie Crop option, the central portion of the frame is magnified by 7.2x, giving an equivalent focal length of 1555mm.
Now the Moon fills over half the frame. If you had a 70-300mm, the effective focal length when zoomed-in would jump from 480mm to a whopping 3456mm, allowing you to better see crater and mountain detail. Of course this would require critical focusing, a steady tripod and ideal atmospheric conditions, but the possibilities are exciting.
The downside is the Movie crop mode is only available in standard definition VGA. Of course if it were offered in HD on a 720p or 1080p frame, the magnification would reduce to 4x or 2.7x thanks to the active area occupying a larger portion of the sensor – but it would still have been a really nice option. Coincidentally, Canon’s own PowerShot SX1 IS offers a similar facility in HD with a 2x mode at 1080p. So please Canon can we have a firmware update which allows Movie crop filming in HD?
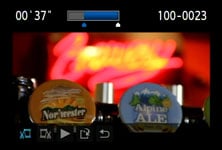
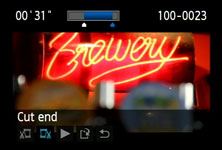
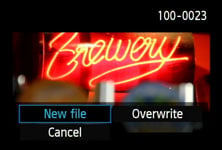
Finally, the EOS 550D / T2i completes its movie experience with another feature inherited from the EOS 7D: the ability to trim clips at either end during playback. The shorter file can then overwrite the original or be saved as a new movie. We used this process to trim the clip demonstrating a shallow depth-of-field above.
 |
 |
 |
|
As for the overall quality and handling of the movie mode, the experience and results are unsurprisingly similar to using the EOS 7D. As such, the EOS 550D / T2i is capable of delivering superb-looking results in both bright and low light. It’s easy to enter the movie mode and start filming, the choice of resolutions and frame rates allows you to integrate footage into almost any project, the manual exposure control gives you the creative freedom which typical camcorders can only dream of, and the external microphone input allows far superior audio quality.
As with all DSLR video modes though, there are caveats. First, the dreaded jello effect can still rear its head under certain conditions. Without optional mountings, the DSLR form factor also isn’t particularly comfortable to handle for filming, and it’s tricky to pull focus or adjust the zoom without twisting or wobbling the camera. Indeed without a motorised zoom and continuous AF, the 550D / T2i, like all video-equipped DSLRs to date, is no replacement for a consumer camcorder. And even if you do capture the perfect sequence, the hefty files can be tricky to edit on all but the fastest computers.
But as we’ve said before, cameras like the 550D / T2i are perfect for capturing clips or sequences which a consumer camcorder would otherwise find difficult or impossible. These could then be inserted into a project to spice it up, and the 550D / T2i’s choice of frame rates mean you’ll easily integrate it into PAL, NTSC or even 24fps feature-film footage.
Once again it’s the independent film makers or very serious amateurs who’ll really appreciate the 550D / T2i’s movie capabilities. They’ll already be used to manually pulling focus where necessary and working around the caveats to achieve great-looking footage.
Ultimately the EOS 5D Mark II’s bigger sensor may offer greater potential for shallow depth-of-field effects and low light performance, but by matching the 7D’s output at a sub-$1000 price point, Canon has seriously raised the bar for video on an entry-level DSLR. Video is an absolute highlight of the EOS 550D / T2i and it’s wonderful to have this degree of control in a camera this price – just remember to buy a Class 6 card or higher to enjoy the full experience. You can see some more examples of its footage in our HD video tour. Now let’s see how the still image quality compares in our Canon EOS 550D / T2i Real-life results.