Canon EOS 500D / Rebel T1i
-
-
Written by Gordon Laing
Canon EOS 500D / T1i focusing, sensor and drive
The Canon EOS 500D / T1i employs an EF lens mount and is fully compatible with both Canon EF and EF-S lenses. Thanks to its APS-C sensor size, all lenses effectively have their field of view reduced by 1.6 times.
 |
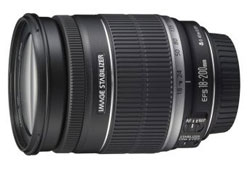
The EOS 500D / rebel T1i is available as a body alone or in a kit with a stabilised zoom lens. Most geographic regions will be offered the standard EF-S 18-55mm IS kit lens, which offers a basic 3x optical range that’s equivalent to 29-88mm; as the most common option, this is the lens we used for our tests. Alternatively, some regions may offer the 500D / T1i in a kit with the EF-S 18-200mm IS super-zoom, which boasts a much longer 11x optical range equivalent to 29-320mm.
The design and build quality of this lens are roughly the same as the EF-S 55-250mm IS, with a large zoom ring closest to the lens mount and a thinner manual focusing ring towards the end of the lens. The manual ring turns when auto-focusing, but since your grip is further back on the zoom ring, it’s not a problem. The filter thread is 72mm and the end section of the lens does not rotate while focusing, which is good news for users of polarisers.
 |
The lens doesn’t have USM or full-time manual focusing, but autofocus is reasonably quick, if quite audible. Like Nikkor’s DX 18-200mm VR, we noticed a little creep with the EF-S 18-200mm IS when it was pointed vertically up or down, although a small switch at the side will lock the barrel in its shortest position. Like all of Canon’s Non-L lenses, the lens hood continues to be an optional extra – please Canon, take notice of what your rivals are doing and don’t be so tight.
In our tests with this lens we found that while it won’t quite exploit the full resolution of a 15 Megapixel APS-C model, many people would be happy to accept that sacrifice in order to enjoy the flexibility of its enormous zoom range. Read our full report in our Canon EF-S 18-200mm IS lens review.
Canon EOS 500D / Rebel T1i focusing
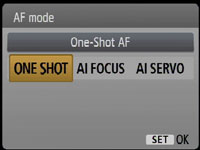
The Canon EOS 500D / T1i employs the same 9-point AF system as the EOS 450D / XSi with a centre cross sensor; these are arranged as a diamond pattern with red dots illuminating within the squares through the viewfinder to indicate which are active. The three AF modes remain the same as before though: One Shot for use with still subjects, AI Servo for moving subjects, or AI Focus which lets the camera decide between the two.
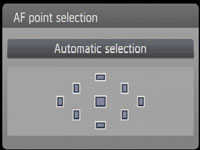 |  |
Press the focus area button and you can use the cross-keys to manually select a single focus point or use the finger dial to cycle through the options. Under dim conditions, the flash will popup and flicker to provide AF assistance, but if you find this alarming, you can disable it or only request AF assistance from an external flashgun in a custom menu. And while the 500D / T1i inherits a number of features from the higher-end 50D, AF Micro-adjustment isn’t one of them. So if you’re experiencing front or back focusing issues, you’ll need to return the offending item.
Fitted with the standard EF-S 18-55mm IS kit lens, focusing felt the same as its predecessor, with the camera locking-on during most situations in less than a second. We should however note we experienced a higher than average number of focusing failures with our particular test sample, where the camera appeared to lock-on without a problem, but the recorded image was soft.
The lens supplied in our kit appeared to be the culprit, as switching to different models improved the situation. We’ll keep a close eye on this particular issue though and update this section if there’s any new information or experiences to report – in the meantime, if you have a 500D / T1i, let us know how your AF performs in the Cameralabs forums.
Canon EOS 500D / Rebel T1i metering, exposures and bracketing
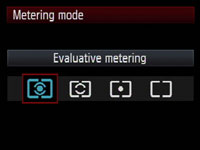 |
The Canon EOS 500D / T1i offers the same four metering modes as the 450D / XS1: 35-zone TTL Evaluative, Partial (9% of v/f area), Spot (4% of v/f area) and Center-weighted; the viewfinder also indicates the spot metering area with a circle. As before, we used Evaluative metering for all our sample images and found very few occasions when we’d want to apply any compensation.
 |
The EOS 500D offers shutter speeds from 1/4000 to 30 seconds plus a Bulb option; the fastest flash sync speed is 1/200. Like most non-pro bodies, there’s no figures quoted for the longevity of the shutter block.
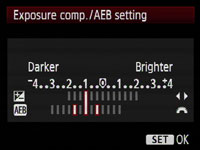
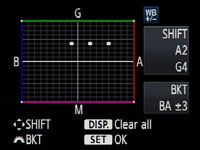
Exposure bracketing is available with three frames up to 2EV apart in 0.3EV increments, which puts it in line with most cameras at this price-point. White balance bracketing is also available on the 500D / T1i, again with three frames, and at +/-3 levels in one level increments.
Canon EOS 500D / Rebel T1i anti-dust
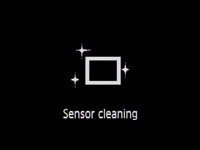
The EOS 500D / T1i offers the same three techniques as previous models to combat dust: anti-static coatings and materials to reduce it sticking in the first place, a vibrating filter which tries to shake-free the more stubborn particles, and a software-based solution which maps the position of any pesky marks and appends them to images for automatic removal later using the supplied Digital Photo Professional software.
There is however one difference between the anti-static coating on the 500D / T1i and that employed by the higher-end EOS 50D and 5D Mark II: the pricier models boast a Fluorine coating that’s absent on the 500D / T1i. Canon says the Fluorine coating offers a higher resistance to dust, and makes no claims over the capabilities of the (presumably cheaper) coating employed by the 500D / T1i.
 | 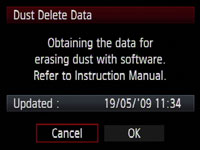 |
To put the 500D / T1i’s anti-dust systems to the test, we followed our usual DSLR torture-test of leaving the body face-up without a lens, inside and outside for ten minutes each; we can’t know how much dust entered the body during this time, nor even how much was present to start with, but we know such a process would result in dust being a problem for most models. We then updated the 500D / T1i’s Dust Delete Data and powered the camera on and off twice to vibrate the filter with the camera facing down. Note we also tested the Nikon D5000 and Olympus E-620’s anti-dust capabilities at exactly the same time, and while we again can’t know how much dust entered each, the consistent conditions allow a reasonable fair comparison – see our reviews of those models.
We then took a series of photos at every aperture setting of a plain white surface at close range with the EF-S 18-55mm IS lens zoomed-into 55mm and manually focused to infinity. Dust marks normally become most apparent at the smallest apertures (eg f16 and f22), but it’s also important to test at more common apertures.
|

Canon EOS 500D / T1i dust example at f22 / f8 | ||
 | ||
100% crop, 18-55mm at 55mm, f22 |
100% crop, 18-55mm at 55mm, f8 | |
With the 500D / T1i set to f22 we spotted two dust marks, towards the upper side of the image; we’ve cropped the worst of the pair and shown it above left at 100%. Applying Auto Levels to the whole image revealed a number of fainter marks, but these weren’t visible under normal conditions.
As the aperture was opened, the visible mark became larger, more diffused and trickier to see. We’ve pictured the exact same area above right from the sample taken at f8 where the mark has grown to around the full crop height and become virtually invisible.
The supplied Digital Photo Professional software identified that Dust Delete Data was present on the JPEG files, and with a single click virtually wiped out the worst offender above, although interestingly left the other mark intact. Upon close examination, the software had also left a faint ring behind when retouching the first mark. The effectiveness of this automatic process can of course vary with different marks, and on the earlier 50D, it very successfully cleaned-up the image.
Despite not sporting the Fluorine coating of the higher-end EOS 50D though, the dust marks seen here were actually less offensive – although again this is very much the luck of the draw. Like most DSLRs these days, the anti-dust features on the 500D / T1i seem reasonably effective, but are not a 100% solution. If you change lenses frequently, or are just unlucky, you will need to use a manual blower at some point.
Canon EOS 500D / Rebel T1i sensor and processing
The Canon EOS 500D / Rebel T1i features a jump from the 12.2 Megapixels of its predecessor to the same 15.1 Megapixels as the semi-pro EOS 50D. Canon describes the CMOS sensor as being almost the same as the 50D’s, and indeed beyond resolution it also shares the same sensitivity range and 14-bit processing. But there are a number of key differences, starting with half the data transfer rate, responsible for the 500D / T1’s slower continuous shooting rate and its 1080p video mode only operating at 20fps (see below). Additionally while the 50D’s sensor employed gapless micro-lenses, the 500D / T1i does not. The Fluorine anti-dust coating on the 50D’s sensor is also not present here.
The physical size and pixel count is the same though: the 500D / T1i’s sensor measures 22.3×14.9mm and generates 3:2 aspect ratio images with a maximum resolution of 4752×3168 pixels. This gives it around 500 more pixels horizontally and 300 more pixels vertically than the 450D / XSi, allowing 300dpi prints to be made at 15.8×10.5in to its predecessor’s 14.2×9.5in.
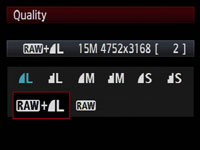 |
The 500D / T1i’s JPEGs can be recorded at two lower resolutions (8 and 3.7 Megapixels) and with the choice of Fine or Normal compression. RAW files are of course offered, at the maximum resolution and you can choose whether to record them individually or accompanied by a Large Fine JPEG. The multiple size and compression combinations of the 50D aren’t available here. Best quality Large Fine JPEGS typically measure around 5MB each, while RAW files weigh-in around 20MB each.
Like its predecessor, the EOS 500D / T1i employs 14-bit analogue to digital conversions, and this 14-bit tonal detail is also recorded in the RAW images. See our Results pages for examples comparing the camera’s JPEG and RAW output.
In a feature inherited from the EO 50D, copyright data can now be added to images, but you can’t edit this information in-camera; instead you’ll need to use the supplied EOS Utility.
As mentioned above, the EOS 500D / T1i shares the same total sensitivity range of the higher-end EOS 50D, which runs from 100 to 12,800 ISO. Interestingly unlike the 50D which labelled its 6400 and 12,800 ISO modes as H1 and H2 respectively, the 500D / T1i simply refers to 6400 ISO numerically, leaving a single H to describe the 12,800 ISO mode. Regardless of the labelling though, it represents a significant boost over the range of its predecessor which stopped at ‘just’ 1600 ISO. Note: if Highlight Tone Protection is enabled, the 500D / T1i’s sensitivity range is reduced to 200-3200 ISO.
 |
Like the 450D / XSi before it, the sensitivity sticks at 400 ISO when the ISO is set to Auto in Manual mode, so if you want lower sensitivities in Manual mode, ensure you also manually set the sensitivity; the 500D / T1i will at least tell you on its screens and in the viewfinder what ISO value it’s going to use when set to Auto though, so there shouldn’t be any nasty surprises.
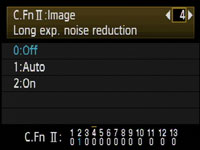 | 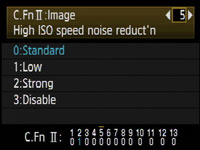 |
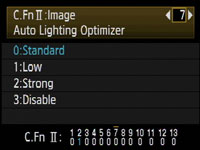
Like the EOS 450D, two noise reduction modes are available in the Custom Functions: Long Exposure Noise Reduction is applied to exposures longer than one second and can be set to Auto, On or Off, while High ISO Noise Reduction is now available in the choice of four settings, Standard (the default), Low, Strong or Disable. Note Strong NR will reduce the maximum burst during continuous shooting.
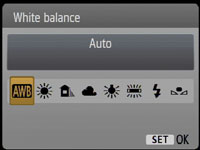 |  |
Pressing the White Balance button allows you to choose from Auto, Daylight, Shade, Cloudy, Tungsten, White Fluorescent, Flash and Custom; there’s no option to manually enter a colour temperature, although White Balance correction and bracketing are available.
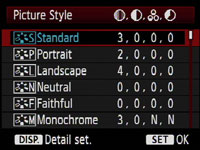
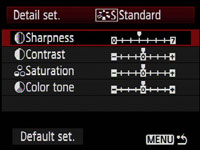
Sharpness, Contrast, Saturation and Colour Tone are applied using a number of Picture Styles: for colour photography, you have the choice of Standard, Portrait, Landscape, Neutral and Faithful, while a further Monochrome option offers four filter and four toning effects. Contrast, Saturation and Colour Tone can be adjusted in a new wider range of +/-4, while Sharpness is offered from 0 to 7. It’s possible to tweak these presets or configure your own with the three custom modes in-camera, or via the supplied software.
 |  |
We used the default Standard Picture Style for all our sample images, and found it delivered a natural-looking balance which was neither overly punchy, nor too restrained. Like most of Canon’s recent DSLRs, the output is very smooth and can handle additional sharpening if you prefer a crisper results.
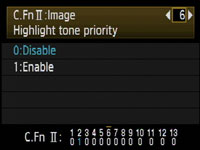 |
Leveraging the EOS 500D / T1i ’s 14-bit A-D conversion is the Highlight Tone Priority (HTP) option, inherited from the EOS 40D and 450D / XSi and buried away in one of the custom function menus; it’s disabled by default. According to Canon, this improves the highlight detail by expanding the dynamic range from the standard 18% grey to bright highlights.
This option is only available between 200 and 3200 ISO and Canon warns noise could be increased in shadow areas. Like the EOS 50D, ‘D+’ icons on the screen and in the viewfinder indicate when Highlight Tone Priority is enabled.
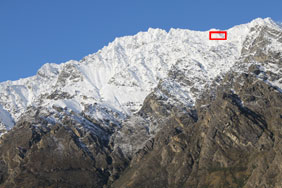 |
To put this to the test we photographed a recent snowfall on the mountain-tops using the EOS 500D / T1i and the EF-S 18-55mm IS with and without Highlight Tone Priority enabled. Under direct sunlight, this snow can often result in blown highlights and a loss of tonal detail.
Below you can see crops taken from the area marked by a red rectangle with and without Highlight Tone Priority, and on good quality monitors, the version with the feature enabled has recorded subtle highlight details which have become blown-out on the normal image. We didn’t notice any increase in noise in darker areas of this particular image, although it was taken under bright daylight. Highlight Tone Priority will be a popular option for wedding photographers along with anyone shooting in bright wintery conditions, but we wouldn’t recommend it for all situations. As always, check the result with examples of your own to see if its having a positive or detrimental effect.
|

Canon EOS 500D / T1i JPEG Highlight Tone Priority Disabled (default) |
Canon EOS 500D / T1i JPEG Highlight Tone Priority Enabled | |
 | ||
1/640, f8, 200 ISO |
1/640, f8, 200 ISO |
 |
The EOS 500D / T1i additionally inherits the Auto Lighting Optimizer from recent models, which adjusts the brightness and contrast of images with dark areas (such as backlit portraits), although the implementation has expanded over time.
On the 450D / XSi, there was only one Auto Lighting Optimizer mode and it was always applied in Auto or the Scene Presets. But the 450D / XSi also let you apply it in PASM or A-DEP modes, and enabled it by default; you could disable it in a custom menu if preferred.
On the 500D / T1i, there’s now four different Auto Lighting Optimizer settings: Standard, Low, Strong and Disable. The Standard setting is always applied when the 500D / T1i is set to Auto or its Scene presets, and is also applied by default in PASM or A-DEP modes, although you can adjust it in the custom menu to one of the other three settings.
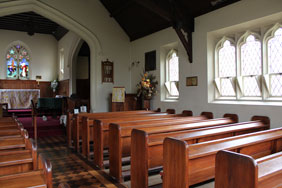
Canon EOS 500D / T1i Auto Lighting Optimiser: Off / Strong | ||
 |
 | |
 |  | |
Auto Lighting Optimiser Off: 100 ISO, f3.5, 1/4 sec |
Auto Lighting Optimiser Strong: 100 ISO, f3.5, 1/3 sec | |
Above you can see two examples of the same composition taken with the Auto Lighting Optimizer disabled (above left) and with its Strong setting (above right). In this example it’s clear how the darker areas have become been boosted by the Auto Lighting Optimizer, and upon close inspection the stained glass windows are also now less saturated. You can technically see what’s happening in the histograms below each image, especially in terms of the darker areas. Interestingly it’s a more effective result than we’ve measured with the Auto Lighting Optimizer on previous Canon models.
Following our policy of using default settings when testing cameras, most of the same images you’ll see in this review were taken with Highlight Tone Priority off and the Active Lighting Optimizer set to Standard. Since both can result in artificially higher noise levels though, we ensured both were disabled for our High ISO Results page.
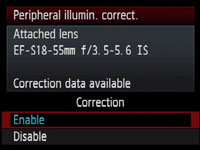 |
New to the EOS 500D / T1i over its predecessor is Peripheral Illumination Correction. Inherited from the higher-end 50D, this optionally reduces the effect of vignetting on JPEGs where the image darkens towards the corners. The EOS 500D / T1i contains correction details for 24 Canon lenses and allows you to enter a further 16 models using supplied software. If the lens model is recognised, the correction will be applied by default to JPEG images, although you can switch the option off if preferred. Canon describes the resulting effect as similar to that offered on RAW images in recent versions of its Digital Photo Professional (DPP) software, although DPP itself can offer additional corrections.
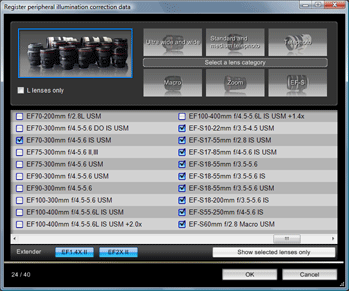 |
Any lens for which DPP offers corrections can be entered into the 500D / T1i’s internal database using the supplied EOS Utility – see left. At the time of writing, the latest version of DPP offered correction data from a choice of 82 Canon lenses including all EF-S models and the latest EF-S 18-200mm IS super-zoom. DPP also offers data for each lens fitted with a 1.4x or 2x Extender, although these will count as additional entries in the 500D / T1i ’s 40-model database.
Since Peripheral Illumination Correction is enabled by default, you’ll see the effect of it on our JPEG sample images throughout this review taken with the EF-S 18-55mm IS. To test its effectiveness in practice though, we have examples below taken with and without the feature enabled using the EF-S 18-55mm IS when zoomed-out to 18mm and with its aperture open to f3.5, at which point this lens normally suffers from noticeable vignetting. As the standard kit lens, this model was already loaded in the 500D / T1i’s internal database. The tests were taken of an evenly-lit white surface using a diffused filter and the lens focused to infinity.
|
Canon EOS 500D / T1i with EF-S 18-55mm IS Peripheral Illumination Correction: On (default) / Off | ||
 |  | |
EF-S 18-55mm at 18mm f3.5, 1/10 Peripheral Illumination Correction Enabled |
EF-S 18-55mm at 18mm f3.5, 1/10 Peripheral Illumination Correction Disabled | |
As you can clearly see above, the 500D / T1i’s in-camera Peripheral Illumination Correction has greatly reduced the effect of vignetting on our sample, but remember any digital brightening will result in potentially greater visible noise in the applied areas.
Canon EOS 500D / Rebel T1i drive modes and remote control
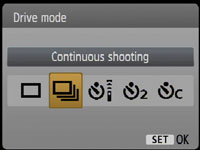 |
The Canon EOS 500D / Rebel T1i offers one continuous shooting mode rated at 3.4fps, just a fraction below the 3.5fps of the EOS 450D / XSi; both models are clearly much slower than the 6.3fps on the higher-end EOS 50D which manages to achieve this speed partly thanks to faster data readout from it sensor.
Fit the 500D / T1i with a fast memory card though (Class 6 models are supported) it should capture more images than its predecessor in a continuous sequence whether in JPEG or RAW; Canon quotes up to nine RAW frames in a single burst.
To put these figures to the test we fitted the EOS 500D / T1i with a formatted Lexar Platinum II 60x 4GB SDHC card (albeit ‘only’ Class 4 in speed). In Large Fine JPEG mode, the 500D / T1i fired-off 50 frames in 15.7 seconds and showed no signs of slowing; this corresponds to a speed of 3.2fps.
With the camera set to RAW, we fired-off the quoted nine frames in 2.5 seconds, corresponding to a speed of 3.5fps. So in practice, the JPEG rate fell slightly below the quoted speed and the RAW rate slightly above. The overall speed is roughly the same as the Olympus E-620, although Nikon’s D5000 beats them both, by delivering 4fps both on paper and in practice.
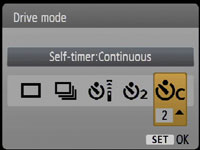 | 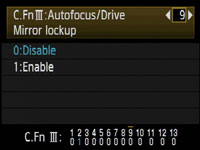 |
In terms of the self-timer, the EOS 500D / T1i gives you the choice of a two second countdown, a continuous option which fires between one and ten shots after 10 seconds, and a mode desgined to work with the optional IR remote control. A mirror lockup option is also available in the custom menu, which applies to either normal or self-timed shots. Unlike the Nikon D5000, there’s no built-in Intervalometer, but in its favour, the 500D / T1i can achieve this and more when connected to a computer with supplied software.
In a feature which first made its debut on the EOS 40D, the 500D / T1i can be connected to a PC or Mac with a USB cable and remote controlled using the supplied EOS Utility. Images can be recorded to your computer’s hard disk, the internal memory card or both, and there’s Intervalometer facilities for programmed shoots.
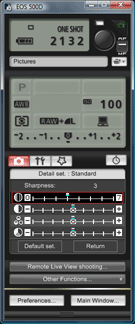 |
The EOS Utility lets you remote control and adjust pretty much any setting that doesn’t involve physically moving a dial or switch. So you can’t change the exposure mode from, say, Aperture to Shutter Priority using the software, but you can adjust the aperture or shutter value, the quality, white balance, metering or sensitivity for example. Impressively the software also lets you see the Live View on your computer monitor and even lets you manually focus the lens with a magnified view for assistance. We have a demonstration of this in our Canon EOS 500D / T1i video tour.
You can also ‘virtually’ switch between AF and manual focusing, and if the former is selected, the camera will autofocus as you pass the mouse over the graphical shutter release ‘button’ on-screen; it’s acting as a virtual half-press. You’ll also see a Peripheral Illumination Correction section which lets you choose which 40 lenses from the entire Canon EF catalogue should populate the 500D T1i’s internal database. New to version 2.6 which comes supplied with the EOS 500D / T1i is the option to directly edit Picture Styles – see screengrab.
Software-based remote control is a wonderful feature to have and if you have a laptop handy, it could even eliminate the need for certain photographers to invest in a cable release. In fact the only downside we could find was the inability for the USB port to power the camera itself, thereby making an AC adapter mandatory for serious unattended time-lapse photography.
Note: remote control with the EOS Utility is now supported across the entire EOS range including the entry-level EOS 1000D / XS. So while Canon can be mean about not supplying lens hoods with its non-L models, it certainly doesn’t skimp on the bundled software. Similar remote control software – often without the Live View capabilities – is an optional extra from other manufacturers, and remember, Canon also bundles decent RAW processing software with its Digital Photo Professional.
New to the EOS 500D / Rebel T1i over its predecessor is a movie mode, and we’ve dedictaed an entire page to it: see our Canon EOS 500D / Rebel T1i movie mode section.


