Epson R-D1 retro review
-
-
Written by Gordon Laing
Welcome back vintage camera lovers to a very special episode about the legendary Epson R-D1, one of the most original and innovative digital cameras ever made, but one that’s little-known today outside dedicated groups. Launched in 2004 at a price of around $3000, the R-D1 featured a 6 Megapixel, APS-C sized CCD sensor, a mount for Leica M lenses and a true optical rangefinder for composition and focusing.
This made it the World’s first digital rangefinder camera, beating Leica by two years, and providing an earlier solution for M-mount lens owners who wanted to go digital. And while Fujifilm would later adopt a rangefinder style for their X-Pro series, they didn’t arrive until eight years after the R-D1, and even then lacked true rangefinder focusing. In fact it’s rarely mentioned, but the R-D1 also effectively became the first mirrorless digital camera with interchangeable lenses, beating the Panasonic Lumix G1 by four years, albeit without the live view composition commonly associated with mirrorless today.
The R-D1 was also one of the best-looking cameras ever designed, cunningly disguising its digital elements to give the appearance and control of a fully-analogue film model, and becoming one of only a handful of cameras to employ analogue watch-style gauges.
22 years later, the R-D1 has justifiably earned legendary status which, coupled with the low number of units made, commands high prices on the used market, typically around $2000, pounds or Euros at the time I made this review. Unable to bag one for my own collection, an Epson employee was kind enough to lend me theirs, so many thanks to them! Their model had been updated to firmware v2, which as you’ll discover, essentially makes it an R-D1s inside. So let’s find out the story behind the R-D1, what made it special, and why it ended up being Epson’s last camera series. Everything is in the video below, but for the written highlights, keep scrolling!
If you’re new to the R-D1, the first question you probably have is why Epson? After all, they’re best-known as a printer company, and while their PhotoPC cameras were popular budget models in the late Nineties, the high-end R-D1 was a World apart from these early digicams.
It begins to make sense when you discover the R-D1 was a collaboration between Epson and Cosina Voigtlander. Around 2002, Epson wanted to be taken more seriously as a photography company, so partnered with Cosina who had licensed the Voigtlander name a few years earlier. Their goal was to make a digital camera that retained the look and feel of an analogue mechanical model.
Code-named Yudanaka, the camera would be based on the Cosina Voigtlander BESSA R2 rangefinder, seen here in the updated R2 A version. This particular model belongs to Jaron Schneider, the Editor of Petapixel, who was kind enough to film some b-roll – thanks Jaron, and hello to anyone watching from Petapixel!
Meanwhile Epson would provide the electronics, cleverly adapting or maintaining some of the analogue controls for digital functionality, while their own parent company Seiko would use their expertise in watches to make the unique chronograph display.
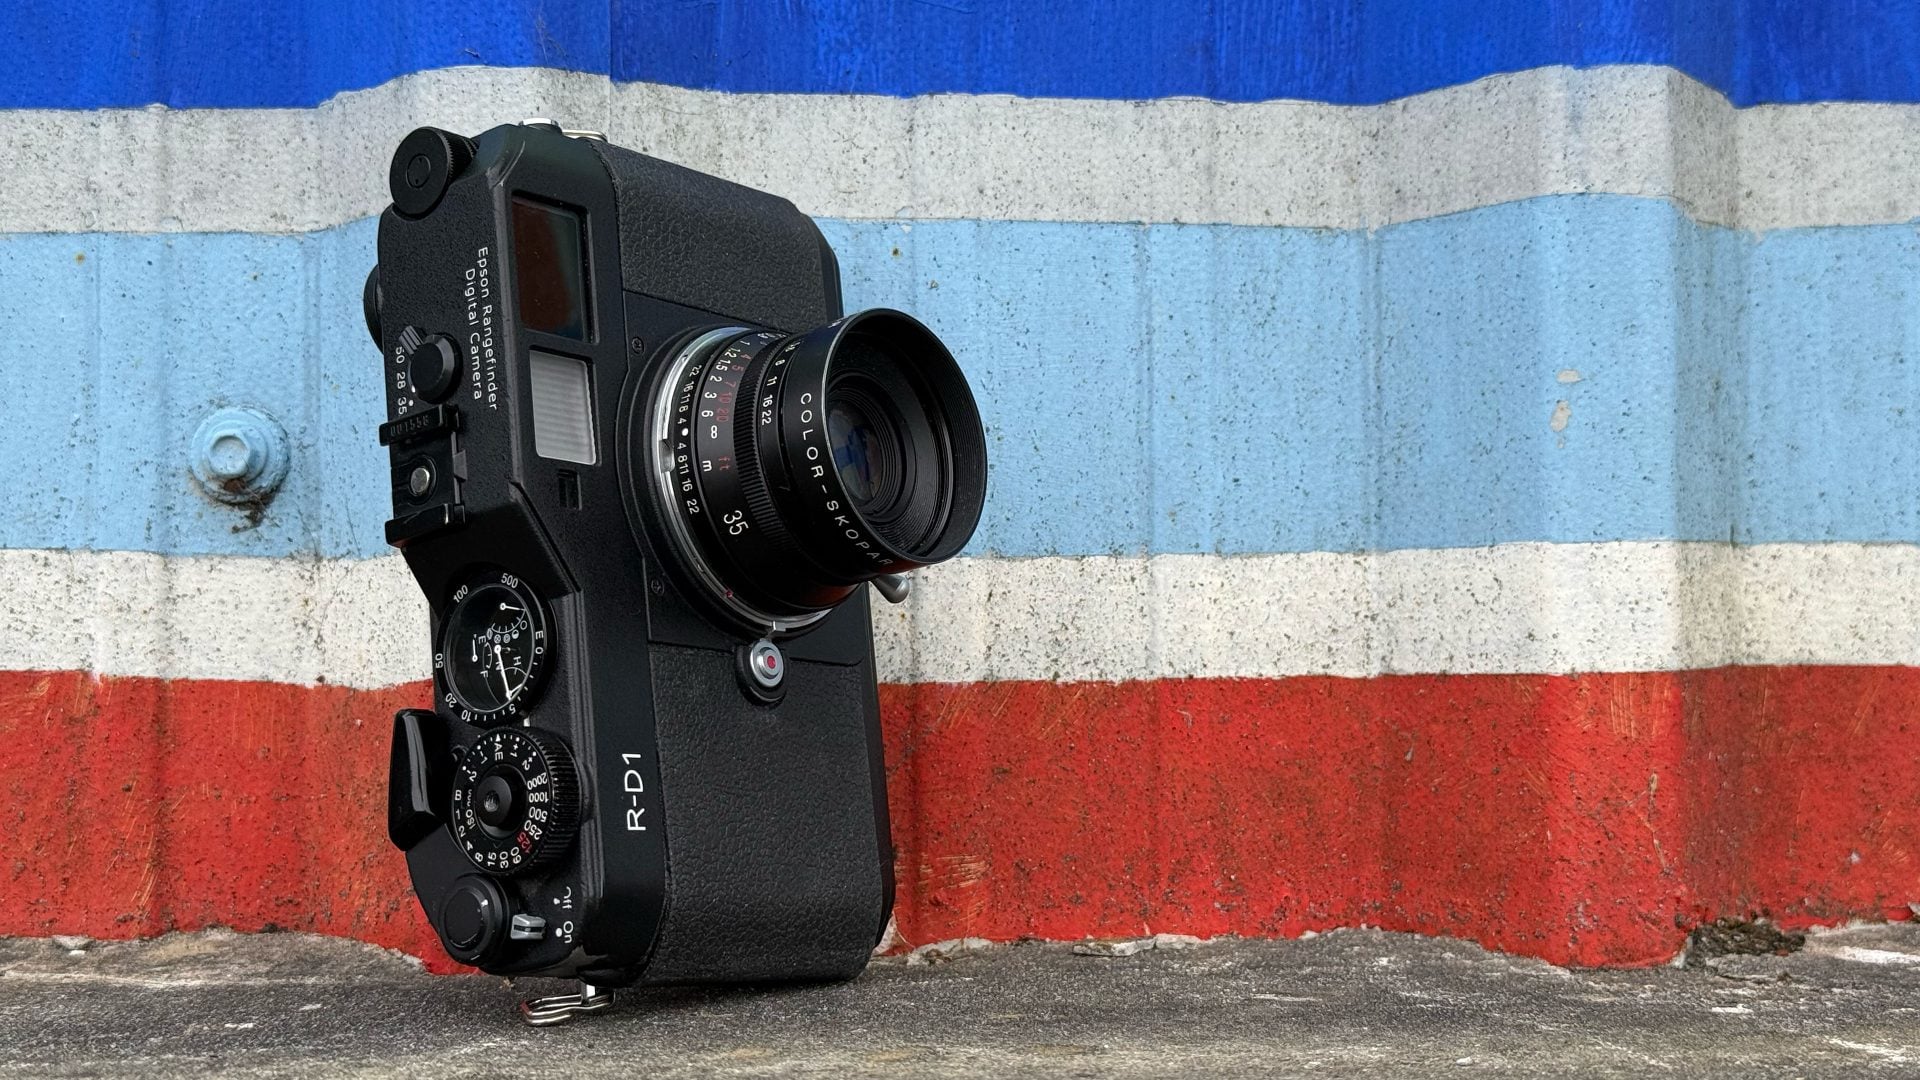
Ok, let’s take a tour around the body and controls. From the front, you can clearly see the similarities between the R-D1 and the BESSA R2. Both share clean, uncomplicated front surfaces, with the only label being the model name in the upper left corner. There’s no pronounced grip on the front to wrap your fingers around, but the rubberised panels provide secure purchase, especially when your thumb is pushed against the ridge on the rear. The body feels really solid and well-built in your hands with just the right amount of heft.
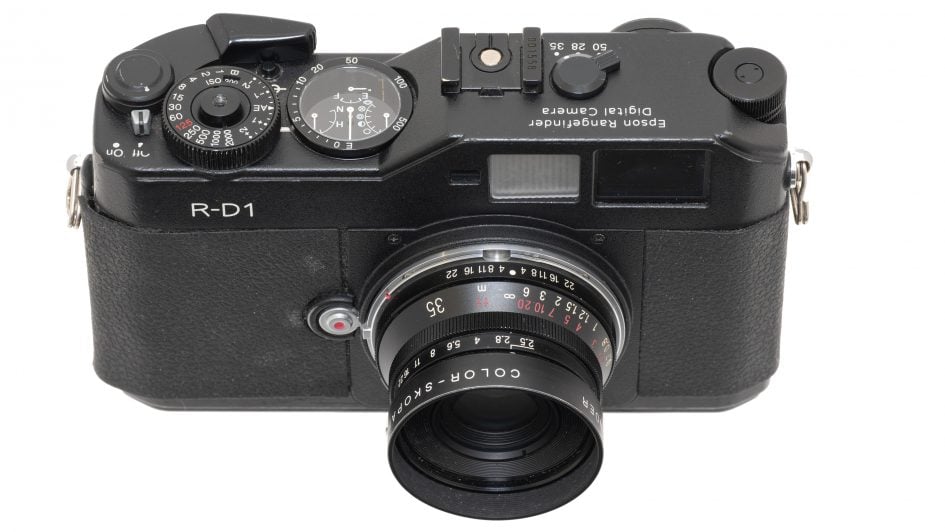
The only control on the front surface is the lens release button. The R-D1 has an M-mount that’s compatible with a huge array of manual focus lenses from Leica, Voigtlander and many others, with the only restriction being those with rear elements that protrude more than 20.5mm into the camera, as they’ll interfere with the shutter curtain.
Behind the curtain lies a 6 Megapixel APS-C sized CCD sensor, based on the same one Nikon employed in the D100 DSLR the year earlier, but I believe tweaked for the R-D1. Obviously Leica M lenses were designed for larger 35mm film, but digital full-frame sensors were rare and prohibitively expensive at the time, so a smaller APS-C sensor was used on the R-D1, with its crop factor reducing the field of view of all lenses by 1.5 times.
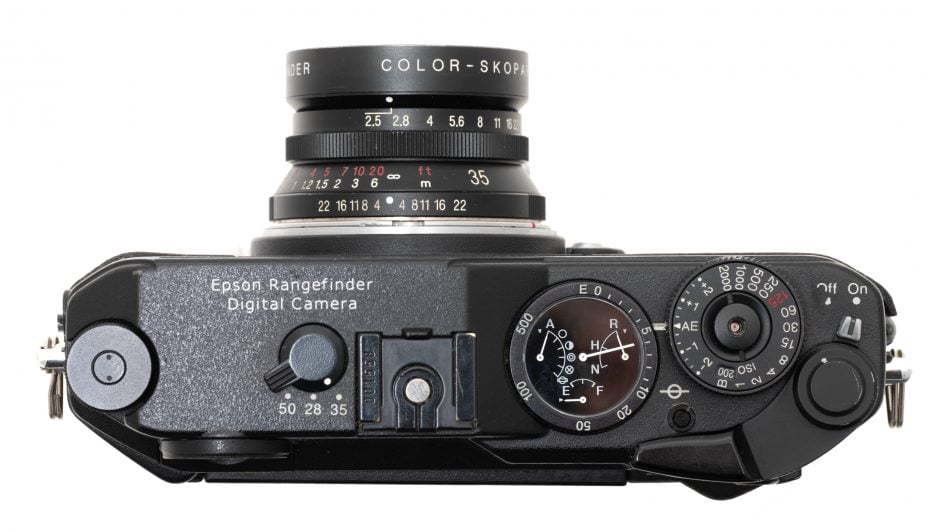
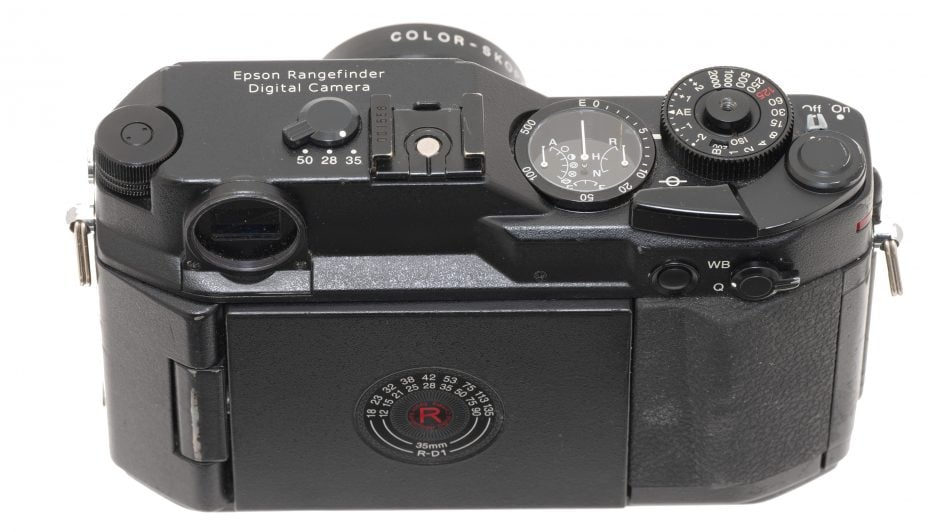
Moving onto the top panel, there are again many similarities between the R-D1 and Bessa R2, although do note their respective branding. Starting from the left, you’ll notice the old film-rewind mechanism has been cleverly repurposed into a satisfyingly clicky jog-dial to adjust settings. It can also be pushed-up to unlock alternative functions and as I’ll show you in a moment, this single dial works surprisingly well for navigating the camera’s options.
To its right is the frame selector lever inherited from the BESSA R2 with a little modification. Like the R2, there’s three positions corresponding to different lens focal lengths which adjust framing guidelines in the viewfinder to match the coverage.
The R-D1 labels the positions as 50, 28 and 35, and you should match these to the actual lenses you have fitted. The R-D1 then considerately takes care of the crop-factor, with the viewfinder frame guides showing the reduced equivalent coverage. So if you fit a 35mm lens, choose 35mm from the lever, but the R-D1 will present a frame in the viewfinder that’s actually equivalent to around 53mm. Meanwhile alongside the frame lever is a hotshoe with a single sync pin, or if you prefer there’s a sync port on the left side of the body.

Ok, the time has come to look at – nay – pore over the gorgeous upper right side of the R-D1, arguably the most unique set of controls and displays of any digital camera.
Power-up the camera using the small switch in the upper right corner and watch those gauge pins rotate into place like a sports car dashboard, but before getting to that, what business does a film-advance crank have on a digital camera? On film bodies, this lever would wind the film onto the next frame, but also recharge the shutter mechanism, and rather than motorise the latter process on the R-D1, Epson decided to keep it a mechanical operation.

So before you’re able to take a photo, you’ll need to wind this lever to charge the mechanism, and repeat it for subsequent shots. If you’ve used a mechanical film camera, this is of course a familiar and enjoyable visceral movement that says to your brain, I’ve taken a shot and I’m ready for the next one. I love that it’s retained here with a genuine purpose versus some modern cameras that include a crank for nostalgic aesthetics alone.
Sandwiched alongside the crank lever is the shutter dial, offering manually selected speeds between 1/2000 and one second, with a Bulb option for long exposures and a top flash sync of 1/125. The focal plane shutter makes a positive click sound, but it is quieter than typical SLRs and sufficiently discrete for street photography in all but the quietest locations.

Also notice how the dial can be turned to an AE position for semi-automatic aperture priority mode, where the aperture is set on the lens and the camera meters an automatic shutter speed. AE mode also has exposure compensation of +/-2EV. When set to AE, the dial locks to prevent accidental operation, with a small button to its lower left releasing it.
Meanwhile like many mechanical film cameras, the ISO value is selected by pulling up the outer edge of the shutter dial to turn an inner dial with the selected number shown here in a tiny window alongside the Bulb position.
There’s four settings: 200, 400, 800 and 1600 ISO, with no Auto ISO option. One of my only complaints about the R-D1 experience is the ISO number is so small, I couldn’t see it easily during general use, especially in low light. You could however learn the value based on feeling clicks and whether you were pushed-up against the 200 or 1600 end. As for the shutter button, it’s in the middle of the shutter dial and threaded for use with a mechanical cable release accessory.
And finally to that status gauge, a triumphant display from the watch expertise of Seiko, indicating four separate aspects of the camera. First the largest needle indicates the number of shots remaining, starting with an approximate figure when it’s safely in the hundreds, then becoming more accurate as you dip below 50, before finally counting down individual frames from ten to Empty.
The number of frames is of course influenced by the current quality setting, shown by the needle on the right. This indicates the R-D1’s three quality settings of N, H and R, corresponding to Normal, High and RAW.
To adjust the image quality, push and hold the lever on the upper right of the rear surface to the Q position, before using the jog dial to cycle between the three settings indicated with the gauge. Notice the shots remaining needle adjusting as you change the image quality.
N records JPEGs at a reduced size of 2240×1488 pixels, while H records JPEGs at the maximum resolution of 3008×2000 pixels; both use an unchangeable compression ratio of one quarter. Meanwhile R records a RAW file for processing later, while a menu on firmware-updated models could configure this to also record a JPEG file.
Opposite this on the left side is a needle indicating the current White Balance. Again to adjust it, push and hold the rear lever to WB while turning the jog dial. There’s A for Auto, and five manual settings for Sunny, Shade, Cloudy, Incandescent, and Fluorescent.
The final needle at the bottom of the display indicates the battery status from Empty to Full, like a fuel gauge on a car. And that’s a relevant analogy to make as many cars continue to use analogue needles to indicate things like speed, revs, fuel and temperature as they can be visually registered at a glance.
But displays like these remain a rarity on cameras. The closest example I’ve seen is from the Nikon 28Ti and 35Ti 35mm film compacts released roughly a decade before the R-D1. Both cameras are widely regarded as having a beautiful design, and yet barely any other camera features analogue gauges. An unexpected exception is the Samsung NV9 or TL9 released in 2008, but that’s the only other example I could find.
Turning to the rear shows a camera apparently bereft of any of the usual digital controls. There’s the White Balance and Quality lever mentioned earlier, alongside an AE lock button, but that’s it, at least at first glance. Ooh, foreshadowing!
Slap-bang in the middle of the rear panel is a circular guide to calculating the impact of the crop sensor on coverage. So the inner ring of numbers are typical 35mm focal lengths, while the outer ring shows what they become equivalent to on the R-D1, for example, 28, 35 and 50 become equivalent to 42, 53 and 75mm coverage respectively.
But wait, in a plot-twist, a hinge on the side allows the panel to angle out before flipping round to reveal a 2in screen with five buttons running along the right side. This is the unapologetically digital side of the camera, with Epson’s name under the screen.
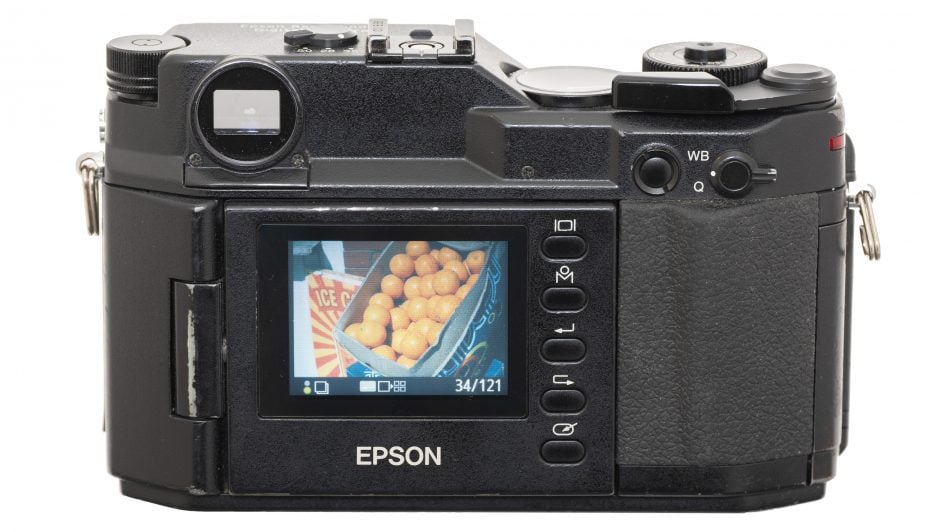
There’s no live view, so the screen is only used for menus and playback, and the first thing you’ll need to do is switch it on using the top button. This displays the most recent photo, and you can use the jog dial to cycle through other images. Note again I’m showing you the R-D1 running firmware v2 which effectively turns it into an R-D1s.

Pushing the jog dial upwards unlocks the second function in playback of different information views, including the settings, a grid to check alignment albeit after the event, and a brightness histogram.
Pushing the enter button with the arrow pointing left switches to a thumbnail view with four images. Pushing the second button labelled M with a small circle brings up the R-D1’s unique user circular interface that’s designed to work with the jog-dial. Just rotate the dial to the desired pie on-screen, before pushing enter to select it.
For example, selecting the magnifying glass icon lets you take a closer look at your image, zooming-in with the jog-dial of course, or pushing it up to select a side-to-side or up and down motion instead. The firmware update or R-D1s provided greater magnification in playback.
Playback options represent the main menu though and to access actual camera settings, you’ll need to first select the settings option. This brings up a new wheel of options, albeit now with eight pies to now choose from. First is the colour setting which allows you to choose between colour and a great looking black and white mode. Pushing Menu again lets you choose between five digital filter effects, for example red to darken a blue sky. Under the basic setup menu you can adjust things like the screen brightness, as well as calibrating the needle positions or customising the user button.

Other menu settings include a long exposure noise reduction option, the chance to adjust the colour space between sRGB and Adobe RGB, the ability to configure the RAW mode to either record a plain RAW file or accompanied by a JPEG, and finally the option of four film settings, with three allowing you to tweak parameters including sharpness, saturation, tint, contrast and noise reduction. I believe most of these options are part of the version 2 firmware, so it’s well worth updating original R-D1’s if possible.
But the best part about the screen is once the camera’s configured as you like it, you can twist that screen back on itself for the clean, uninterrupted analogue experience. Sure it’s there if you want to view your images after taking them or change a colour mode, but it is nice to remove that distraction for a more film-like experience.
My only note is that I frequently switched between colour and black and white modes and couldn’t do it without flipping-out the screen and navigating some of the menus. Sure you can configure the user button to the Film page and perhaps select a completely desaturated preset, but a button and indicator elsewhere would have been better for me. That said, I do appreciate doing so would have interrupted that otherwise analogue experience, and maybe the way forward is to just shoot a whole set in mono as you would with film.
Moving onto composition, the R-D1 exclusively employs its headline feature, the optical rangefinder in the upper left corner. If you’re new to rangefinders, they have two main differences to an optical SLR viewfinder or indeed an electronic viewfinder. Rather than looking through the main lens, a rangefinder has its own optical window with bright lines roughly indicating the area that will be captured. Crucially the viewfinder lets you look a little beyond these lines to see subjects outside of the frame, allowing you to prepare for when they enter it. This is useful for street photography and reportage, and by being separate from the main lens, also avoids any blackout as you take the shot.
Most rangefinders include framing guides for several different focal lengths, and on the R-D1, there are three, selected using the lever on the top. Again the options of 50, 28 and 35 may refer to fitting those actual lenses, but the viewfinder lines are showing you their effective coverage after the sensor crop has been taken into account. So set the lever to 28, and the viewfinder shows you markings for 42mm coverage. Meanwhile at 50 you’ll see the smallest frame of all, equivalent to 75mm coverage. Anything wider than 28 or longer than 50 will involve guesswork or a separate finder atop the hotshoe.
What really makes a rangefinder unique though is how it focuses. A second image is superimposed in a small box in the middle of the frame. As you adjust the manual focusing ring of the lens, the superimposed image moves from side to side, and when it lines-up to overlap the main view perfectly, you’re in focus. This way of focusing coupled with approximate framing, especially if your lens doesn’t match the lines, makes for a very different experience than using an SLR, but it can be very quick and some prefer it. Lest we forget, they’ve been a defining part of the Leica M series for over half a century, and with the R-D1, Epson beat them to coupling one with digital imaging.

Continuing the analogue theme, don’t go looking for USB or TV outputs as the R-D1 has neither, as the only connector is the PC Sync port on the side. Even the card slot is well-hidden, requiring you to insert a fingernail into a small gap in the lower right corner to prise-open a door. Here you’ll see a single SD slot, chosen for size at a time when most digital cameras used Compact Flash. The SD format is undoubtedly more convenient today too, until you discover the R-D1 is only compatible with cards up to 2GB. As for power, the R-D1 employs an EU-85 Lithium Ion pack rated at 1500mAh, and like most larger cameras of the day, you charge the pack externally using a supplied AC charger.
Fast forward 22 years to the present day and I had minimal issues with the R-D1 I was loaned. The camera was in great condition with the focusing mechanism being mostly reliable and only a small corner of the front grip material peeling back. Both the battery and charger were working fine too, although replacements are available, and while I don’t have any 2GB SD cards, I had a bunch of 1GB ones that worked fine with it. Like all rangefinders, expect to spend some time learning how your particular lenses correspond to the guide marks in the viewfinder, as you may end up capturing a bit more or less than initially expected. But that’s part of the fun.
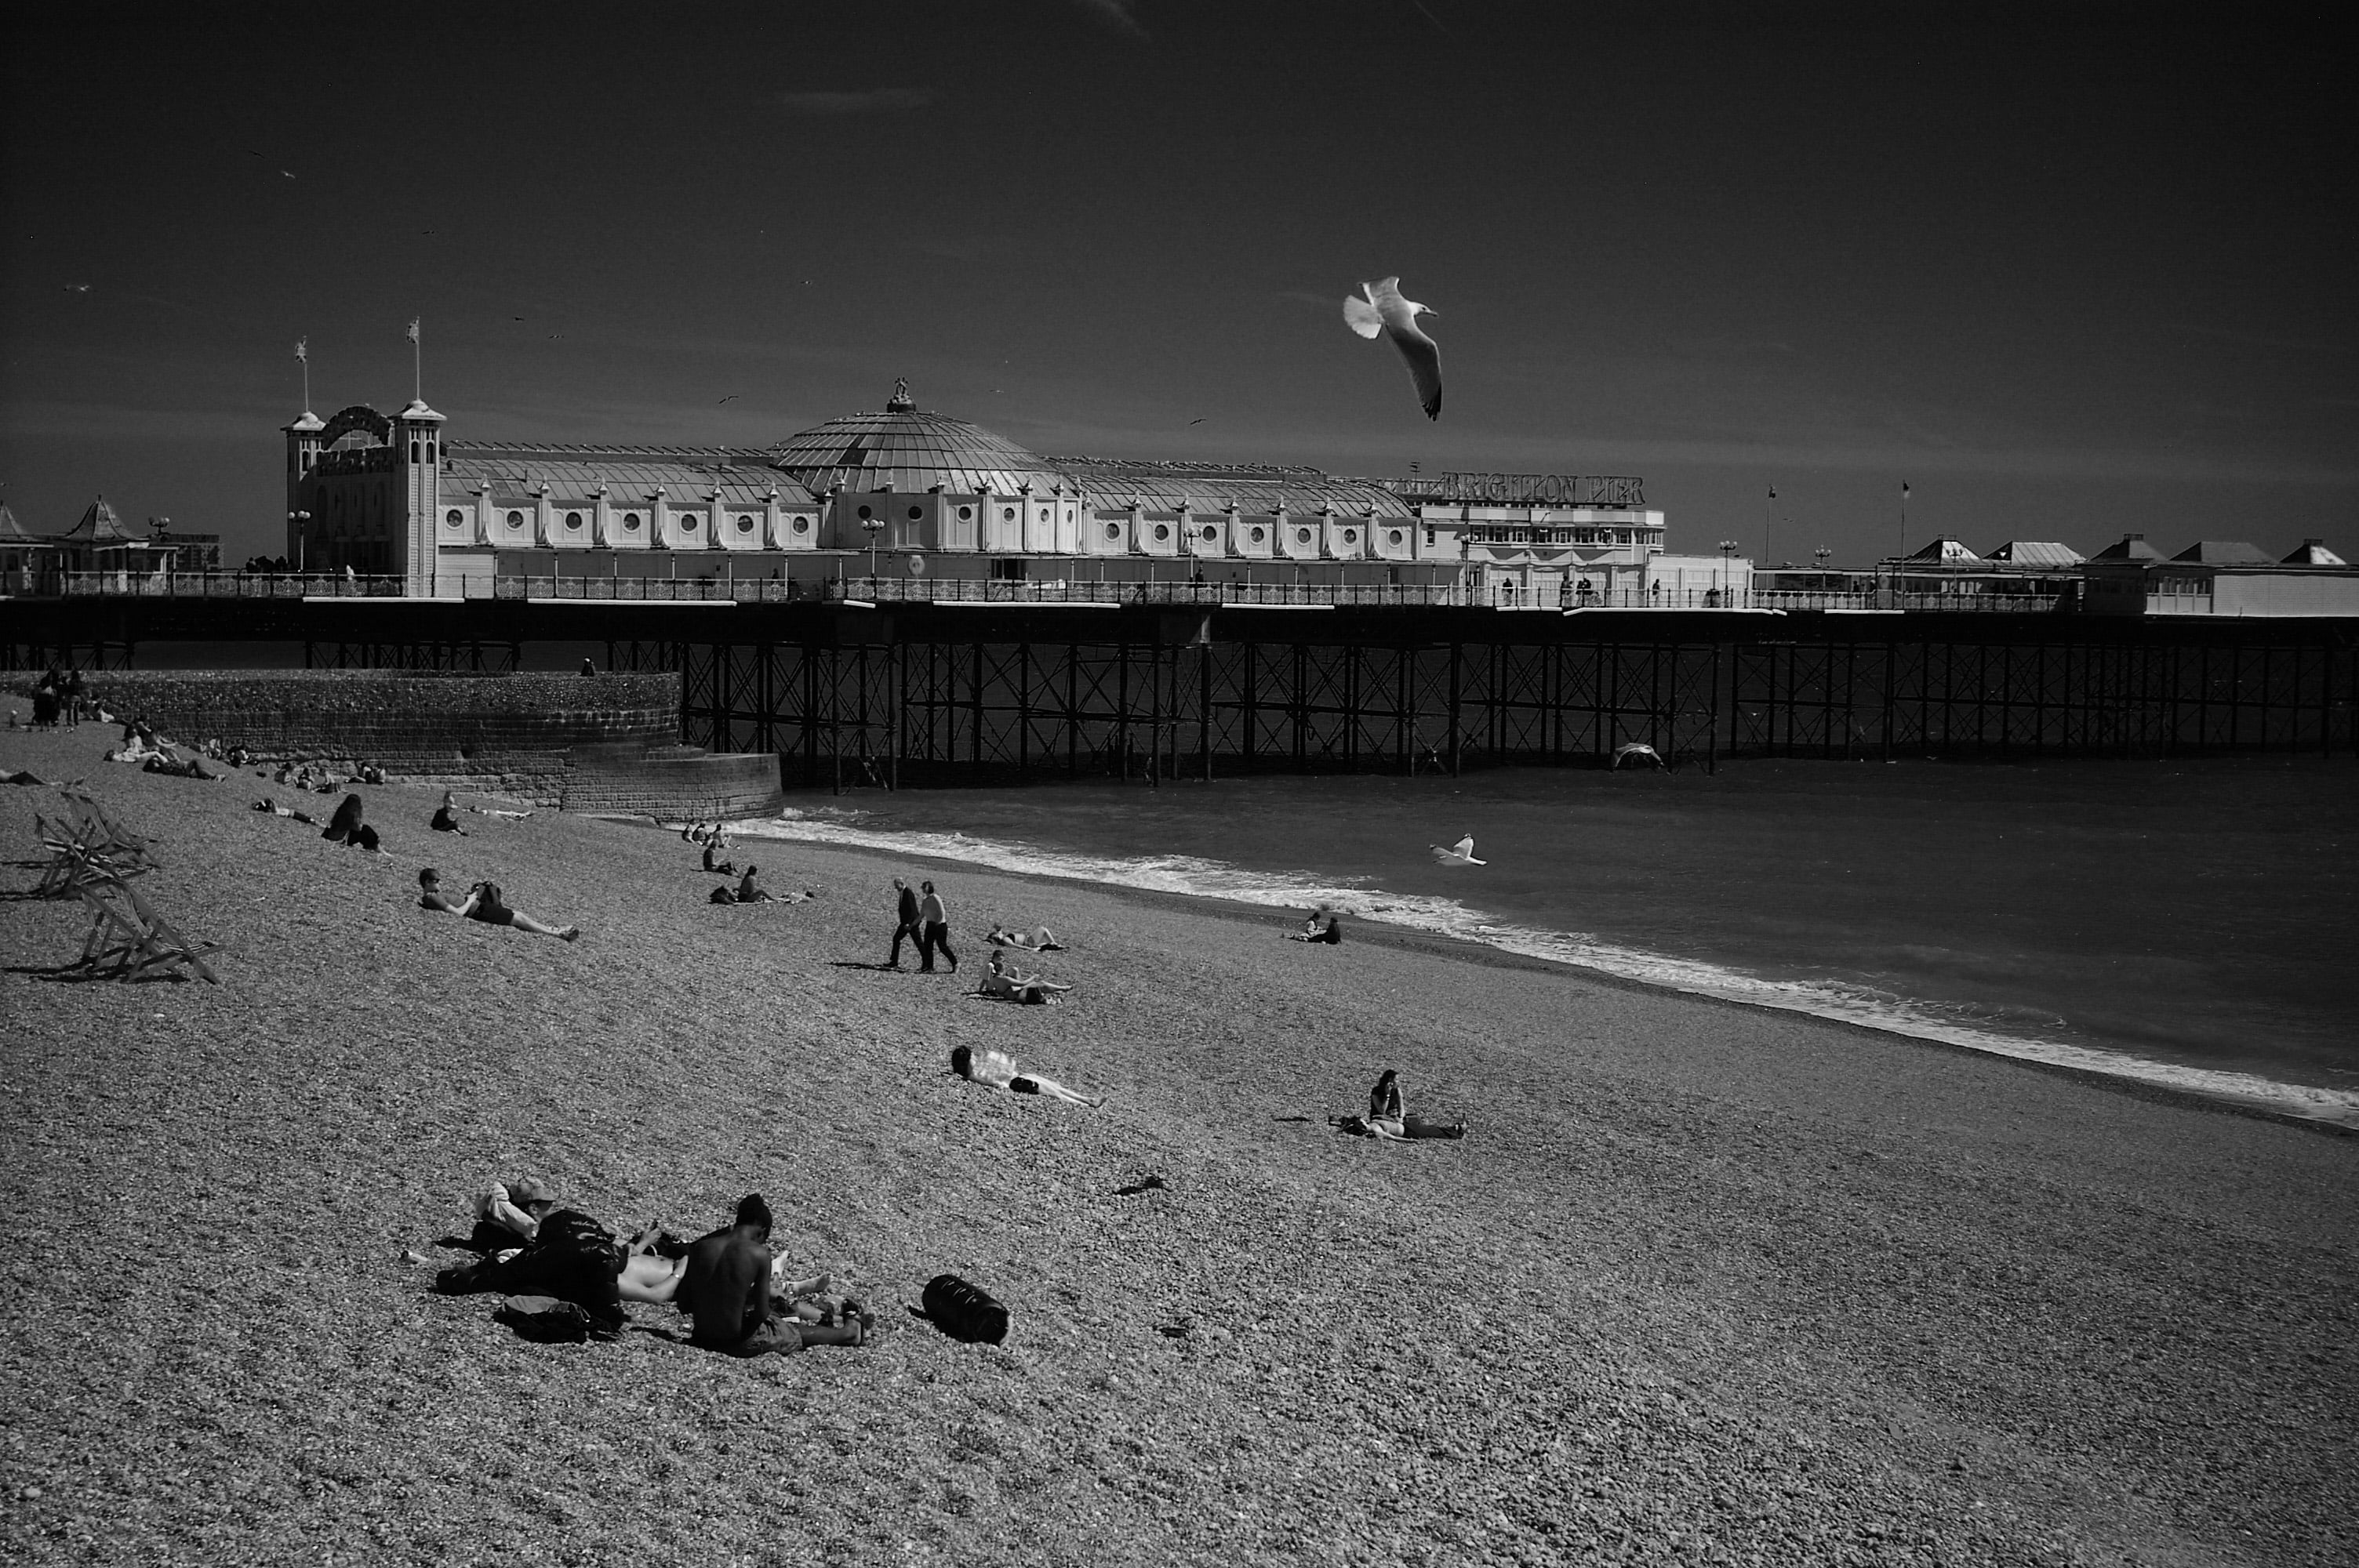
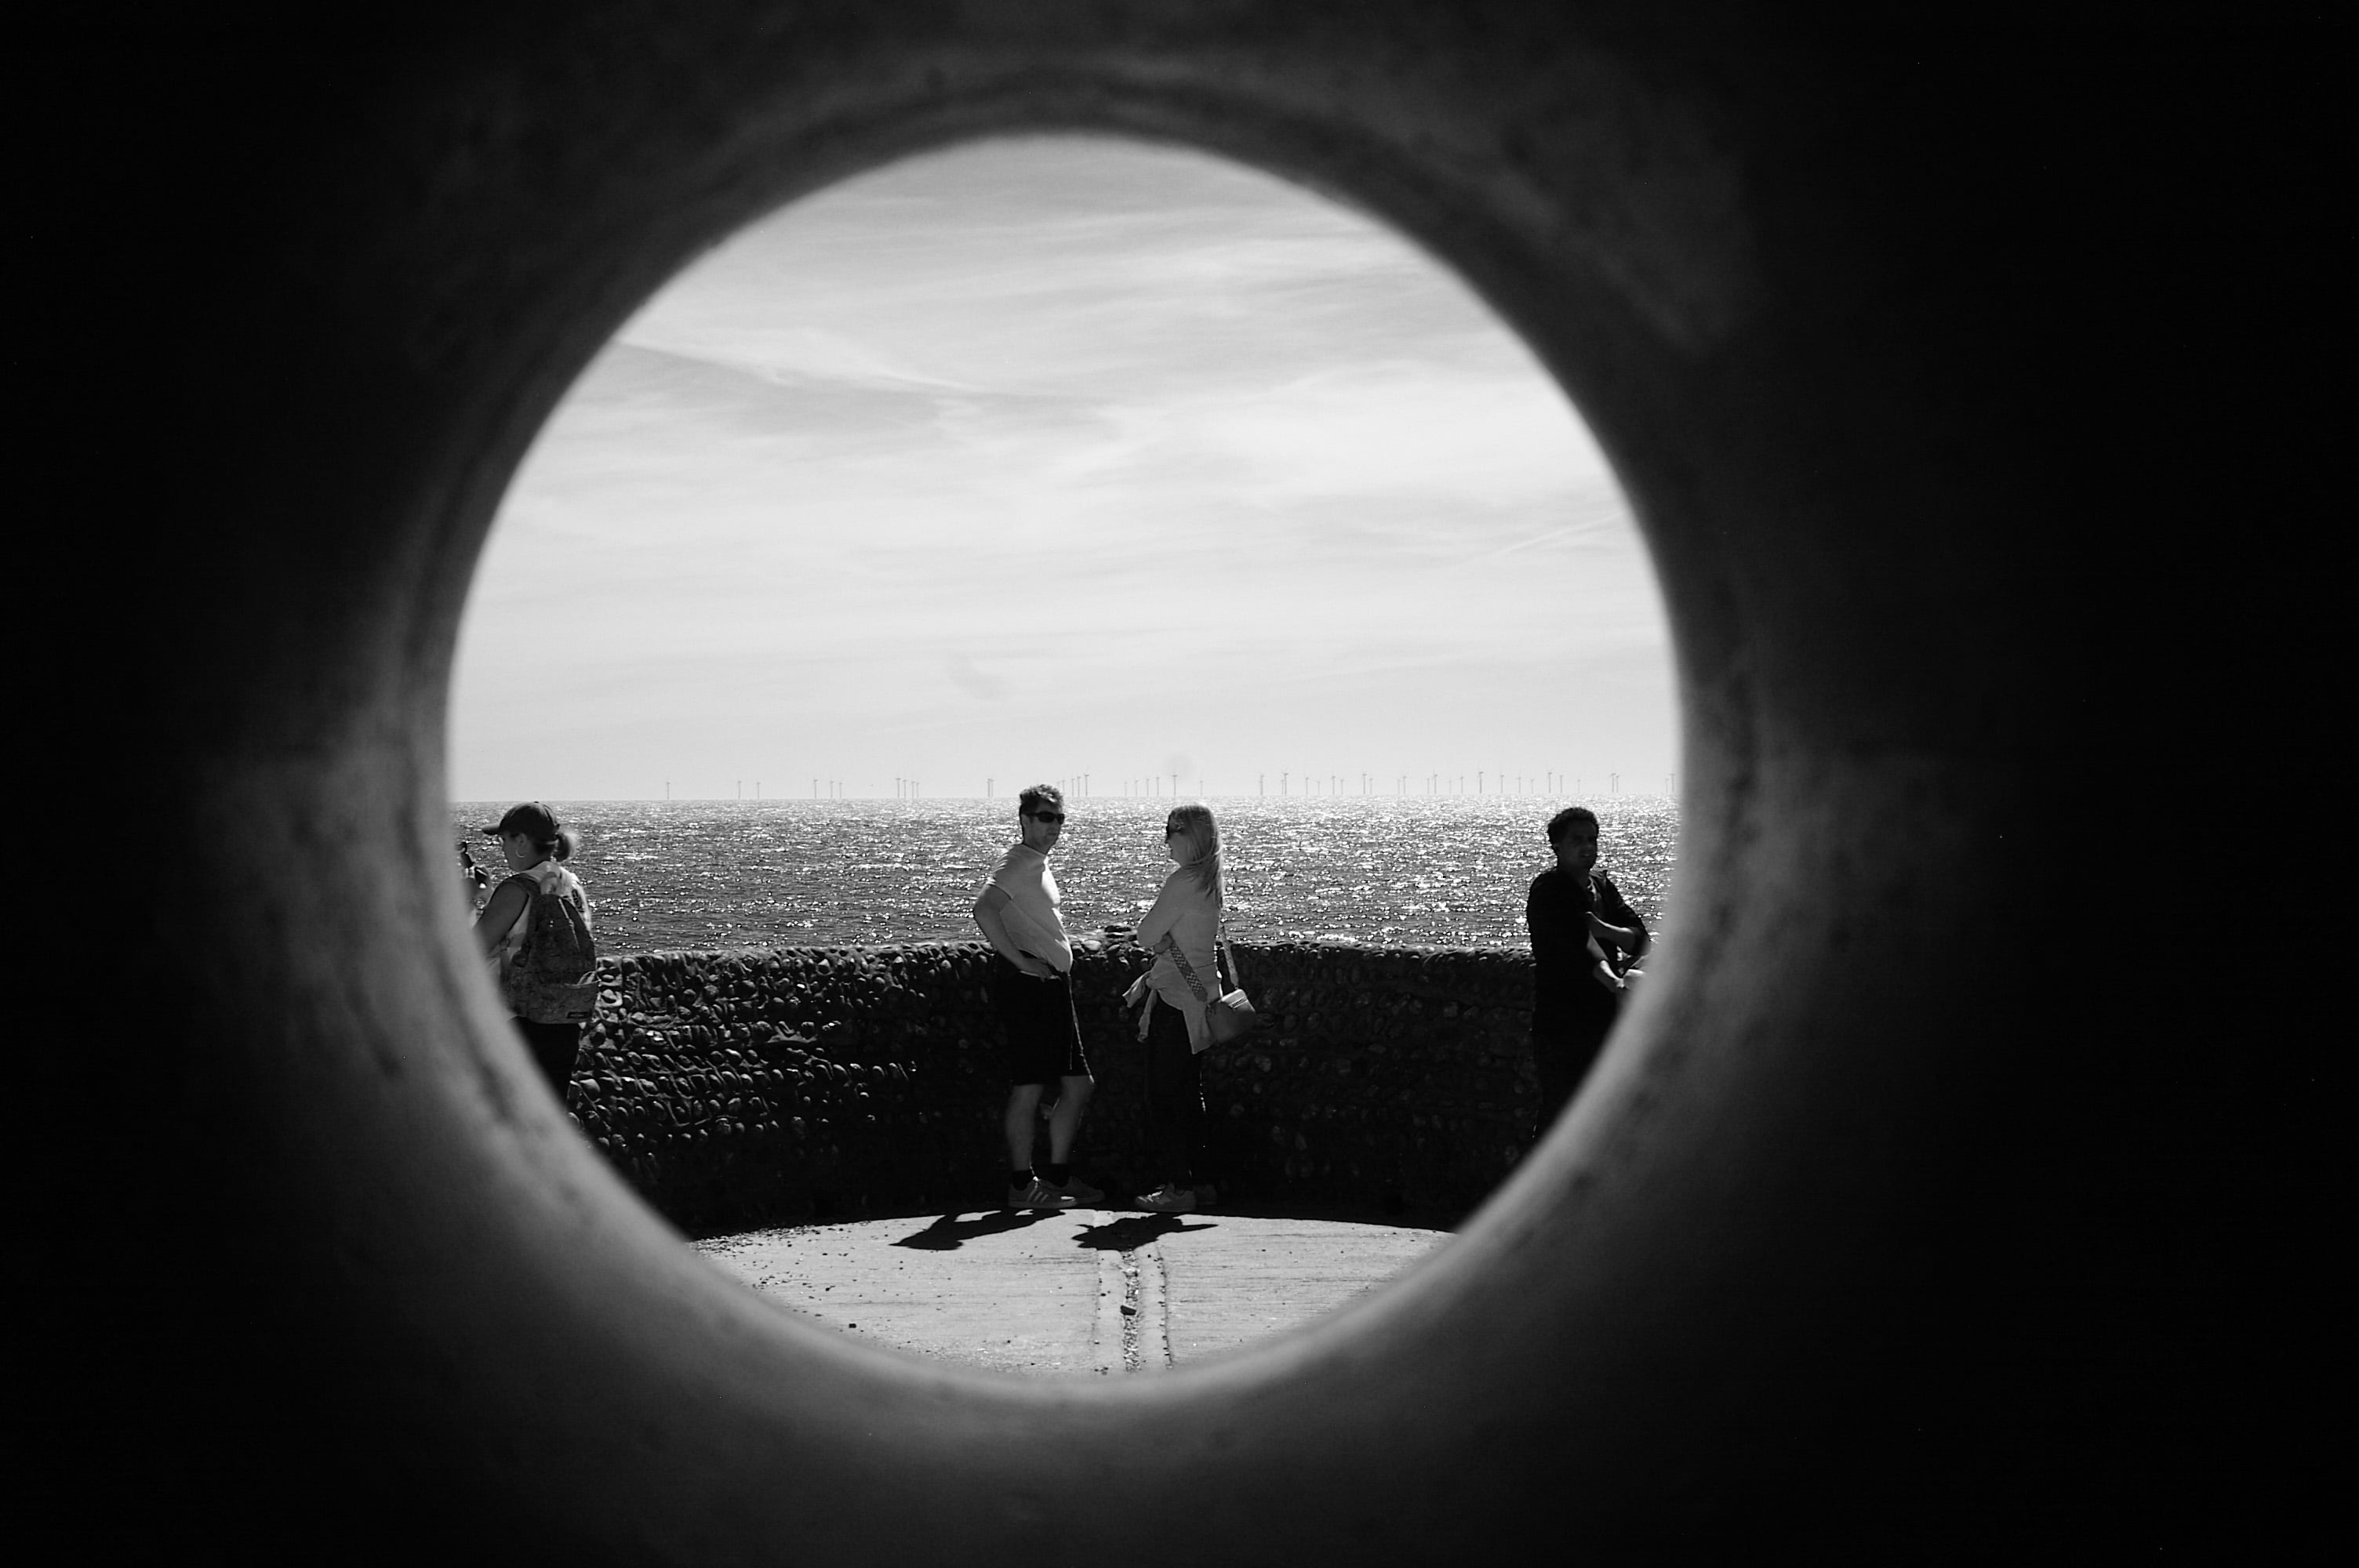
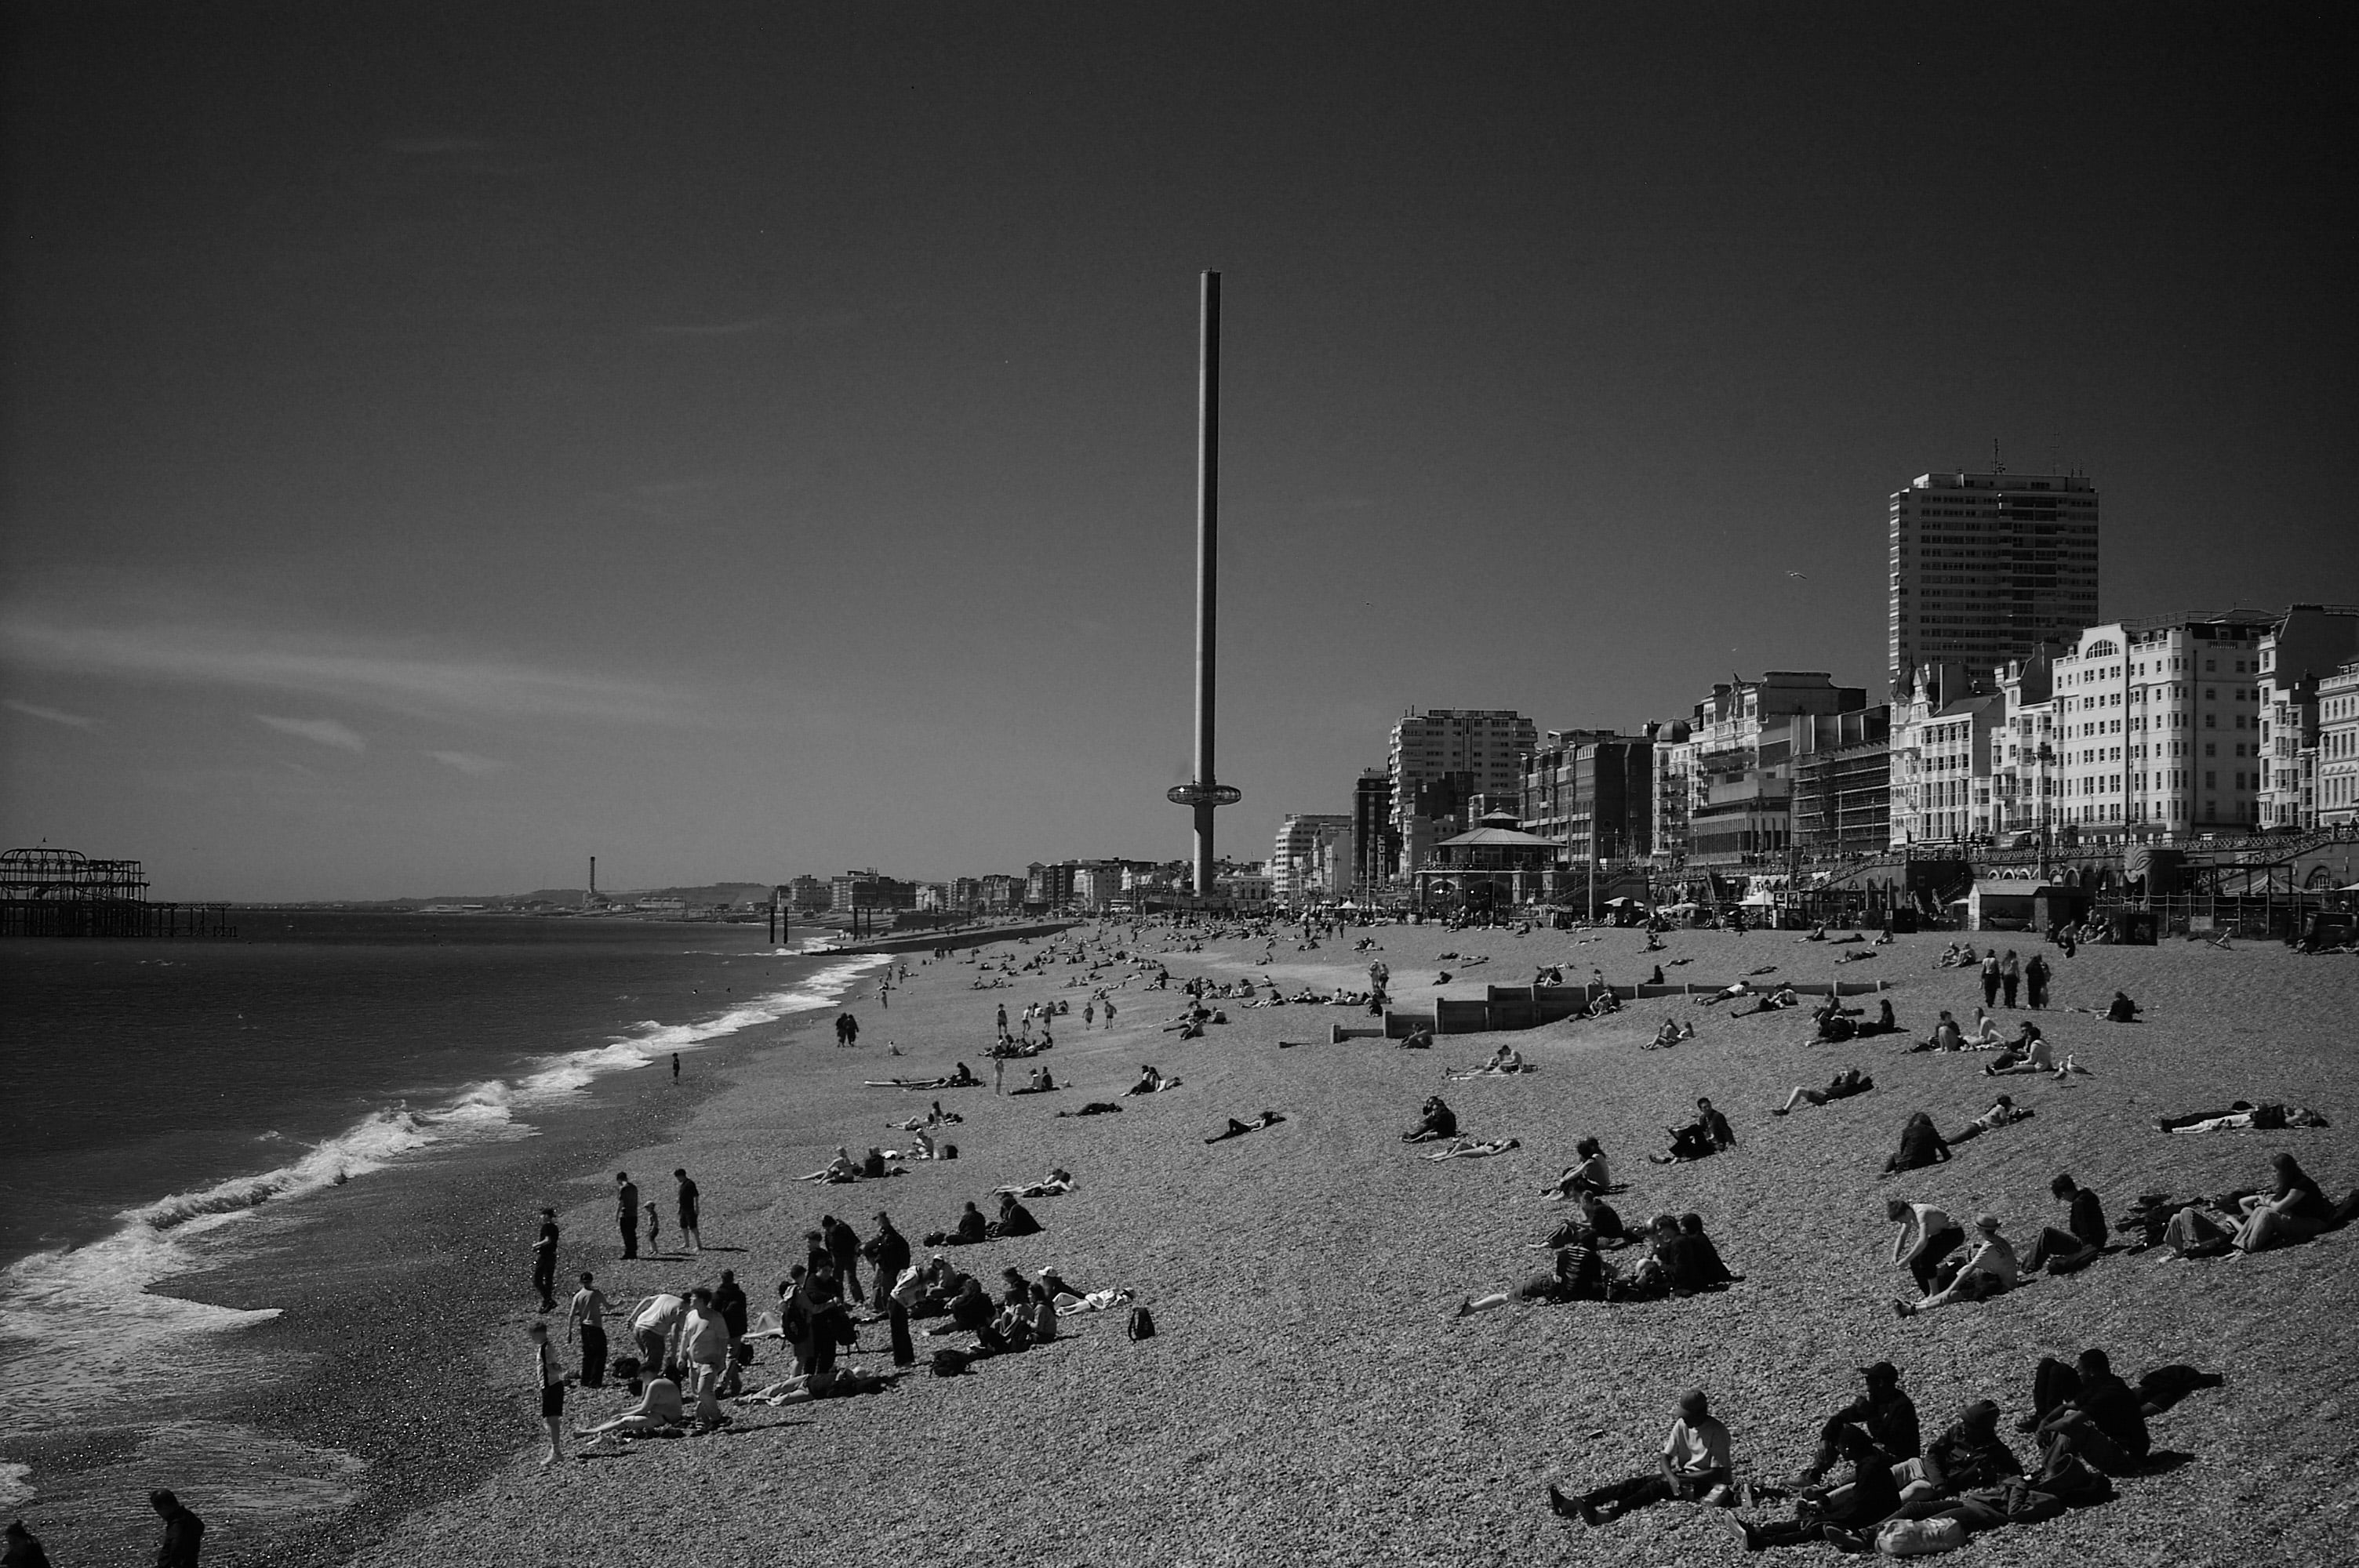
For my sample images seen throughout this page, I used the two lenses loaned with the camera, a Voigtlander Color Skopar 35mm f2.5 and a Leica Elmar-M 50mm f2.8. Both great choices for the R-D1. All of my sample images were taken in the AE mode with no compensation applied, and they’re JPEGs out of camera, using the standard or Film 1 presets, along with a few Monochrome with the red filter. Keep an eye open for any vignetting.
Epson R-D1 verdict
I shot with the R-D1 for several weeks, but made my mind up almost immediately. This is not only a gorgeous-looking camera but one of the most enjoyable I’ve used in a long time. I’ve owned multiple film rangefinders in the past and always appreciated their size and operation, but was often frustrated by their lack of precision framing and alignment compared to an SLR. But returning to a rangefinder after many years reminded me of their simplicity and speed, and I particularly like how the R-D1 can completely hide its digital aspects during day to day use. So long as you commit to a colour or monochrome mode, you can flip the screen away and enjoy what looks and feels like an entirely analogue experience, even winding a lever between shots. No distractions.
As for the image quality, the R-D1 arguably benefits from its age. Back in 2004, its status as the first digital rangefinder meant it was also the first time many film owners had worked with a smaller digital sensor. The crop factor not only made their lenses act differently, but the sensor microlenses coupled with close rear lens elements meant vignetting could be considerably more pronounced than they were used to.
But today we understand crop factors and accept vignetting on many lenses. If you don’t like it, it can be reduced effectively in post, but many find it adds to the vintage charm. Plus the look of older CCD sensors and processors are very much in fashion right now and while I won’t pretend the R-D1’s images look anything like the film I used to shoot, there is a very satisfying and attractive vibrancy to the output, not to mention a great-looking monochrome mode. Just beware of those higher ISOs where possible.
So if it’s that good, why wasn’t the R-D1 a broader success? Well, a number of factors held it back at launch. First was the high price coupled with limited availability. Epson may have displayed it at international exhibitions, but I don’t recall a UK launch, and looking back there’s revealingly few reviews from Europe and America outside of specialist publications.
There was also the fact everyone knew a digital rangefinder from Leica was inevitable at some point, and from a branding perspective I wonder if Epson made the right choice using their name atop the body? After all, potential customers with a collection of carefully-curated and often rare or expensive M-mount lenses may have preferred Voigtlander’s branding, especially on such an expensive camera. Just look at the top of the BESSA R2 and tell me which branding you’d prefer here.
Epson released the mildly-updated R-D1s two years later in 2006, including support for RAW+JPEG, Adobe RGB, 16x playback magnification, and long exposure noise reduction, but the body was the same. In fact a firmware update for the original R-D1 equipped it with the same features.
But more importantly in the same year, Leica finally released their first digital rangefinder, the M8, crucially featuring a larger and higher resolution 10 Megapixel APS-H sensor. It was far from perfect, suffering from buggy software and arguably oversharp images due to no AA filter, but its less severe crop-factor coupled with the Leica branding made the R-D1 a harder sell even at a lower price.
Then in 2009, Leica released the M9, their first full-frame digital rangefinder, eliminating the pesky crop-factor of the M8 while maintaining CCD imaging. It didn’t come cheap at a launch price of around $7000, but this was the digital rangefinder many M-lens owners had been waiting for.
Meanwhile in the same year, Epson released another minor update, with the R-D1x, now sporting a slightly bigger 2.5in screen and support for larger SDHC memory cards. Meanwhile an R-D1xG version added a removable grip, but as far as I know these were intended for the Japanese market only. Plus the screen was now fixed in place, losing some of the analogue charm of earlier models. By 2014, the series was discontinued due to low sales.
But that’s not the end of the R-D1 story. In a lovely plot twist in 2021, Epson found 30 brand new R-D1s cameras in a warehouse and arranged an event to give them away to existing R-D1 owners in a lottery.
Applicants needed to live in Japan and prove they owned an R-D1 by submitting one of their photos with the required EXIF data. Selected winners had their photos exhibited in Epson’s Tokyo showroom, and had to use their existing batteries on the new camera as the originals had not survived.
At a celebration event held in early 2022, Epson arranged a presentation featuring online appearances by CEO of sales Fuminori Suzumura who was in charge of marketing the R-D1 in 2004, and Ryuichi Shiobara, the original R-D1 development leader.
The team shared a number of anecdotes, with highlights available on YouTube, including how Shiobara-San spent a month refining the motion of the chronograph pins at power-up to be exciting like turning the ignition on a sports car. It was lovely to hear this, as the power-up process is something I love about the R-D1 and always delights anyone who sees it.
The team also shared tantalising details about the R-D1’s intended successor, approved in 2009 with development starting in 2010. The prototype was a more modern-looking design with an electronic viewfinder and an Epson EM mount which could also use Yashica / Contax lenses. But plans were scrapped due to shrinking sales.
Personally I think a lot of the charm of the R-D1 then and now lies with its true rangefinder and analogue appearance, so I’m not sure how well a more modern-looking version with electronic composition would have fared.
Today the R-D1 series remains a unique and desirable camera, and one I’m sure would be successful if sold new. I know I’d be interested in it. Fujifilm approaches some of the charm with their rangefinder-styled X-Pro series, and their third version even featured a screen that could be hidden. But their viewfinder doesn’t have rangefinder focusing, and even Fujifilm doesn’t lean into the analogue control experience as much as Epson did.
Would I buy a used R-D1 today? That’s a harder sell, as while I connected with it in a way I’ve not with other cameras, I’d find it hard to hand over the best part of two grand on something that’s hard or impossible to repair. Plus for much the same money you could buy a used Leica M8 with a bigger sensor, albeit lacking some of the unique R-D1 aspects and equally hard to repair today.
If it’s just the sensor you’re after, you could also get similar quality from a used Nikon D100 for around 50 to 100 bucks, albeit obviously lacking the analogue looks and experience. Or if you want a new digital rangefinder with an M-mount for less than Leica prices, there’s always the Pixii models, but they’re going for a different aesthetic and are still expensive at around four grand for the full-frame model.
Ultimately the R-D1 gives you a combination of looks, controls and quality that’s not only unique but adds up to one of the most enjoyable, inspiring and refreshing experiences of any camera I’ve used. I think modern designers could learn a lot from it and I’d love to see something similar that truly leans into analogue style and operation. It’s certainly testament to how much Epson got right on the R-D1 that its owners, both previous and current, remain truly passionate about it. PS Thanks also to Epson for lending me their R-D1 – are you sure you need it back?