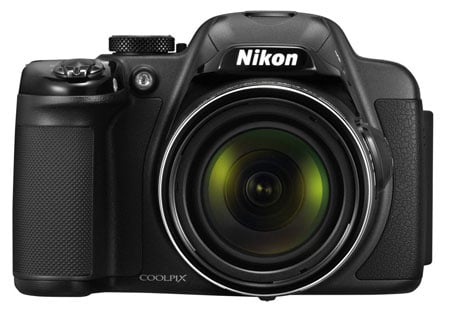
Nikon COOLPIX P520
-
-
Written by Ken McMahon
Intro
The Nikon COOLPIX P520 is a super-zoom camera with a 42x stabilised range and an 18.1 Megapixel sensor. Launched in January 2013, it replaces the COOLPIX P510, which remains in the Nikon product line-up. The newer P520 retains the earlier model’s 24-1000mm f3-5.9 zoom lens, but couples it with an updated sensor that adds two Megapixels to the resolution.
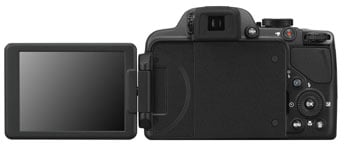
The other major change is the screen; the COOLPIX P510’s screen was articulated with a hinge that allowed up and down movement, but the COOLPIX P520’s vari-angle screen is now hinged at the side, so you can turn it in any direction including forwards-facing for self-shooting as well as folded inwards for protection when the camera’s not in use. At 3.2 inches the screen is also slightly bigger, though with the same 921k dot resolution as before.
Like the earlier model, the COOLPIX P520 includes a built-in GPS receiver which has a database of place names and tags photos with locational information. While it doesn’t have built-in Wifi it is compatible with Nikon’s Wu-1A Wifi dongle, though with the proliferation of Wifi-equipped cameras now on the market this is a feature that is unlikely to be much of a crowd-puller for the COOLPIX P520.
When it was introduced on the COOLPIX P510, the 42x optical zoom was a market-leader and though it’s since been overtaken, the COOLPIX P520 still provides one of the longest optical zoom ranges of any super-zoom. In my review I’ve compared it with two of the models that outgun in in terms of zoom reach, the 50x Canon PowerShot SX50 HS and the 60x Panasonic Lumix FZ70 / FZ72. Is it all just about size, or does the COOLPIX P520 have other things to offer that make it worth considering? Read my full review to find out.
 |
Nikon COOLPIX P520 design and controls
Though it’s actually slightly larger than the model it replaces, the COOLPIX P520 is small for a super-zoom ‘bridge’ model. Measuring 125.2 x 84.1 x 101.6mm and weighing 550g with a card and battery fitted, it’s a half a centimetre wider, a millimetre taller and a millimetre thinner than the COOLPIX P510 which also weighs a few grams more. Alongside the Panasonic Lumix FZ70 / FZ72 it looks very cute and diminutive; the FZ70 / FZ72’s dimensions are 130.2x 97 x 118.2mm and it weighs 606g; although of course the FZ70 / FZ72 is packing a longer 60x zoom inside. The same could be said for the 50x Canon PowerShot SX50 HS, though at 122.5 x 87.3 x 105.5 and 595g it’s not that much bigger than the COOLPIX P520.
I quite like the gloss plastic finish of the COOLPIX P520, but it may not be everyone’s cup of tea. The camera is available in three colours, black, dark sliver and red with the grip, thumb rest and a small area running almost the length of the body on the left side (as you hold the camera) covered with rubber-like material. On the grip this is dimpled and the COOLPIX P520 not only feels very secure in your hand but a very comfortable fit, not always the case with smaller models.
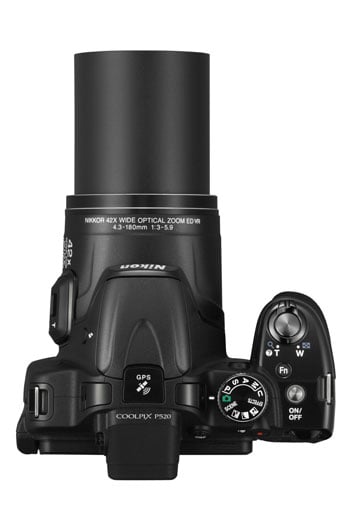 |
With the exception of the side-hinged screen, the design and control layout is largely unchanged from the COOLPIX P510 with the mode dial located on the right side of the top panel and the shutter release located where you’d expect at the front on the top of the grip with a collar type zoom control surrounding it. Behind it are a small slightly raised Fn button and the slightly recessed On/Off button with a circular LED surround which momentarily glows green when you turn the camera on and glows continuously during charging.
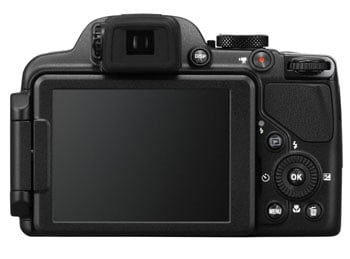
There’s also a charging LED on the rear panel located to the right of the screen along with the other controls. These include playback and menu buttons on a slightly raised section along the screen’s right edge. Inset into this is the four-way controller, or Multi-selector as Nikon calls it, with an OK button in the centre and the four cardinal positions marked on the body with symbols for, clockwise from the top, flash, exposure compensation, macro AF and self-timer. Finally there’s a button for deleting images in the bottom right corner.
The Command dial, used for setting exposure as well as menu navigation is located just above the thumb rest and next to it on the left, just behind the mode dial is a dedicated record button for starting movie shooting in any mode. To the left of that, and just to the right of the electronic viewfinder there’s a button for toggling screen and viewfinder display overlays. That’s it for rear panel controls. The button to operate the pop-up flash is located on the left side of the body just below the flash housing itself and, a little further down on the side of the lens housing there’s a second rocker switch for operating the zoom.
On the right side of the camera body mini HDMI and a combined USB / AV out port are located behind a soft plastic flap. Nikon provides a USB cable in the box as well as an A/V cable to connect the COOLPIX P520 to a standard definition TV via a composite video RCA plug, but if you want to connect to an HDTV you’ll have to buy your own HDMI cable if you don’t already have one.
 |
The COOLPIX P520’s combined battery and card compartment is located in the grip and accessed via a door in the base of the camera. It takes the same slim EN-EL5 battery as its predecessor with a power rating of 1100mAh. That delivers enough power to take 200 shots with the COOLPIX P520, down from 240 on the COOLPIX P510 and by any standard a pretty meagre allotment, certainly compared with the PowerShot SX50 HS’s 315 shots or the Panasonic Lumix FZ70 / FZ72’s more generous 400 shot capacity.
Remaining battery power on the COOLPIX P520 is indicated by a three-segment graphic. I found the 200 shot capacity of the COOLPIX P520 quite a limitation, with the low battery indicator appearing all too soon when out shooting for the day. Even for casual snappers, at an event like a wedding, or party the COOLPIX P520 is likely to give up before you’re ready to, and that’s assuming you have a full charge to begin with. I’d strongly recommend you buy at least one additional battery along with the camera. Look at it this way, with a spare battery you still get only the same shooting capacity as the Lumix FZ70 / FZ72 with a single one.
The COOLPIX P520’s battery is charged in the camera via the USB port using the supplied cable and either the supplied charger, or by plugging it into a USB port on your computer. One advantage of in-camera charging is that you don’t have to pack a separate charger when travelling if you’re taking a computer along, the drawback is that even if you have a spare you can’t use the camera while a depleted battery is recharging. There is an optional external charger available, the MH-61, which can be used to charge batteries externally as well as an AC adapter used to power the camera from the mains while shooting (it can’t be used while recharging, either using the charger or a computer).
The COOLPIX P520 has a built-in flash which is raised mechanically by pressing a button on the left side of the body just below the flash head. Once in the raised position you can select the flash mode by pressing the top position on the multi selector four-way control wheel. The options are Auto, Auto with red-eye reduction, Fill flash, Slow sync and Rear-curtain sync. When you’ve finished using the flash you just push it back down into the closed position.
The flash has a maximum distance at the wide angle lens setting, with the aperture set to f3, of 8 metres, not at all bad though as it’s quoted with the ISO set to auto it’s not easy to make comparisons. If you make the (most likely correct) assumption that the distance is calculated using the default maximum auto ISO sensitivity of 1600 ISO, that means it delivers a little more power than the PowerShot SX50 HS at max 5.5 metres, but quite a bit less than the Lumix FZ70 / FZ72 with a maximum distance of 13.5 metres. That said, the COOLPIX P520 provides bright, even illumination that’s perfectly adequate for fill-in and reasonably close subjects.
If the built-in flash isn’t sufficient for your needs, well, you’re out of luck; the COOLPIX P520 has no hot shoe so, unlike the PowerShot SX50 HS and the Lumix FZ70 / FZ72, you can’t fit an external flash to the camera for more power or bounced lighting.
Nikon COOLPIX P520 screen and EVF
The COOLPIX P520 sports a new 3.2 inch 921k dot LCD screen, 0.2 of an inch bigger than it’s predecessor’s and, where the earlier model’s screen could be flipped up or down, the new model’s is hinged at the side which means it can be angled in just about any position you like including forward-facing and folded in to protect the screen when the camera isn’t in use, or when you’re using the electronic viewfinder.
 |
Fold out screens are becoming increasingly popular on super-zooms, and Panasonic’s FZ70 / FZ72 is one of the few models that lacks one, opting instead for a fixed 3 inch 460k dot screen. It’s undeniably useful to be able to adjust the screen for shooting from unusual angles, and even if you use the viewfinder to compose it’s reassuring to be able to fold the screen away to keep it scratch and smear-free when not in use.
The PowerShot SX50 HS has a similarly side-hinged articulating screen. At 2.8 inches and with 460k dots, it’s slightly smaller and less detailed than the COOLPIX P520’s and, although the additional resolution isn’t all that noticeable, the 0.4 of an inch makes a much bigger difference than you might imagine. The COOLPIX P520’s screen provides a nice big, bright, detailed image that I found was much better both for composing and reviewing shots than either the PowerShot SX50 HS or the Lumix FZ70 / FZ72.
The COOLPIX P520 has the same 0.2inch, 201k dot electronic viewfinder as its predecessor. A small dial on the left of it allows you to adjust the dioptre correction for your vision. These specifications are fairly typical in a super-zoom in this price category and in fact they’re shared by both the PowerShot SX50 HS and the Lumix FZ70 / FZ72. But one thing the specifications don’t show is the apparent size of the viewfinder and the COOLPIX P520’s EVF looks a little bit smaller than those of the other two models. It’s a small difference, but one that could be significant if you rely on the EVF the majority of the time to compose shots.
Like most EVF’s, and the PowerShot SX50 HS and Lumix FZ70 / FZ72 are no exception, the COOLPIX P520’s provides a bright and stable image when stationery, but when panning and with moving subjects things have a tendency to get a little jittery with visible pixelation and noticeable lag. The Lumix FZ70 / FZ72 allows you to increase the refresh rate (at reduced display resolution) to address this problem, but the COOLPIX P520 lacks anything similar and, though you can adjust the brightness of the screen, no adjustments are available for the EVF.
Like most super-zooms, the screen and EVF provide alternative options for viewing the same information, you can’t for example use the EVF for live view while displaying exposure information on the screen. The COOLPIX P520 employs a unique (among these three models, at any rate) method for switching between the EVF and the screen. The EVF is only active, when the screen is in the closed position. Flip it out and the screen becomes the viewer, with the EVF automatically switched off.
It’s simple, but I must admit to finding it a bit of a nuisance to have to have to put the screen away every time I wanted to switch to using the EVF. It adds an extra button, but I found the toggle switch on the Lumix FZ70 / FZ72 provided a simpler and quicker method that enables toggling – something you find yourself doing quite often – at the press of a button. With the COOLPIX P520 I found myself relying overly on whatever I happened to be using at the time, the effort involved in folding the screen in and out made me reluctant to switch in circumstances where had it been quicker and easier I would have done. That said, the PowerShot SX50 HS’s approach, which requires pressing the display button twice to cycle through the screen overlays in order to toggle from the screen to the EVF is only marginally less irritating.
Nikon COOLPIX P520 lens and stabilisation
The COOLPIX P520’s 42x optical zoom has a 35mm equivalent range of 24-1000mm and a maximum aperture of f3-5.9. As I mentioned in the introduction, this is the same lens as on its predecessor, the COOLPIX P510 which was unmatched on its release in early 2012, and although there are now longer super-zooms out there it remains an impressively long reach with which few models, present company excepted, can compete.
There will be few scenarios that the COOLPIX P520’s zoom can’t cope with, but both the PowerShot SX50 HS and Lumix FZ70 / FZ72 outgun it at the telephoto end of the range by an additional 200mm with a maximum zoom of 1200mm. If you’re wondering how much of a difference that makes in practice, take a look at the table below where, in addition to the usual wide angle and telephoto range example I’ve included a comparison with the 20-1200mm Lumix FZ70 / FZ72. It’s worth noting, however, that the COOLPIX P520’s higher 18 Megapixel resolution enables you to crop the central 4000 x 3000 portion of the image to provide virtually the same field of view as the Powershot SX50 HS (it makes up a fair bit of ground on the 16 Megapixel FZ70 / FZ72 as well) at the same 12 Megapixel resolution.
tr>
Nikon COOLPIX P520coverage wide |
Nikon COOLPIX P520
 coverage tele | |
 | ||
| 4.3-180mm at 4.3mm (24mm equiv) | 4.3-180mm at 180mm (1000mm equiv) | |
Panasonic Lumix FZ70 / FZ72coverage wide |
Panasonic Lumix FZ70 / FZ72coverage tele | |
 |  | |
| 3.58-215mm at 3.58mm (20mm equiv) | 3.58-215mm at 215mm (1200mm equiv) |
Another thing you’ll notice from that comparison is that, as well as outdoing the COOLPIX P520 at the telephoto end of the range, the Lumix FZ70 / FZ72 also has a wider wide angle at 20mm equivalent compared with 24mm on the COOLPIX P520. To be fair to the COOLPIX P520 though, the 60x range on the Lumix FZ70 / FZ72 is unparalleled and, while it does give you that little extra, which is particularly effective at the wide angle end of the range, the COOLPIX P520 is more than enough zoom for virtually any situation you’re likely to encounter. Just to note that the Canon PowerShot SX50’s 50x zoom has the same 24mm equivalent wide angle as the COOLPIX P520 but, like the FZ70 / FZ72, has a 1200mm equivalent maximum telephoto focal length.
Before I move on to talk about shooting modes just a quick word on the aperture range of the COOLPIX P520. The f3-5.9 maximum aperture is a a little brighter than the maximum aperture of both the f3.4-6.5 lens of the PowerShot SX50 HS and a little slower than the f2.8-5.9 lens of the Lumix FZ70 / FZ72 at the wide angle end of the range. The gap between the COOLPIX P520 and the PowerShot SX50 HS is small, less than half a stop, but consistent throughout the zoom range. The Lumix FZ70 / FZ72 on the other hand is a tiny bit brighter at its 20mm wide angle setting (zoomed in to 24mm equivalent, the Lumix FZ70 / FZ72’s lens closes to the same f3 as the COOLPIX P520), but the gap closes and there’s nothing in it at the telephoto end of the range, with both providing an f5.9 maximum aperture. For all that, these small differences maximum aperture aren’t going to make much of difference in practical terms.
Like the PowerShot SX50 HS and Lumix FZ70 / FZ72, the COOLPIX P520’s lens is stabilised. Nikon calls its stabilisation Vibration Reduction and it’s activated from the Setup menu. There are two options, Normal and Off as well as an Active mode that irons out excessive wobbling, examples of the kinds of conditions it might be useful in, according to the manual, are ‘when shooting from a car or under poor foothold conditions’.
Ordinarily, this kind of additional stabilisation is reserved for movie shooting and it’s a little odd to provide two levels of stabilisation for stills shooting, if there’s a more effective option, why not just include that and forget about the less effective one? It’s possible, I suppose, that Active mode consumes significantly more power, and with the COOLPIX P520’s less than stellar battery life, that would be a consideration. But the answer to that is surely to turn on Active mode when you need stabilisation and turn it off altogether when you don’t?
The question is, how much more effective is Active mode than the Normal setting? To find out, I zoomed the COOLPIX P520 to its maximum 1200mm telephoto focal length and set it to Shutter priority mode. I then took a sequence of shots with the stabilisation turned off at progressively slower shutter speeds. I repeated the sequence with the stabilisation in Normal mode, then a third time with stabilisation set to Active mode.
The table below shows the results. In Normal mode the COOLPIX P520 can shoot hand-held at an impressive five stops slower that the photographer’s rule of thumb says is advisable. Interestingly I didn’t gain any further advantage by switching to Active mode. That said, I was standing on firm level ground and was able to hold the camera steady, pressed to my face while using the viewfinder. In less favourable circumstances, i.e. when shooting from a car or under poor foothold conditions, the Active mode may well yield an advantage.
In addition to Vibration reduction the COOLPIX P520 also includes the Motion detection feature common on Nikon compacts which raises the shutter speed and/or ISO sensitivity in Auto and some scene modes to avoid shutter speeds that are likely to result in camera shake.
Nikon COOLPIX P520 VR Off / Normal | ||||
 |  | |||
100% crop, 4.3-180mm at 180mm 80 ISO 1/30 VR Off. | 100% crop, 4.3-180mm at 180mm 80 ISO 1/30 VR Normal. | |||
Nikon COOLPIX P520 shooting modes
The COOLPIX P520 can be used as a point and shoot in Auto mode. This is an old school auto mode with no scene detection to detect backlit or moving subjects, for that you need Scene Auto selector mode, which uses Scene detection to automatically choose the most appropriate scene mode for the subject from one of ten scene options. The available scene modes are: portrait, group portrait, landscape, night portrait, night group portrait, night landscape, close up, backlighting (non-human), backlighting (human) and other.
Switch to the PASM modes and you have a range of semi auto and fully manual modes to choose from. In PASM modes both the Command dial and multi-selector wheel are used to change the appropriate exposure control; the command dial engages program shift in Program auto and the shutter speed in Shutter priority and Manual modes. The multi selector wheel is allocated to the aperture in Aperture priority and Manual modes. So far, so straightforward, but it’s a bit of a shame the redundant dial is just that – the command dial is disabled in Aperture priority mode, likewise the Multi selector wheel in Shutter priority mode.
The COOLPIX P520 has 16 manually-selected scene modes including all the usual suspects from Portrait to Party via Landscape, Sports, Beach, Fireworks, Backlighting and Sunset. There are two panorama modes for shooting 180 and 360 views. Both work along the same lines as Sweep Panorama on Sony compacts and its numerous clones – you press the shutter once and pan the camera as smoothly a you can. You can pan with the camera in portrait or landscape orientation – the P7700 works out which, you don’t need to tell it beforehand. More often than not that’s all you need to do; the camera stops shooting when you complete the sweep and stitches the images into a single 180 or 360 view. Portrait mode produces the largest images which are 1536 x 4800 pixels for 180 panoramas and the 360 ones measure 1536 x 9600.
If your panning technique leaves something to be desired, or there are objects close to the camera, there’s a lack of detail for it to match up, or for some other unknowable reason it occasionally doesn’t make the full sweep, in which case it saves the partial view for you providing you got more than half way round.
Like the Lumix FZ70 / FZ72 the COOLPIX P520 includes a 3D mode which combines two horizontally offset shots to produce a 3D image in the MPO file format. 3D photos on the COOLPIX P520 have a 16:9 aspect ratio and a size of 1920×1080 and the first of the two images is saved to the card as well as the 3D file.
Another feature the COOLPIX P520 shares with the Lumix FZ70 / FZ72 is its composite HDR mode. On the COOLPIX P520 it’s actually a sub-setting of the Backlighting Scene mode, one of three scene modes, the other two are Landscape and Night landscape, to have dedicated positions on the mode dial. With the mode dial in the Backlighting position, pressing the menu button provides the option of one of three HDR modes which shoot a fast burst of bracketed images and produces a composite HDR image from them. Below I’ve included examples of the three levels available, I’d assume that each level uses a wider EV interval then the previous ones.
COOLPIX P520 Program Auto200 ISO |
COOLPIX P520 Backlighting HDR Level 1
 160 ISO | |
 | ||
COOLPIX P520 Backlighting HDR Level 2250 ISO |
COOLPIX P520 Backlighting HDR Level 3250 ISO | |
 |  |
As on the Lumix FZ70 / FZ72, the COOLPIX P520 sets the ISO sensitivity automatically in Backlighting mode and for my example it chose 160 ISO for the first Level 1 HDR example, then raised it to 250 ISO (the light remained consistent) for the other two examples at level 2 and Level 3. In addition to the HDR composite the COOLPIX P520 also saves a non-HDR composite shot, but I’ve included a shot taken in Program auto mode with the sensitivity set to 200 ISO which I think provides a better comparison.
As you can see from the results above, while all three HDR Levels provide a greater level of highlight and shadow detail, the level 2 and 3 composites look a little flat and unnatural. The results will depend to some extent on the subject, but I’d be a bit wary of the higher levels and at least take a shot in Program auto mode as a back up.
 |  |  | ||
High-contrast monochrome |
Selective colour |
Cross process |
Finally, the effects position on the mode dial provides a range of filters which you can apply in-camera to reproduce traditional darkroom techniques. A selection of these is shown above. You either love or hate this stuff, but whatever your view, it’s becoming increasingly popular on cameras aimed at all levels. While effects modes are a relatively new addition to COOLPIX compacts, they’ve been available for a while on Canon and Panasonic models. They also allow you to shoot in RAW+JPEG mode, which means you can have a JPEG with the effect applied, plus an unadulterated RAW file to fall back on, something the COOLPIX P520 sorely lacks.
Nikon COOLPIX P520 movie modes
The COOLPIX P520 has a best quality HD movie mode of 1080p25 which is encoded at an average bit rate of 18.8Mbps. All of the video modes are available in PAL and NTSC compatible frame rates (i.e. 25/30 and 50/60fps) depending on the Video mode setting in the Setup menu. From here on I’ll use the PAL specifications, but NTSC frame rates are also available. The 18.8Mbps mode is indicated in the menu by a star, there’s also a non-starred 1080p25 mode that’s encoded at a lower 15.7Mbps average rate. Next on the menu is and interlaced 1080i50 mode, followed by 720p25. That’s followed by a 960p540 mode saved in Apple’s edit-friendly iFrame format, and lastly a VGA mode that records 640×480 resolution video at 25fps (or 30fps for NTSC video mode).
That’s just the normal speed modes; the COOLPIX P520 also has several HS options for playback at speeds other than real time. HS480/4x shoots 640×480 video at 4x normal speed (100 or 120fps depending on whether you have PAL or NTSC video mode selected) which plays back at quarter speed. HS720/2x records 1280×720 at double the normal frame rate for half speed playback, and finally 1080/0.5x records full HD video at half the normal frame rate for double-speed playback.
Audio isn’t recorded with the HS video modes but I was pleasantly surprised to discover that you can use the effects filters. The only limitation on this is that the Soft and Nostalgic sepia effects are only available with the HS720/2x mode. I should also mention that you can’t use the use zoom or Full-time AF with the HS modes. Regardless of that, this is an impressive range of high speed recording modes and surpasses the PowerShot SX50 HS which provides two High speed modes 4x and 8x at VGA (640×480) and QVGA (320×240) respectively. The Lumix FZ70 / FZ72 doesn’t offer any high speed video modes.
The COOLPIX P520 doesn’t have a movie position on the mode dial, so recording is started by pressing the dedicated record button whatever mode you’re in. One of the drawbacks of this approach is that you can’t frame up your shot very easily as the screen switches from 4:3 proportions to 16:9 (assuming your shooting in one of the HD or iFrame modes). But there is a least a display mode that superimposes the 16:9 area on the 4:3 screen for you.
The COOLPIX P520 provides two autofocus modes for movie shooting, Single AF (AF-S), which sets the focus at the beginning of your clip and Full time AF (AF-F) which continually adjusts it. AF-S is the default, but if you want to record anything that’s moving, or if you’re panning the camera from near to far subjects, you need to switch to Full-time AF. The COOLPIX P520 manages reasonably well in Full-time AF mode, it’s reasonably stable and doesn’t frantically flit from one subject to another, but it didn’t perform particularly well in my coffee cup test (see below) when I panned from a close up of a coffee cup to a more distant bar and back again.
The COOLPIX P520 doesn’t support any of the PASM exposure modes for movie shooting, regardless of the position of the mode dial and ISO, the sensitivity and exposure are set automatically. If you want more control over exposure for movies the Lumix FZ70 / FZ72 provides full PASM modes and will even let you change settings while recording. The PowerShot SX50 HS, only goes as far as letting you chose from a selection of scene modes.
| |
|---|---|
| |
| |
| |
|---|---|
| |
| |
| |
|---|---|
| |
| |
| |
|---|---|
| |
| |
| |
|---|---|
| |
| |
Nikon COOLPIX P520
handling
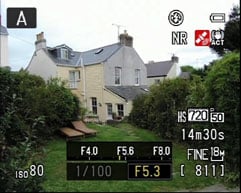
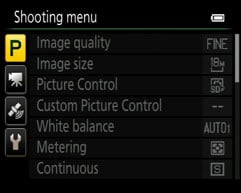
The COOLPIX P520 isn’t the World’s fastest super-zoom. Switch it on and it’s ready to shoot in a couple of seconds – not lightning fast, but not snail-like either. But it isn’t the response when you turn it on that’s the COOLPIX P520’s problem, it’s the time it takes to write data to the card. The COOLPIX P520 seems to take an age to ready itself for the next shot after you’ve pressed the shutter release. Unlike the PowerShot SX50 HS and Lumix FZ70 / FZ72 the COOLPIX P520 has no quick menu button so for things like image quality and size, ISO sensitivity setting, white balance, continuous shooting, exposure bracketing, and AF mode, among others, a trip to the Shooting menu is required.
The COOLPIX P520’s menu system is divided over four tabs, Shooting, Movie, GPS and Set up. The Shooting menu is a long list of 18 items, so changing something like the AF mode, or Active D-lighting, which are in the middle somewhere, can be a bit tedious. The COOLPIX P520 does have a single programmable function button, though, which can be assigned to one of nine functions including image quality, size, white balance, metering, continuous shooting, ISO sensitivity, AD area mode and Vibration reduction.
The built-in GPS receiver gets in own tab on the menu system from where you can turn it on or off, create a track log and synchronise the camera’s clock with the accurate time clock of the GPS satellite system. There’s also an option to display points of interest at one of 6 detail levels; level 1 provides only general regional information, in my case it told me I was in England. You can get more specific location information, and the database is reasonably accurate, though there were a couple of occasions when in places that I was familiar with the location information made little sense. The location information from the database can be embedded in the image, as of course are the lat and long co-ordinates and these can be used by applications to place your photos on a map.
In practice the GPS worked pretty well. Time taken to acquire satellites, like all such systems, depends on where you are and how long it is since the system was last able to obtain a fix, and varies from under a minute to a wait of several minutes. The GPS continues to update its position even when the camera is switched off, enabling the continued recording of track log data and reducing the time taken to obtain a fix when you turn the camera back on. Obviously it takes its toll on battery life, so if you plan on making extensive use of it there’s even more of a necessity to pack a spare. Despite that, it’s a great feature to have and one clear advantage the COOLPIX P520 enjoys over the PowerShot SX50 HS and Lumix FZ70 / FZ72.
 |
 |
 |
 |
 |
 |
Nikon COOLPIX P520 focus
In general use the COOLPIX P520’s contrast detect AF is swift, though not lightning fast. In good lighting conditions it’ll lock on to a subject quickly, with a short, but perceptible delay between half-pressing the shutter release and the beep sounding to indicate the focus has locked.
The COOLPIX P520 has no fewer than seven AF area modes – Face priority, Auto, Manual, Centre (normal), Centre (wide), Subject tracking and Target finding AF. The P520’s face detection works reasonably well when people are within a few metres of the camera in good light. But it quickly loses faces when they turn to profile and seemed to have quite a lot of trouble recognising spectacle wearers. If there are no faces in the frame it defaults to the nine-area AF system which it uses to focus on the subject closest to the camera. Alternatively you can manually select the focus area from one of 99 positions using the multi-selector to move the frame around a 9×11 grid.
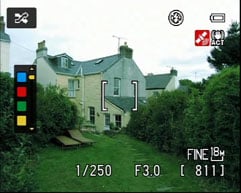
The COOLPIX P520 also includes the target finding AF feature introduced on the COOLPIX S8200 in 2011 and later included on the P7700. This identifies both human and non-human subjects in the frame when the camera is pointed at a scene. It’s quite interesting to watch the P520 at work while it’s doing this – potential subjects are identified and tracked with green rectangles. If you’re shooting people, face recognition is probably a better choice of AF modes, but target finding does seem to have an uncanny knack for picking the main subject in a scene which for some situations is a real improvement on the nine-area AF mode.
Nikon COOLPIX P520 Continuous shooting
The COOLPIX P520 has two full resolution continuous shooting modes; Continuous L shoots a burst of up to 30 frames at about 1fps and Continuous H shoots a one-second burst of 7 frames at, that’s right, 7fps. There are also some novel continuous shooting options that use a pre-shooting cache to capture a sequence including images recorded before you press the shutter release. The pre-shooting cache starts recording when you half-press the shutter release for half a second or more and captures a total of up to 20 frames included 5 pre cached frames at around 15fps.
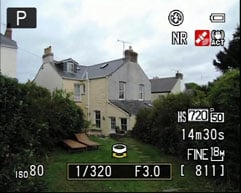
I tested the COOLPIX P520’s full resolution Continuous H 7fps burst mode by fitting it with a freshly formatted SanDisk Extreme Pro UHS-1 card, set the image quality to large fine JPEG and set the shutter speed to 1/500 in Shutter priority exposure mode. Set to Continuous H mode, using its electronic shutter the P7700 fired a burst of exactly 7 frames in a second. Below you can see the first six frames of a seven frame sequence shot in Continuous H mode.
There are two other reduced resolution modes running at 60fps and 120fps at 1920×1080 and 640×480 respectively. The COOLPIX P520 also has the Best Shot Selector and multi-shot 16 features common on COOLPIX compacts, the former, designed for low light shooting, takes a burst of ten shots and retains the sharpest one. Multi-shot 16 takes a 16-shot 5 Megapixel burst at around 30fps and combines the images into a 16×16 grid. Lastly, there’s an interval timer which shoots at intervals of 30s, 1m, 5m or 10m.
 |
 |
 |
 |
 |
 |
The COOLPIX P520 doesn’t offer particularly fast continuous shooting or extended bursts, if the action lasts any longer than a second you won’t be able to capture at full resolution. But it does offer a wide range of reduced resolution burst modes as well as some novel and versatile ones. If you want fast continuous shooting at full resolution, neither the PowerShot SX50 HS nor the Lumix FZ70 / FZ72 does better, for that a better option would be something like the Canon PowerShot S120 or G16, or of course a mid-range DSLR. But the COOLPIX P520 does at least offer some other options.
Nikon COOLPIX P520
Sensor
The COOLPIX P520 has a new 1/2.3in, 18.1 megapixel sensor that produces images with maximum size of 4896×3672. Photos are saved as JPEGs at one of two quality settings, Normal and Fine. Fine JPEG files are typically around 5MB to 7MB in size; note unlike the Lumix FZ70 / FZ72 and the SX50 HS, there’s no opportunity to record a RAW file. The ISO sensitivity range is 80 to 6400 ISO with a 12800 ISO black and white scene mode. The shutter speed range is 1/4000 to 8 seconds.
To see how the quality of the Nikon COOLPIX P520 measures-up in practice, take a look at my COOLPIX P520 quality and COOLPIX P520 noise results pages, browse my COOLPIX P520 sample images, or skip to the chase and head straight for my verdict.