 Canon's EOS 200D / Rebel SL2 is a compact DSLR aimed at photographers and vloggers buying their first interchangeable lens camera. Replacing the four-year-old EOS 100D / SL1, it offers a more sophisticated point-of-entry than the cheapest DSLRs and a smaller body to boot. You get a choice of three body colours, a 24 Megapixel APSC sensor with Dual Pixel CMOS AF for smooth and confident refocusing in Live View and movies, a fully-articulated touchscreen, and Wifi with NFC and Bluetooth for easy connectivity. The entry-level EOS 1300D / T6 may remain Canon's cheapest DSLR, but with its smaller body, superb movie autofocus, mic input and flip-out touchscreen, the EOS 200D / SL2 is simply much more compelling for first-time DSLR buyers who are willing to spend a little extra. It may not have 4k video, and the viewfinder autofocus and burst shooting are basic for sports and action, but overall for the money it remains a highly desirable and highly recommended camera, especially if you're into video.
Canon EOS 200D / Rebel SL2 review
-
-
Written by Gordon Laing
In depth
Canon’s EOS 200D, or Rebel SL2 as it’s known in North America, is a compact DSLR aimed at photographers buying their first interchangeable lens camera. Announced in June 2017, it replaces the four-year-old EOS 100D / SL1, and like that model offers a more sophisticated point-of-entry than the cheapest DSLRs and a smaller body to boot.
Available in black, white or silver and tan, the EOS 200D / SL2 is the smallest and lightest DSLR from Canon. The resolution receives a boost from 18 to 24 Megapixels and more importantly the Hybrid AF system has been upgraded to Canon’s Dual Pixel CMOS AF for smooth and confident refocusing in live view and movies. To make the most of the live view and movie autofocus, Canon’s equipped the EOS 200D / SL2 with a fully-articulated touchscreen monitor which lets you tap to refocus for stills or video. Beginners will also appreciate the guided user interface which helps you explore the creative options.
As before there’s a small optical viewfinder with a basic 9-point AF system, burst shooting is slightly quicker at 5fps vs 4fps, and 1080p movies are now available at up to 60p with continuous autofocus, and while there’s no 4k, the external microphone input remains. Bringing it in-line with other modern cameras, the EOS 200D / SL2 also includes built-in Wifi with NFC and Bluetooth, the latter used for easy connectivity, seamless GPS tagging and image browsing and transfer with your phone even when the EOS itself is powered-off. The entry-level EOS 1300D / T6 may remain the cheapest Canon DSLR, but with its smaller body, better movie AF and fully-articulated touchscreen, the EOS 200D / SL2 is much more compelling for first-time DSLR buyers who are willing to spend the extra. Find out if it’s the right camera for you in my in-depth review!
Canon EOS 200D / Rebel SL2 design and controls
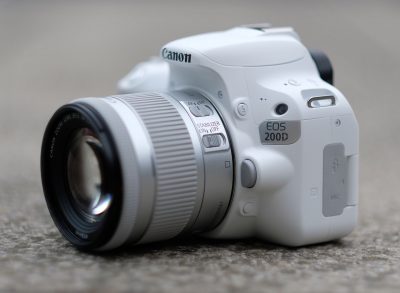
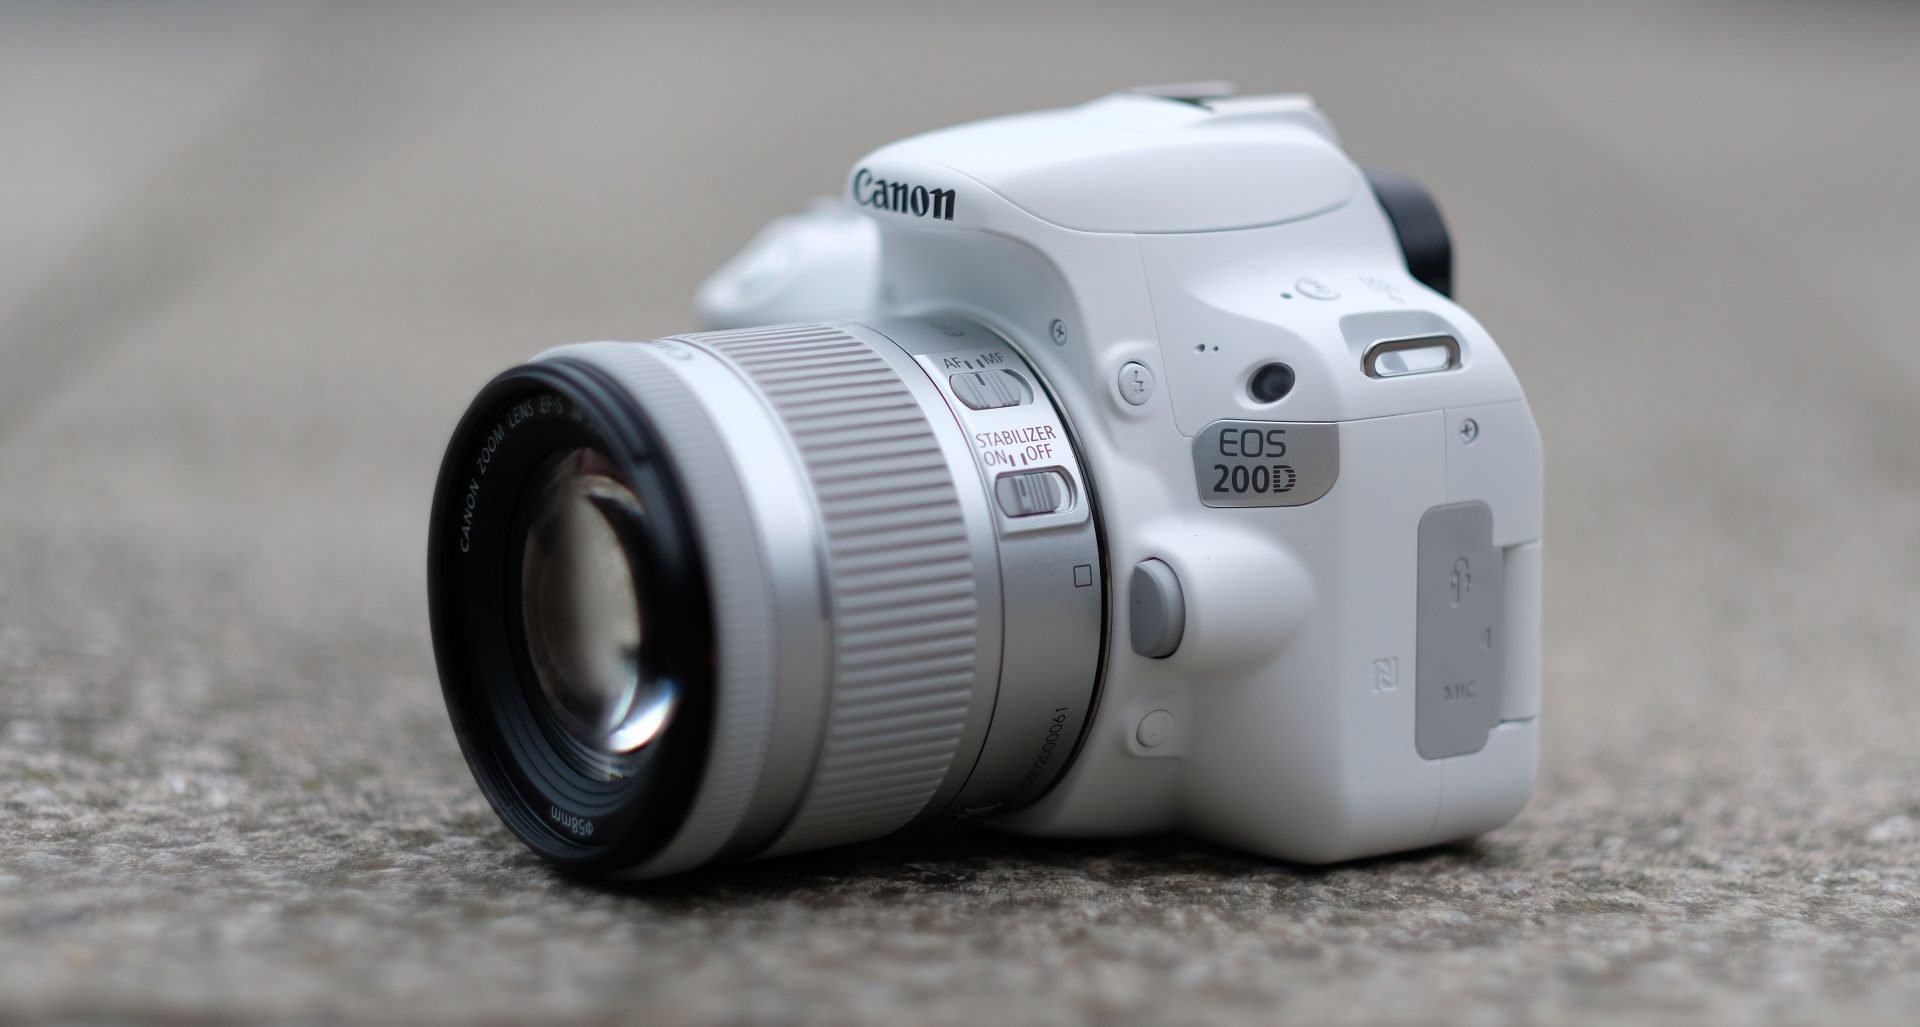
Above: Canon’s EOS 200D / SL2 is the smallest and lightest DSLR in the current EOS lineup. Measuring 122x93x70mm and weighing 453g including battery (but no lens), it’s refreshingly compact for a DSLR, although a tad larger and heavier than its predecessor thanks to the new articulated screen. It also remains larger than a typical mirrorless camera at this end of the market, but again if you want a traditional DSLR with an optical viewfinder than won’t dominate your bag, the 200D / SL2 will fit the bill. Canon’s also wisely broadened the availability of alternative colours, so in most regions you should be able to get a 200D / SL2 – and a matching kit zoom – in black, white, or silver and tan. I was particularly fond of the white version I photographed here. The grip also feels deeper with a grippier finish than before too, although the build quality remains the same – as such there’s no weather-proofing to speak of.

Above: The EOS 200D / SL2 on the left and the older EOS 80D on the right. Canon now offers four cropped-frame APS-C DSLRs with the killer combination of Dual Pixel CMOS AF and a fully-articulated touchscreen: the EOS 200D / Rebel SL2, EOS 800D / Rebel T7i, EOS 77D and EOS 80D. The EOS 80D is the most sophisticated of the group, although the heftiest too at 139x105x79mm and 730g including battery (but no lens). If you were considering the 80D for its movie capabilities, the 200D / SL2 gives you most of them (apart from the headphone jack) in a smaller, lighter and more affordable package.

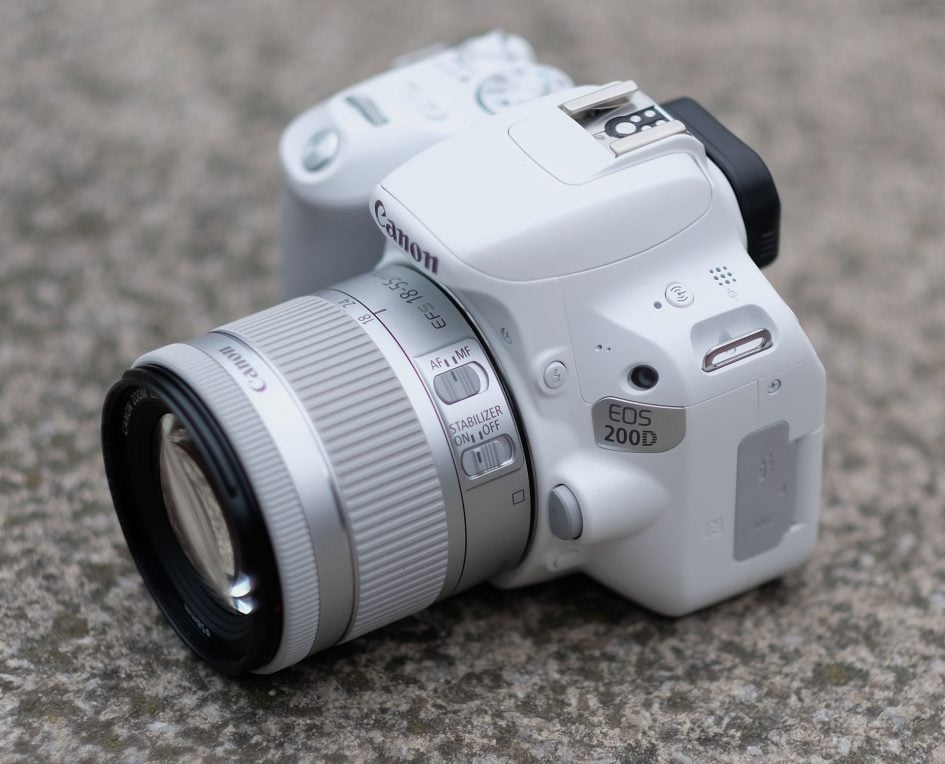
Above: In terms of controls, Canon’s made a number of changes to the top panel of the 200D / SL2 compared to its predecessor. The presence of wireless connectivity is indicated by a dedicated Wifi button to the left of the viewfinder hump, although if you can exploit Bluetooth or NFC, you won’t be needing it as you’ll be able to initiate the connection from your phone. The mode dial to the right of the viewfinder hump is now indented and flush to the upper panel, and Canon’s also dispensed with the earlier chunky power switch around it in favour of a separate power dial to the side. While both controls offer the same Off, On and Movie positions, I prefer the older style on the 100D / SL1 as it felt more tactile. Meanwhile the single finger dial remains behind the shutter release button, and in front of it the dedicated ISO button is now joined by a DISP button.
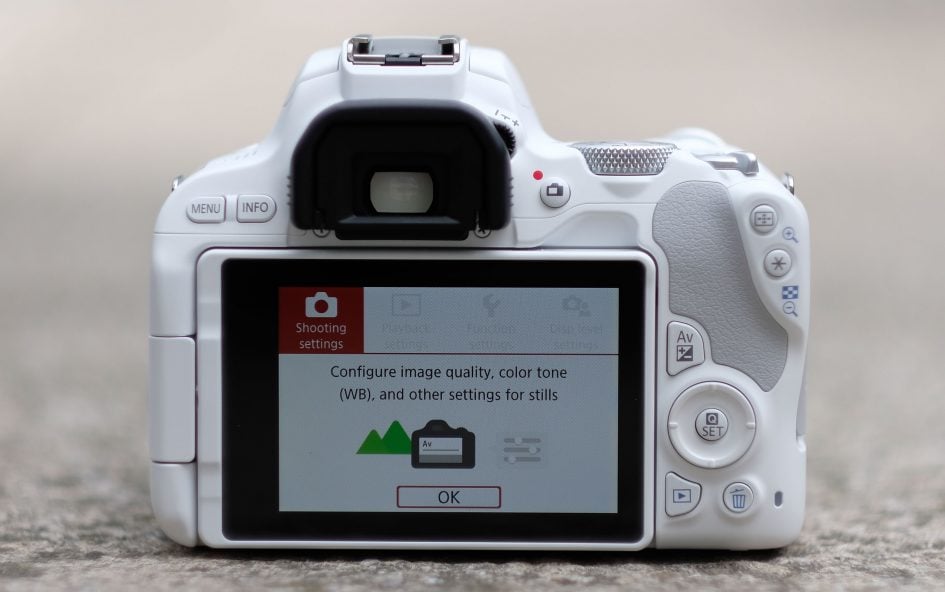 Above: while Canon’s made a number of tweaks to the upper panel of the SL2 / 200D compared to its predecessor, the rear panel layout is essentially unchanged. As such there’s a button to the right of the viewfinder that enters or exits live view in stills mode, or starts and stops video in the movie mode. There’s the usual focus area and focus lock buttons, cross keys with a central customizable SET button, and an AV button for accessing exposure compensation, or aperture settings in Manual. There’s no dedicated function buttons on the 200D / SL2 – you can only customize the SET button.
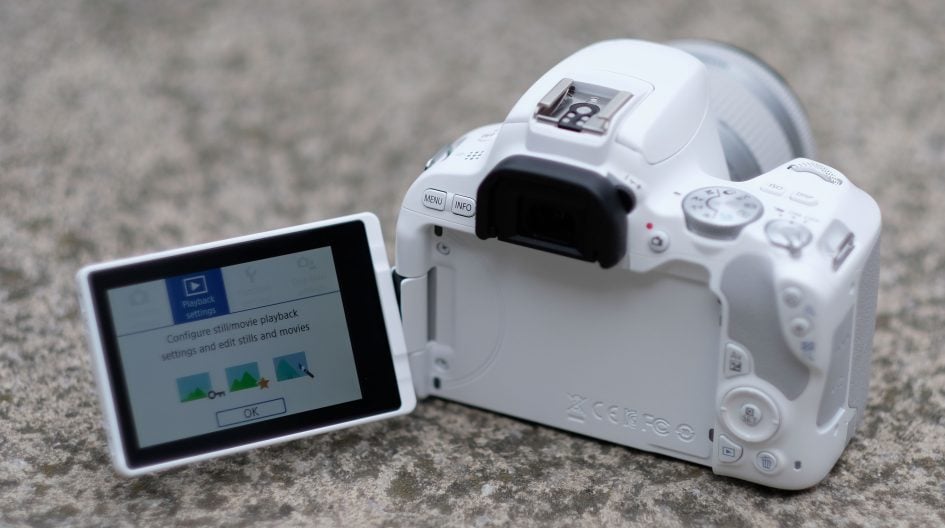
Above: The EOS 200D / Rebel SL2 allows you to compose with a traditional optical viewfinder or a fully-articulated, side-hinged touchscreen. Like other lower-priced DSLRs, the 200D / SL2 employs a penta-mirror optical viewfinder with 0.87x magnification, 95% coverage and basic shooting information / warnings. It’s par for the course on a DSLR of this class, but most electronic viewfinders on rival mirrorless cameras deliver a bigger image with 100% coverage and a wealth of shooting aids absent here. The 200D / SL2’s screen though is much more sophisticated: the 3in / 3:2 shaped / 1.04 Million dot panel benefits from a small boost in brightness from the menus, but then provides a clear and detailed view that can be flipped-out and angled in almost any direction. You can tap to focus (and trigger the shutter too if desired), zoom-in to check focus, display alignment grids and a live histogram, although there’s sadly no levelling gauge nor focus peaking available. During playback you can swipe through images, pinch to zoom, push to scroll, or double-tap for an instant maximum zoom. Canon also lets you tap your way through the entire user interface, from the super-imposed Q menu to the full tabbed menu options.
In terms of connectivity, the EOS 200D / Rebel SL2 is equipped with a 3.5mm microphone input and a port for the optional RS-60E3 remote cable release behind a flap on the left side of the body. Behind a flap on the right main grip side, you’ll find a Type-C HDMI port and a USB 2 port. Unlike the higher-end EOS 80D, there’s no headphone jack, but I wouldn’t expect one on a camera at this price or size.
On top of the camera is a hotshoe for mounting an optional Speedlite flashguns or external microphones. I tried vlogging with the 200D / SL2 with a Rode VideoMic Pro shotgun microphone connected to the mic input on the side. The combination worked well, and with the microphone connected, there was only a tiny obstruction with the screen flipped out to face you. See the movie mode section later in the review for more details.
Power is supplied by an LP-E17 Lithium Ion battery pack that’s good for up to 650 shots with the optical viewfinder or 260 in Live View. If you’re filming movies, Canon estimates around two hour’s worth of video per charge, although in my own tests I actually managed around 20 minutes longer, spread across five clips. Like all Canon DSLRs, the battery itself is charged externally in a traditional AC unit which demands a wall outlet – sadly no convenience of in-camera charging over USB here, unlike most rival mirrorless cameras.
The battery pack is housed in a compartment under the camera alongside the SD memory card slot, with a door that’ll be blocked when mounted on all but the smallest tripod plates. I tried the camera with UHS Class I and II cards and while it happily works with both, there appeared to be no benefit in the faster Class II versions in terms of buffer depth or emptying times.
The 200D / SL2 is well-equipped for wireless connectivity with Wifi, NFC and Bluetooth, all of which I’ll cover later in the review. I’ll just finish for now by noting the 200D / SL2 is also compatible with Canon’s recent BR-E1 Bluetooth remote control accessory.
Canon EOS 200D / Rebel SL2 lenses
As an EOS DSLR, the 200D / SL2 features a standard EF lens mount with native compatibility with the entire Canon EF lens catalogue, including EF-S models designed for its smaller APS-C sensor. This is the key benefit of the EOS 200D / Rebel SL2 over rival formats, especially youthful mirrorless ones: native access to over 80 lenses from the enormous Canon catalogue without the need for an adapter or compromised AF performance. I should also add that some of the budget lenses are much more affordable than mirrorless alternatives, in particular models like the EF 50mm f1.8. See my Canon lens guide for the lenses I recommend.
With its APS-C / cropped sensor, the EOS 200D / SL2 effectively reduces the coverage of all lenses by 1.6 times, so the 18-55mm kit zoom delivers a field-of-view equivalent to 29-88mm. Here’s how the coverage of this lens looks in practice.
Above: Canon EF-S 18-55mm coverage
I tested the EOS 200D / Rebel SL2 with a variety of lenses including the EF-S 18-55mm f3.5-5.6 STM, EF 50mm f1.8 STM, EF 85mm f1.8 and EF 70-200mm f2.8L IS USM II. The STM lenses feature the best focusing performance in live view and movies, so if you intend to film lots of video or shoot using the screen, I’d recommend going for them over non-STM lenses.
It’s worth paying attention when you’re ordering a kit as the body is often sold in a variety of bundles that may or may not have the exact lens you’re after. A common kit lens option for the 200D / SL2 is the most recent EF-S 18-55mm f4-5.6 STM kit zoom which is shorter than the earlier model (61.8mm vs 75.2mm) and claims superior image quality. Unfortunately this particular lens wasn’t available at the time of reviewing the camera, so I used the older and physically longer EF-S 18-55mm f3.5-5.6 STM kit zoom which shares the same coverage, but has a slightly brighter aperture at the wide-end. I’d be happy to sacrifice this small benefit for the shorter barrel of the newer lens given the choice.
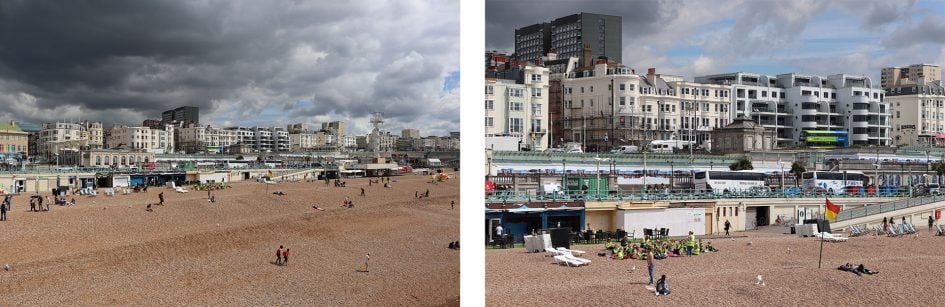
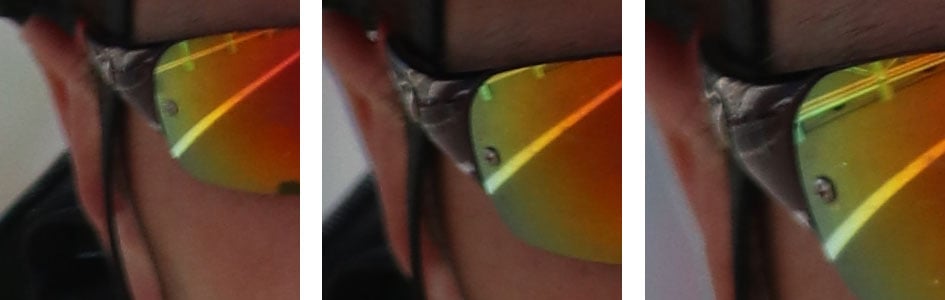
If you’re looking for a second lens to complement the kit zoom, I’d recommend the EF 50mm f1.8 STM as it will allow you to achieve much shallower depth-of-field effects where you can blur the background and concentrate on the main subject. This is perfect for portraits, or still life subjects. To illustrate the difference between it and the kit zoom, here’s two shots of the same subject at the maximum aperture of each lens: f5.6 on the 18-55mm at 55mm on the left and f1.8 for the 50mm on the right. The difference in blurring potential is clear! Check out my Canon EF 50mm f1.8 STM review for full details.

Above left: EF-S 18-55mm at 55mm f5.6. Above right: EF 50mm f1.8 at f1.8
The shallow depth-of-field effect also works well in movies and thanks to the great video focusing and touchscreen on the EOS 200D / SL2, you can easily ‘pull-focus’ between near and far while filming. Here’s a clip I filmed using the EF 50mm f1.8 STM, and I have another example with the EF-S 18-55mm STM kit zoom in the movie mode section later. Once again this effect works best with Canon’s STM lenses that have the smoothest and quietest refocusing for video.
Above: Download the original file (Registered members of Vimeo only).
PS – if you’re into vlogging, you can just about get away with one of the EF-S 18-55mm kit zooms, but even at 18mm your face can become quite large on the frame with the camera held at arm’s length – see my clip later in the movie mode section. Instead I’d recommend the EF-S 10-18mm zoom which goes much wider, allowing you to appear further away while also being more forgiving to any camera shake. See my Canon EF-S 10-18mm STM review-so-far.
Canon EOS 200D / Rebel SL2 autofocus and burst shooting
Like most modern DSLRs, the EOS 200D / Rebel SL2 is equipped with two different autofocus systems depending on whether you’re shooting with the traditional optical viewfinder or with the screen in Live View. There’s pros and cons to both systems, but overall the Live View experience is superior in almost every respect.
When shooting through the optical viewfinder, the EOS 200D / SL2 employs a fairly basic 9-point AF system, spread in a diamond pattern; as always, this concentrates the points towards the middle of the frame, neglecting the corners. Only the centre AF point is cross-type and sensitive to both horizontal and vertical patterns, and it’s only sensitive in light levels down to -0.5 EV.
When shooting in Live View, the EOS 200D / SL2 employs Dual Pixel CMOS AF which allows 80% of the sensor area to become phase-detect AF points, before switching back to imaging when the picture needs to be taken. It all happens seamlessly and from the photographer’s perspective you get to enjoy a responsive and confident autofocus system when shooting with the screen. The area of focusing coverage is rectangular and covers most of the frame, giving you much broader coverage than the viewfinder system. It also works in much lower light levels too, down to -2EV, and again across the entire area too, not just in the middle. Dual Pixel CMOS AF can also deploy face detection to track human subjects almost anywhere on the frame, and the camera also offers zoned AF areas in Live View. The only major limitations when shooting in Live View are slower burst shooting and increased battery consumption; some may also simply prefer shooting through the viewfinder and there’s no denying it feels more intuitive when shooting action, not to mention easier in bright light.
When using the viewfinder AF system you can manually choose which of the nine AF points to use, or let the camera automatically select from them. You can also choose whether to use One Shot (Single AF), AI Servo (Continuous AF), or AI Focus (which automatically switches between them depending on the subject. I prefer to use One Shot for static subjects or AI Servo for moving ones rather than risk the camera not figuring it out. When shooting action, I also prefer to manually choose the AF area closest to the subject or person’s face and try to keep it positioned over it or them, but beware on the 200D / SL2, only the central point is the most sensitive to different patterns and lowest light, meaning the other eight points around it may not be as quick or confident.
In Live View you can choose between Face / Tracking, Smooth Zone AF and Live 1-point AF. The Face / Tracking mode uses face detection to recognise a human subject, or if none are detected, it reverts to an automatic selection of a 7×7 / 49 area grid. If you tap anywhere on-screen, a small square target is positioned over it, after which the camera will attempt to track it across the frame whether it, or you, move around. The tracking can work well if there’s sufficient difference in colour or contrast between the subject and background, but my challenge with action and sports was trying to tap a subject that could be moving towards me or around the frame at speed, especially if the camera were handheld.
Smooth Zone AF lets you position a large rectangle almost anywhere on the frame by touch, which the camera then sub-divides into nine smaller AF areas; it allows you to tell the camera approximately where you want it to focus, before leaving the final selection within that smaller area to the camera. I found this mode much more effective for tracking action, as I could narrow the area I wanted to camera to concentrate on, before leaving it to finalise the selection. Finally, Live 1-point AF lets you define the position of a small, single AF area by touch for precision focusing.
In any of the Live View focusing modes, you can choose to enable continuous autofocus by selecting Servo AF, using an icon button in the corner of the screen. Thanks to Dual Pixel CMOS AF driving the Live View focusing, it’s possible to track subjects approaching or receding at reasonable speed – and across a broader area and in lower light too than the viewfinder AF system, albeit at a reduced burst rate.
In use I was struck at the difference in performance between the traditional viewfinder AF system and that of Dual Pixel CMOS AF in Live View. When composing with the viewfinder, the central AF point felt fine, but switching to any of the other eight I noticed the confidence reduce quite visibly, especially in lower light. The camera would search more and in low light sometimes never settle confidently on the subject.
In good light, using continuous autofocus to track subjects in motion, I again found the central point adequate for most tasks, but the other eight delivered a lower hit rate when I came to view the results at higher magnifications. If you’re experiencing a modest hit rate for focusing with the 200D / SL2, I’d suggest manually selecting the central point only.
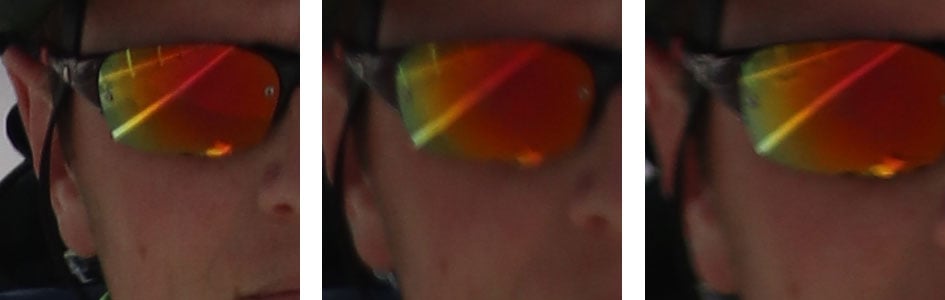
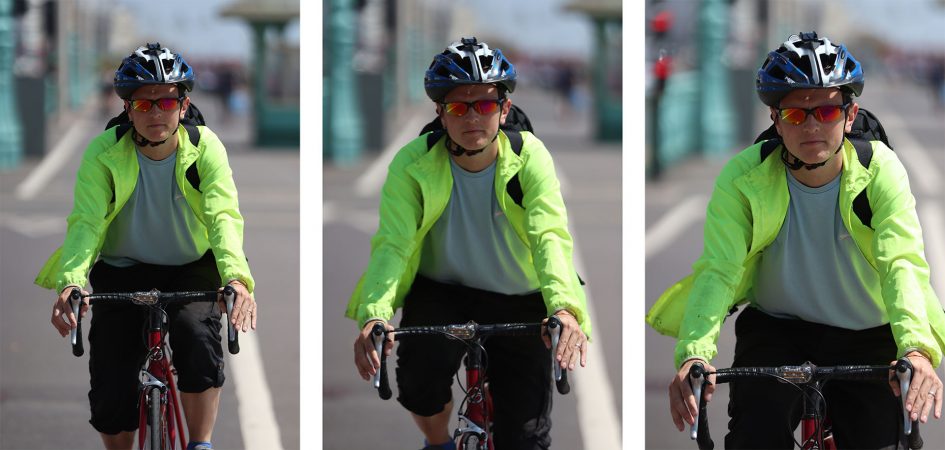
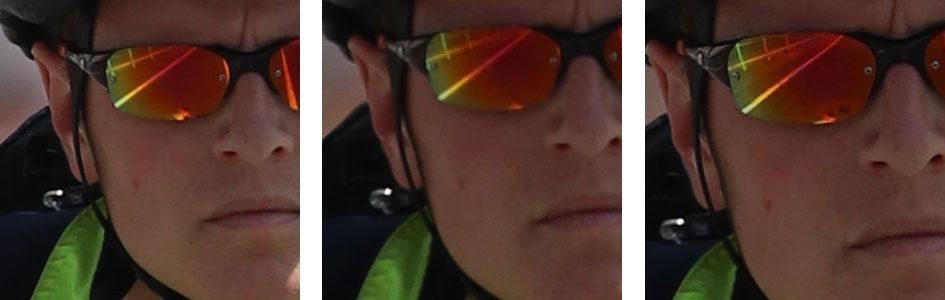
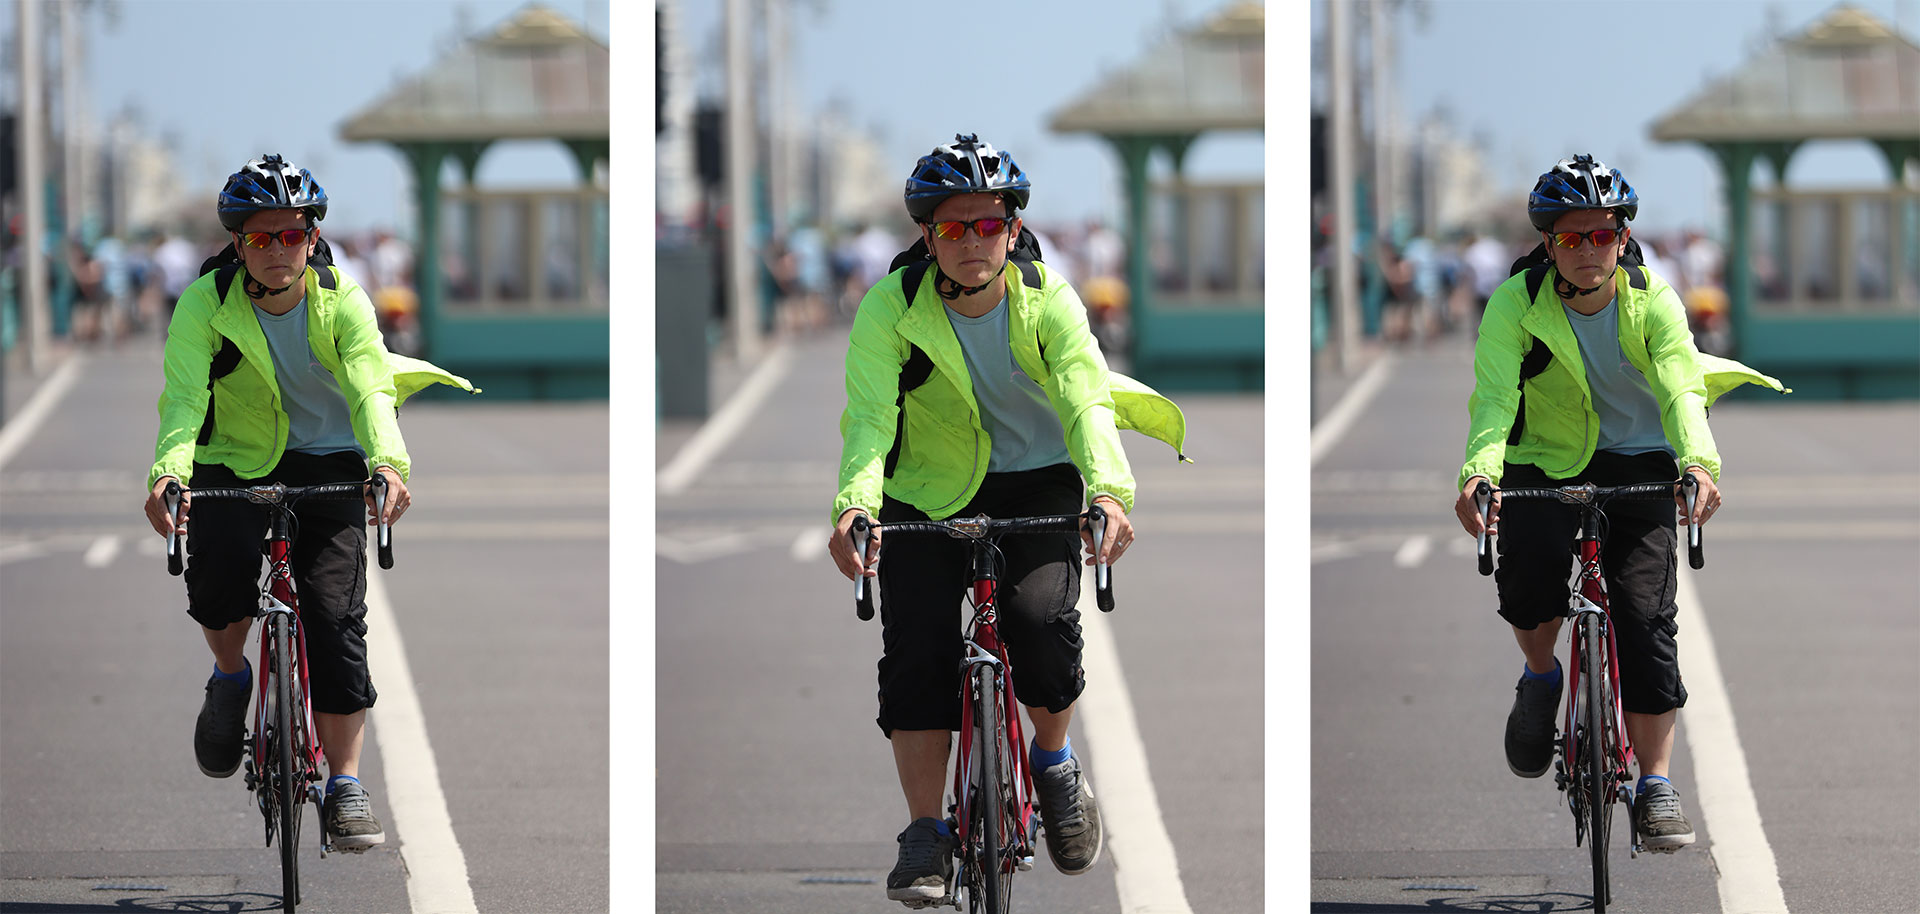
To illustrate my experiences with continuous autofocus, here’s a short sequence of my friend Ben riding his bike straight towards me at mild speed. I used the EF 70-200mm f2.8L IS USM II at 200mm f2.8 and in this sequence, the upper-most AF point when the camera was held vertically. This was positioned over Ben’s face.
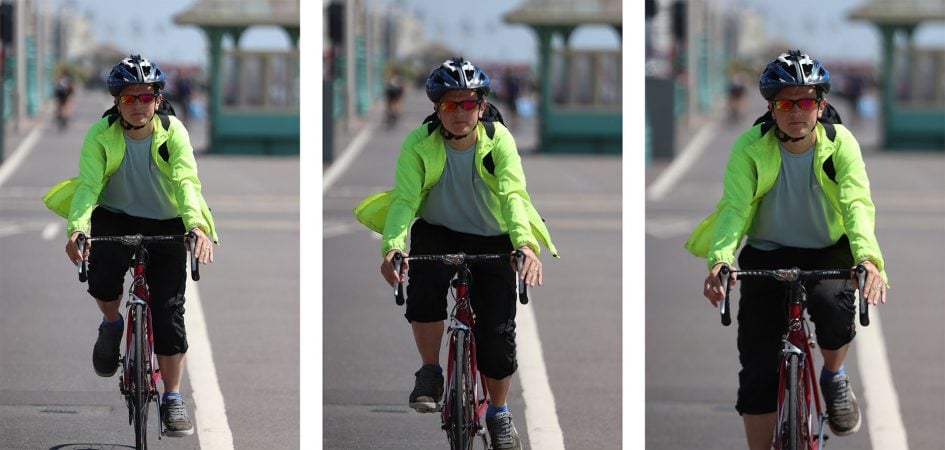
Above: EF 70-200mm f2.8 at 200mm f2.8. Below: 100% crops. Taken with viewfinder AF.
Above: EF 70-200mm f2.8 at 200mm f2.8. Below: 100% crops. Taken with viewfinder AF.
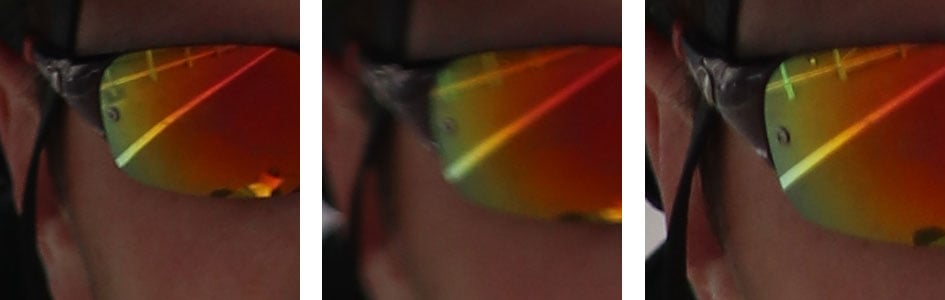
Above: EF 70-200mm f2.8 at 200mm f2.8. Below: 100% crops. Taken with viewfinder AF.

Switching to Live View delivered quite a different autofocus experience. Not only was there much broader coverage across the frame, but it remained effective in lower light and didn’t mind if the subject was in the middle or the corners; it could also deploy face detection or zoned options.
In single AF situations, I found the 200D / SL2 kept focusing in noticeably lower light than the viewfinder-based system, and at times when the viewfinder AF struggled, the Live View system locked-on more quickly and with greater confidence.
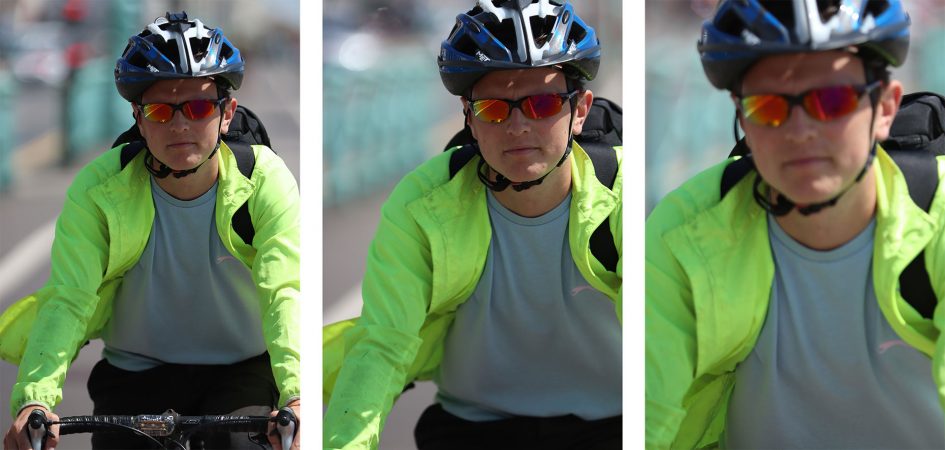
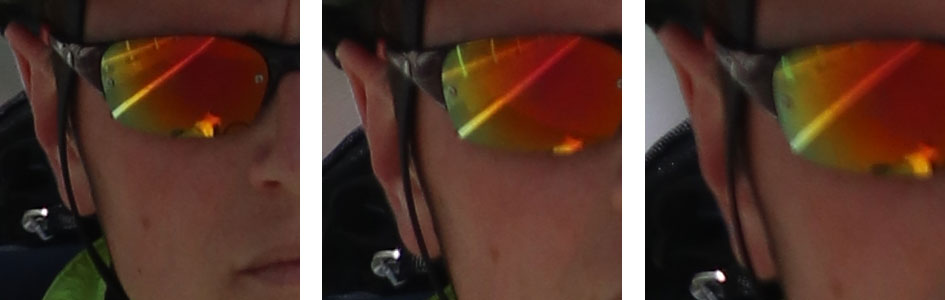
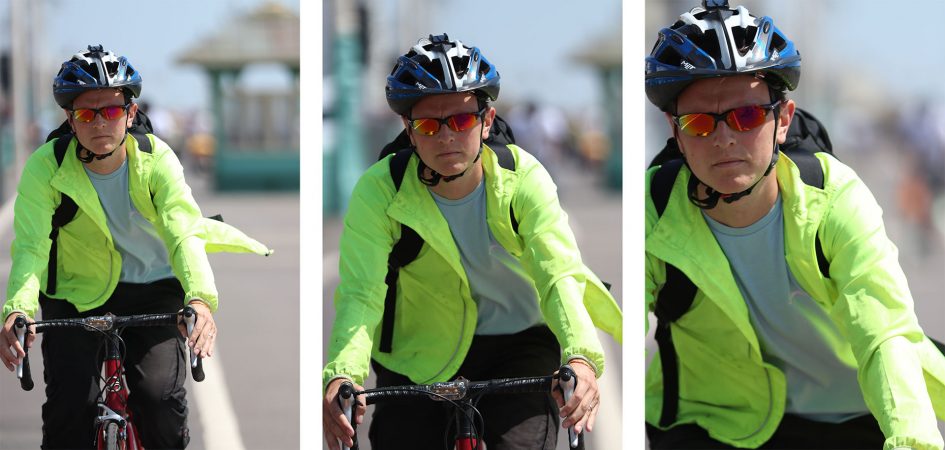
In continuous autofocus, or rather Servo AF, the Live View system could also track subjects quite effectively, although in my tests the burst speed fell to a modest 3.5fps or so. As noted earlier, I also found it awkward to deploy the tracking by tapping the screen when handholding the camera and with the subject already in motion, but the zoned options worked well. Indeed it was the Smooth Zone AF option I used to test the Live View AF again with Ben and the EF 70-200mm f2.8L IS USM II at 200mm f2.8.
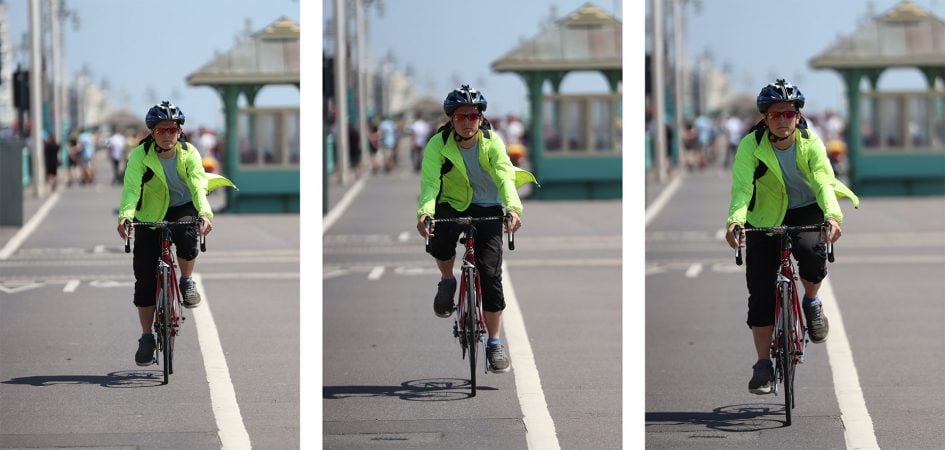
Above: EF 70-200mm f2.8 at 200mm f2.8. Below: 100% crops. Taken in Live View.
Above: EF 70-200mm f2.8 at 200mm f2.8. Below: 100% crops. Taken in Live View.
Above: EF 70-200mm f2.8 at 200mm f2.8. Below: 100% crops. Taken in Live View.
To formally measure the burst shooting speed of the 200D / SL2, I fitted it with a freshly-formatted Lexar Professional 32GB UHS-II 2000x card, rated at 300MB/s, set the shutter to 1/500, the sensitivity to 400 ISO and fired-off a number of tests.
Using the viewfinder and with the quality set to Large JPEG, I fired-off 100 frames in 20.1 seconds, for a speed of 4.97fps. The camera seemed happy to keep shooting JPEGs at this speed while memory and power remained, and essentially flushed the buffer in real-time. Set to RAW though, the buffer comes into play very quickly: I managed the quoted six RAW frames in just over a second, for a speed of 5.1fps before the camera slowed significantly to just 1.4fps. If I let go of the shutter after the initial burst, the camera took four seconds to clear the buffer.
When composing in Live View, I shot 169 frames in 34.71 seconds for a rate of 4.87fps, and again the camera seemed happy to keep shooting while memory and power remained.
So far all of these tests were performed with fixed focus. Setting the 200D / SL2 to AI Servo and shooting with the viewfinder saw me capture 74 frames in14.97 seconds, for a rate of 4.94fps. Switching to Live View and enabling Servo AF allowed me to capture 63 frames in 17.95 seconds for a rate of 3.5fps.
These figures confirm what I experienced in practice, and also roughly what Canon quotes for the camera. When set to JPEG you should be able to keep shooting indefinitely at around 5fps, although if you want 5fps with continuous autofocus you’ll need to use the viewfinder and as noted earlier that means relying on the central AF point only for the best results. When set to Live View, the 200D / SL2 can maintain 5fps, but only for fixed focus – once set to continuous, the speed falls to around 3.5ps in my tests. And as for RAW? The buffer is too small to make it practical, with only six frames available at the full speed.
So with a viewfinder that’s limited to a basic 9-point AF system with modest low-light sensitivity and only one cross type sensor, and live view limited by a lower frame rate, the EOS 200D / SL2 isn’t a leader when it comes to action or sports photography. If you want faster burst shooting with continuous autofocus at this price point, you should consider a Sony mirrorless camera like the Alpha A6000. Alternatively if you like the idea of buffering the last second or so of action, allowing you to effectively rewind to capture the perfect moment, then you may enjoy shooting in the 4K Photo modes of a Lumix G mirrorless camera. See my Sony A6000 review and Panasonic Lumix GX80 / GX85 review for more details.
Canon EOS 200D / Rebel SL2 shooting modes
The EOS 200D / SL2’s mode dial provides access to the different shooting options and unlike the chunky raised dial of its predecessor, it’s now recessed within the body and turned by your thumb from the rear. The new mode dial also has fewer positions than before, although the core options remain. Alongside the traditional Program, Aperture Priority, Shutter Priority and Manual modes, there’s Canon’s green square Auto+, flash-off, Creative Auto, SCN and Creative Filter modes. Anyone coming from the older 100D / SL1 will note the addition of Creative Filters and the removal of the four dedicated positions for the most common scene presets.
The camera has access to mechanical shutter speeds between 1/4000 and 30 seconds, plus a Bulb option for longer exposures; the fastest flash sync speed is 1/200. There’s no built-in Bulb timers for pre-set periods, but when shooting in Live View you can start and stop a Bulb exposure by tapping the screen and a timer is helpfully displayed. There’s no interval timer facilities built-in either, unless you count the timelapse movie mode which doesn’t record the individual images. Offering some consolation though is the supplied EOS Utility for Mac OS and Windows systems which, when connected via USB or Wifi, offers both an interval timer and Bulb timer; the Camera Connect app also lets you tap your phone’s screen to start a Bulb exposure and again to stop it.
The 200D / SL2’s shutter makes a defined mechanical clack sound that comes across a little differently to the slightly quieter and more motorized sound of the higher-end EOS bodies. As with other EOS models, there’s a ‘Silent Shutter’ drive mode that appears to simply slow down and stretch out the mechanical processes to make it sound a little quieter. It’s certainly less sharp and a little quieter than the standard shutter but it only works in single AF modes and remains far from silent.
It’s important to note at this point that genuinely silent cameras have been available for some time, just not from Canon. The vast majority of mirrorless cameras from rival manufacturers now allow you to shoot with an electronic shutter option which may have some quality issues when you pan, but have the benefits of operating in absolute silence while also typically allowing you to access faster shutter speeds (in some cases as quick as 1/32000) which are useful when shooting with large aperture lenses in daylight.
To be fair, a DSLR could only allow an electronic shutter in live view, but it’d still be a useful feature to have. I should also add the 200D / SL2 does actually deploy an electronic shutter when capturing a timelapse video, but you can’t use it in normal live view shooting modes.
Moving on, the metering through the viewfinder is performed by a 63-zone TTL sensor with the choice of Evaluative (linked to all AF points), Partial (9% of viewfinder at centre), Spot (4% of viewfinder at centre), or Centre-weighted metering. I used Evaluative metering for all my test shots and while the 63 zone sensor on the 200D / SL2 is far from Canon’s most sophisticated, it generally did a fine job with anything I pointed it at; you can see examples on my samples page. If you’re shooting in Live View, the 200D / SL2 can analyse the entire frame with a more sophisticated 315 zone system, and also deploy scene detection in full Auto, for an even more foolproof experience.
If you want to over-ride the metering, exposure compensation is available in a range of +/-3EV. Auto Exposure Bracketing is also available, although like most Canon bodies at this end of the market, it’s limited to three frames between 0.3 and 2EV apart. If you’re into HDR photography, a selection of in-camera options are available in the Creative Filters mode, more about which in a moment.
Canon wants you to make the most of the camera, so helps you explore the options in each mode with a handy on-screen guided interface. It’s all operated by touch, but to prevent unwanted adjustments, you’ll first need to enter the Q menu either by pressing the SET button on the rear, or by tapping the Q icon on-screen; try tapping anywhere else on-screen and you’ll be instructed to tap the Q icon first. Once you’ve entered the Q menu, the screen is split into an upper and lower section. In the upper section you’ll see the more graphical options like sliders to adjust the key settings, while in the lower half you can tap a number of smaller panels to adjust things like the drive and AF modes.
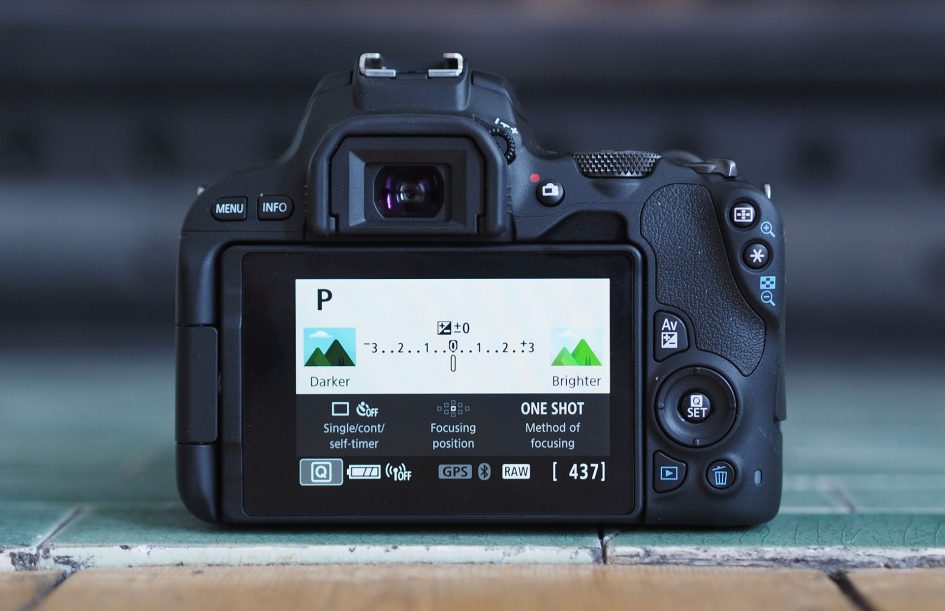
Above: In Program mode, the graphical slider adjusts exposure compensation with icons on either side explaining the adjustment will make the picture darker or brighter.
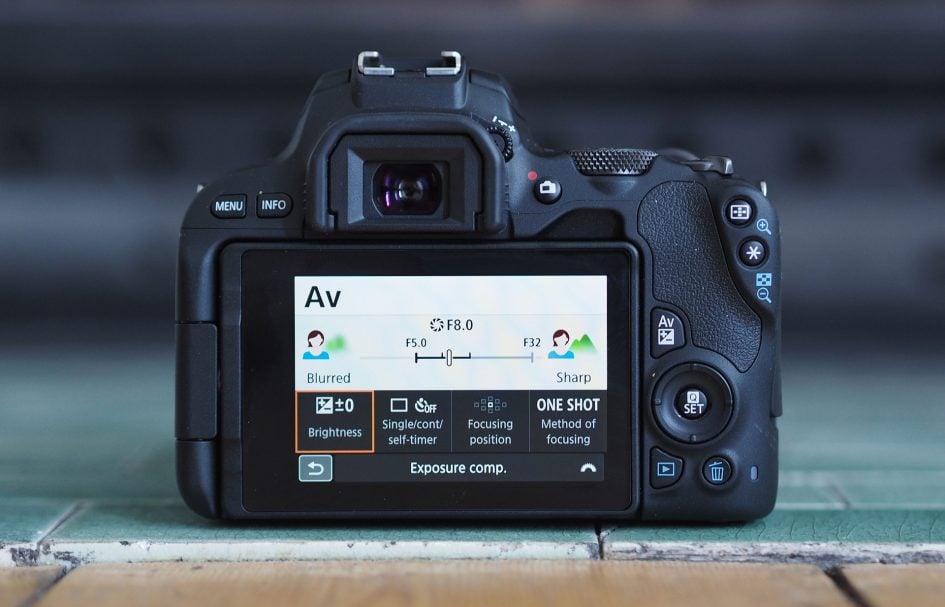
Above: In Aperture Priority mode, the slider adjusts the lens aperture with the guide explaining one end blurs the background while the other end sharpens it.
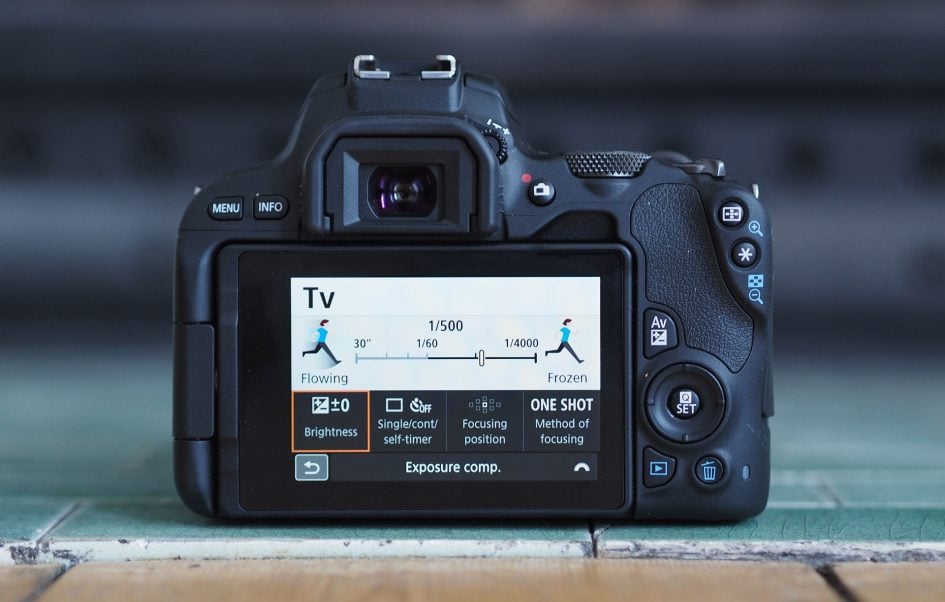
Above: Meanwhile in Shutter Priority, the slider adjusts the shutter speed, with each end of the scale indicated by a person in motion with flowing on the left and frozen on the right.
The guide changes on the mode, but in each case makes it easy to explore the creative options available. I think Canon’s done a great job here in making all aspects of the camera very accessible to beginners without patronizing more advanced photographers – it appeals to, and works well with all skill levels.
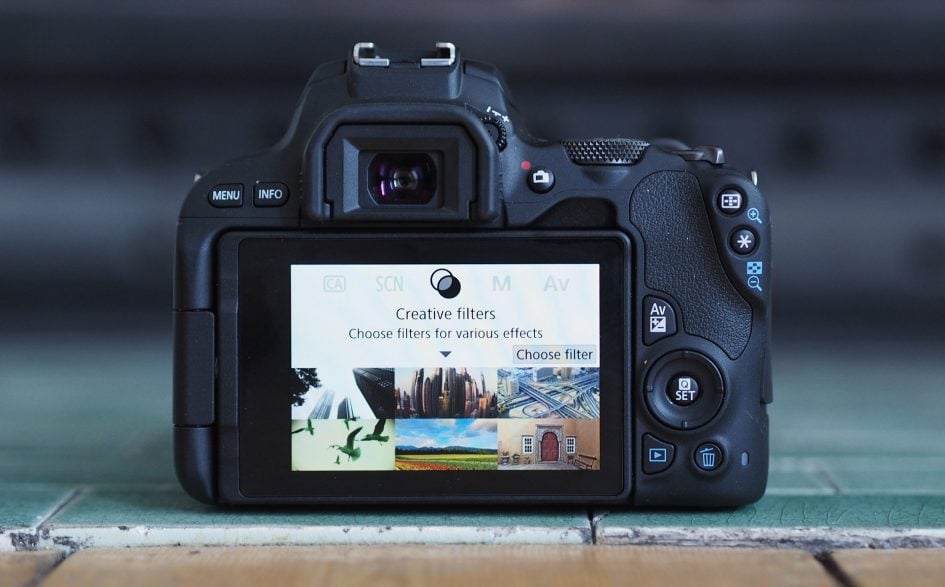
Turn the mode dial to Creative Filter and you can choose to apply one of ten effects: Grainy B&W, Soft Focus, Fish-eye effect, Water Painting Effect, Toy Camera effect, Miniature effect, and four HDR options which capture and combine three frames with varying tone mapping: you’ve the choice of HDR Art Standard, HDR Art Vivid, HDR Art Bold and HDR Art Embossed. Here’s how a selection of the filters look in practice.
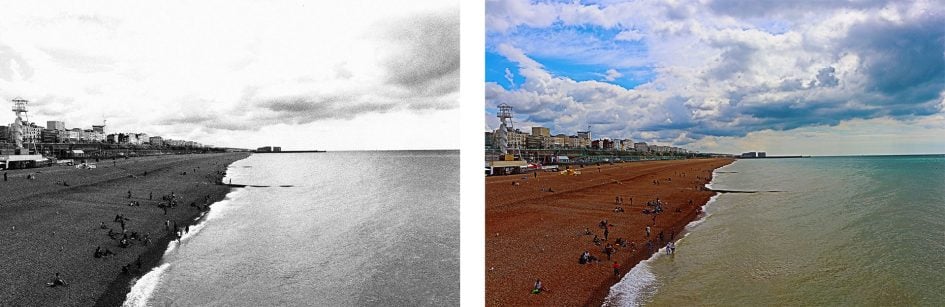
Above left: Grainy B&W effect. Above right: Art Bold effect.
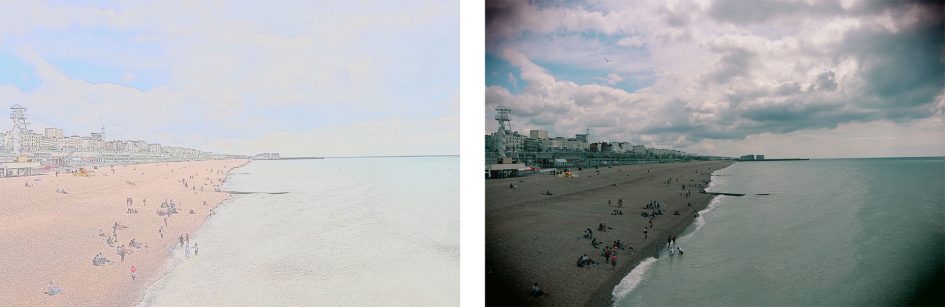
Above left: Water painting effect. Above right: Toy Camera effect.

Above left: HDR Art Standard effect. Above right: HDR Art Vivid effect.

Above left: HDR Art Bold effect. Above right: HDR Art Embossed effect.
The Creative Filter mode operates in JPEG only – the RAW options disappear from the quality menu. If you prefer more flexibility, you may prefer to shoot normally in RAW, then apply Creative Filters in playback from the menus. This lets you apply Grainy B&W, Soft Focus, Fish-eye effect, Water Painting Effect, Toy Camera effect or Miniature effect to an existing RAW (or JPEG) file, then generate a new JPEG with the effect. You’ll note the HDR options aren’t available after the event as these require three frames to be taken and processed into one at the point of capture, but Canon offers an additional Art Bold option in playback which simulates the HDR effect.
Note the ability to apply effects in playback to existing images is an option by itself. Sadly unlike many cameras nowadays, there’s no broader RAW processing available in-camera, to adjust things like White Balance, colour, contrast or sharpening after the event. I should also mention that cropping and resizing is also possible in playback, but only to existing JPEGs, not RAW files.
The seven filter effects offered in playback are also available when shooting in Live View in the traditional PASM modes, although you won’t find them if you’re shooting with the viewfinder. You could argue this makes sense as it’s helpful to preview the effect electronically, and for a DSLR that means shooting in Live View using the screen. But then when the mode dial is turned to Creative Filter, the camera doesn’t mind if you’re composing electronically or with the viewfinder. It can also be confusing to find a slightly different selection of filters depending on the mode you’re in – for example when shooting in PASM, I’d find the effects options in Live View, but wonder where HDR had gone, then become even more confused when all the effect options disappeared when shooting with the viewfinder, unless I turned the dial to Creative Filters.
I should also add that if the mode dial is set to Creative Filters and you enter movie mode, yet another selection of effects becomes available: Dream, Old Movies, Memory, Dramatic B&W, or Miniature which are applied automatically to the clip as you film – see the Movie mode section in a moment.
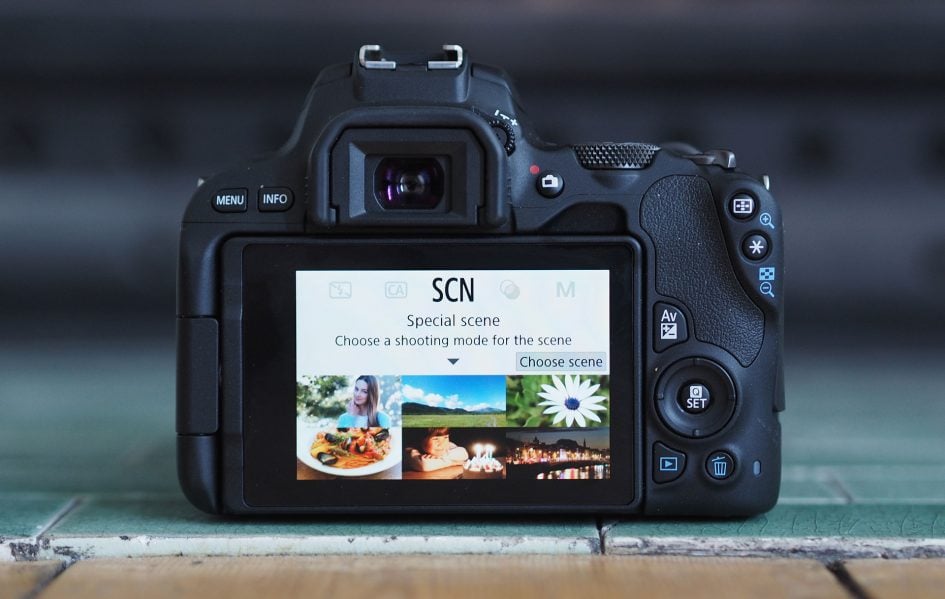
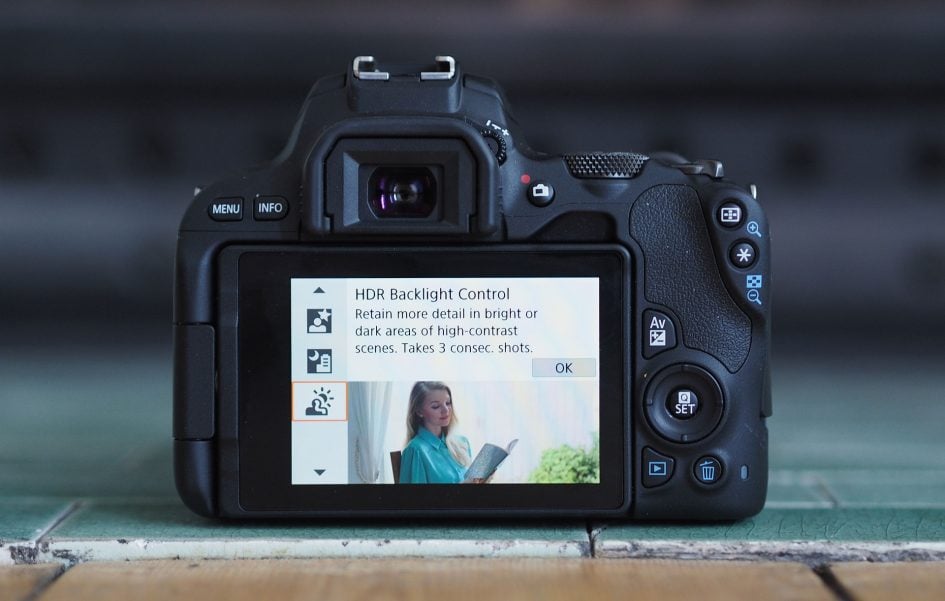
Moving on, turning the mode dial to SCN lets you choose from the following presets: Portrait (maximizing the potential for blurring depending on your lens), Group Photo (deploying a larger depth-of-field to maximize the number of people in focus), Landscape, Sports (which enabled continuous autofocus, burst shooting and faster shutters), Kids, Close-up, Food, Candlelight, Night Portrait (which retains lights in the background), Handheld Night Scene (taking four shots for shooting at night without a tripod), and HDR Backlight Control (taking three shots and combining into one).
If you prefer an even easier life though, turn the dial to green square auto which, as noted earlier, analyses the scene and deploys one of a selection of presets. This works best of all when shooting in Live View as the camera can work with data from the entire imaging sensor as oppose to just the metering sensor. Like earlier Canon cameras, it’s fun to see the icon indicating the detected conditions change in the corner of the screen when shooting in full Auto in Live View, particularly when it notices motion or a backlit subject.
Finally to wrap-up this section, there’s still no auto-stitched panorama option on the 200D / SL2. I don’t know why Canon continues to avoid it when most of its rivals, including Sony, Panasonic and Fujifilm, offer a means to pan the camera, capture a bunch of images then automatically stitch them together into one long photo. I think it would enhance the 200D / SL2.
Canon EOS 200D / Rebel SL2 movie mode
The EOS 200D / Rebel SL2 can film 1080p video up to 60p with full manual control over exposure and effective continuous autofocusing thanks to the Dual Pixel CMOS sensor; there’s also a 3.5mm microphone input, but unlike the EOS 80D, no headphone jack, and like all Canon consumer and mid-range bodies to date, no 4k nor any higher frame rate options either. Lack of 4k and slow motion aside though, the combination of a screen that can flip-forward to face the subject, an effective AF system with great face detection, and a mic input with a hotshoe for mounting accessories makes the 200D / SL2 a very capable movie camera and one that will greatly appeal to vloggers.
Set the camera to the PAL video system and you can film 1080p in 50p or 25p (in normal or light compression), 720p in 50p or 25p Light, or VGA in 25p (in normal or light compression). Set the video system to NTSC and you can film 1080p in 60p, 30p or 24p (with 30p available in normal or light compression), 720p in 60p or 30p Light, or VGA in 30p (in normal or light compression).
Filming 1080p or 720p without digital stabilisation takes the full sensor width and scales it down to the desired resolution without any field-reduction (beyond the 16:9 widescreen crop). The longest clip length is the usual second shy of half an hour and in terms of battery life, on a single charge I managed to record four 29:59 clips and a final one lasting 20:27 – for a total recording time of 140 minutes and 23 seconds, almost two and a half hours. At the end of the process, parts of the camera were a little warm, but not hot.
In most modes, the 200D / SL2 films with fully automatic exposure, but set the mode to Manual and you can adjust the aperture, shutter and ISO as desired; in Manual it’s also possible to lock the aperture and shutter and deploy Auto ISO to balance varying light conditions. You can display guidelines and or a live histogram if desired while composing the shot, although bizarrely both will disappear once you start recording; and like all Canon consumer cameras to date there’s no focus peaking nor zebra patterns to aid focusing and exposure.
The highlight of the EOS 200D / SL2’s movie mode is Dual Pixel CMOS AF, a big upgrade over the Hybrid AF system of its predecessor. Dual Pixel CMOS AF allows 80% of the sensor’s pixels double-up as phase-detect AF points, allowing the camera to confidently refocus without hunting. The touchscreen interface lets you tap just about anywhere and have the camera refocus on that point, or track a moving subject, such as an approaching face. It’s an absolute delight to use in practice, and while you’ll need an STM lens for the smoothest results, it still works well with USM models as you’ll see in the clips below. Here’s one filmed with the EF-S 18-55mm STM kit zoom, showing focus-pulling by touchscreen. I should also add it’s possible to pull-focus by remote control using the Canon Camera Connect app and tapping the live image on your phone’s screen.
Above: Download the original file (Registered members of Vimeo only).
Also new to the 200D / SL2 over its predecessor is a Timelapse Movie mode. This allows you to automatically capture up to 3600 images at intervals of between one second and a second shy of 100 days, and as you adjust these, the total capture and playback time is displayed. The exposure can be fixed throughout the sequence or adjusted for each frame, and to save power you can set the screen to switch off during the process. During capture the camera employs an electronic shutter for silent operation, although for feedback you can optionally enable a beep at every frame. Note the Timelapse mode is geared to creating video only, not stills, so individual photos aren’t saved, and annoyingly the minimum shutter speed is 1/25, even though the shortest interval is one second – frustrating if you want to introduce motion blur into each shot. Once complete, the camera automatically generates a 1080p movie file with IPB compression in 25p for PAL regions or 30p for NTSC. Here’s two examples of Timelapses I filmed with the 200D / SL2.
Above: Download the original file (Registered members of Vimeo only). Timelapse movie filmed with a Canon EOS 200D Rebel SL2. I enabled the Timelapse movie mode, set the number of shots to 500 and the interval to one second. Exposure was fixed at the first frame, using 1/50, f5.6 and 1600 ISO. I shot with the EF-S 18-55mm f3.5-5.6 at 18mm.
Above: Download the original file (Registered members of Vimeo only). Timelapse movie filmed with a Canon EOS 200D Rebel SL2. I enabled the Timelapse movie mode, set the number of shots to 300 and the interval to five seconds. Exposure was adjusted with every frame. I shot with the EF 85mm f1.8.
With the camera set to Movies and the mode dial set to Creative Filters, you can choose from Dream, Old Movies, Memory, Dramatic B&W, or Miniature effects which are applied automatically to the clip as you film.
Above: Download the original file (Registered members of Vimeo only).
Above: Download the original file (Registered members of Vimeo only). Also see my Canon 200D / SL2 Dream effect movie, Canon 200D / SL2 Dramatic B&W effect movie, and Canon 200D / SL2 Memory effect movie.
With the camera set to Movies and the mode dial turned to SCN, the 200D / SL2 enters its HDR movie mode. This halves the maximum frame rate to 25p or 30p for PAL or NTSC regions, allowing it to effectively capture two different exposures for every frame and combine them into one. This allows the 200D / SL2 to prevent clipping at one end of the tonal scale and Canon’s decided to go for protecting the highlights. The effect was subtle on my tests, but generally speaking the HDR movie mode can help retain some tonal detail in bright highlights that would otherwise become irretrievably washed out on a normal clip.
If you’re into grading your own footage you’ll need to explore the various Picture Styles available. There’s unsurprisingly no log option, so for the flattest footage you’ll need to shoot in Neutral with all the parameters turned down. Here’s an example for you in Neutral with sharpening, contrast, saturation and colour tone set to their lowest values.
Above: Download the original file (Registered members of Vimeo only).
The EOS 200D / SL2 also offers a Digital Zoom facility for movies that’s well worth checking out. The 24 Megapixel sensor has sufficient resolution for the camera to take a Full HD crop from the middle and effectively zoom-in by 3.125 times with no loss of quality. Canon then lets you gradually zoom further to around ten times, but this employs interpolation and scaling, so there’s no additional detail than the version at around 3x. But again if you stay at the start of the digital zoom scale, you’ll enjoy just over 3x magnification with no reduction in quality with full 1080 resolution. Here’s a clip showing the digital zoom in action, followed by crops from the footage.
Above: Download the original file (Registered members of Vimeo only).

Above from left to right: no zoom, digital zoom at 3x, digital zoom at 10x. All full image at 55mm.

Above from left to right: no zoom, digital zoom at 3x, digital zoom at 10x. All 100% crops of images above. Note how the 3x zoom contains genuinely more detail than the non-zoom version.
As noted at the start of this section, the EOS 200D / SL2 manages to tick a lot of boxes for vloggers, or anyone who needs to film pieces to camera. For me it has the holy trinity of a screen that can flip to face the subject, a means to connect and mount an external microphone without blocking the screen, and a great autofocus system with minimal searching and reliable face detection. The only things missing are 4k, a flat profile and a headphone jack, although to be fair most vloggers won’t mind at this price point. Built-in sensor-shift stabilisation would have also been great, but at least Canon offers a variety of optically stabilised wide zooms – I’d recommend the Canon EF-S 10-18mm for this kind of work, although if you don’t mind your face being quite large on the frame, you can just about get away with the EF-S 18-55mm kit zoom at arm’s length. Here’s a clip I filmed to demonstrate how the camera can work for vlogging: I used the EF-S 18-55mm at 18mm with face detection handling the autofocus and a Rode external shotgun mic mounted on the hotshoe for the audio. Note the 200D / SL2 specs claim it offers optional digital stabilisation for movies – which could help iron-out some wobbles at the cost of slightly cropped coverage – but I couldn’t find the option during testing; perhaps an incompatibility with the lenses I was using. So here you’re looking at the optical stabilisation of the kit zoom alone.
And now for a few more clips to wrap-up the video performance.
Above: Download the original file (Registered members of Vimeo only).
Above: Download the original file (Registered members of Vimeo only).
Above: Download the original file (Registered members of Vimeo only).
Above: Download the original file (Registered members of Vimeo only). Also see my Canon 200D / SL2 3200 ISO movie, Canon 200D / SL2 6400 ISO movie, Canon 200D / SL2 12800 ISO movie, and Canon 200D / SL2 25600 ISO movie.
Canon EOS 200D / Rebel SL2 wireless connectivity
The EOS 200D / Rebel SL2 is equipped with Wifi, NFC and Bluetooth, all representing a big upgrade over the original EOS 100D / SL1 which had no wireless connectivity at all.
Wifi lets you wirelessly remote control the camera with a Mac or Windows computer (using the free EOS Utility) or with an iOS or Android smartphone (using the free Camera Connect app). You can wirelessly transfer images to a variety of devices including smartphones, computers, printers and compatible cameras, or view them on DLNA devices like a Wifi-equipped TV. Alternatively you can connect the camera directly to the internet and share images on various networks via Canon’s Image Gateway.
Bluetooth allows the camera to maintain a low power link with your phone, allowing them to fire-up and connect their Wifi for you, or automatically tag images with the GPS location from your phone. It’s also possible to configure the camera so that the phone app can wake it up over Bluetooth even when it’s switched off in order to browse and copy images over – the first Canon camera to support this capability. NFC is also provided as an alternative to fire-up and connect the Wifi by touching a compatible phone against the side of the camera, and if all else fails, there’s also a dedicated Wifi button on the upper left panel of the camera that broadcasts a wireless network for you to manually connect to using your device.
I’ll concentrate on the smartphone and computer remote control here, starting with the former and the latest Camera Connect app which must first be installed on your handset. I tested the Android version 2.0.40.38 (build 593) on my Samsung Galaxy S7.
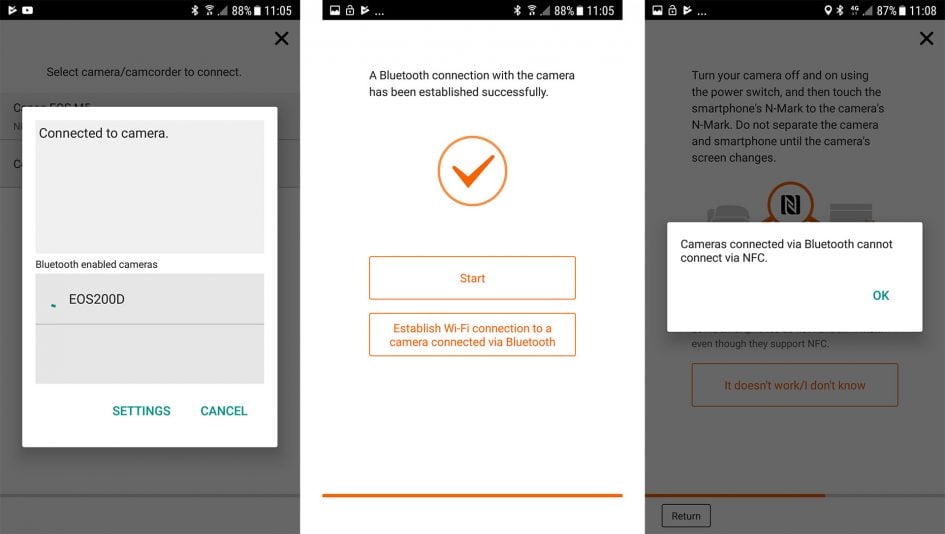
Once you’ve paired the Bluetooth on your camera and phone, it becomes by far the quickest and easiest way to get them working together. After starting the Camera Connect app, you’ll see a Bluetooth icon indicating the phone and camera are connected, after which you need only tap one of the options for the app to automatically fire-up the Wifi and connect them for the more serious business of browsing and copying images or remote control. The great thing is you don’t need to touch anything on the camera, or even have them right next to each other as the phone can initiate the process and control everything from that point on. As with most Wifi solutions though, don’t expect the connection to be instant – it’ll take around 15 seconds for the Wifi to startup and connect the devices together. Once again if you can’t get the Bluetooth to work, you can use NFC to connect your phone and camera or simply push the dedicated Wifi button on the camera for it to broadcast an SSID for you to manually connect to.
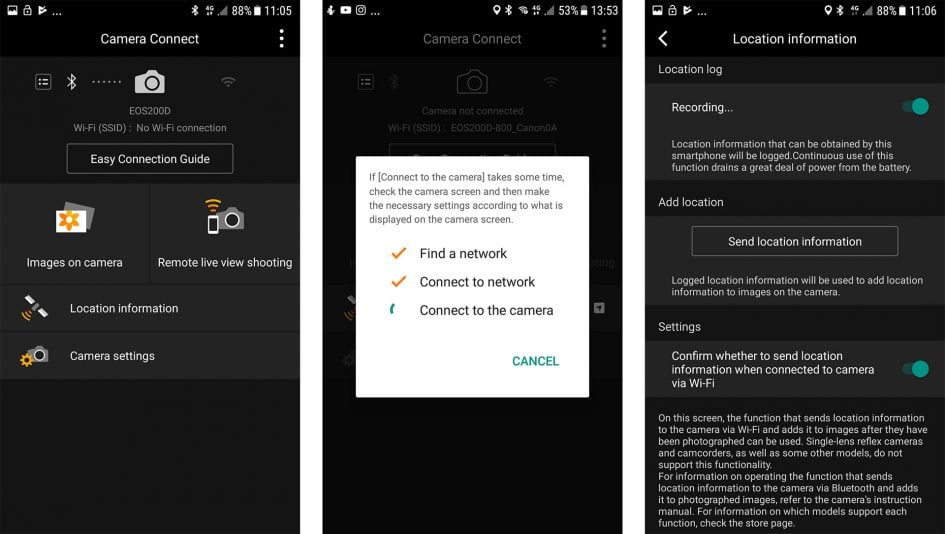
The app itself offers two main options: Images on Camera and Remote Live View Shooting. You’ll also see options for Location Information and Camera settings, although the former isn’t for use with the 200D / SL2 as I’ll explain in a moment.
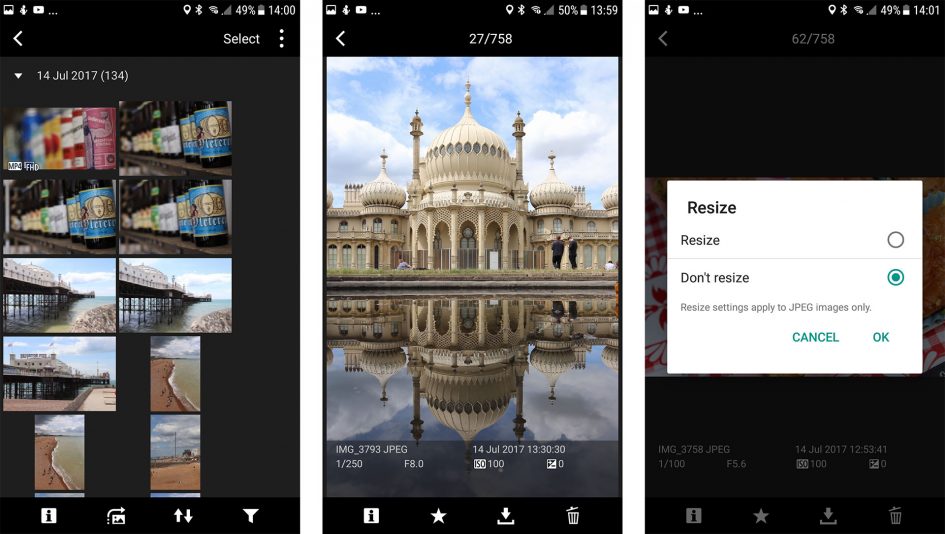
Selecting the Images on Camera option allows you to browse and download photos on the 200D / SL2’s memory card; these are presented in a choice of two thumbnail views on your phone, and once the desired image is selected, you can choose to copy it over in the original or a down-sized version. You can also copy MP4 movies in their original format up to 1080p if desired, and these imported without issue into mobile apps including Instagram on my phone; like most phone apps though, you won’t be able to access the RAW files. It’s also possible to initiate the wireless transfer of images during playback on the camera itself, if you prefer to use it for browsing.
A Bluetooth option in the camera’s menus labeled ‘Stay conn. if off’ allows the 200D / SL2 to remain connected to your phone over Bluetooth even the main switch on the camera is off. This means you can connect to it, browse and download images or movies without actually turning the camera itself on. This is the first Canon camera to offer the feature and thanks to the low power nature of Bluetooth, there’s minimal battery impact in doing so. I enjoyed being able to take my photos, then put the camera safely away into my bag, them access the images for sharing, one-handed, with my phone as I went about my day.
Returning to the app, the Remote Live Shooting option allows you to remote control the camera with your phone. You’ll see a Live View of the scene on your phone, and you can tap anywhere to refocus on a different subject, or double-tap for a magnified view. Depending on the camera’s shooting mode, you can also remote control the exposure, including the shutter, aperture, ISO or compensation, as well as White Balance, metering, AF mode, drive mode and image quality. Taking the app beyond most rivals, you can also adjust the manual focus of the lens in a choice of three increments in either direction – just like the ‘grown-up’ EOS Utility running on a Mac or Windows system. If the camera’s mode dial is set to Manual, you can also set the shutter to Bulb and tap once to start the exposure, and again to end it, complete with a handy timer on your phone’s screen; this is some compensation for the camera itself not featuring its own Bulb timers.
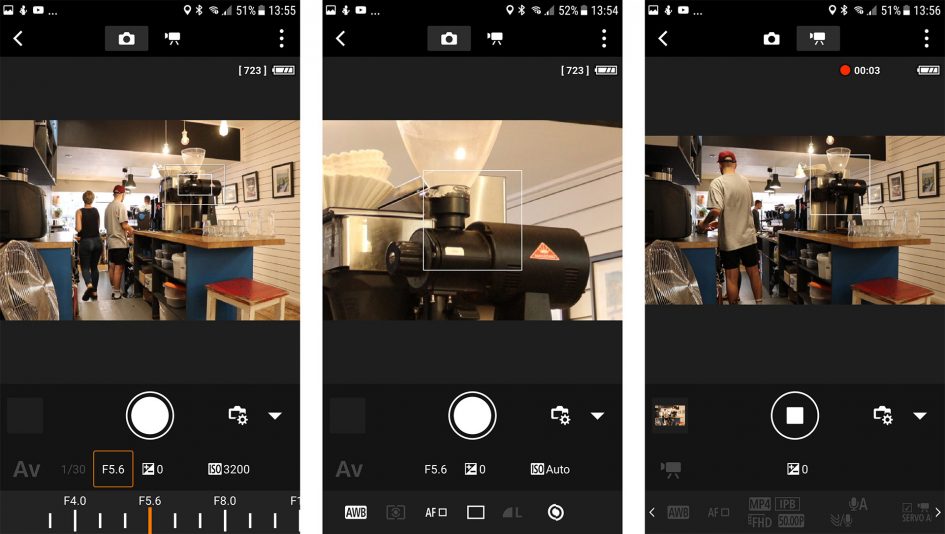
A button at the top of the app lets you switch into Movie Mode, again with full control over exposure and other options; you can also use the phone’s screen to pull-focus remotely while filming. Whether shooting stills or filming video, the files are always recorded to the camera’s memory card, but as explained above, they’re easy to subsequently access from the Images On Camera option in the app.
I mentioned earlier there’s a Location Information option in the app that records a log of GPS positions for tagging later. Since this option isn’t greyed-out when the app’s connected to the camera, you’d be forgiven for thinking this is the way to location-tag images on the 200D / SL2. Indeed I tried that before reading the manual, and was disappointed to find that despite happily recording the log, the app refused to then transfer it to the camera, saying it was not supported. Luckily frustration turned to relief and happiness when I read the manual and discovered location logging was not only possible, but actually much easier to implement in practice.
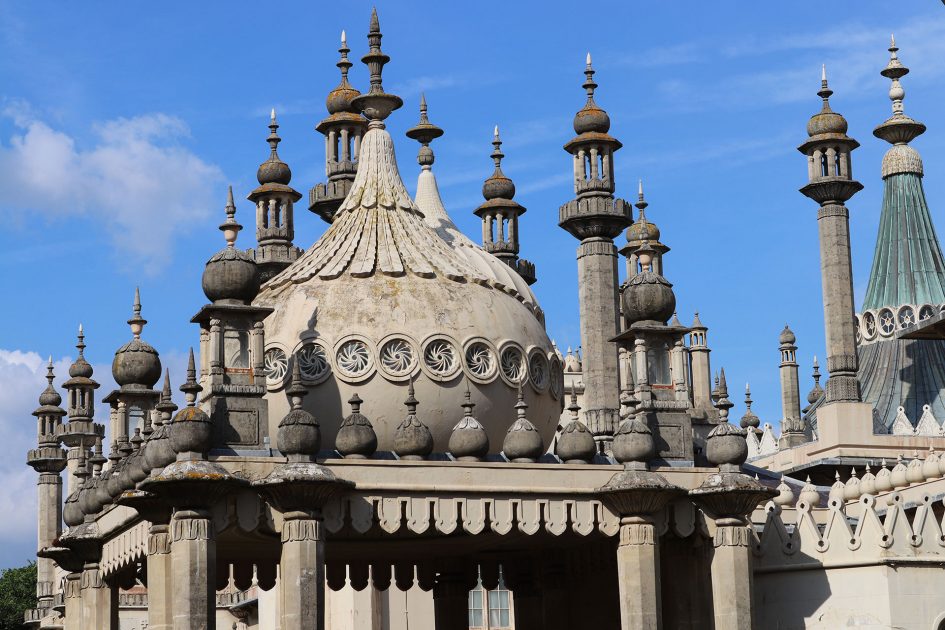
In the camera’s second Function Settings menu, you’ll find an option for GPS Device settings. Here, choose Smartphone, and so long as the camera and phone are connected with Bluetooth and the Camera Connect app is running, then all your images and videos will be automatically tagged with GPS positional data from your phone as you shoot. You don’t need to do anything else, and you’ll know it’s working as the GPS and Bluetooth icons on the camera’s screen will turn from greyed-out to Bold white. When it’s running, you’ll also be able to view the GPS co-ordinates on-screen, as well as seeing them on previously tagged images during playback. If you prefer privacy and don’t want tagging, just exit the Camera Connect app on your phone and you’ll see the GPS and Bluetooth icons become greyed-out again on the camera – or of course de-select Smartphone from the camera’s GPS menu. Here’s an image I took with the location logged and entered into Google maps.
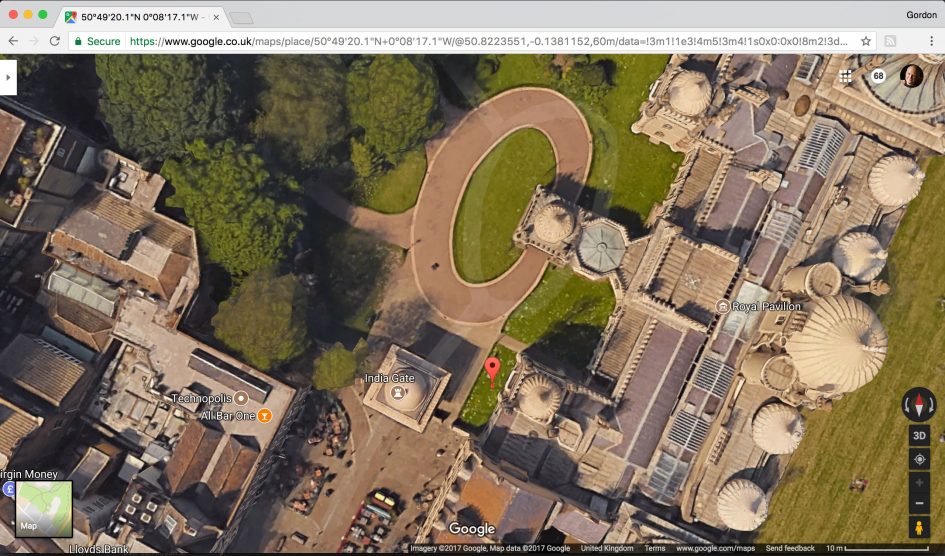
Once I’d read the manual (top tip there readers!) and worked out how the tagging worked, I became really fond of Canon’s solution. There’s no Wifi connections or logging to worry about, nor the process of manually applying the log later. You just ensure the app’s running on you phone when you want the locations logged and it all happens automatically as you shoot – a perfect application for Bluetooth. Oh and in case you’re wondering, the Location information option in the app is for Canon’s compact cameras; I just feel it should be greyed-out when connected to the 200D / SL2 to avoid confusion, especially as the actual solution is so much easier.
Moving on, the EOS 200D / Rebel SL2 allows you to connect the body directly to a network and share images without going through your phone or computer. As before, your images are actually uploaded first to Canon’s Image Gateway service which then shares them onto third party networks (after you’ve granted it access) including Facebook, Twitter, YouTube, Flickr, Google Drive and or email. Most of the services are configured before-hand by connecting the camera to your computer over USB, then using the Web Services application and the Image Gateway website itself. So when you come to share directly from the camera, there’s little more to do other than select the desired Web Service on the camera’s menus.
It works, but the initial setup is more than a little complicated and while the touch-screen on the 200D / SL2 makes it fairly easy to tap out a caption, I still much prefer sharing images socially with my phone. So if it were me, I’d use the Wifi to simply copy the desired images from the camera onto my phone first, then share from there.
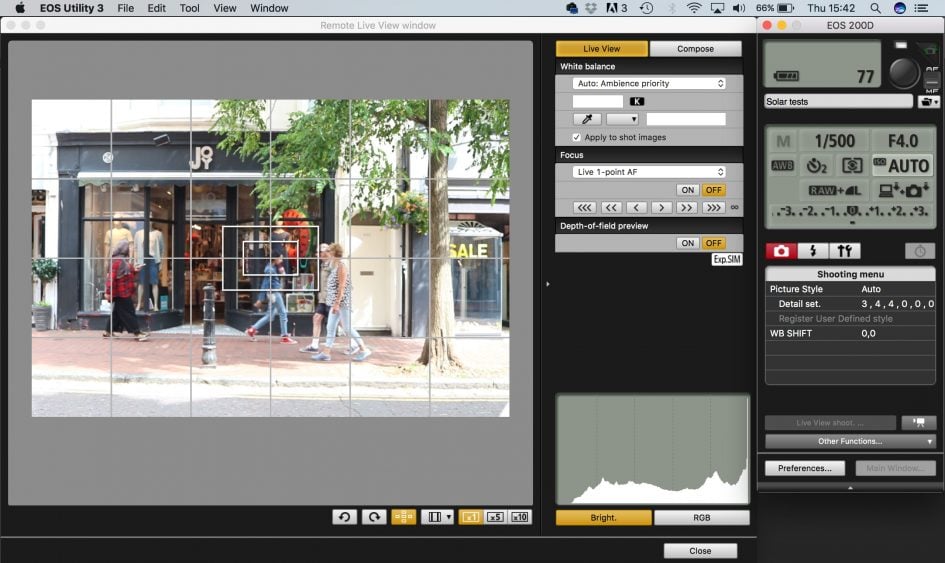
As mentioned earlier, you can also use Wifi to wirelessly remote control the EOS 200D / SL2 using the free EOS Utility application for Windows and MacOS computers. The EOS Utility is one of the lesser-known highlights of owning a Canon DSLR. With the camera connected to your computer, whether wirelessly or over USB, the EOS Utility lets you remote control pretty much any function or setting of the camera that doesn’t involve turning a physical switch or dial – so you may not be able to remotely change the exposure mode, say from Aperture Priority to Manual, but you can control pretty much anything else.
As before you can fire-up a large Live View window with a high resolution live image, remote focus (manually nudging it back or forth of going for auto and clicking the desired region with the computer’s mouse), take photos and have them recorded to the computer, camera or both, or trigger movie recording, although videos are still only recorded to the internal memory card. You can also set up an interval timer or a remote Bulb timer (between five seconds and a second shy of 100 hours), neither of which are possible within the camera’s own menus. In Live View Shooting you can overlay a wealth of guides, grids and lines, although the leveling gauge option of higher-end models is not available as the camera itself doesn’t have the hardware to drive it.
On older generations if you wanted to control the DSLR over Wifi using the EOS Utility, it had to be via a router or hub, which limited wireless operation to home, office or studio use. But since the 70D, it now also works with a direct peer-to-peer connection between camera and computer. This means you can wirelessly remote control the EOS 200D / SL2 directly with a laptop alone, literally in the field. I tried it in my house, remote controlling the camera from different rooms or even floors with my MacBook Pro, although understandably as the range increased, the live view refresh and speed of transferring images (if enabled) reduced. So while wireless control is cool, you should still use a USB cable for the best and most responsive experience. I’d also love to see an option to program a series of shots, not just at preset intervals but also with preset exposure values that could be different for each shot if desired.
Ultimately with full control over the camera via your phone, tablet or laptop, along with Bluetooth providing easy GPS tagging and connectivity, the EOS 200D / SL2 features one of the best wireless experiences around.
Check back soon for the rest of my review, or have a look at my sample images page!
Check prices on the Canon EOS 200D / Rebel SL2 at Amazon, B&H, Adorama, or Wex. Alternatively get yourself a copy of my In Camera book or treat me to a coffee! Thanks!