The Lumix TZ100 / ZS100 resets the clock on Travel zoom development. Rather than exclusively continue with ever longer zooms, Panasonic has boldly split the range, leaving the TZ80 / ZS60 to pursue the long zoom market and allowing the new TZ100 / ZS100 to go for photographers willing to sacrifice some reach for improved quality. So with its latest generation, the top-end Lumix travel zoom once again finds itself offering something unique in the market. Of course Canon and Sony might have something similar in the wings, but with their latest G-series and RX100 IV still being fairly recent, Panasonic may find itself with a one of a kind proposition for some time. Either way, there's nothing to match it if you desire the quality of a 1in sensor with a longish zoom that will fit in your pocket.
Panasonic Lumix TZ100 / ZS100 review
-
-
Written by Ken McMahon
In depth
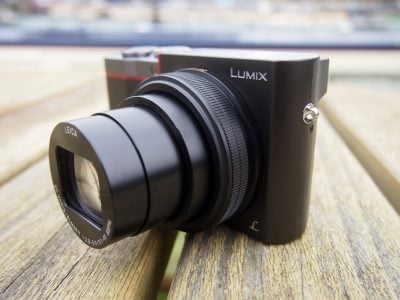
Panasonic’s Lumix TZ100, or ZS100 as it’s known in North America, is the new top model in its enormously popular travel-zoom series. Announced in January 2016, it follows Panasonic’s trend of waiting a year between new models, but after a decade of gradually increasing the zoom range from 10x to 30x while sticking with roughly the same-sized tiny sensor, 2016 sees the TZ100 / ZS100 making the leap to a much larger 1in sensor and a new product category.
This is big news for the TZ / ZS series which traditionally exploited a tiny sensor to deliver a huge zoom in a pocketable body. Now with the TZ100 / ZS100, the sensor boasts roughly four times the surface area of its predecessors, delivering far superior quality in low light. The compromise is a shortening of the optical zoom, although impressively Panasonic has still managed to squeeze a respectable 10x / 25-250mm f2.8-5.9 range into much the same body as last year’s TZ70 / ZS50.
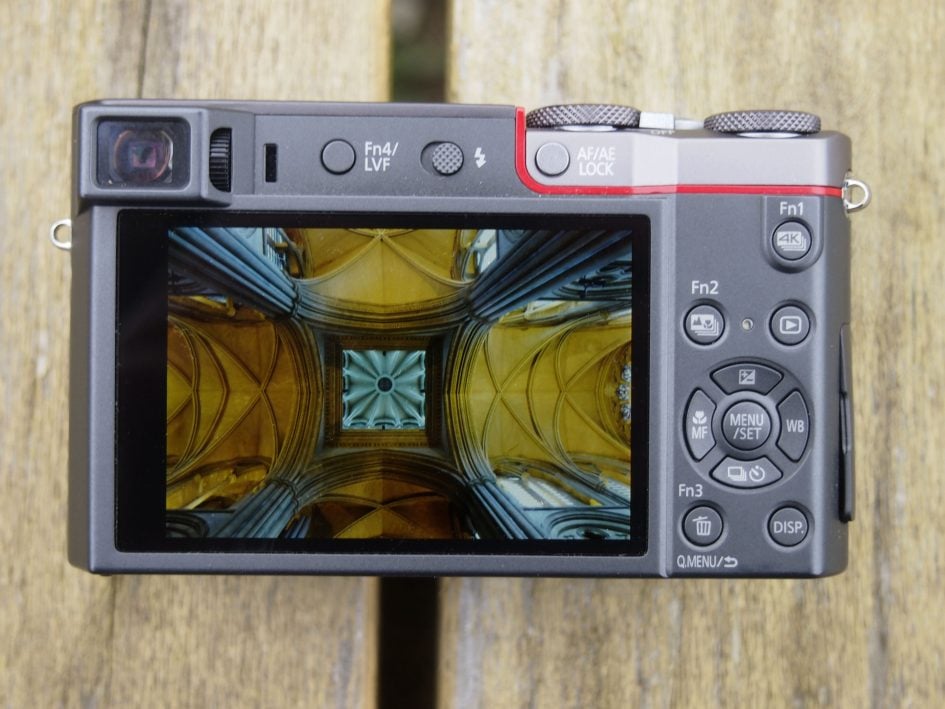
The Lumix TZ100 / ZS100 also shares the built-in 1166k dot electronic viewfinder of its predecessor with an eye-sensor, and I’m delighted to report the screen is now touch-sensitive once more, a feature missing for three previous generations. The touch-screen is necessary to support Panasonic’s latest innovation, Post Focus, which exploits 4k video to swiftly focus across a scene, allowing you to subsequently extract an image where just about any part of the composition can be sharp.
The camera also supports a neat Live Edit mode which lets you pan and zoom a 1080p crop by touch within a 4k frame as you film. Suffice it to say you can also record normal footage in 4k or 1080p, and the TZ100 / ZS100 additionally inherits RAW stills along with in-camera processing of RAW files. In my review I’ve compared its features with two models that, though they lack its zoom range, will be viewed as close competitors due to their 1in sensors and built-in viewfinders: the Sony RX100 IV and Canon’s PowerShot G5X.

Panasonic Lumix TZ100 / ZS100 design and controls
For anyone familiar with earlier TZ / ZS models the most immediate difference is the TZ100 / ZS100 is a little bit chunkier. In fact at 110 x 64 x 44mm it’s the same width and height as the earlier TZ70 / ZS50, but almost exactly a centimetre thicker and at 310g with battery and a card weighs 67g (two and a bit ounces) more.
Interestingly, given the Lumix TZ100 / ZS100’s zoom range is 10x compared with 30x on its predecessor because of the larger sensor, the newer model’s lens accounts for a significant proportion of the increased thickeness. As before, it features a customisable control ring that can be used for exposure control and manual focus.
So it’s still very pocketable, if we’re talking raincoat pockets it’ll fit comfortably, and if you don’t mind the bulge a jacket pocket is doable, it’ll even fit in the back pocket of loose fitting jeans, but not all that comfortably. Sony’s RX100 IV weighs a few grams less and is a full centimetre smaller in width and height as well as a few millimetres thinner, so it passes the jeans pocket test, but the price you pay for that amazing compactness is a mere 2.9x optical zoom. The mini-dslr-styled Canon PowerShot G5X is similarly limited in range with a 4.2x zoom but it’s actually a full centimetre taller than the TZ100 / ZS100 due to its viewfinder hump. It’s the same thickness and a couple of millimetres wider but perhaps more significantly, it weighs 377g with a card and battery – so is a fair bit heftier.
Indeed the TZ100 / ZS100 really is unqiue in packing a 1in sensor and a comparatively long 10x zoom into a relatively pocketable body. Sure there may be existing 1in cameras with similar zoom ranges – for example Sony’s RX10 II – but they’re much larger and heavier due to their brighter apertures. Taking the RX10 II as a comparison, it features an 8.3x zoom with a constant f2.8 focal ratio, but measures 129 x 88 x 102mm and weighs 813g, so you’re most certainly not going to fit in any of your pockets. Right now the TZ100 / ZS100 is the only 1in compact that’ll fit in your pocket and reach 250mm in equivalent focal length.
The design of the Lumix TZ100 / ZS100 has been modified in a number of ways none of which individually amounts to a radical change but overall they add up to more than the sum of their parts, making the TZ100 / ZS100 a more striking and attractive model as a result.
Looking at it from the front, the most obvious change is the integral flash which has been relocated from the front panel above the grip to a pop-up unit mounted in the top panel. In place of the TZ70 / ZS50’s textured grip the body is now moulded with a grip ridge that runs from top to bottom. The older model’s textured thumbpad is also gone, but despite the abandoning of textured surfaces the TZ100 / ZS100 never feels insecure in your hand and the result is a much cleaner more attractive design.
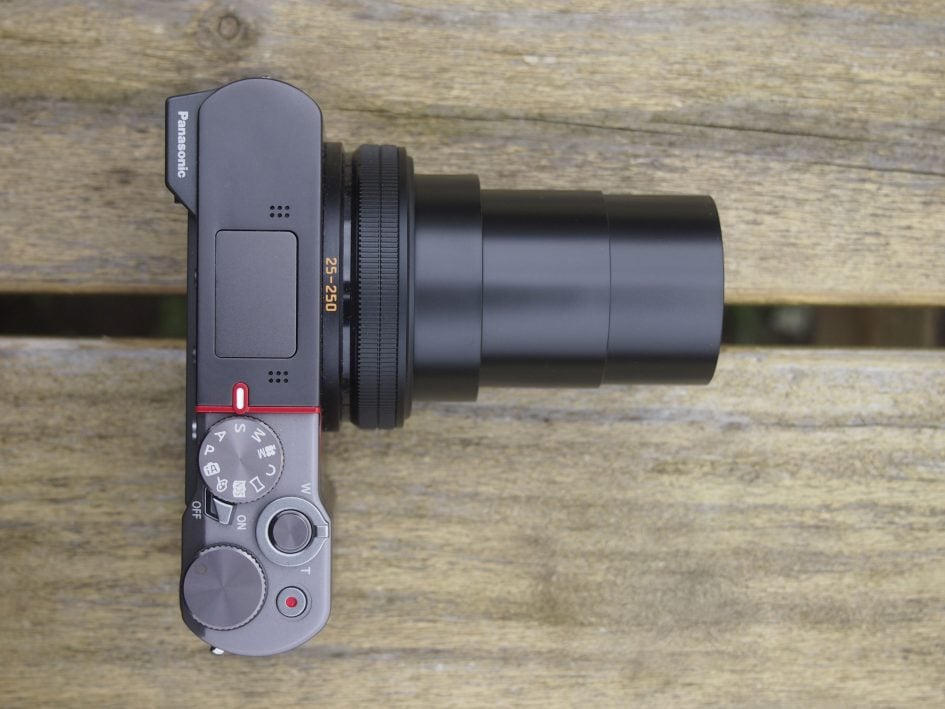
Moving on to the top panel, The biggest difference here is a new control dial which replaces the rear dial on the TZ70 ZS50. It functions in exactly the same way, but it’s a big dial with a knurled edge that can be thumb operated and makes for a better physical handling experience.
As before, the mode dial, shutter release with zoom collar and movie record button sit on a recessed section of the top panel now edged with a very stylish red stripe on the model finished in grey. The earlier model’s lozenge-shaped on/off button is replaced with a small switch inset in the five o’clock position on the mode dial. Many people will see this as a retrograde step as it means that if you want to view your photos when the camera is turned off you must first switch it on, then press the playback button. It’s not quite as bad as the record/playback switch on older TZ models though which often led to confusion when the camera wouldn’t shoot when switched on as you’d inadvertently left it in the playback position.
The rear panel layout is similar but the new control dial on top means there’s now no need for it on the rear and so the TZ100 / ZS100 reverts to a more conventional four-way controller. As before, exposure compensation is at the top, Focus mode on the right, drive mode at the bottom and white balance replaces flash options on the right.
The number of programmable function buttons has been extended from two on the TZ70 / ZS50 to four here, though Fn3 is the default Q menu button and Fn4 toggles the electronic viewfinder and screen display, so you might not want to sacrifice those to something else.
The combined battery and card compartment is accessed via a door in the base – note it’s not possible to change the card or battery when the camera is mounted on a tripod. The TZ100 / ZS100’s BLG10E battery provides enough power on a full charge for 300 shots using the screen exclusively or 260 shots with the EVF so, in practice, probably somewhere between the two. That’s much better than the 210-215 shots you’ll get with the Canon PowerShot G5X, and about the same as the 280 shots quoted for the Sony RX100 IV. Like both those cameras, the Lumix TZ100 / ZS100 charges its battery in the camera via the standard USB port. An a/c adaptor and a USB cable are included in the box, but you can use any USB Micro B cable and any suitable power source. However, unlike the RX100V you can’t externally power the camera while shooting. If you switch the Lumix TZ100 / ZS100 on while it’s charging an alert that tells you ‘To begin charging turn the camera off’ is displayed. You can still shoot, but the battery won’t start charging until you turn the camera off.
Panasonic Lumix TZ100 / ZS100 screen and viewfinder
The Lumix TZ100 / ZS100 shares the built-in 1166k dot electronic viewfinder of the TZ70 / ZS50 with an eye-sensor and a button for toggling between the viewfinder and the screen which doubles up as Fn4. This works in the same way as other recent Lumix models with three options – viewfinder, screen or eye sensor, the latter activating the viewfinder when you put your eye to it and the screen at all other times.
The viewfinder itself is the same 1166k dot 0.2 inch panel as in the TZ70 / ZS50 and while providing a smaller and less detailed view than either the RX100 IV or Canon G5X, it nonetheless provides a bright and detailed view. In use, it’s of course invaluable in bright sunlight and using it helps steady the camera when shooting at slower shutter speeds.
The only real issue I had with the viewfinder was the tendency to accidentally reposition the AF area with my nose – touch AF remains active when using the EVF. You can turn it off, but then if you want to reposition the AF area you need to activate Direct Focus area from the Custom menu so that you can reposition the AF area using the four-way controler – and that means you can’t then use it for its default functions, though two of them are already available on the Quick menu and any can be assigned to a Fn button.
What would be nice is if there was an option to temporarily disable touch AF when the viewfinder is in use, though I appreciate that this is more of a problem for those who, like me, compose using their left eye. If you’re right-eyed it can actually be an advantage to have touch AF active on the screen while you compose using the EVF.
Though they have very different feature sets to the Lumix TZ100 / ZS100, both the Sony RX100 IV and the Canon PowerShot G5X feature a 1 inch sensor and feature an electronic viewfinder. In the Sony’s case it’s an XGA OLED panel with a higher 2359 dot resolution so it provides a more detailed view. One other big difference on the Sony RX100 IV is that its viewfinder folds down into the body when not in use. That makes the Sony more compact when not in use, but it’s also more fiddly. Raise the Lumix TZ100 / ZS100 to your eye and you’re ready to shoot, but with the RX100 IV you must first press a button to pop up the viewfinder, then pull it backwards, then push it in and down to fold it away when you’re done. It sounds like a small thing, but there’s no denying that it makes spontanous shooting with the RX100 IV slower and less immediate than with the Lumix TZ100 / ZS100.
The other competitor to the Lumix TZ100 / ZS100 in the big sensor compact market, the Canon PowerShot G5X is the first model in the current G series lineup to feature a built-in electronic viewfinder. It’s a good one too with a large magnification, 2.36 Million dot OLED panel, proximity sensor and shooting information that turns as you compose in the portrait / tall orientation – a great feature I’ve only seen Fujifilm implement before. There’s also a fully-articulated side-hinged touchscreen, which provides much more flexibility than a screen that only tilts, like the one on the Sony RX100 IV.
Which brings us to the Lumix TZ100 / ZS100’s screen. The screen is a 3 inch LCD panel with a 1040k dot resolution but that’s nothing remarkable. What is new is that, for the first time in three generations, a Lumix TZ / ZS series model once again features a touch sensitive screen. While brought back to support some of the 4k shooting modes, the touch screen can also be used to place the AF area for focussing, meter exposure, shoot and select soft function buttons, but also allows menu selection and entering of details when making network connections. I’m very pleased to see the touch-screen return to the TZ / ZS series and while Canon’s G5X screen is also touch-sensitive, the screens on the Sony RX100 series are not.
Where the Lumix TZ100 / ZS100’s screen loses out to both the Sony RX100 IV and Canon PowerShot G5X though is that it’s fixed in place and won’t angle-out. Panasonic may be ready to re-enbrace touch screens, but for now at least an articulated screen remains on the wish list. That’s a shame as it not only makes self-shooting stills or video more difficult, but renders the TZ100 / ZS100 less versatile when shooing from unusual angles. So with a large and detailed EVF, and a fully-articulated touch-screen, the Canon G5X beats its rivals in terms of composition, but again is chunkier as a result.
Panasonic Lumix TZ100 / ZS100 lens and stabilisation
The Lumix TZ100 / ZS100 has a 10x zoom with an equivalent range of 25-250mm and an f2.8-5.9 maximum aperture. Compared with the 30x 24-720mm zoom range of its predecessor that might sound like a drastic reduction, but the new 1 inch sensor puts the Lumix TZ100 / ZS100 into a different class, one where zoom ranges are typically measured in low single digits on the pocket models, so its 10x range puts it at the top of its class by a wide margin.

The Sony RX100 IV, for example, sports a 2.9x zoom ranging from 24 to 70mm and the Canon PowerShot G5X’s 4.2x zoom ranges from from 24 to 100mm equivalent. That said, both of those models have a much brighter maximum aperture of f1.8-2.8.
Given the TZ100 / ZS100 starts off with a comparitively smaller maximum aperture of f2.8 when zoomed out, it’s useful to know how quickly the lens stops down as you zoom in. Flick the zoom collar to zoom into 27mm and the lens start closing straight away to f3. At 50mm the maximum aperture is f4.1 and at 90mm – a typical portrait focal length – it’s f5.0. By the 160mm mark the lens has already reached f5.9 where it stays until its maximum 270mm telephoto focal length. So you can really only take advantage of the Lumix TZ100 / ZS100’s f2.8 maximum aperture at, or very close to the 25mm maximum wide angle focal length, and as you zoom in you very quickly reach the f5.9 maximum aperture.
One consequence of this is that it’s more difficult to throw backgrounds out of focus than on its rivals with shorter but brighter lenses. At a typical portrait focal length of 75 to 100mm, the maximum aperture on the TZ100 / ZS100 isn’t really wide enough to blur the background sufficiently as you can see in my example below which was shot at 90mm equivalent.
This is less of a problem with macro shots. In macro mode the Lumix TZ100 / ZS100’s closest focus distance is 5cm at the 25mm equivalent focal length. As you can see from the second example below, this is close enough to produce a nicely blurred background at the f2.8 maximum aperture.
Panasonic Lumix TZ100 / ZS100 Aperture priority 1/80, f5, 125 ISO, 32.8mm (90mm equivalent)
Panasonic Lumix TZ100 / ZS100 Aperture priority 1/25, f2.8, 400 ISO, 9.1mm (25mm equivalent)

There’s another way to get nicely blurred backgrounds on the TZ100 / ZS100 though, and that’s by zooming in to the maximum 250mm equivalent focal length. With the lens zoomed all the way in you can still get relatively close to your subject – the closest focus distance becomes 70 cm and as you can see below that also makes for a nicely blurred background. But if your subject is any bigger than individual flowers then you’ll either have to zoom out or move back and then the background quickly becomes less blurry.
Because both the Sony RX100 IV and Canon PowerShot G5X start with a much wider f1.8 aperture they’re able to produce much blurrier backgrounds in all situation. Even when fully zoomed in both of these models are still as bright as the Lumix TZ100 / ZS100 at its widest focal length. So while the TZ100 / ZS100 is fine for isolating small subjects where you can get close in, for portraits you’d be better served by the Sony RX100 IV or Canon G5X; see Gordon’s reviews of these for portrait examples.
Panasonic Lumix TZ100 / ZS100 Aperture priority 1/200, f5.9, 125 ISO, 9.1mm (250mm equivalent)

And remember it’s not just shallow depth of field that a wider aperture provides, for many that’s really secondary to the main advantage – the ability to shoot in low light with faster shutter speeds to reduce the risk of camera shake, or at lower sensitivities for better quality. At the wide angle setting the RX100 IV and G5X are a little over one stop brighter than the Lumix TZ100 / ZS100 so given the same lighting conditions and the same aperture and shutter speed you’d need a sensitivity of around 500 ISO on the Lumix compared with 200 on the Sony and Canon models. Zoomed-in the difference is a little over two stops so it would be 800 ISO on the Lumix TZ100 / ZS100 compared with 200 ISO on the RX100 IV and G5X.
Just to redress the balance a little, let’s not forget that while all this is true, the Lumix TZ100 / ZS100’s 10x zoom will get you a lot closer to distant subjects. So if zoom range and a pocket body are important to you, the compromise you’ll have to make on maximum aperture may well be worth it.

The TZ100 / ZS100 has 5-axis correction when shooting video up to 1080p. For stills shooting the TZ100 / ZS100 employs 3-axis O.I.S. There are three menu-selectable positions – Off, On and a panning mode that only corrects for vertical motion. To test it I put the TZ100 / ZS100 in Shutter priority mode and zoomed the lens in to its maximum 250mm equivalent focal length before taking a series of shots at progressively slower shutter speeds first with the stabilisation disabled, then with it turned on. As you can see from the crops above I was able to avoid camera shake down to 1/15th. That’s a very respectable four stops. It’s possible, with steady hands and using the electronic viewfinder, (pressing the TZ100 / ZS100 to your face makes for a more stable platform) to get sharp shots at 1/8th, and although I managed this on occassions I wasn’t able to consistently get sharp shots at 1/8th.
Panasonic Lumix TZ100 / ZS100 movie modes
The Lumix TZ100 / ZS100 has 1080p HD movie modes at 25 and 50 frames per second in PAL regions and 30 and 60 fps in NTSC regions. It also supports 4k UHD video at 25 or 30fps along with Panasonic’s 4k Photo mode – a fun way of exploiting the fact 4k video captures an 8 Megapixel image up to 30 times a second. The clever part is Panasonic equips its 4k Photo cameras with menus that let you easily capture bursts of video before scrolling through the footage and extracting the perfect frame as a JPEG image, all in-camera. You could of course frame grab from video externally, but Panasonic has made it easy to perform the whole process in-camera. Gordon’s gone into more detail about 4K Photo in his Lumix GX8 review and I’ve demonstrated it later in the review, along with the Post Focus feature.
Returning to the Lumix TZ100 / ZS100’s movie modes, the 4k options record Ultra High Definition video (3840×2160 pixels) at 25 or 30fps depending on region, and at a bit rate of 100Mbit/s in an MP4 wrapper. There’s also a 24fps option encoded at 100Mbit/s. In 4k I managed to record clips lasting up to 15 minutes each before the camera stopped recording, but I was able to start a new clip straightaway. In total, I managed to record just a few seconds shy of one and a half hours of 4k clips before the battery gave out.
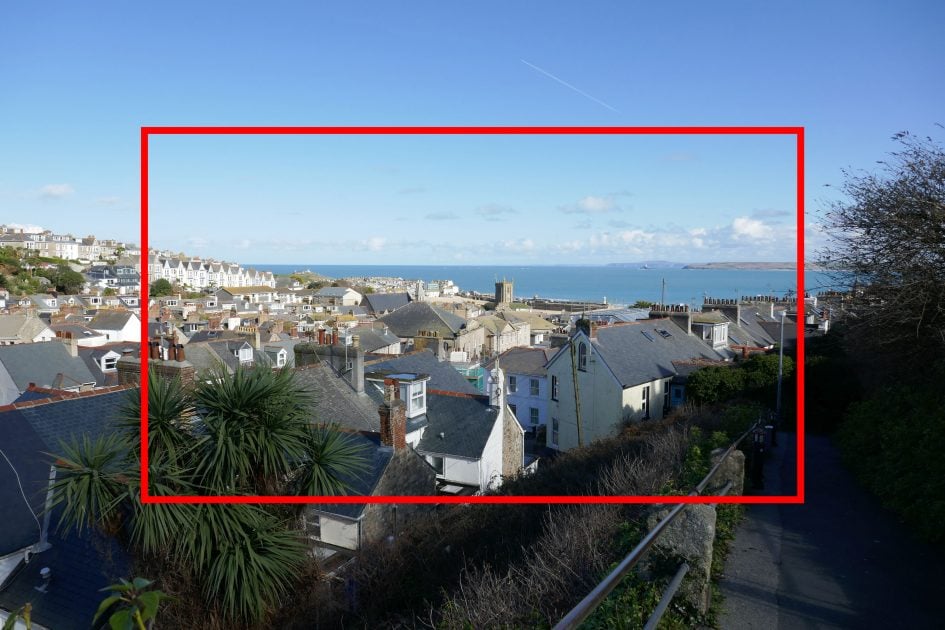
The Lumix TZ100 / ZS100 starts with a larger sensor resolution of 5472×3648, from which it takes what appears to be a 1:1 crop to generate a 4k UHD frame. To illustrate the difference in coverage I compared actual 4k footage I filmed with the TZ100 / ZS100 against still photos when using the same lens setting and position. In the image below, the 4k coverage is indicated by the outer edge of the red frame, resulting in a not insignificant reduction in the field of view; indeed when filming 4k video, the equivalent range is cropped from 25-250mm to 37-370mm – good news at the long-end, but you lose a lot of coverage at the wide-end.
If you want the to capture video at the full sensor width, you’ll need to reduce the quality to 1080, although there’s abviously a vertical crop due to the different aspect ratios – 16:9 against 3:2. Here’s how the TZ100 / ZS100 crop looks for 4k video, below left, compared to 1080p video, below right.
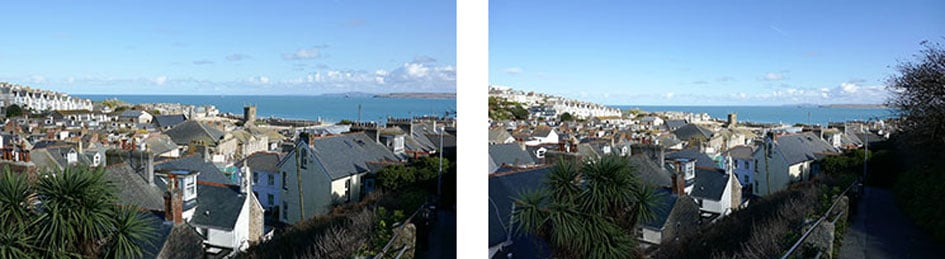
It’s clear from the views above that filming in the 1080 modes captures a wider field of view, but how does the quality compare? Below are 100% crops made from the 4k footage on the left and the 1080p footage on the right. Note that the 1080p crop on the right shows a larger area with smaller detail not just because of the lower resolution of the 1080p clip, but the wider field of view. Zooming the 1080p clip to provide the same horizontal field of view would have provided a better comparison but even so there’s no question that there’s significantly more detail in the 4k crop on the left.

Moving on, the Lumix TZ100 / ZS100 records 1080p at up to 28Mbit/s in AVCHD or MP4 modes. In addition to 1080p50/60, the MP4 modes are 1080p25/30, 720p25/30 and 640x480p25/30. Switch to AVCHD format and the options are 1080p50/60 at 28Mbit/s, 1080i50/60 at 17Mbit/s (from 50p sensor output) or 24Mbit/s (from 25p sensor output), and 1080p24 at 24Mbit/s.
The Lumix TZ100 / ZS100 can also shoot 1080p movies at 100fps for slow motion playback at a quarter real time speed, but it lacks the 1/8th speed 640 x 480 VGA mode included on some other Lumix compacts like the TZ80 / ZS60.
If slow motion video is your thing the single HD mode on offer may come as something of a disappointment. If that’s the case Sony’s RX100 IV will put a smile back on your face. Its High Frame Rate feature offers a multitude of slowmo options including 240 / 250fps, 480 / 500fps or 960 / 1000fps in NTSC / PAL regions respectively. These are automatically conformed in-camera to (your choice of) either 25p or 50p for PAL regions, or 24p, 30p or 60p for NTSC regions. If you choose the 25p and 24p options, the three recording modes will slow-down the action by 10, 20 or 40 times respectively. Canon’s PowerShot G5X on the other hand offers no slow motion movie modes and no 4k video either with a top mode of just 1080 / 60p.
Other video features include snap movie, which records a short clip of between two and eight seconds in length. With snap movies you can set up a focus pull in advance tapping the screen to define the start and end focus positions, which is pretty neat. You can also add a monochrome to colour fade in our out effect, as well as a simple exposure fade. There’s are also Time Lapse and Stop Motion modes, accessed through the main menus rather than the movie options. Panasonic recommends using an SD card rated at Class 4 or faster for AVCHD, and UHS-I Class Speed 3 (U3) for the 100Mbit 4K UHD and 1080p / 100p / 120p modes.
New to the TZ100 / ZS100 is 4k Live Cropping which exploits the resolution of a 4k frame to provide a digital pan and zoom feature at 1080p resolution. You specify the start and end of the clip by tapping the screen to position a 1920×1080 sized frame. You can also set the overall time of the clip to either 40 or 20 seconds. The degree of zoom is limited to the full 4k frame at the wide end to the 1920×1080 frame at the ‘zoomed-in’ end to maintain quality. It’s a neat feature which, once again, makes innovative use of the TZ100 / ZS100’s 4k resolution to make life easier, particularly if you need a super-smooth panning shot, but don’t have a tripod.
On the Lumix TZ100 / ZS100 you can record in PASM exposure modes, selected either from the video menu or by tapping the exposure mode icon in the top left of the screen when the mode dial is in the movie position. During recording you can change the exposure setting including, depending on the mode, aperture, shutter speed, ISO sensitivity and exposure compensation. While you can use the camera’s physical controls to alter the settings the touch screen provides a slide out panel allowing you to do so silently. You can also tap the screen to pull focus during recording, or of course use the lens control ring. There’s also focus peaking and zebra patterns to help with focus and exposure.
Now here’s a selection of other clips to demonstrate the TZ100 / ZS100’s video performance in various conditions.
Panasonic Lumix TZ100 / ZS100 sample video: hand-held / 4k / 25p / 125 ISO
Download the original file (Registered members of Vimeo only)
For this hand-held panning shot the stabilisation was enabled and it does a great job of keeping things wobble-free during the pan and zoom.
Panasonic Lumix TZ100 / ZS100 sample video: daylight tripod pan/ 4k / 25p
Download the original file (Registered members of Vimeo only)
Here’s the Lumix TZ100 / ZS100 in its 4k / 25p mode at 100 Mbit/s. For this clip the camera was mounted on a tripod and the stabilisation was disabled. The quality is excellent though the wind noise is a bit intrusive. For this clip the Wind Noise canceller was on the default standard setting, there are two other options – Off and High.
Panasonic Lumix TZ100 / ZS100 sample video: low-light handheld / 4k / 25p
Download the original file (Registered members of Vimeo only)
This low light interior panning shot was shot with ISO sensitiviy set tot auto, the quality is, once again, excellent and there’s very little evidence of noise. Here, as for the other clips I set continuous AF – the TZ100 doesn’t have separate focus modes for video, so you need to be aware that if you change to AFC for video, you need it change it back to AFS for stills, if that’s what you normally use.
Panasonic Lumix TZ100 / ZS100 sample video: touch focus-pulling / 4k / 25p
Download the original file (Registered members of Vimeo only)
Here you can see the Lumix TZ100 / ZS100’s touch focus in action. I hand-held the TZ100 / ZS100 and positioned the bottle in the foreground. I zoomed the lens in a little and tapped to set the focus on the bottle before pressing the record button. I then alternately tapped the screen in the region of the chalk board and the bottle to shift the focus back and forth between them. Ordinarily with contrast-detect AF you’d expect to see the focus drift slightly through the subject before returning, but there’s no hint of that here.
Panasonic Lumix TZ100 / ZS100 shooting experience
The Lumix TZ100 / ZS100 has six focus modes, Pinpoint, 1-Area, Custom Multi, 49-Area, Tracking and Face / Eye Detection. Face detection can detect up to 15 faces and lock focus on one of them. Multiple AF uses 49 areas to determine the best focus regions and there’s a single area AF option with a resizeable AF area that can be moved around the screen. Additionally there are three AF styles, the usual AFS and AFC single and continuous modes are joined by a third AFF, or Auto Focus Flexible mode. This is designed for shooting subjects like children and pets that move in an unpredictable manner. There’s also manual focus with focus peaking.
Of course it’s great to have such a wide choice of AF area modes, but it’s the touch screen that makes the biggest difference to focussing with the TZ100 / ZS100. You can simply tap the screen to position the AF area in single area mode. Custom Multi mode allows you to select a subset of the 49 areas arranged in a diamond configuration a single row or column, or a user defined pattern, then you simply tap the screen to position your AF grid. When you’re in Face detect mode you can also select which eye you want to focus on by tapping it.
As I’ve mentioned earlier, it’s easy to inadvertently reposition the AF area with your nose when using the viewfinder, particularly if, like me, you use your left eye. You can always turn touch AF off, I just wish there was a way to do it temporarily when using the electronic viewfinder.
Another advantage the touch screen provides is additional programmable function buttons. There are four physical buttons labelled Fn1 to Fn4 and all can be reassigned to other functions including ISO sensitivity – something that wasn’t possible on the TZ70 / ZS50. Fn3 by default activates the Quick menu and Fn4 toggles between the screen and viewfinder and auto sensing which can be very handy to prevent the screen going blank because your finger is covering the sensor when shooting from awkward angles, so in practice most people are likely to only think about reassigning Fn1 (default 4k photo) and Fn 2 (default Post Focus shooting). The touch screen provides a further five programmable soft buttons labelled Fn5 to Fn8 and by default allocated to WiFi, Level gauge display, histogram display, Snap movie and unassigned.
Plus of course there’s the lens ring and rear control dial which can also be reassigned. It’s good to be able to do that, but it would be better if the controls that are redundant in some modes were automatically reassigned. For example in Manual exposure mode the lens ring controls aperture and the rear dial controls shutter speed. But in Aperture and shutter priority modes both controls adjust the same thing – either the aperture or shutter speed respectively and they both Program shift in P mode. You can reassign the rear dial to exposure compensation which works fine in the modes where it simply duplicates the lens ring, but then in Manual exposure mode there’s no way to adjust the shutter speed.
In use, the TZ100 / ZS100’s autofocus is quick and accurate. In good light it reacts almost instantly, the confirmation beep sounding almost the instant you half-press the shutter. Even in poor lighting and when fully zoomed in it reacts reasonably swiftly, the AF assist light helping to illuminate and focus on relatively close subjects.
The Lumix TZ100 / ZS100’s AF also supports Panasonic’s Depth from Defocus technology to deliver a quicker response and better continuous AF. Contrast detect AF systems in models like the TZ100 / ZS100 adjust the focus to try and achieve higher contrast in edge detail. But it’s difficult to determine which way to go – is the current focus position in front of or behind the subject? Contrast detect AF systems also find it difficult to know when the optimum focus point is reached, so they often go past the best focus position before returning to it.
Depth from defocus profiles the out-of-focus characteristics of the lens in order to help overcome these problems, resulting in faster more confident focussing. On the Lumix models that I’ve tested it on, Depth from Defocus certainly seems to make a difference. With the TZ100 / ZS100 I couldn’t say whether it results in faster focussing in optimal conditions, Lumix travel zooms were already very good performers in that respect. What I did notice was that there were fewer instances of hunting in poor light conditions and when fully zoomed in. If the TZ100 / ZS100 can autofocus it will do it quickly and without the back and forth that sometimes occurs with contrast detect only AF.
Shooting moving subjects with the focus mode set to continuous is a bit more of a hit and miss affair though. As on the Lumix FZ330 / FZ300 which also has Depth from Defocus, I found the best results were achieved with the TZ100 / ZS100 set to custom multi mode using the central AF area grouping. In good light the TZ100 / ZS100’s contrast detect system, aided by Depth from Defocus, can acquire and maintain focus on a moderately paced subject moving towards the camera with a better than 50% success rate. Once the light starts to fade, however, it becomes much less reliable. And you can expect the hit rate to fall pretty dramatically with faster moving and less predictable subjects like animals or football players. So to help you manage those expectations, the long zoom may let you get closer to wildlife or sports subjects, but may struggle to keep them in focus if they’re moving, especially in lower light.
There’s four continuous shooting modes on the Lumix TZ100 / ZS100: Low (2fps with Live View), Medium (6fps with Live View), High (10fps without Live View) and Super High (5 50fps but only for a three second burst of 120 frames and at a reduced resolution of 10 Megapixels using the electronic shutter). With Continuous autofocus, the top speed reduces slightly to 6fps reagrdless of whether you’re set to Medium or High, so you may as well go for the former and enjoy Live View.
Fitted with a UHS-3 card and set to AFS, I fired-off 44 Large Fine JPEGs in High mode in 4.49 seconds before it began to stutter. This corresponds to a speed of 9.79fps. Set to RAW, I captured 14 frames in 1.39 seconds for a speed of 10.07fps before the camera stalled, then continued at a much slower rate. Both essentially confirm the top speed, but if you want to shoot a burst of longer than around a second you’ll need to make do with JPEGs.
Like other recent Lumix models with 4k video, the TZ100 / ZS100 also supports Panasonic’s 4k Photo mode – a fun way of exploiting the fact 4k video captures an 8 Megapixel image up to 30 times a second. The TZ100 / ZS100 is equipped with software that lets you easily capture bursts of video before scrolling through the footage and extracting the perfect frame as a JPEG image, all in-camera. You could of course frame grab from video externally (and here’s the clip I filmed), but Panasonic has made it easy to perform the whole process in-camera.
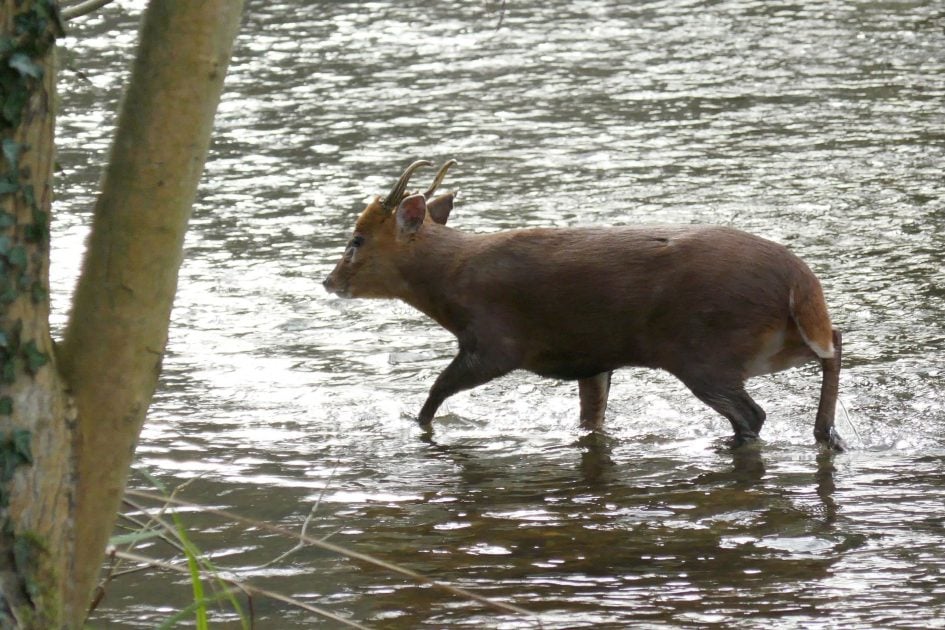
There’s three options: Burst (which records video while the shutter button is pressed), Burst S / S (which starts recording with one press and stops with another), and 4K Pre-burst (which keeps a rolling buffer to avoid unwieldy clips to store and go through). Mostly I used the Burst mode, and above you can see an example selected from about a second of burst shooting which gave me a choice of around 30 frames. 4k Photo isn’t only good for action, here it helped me capture the best frame compositionally in terms of the animal’s stance and its position relative to the tree on the left of the frame which only appeared in the last few frames. Below you can see another frame from earlier in the sequence, which is the shot I probably would have got if I’d been shooting in single frame drive mode.

Post Focus is another feature that uses the TZ100 / ZS100’s 30fps 4K shooting mode, in this case to focus-bracket a rapid sequence of images. Post focus mode is selected from the Rec menu and is also assinged by default to the Fn2 button. When selected you obviously can no longer set the AF area, but the PASM and other shooting modes can be set in the usual way as can the ISO sensitivity. The only limitation is the slowest available shutter speed which, as for other 4k shooting modes is 1/30. You can choose one of four 8M aspect ratios – 4:3, 3:2, 16:9 and 1:1.
Lumix TZ100 / ZS100 Post Focus, Aperture Priority, 1/125, f5, 125 ISO, 32.8mm (90mm equivalent)


Click for the original Post Focus video sample used for extracting the stills
When the shutter is pressed the TZ100 / ZS100 fires a short burst in 4k mode using the electronic shutter. It then takes a short while to process the results before displaying a composite on screen. You can simply tap the screen to select the focus point. If a green rectangle appears, you’re in luck, if the rectangle is red then TZ100 / ZS100 didn’t record a frame with the focus set at that specific point. In practice, this doesn’t happen very often, and when it does there’s often another point in the image that was recorded where the focus was in the same plane.
The second option is to zoom in to an area you want in focus and drag a slider at the bottom of the screen which cycles through all of the bracketed frames. Once you’ve found a version you’re happy with, you can export it to the memory card as a JPEG.
The Post focus clips are saved as .mp4 files so if you keep these you can always grab a frame later using video editing software, but it’s much simpler to do in the camera. You don’t have to edit immediately after shooting, you can activate post focus editing at any time in playback mode. If you’re curious about the file which the camera works with, here’s mine used for the grabs above.
Post focus is more than just a gimmick, like 4K photo it’s a feature that takes advantage of the 8 Megapixel resolution avalable in 4k video frames to improve your chances of getting a great still image that truly captures the moment. If you want to know more about how you can use the Post Focus feature take a look at my Lumix FZ330 / FZ300 review where I cover it in a little more depth.
Before I move on to the Lumix TZ100 / ZS100’s WiFi , there’s one other feature that I want to briefly mention. Diffraction compensation appears on the Rec menu and has two settings, Off and Auto. Diffraction is an issue that affects lenses at very small apertures whereby the edge of the diaphragm interferes with light passing through it adversely affecting sharpness or, to put it another way, causing a slight blurring. According to the Lumix TZ100 / ZS100 manual, with Diffraction compensation enabled ‘The camera raises the resolution by correcting the blurriness caused by diffraction when the aperture is closed.’
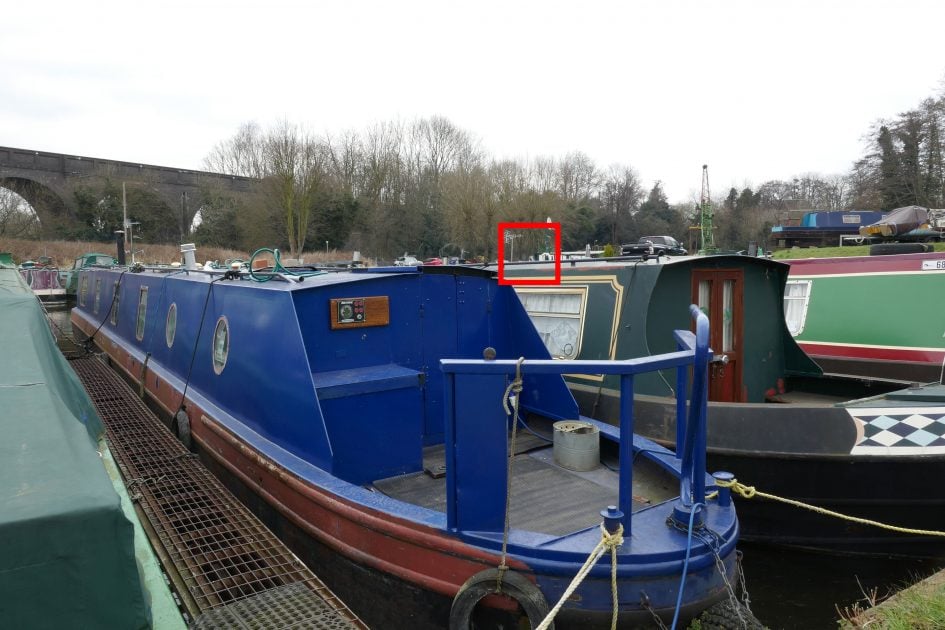
To test Diffraction compensation I took the same shot with the camera mounted on a tripod and stabilisation disabled with diffration compensation turned off and with it on auto. In both cases I set the the smallest aperture available – f8 – in Aperture priority mode. The 100 percent crops below are taken from the area marked in red above. The off crop is on the left and the crop on the right is with Diffraction compensation set to Auto. The one below right with diffraction compensation enabled looks as if a little extra sharpening has been applied, but the effect is subtle.
Panasonic Lumix TZ100 / ZS100 Wifi
The TZ100 / ZS100 has Wifi that allows you to wirelessly transfer images from the camera and operate it remotely using a smartphone. The NFC chip that featured in the earlier TZ70 / ZS50 is gone, that’s not a huge drawback though, as you can quickly establish a connection by scanning a QR code displayed on the screen.
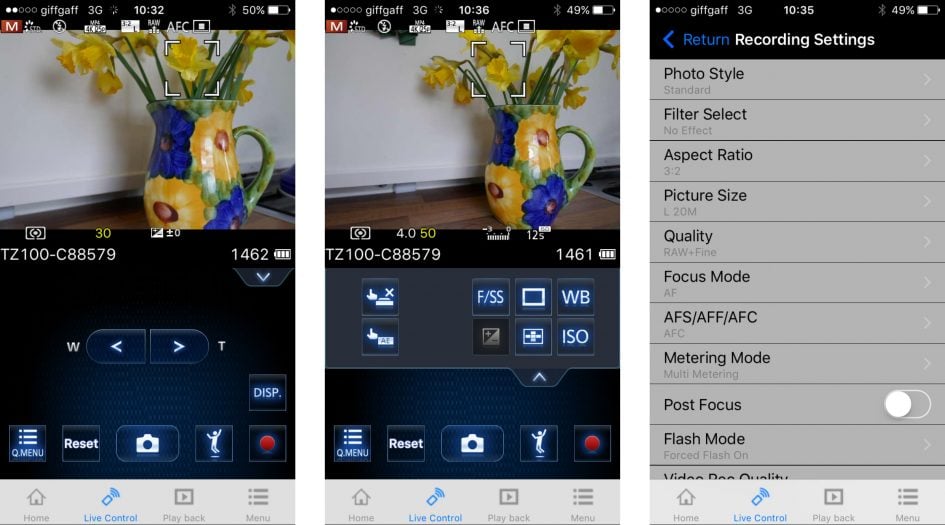
Once your phone or tablet is connected to the TZ100 / ZS100, you can remote control it, browse the images direct from the memory card, copy them onto the handset and if desired send them onto various storage or sharing services. You can also set the app to make a GPS log for subsequent syncing and tagging, create a snap movie, or photo collage.
The remote control feature shows a live image on your phone or tablet’s screen allowing you to take a photo or start or stop a video recording. You can tap anywhere on the live image to set the AF area or directly take the shot. If the camera’s mode dial is set to Aperture or Shutter Priority, you can remotely adjust the aperture or shutter speed respectively, and in Manual you can change both.
You can adjust the ISO, white balance, exposure compensation or focus area, and there’s also a Q.Menu button which presents a list of additional options you can remotely change including the flash mode, aspect ratio, resolution, compression, metering mode, macro mode,photo style or movie quality.
It’s slightly disappointing that you can’t change the drive mode remotely, that has to be done on the camera, however once you’ve set a drive mode it is then possible to alter, say, the continuous shooting speed, or self-timer delay. You can even select the new post focus mode, though you can’t transfer the post focus mp4 clips via the app.
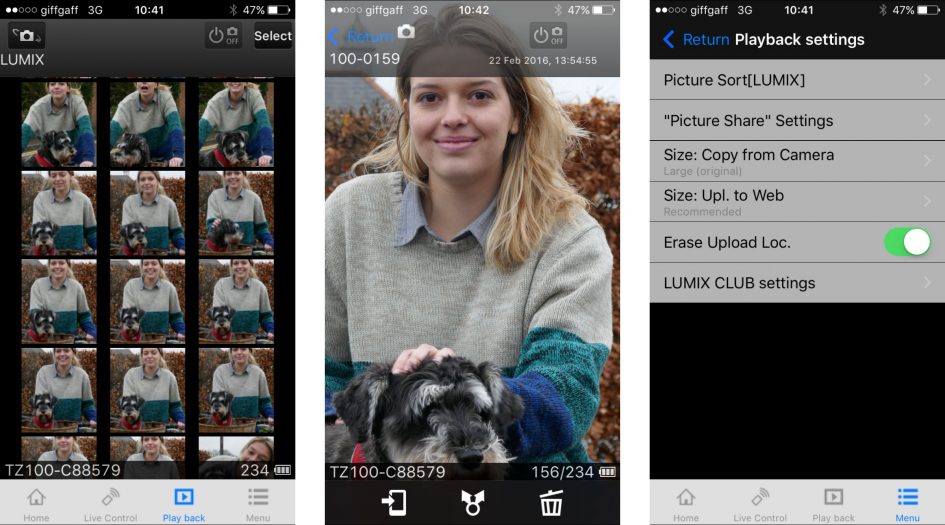
There are two options for transferring images; Batch transfer provides a menu from which you can select options to transfer the current day’s images, or you can include the last 3, 7 or 30 days, or if you’re feeling impetuous you can opt to transfer everything. Further options allow you to restrict transferred files to just photos or videos. If you want to browse the images on the card in the camera before deciding which to transfer, then Transfer selection is the option to go for.
To maintain a responsive experience which feels like the images are stored locally on your phone or tablet, the camera sends a lower resolution version. So you can pinch to zoom-in a little, but not as much as if you were viewing the original. When you see an image you like, just tap it and the Lumix Image app will let you save the original to your device or start uploading it to one of the social, sharing or storage services installed on your device. You can configure the app to provide shortcuts to two or three of your most used services which could include Dropbox and Instagram in addition to the more usual suspects. Or of course once the image is copied into your device, you could just exit the Panasonic app and handle it direct from whichever sharing or storage app you like via your phone’s gallery.
You can also choose whether to copy images in their original resolution, or in one of two smaller versions. It typically took about 6 seconds to copy an original JPEG from the camera to my iPhone 6 from a distance of about 1m; it’s not possible to copy RAW files though.
The Lumix TZ100 / ZS100 can also upload images directly to the Internet by itself via a suitable Wifi connection. You can upload directly to Facebook, Twitter, Picasa, Youtube, Flickr, but there’s two gotchas. The first is the camera doesn’t have any kind of built-in browser to accept the terms and conditions of public hotspots, so you’ll mostly be using home or office-based Wifi. The second problem is before letting you upload anything directly from the camera you’ll first need to register for Panasonic’s free Lumix Club.
To be fair, the approach is not dissimilar to the way most other manufacturers implement direct uploads, but to me it makes more sense to just use Wifi to copy the image from the camera to a more capable device and upload from there instead.
Finally, the Lumix Image app allows the TZ100 / ZS100 to inherit the fun Jump Snap feature introduced with the GF7. This uses the accelerometer in your phone to trigger the shutter remotely as you jump in the air. It works surprisingly well too. Using the app you can remotely view the composition and refocus the camera if necessary, before then setting the sensitivity of the jump detection. After a little fine-tuning of the sensitivity you’ll be able to capture the perfect moment when you’re at the top of your leap. It’s a really fun way to exploit the technology in your pocket.